
Using Microsoft Teams and Microsoft Translator to host a multilingual parent-teacher conference
Microsoft Teams allows parents and teachers to communicate with each other remotely. However, if do they do not speak a common language, communication can be difficult. Microsoft Translator allows parents and teachers to communicate, in-person or virtually, in their preferred languages. Pairing Teams with Microsoft Translator allows teachers to call parents, caption what they are saying, and have it translated for parents. In turn, parents can talk or write back in their preferred language. Multiple parents can join a conference, and each can communicate in their own language.
Below are instructions on how to set up and join a translated parent-teacher conference from a computer or mobile device. Things will work the same for all people regardless of which method they use; for example, it’s fine if the teacher joins on a computer and the parent(s) join on a mobile device(s).
Click this link for a step-by-step video tutorial of these instructions.
Instructions for teachers
Hosting/starting a conversation from a mobile device
- Start a conversation session by downloading and installing the free Microsoft Translator app from your device’s app store, then launch the Translator app.
- Select the Conversation icon (the icon that depicts two people talking).

- Under “Start conversation,” select Start.

- Enter your name in the field labeled “Your name”, select your language in the “Your language” menu, and then select Enter.

- The session will begin and you will be shown a series of Conversation codes (session join code). One will be a series of characters like “ABCDE,” another will be a scannable QR code and the last will be a web link. Share these codes with the parent and other participants. You can do this by sharing your screen, sending them as text messages or allowing the participant to use their mobile device’s camera to scan the QR code.
- The conversation session will open:

- Speak or type in your own language; the conversation will be translated into the preferred language of the other party.
- Follow these tips if you are having audio issues.
iOS Alternative
If the teacher and all other participants are using iOS devices and are physically in the same room having an in-person meeting, we recommend that they try the Microsoft Group Transcribe iOS mobile app. This allows users to have a real-time translated conversation with automatic transcription. Group Transcribe also features automatic speaker recognition so users can have a natural conversation without having to take turns enabling the microphone on their devices. The session host and join process is similar to the Translator app where a character code is displayed to the host that can be shared with other participants.
On a desktop, laptop, or tablet
- Starting a conversation must be done with the free Translator mobile app (see above), however you may continue as a participant on your desktop or laptop.
- Initiate your call on Microsoft Teams.
- Start your browser and navigate to the Microsoft Translator Conversation website.
- Enter your name and select your language in the form, then click the Enter button.
- Depending on your setup, you might be asked to test your microphone to make sure things are working.
- The session will begin and you will be shown a series of Conversation codes (session join code). One will be a series of characters like “ABCDE,” another will be a scannable QR code and the last will be a web link. Share any of these codes with the parent and other participants. You can do this by sharing your screen, sending them as text messages or allowing the participant to use their mobile device’s camera to scan the QR code.
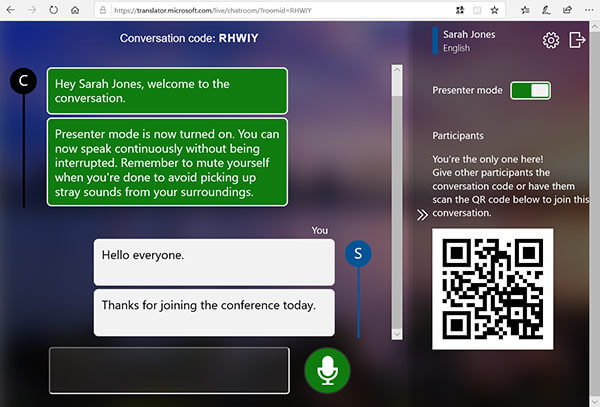
- If you are using a headset, which we recommend, you can turn on Presenter mode so that you can talk freely without having to continually enable the microphone. (If you do not have a headset, please see our list of Recommended Headsets.) Please note that when Presenter mode is enabled, other participants are muted, so remember to disable this to allow others to speak.
- Speak or type in your own language; the conversation will be translated into the preferred language of the other party.
- Follow these tips if you are having audio issues.
Instructions for parents
On iOS or Android
- Download and install the free Microsoft Translator app from your device’s app store, then open the Translator app.
- Select the Conversation icon (the icon that depicts two people talking).
- Under “Join conversation,” enter the 5-letter Conversation code (Join code) shared with you by the teacher, and select Join.

- If you receive a QR code, use the Camera icon to scan the image.
- Enter your name in the field labeled “Your name”, select your language in the “Your language” menu, and then select Enter.

- The conversation session will open:

- Speak or type in your own language; the conversation will be translated into the preferred language of the other party. (It’s best to press and hold the microphone button while you are talking.)
- Follow these tips if you are having audio issues.
iOS Alternative
If the teacher and all other participants are using iOS devices and are physically in the same room having an in-person meeting, we recommend that they try the Microsoft Group Transcribe iOS mobile app. This allows users to have a real-time translated conversation with automatic transcription. Group Transcribe also features automatic speaker recognition so users can have a natural conversation without having to take turns enabling the microphone on their devices. The session join process is similar to the Translator app where a character code is displayed to the host (teacher) who can then share that code with the parent and other participants who can enter that into the app to join the session.
On a desktop, laptop, or tablet
- Go to the Microsoft Translator Conversation website.The teacher will give you a code to enter into the “Join code” field.
- Enter your name and select your language in the form, then click the Enter button.
- Depending on your setup, you might be asked to test your microphone to make sure things are working.
- The conversation session will open:
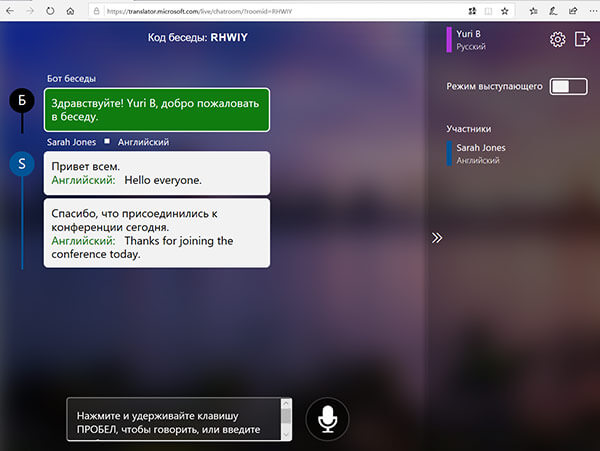
- Speak or type in your own language and the conversation will be translated into the preferred language of the other party.
- Follow these tips if you are having audio issues.


