
Step-by-step Total Chaos Upper Control Arms Installation
The following article is a step-by-step process on the installation of the Total Chaos Upper Control Arms on a 2012 Toyota 4Runner SR5.
The UCA’s are installed along with King Shocks – King Suspension Coilovers, where you will find that full step by step install here.
Looking at these instructions will also help simplify the UCA install. This instruction sheet is Step 8 in the King Suspension Install Instructions. We hope you find the following instructions useful!
Parts used:
- Total Chaos Upper Control Arms (UCA’s) (Part: TC 96504) – Check Price
Step 1. Preparation
1.1 – Read instructions
**Disclaimer: The following instructions were created to break down and simplify the process of installing the OEM King Suspension Kit w/ Adjustment with a ~2.5” Lift in front and ~2.0” lift in the rear. Do not solely rely on these instructions! Make sure to thoroughly read the instructions you received as well. Contact the manufacturer or your distributor if you have any questions regarding your install.
1.2 Prep Tools
It is recommended that you thoroughly read the entire instructions to make sure you feel comfortable and have all the tools needed for the installation. Below is a list of tools used:
- 100 ft/lb Torque Wrench
- Sockets and/or Wrenches Size: 10mm, 12mm, 14mm, 19mm
- 21mm breaker bar to remove lugs
- Rubber mallet or a Vice with soft clamping faces
- Flathead screwdriver
- Grease gun (recommended)
- Super Lube (or an equivalent PTFE marine grade waterproof grease.)
- A safe lift and stands.
- A friend to help
Step 2. Lift 4Runner and Remove Wheels

Safety first! Make sure your 4Runner is lifted safely whether using a lift or jack stands.
Remove the wheels by removing the five M12X1.5 lug nuts from each wheel using a 21mm breaker bar.
Step 3. Prepare New UCA’s
3.1 Grease and Install the Dry Bushings

Greasing your polyurethane bushings properly is important for full life span. Note that polyurethane bushings are prone to squeaking and have the potential of making slight noise even when maintained properly. Polyurethane is much stronger and stiffer than stock rubber bushings which is why Total Chaos opts for them. Total Chaos recommends using Super Lube (or an equivalent PTFE marine grade waterproof grease).
Next, install the dry bushings into the control arm pivots using a rubber mallet.
3.2 Grease Inner Diameter of Brushings

After bushings have been installed in the control arm pivots, grease generously to the inner diameter of the bushings, trying to fill the bushing grooves completely.
3.3 Grease Outer Diameter of Metal Inner Sleeves

Generously grease the outside diameter of the metal inner sleeves. Use clean gloves, not like the ones shown in the picture!
3.4 Insert Metal Sleeve Into Bushings

Using a mallet, arbor press, or smooth jawed vise, insert the metal sleeve into the bushings, making sure the bushing on the opposite end does not get pushed out.
3.5 Grease the Outsides of the Bushings

Grease the outsides or “hats” of the bushings where they will make contact with the plated washers/control arm pockets.
3.6 Install Zerk Fittings and Finish Greasing

When installing the zerk fittings, Total Chaos mentions it may be necessary to use a sharp object to clean out the top of the threaded hole so the ¼”-28 NPT threads will catch. We did not have to do this as they screwed in fairly easily. Tighten the zerk until it gets snug. DO NOT tighten to the bottom of the thread. Rotate as far as needed for access to connect a grease gun. When adding grease through the zerk fitting, make sure to loosen the factory control arm pivot bolt holding the bushings together. This gives the grease an area to properly expand throughout the bushing. If the bolt is not loosened, the grease has the potential to hydraulic and mushroom and destroy the bushings. If you see the bushings start to deform, immediately stop adding grease, disconnect the grease gun from the zerk fitting and push the ball on the zerk tip to release the excess pressure.
When pumping grease through the zerk, the bolt should be loose and excess grease should begin to bleed out from between the bushing “hat” and the washers.
Step 4. Remove Inner Wheel Well Liner/Splash Shield Mud Guards

I believe there are 9 pins on each side. Remove both the front and back liner under the front wheel wells. Remove using a flat head or pin removing tool like shown in the picture (not sure what the tool is called).
Step 5. Remove Brake Line/ABS Sensor Wire Bracket

Remove the ABS sensor brackets from the UCA and spindle by removing the 10mm head bolts from each bracket. Remove the brake line bracket attached to the chassis (12mm head bolt).
Step 6. Disconnect Upper A-Arms King Nut

Disconnect the upper a-arm king nut and remove the king nut (19mm). Make sure to remove the Cotter Pin first!
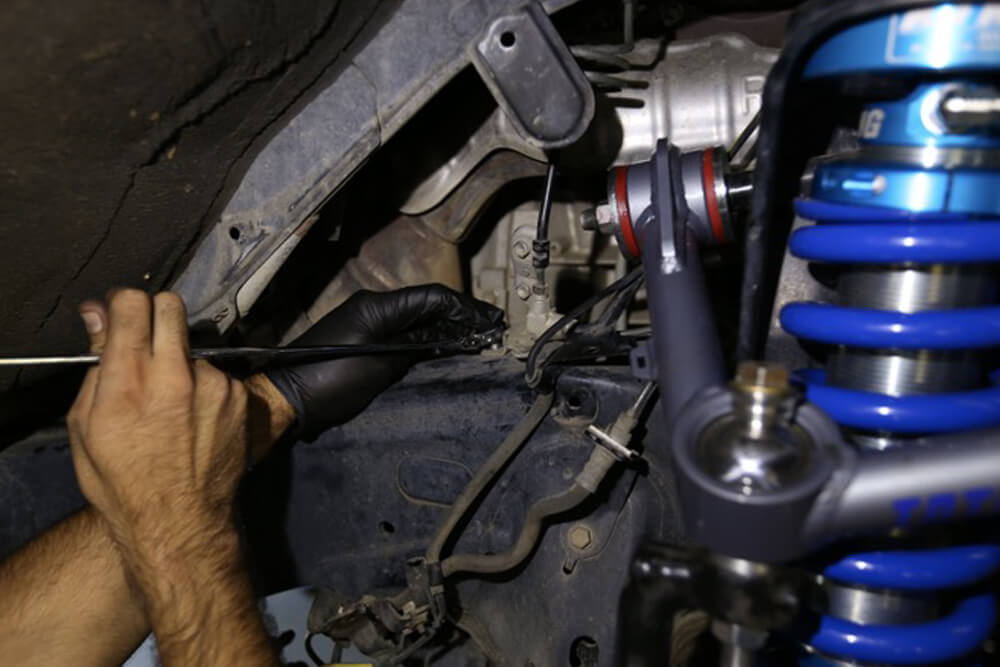
Step 7. Remove Factory UCA Pivot Bolt

When removing the factory UCA Pivot Bolt the fender well might have to be bent on the inside by the bolt head. Total Chaos’ Instructions called for bending the inner fender well on both sides, however, we only had to bend the driver side…It will be a bit tricky to remove the bolt since it is so long. Some people chose to cut the bolt instead and buy new ones. We did not find the need to do this. We did not cut the bolt.
Use 19mm wrenches to remove the bolt and nut
Step 8. Remove UCA
At this point, you should be able to remove the UCA and set it aside. It might look something like this if you are replacing your front suspension as well.
Step 9. New Suspension Install
At this point, you can install your new shocks if you plan to install new suspension. You can refer to the King Suspension Install article for further assistance on installing your new suspension.
Step 10. Install UCA
Hold the UCA in place and make sure everything lines up. Help from a friend will make things much easier for the next step.
Step 11. Install UCA Arm Pivot Bolt

Install the long factory bolt and nut (~100ft/lbs)Remember bolt slides in from the front towards the back of the vehicle. Use the correct spacers at the correct location (4 on each side of the vehicle). This step will most likely require the help of another set of hands. Refer to the images below, and the image provided by Total Chaos for configuration of spacers.
Step 12. Install Upper A-Arms King Bolt and Nut

The hardware provided by Total Chaos will be used for this step. It is best to look at the above image provided by Total Chaos for correct configuration of parts. During assembly, it is important to note that the upper and lower spacers are specific. Failure to properly follow the instructions will result in damage to all components. (~82ft/lbs)
Step 13. Install Brake Line/ABS Sensor Wire Bracket
Install the ABS sensor brackets from the UCA and spindle by using the 10mm head bolt for the spindle and a zip tie for the UCA. Install the brake line bracket attached to the chassis if you removed it earlier (12mm head bolt).
Step 14. Install Inner Wheel Well Liner/Splash Shield Mud Guards
Install the front and back liner under the front wheel wells using the 9 pins on each side. Make sure to reinstall these before installing your King Suspension Reservoir Brackets if installing suspension with remote reservoirs.
Step 15. Tighten and Double Check Everything!
Double check everything before reinstalling wheels. Make sure to recheck all hardware after 100 miles and periodically thereafter as routine maintenance.
Step 16. Install Wheels
At this point, your UCA’s are installed and unless you are installing new suspensions, the wheels can be bolted back on. (85ft/lbs)
Step 17. Alignment

Make sure to get a PROFESSIONAL ALIGNMENT before driving at highway speeds. Some people like to get an alignment directly after. Some people like to get an alignment after driving the vehicle slowly for 100 miles. We recommend finding an alignment shop that will align your vehicle “immediately” after your install and will then fine tune after 100 miles or so.
Step 18. ENJOY YOUR NEW RIDE!
Make sure to check out @Venture4Adventure for awesome films, pictures, projects, product reviews, journeys & destinations, and more coming soon!
We want to give a BIG thanks to Niche Automotive Precision Automotive Service and Repair.
Casey and Rob were a huge help and extremely knowledgeable.
hows the NVH for the added upper control arms? ive heard and seen reviews that although they are necessary for higher lifts, they add a ‘crashy’ feel and a lot more NVH even with a good coil set-up upfront (i.e bilsteins 6112 mod).
asking coz my truck is a daily / family vehicle but we would like to lift it up 2″ at least or just use stock and lift mild around 1.2″.
Hello Mikko,
Sorry for the late response. We are usually pretty good about responding, however we missed this one.
They can definitely add more NVH. TBH I have not felt other UCA installs before so I can only speak for this one.
Overall it is still a great smooth ride, it is only when I push it a bit harder that I feel it the “crashy” feeling. (Going over bumps and small rocks). On the freeway, I do not feel it and feels very smooth. I do not hear any noise and the ride was definitely improved with the king suspension.
I would recommend getting a good amount of grease in there for longer lasting smoothness and quietness.
Hope this helps!
No reply huh? Classy…
Twysh