

Walkthrough Menu
- General Tips
- Chapter 1: Rodger Baskerville
- Chapter 2: Luisa Baskerville
- Chapter 3: James Baskerville
- Chapter 4: Lily Baskerville
- Chapter 5: Edward Baskerville
- Chapter 6: Elizabeth Baskerville
- Chapter 7: Charles Baskerville
General Tips
- Choose between Easy and Hard Mode at the beginning of the game. This guide was written while playing in Hard Mode.
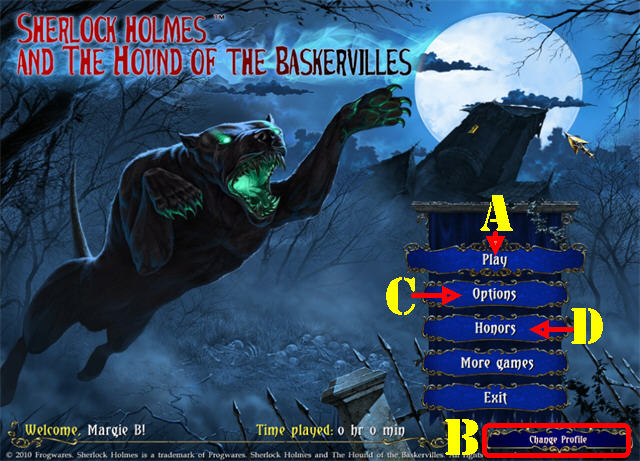
- Click on the “Play” (A) button to begin your adventure.
- The “Change Profile” (B) button allows you to manage your player profiles.
- In the “Options” (C) menu you can adjust the resolution, music volume, voice volume, sound effects, and custom cursor.
- The “Honors” tab (D) gives you access to the all the achievements you’ve collected throughout the game.
- Lift the curse off the members of the Baskerville family by finding all the pieces to their COAT OF ARMS; place these pieces into the portraits in the gallery to earn rewards.
- All COAT OF ARMS pieces will be marked “#” in the screenshots.
- In each chapter you will have to find 2 CRYSTAL EYES that belong on the wolf’s head in one of the rooms. Place the eyes on the wolf and then click on the wolf to travel through time.
- You can skip puzzles or Hidden Object Scenes by clicking on the skip button once it fills.
- There are 32 achievements in the game. You will receive an immediate notice each time one is earned.
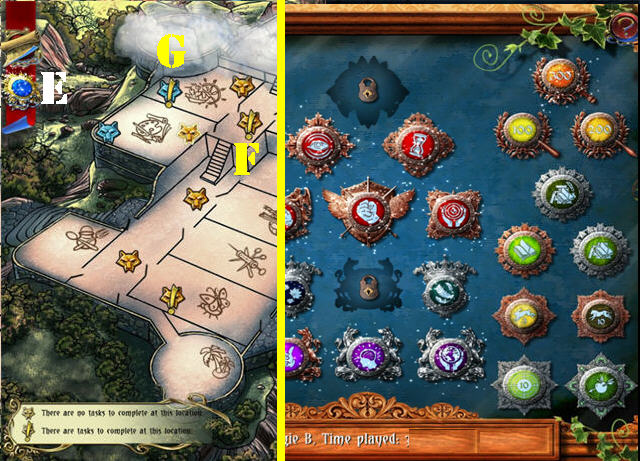
- View the “Honors” section through the main menu, or by opening the book in the lower left during play, or from the map in the upper left (E).
- Hover your mouse over an achievement to read its fulfillment requirements.
- Use the map to move between locations.
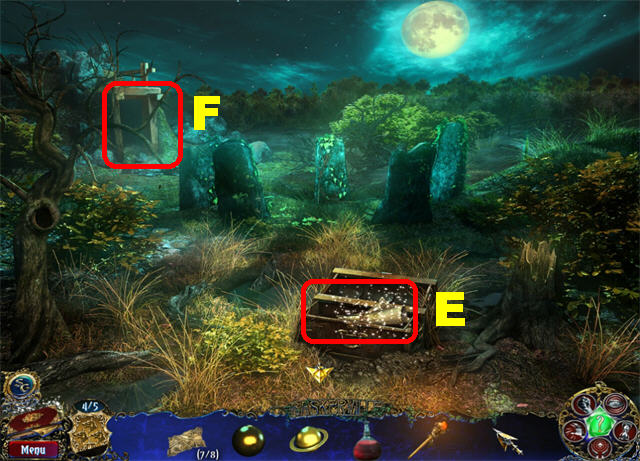
- Icons on the map with an exclamation point (F) are areas in which a task is pending.
- Blue icons (G) on the map refer to locations in the past.
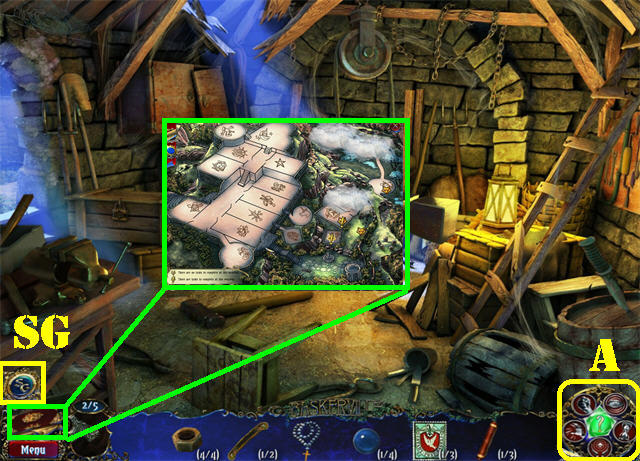
- Click on the “SG” letters (SG) in the lower left corner to be taken to the link to buy the Strategy Guide for this game.
- Click on the “?” button in the center of the medallion for a hint, if you’re stuck.
- Zoom scenes consist mainly of puzzles that need to be solved. Look at the bottom of these scenes to find out how many elements must be found before the puzzle can be activated.
- There are 5 special abilities you can earn in the game. Click on one and place it in the right area to use it; then take the item it unlocks (A).
- Strength allows you to lift heavy items or break objects.
- Perception increases visual accuracy and perception of small details.
- Speed allows you to accelerate the passage of time.
- Materialization allows you to materialize a figurative representation. For example you can materialize a key painted in a picture.
- Telekinesis allows you to obtain out-of-reach items.
Chapter 1: Rodger Baskerville

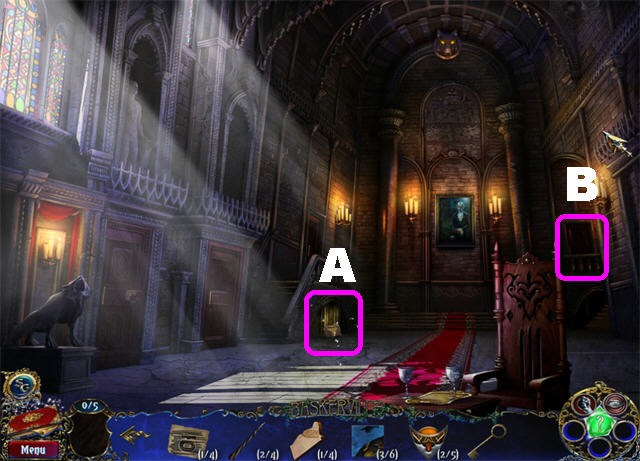
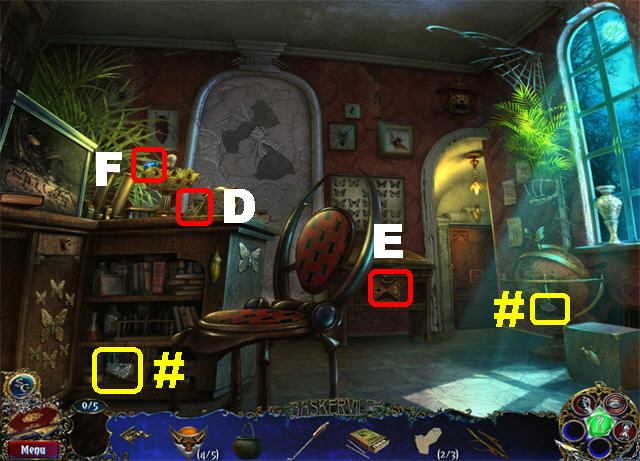
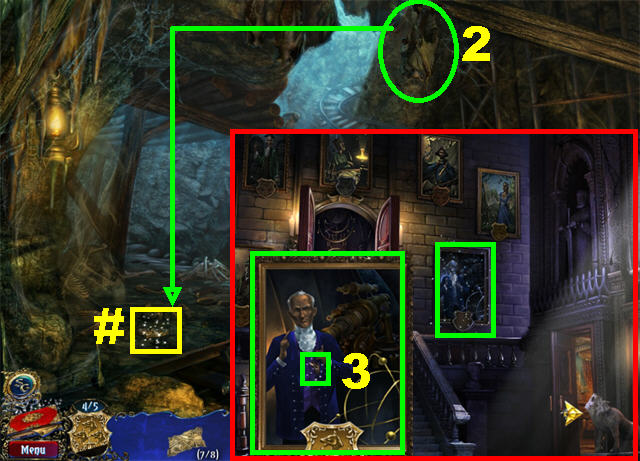
- You start the game in the portrait gallery.
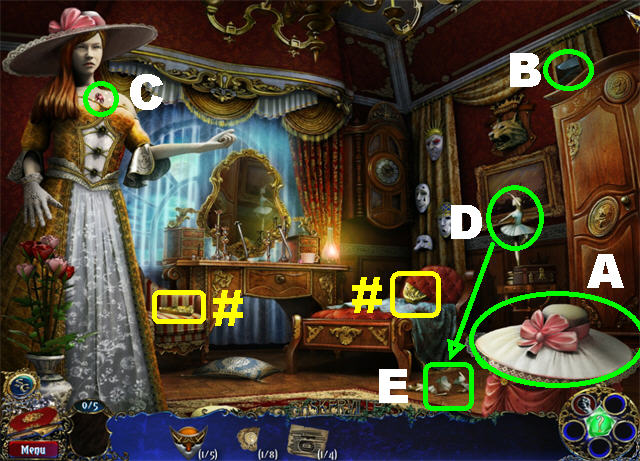
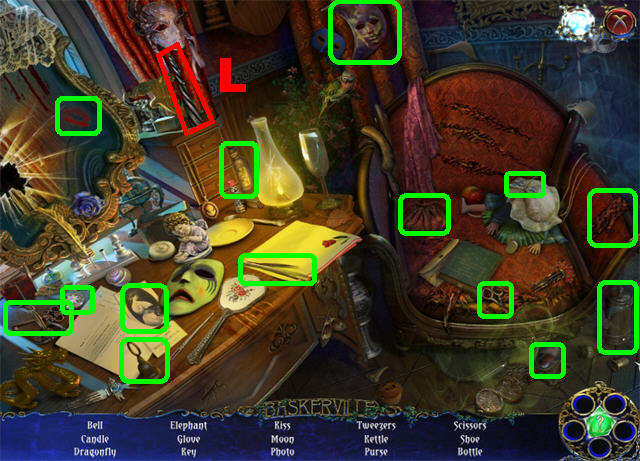
- Take RODGERS’ PIECE OF COAT OF ARMS 1/5 (#) by the steps.
- Take PART OF RODGER’S DOOR LOCK (A) on the left.
- Grab the CARAFE WITH WATER (B) on the lower left.
- Zoom into Rodger’s door on the right; place the PART OF RODGER’S DOOR LOCK (C) on the door to activate a puzzle.
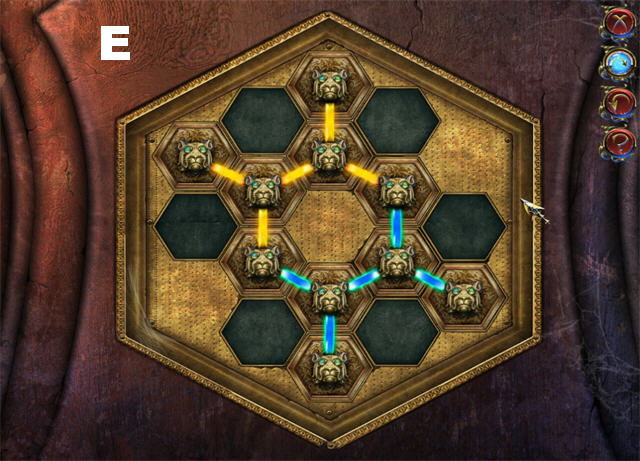
- Arrange the tiles as shown in the screenshot (E).
- Pick up CRYSTAL EYE 1/2 (F) in the lower left.
- Take the CROSSBOW PIECE (G) in the lower right.
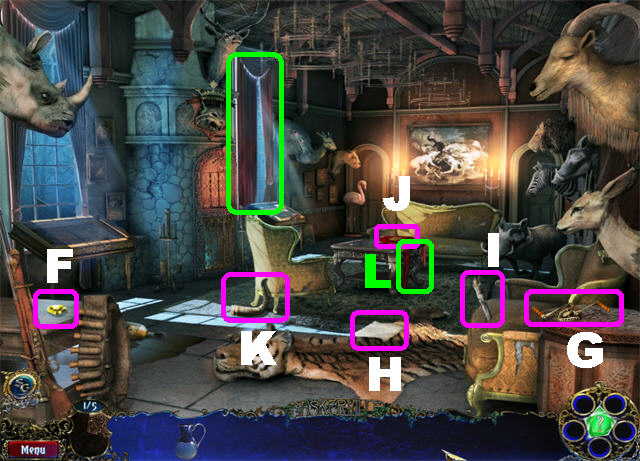
- Take the PAPER (H) on the carpet.
- Grab the KNIFE (I) on the chair.
- Take the BOOK OF THE BASKERVILLES (J) on the table.
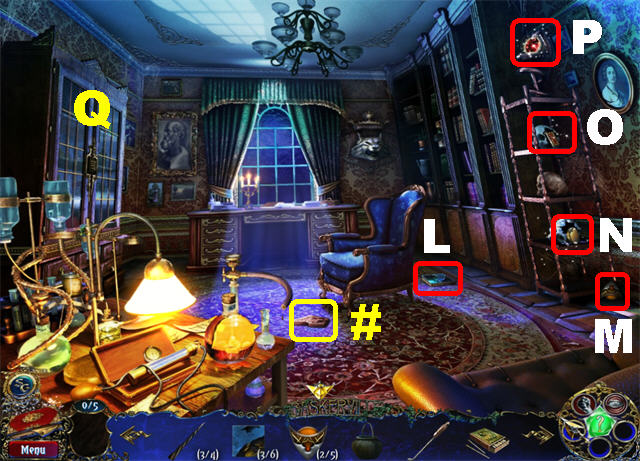
- Take the HORN (K) by the chair.
- Take the CURTAIN RIBBON (L) below the table.
- Tie the red curtain with the CURTAIN RIBBON (M); click on the window to trigger a search scene.
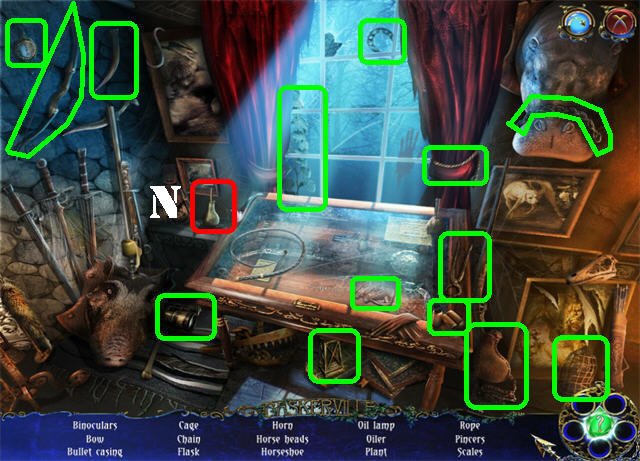
- The OILER (N) will be added to inventory.
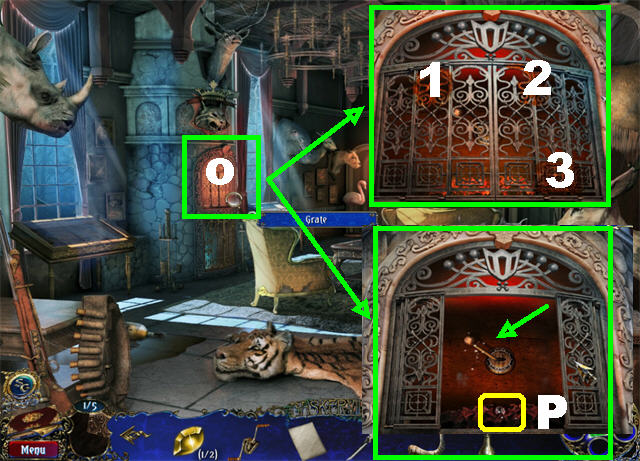
- Zoom into the grate (O); place the OILER on the 3 rusty spots.
- Place the CARAFE WITH WATER into the fire.
- Take the COAL (P).
- Pull the LEVER and go into the secret garden below the grate.
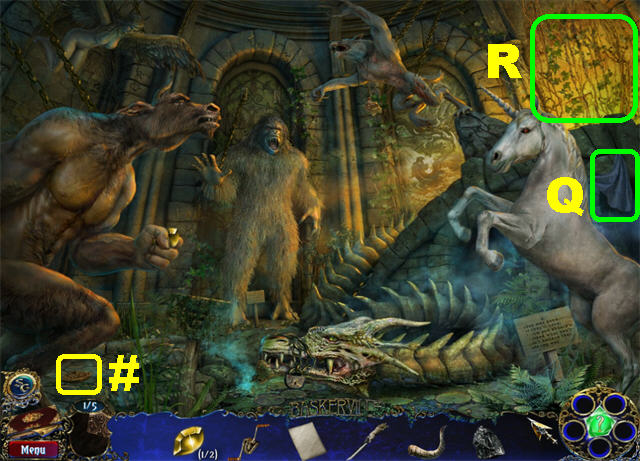
- Take the CLOTH (Q) in the upper right.
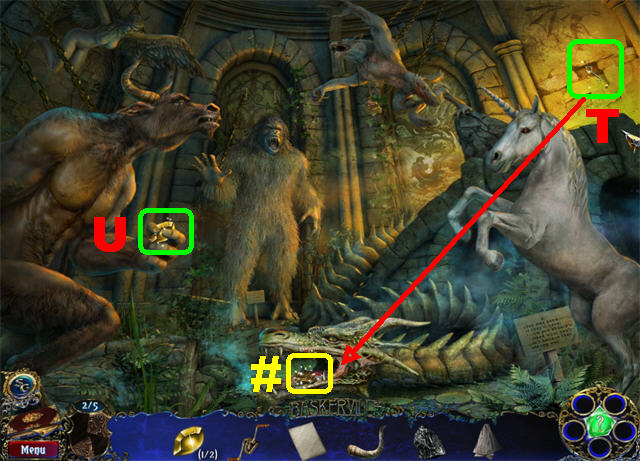
- Take RODGERS’ PIECE OF COAT OF ARMS 2/5 (#) in the lower left.
- Cut the IVY in the upper right 2 times with the KNIFE to trigger a puzzle (R).

- Assemble the mosaic as shown in the screenshot (S). Click the squares to change their images.
- Take the PADLOCK KEY (T) that appears in the upper right corner.
- Place the PADLOCK KEY on the lock around the dragon’s head; take RODGER’S PIECE OF COAT OF ARMS 3/5 (#) from the dragon’s mouth.
- Put the HORN on the minotaur’s head; take CRYSTAL EYE 2/2 (U) from the minotaur’s hand.
- The game will give you a choice to return to the place in which you’ll need to put the crystal eye, or stay where you are; choose “YES.”

- Place the CLOTH on the whiskey to create CLOTH WITH ALCOHOL (V).
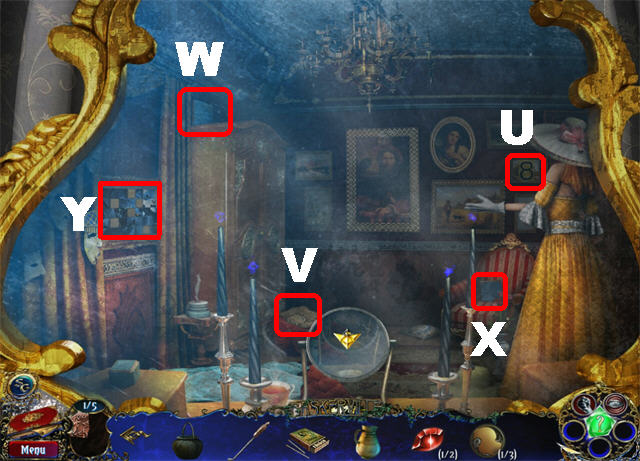
- Zoom into the wolf‘s head (W) above the mantle; place the 2 CRYSTAL EYES there.
- Click on the wolf to access the past.
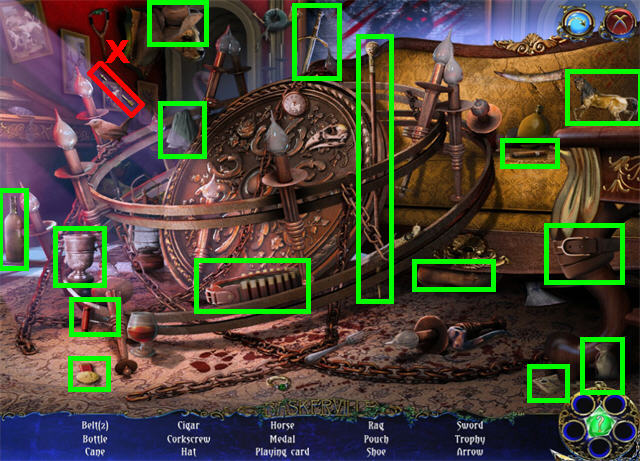
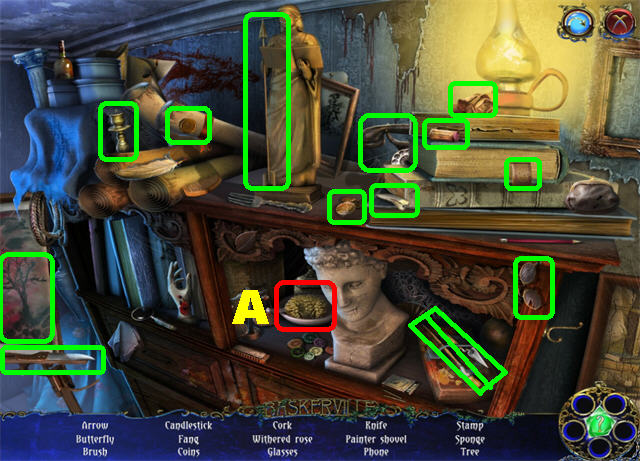
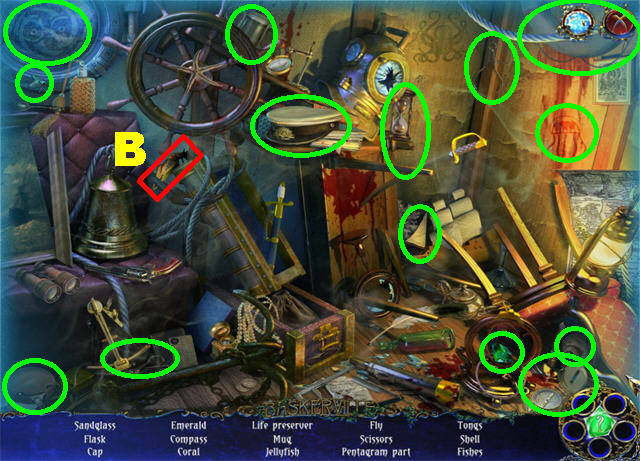
- Click on the table to trigger a search scene.
- The GOLDEN ARROW (X) will be added to inventory.

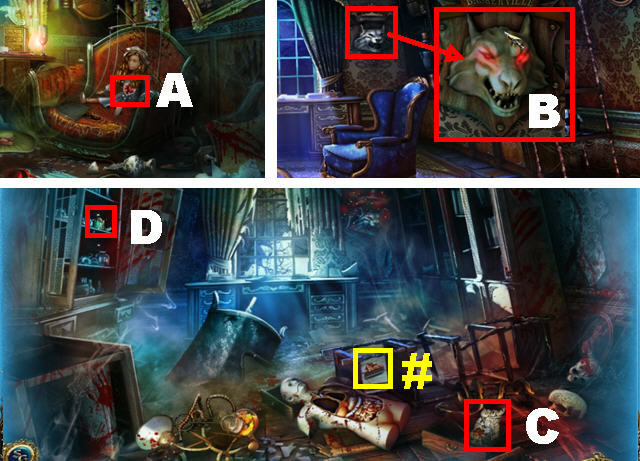
- Take the SECOND FLOOR KEY 1/5 (A) in the lower left.
- Grab the PIECE OF SCHEME 1/8 (B) in the lower right.
- Take the RODGERS’ PIECE OF COAT OF ARMS 4/5 (#) on left.
- Click on the NEWSPAPER (C) in the lower center.
- Place the GOLDEN ARROW and the CROSSBOW PIECE on the crossbow (D).
- Take the CROSSBOW WITH ARROW.
- Go into the secret garden below the grate.
- Place the CROSSBOW WITH ARROW on the werewolf. The game will ask you if you want to leave this scene, answer “No”.
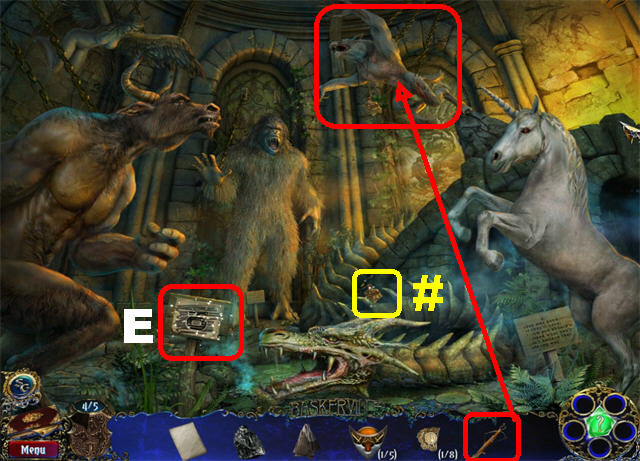
- Take the RODGERS’ PIECE OF COAT OF ARMS 5/5 (#) that falls on the ground after the wolf disappears.
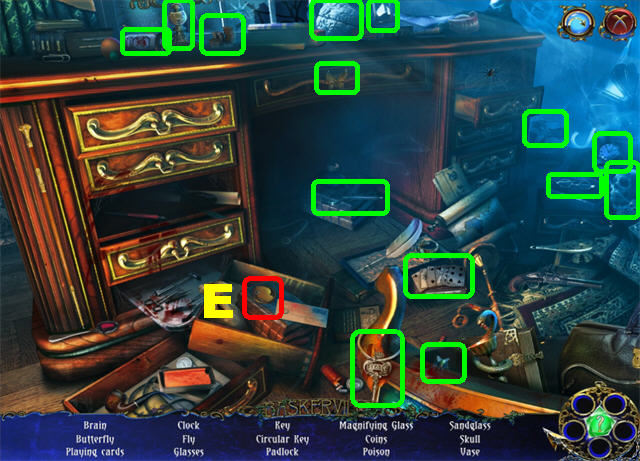
- Put the CLOTH WITH ALCOHOL on the DIRTY SIGNBOARD (E).
- Put the PAPER on the CLEAN SIGNBOARD.
- Place the COAL on the SIGNBOARD WITH PAPER; take the STRANGE SIGN 1/4.
- The secret garden location has been completed.
- Go to the portrait gallery.
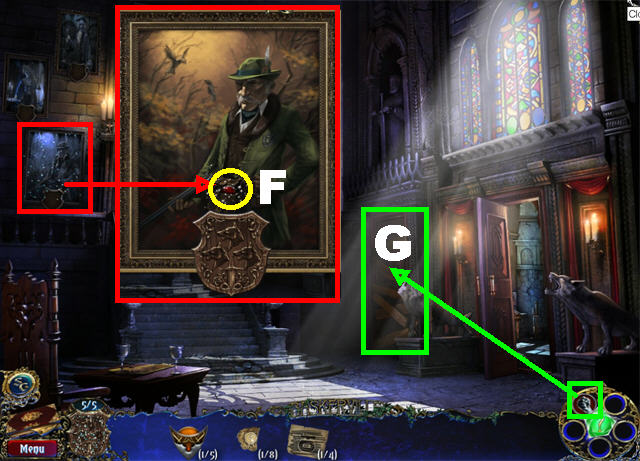
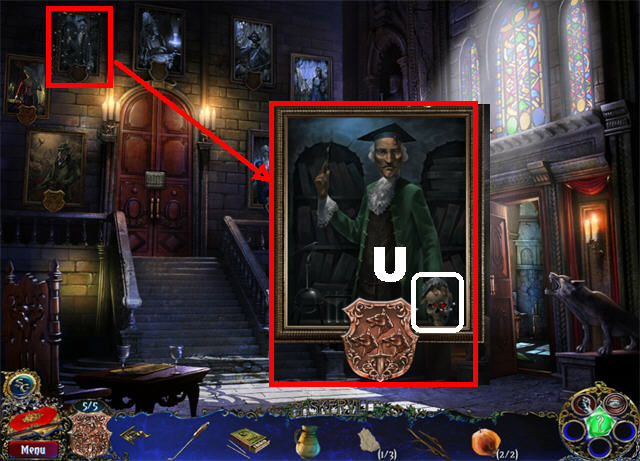
- Zoom into Rodger Baskerville’s portrait on the left; place RODGER’S COAT OF ARMS in the slot below the picture.
- Take the STRENGTH JEWEL (F) from the portrait.
- Click on the STRENGTH JEWEL in the lower right corner to attach it to your cursor; place it on LUISA’S DOOR (G) twice to break the boards.
- Go into Luisa’s room.
Chapter 2: Luisa Baskerville
- Grab the HAT (A) in the lower right.
- Take PART OF PAINTING 1/6 (B) in the upper right.
- Take LUISA’S PIECE OF COAT OF ARMS 1/5 (#) on the lounge chair.
- Take LUISA’S PIECE OF COAT OF ARMS 2/5 (#) on the chair.
- Place the HAT on the mannequin’s head; take CRYSTAL EYE 1/2 (C) on the mannequin’s chest.
- Use the STRENGTH ABILITY to break the ballerina statuette (D) on the right; take the GEAR 1/4 (E) that falls on the ground.
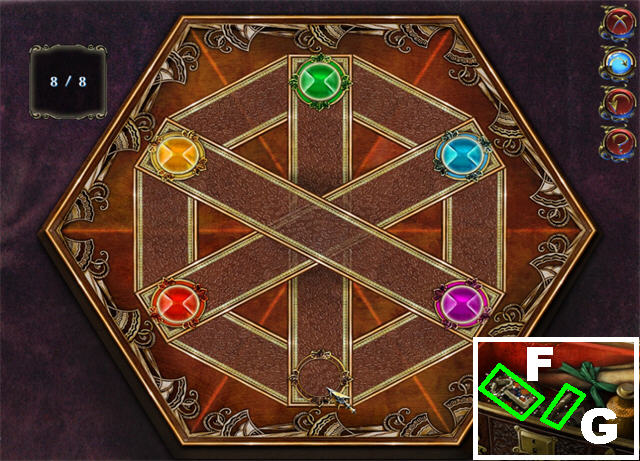
- Zoom into the small box in the lower right to trigger a puzzle.
- Click on the jewels in this order: RED, YELLOW, BLUE, RED, GREEN, PURPLE, YELLOW, and GREEN.
- Take the LITTLE KEY (F) and the FANG 1/2 (G) inside the box.
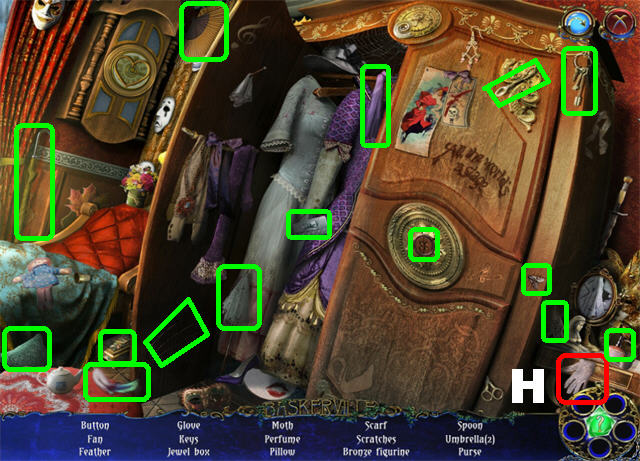
- Open the wardrobe with the LITTLE KEY to trigger a search scene.
- The GLOVE (H) will be added to inventory.
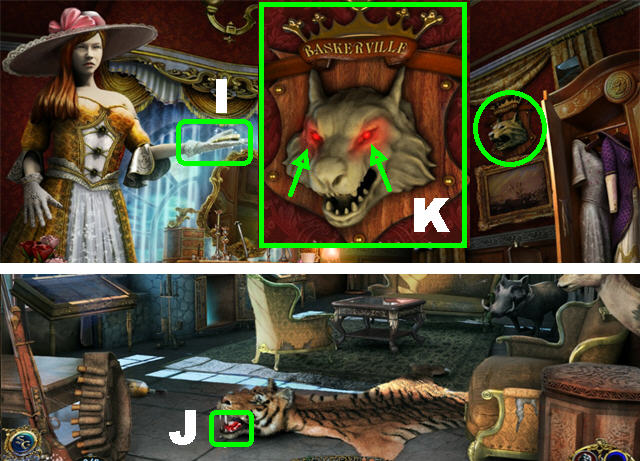
- Place the GLOVE on the mannequin’s hand; take FANG 2/2 (I).
- Return to Rodger’s room.
- Place the 2 FANGS in the tiger’s mouth; take CRYSTAL EYE 2/2 (J).
- Return to Luisa’s Room.
- Zoom into the wolf’s head; place the 2 CRYSTAL EYES and go to the past.
- Zoom into the dresser to trigger a search scene.
- The BLACK CANDLE 1/4 (L) will be added to inventory.
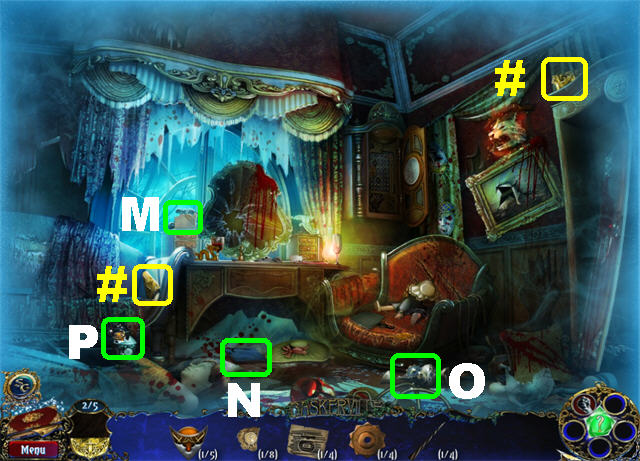
- Take PART OF JAMES’ DOOR LOCK 1/4 (M) on the left.
- Grab the PART OF PAINTING 2/6 (N) in the lower center.
- Take LUISA’S PIECE OF COAT OF ARMS 3/5 (#) on the couch.
- Take LUISA’S PIECE OF COAT OF ARMS 4/5 (#) in the upper right.
- Use the STRENGTH ABILITY to break the VASE in the lower right; take GEAR 2/4 (O).
- Use the STRENGTH ABILITY to break the VASE in the lower left; take the SECOND FLOOR KEY 2/5 (P).
- Return to the present by clicking on the wolf.
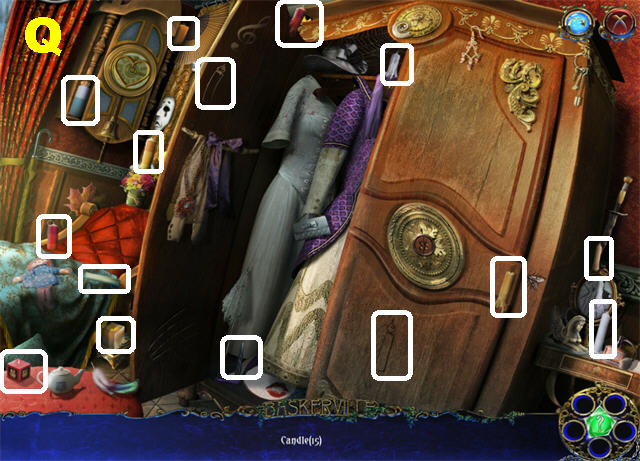
- Zoom into the wardrobe to trigger a search scene to find 15 candles.
- BLACK CANDLE 2/4 will be added to inventory (Q).
- Go to Rodgers’ past room.
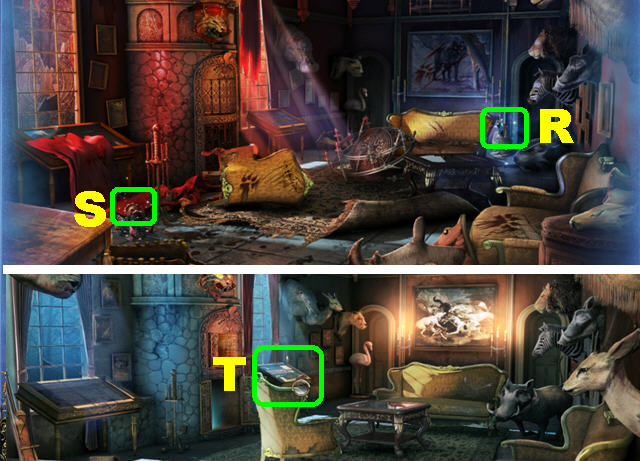
- Break the vase on the right with your STRENGTH ABILITY; take the PART OF PAINTING 3/6 (R).
- Break the old vase on the left with your STRENGTH ABILITY; take the GEAR 3/4 (S).
- This location has been completed; return to the present.
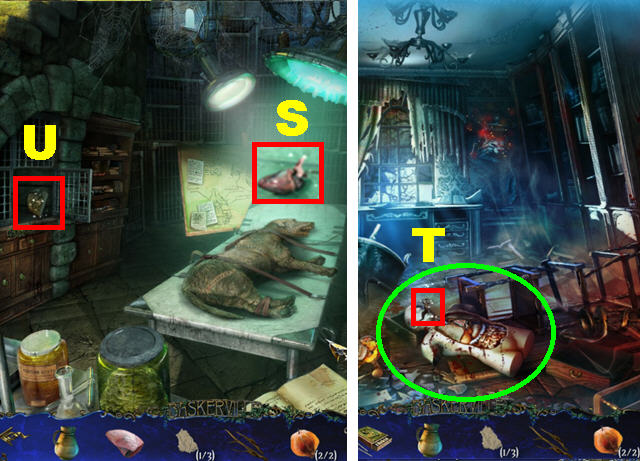
- Click on the stand below the elephant to trigger a search scene (T). If the search scene does not open for you right away, place the 3 gears in the clock in Luisa’s past room to activate it.

- GEAR 4/4 (U) will be added to inventory.
- This location has been completed.
- Return to Luisa’s past room.
- Zoom into the clock; place the 4 GEARS to activate the puzzle.
- Arrange the gears as shown in the screenshot (V).
- Take the HANDLE (W) on the clock after the puzzle has been solved.
- Go to the present.
- Place the HANDLE on the drawer; take LUISA’S PIECE OF COAT OF ARMS 5/5 (#) in the drawer.
- Go to the portrait gallery.
- Zoom into Luisa Baskerville’s portrait.
- Place LUISA’S COAT OF ARMS on Luisa’s portrait; take the PERCEPTION JEWEL (X) from the portrait.
- Place the PERCEPTION ABILITY in the dark corner in the lower left; take the KEY TO THE KITCHEN (Y).
Chapter 3: James Baskerville
- Go to the Hall.
- Use the PERCEPTION ABILITY in the dark spot below the steps; take PART OF JAMES’ DOOR LOCK 2/4 (A).
- Place the KEY TO THE KITCHEN on the kitchen door on the right (B).

- Take the JUG (C) and the MATCHES (D) on the table.
- Grab the CAULDRON (E) on the right.
- Take BLACK CANDLE 3/4 (F) from the niche on the right side of the wall.
- Take the FIRE POKER (G) next to the fireplace.
- Break the POT on the left with your STRENGTH ABILITY; take PART OF JAMES’ DOOR LOCK 3/4 (H).
- Use your PERCEPTION ABILITY in the dark place above the hood; take the PART OF JAMES’ DOOR LOCK 4/4 (I).
- Use your PERCEPTION ABILITY in the dark place in the upper left; take the PART OF CABINET LOCK 1/2 (J).
- Go to the hall.
- Zoom into James’ door; place the 4 PARTS OF JAMES’ DOOR LOCK on the door to activate a puzzle.
- Click on the lock parts in this order: A, G, I, C, E, B, H, I, C, A, and G.
- Take JAMES’ PART OF COAT OF ARMS 1/5 (#) on the floor.
- Take the PART OF PAINTING 4/6 (L) on the ground.
- Grab the SECOND FLOOR KEY 3/5 (M) in the lower right.
- Break the SKULL 1 in the lower right using your STRENGTH ABILITY; take CIRCULAR KEY 1/3 (N).
- Break the SKULL 2 in the upper right using your STRENGTH ABILITY; take PART OF CABINET LOCK 2/2 (O).
- Use the PERCEPTION ABILITY on the dark place in the upper right corner; take CRYSTAL EYE 1/2 (P).
- Zoom into the medicine cabinet on the left; place the 2 CABINET LOCK PARTS on the cabinet (Q).
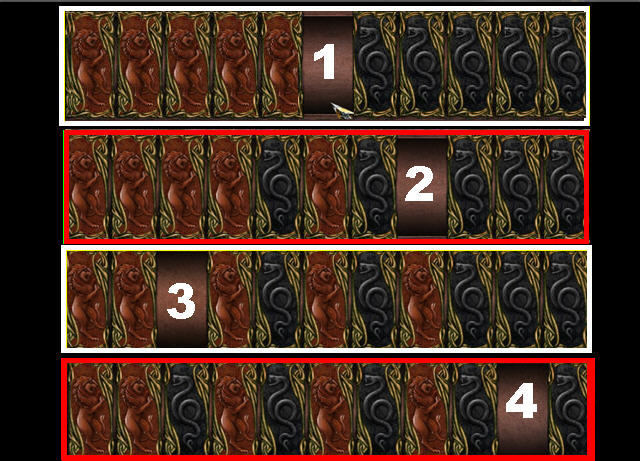
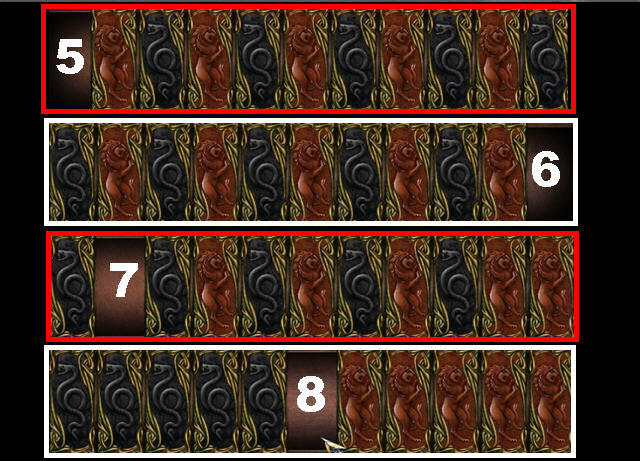
- Move the black pieces to the left and the red pieces to the right using the steps in the screenshot.
- Take the BLACK CANDLE (R) and the SMALL MIRROR (S) inside the cabinet.
- Return to Luisa’s room.
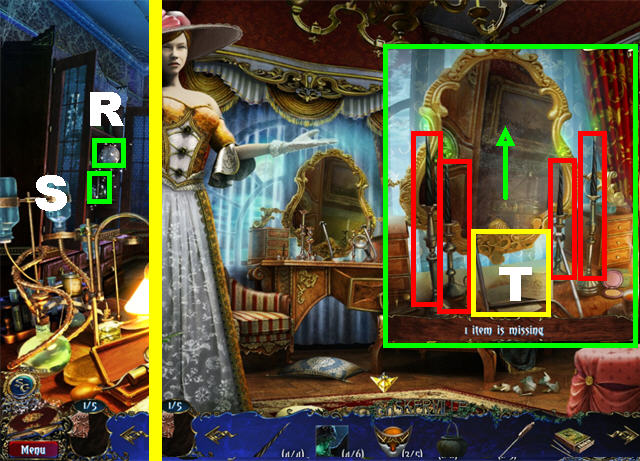
- Zoom into the mirror; place the 4 BLACK CANDLES in the candleholders marked in red.
- Place the MIRROR on the stand (T).
- Place the MATCHES on the 4 candles.
- A corridor just opened in the mirror; click on it to access Beyond the Mirror!
- Take the STRANGE SIGN 2/4 in the upper right (U).
- Take the PIECE OF SCHEME 2/8 (V) in the lower center.
- Grab the PART OF PAINTING 5/6 (W) in the upper left.
- Grab the PART OF PAINTING 6/6 (X) on the chair.
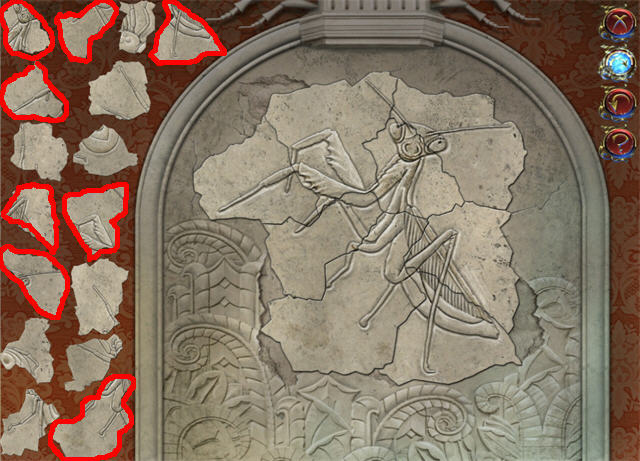
- Zoom into the picture on the left and place the 6 PAINTING PARTS to activate the puzzle (Y).
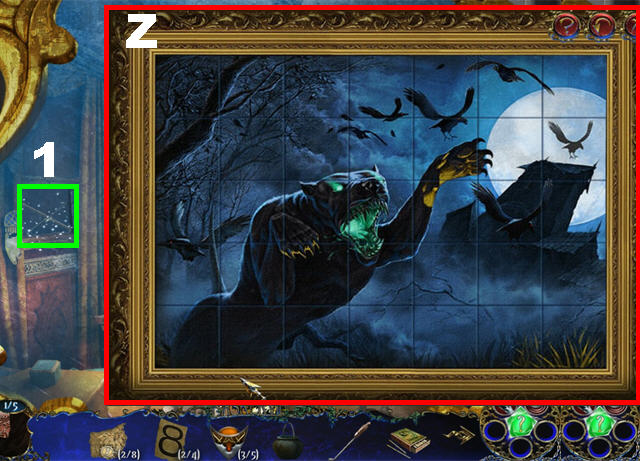
- Assemble the puzzle as shown in the screenshot (Z).
- Take the MARIONETTE RULERS (1) after the puzzle has been solved.
- This location has been completed!
- Go to Luisa’s past room.
- Place the MARIONETTE RULERS on the marionette in the chair; take CRYSTAL EYE 2/2 (A).
- Go to James’ room.
- Zoom into the wolf’s head.
- Place the 2 CRYSTAL EYES on the wolf and go to the past. (B).
- Take the PIECE OF SCHEME 3/8 (C) on lower right corner.
- Take JAMES’ PART OF COAT OF ARMS 2/5 (#) on the ground.
- Break the FLASK in the cabinet with your STRENGTH ABILITY; take CIRCULAR KEY 2/3 (D).
- Zoom into the desk to access a search scene.
- The CIRCULAR KEY 3/3 (E) will be added to inventory.

- Go to the present.
- Click on the carpet to find a trapdoor underneath; zoom into it.
- Place the 3 CIRCULAR KEYS on the trapdoor to activate a puzzle.
- Slide the red piece to the exit on the right.
- Please look at the screenshot for the solution.
- Go into the hatch, once the puzzle has been completed, to access the laboratory.
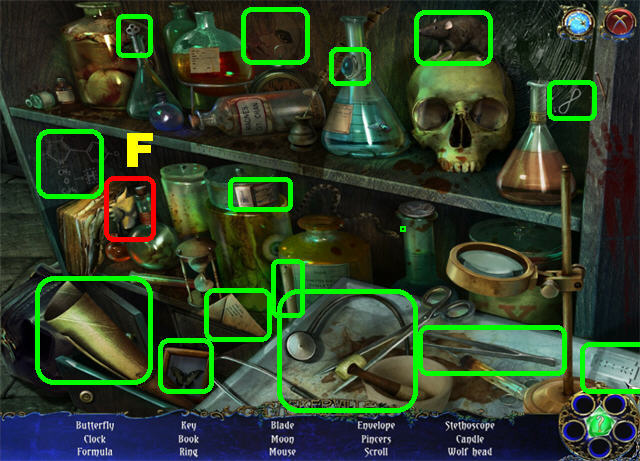
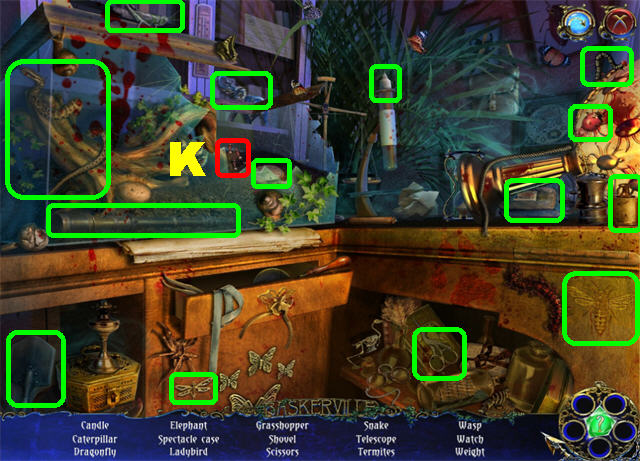
- Zoom into the right shelves to activate a search scene.
- The FOUNTAIN PART 2/3 (F) will be added to inventory.
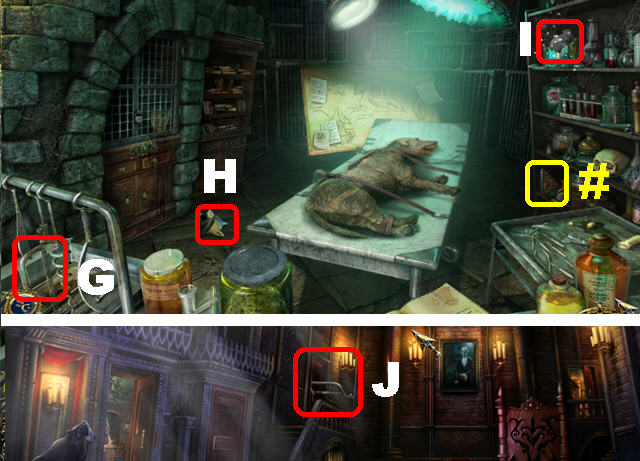
- Take the SURGERY SAW (G) in the lower left.
- Take the FOUNTAIN PART 2/3 (H) in the lower left.
- Break the BOTTLED LUNG (I) with the STRENGTH ABILITY; take the LUNG.
- Take JAMES’ PART OF COAT OF ARMS 3/5 (#) on the bottom shelf on the right.
- Return to the hall.
- Place the SURGERY SAW on the winter garden door on the left (J).
- Take the SECOND FLOOR KEY 4/5 (K) by the steps.
- Grab the PART OF MOULDING 1/3 (L) on the right.
- Take the PIECE OF SCHEME 4/8 (M) above the fireplace.
- Take JAMES’ PART OF COAT OF ARMS 4/5 (#) in the fireplace.
- Cut the DRY TWIG in the upper left with the SURGERY SAW to add it to inventory (N).
- Break the BIRDCAGE with your STRENGTH ABILITY; take the FOUNTAIN PART 3/3 (O).
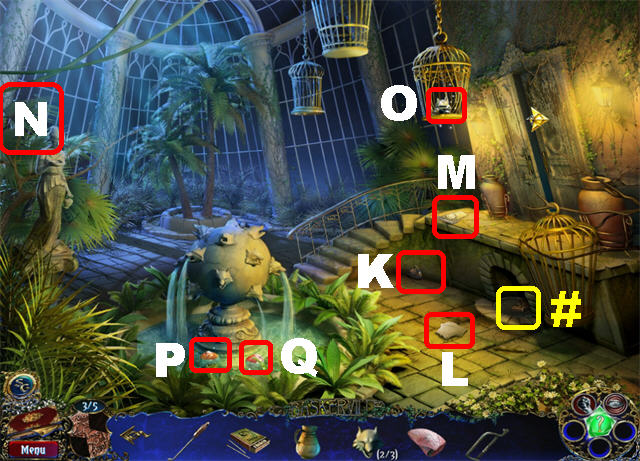
- Zoom into the fountain; place the 3 FOUNTAIN PARTS on the fountain.
- Take the 2 SEEDS at the bottom of the fountain (P and Q) after the fountain has been restored.
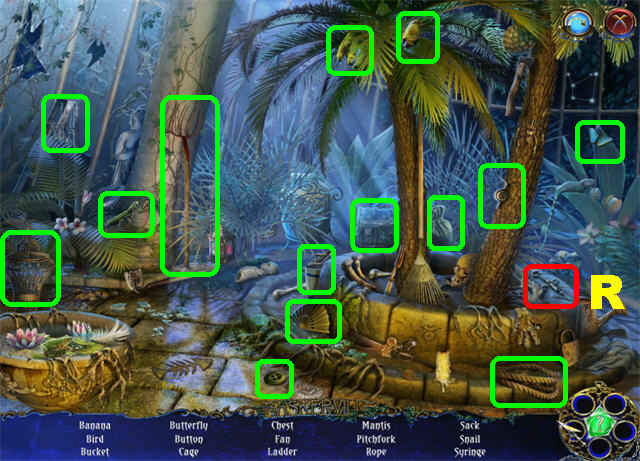
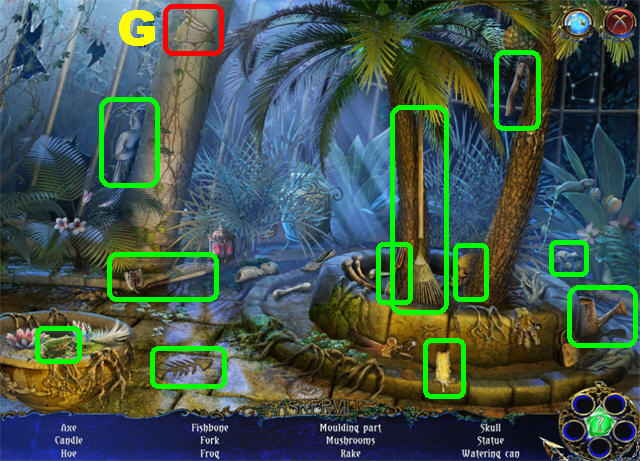
- Click below the palm trees to activate a search scene.
- The SYRINGE (R) will be added to inventory.
- Go to the past in James’ room.
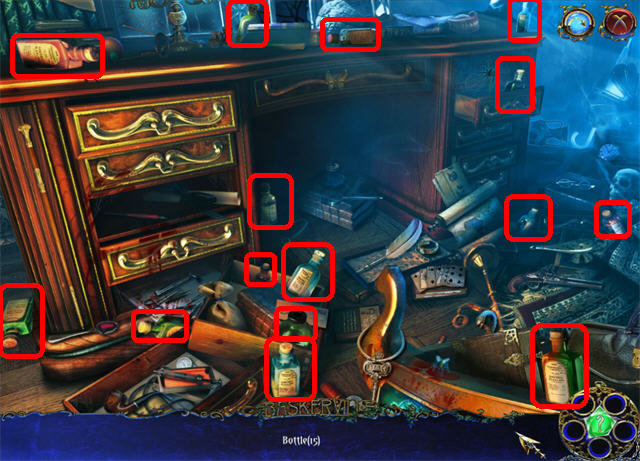
- Zoom into the desk to trigger a search scene in which you need to find 15 Bottles.
- The FULL SYRINGE will be added to inventory.
- Return to the present.
- Go down the hatch in James’ room to reach the laboratory.
- Give the FULL SYRINGE to Frankendog on the operating table; take the HEART (S).
- Return to James’ past room.
- Place the LUNG and the HEART into the anatomic model on the ground; take the PADLOCK KEY (T).
- This location has been completed!
- Return to the laboratory.
- Place the PADLOCK KEY on the cage on the left; take JAMES’ PART OF COAT OF ARMS 5/5 (U).
- This location has been completed!
- Go to the portrait gallery.
- Zoom into James Baskerville’s portrait on the left; place JAMES’ COAT OF ARMS on the portrait.
- Take the SPEED GEM (U) from the portrait.
Chapter 4: Lily Baskerville
- Go to the winter garden.
- Place the JUG on the fountain to create the JUG WITH WATER.
- Place a SEED in the flowerpot on the right.
- Place a SEED in the other flowerpot on the table.
- Place the JUG WITH WATER on the flowerpots.
- Use the SPEED ABILITY on the flowerpots.
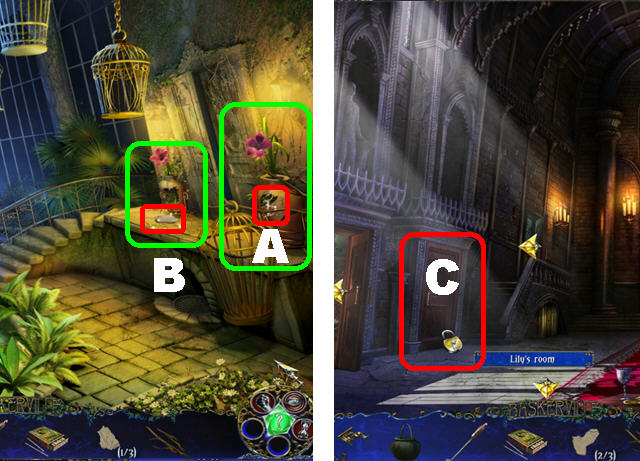
- Take LILY’S ROOM KEY (A) and PART OF MOULDING 2/3 (B) next to each flowerpot.
- Go to the hall.
- Place LILY’S ROOM KEY on Lily’s door on the left (C).
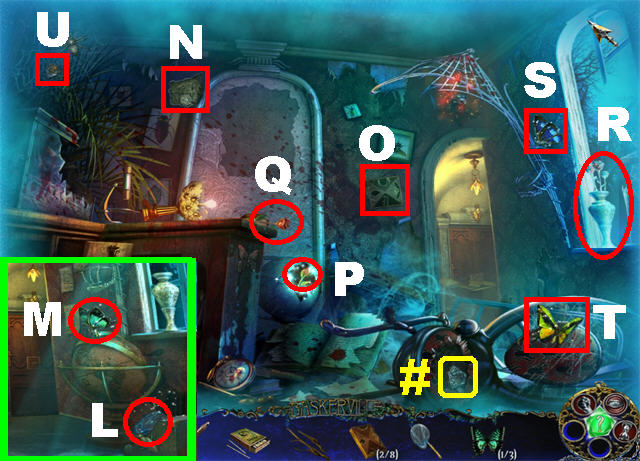
- Take the TETRAVEX 1/8 (D) on the desk.
- Take the TETRAVEX 2/8 (E) in the lower center.
- Take LILY’S PART OF COAT OF ARMS 1/5 (#) in the lower left.
- Take LILY’S PART OF COAT OF ARMS 2/5 (#) on the globe.
- Break the lamp with the STRENGTH ABILITY; take the CRYSTAL EYE 1/2 (F).
- Go to the winter garden.
- Click on the palm tree to trigger a search scene.
- The PART OF MOULDING 3/3 (G) will be added to inventory.
- This location has been completed!
- Return to Lily’s Room.
- Zoom into the destroyed moulding on the back wall; place the 3 MOULDING PARTS on the wall to activate the puzzle.
- Click on the pieces marked in red in the screenshot to solve the puzzle.

- Take the CRYSTAL EYE 2/2 (H) on the back wall.
- Zoom into the wolf’s head in the upper right (I).
- Place the 2 CRYSTAL EYES on the wolf and go to the past.
- Place the STRENGTH ABILITY over the termites on the left to trigger a search scene (J).
- The TERMITES (K) will be added to inventory.
- Return to the present.
- Place the TERMITES on the wooden chest in the lower right.
- Place the SPEED ABILITY on the chest; take the BUTTERFLY NET (L) inside the chest.
- Use the BUTTERFLY NET to obtain the BUTTERFLY 1/3 above the globe (M).
- Return to the past.
- Take the PIECE OF SCHEME 5/8 (N) in the upper left.
- Take the TETRAVEX 3/8 (O) on the right side of the back wall.
- Take LILY’S PART OF COAT OF ARMS 3/5 (#) in the lower right.
- Use your PERCEPTION ABILITY in the dark place on the broken sphere; take FLOWER 1/2 (P).
- Take FLOWER 2/2 (Q) on the edge of the desk.
- Zoom into the flowerpot by the window; place 2 FLOWERS in the incomplete bouquet (R).
- Grab the BUTTERFLY 2/3 (S) that flies next to the window with the BUTTERFLY NET.
- Place the SPEED ABILITY on the chrysalis in the lower right; use the BUTTERFLY NET to catch BUTTERFLY 3/3 (T).
- Use the BUTTERFLY NET to catch the SECOND FLOOR KEY 5/5 (U) in the upper left corner.
- This location has been completed.
- Return to the present.
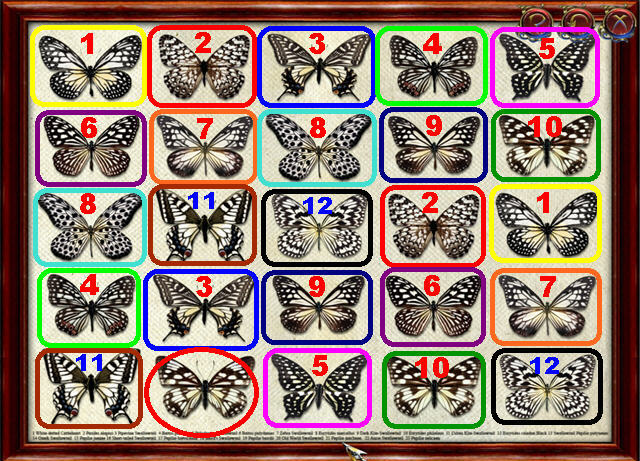
- Zoom into the butterfly collection on the back wall; place the 3 BUTTERFLIES on the board to activate the puzzle.
- Click on 2 matching butterflies to eliminate them from the board.
- Please look at the screenshot for the solution (V).
- Take LILY’S PART OF COAT OF ARMS 4/5 (#) on the butterfly board.
- Go to the portrait gallery.
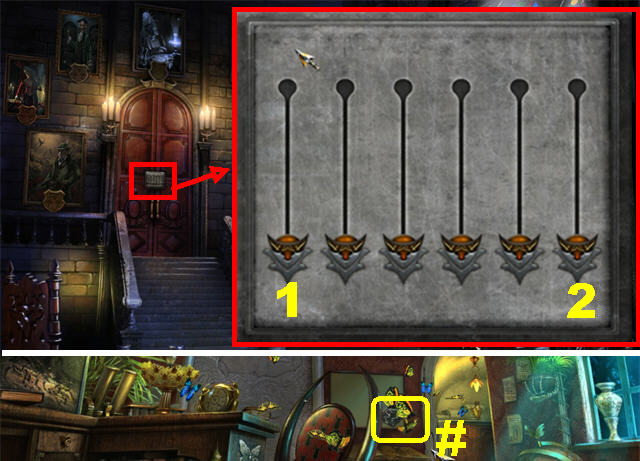
- Zoom into the door above the steps; place the 5 SECOND FLOOR KEY PARTS on the door to activate the puzzle.
- To solve the puzzle, click on the first and last keys.
- Go through the door.
- Take the LENS (W) in the lower right.
- Take the TETRAVEX 4/8 (X) in the lower left.
- Take the WAX MOULD (Y) on the left.
- Go to the kitchen.
- Place the CAULDRON on the hook in the fireplace (Z).
- Place the DRY TWIGS below the cauldron.
- Place the MATCHES on the dry twigs.
- Place the WAX MOULD into the cauldron.
- Place the FIRE POKER on the cauldron to get it out of the fireplace.
- Take LILY’S PART OF COAT OF ARMS 5/5 (#) on the ground.
- This location has been completed!
- Go to the portrait gallery.
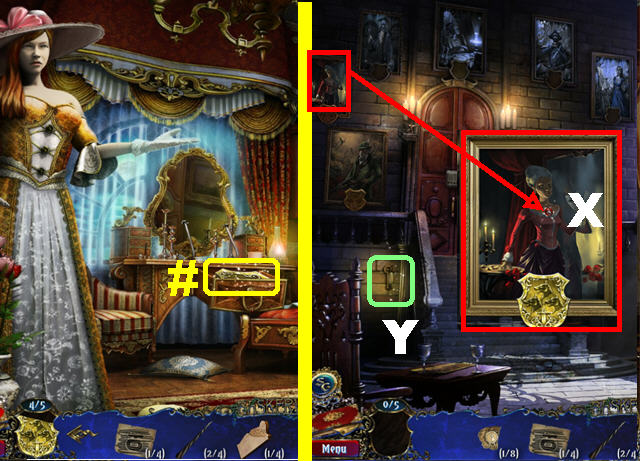
- Zoom into Lily Baskerville’s portrait on the left; place the LILY COAT OF ARMS on the bottom of the portrait.
- Take the MATERIALIZATION JEWEL (1) from the portrait.
Chapter 5: Edward Baskerville
- Return to the second floor.
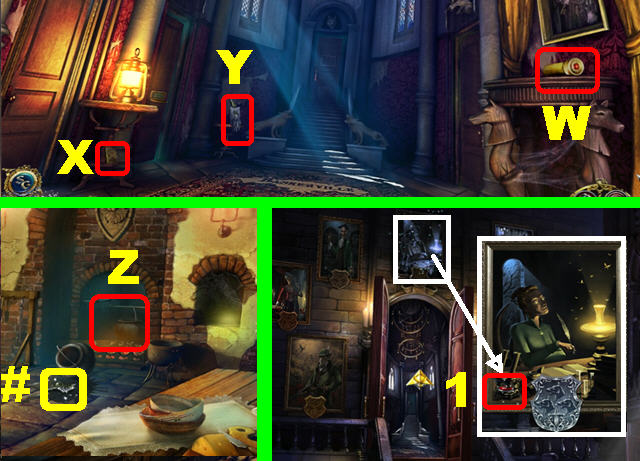
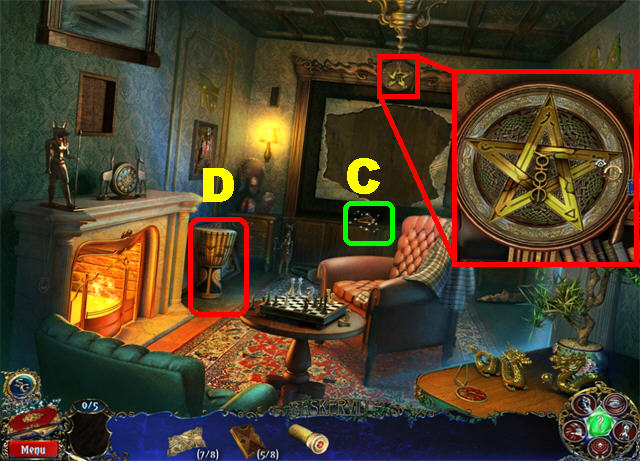
- Use the MATERIALIZATION ABILITY on the picture in the upper right; take HENRY’S KEY, highlighted in green.
- Place HENRY’S KEY on Henry’s door, on the right, to go inside.
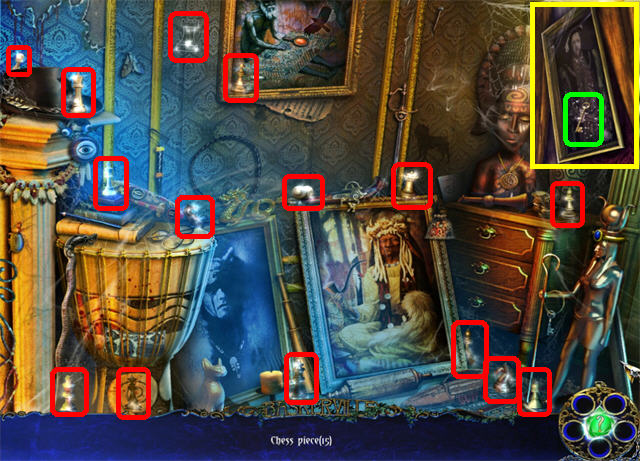
- Click on the drum to trigger a search scene; find the 15 CHESS PIECES.
- The CHESS PIECE will be added to inventory.
- Place the CHESS PIECE on the chessboard to activate the puzzle.
- Use the arrows to move all the chess pieces to their matching silhouettes.
- You must complete 3 rounds of this puzzle.
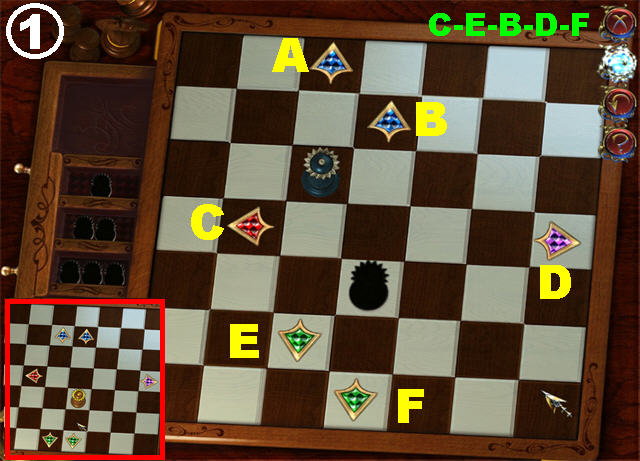
- This solution is for round one: C, E, B, D, and F.

- This solution is for round two: C, D, I, F, I, D, F, C, and D.
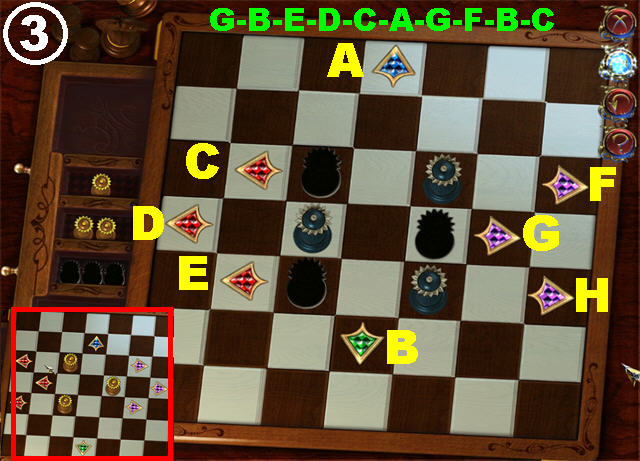
- This solution is for round three: G, B, E, D, C, A, G, F, B, and C.

- Take the STRANGE SIGN 3/4 (A) on the left side of the wall after the puzzle has been completed.
- Take the STRANGE SIGN 4/4 (B) below the chair.
- Take the PIECE OF COAT OF ARMS 1/5 (#) on the right side of the ground.
- Take the PIECE OF COAT OF ARMS 2/5 (#) on the left side of the ground.
- Grab CUBE 1/2 (C) in the lower right.
- Exit this room.
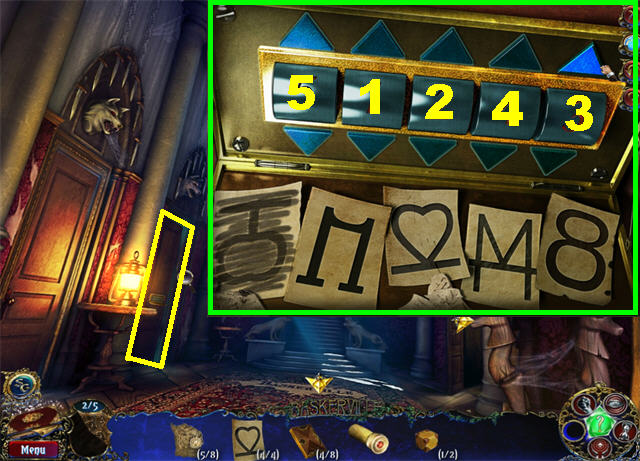
- Zoom into Edward’s door on the left; place the 4 STRANGE SIGNS on the lock to activate the puzzle.
- Solve the riddle and enter the code into the puzzle using the blue arrows.
- The symbols are mirror images for numbers. The solution is: “51243.”
- Go into Edward’s Room.
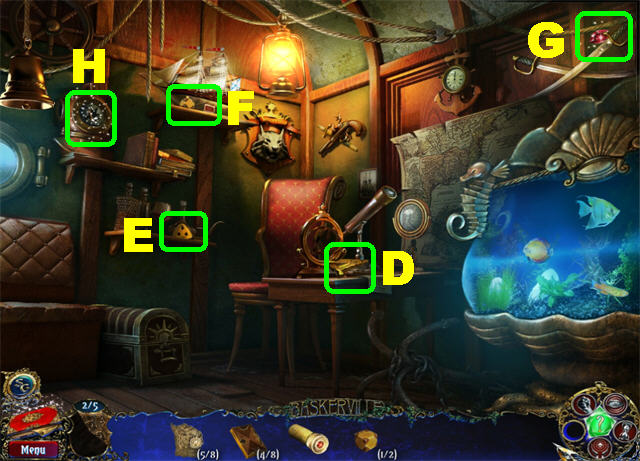
- Take the PENTAGRAM PART 1/3 (D) on the table.
- Take the WOOD PIECE 1/3 (E) on the left shelf.
- Take CUBE 2/2 (F) in the upper left, by the ship.
- Place the PERCEPTION ABILITY on the dark place in the upper right; take CRYSTAL EYE 1/2 (G).
- Use the STRENGTH ABILITY to break the glass on the diving helmet in the upper left; take ELIZABETH’S ROOM KEY (H).
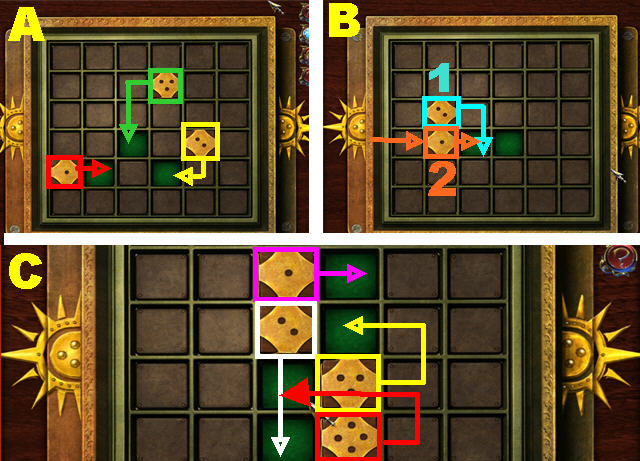
- Zoom into the chest in the lower left; place the 2 CUBES on the board to activate a puzzle.
- Drag the dice to one of the green spots using the same number of steps as the numbers on each die.
- The screenshot has solutions for all 3 rounds.
- Take the CRYSTAL EYE 2/2 inside the chest after the puzzle has been solved.
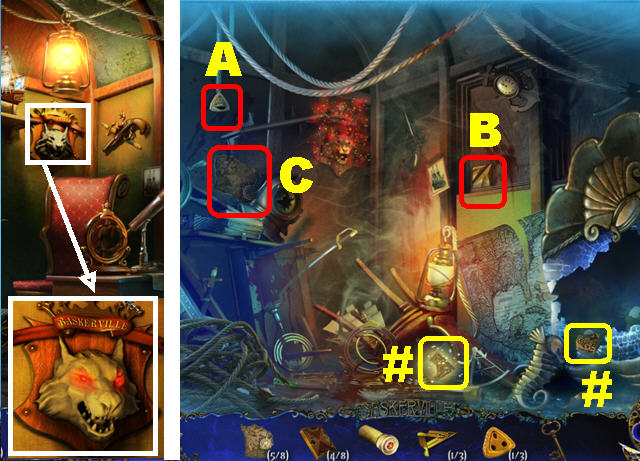
- Zoom into the wolf.
- Place the 2 CRYSTAL EYES on the wolf and go to the past.
- Use the PERCEPTION ABILITY in the dark place in the lower center; take EDWARD’S PIECE OF COAT OF ARMS 3/5 (#).
- Take EDWARD’S PIECE OF COAT OF ARMS 4/5 (#) in the lower right.
- Grab the WOOD PIECE 2/3 (A) in the upper left.
- Take CHARLES’ DOOR KEY PART 1 /2 (B) in the upper right.
- Take the PIECE OF SCHEME 6/8 (C) on the left.
- Return to the present.
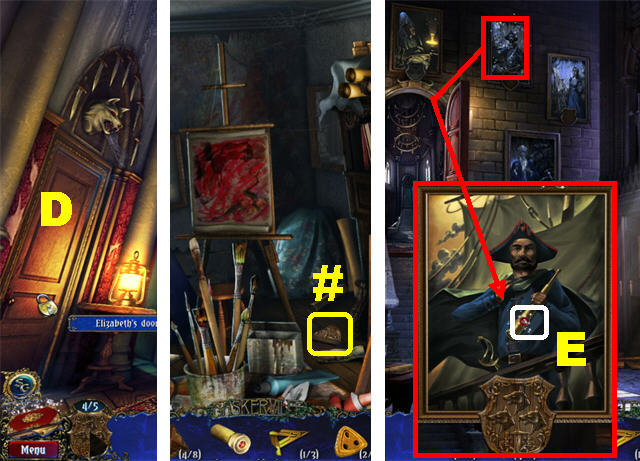
- Go to the second floor hallway.
- Place ELIZABETH’S ROOM KEY on the door marked “Elizabeth’s door” (D).
- Take the PIECE OF COAT OF ARMS 5/5 (#) in the lower center.
- Go to the portrait gallery.
- Zoom into Edward Baskerville’s portrait in the upper center; place EDWARD’S COAT OF ARMS on the bottom of the portrait.
- Take the TELEKINESIS GEM (E) on the portrait.
Chapter 6: Elizabeth Baskerville
- Return to Elizabeth’s Room.
- Click on the top part of the bookcase to trigger a search scene.
- The SPONGE (A) will be added to inventory.
- Use the MATERIALIZATION ABILITY on the PENTAGRAM DRAWING on the side of the bookcase; take the PENTAGRAM PART 2/3 (B).
- Take the BRUSH (C) in the lower center.
- Take WOOD PIECE 3/3 (D) in the lower left.
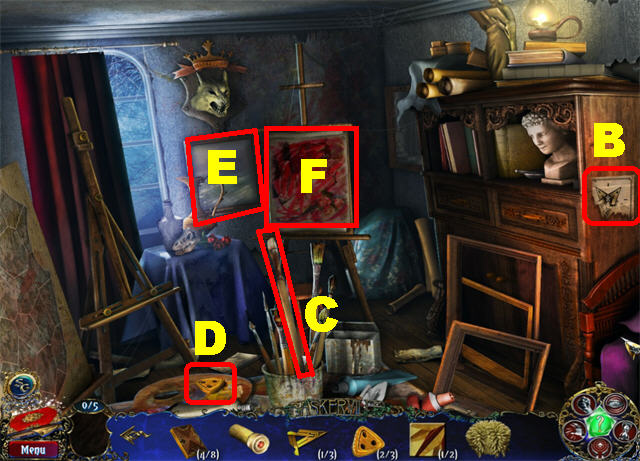
- Use the MATERIALIZATION ABILITY on the seascape by the window (E).
- Place the SPONGE on the salt water that appeared on the seascape painting to create the WET SPONGE.
- Place the WET SPONGE on the damaged painting (F) to trigger a puzzle.
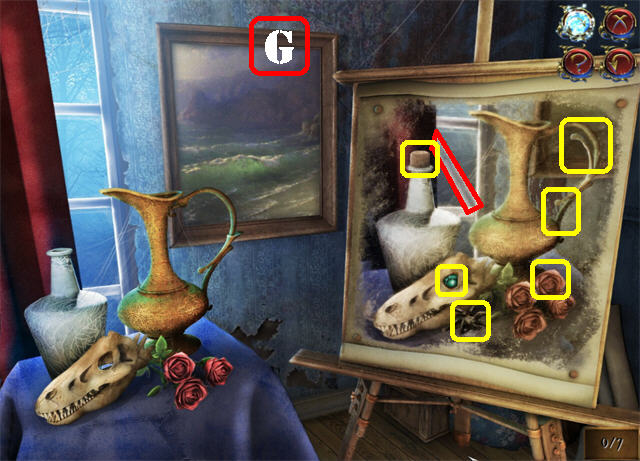
- Clean the painting and then find the 7 differences between the two images.
- Click and drag the sponge all over the painting until the sponge disappears.
- The small counter in the lower right will let you know how many differences you’ve found.
- Please look at the screenshot for all the differences (G).
- The CRYSTAL EYE 1/2 will be added to inventory.
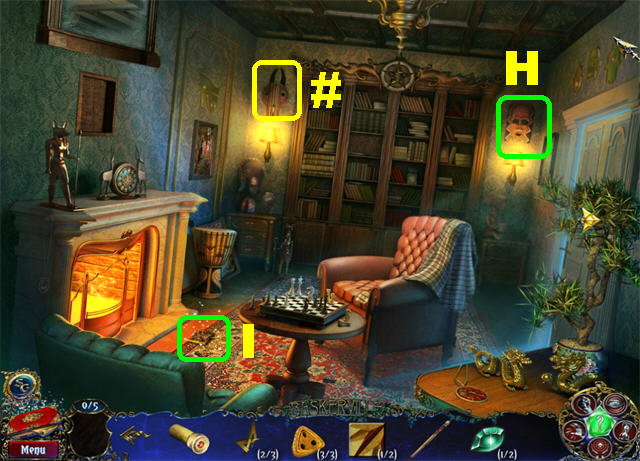
- Go to Henry’s room.
- Use the TELEKINESIS ABILITY on the mask in the upper right; take CRYSTAL EYE 2/2 behind the mask (H).
- Use the TELEKINESIS ABILITY on the mask in the upper left; take ELIZBETH’S PIECE OF COAT OF ARMS 1/5 behind the mask (#).
- Use the TELEKINESIS ABILITY in the fireplace; take the TETRAVEX 5/8 (I) after the fireplace spits it out.
- Go to Elizabeth’s room.

- Zoom into the wolf’s head.
- Place the 2 CRYSTAL EYES on the wolf and go to the past.
- Take the PALETTE on the right (J).
- Take the PIECE OF SCHEME 7/8 (K) from the painting.
- Take ELIZABETH’S PIECE OF COAT OF ARMS 2/5 (#) in the lower left.
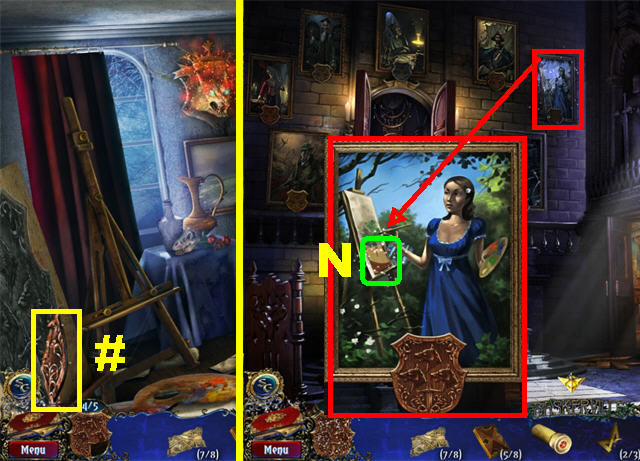
- Use the MATERIALIZATION ABILITY on the unfinished picture; take ELIZABETH’S PIECE OF COAT OF ARMS 3/5 on the picture (#).
- Use the PERCEPTION ABILITY on the dark corner in the upper right; take ELIZABETH’S PIECE OF COAT OF ARMS 4/5 (#).
- Return to the present.
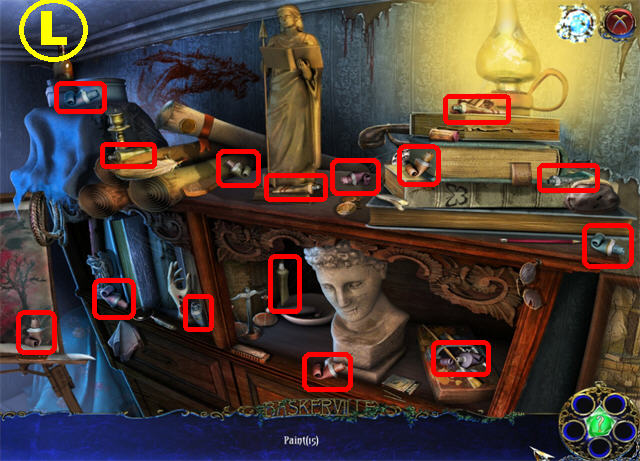
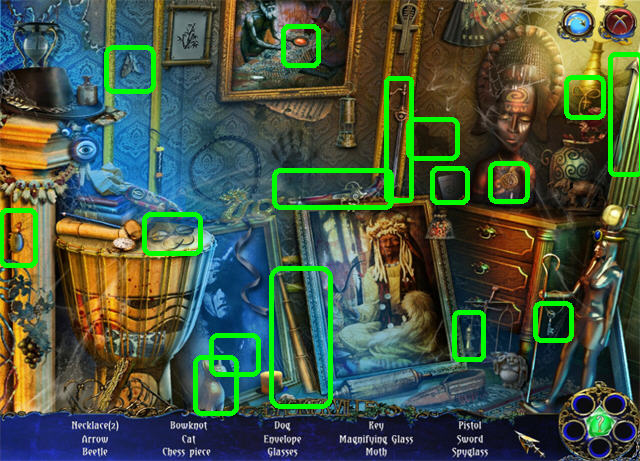
- Zoom into the shelf on the right to trigger a search; find the 15 paints.
- The PAINT (L) will be added to inventory.
- Zoom into the unfinished painting in the lower left.
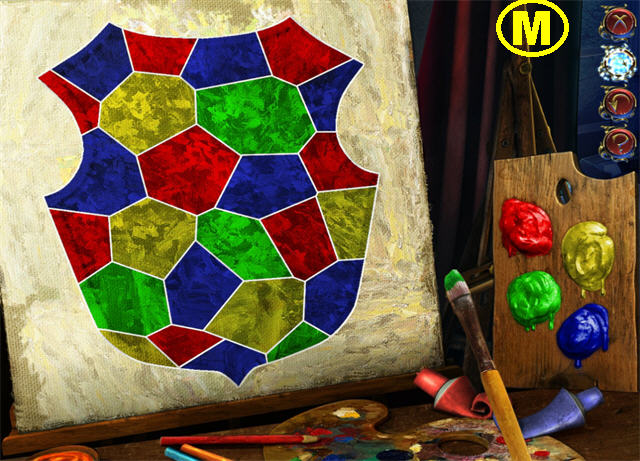
- Place the PALETTE, PAINTS, and BRUSH on the painting to activate a puzzle.
- Use the 4 colors on the palette to fill in the empty spots on the painting so that no like colors are next to one another.
- Dip the brush into the desired color and place it on the canvas in as many spots as you like without having to re-dip the brush.
- Click on a different color with the brush to load the brush with that color.
- Please look at the screenshot for the solution (M).
- Take ELIZABETH’S PIECE OF COAT OF ARMS 5/5 (#) after the puzzle has been solved.
- Go to the portrait gallery.
- Zoom into Elizabeth Baskerville’s portrait on the upper right; place ELIZABETH’S COAT OF ARMS at the bottom of the portrait.
- Take CHARLES’ DOOR KEY PART 2/2 (N) from the portrait.
Chapter 7: Charles Baskerville
- Go to Edward’s past room.
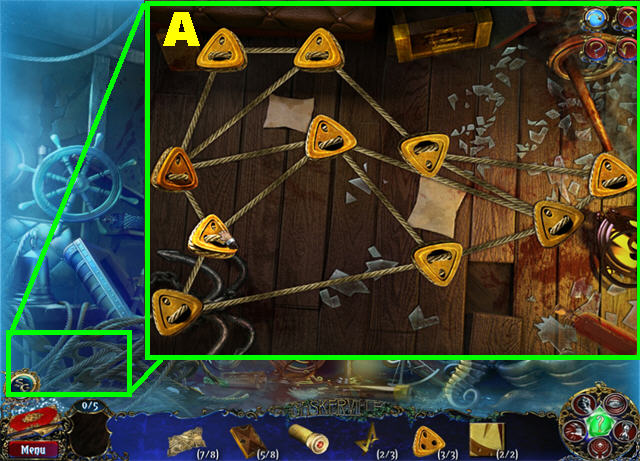
- Zoom into the net in the lower left; place the 3 WOOD PIECES onto the puzzle to activate it.
- Untangle the ropes. Brown ropes are untangled; red ropes are not.
- Please look at the screenshot for a solution (A).
- Zoom into the lower left corner to activate a search scene.
- The PENTAGRAM PART 3/3 (B) will be added to inventory.
- Return to the present.
- Edward’s past and present rooms have been completed!
- Go to Henry’s room.
- Zoom into the pentagram in the upper center; place the 3 PENTAGRAM PARTS in the empty slots to reveal the ceremonial scheme.
- Take the TETRAVEX 6/8 (C) below the ceremonial scheme.
- Click on the drum to activate a search scene (D).
- STAIR BOARD 1/2 will be added to inventory.
- Go to the hallway.
- Zoom into Charles’s door in the back; place the 2 CHARLES’ DOOR KEY PARTS in the empty slots to activate the puzzle.
- The best way to solve the puzzle is by starting at the top and working your way down.
- Hovering your cursor over the tiles will darken the ones that will be moved.
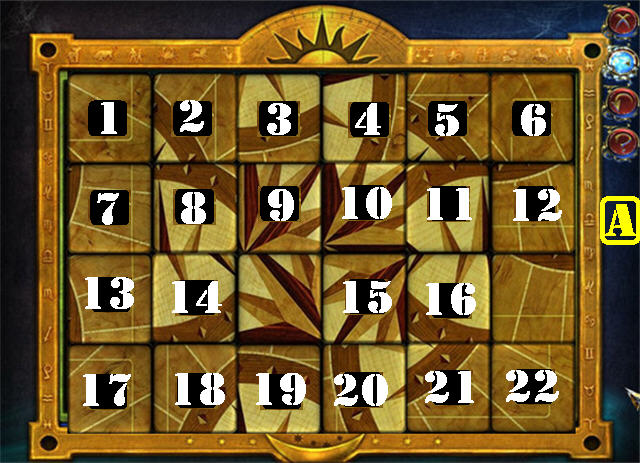
- The first number in the solution (A) corresponds to the tile number and the second number corresponds to the amount of times you need to turn it.
- To solve the puzzle, please click on the tiles in the following order:
- 1 x2, 3 x1, 4 x1, 5 x1, 6 x2, 1 x2, 4 x2, 2 x2 .
- 5 x2, 15 x1, 13 x2, 15 x2, 14 x2, 16 x2, 17 x2 .
- 19 x3, 20 x3, 22 x3, 17 x2, 20 x2, 18 x2, 21 x2.
- 9 x2, 3 x2, 19 x2, 10 x3, 4 x1, 20 x1, 11 x3.
- 5 x1, 21 x1 -12 x1, 6 x3, 22 x3, 1 x3, 4 x3- 17 x3.
- 20 x3, 7 x1, 10 x1 , 8 x3, 11 x3, 2 x1, 5 x1, 18 x1, 21 x1.
- This screenshot (B) shows you the final image for the puzzle.
- Take STAIR BOARD 2/2 (E) in the lower left.
- Take CHARLES’ PIECE OF COAT OF ARMS 1/5 (#) in the lower center.
- Use the MATERIALIZATION ABILITY on the Mars representation by the door; take MARS (F).
- Use the STRENGTH ABILITY on the stone planet in the upper right; take CRYSTAL EYE 1/2 (G).
- Use the PERCEPTION ABILITY in the dark place below the bed; take the TETRAVEX 7/8 (H).
- Place the 2 STAIR BOARDS on the broken steps in the upper left to reach Charles’ observatory (I).
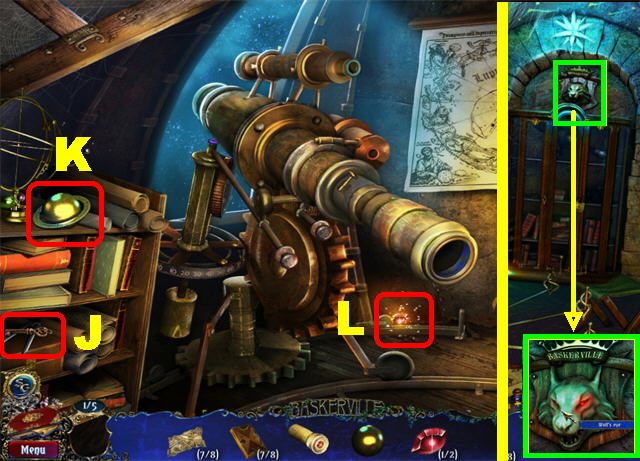
- Take the PADLOCK KEY (J) in the lower left.
- Grab SATURN (K) on the left.
- Use the PERCEPTION ABILITY in the dark place in the lower center; take the CRYSTAL EYE 2/2 (L).
- Go to Charles’ room.
- Zoom into the wolf’s head.
- Place the 2 CRYSTAL EYES on the wolf and go to the past.

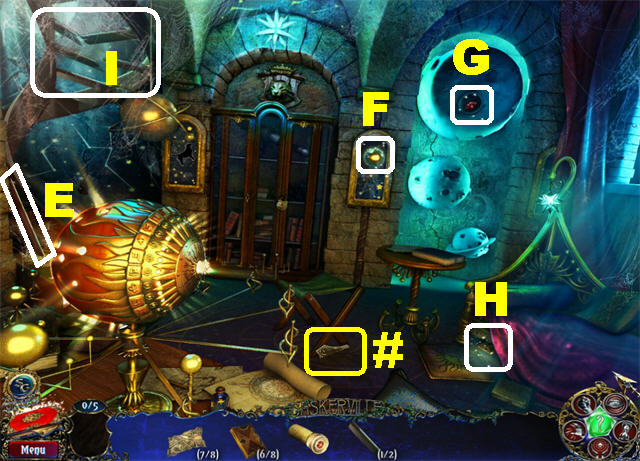
- Click in the lower right to trigger a search scene.
- The OCULAR (M) will be added to inventory.
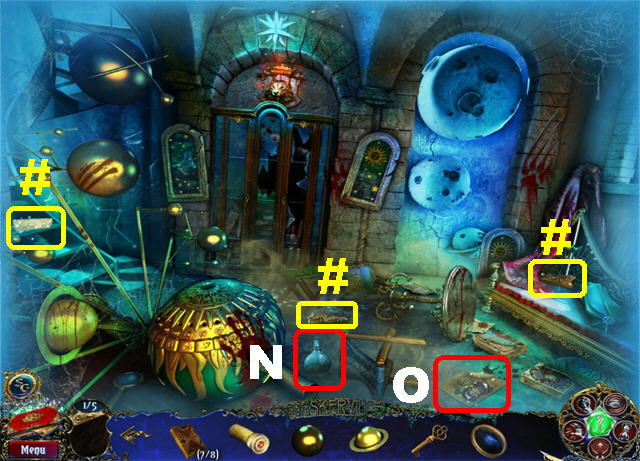
- Grab the JAR (N) in the lower center.
- Use the MATERIALIZATION ABILITY on the telescope scheme in the lower right; take the TELESCOPE FOCUSER (O).
- Take CHARLES’ PIECE OF COAT OF ARMS 2/5 (#) in the lower center.
- Take CHARLES’ PIECE OF COAT OF ARMS 3/5 (#) in the lower right.
- Use the PERCEPTION ABILITY in the dark place in the lower left; take CHARLES’ PIECE OF COAT OF ARMS 4/5 (#).
- This location has been completed!
- Return to the present.
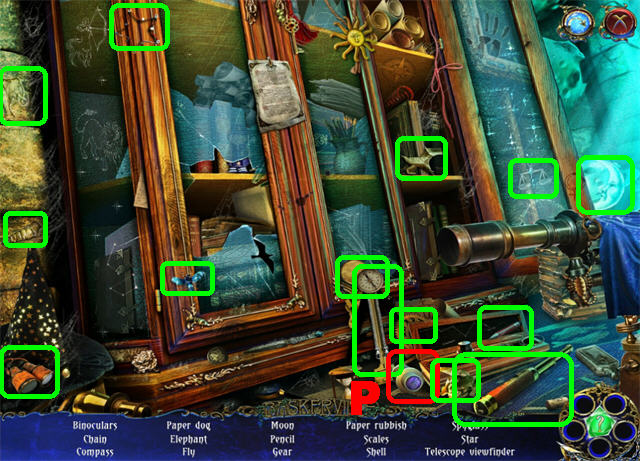
- Place the PADLOCK KEY on the cabinet in the back of the room; click on the cabinet to trigger a search scene.
- The TELESCOPE VIEWFINDER (P) will be added to inventory.
- Go to Elizabeth’s past room.
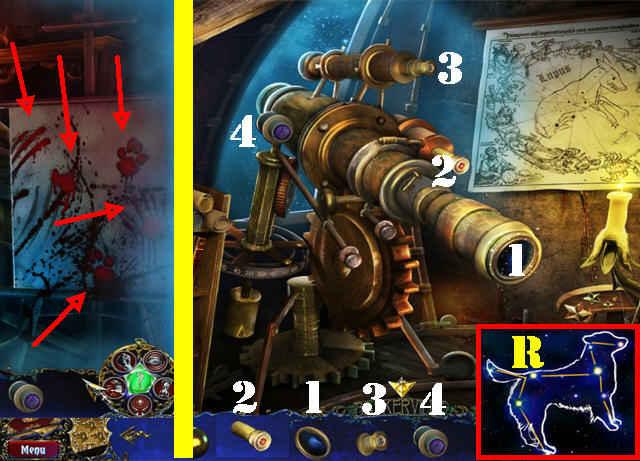
- Use the MATERIALIZATION ABILITY (Q) on the large painting.
- Place the JAR on the painting’s 5 sections tainted with blood to create the JAR WITH BLOOD (red arrows).
- Elizabeth’s past and present rooms have been completed!
- Go to Charles’ observatory.
- Place the OCULAR at the end of the telescope (1).
- Put the LENS in the “place for lens” on the telescope (2).
- The TELESCOPE FOCUSER belongs on the “place for focuser” (3).
- Put the TELESCOPE VIEWFINDER on the “place for viewfinder’’ (4).
- Click on the lens; use the PERCEPTION ABILITY on the constellation.
- Use the MATERIALIZATION ABILITY on the constellation to add the DOG SHAPE (R).
- This location has been completed!

- Go down to Charles’ room.
- Put the DOG SHAPE into Lupus’ constellation (S); take TETRAVEX 8/8.
- Go to Lily’s room.
- Zoom into the door to the garden in the back; place the 8 TETRAVEX pieces into the gears to activate the puzzle.
- Swap the tiles to complete the picture.
- The center piece is locked in place; use that as a guide.
- Please look at the screenshot for the solution (T).
- This location has been completed!
- You are now in the garden.
- Click below the arch to trigger a search scene.
- STONE 1/3 (U) will be added to inventory.
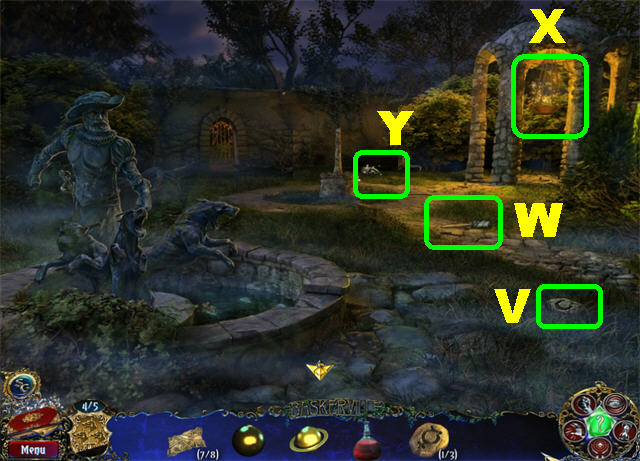
- Take STONE 2/3 (V) in the lower right.
- Grab the TORCH (W) by the arch.
- Place the TORCH on the brazier inside the arch to create the LIT TORCH (X).
- Put the LIT TORCH on the dry sticks above the sundial.
- Use the SPEED ABILITY on the flames; take STONE 3/3 (Y) behind the sundial.
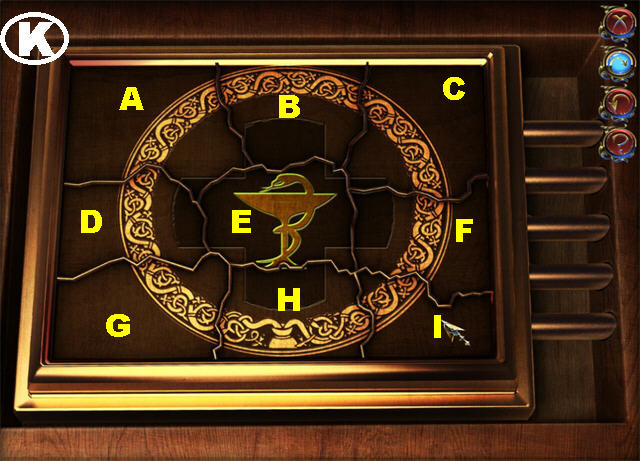
- Zoom into the sundial; place the 3 STONES in the empty slots to activate the puzzle.
- Duplicate the sequence of the lit stones.
- The first sequence is F, C, and D.
- The second sequence is B, A, D, and F.
- The third sequence is E, D, A, C, and F.
- The fourth sequence is E, B, D, A, F, and C.
- The fifth sequence is C, D, E, A, B, and F.
- Go through the gate on the left to access the Moor.
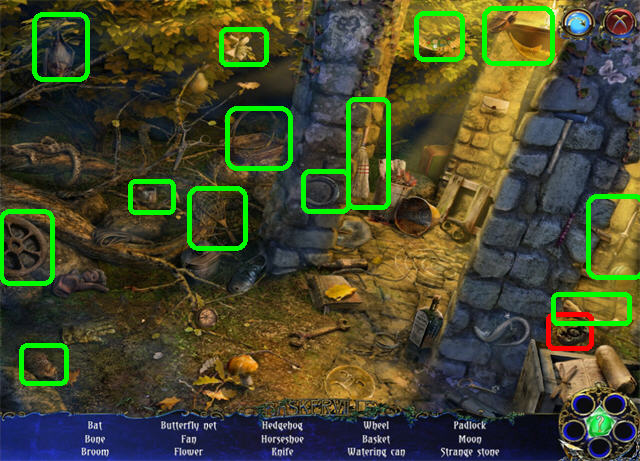
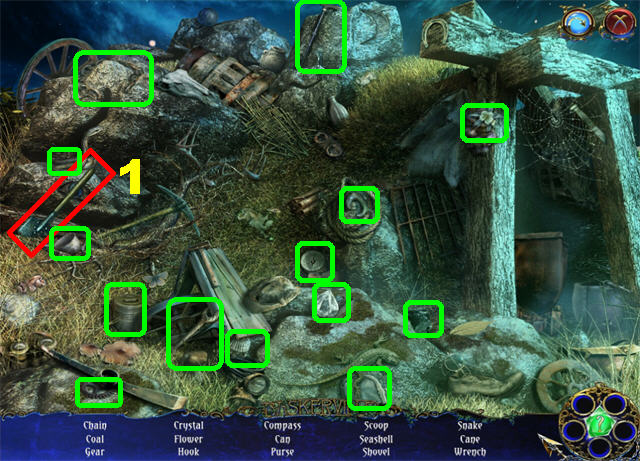
- Zoom into the upper left to access a search scene.
- The SHOVEL (1) will be added to inventory.
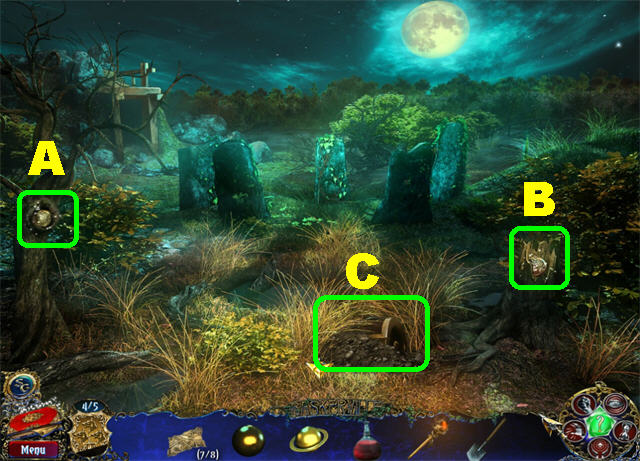
- Use the PERCEPTION ABILITY on the dark hollow on the left; take the METAL PLAQUE 1/3 (A).
- Use the STRENGTH ABILITY on the stump in the lower right; take the METAL PLAQUE 2/3 (B).
- Use the SHOVEL on the buried chest in the lower center to trigger a search scene in the garden (C).
- Click down to return to the garden.
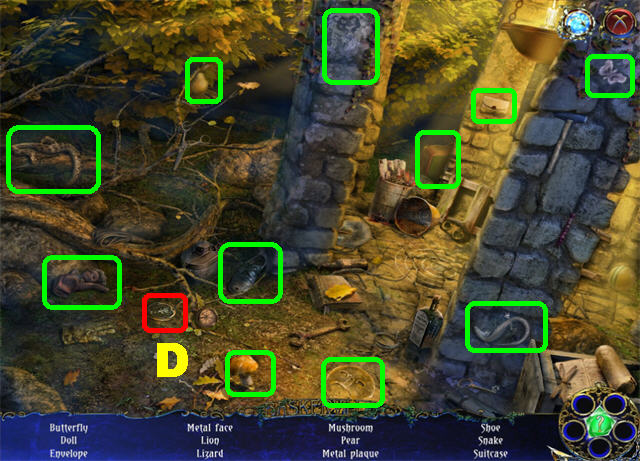
- Zoom into the arch in the back to trigger a search scene.
- The METAL PLAQUE 3/3 (D) will be added to inventory.
- This location has been completed!
- Return to the Moor.
- Place the 3 METAL PLAQUES on the empty slots above the chest.
- Take the MAP OF THE MINE inside the chest (E).
- Place the MAP OF THE MINE on the mine entrance (F).
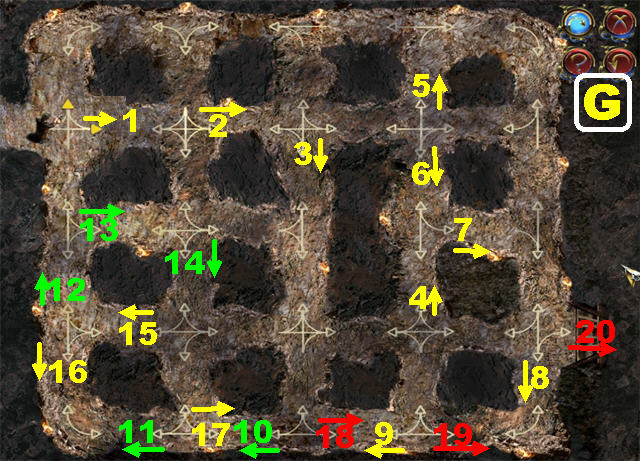
- Guide Sherlock to the mine’s exit in the lower right side.
- Please look at the screenshots for the solution (G).
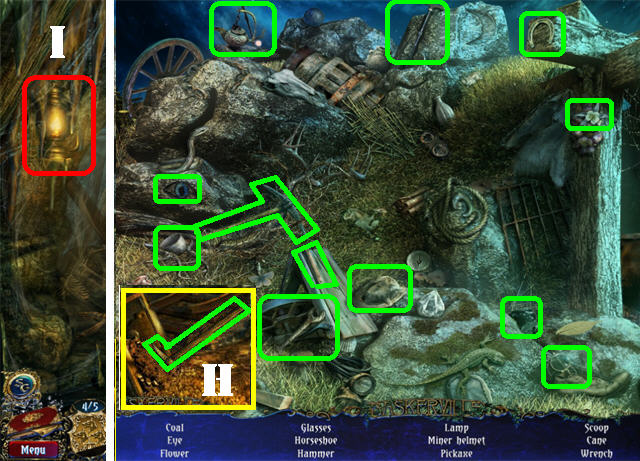
- Take the PICK (H) in the lower center.
- Use the PICK on the lamp (I) in the upper left.
- Go up to the Moor.
- Zoom into the upper left to trigger a search scene.
- The OILER (not pictured) will be added to inventory.
- Return to the mine.
- Place the OILER on the lamp (I) in the upper left.
- Put the LIT TORCH on the lamp.
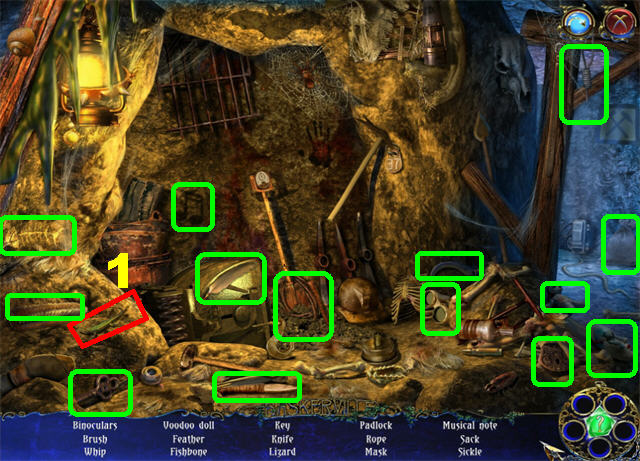
- Click in the lower right corner to activate a search scene.
- The LIZARD (1) will be added to inventory.
- Give the LIZARD to the bat in the upper right (2).
- Take CHARLES’ PIECE OF COAT OF ARMS 5/5 (#) which falls in the lower left side.
- The mine location has been completed!
- Go to the portrait gallery.
- Zoom into Charles Baskerville’s portrait in the upper right; place CHARLES’ COAT OF ARMS at the bottom of the portrait.
- Take the PIECE OF SCHEME 8/8 from the portrait (3).
- The portrait gallery has been completed!
- Go to Henry’s room.
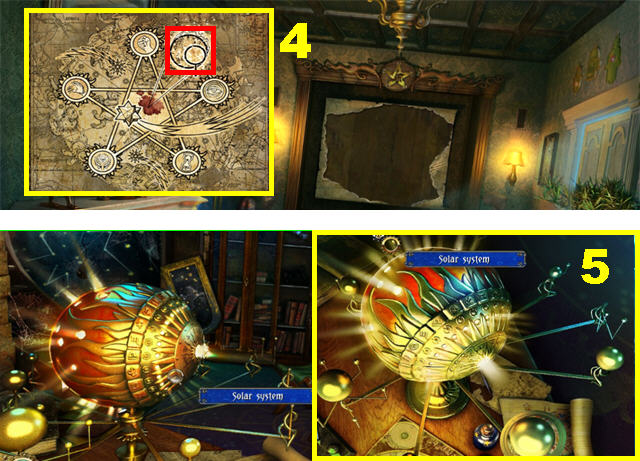
- Zoom into the ceremonial scheme on the back wall; place the 8 SCHEME PARTS in the empty sections.
- Use the MATERIALIZATION ABILITY on the Venus drawing; take VENUS (4).
- Henry’s room location has been completed.
- Go to Charles’s room.
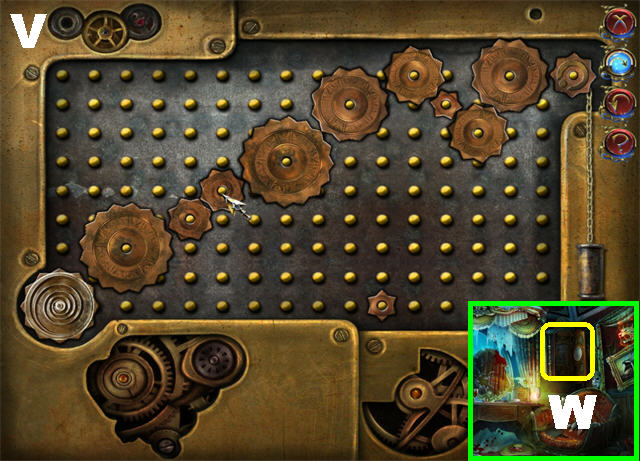
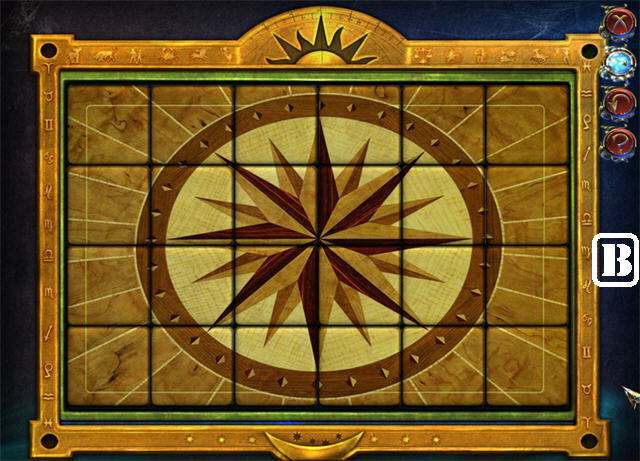
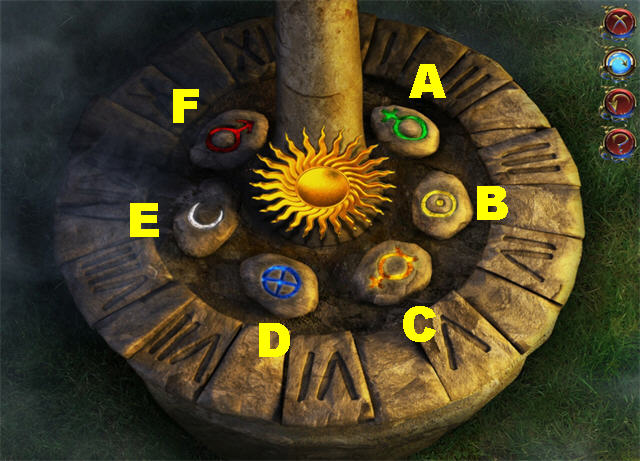
- Zoom into the solar system on the left (5); place VENUS, MARS, and SATURN on the “places for planets” to trigger a puzzle.
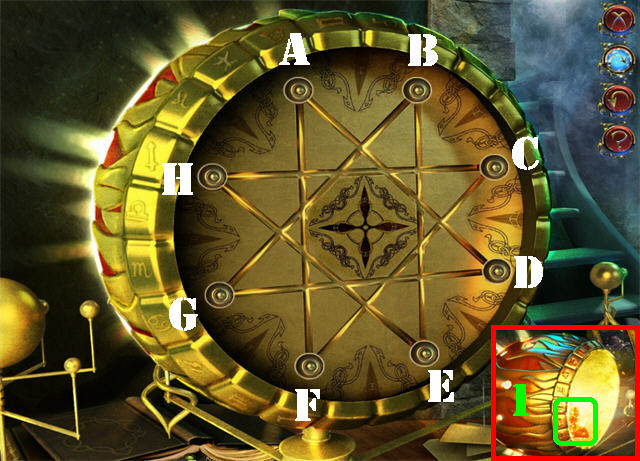
- Fill the rays with the dots.
- Click on each dot to light up two possible routes, choose the right moves to light up all the rays.
- The solution is as follows:
- Light B, click on G.
- Light A, click on D.
- Light E, click on B.
- Light F, click on A.
- Light C, click on F.
- Light H, click on E.
- Light C, click on H.
- Click C to complete puzzle.
- Take the METEORITE on the left after the puzzle has been solved (1).
- Charles’ room has been completed!
- Go to the Moor.
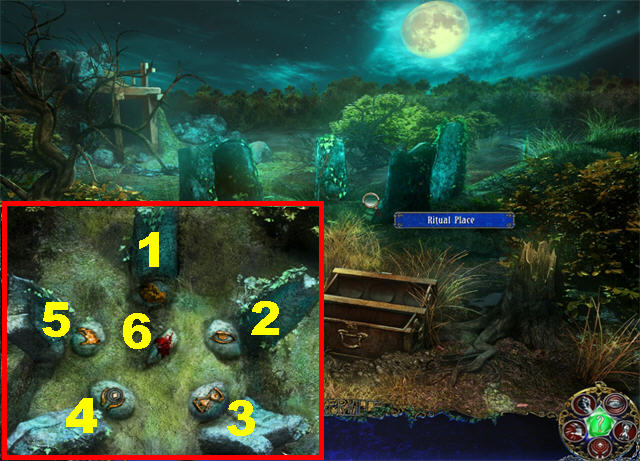
- Zoom into the ritual place.
- Put the STRENGTH ABILITY on the strength slot (1).
- Put the PERCEPTION ABILITY on the perception slot (2).
- Put the SPEED ABILITY on the speed slot (3).
- Put the MATERIALIZATION ABILITY on the materialization slot (4).
- Put the TELEKINESIS ABILITY on the telekinesis slot (5).
- Place the JAR WITH BLOOD and the METEORITE into the meteorite and jar with blood slot (6).
- Congratulations! You’ve completed Sherlock Holmes: The Hound of the Baskervilles!
Created at: 2010-12-11