Scientific Method Worksheets: Free and For All Ages!

Need some scientific method worksheets for your kids?
Wouldn’t hurt if they were free and easy to print?
I got you, Homeschool Mama!
At the bottom of this post you will find 7 Scientific Method Worksheets in a free printable pack! And they can be used for early elementary students to about 7th grade.
They will easily slide into any lesson plan as you teach the scientific method steps!
The 7 Steps Of The Scientific Method

There seem to be several variations out there, but let’s pause and nail down the basics of the scientific method.
Here is a quick review if you need a brush-up:
1. Make An Observation

The first step is to look at the world around you. What do you notice? What interests you? What are you curious about?
Things outside? In the kitchen?
What do you not understand or have questions about? What would you like to know more about?
Example: My mom waters her flowers every day, but she doesn’t water the grass. But the grass and flowers look to be equally healthy.
2. Ask A Question

Work with your young scientists to develop a question from their observations.
Example: Do flowers really need to be watered more than the rain that waters the grass? Is my mom just wasting her time?
****Some science curriculum will teach that you should have a step of research at this point in the scientific method. Feel free to do that with older kids to look up background information and enrich your experiment. Younger kids may feel that this step stifles their curiosity or slows down their science learning energy.
3. Come Up With A Hypothesis (Prediction)
Help your student to make a hypothesis (kids usually love saying this word!) about what they think is the answer to their question.
Depending on the age of the child, tell them it is an educated guess or a prediction.
Example: I predict that the flowers will do just fine without extra water from my mom.
4. Test The Prediction (Do An Experiment!)

Obviously, this is the fun part of science.
Kids get to put the books and pencils aside and start building their own science experiments!
Your students will likely need help with their experimental design. Definitely dig in and help them figure out the best way to test their hypothesis.
For older kids, you might introduce the concepts of independent variables and control group vs. experimental group.
Example: I stop watering the flowers for 1 month while keeping a daily photographic record of the flowers and grass’ health/appearance.
I also keep a data table to monitor rainfall and temperature.
As a control group, I water only one flower regularly as my mother did.
5. Analyze Results

Now that the experiment is over, it’s time to sit down and do some data analysis.
Which is fancy science talk for looking closely at the results of your experiment. Are there any patterns or trends in your data collection?
Did anything unexpected happen? What did the experiment show you?
Example: All my flowers are turning brown, but the grass looks about the same. The charts and pictures during the experiment show me that it only took 3 days to start noticing wilting in the flowers. The flowers perked up after a rain, but they would start to wilt again a few days later. My control flower (that I watered regularly) looks as health as it did on day 1.
6. Compare Results To Your Hypothesis
Look at the results of your experiment and compare them to your prediction.
Was your hypothesis correct or incorrect?
Example: My hypothesis was incorrect. The flowers did not thrive on the same amount of water that the grass gets.
7. Make a Conclusion

At the end of the experiment, you must write out what you can conclude from your experiment. Older kids should be encouraged to follow up with further questions they have from the results of the experiment.
Example: I conclude that the grass in my yard does not need as much water as the flowers.
As a question for further study, I would like to know if this is only true of the type of flowers in my garden. Would other flowers respond the same way? Why do wild flowers seem so healthy without any human help?
7 Free Scientific Method Worksheets!
Now that we’ve brushed up on our knowledge of the scientific method, let’s dive into these worksheets!

This worksheet is actually a colorful poster displaying all the steps of the scientific method for your students!
I recommend printing it on cardstock or laminating it.
It’s the perfect thing to have displayed in your homeschool or science classes.

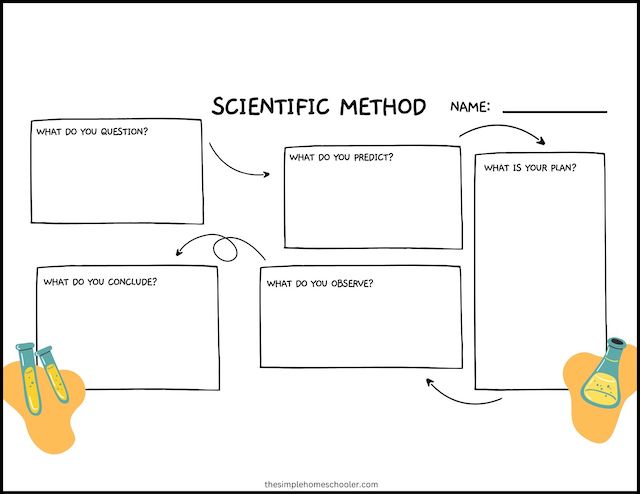
This is a follow-up student worksheet that matches the above poster.
The boxes help your student hit all of the most important steps as they work through their own experiments – without being too overwhelming.

I love this science worksheet for simple experiments with first grade and 2nd grade students.
Writing out or drawing every detail as they go along, may seem overwhelming.
This style of worksheet is a fun way of bringing the scientific method down to their level!
This worksheet option goes a step further.
It allows young students to walk through the steps of the scientific method by drawing pictures or writing small phrases.
This can be a great way to make science more approachable!

This worksheet is more appropriate for 3rd grade and up.
The steps are still slightly abbreviated, but the child is expected to write out sentences.

This worksheet is perfect for a more detailed and thorough approach.
The student has space for thinking through and writing out their experiment steps.
Science teachers can get a quick overview of how the student is doing.

This last worksheet is clearly for the older student, such as 5th grade and up.
Writing out full sentences and recording their work is more appropriate at this age.
The worksheet still provides the structure of showing each of the steps.
****This sheet does have a space for hypothesis and prediction. I left that for the older students because some lessons do teach them as separate things. The hypothesis is the answer to your question, and the prediction is what you think will happen in the experiment. Using my flower/grass experiment from earlier, let me give you an example. Hypothesis: Flowers do not need more water than grass. Prediction: The flowers and grass will look healthy after 1 month of only rainwater.
Click Here To Download Your Scientific Method Worksheet Packet!
You might be wondering why there wasn’t a “typical” worksheet in this post.
Such as a cut and paste, crossword, or match with an answer key.
The reason is that hands-on activities are the best way to teach the scientific method – not worksheets. Kids will learn science and *remember* it more when they get to DO it.
And as you know, that’s actually true of most things.
I hope these worksheets bless your students and you enjoy exploring the world around you!
Read Next: