Looking to become a Gmail power user?
Making use of productivity extensions or scrutinize Gmail for easily overlooked settings are the two easiest ways to supercharge your Gmail productivity.
In this ultimate guide, we’ll be looking at the later option.
Gmail settings are one of the most underrated (but powerful) tools. You’ll only see what you’re missing when you dig just a little bit deeper.
That said, here are some of the mind-blowing settings you didn’t know existed in Gmail.
But first…
Where are Gmail Settings?
Accessing your Gmail settings depends on the device you’re using. For basic settings, you can access them on your android phone by following the steps below.
Step 1: Click on the Gmail app on your android phone or a tablet.
Step 2: Tap the menu icon on the top left side of the screen.
Step 3: Scroll down to the settings icon and click General settings on the account you want to change.
Step 4: A pop-up page will then appear. Make your desired changes by following the instructions in each section.
Accessing Gmail settings on a computer is quite similar:
Step 1: Open your Gmail account on your computer and log in.
Step 2: Click Settings on the top-right side of your screen.
Step 3: Click “sell all settings.”
Step 4: Make any changes on each tab and click “save changes” at the bottom of the page.
What are Gmail POP Settings and SMTP Settings?
SMTP Settings
SMTP is an abbreviation for Simple Mail Transfer Protocol. It’s used to send emails from one server to another.
For example, you might want to use Gmail to send a message from an email service like Outlook or Thunderbird, which seems impossible.
For it to work, the service must understand how to communicate with a Gmail Server. It does this using the SMTP setting, similar to any email service provider you use with Gmail.
Default SMTP Settings for Gmail
If your email provider is asking for Gmail SMTP settings, below are Gmail’s default SMTP settings.
(Note that it only asks you this when setting up an email client to synchronize with your Gmail account).
- Gmail SMTP server address: smtp.gmail.com
- Gmail SMTP port (TLS): 587
- Gmail SMTP password: Your Gmail password
- Gmail SMTP port (SSL): 465
- Gmail SMTP username: Your Gmail address (for example, example@gmail.com)
- Gmail SMTP password: Your Gmail password
- Gmail SMTP TLS/SSL required: Yes
POP Settings
SMTP settings allow you to send emails to other email service providers. POP settings in Gmail do the opposite.
In short, it allows you to receive emails from email service providers like Outlook and any email client.
POP stands for Post Office Protocol. The latest version is POP3 which is what you see on your Gmail settings.
Here’s a step-by-step process on how to enable POP in your Gmail account.
Step 1: Open your Gmail account and click Settings on the top right corner of the screen. Then, click see all settings.
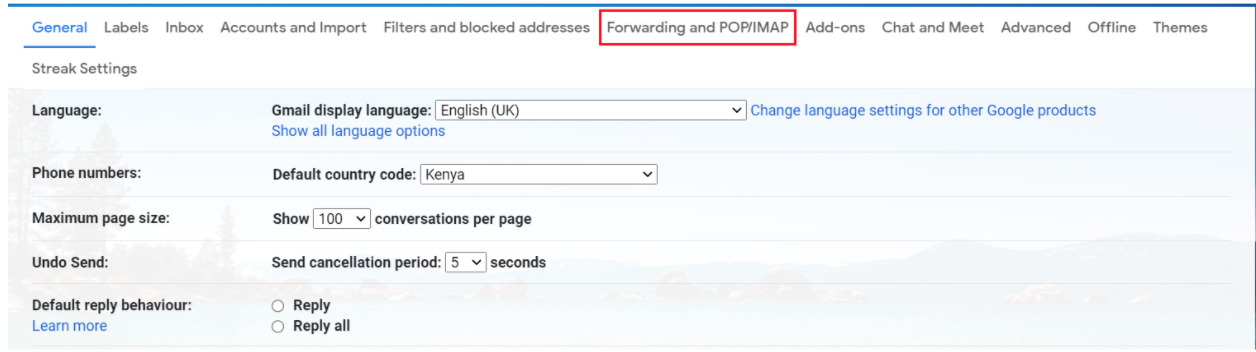
Step 2: The action opens up a screen with multiple setting options. Choose Forwarding and POP/IMAP tab.
Step 3: On the POP download tab, click Enable POP for all mail or Enable POP for mail that arrives from now on.
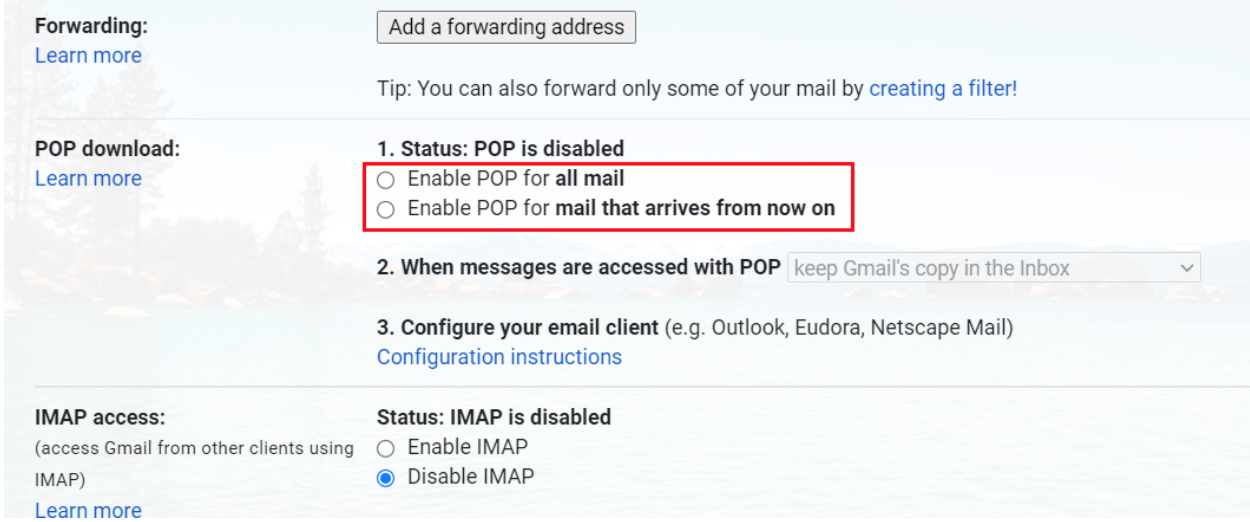
This process is important since it will enable you to download emails directly from a local device anytime.
How To Reset Gmail Account to Default Settings
If you thought Google is a spotless company, you’re mistaken.
Why so?
Gmail doesn’t have a “reset to default” button that can factory reset everything at once – a big letdown. But there are a couple of manual options to reset your Gmail account.
The common (and tiresome) way is tracking back all the settings you messed up with one by one. Spoiler alert – this will take ages.
If you can’t bear the time, there’s an easier solution, which puts your account at risk. This option is hard reset using Google Scripts.
Here’s an overview of what it does.
- Deletes all Draft messages
- Deletes all Gmail filters
- Deletes all email messages in Gmail
- Permanently empties your Gmail trash folder
- Removes Out-of-Office message
- Deletes all Gmail labels
- Deletes all spam messages
As hinted, the option is riskier because it’s irreversible. You can’t recover any of your Gmail data once the reset is complete.
How To Change Spam Settings In Gmail
Gmail spam filters settings get stronger by the day.
Thanks to AI, Gmail can now block over 100 million spam messages every day. While that’s good progress, It’s best if you change Gmail spam settings and tweak them to your liking.
There are so many things you can do here. I’ll just give you the most popular spam setting change – disabling your Gmail spam filter.
Step 1: Log in to your Gmail account and open the settings icon. Click see all settings.
Step 2: Choose the tab labelled Filters and blocked addresses.
Step 3: Since you want to create a new filter, click create a new filter.
Step 4: Type is:spam or includes the words option.
Step 5: Scroll down to the create filter with this search and click okay.
Step 6: You’ll be directed to another section. Choose the option to Never send to spam.
It means that you’ve overridden Google from deciding which email is spam and which one isn’t.
As said earlier, there are many changes that you need to make to change your Gmail spam settings.
Now that we’ve covered the basic elements of Gmail settings and what they are let’s dive into the Gmail settings you should be using day to day.
20 Gmail Settings You Should Know About
1. Undoing sent emails
Gmail doesn’t allow you to edit an email after hitting the send button.
But it gives you a small window to undo a message before the recipient opens it. Here’s how it works.
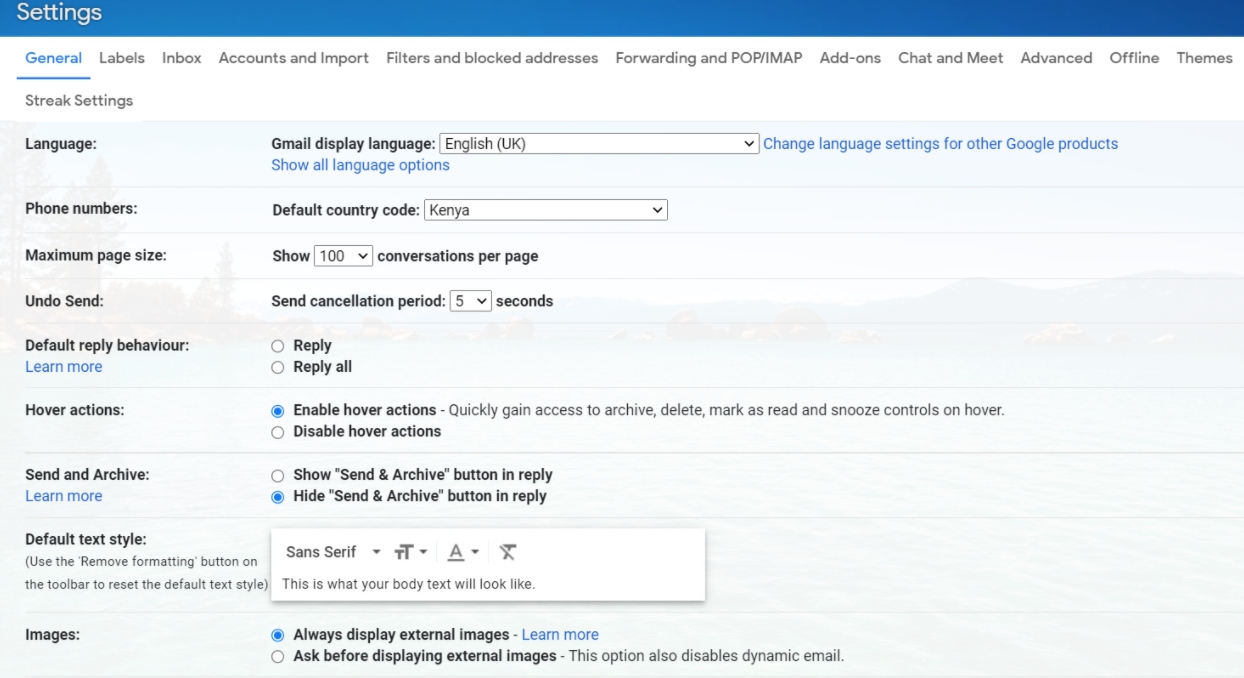
Go to Gmail settings and stop at the General tab. You’ll see an undo send icon, as shown in the screenshot.
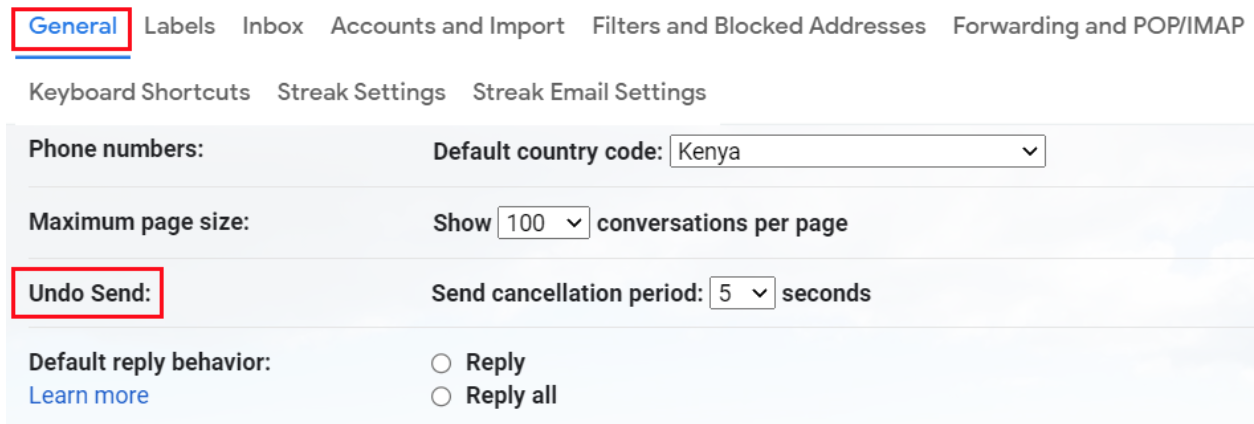
Next, click select a cancellation period which is between 5 to 30 seconds. Anytime you send an email, you’ll get an undo popup that will stay for the time you selected.
2. Changing Email Density
As the name hints, this setting allows you to change the density of emails you want to fit the screen.
The process is simple. First, click the settings icon. You’ll see three different density options to chose from:
- Default: Shows all emails with attachments
- Comfortable: Shows emails only. It doesn’t include attachments to create more space.
- Compact: Shrinks the comfortable view even further to create more space to show more emails.
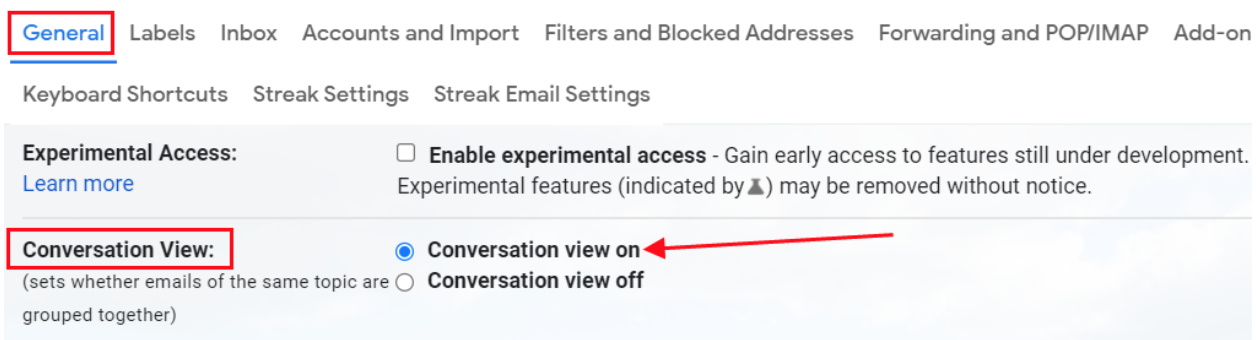
3. Enable/Disable Conversation View
By default, Gmail automatically enables the conversation view when you create a new Gmail account.
This is understandable since the setup is well organized. The conversation allows you to see the trend of a conversation on one thread.
However, some people don’t like this setup and would rather have their messages out in the open. Such users argue that it’s hard to find a single message when the thread is long.
Either way, you can choose any option based on your preference.
To enable or disable conversation settings, open settings and go to the general tab. Next, scroll down to the conversation view setting. You have the option of turning the conversations on or off.
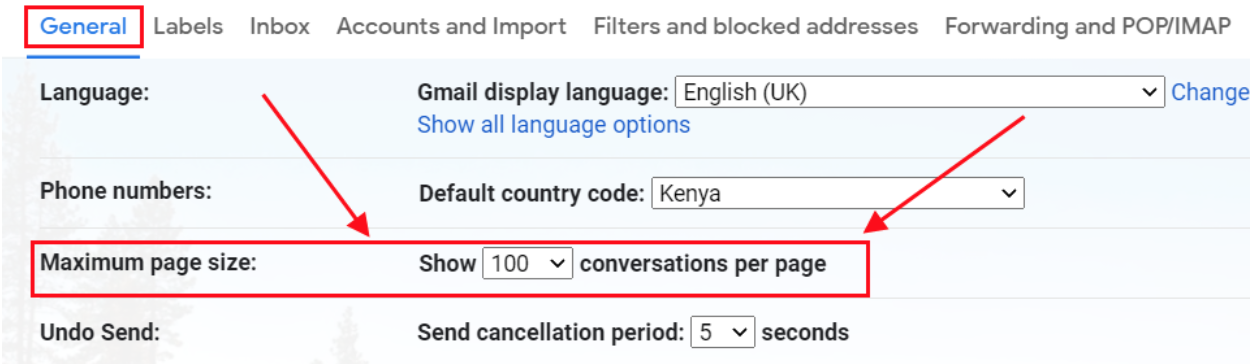
4. Setting Maximum Page Size
This setting aims to increase or decrease the number of emails per page.
For example, if you receive many emails per day, it’s only wise to increase the maximum page. You won’t need to keep skipping to the next page many times.
Here’s how it goes.
Click settings and go to the General tab. Choose the maximum page size and select the number of emails you want to appear per page.
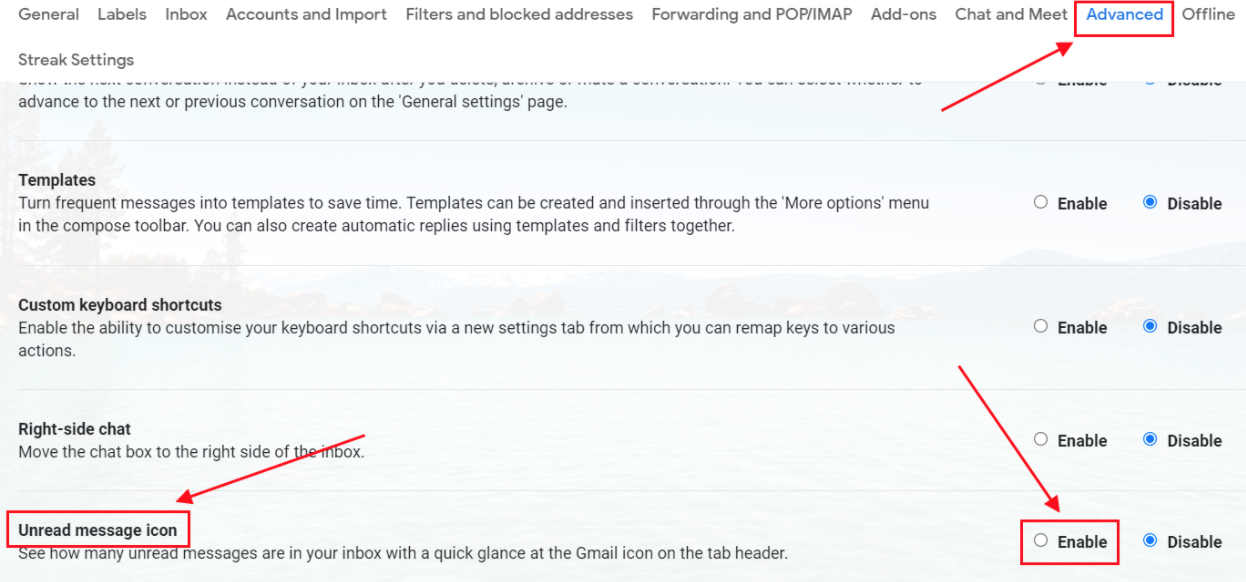
5. Getting Unread Messages Icon
This feature comes in handy when you keep your Gmail tab open for long. Plus, it’s useful when you need real-time updates on emails you haven’t read.
On your Gmail account, go to the settings section and choose the advanced tab. The unread message icon is the second last option on the list.
Click enable. This will allow you to see the unread email count at the top of Gmail. Also, note that it can keep the count to 100 emails only.
Additional Reading: How to Find Unread Emails in Gmail
6. Setting Own Default Snooze Times
While the Gmail snooze feature comes in handy, the default setting might not suit you: hence you need some customization.
What’s interesting is that you can’t change the default settings on Gmail.
You have to do the customization from Google Keep, Google’s note-taking app. Honestly, we still don’t know why Google hasn’t pushed this feature to Gmail yet.
Nevertheless, here’s how to do it.
Go to your Google account menu and open Google Keep (the white bulb inside a yellow box). Click Settings at the top right corner of the screen.
On the reminder defaults section, set your own time for morning, afternoon, and evening. Click save once done.
Finally, go back to your Gmail and snooze a message. You’ll see your new custom times on the default suggested option.
7. Keyboard Shortcuts
Gmail has powerful shortcuts that come in handy when you need to access something quickly.
Although it’s good to master these shortcuts, what’s even more powerful is customizing your own shortcuts for maximum productivity.
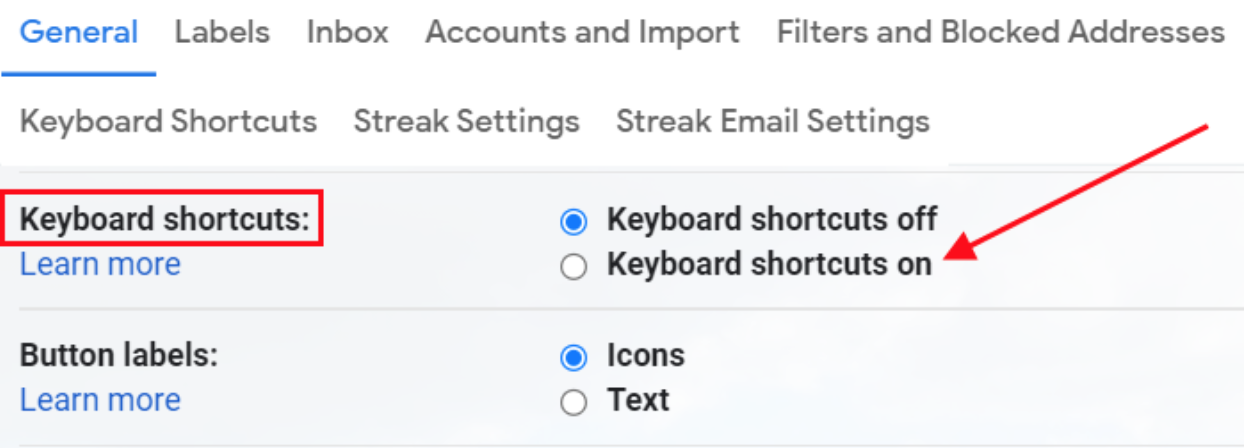
But before we go there, let’s first make sure keyboard shortcuts are enabled. On your computer, head to Settings and choose the general tab. Put the keyboard shortcuts on.
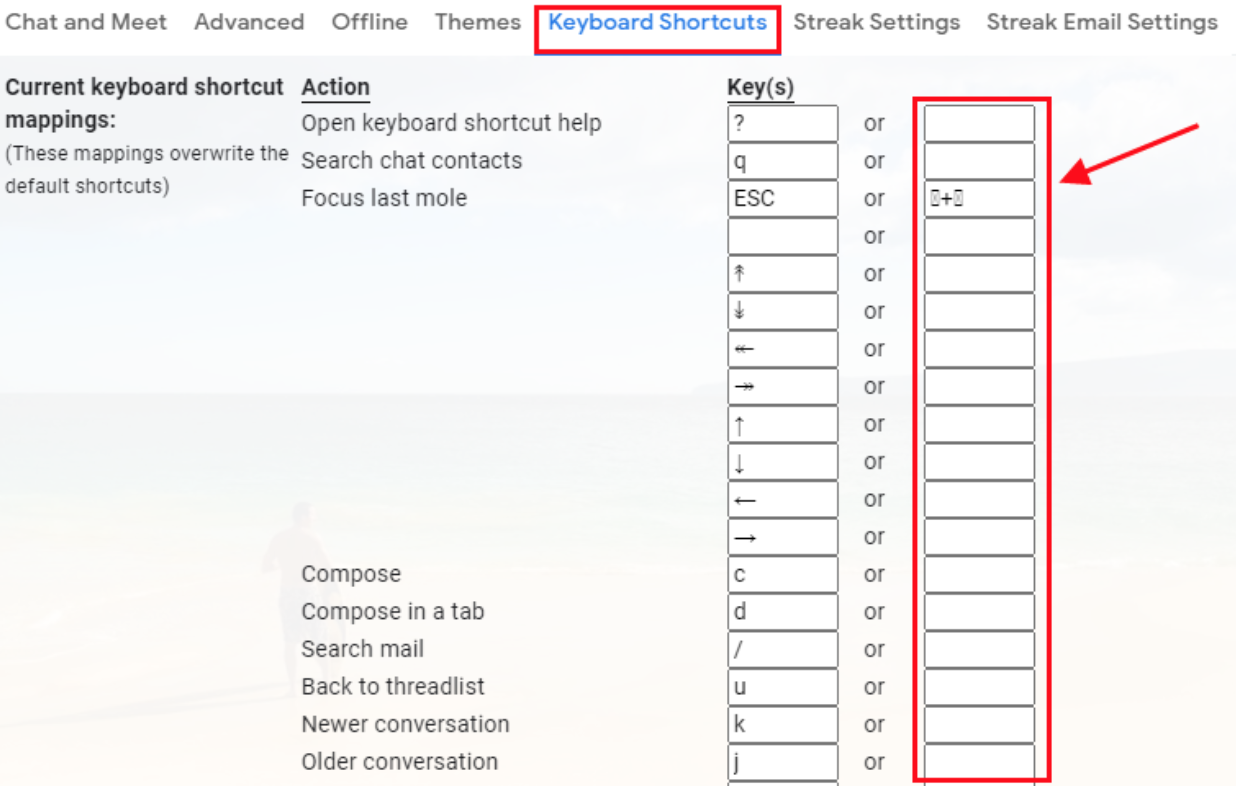
Since that’s done, let’s see how you’ll create your own shortcuts.
Not too fast though, there’s a catch. You can only edit the inbox management shortcuts and main navigation.
To do that, first, enable the custom keyboard shortcuts. Click settings and head over to the advanced tab.
Scroll down to the custom keyboard shortcuts and enable it.
Save changes once you’ve done that.
A new tab will appear named keyboard shortcuts. Click on it, and it will open the page below. For each action, there’s a default shortcut. But you have an option to replace it with something you’ll remember easily.
8. Using the Priority Inbox
As the name hints, the priority inbox allows you to have a specific section that prioritizes some emails. This cuts across starred messages, unread messages, new inbox emails.
And how does Gmail know which emails are important? Check out this guide from their support page.
First, click Settings and select the inbox tab. In the inbox type section, select priority inbox from the drop-down menu.
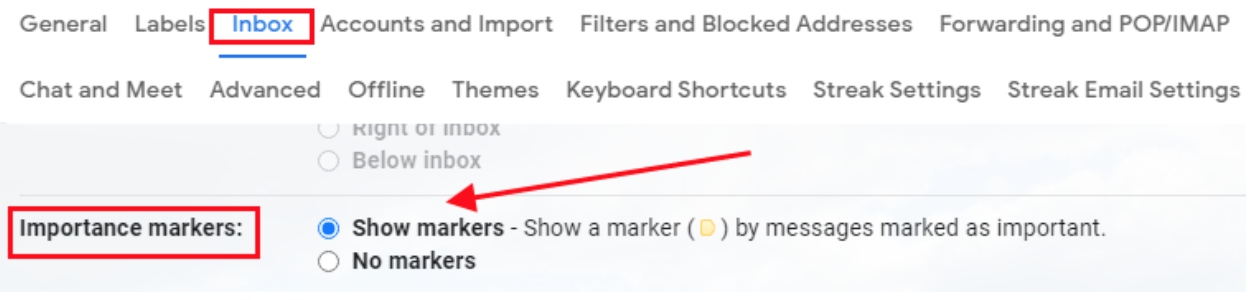
9. Adding Important Markers
Gmail functions like a filter.
It checks your inbox, analyzes the frequency of messages from each sender and how you’ve treated their messages before.
It will then find out which email is important and add the important label next to it.
What does this mean? You can easily navigate through your messy inbox to read the most important message promptly.
Here’s how to bring this setting to life.
First, open the settings and go to the inbox tab. Check for the importance markers section and choose show markers.
10. Disable/enable nudges
We tend to forget a lot, and this habit may cost you a life-changing opportunity.
A study by Hubspot found that 90% of customers want to get a response to any email they send in less than ten minutes.
If you’re the “too-forgetful” type of Gmail user, this setting will come in handy.
Once again, go to the setting option and choose the general tab. Scroll down to the nudges section.
You have two nudge options: “suggest emails to reply to” and “Suggest emails to follow up on.” You can choose any of the options or both.
11. Creating a Signature File
A signature seals your professionalism.
Google allows you to create signatures for your emails that don’t go beyond 10,000 characters. Once created, the signature will appear at the bottom of each email you send.
Here’s how to create your next signature file.
Open settings and go to the general tab. Scroll down to the signature section and create a signature.
You can add a short description of what you do, an image and a hyperlink to your website. Click save changes once done.
12. Setting a Vacation Responder
It’s always good to reply to emails whenever you’re out of the office for the weekend or a vacation.
Sure, this will destruct your peaceful time. But that doesn’t mean you must personally reply to all emails. Why not let the vacation responder do it?
It lets you set up a reminder that automatically responds to senders, telling them that you’re out of the office for some time.
To turn your vacation on or off, follow the following steps.
Open see all settings and on the general tab, scroll down to the Vacation responder section.
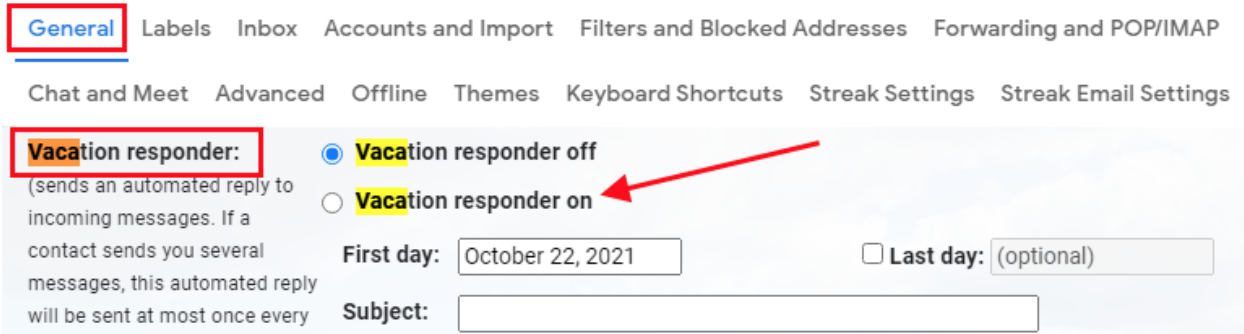
The default setting is always off. If you want to turn it on, put the dates you’ll be out of office. Then, write a subject and a message.
13. Using Labels for Organizing
Labels in Gmail organize your inbox and make it clutter-free.
However, you might find yourself having too many labels that bring back the disorganization. In this case, you need to hide the labels you rarely use.
Head over to settings and choose the label tab. On the left side, you’ll see all kinds of labels you can show or hide. Make sure that you show what’s relevant and hide what’s not.
14. Sending Emails From a Different Address
This setting comes in handy for users who have customized Gmail addresses.
You can connect your customized email with your main account. So you won’t have to jump from one email address to another.
In the settings, go to the Accounts and Import tab. Scroll down to the send mail as section and choose to add another email address.
The action above will open a new window. Add your customized email, the name and click the next step. Gmail will send an email to the new address for verification before it’s added.
15. Preventing Gmail From Creating Contacts Automatically
Whenever you reply or message someone not in your Google contacts app, Gmail automatically adds that person’s email address to your Google contact’s app.
While this may come in handy in the future, it also means that you’ll end up with hundreds of unwanted email addresses clogging your contacts.
Here are the steps to follow to get rid of the feature.
Open Gmail settings and go to the general tab. Scroll down to the Create contacts for auto-complete section.
Choose I’ll add contact myself and save changes.

16. Simplifying Your Inbox
Tired of wondering whether an email is in your Primary, Promotions, or Social inbox? Well, luckily, you can have all emails land in the same place.
To make this change, click on the Settings icon and then See all settings. Navigate to the Inbox tab and click on the Promotions and Social checkboxes so they are clear instead of blue.
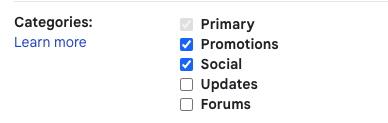
Scroll down to the bottom of the page and click Save Changes. And you’re all set!
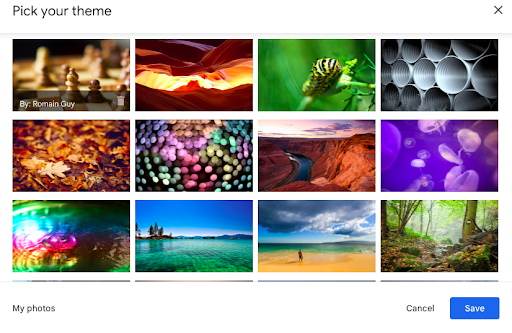
17. Changing The Theme
From the settings dropdown menu, scroll to the Themes section and click on View all.
From here, Gmail allows you to choose from a variety of colorful themes — from dark mode to natural beauty, the sky’s the limit.
18. Live Chat
From your Gmail inbox, navigate to the left tab where it says Chat and click on it. Then, hit New chat.
Add the recipient you want to start talking with. From here, you’ve got a live conversation started — just as if you were messaging with someone on other platforms.
19. Email Forwarding
We’ve already covered how you can send emails from your Gmail, even if it’s technically from another address. However, you can also receive emails from other accounts in your Gmail.
To do this, you’ll need to log in to your other email account and enable it. But secondly, you’ll have to approve it from Gmail’s end as well. Look out for an email in your inbox from Gmail confirming that you want to allow forwarding to that address. Then you can start taking advantage of this powerful feature.
20. Preventing Important Emails From Getting Sent To Spam
This tip is also called “whitelisting.” Occasionally, Gmail will mark messages as spam that you actually want to read or receive. To ensure this doesn’t happen, click on the three-dot menu by an email from the sender you want to whitelist.
Then, click the Filter messages like this in the dropdown menu.
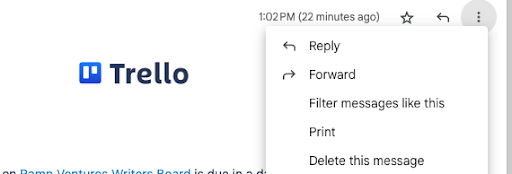
Then, select Create filter. On the next page, check Never send it to Spam. Then, hit Create filter again.
Gmail Settings FAQ
How do you Set up Gmail on a mobile device?
Setting Gmail on a mobile device doesn’t give you many options as compared to a laptop.
But you can still do basic settings. Go back to the first subsection of this guide to see how you can do basic settings using your android phone.
What are the correct settings for Gmail?
There are tons of settings you can do in Gmail.
What we’ve given you is just the tip of the iceberg. This begs the question – which is the most important setting?
Well, there’s no setting that’s more important than all. It goes back to your preferences and what you want to achieve with Gmail.
This way, it’s easy to choose a setting that will boost your productivity and improve your experience in Gmail.
How do you manage Google privacy settings?
Managing google privacy settings improves your browsing experience.
To activate it, go to your settings. Choose privacy and security. There’s a bunch of settings you’ll see. Choose what you prefer.
What are the best settings for Gmail?
While it would be nice to make a one-size-fits-all list for Gmail settings, it doesn’t exist. Each user is unique. Everyone uses their email differently, which is why it’s worth taking the time to customize your experience.
Can I add more settings for Gmail?
Yes, luckily you can enjoy even more features than those that come with stock Gmail. Installing Right Inbox and other third party apps opens you up to additional possibilities with settings and configurations.
Track emails, email reminders & templates in Gmail for free
Upgrade Gmail with the features it’s missing
Add to GmailDavid Campbell
David Campbell is the editor of the Right Inbox blog. He is passionate about email productivity and getting more done in less time.