Microsoft Access Tutorial: MS Access with Example [Easy Notes]
What is Microsoft Access?
Microsoft Access is a Database Management System offered by Microsoft. It uses the Microsoft Jet Database Engine and comes as a part of the Microsoft Office suite of application.
Microsoft Access offers the functionality of a database and the programming capabilities to create easy to navigate screens (forms). It helps you analyze large amounts of information, and manage data efficiently.
Important Terms and Basic Objects
Now in this Microsoft Access tutorial, we will learn about some important terms and basic objects in MS Access:
Database File
It is a file which stores the entire database. The database file is saved to your hard drive or other storage devices.
Datatypes
Datatypes are the properties of each field. Every field has one datatype like text, number, date, etc.
Table
- A Table is an object which stores data in Row & Column format to store data.
- A Table is usually related to other tables in the database file.
- Each column must have Unique name
- We can also define Primary Key in a table.
Query
- Queries answer a question by selecting and sorting and filtering data based on search criteria.
- Queries show a selection of data based on criteria (limitations) you provide.
- Queries can pull from one or more related Tables and other Queries.
- Types of Query can be SELECT, INSERT, UPDATE, DELETE.
Form
- A form is a database object that you can use to create a user interface for a database application.
- Forms help you to display live data from the table. It mainly used to ease the process of data entry or editing.
Report
- A report is an object in desktop databases primarily used for formatting, calculating, printing, and summarizing selected data.
- You can even customize the report’s look and feel.
Macros
Macros are mini computer programming constructs. They allow you to set up commands and processes in your forms, like, searching, moving to another record, or running a formula.
Modules
Modules are procedures(functions) which you can write using Visual Basic for Applications (VBA).
Microsoft Access Data Types
MS Access common data types are listed below:
| Type of Data | Description | Size |
|---|---|---|
| Short Text | Text, including numbers which does not need calculation. (e.g., Mobile numbers). | Up to 255 characters. |
| Long Text | This data type is used for lengthy text or alphanumeric data. | Maximum 63, 999 characters. |
| Number | Numeric data type used for storing mathematical calculations. | 1, 2, 4, 8, and 16 bytes. |
| Date/Time | Store Date/time for the years 100 through 9999. | 8 bytes. |
| Currency | It allows you to store currency values and numeric data with one to four decimal places. | 8 bytes. |
| Auto Number | Assign a unique number or assigned by Microsoft Access when any new record is created. Usually used as the primary key | Four bytes (16 bytes if it is set as a Replication ID). |
| Yes/No | It only stores logical values Yes and No. | 1 bit |
| Attachment | It stores files, such as digital photos. Multiple files can be attached per record. | Up to 2GB Data can be stored. |
| OLE objects | OLE objects can store audio, video, other Binary Large Objects. | Up to 2GB data can be stored. |
| Hyperlink | Text or combinations of text and numbers stored. That text is used as hyperlink address. | Each part of a Hyperlink data type allows you to store a maximum 2048 characters. |
| Calculated | Helps you to create an expression that uses data from one or more fields. | You can create an expression which uses data from one or more fields. |
Differences between Access and Excel
Microsoft Access and Excel are very similar yet very different. Here, are some important difference points between both of them-
| Access | Excel |
|---|---|
| Deals with text, numbers, files and all kinds of data | Microsoft Excel generally deals with numerical data |
| All the data is stored one time, in one place. | Lots of worksheets or documents are a store with similar, repeated data. |
| Helps you to build highly functional data entry forms and report templates. | Only the primary data entry screen is available. |
| Users will be able to enter the data more efficiently and accurately. | Data accuracy and speed is not much because of the format. |
Also Check:- Microsoft Excel Tutorial for Beginners: Learn MS Excel in 7 Days
Advantages of MS Access
Now in this MS Access Tutorial, we will learn the pros/benefits for using MS Access application:
- Access offers a fully functional, relational database management system in minutes.
- Easy to import data from multiple sources into Access
- You can easily customize Access according to personal and company needs
- Microsoft Access online works well with many of the development languages that work on Windows OS
- It is robust and flexible, and it can perform any challenging office or industrial database tasks.
- MS-Access allows you to link to data in its existing location and use it for viewing, updating, querying, and reporting.
- Allows you to create tables, queries, forms, and reports, and connect with the help of Macros
- Macros in Access is a simple programming construct with which you can use to add functionality to your database.
- Microsoft Access online can perform heterogeneous joins between various data sets stored across different platforms
Disadvantages of MS Access
Here, are the cons for using MS Access
- Microsoft Access database is useful for small-to-medium business sectors. However, it is not useful for large-sized organizations
- Lacks robustness compared to dbms systems like MS SQL Server or Oracle
- All the information from your database is saved into one file. This can slow down reports, queries, and forms
- Technical limit is 255 concurrent users. However, the real-world limit is only 10 to 80 (depending on the type of application which you are using)
- It requires a lot more learning and training compares with other Microsoft programs
How to Start Microsoft Access
Note: We assume you have the latest Microsoft Access installed which comes bundled with Microsoft Office 365 package.
There are two ways to Start MS Access.
- From Windows, ‘Start’ button.
- From Desktop, Right Click> ‘New’ option.
Now in this Microsoft Access tutorial, let’s have a look of starting MS Access using both the ways:
Option 1) From Windows, Start button.
Step 1) Click on the ‘Windows’ icon. You will find the list of installed programs.
Step 2) Find Access icon. Check and click on Access Icon.

Step 3) Check the window. MS Access Application window will appear.

Steps 4) Press ‘Esc’.
Result: This will open the MS Access windows application.

Option 2) From Desktop, ‘New’ option.
Step 1) Right Click from Desktop and Click ‘New’
Step 2) Click on ‘Microsoft Access Database Option’
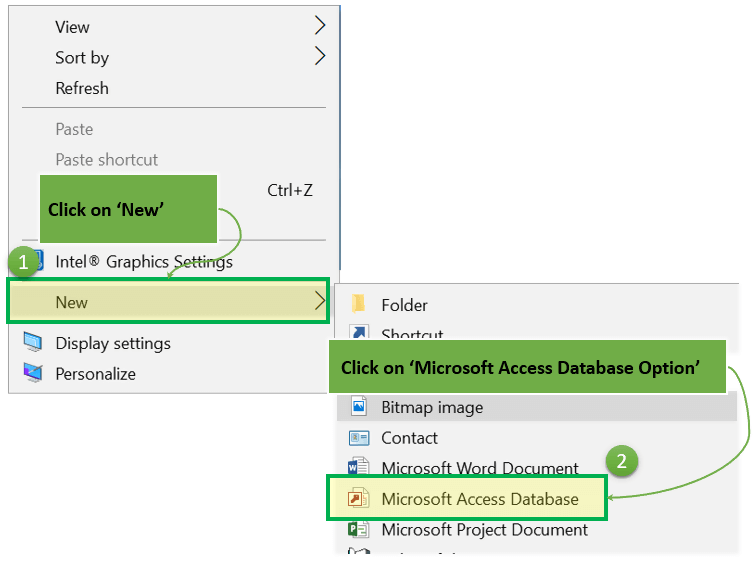
Step 3) Below MS Access Application window will appear

Step 4) Press ‘Esc’
Result: This will open the MS Access windows application

How to Create a Database
Before we create a Database, lets quickly understand the holistic picture of what Database is, with particular reference to MS Access.
Let’s, start with a few real-life Microsoft Access databases example:
- We have Bookcase where Books resides,
- We have i-pods where we have a collection of music & cases are countless.
Similarly, we have MS Access Database is a kind of home for all your Tables, Queries, Forms, Reports, etc. in MS Access which are interlinked.
Technically, Database store the data in a well-organized manner for easy access and retrieval.

There are two ways to create Database in SQL Access:
- Create Database from Template
- Create a Blank Database
Let’s go into the detail of each:
Create Database from Template
- There are many situations where we need to start with some readymade database template for given requirements.
- MS Access provides many ready to use templates for such types of databases requirements where the data structure is already defined.
- You can keep customizing the template structure further as per our requirement.
- MS Access Databases example includes Contacts, Student, Time tracking, etc.
Steps to create Database from Template
Step 1) With MS Access application open, Click on File.

Result: The below window will appear. All the Database templates are displayed below.

Step 2) We can select any template by clicking on it. Click on Contact Template for further reverence.

Step 3) File name box will appear with the default file name.
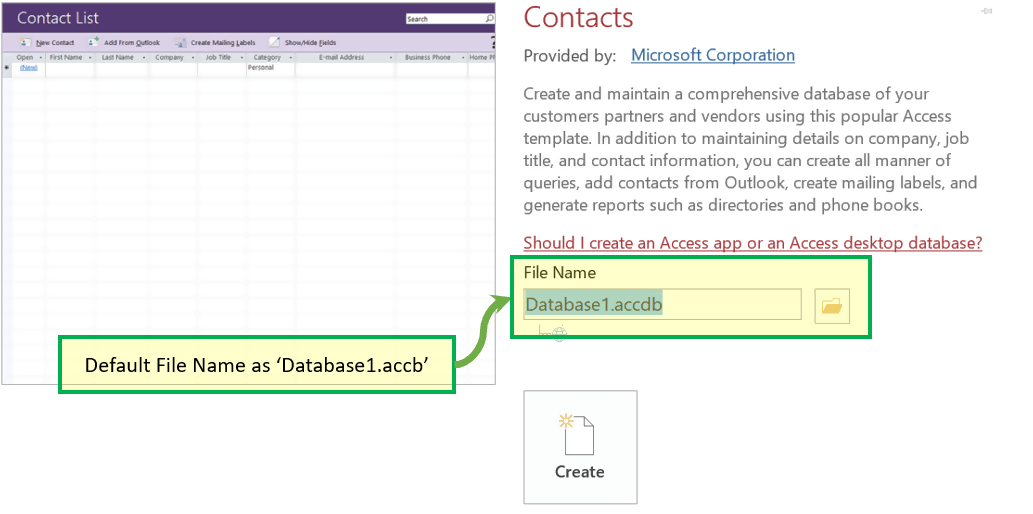
Step 4) Enter the new Name.

Step 5) Click on ‘Create.’

Result: Guru99_Contact Database created and below window will appear.
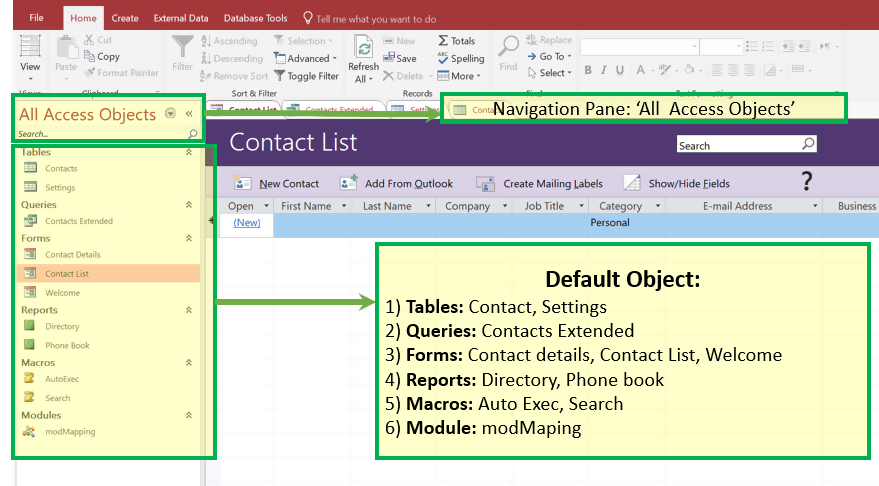
Step 6) Optionally, you can click on any of the objects from left navigation pane and open that object for further references and work.
For, E.g., Clicking on ‘Contact Detail’ form will open ‘Contact Detail’ form as displayed below.

Create a Blank Database
Step 1) With MS Access application open, Click on File > New

Step 2) Click on ‘Blank Database.’

Step 3) File name box will appear with the default file name.

Step 4) Enter the new name.

Step 5) Click on ‘Create.’

Result: Guru99 Database created and below window will appear.

How to Create Table
The first step in this Microsoft Access tutorial to store data in the database is creating a Table where data will reside. Post creation of the table, we can keep inserting the rows in the table.

There are two ways to create Database in MS Access
- Create a Table from Design View
- Create a Table from Datasheet View
Create Table – Datasheet View
Step 1) First Click Create tab. Then from Tables group, click Table.

Step 2) System will display the default table created with ‘Table1’ name.

Step 3) To Rename Column, double click on Column Header and enter the new column Name.

Note that the Data type of Course_ID is ‘AutoNumber.‘ Hence this is also the Unique Key of the table.

Step 4) You can Add Column by clicking on any category from the ‘Add & Delete’ group. Alternatively, you can also add a column by clicking on ‘Click to Add’
For Example, click on ‘Short Text’ from the ‘Add & Delete’ group.

Step 5) Column will be added with the default name as ‘Field1.’

Step 6) Click on Header and rename as ‘COURSE_NAME.’

Step 7) Press ‘Ctrl + S’ and Enter the new table name to save the table.

Step 8) You can also save new Name, Caption and Short description for any Column by clicking on ‘Name and Caption.’ Click on it

Step 9) Dialog Box will appear. Add the following and Click on ‘OK’
- ‘Name’ – This is the actual name of the column.
- ‘Caption’ – This is the user view name of the column.
- ‘Description’ – This is the short description of the column name.

Result: Name, Caption, and Description now exist.

Create Table – Design View
Step 1) First Click Create tab. Then from Tables group, click Table.

Step 2) Table Dialog box appears. For each Field enter Filed Name, Data Type and Description.

Steps 3) To Add Course_ID as Primary Key, select it and Click on ‘Primary Key.’ Course_Id will be Preceded by KEY ICON as shown below:

Steps 4) Press ‘Ctrl+S.’ Enter the Table Name and Click OK

Result:
How to Switch views between Datasheet and Design
Now in this MS Access tutorial, we will learn how to switch views between Datasheet and Design:
To switch views, between the datasheet (spreadsheet view) and the design view, click the ‘View’ button in the top-left hand corner of the Access Ribbon (shown in the Home/Help/Design Tabs). And Click on the View you need to display.
For Example: Let’s Assume You want to switch to the newly created table ‘Course_strength’ from ‘Design view’ to ‘Data Sheet’ View.
Step 1) Click on Datasheet View

Result:

MS Access- Adding Data
- You have created tables Course and Course_Strength.
- There are two ways to add data. One is Datasheet view and other from Form. We will learn to add data from Datasheet view in this section.
- There is no need to save the data manually. Once you click other rows, Access automatically saves the data.
- The only thing you need to take care while adding data is, you should enter the correct data type, i.e., if Column is defined as Number we can add only number and not text.
Let’s add some data in your table by opening the Access database you have created earlier.
Step 1) Select the ‘Course’ table

Steps 2) Select the Datasheet view option in the ribbon and add some data by entering the values in It. Updated Data will be Autosaved.

Now let’s say You want to delete 4th row with ‘My SQL’ as Course name.
Step 3) Select the row by clicking on the leftmost column and Right Click on the row. The options menu will appear with the ‘Delete Record’ Option
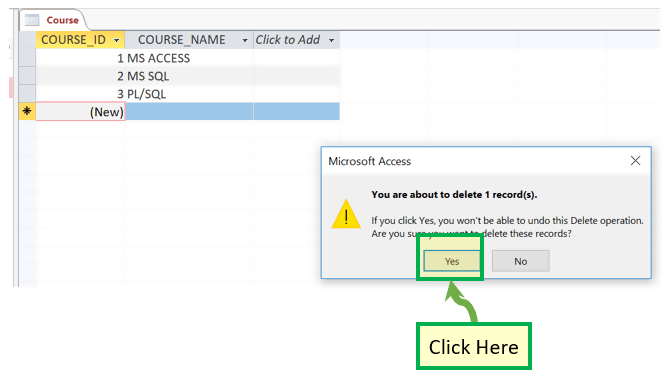
Step 4) Popup Window will appear to confirm the deletion of the record. Click ‘OK’
Result:

Summarizing views
Datasheet View
Displays in the view, which allows you to enter raw data into your database table.
Design view:
Displays the view, which allows you to enter fields, data types, and descriptions into your database table.
Forms in MS Access
- A form is a database object that you can use to create a user interface for a database application.
- It mainly used to ease the process of data entry or editing.
- Data in a form can be selected from one or more tables.
- Forms can also be used to control access to data, like which fields or rows of data are visible to which users.
- Forms have a Form View.
- Help you to display live data with easy creation of new data.
To understand form lets first create two new Record in Contact Table (from the prebuilt Contact Database discussed here)
Step 1) Select the ‘Contact’ table from Left Navigation.
Step 2) Create two rows by entering some relevant data in two rows.

create Form, and then we will see how forms can be leverage for easy display, editing, and creation of new data.
How to Create a form
There are four primary ways to create the form as mentioned below:
- Form Wizard
- Form
- Multiple Item
- Split Form
Let’s have a look at each option to create the form, one by one:
1. Create using Form Wizard
This option allows the user to create the form with the wizard and select the column from the available list of column form in legacy Select window format.
Step 1) Click on ‘Form Wizard.’

Step 2) System will display below the screen.

Step 3) Select the columns which you want to be there in final form.

Result: ID is selected

Step 4) Keep selecting all required column as explained in Step 3 above and then click ‘Next.’

Step 5) Layout selection box will appear which allows the user to select the different type of form layout. Click ‘NEXT’

Step 6) Enter the name of the form as “Contact_Form” and click ‘Finish.’

Result: Contact_Form now exist with all column displayed which are there in step 4 in the Selected column list.

2. Create using Form
It is the simplest way to create the form which will:
- By default, populate all the column from the selected table in ‘form view,’
- The user can delete non-required column manually
Step 1) Select the table for which we want to create the form and click on ‘Form.’

Step 2) Below window will appear.

Step 3) Right-click on any cell which we don’t want to be part of final forms and click on ‘Delete.’
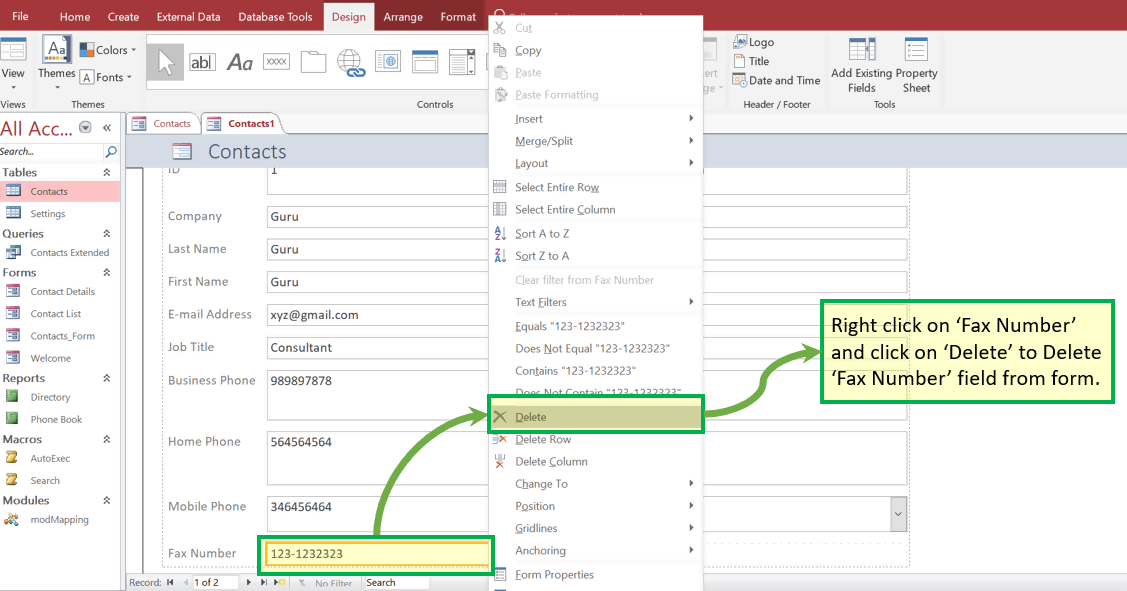
Result: ‘Fax Number‘ field does not exist now.

Step 4) Press ‘Ctrl+S’ and enter new Form Name as ‘Contact_Form2’. Click ‘OK’.

Result: New form with the name as ‘Contact_Form2’ exists under the “Forms” section.

3. Create form by ‘Multiple Item’
It is another type wherein All the records already created will be displayed in Form with an option to Add new record.
Step 1) From the ‘Create’ tab. Click on ‘More forms’ and select ‘Multiple Items.’
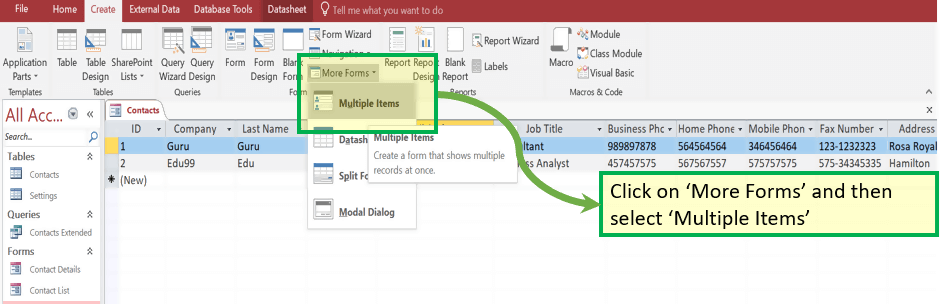
Result: Below Multiple lines, the window will appear

Step 2) Press ‘Ctrl+S’. Enter the new form name and click ‘OK.’

Result: New Form with the name as ‘Contact_Form_Multiple_Item’ exists under the “Forms” section.

4. Create form by ‘Split from’
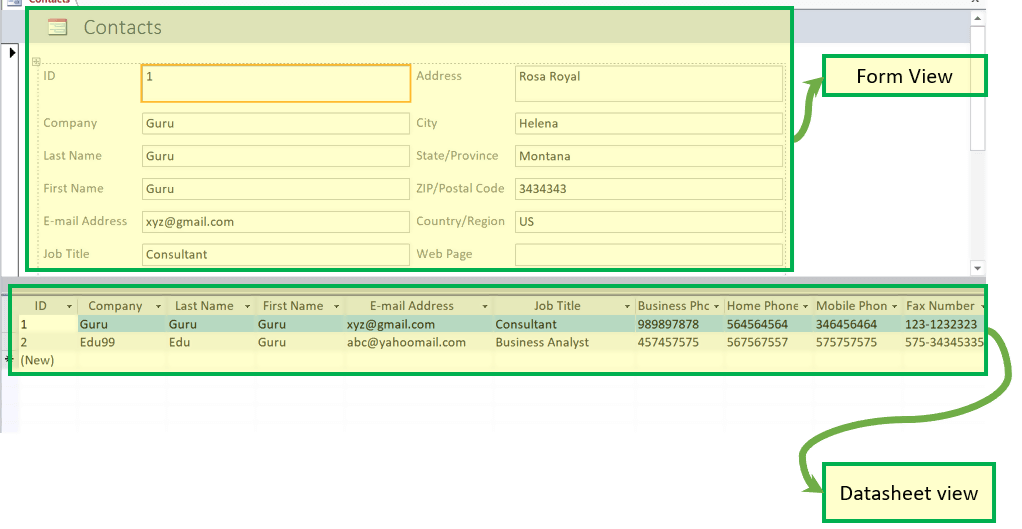
It is a mix of simple form and split form in a way that this form provides the view of Form and datasheet in a split window.
Whatever the user enters in Form is visible directly in Datasheet view immediately and vice versa.
Step 1) From the ‘Create’ tab, click on ‘More forms’ and select ‘Split Form.’

Result: Below window will appear with the Form and data sheet together.
Step 2) Press ‘Ctrl+S’ and enter the new form name. Click ‘OK.’

Result: New Form with the name as ‘Contact_Form_Split’ exists under the “Forms” section.

Edit the existing record via Form
- One of the features of forms is that we can edit the values and data directly from the form.
- It is more user-friendly because as compared to row format in the table, forms have better visibility of selected fields and the user can do the direct updates.
- These values updated from forms will also be reflected in original tables immediately.
Let’s have a look at how to edit value from the form:
Step 1) Click on ‘Contact_Form’

Step 2) Update some values on ‘Contact_Form’ value

Step 3) Double Click on ‘Contact’ table.

Result: Updated value is present in the original table record.

Add a record to a Form
- Forms also give the flexibility to Add records.
- Again, this is a user-friendly and appealing way of adding records as compared to adding records in a row form.
- Here, we will take the Microsoft Access databases example of Split from ‘Contact_Form_Split’ created above.
Step 1) Open ‘Contact_Form_Split’

Step 2) To Add record, click on ‘New (blank) Record Icon.’

Result: New record window appear in:
- Form View and
- Datasheet View.
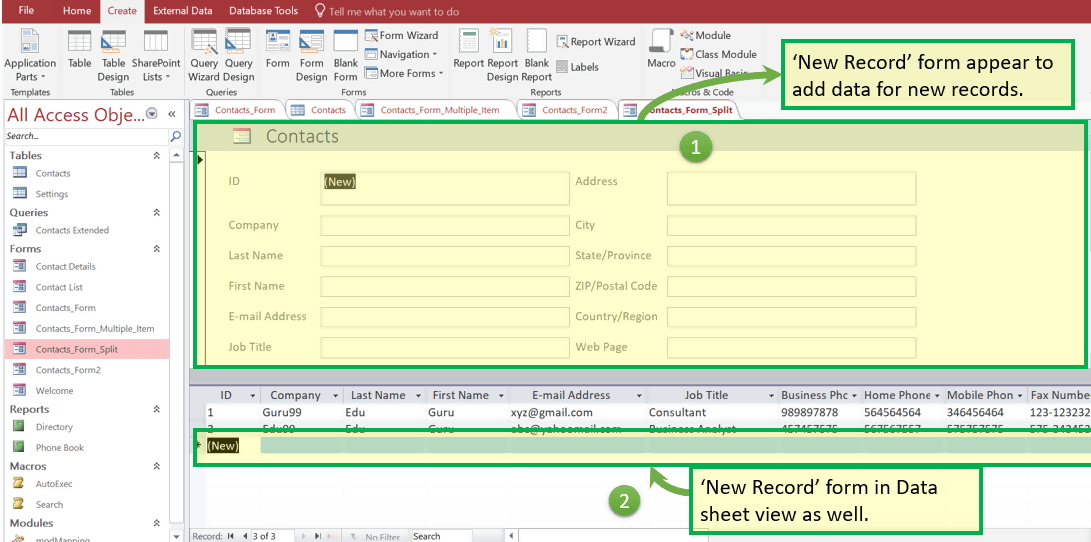
Step 3) Manually fill the data from Form. Note that in split form all data will be automatically reflected in below data sheet as well.

Step 4) Double Click on ‘Contact’ table.

Result: New Record updated to ‘Contact’ Table added from Form ‘Contact_Form_Multiple_Item’

Report
- A report is an object in MS Access that is designed for formatting, calculating and printing selected data in an organized way.
- It contains information from tables and also information that are there in the report design.
- Reports are helpful as they allow you to present all information of your database in an easy-to-read format.
Let’s take an MS Access databases example of ‘Contact’ DB default report – ‘Phone Book.’
Step 1) Click on ‘Phone Book’ under ‘Report’ section. The system will open the inbuilt ‘Phone Book’ report.
It will display Contact Name, Home, Business and Mobile name displayed
for each record present.

Step 2) Now suppose that we want to edit the report Heading from ‘Home’ to ‘Home Number.’ Right click and click on ‘Design View.’
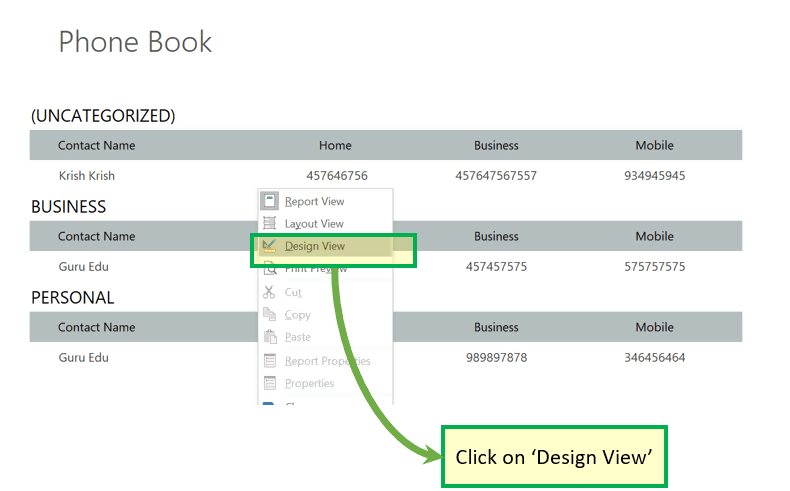
The system will open the Report in Design view.

Step 3) Edit the name you want to update and Press ‘Ctrl+S’.

Step 4) Double click ‘Phone book’ under reports
Result: Label is updated from ‘Home’ to ‘Home Phone.’

Macro
- Macro in MS Access is a time-saving feature that allows you to add functionality or automate simple tasks.
- Steps that are of frequently used can be automated using a macro
- It can add a quick and easy approach to link all other objects together to create a simple database application.
Let take an Microsoft Access databases example of ‘Contact’ DB default Macro – ‘AutoExec.’
Step 1) Click on ‘AutoExec’ under ‘Report’ section. The system will open the inbuilt ‘Welcome’ Macro. It will display Welcome note and other data related to contacts Database which has its code into default ‘AutoExec’ Macro
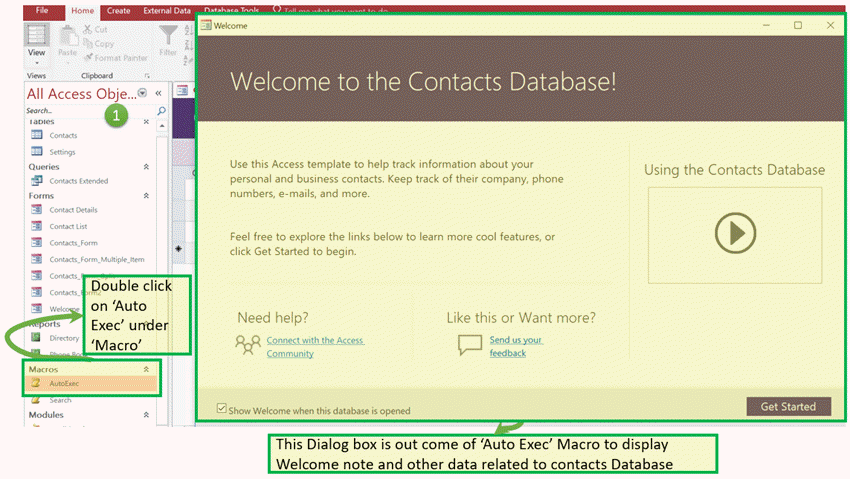
Step 2) If you want to see the code behind this macro right click.

Result:

Module
- It is a collection of user-defined functions, declarations, statements, and procedures that are stored together as a unit.
- It perhaps a standalone object having functions that you can call from anywhere in your Access database.
MS Access databases example from ‘Contact’ DB
Step 1) Click on ‘modMapping’

Result:

Summary
- Microsoft Access is a Database Management System offered by Microsoft.
- Allows you to create tables, queries, forms, and reports, and connect with the help of Macros
- MS-Access will enable you to link to data in its existing location and use it for viewing, updating, querying, and reporting.
- Access consists of four main database objects: Tables, Queries, Forms, and Reports.
- There are two ways to create Database in SQL Access:
- Create Database from Template
- Create a Blank Database
- There are two ways to create Database in MS Access
- Create a Table from Design View
- Create a Table from Datasheet View
- You can switch between the datasheet and the design view by just clicking the ‘View’ button in the top-left hand corner of the Access program.
- A form can be created using Form Wizard, Form, Multiple Item, Split Form
- Macro in MS Access database is a time-saving feature that allows you to add functionality or automate simple tasks.
- A report is an object in MS Access that is designed for formatting, calculating and printing selected data in an organized way.
- A Module is a collection of user-defined functions, declarations, statements, and procedures that are stored together as a unit.
Also Check:- How to Write Macros in Excel: Macro Tutorial – What is & Use