Wireless Adapter needs to be reset on start up after Windows 10 - Microsoft Community

Wireless Adapter needs to be reset on start up after Windows 10 upgrade

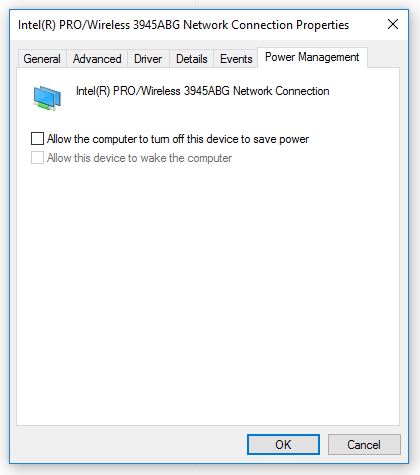
After a Windows 10 upgrade from Windows 7, every time I start up from a Shutdown, the wireless adapter needs to be reset.  I do this through the troubleshooting choice.  It will also reset if I do a Restart. 

I tried to upgrade the driver, but it said I had the latest version. 

These problems occur while plugged in to power, and there is only hibernation on low battery power.  

Answer
Answer

Glad tidings Gentlefolk!

Well, seeing as this forum seems to be more of a self-help group and given that I have made a couple of friends on here, I thought I would come back with some 'fixes' to share.


Method 1 (Works for me and is my preferred method)

OK, so I found this thread, which suggests allowing the computer to turn off the WiFi adapter.  However, mine was already enabled, so I unchecked the box and voilà!  I have tested this around 10 times including a power down of around an hour.  As a sanity check, I checked (pardon the pun) the box and the pesky asterisk returned, so that'll do nicely for me :)

[Right click the WiFi symbol] > Open Network and Sharing Center > Change adapter settings > [Right click WiFi connection] > Properties > Configure > Power Management tab:

Method 2

After stumbling upon the adapter disable/enable commands (effective reset), I composed a batch file which can automatically be run at startup.

Firstly, find the name of your wireless connection.  [Right click the WiFi symbol] > Open Network and Sharing Center > Change adapter settings.  It is the top line of the connection info.  Mine simply said WiFi, but it could be Wireless Network Connection, etc.  

Next, create the batch file.  Copy the text below into Notepad, editing the text before ENABLED and DISABLED; i.e. 'WiFi' to reflect the name of your wireless connection.  Save the file as 'Reset Wifi Adapter.bat' (NB .bat instead of the default .txt).  

@echo off
echo Resetting WiFi Adapter
netsh interface set interface WiFi DISABLED
rem echo Press a key once WiFi is disabled
rem timeout -t 5
netsh interface set interface WiFi ENABLED

Test the batch file by right-clicking on it and selecting Run as administrator.  Observe the WiFi symbol you have become to obsess over.  If you need a pause between disabling and enabling, right-click the file and select Edit and take out the two 'rem's.  

Now the tricky bit: to get it to run at startup.  You can either:

  1. Add it to your Startup folder.  Create a shortcut and edit the Advanced settings of the shorcut to run the batch file as administrator.  Then add the shortcut to the startup folder which is found by [Windows key] + R and enter Shell:Startup in the Run pop-up.  Click OK.  However, this method brings up the User Access Control each time - unless you downgrade your security settings.
  2. Schedule a Startup Task.  You could run the batch file as a Startup/ Log On task.  The Task Scheduler can be found by typing Computer Management into Cortana.  I haven't gone any further with this because, as I said, the Power Management setting worked for me, but I am sure you can take over from there.

Anyways, have a go at the above and let me know which (if any) method works for you.

Good luck.

28 people found this reply helpful

·

Was this reply helpful?

Sorry this didn't help.

Great! Thanks for your feedback.

How satisfied are you with this reply?

Thanks for your feedback, it helps us improve the site.

How satisfied are you with this reply?

Thanks for your feedback.


Question Info


Last updated March 20, 2024 Views 18,403 Applies to: