The Apples macOS Sierra has approached high version which is called “macOS High Sierra”. Unlike usual this time again, the OS is innovatively designed and focused on core features. Except this, there are tons of major changes and enhanced graphics level like its better photos, 5k resolution, and file system. These brillant features has attracted users and attempt them to install specially on PC. No worries, you can do it now, no need to wait if you’re on PC or Mac. If you are a Mac users, so you can download the macOS High Sierra 10.13 from App store but if you are PC user then you’ve got the chance to do it from the guide here. In our previous article, we downloaded the macOS High Sierra VMware Image. In this article, I’m going to show you how to install macOS High Sierra 10.13 on VMware in Windows 10, 8 or 7.

Unlike before, this time, we’re covering every section of guiding users to get what they want from this article. As in our previous article, we downloaded macOS High Sierra 10.13 simply. Now we’re going to install macOS High Sierra on VMware in Windows. Except it, following your comments, if you had problems or errors during installation, we will cover and solve it if possible by us in an article, stay on and enjoy.
Important: Hey Folks, the next version of macOS is out, here’s you can find and really download + install, with the complete guide.
Install macOS High Sierra 10.13 on VMware in Windows
Before we get started, there are several points you need to make sure you have full-filled the requirements and accomplished the important notes from below.
Remember: Before we begin installation, make sure you have enabled virtualization on your PC and VMware too. Here’s how to do it:-
#Step 1: Download & full-fil the requirements
Required System
- 2GB Memory(RAM)
- Number of Processors: 2
- Hard Disk: 80GB
- Graphics memory: 256 MB
Want to give a quick shot to Mojave? Here’s how to do it actually with step by step shots.

Required files to download
Google Drive (One Full): http://bit.ly/2vstWgr
Google Drive (5 of 5): http://bit.ly/2vogTvx
Unlocker208: http://bit.ly/2uYuur7
VMware Workstation: http://bit.ly/1izV0je
Fix Download Limit: http://bit.ly/2f7JPlj
If you wish to download macOS High Sierra latest version please use to link below ;
#Step 2: Extract & run the downloaded files
1. After download, the files, extract them in a folder.

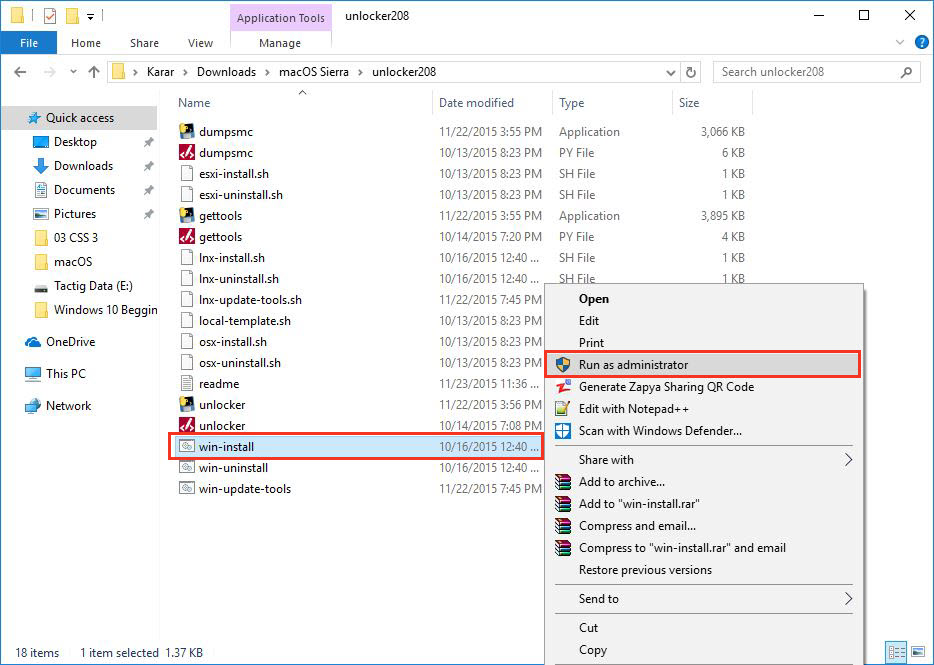
2. Now open Unlocker208 and open ” win-install” and Run as administrator.
#Step 3: Create a New Virtual Machine in VMware
1. Open VMware Workstation and click on “Create a New Virtual Machine” or simply press ” Ctrl + N” to open New Virtual Machine Wizard. When opened, let it by default and click Next.

2. On this page, select “I will install the operating system later” and click Next.

3. Yes, you’re right, select Apple Mac OS X and OS version then hit Next.

4. Personalize and select a preferred location for the virtual machine and click Next.

5. Here specify the disk capacity by storing virtual disk as single file and 40 gig-byte for maximum disk size then continue installation by hitting Next.

6. On the finish line, customize hardware if you want and go for Finish.

#Step 4: Configure & Edit the Virtual Machine
1. When the virtual machine created, you’re ready to edit the VM, hit Edit virtual machine settings to continue.

2. Remove the existing hard disk by selecting the hard disk and click Remove.

3. After removing the hard disk, hit Add on the Virtual Machine Settings and follow the instructions from below.

4. Here you need to select use an existing virtual disk and click Next.

5. Browse the MacOS High Sierra (VMDK) from the extracted folder that you had downloaded then click Finish then click Ok on virtual machine settings.

#Step 5: Edit the Virtual Machine & Insert Code
1. When you have finished configuration, now you need to edit the virtual machine and insert command from below. To do that navigate to virtual machine files and open “virtual machine configuration(VMX)” with Notepad like the shot below.

2. On the Notepad, insert the command below or you can copy and paste from below.
smc.version = “0”

#Step 6: Install macOS High Sierra 10.13 on VMware
Once you have completed the steps above, then you’re able to install it right now. To do that, press the power button to start the virtual machine. When the machine started, on the first screen you’ll see the welcome page, choose your country then click Continue.
If you encounter “Failed to open a session for the virtual machine” or “VT-x isn’t available” you may check out this.

Now choose a keyboard layout and hit Continue.

Select Don’t transfer any information now and hit enter.

On this page, sign in with your Apple ID otherwise select Don’t sign in and Continue or if you don’t have an Apple ID and want to create one here’s how to do:-
How to Create an Apple ID Without a Credit Card?

Read the Terms and conditions fully and click Agree.

Step #8: Personalize Your Mac
So let’s personalize our computer by filling out the required details then Continue.

This new express setup page works as location services and it will locate your location, Continue.

Now your account will be create within few minutes and you’ll finally got it like the shot below.

All right, now the only thing you need to do is installing VMware Tools which is very important.
that’s all. Hope you could install without error and if you got any issue, place it in comments form. We will reply as soon as possible also we will create another article based on your problems for other users if they got, so they can solve it quickly. Stuck booting up or can’t change the screen or do you have another problem? No matter, here’s the solution, click the link below and try one the solution methods from the list.
Notice that if you face boot manager problem or any other problems, check out the step #3 and use the code without quotation marks or you can try the whole tutorial once again if again not succeed, then try to check your laptop/PC if it’s not AMD, if it is then you can’t do it or if your system is Intel then go and check the steps clearly and check once again or do it on another computer.
When the macOS High Sierra installed successfully, now step through essential setting up your Mac after installation. Click the link below and follow the steps.
Searches related to macos high sierra vmware
high sierra vmware fusion
vmware fusion apfs
macos high sierra vmware fusion
vmware fusion tech preview
vmware apfs
vmware fusion 9 beta
install high sierra vmware fusion
vmware tools high sierra


whenever I power the vm it gets stuck on the apple logo
Hey Austin, Check your Setting again and use 50-60% of Ram and CPU.
Same problem here. I got HS installed and running properly in VMware Workstation 12.5.7, thumbs up. The exactly same VM, copied over 1:1, will freeze at the Apple logo on different hardware (Dual CPU XEON based HP Workstation with 8 Cores and 16GB RAM). Seems there is a dependency with the underlying hardware. On another machine the VM won’t boot properly (crash after approx. 10% progress bar) unless I remove the USB device from the VM, which is pointless, since this will kill keyboard and mouse support in the VM. High Sierra will, however, boot right to the login screen.
i got error
C:\Users\Amjad\Downloads\Copy of macOS High Sierra Beta 2 by Techsviewer.part4.rar: Packed data checksum error in macOS High Sierra Beta 2 \macOS High Sierra Beta 2 by Techsviewer.vmdk. The volume is corrupt
Try checking this guide which might help you:-
https://www.tactig.com/fix-macos-high-sierra-problem-on-vmwarevirtualbox/
Currently, have the issue,
“0# I have the same error with displaying as follows. Please help me to solve this immediately…..
VMware Workstation unrecoverable error: (vcpu-0)
vcpu-0:VERIFY vmcore/vmm/main/physMem_monitor.c:1178
A log file is available in “C:\Users\User\Documents\Virtual Machines\OS X 10.11\vmware.log”.
You can request support.
To collect data to submit to VMware support, choose “Collect Support Data” from the Help menu. You can also run the “VM-support” script in the Workstation folder directly.
We will respond on the basis of your support entitlement.
-> Just add smc.version = “0” on your Notepad.”
I did that and still keeps giving me an error even tho I added smc.version code. Any help will be greatly appreciated. Thank You
Working now.
What did you to fix it Anthony?
This tutorial doesn’t work on vm-warte v14. Any work arounds?
Does this work with VMware Player 14?
This works on the vmware workstation v14, but the display is very sluggish. Any solution?
Thanks.
I used vmware 14 workstation, followed the instructions and worked fine.
download quota exceeded for this file!, and I can not download macOS High Sierra Finall by Techsviewer.rar file.
downloading link expire in 24 hours its a very big file its take 4 to 5 days to downloading in india please help
Torrent Option.
the rar file archive is corrupt. It is a damage file which I downloaded from google drive, https://drive.google.com/drive/folders/0Bxo4zVlSzKr6c0hSSDhjR2pFVzg how to slove this error?
Your Mac High Sierra download won’t download. It says it “has succeeded the max download quota, please try again later.”
For guys using VMware 14: Download this unlocker instead of from this article: https://github.com/DrDonk/unlocker
You can choose download zip option or git clone. Run the same as stated in this article.
thanks
this worked properly.
Here is download link for macOS High Sierra 10.13.1 ISO
https://goo.gl/DhsHTy
The operation on file “C:\Users\Soham Mondal\Downloads\Compressed\macOS High Sierra Final by Techsviewer\macOS High Sierra Final by Techsviewer\macOS High Sierra Final by Techsviewer.vmdk” failed.
If the file resides on a remote file system, make sure that the network connection and the server where this disk resides are functioning properly. If the file resides on removable media, reattach the media.
Select Retry to attempt the operation again.
Select Cancel to end this session.
Select Continue to forward the error to the guest operating system.
I am having this issue.
How can I change my resolution?
Just Make it Fullscreen
Install Vm Tools so you get more options with resolutions.
Is it possible to update this operating system too?
I cannot copy files from outside the vmware,
I’ve tried to drag the file, copy && paste and that didn’t work,
using vmware 14
are these files secure to install? thanks
this method works with VMware Player 14?
Hi, thank you so much! I just have a problem, I cant find the virtual machine configuration(VMX) file.
This works for me, thanks. However, I found I can not change its display resolution. Can somebody help?
Thank you SO much! It worked 1000%. All steps were to the point. It worked.
[…] Download the hard disk image of macOS High Sierra from this link. […]
thank you for your great job with the guild also with giving everyone a link that works, great job keep it going
Have you the Admin Password?? Because, this vmware image, had a user account Admin.
Regards.
Try 123
Hello! Can’t change resolution. Any solution?
Though I install VMware tools, i am not being able to use full screen. i am using vmware workstation 14.
thank you very much o:)
Sir, I have followed the every steps,but, whenever I am going to power this virtual machine,The error comes like below:–
VMware Workstation unrecoverable error: (vcpu-0)
vcpu-0:VERIFY vmcore/vmm/main/physMem_monitor.c:1180;
——– Now, what to do? Please tell.
hough I install VMware tools, i am not being able to use full screen. i am using vmware workstation 12.
Another problem occurs, that after installation,the file sharing is not possible.I am not able to see the file of windows from Mac and vice versa.Kindly, rectify it.
I have problem after install. The macOS reboot and can not boot to OS because have problem with bootloop.
https://preview.ibb.co/igwPTS/2018_03_04_143531.png
How can i fix this?
Great work it’s done as descirbe
Worked for me with latest Workstation Pro (build 7528167) under Linux. Note however that it did not work with VMWare Player for me (macOS crashes during boot).
“3. Yes, you’re right, select Apple Mac OS X and OS version then hit Next.”
No, there is no “Apple mac os X
The latest version of VMWare Workstation/Player won’t accept the Tools, win-install, so it fails. No Mac shows up in the setup.
That’s VMWorkstation/Player V 9.0.4-build 1945795
Works great! Thanks for doing all the work!
But, I have a question.
What is the keychain password?
What is the keychain password?
thank you very much o:)
all right.
I don’t know how to turn a file from .iso format to .vmdk format. When I use Winrar tool for conversion, I cannot find the option to convert the file to .vmdk. I also tried 7-zip but I am not able to do the conversion with it either. Please explain to me how to convert the operating system file to .vmdk format. Thanks.
You don’t convert iso to vmdk. The guide here is for setting up the virtual machine using a pre-made virtual disk. Download the vmdk file from the link provided.
You don’t convert iso to vmdk. The guide here is for setting up the virtual machine using a pre-made virtual disk. Download the vmdk file from the link provided.
Can you please help me with the latest unlocker because its not extracting, its shows error that the archieve is either damage or format
I ever successfully run mojave in vmware workstaion 15.0 but after upgrading to 15.1 mojave keep restarting
so I reinstall mojave again but I can’t see the hard disk
https://ibb.co/j2jWCq
downgrade to 15.0 didn’t solve it
delete hd and readd hd still problem
any idea?
thank u
Hello,
At the end of step 4 when I add the .vmdk file it gives me this error:
The selected virtual disk is incompatible with this Workstation 12.x virtual machine. Adding this disk would make this virtual machine incompatible with older VMware products.
I appreciate if you help me.
Installed successfully today on 7th Jan, 19…
Just followed listed information…
Thanks for sharing..
Nice
Use VMware Workstation pro 15 and Macos Hight Sierra installed on Windows 7 64bit.
When the installation is clicked on Power on this virtual machine is presented
first the window of VMware and then the one with Apple’s apple and the progressive bar that starts to scroll.
However, the VNware window is immediately reintroduced and again with the Apple apple again
the progressive bar starts again from zero and the cycle continues to repeat without reaching the conclusion. Where should action be taken to remedy the problem or the normal practice of installing Macos?
For Those Getting a reboot during the Apple logo in a loop, you may want to try masking the CPUID by editing the VM .vmx file.
Add there lines.
cpuid.1.eax = “00000000000000110100011010101001”
cpuid.1.edx = “10111111111010111111101111111011”
Worked like a dream on my install.
Basically the OS install sees the Proc ID and knows it isn’t Mac hadware and invokes a kernal panic and shuts down then VMware restarts the install, and panic again and thus the loop.
If it doesn’t work for yours google the code and you’ll find there are a bunch of other lines you can use to try to mask the CPU ID.
Good luck to all.
bro pls can’t you compress this file to be smaller and pls upload to media fire please…..i really need this mac virtual box image ……pls but i need it to be smaller in size pls compressing it will be good…..i have been sent here by a friend that you have helped pls
I’m really loving the theme/design of your website. Do you ever run into
any web browser compatibility problems? A few of my blog visitors
have complained about my blog not working correctly in Explorer but looks great in Chrome.
Do you have any tips to help fix this issue?
Yes, stop using Explorer and use Google Chrome.