Google Forms is a powerful form-building tool that is easy to use. But, for those new to it or others who only use certain features, you may not realize all that it can do. This guide to Google Forms will walk you through every button, feature, question type, and setting.
So, pop open Google Forms, follow along or skip to the section you need the most. And, remember to bookmark this for future reference!
Get Familiar with the Interface
Google Forms offers a clean and simple user interface with intuitive navigation. Here is a brief description of the items you will see.
Home Page Sections
The main page of Google Forms is divided into two convenient sections. Start a new form right from the top using a Blank sheet or check out a handy template. You can also open a recent form from the area below that.
The Recent Forms section is sortable by form owner, last opened or modified by you, last modified by anyone, or title. This makes it convenient to find exactly the form you need when you have many. You can also switch between grid and list view or open a file from Google Drive.
Home Page Navigation
The top navigation for the Google Forms home page is just like other Google apps. This gives a nice and consistent feel across the board, especially if you are a frequent Google app user.
- Left: Google menu to access Docs, Sheets, Slides, Drive, and settings
- Center: Search box for Google Forms
- Right: Buttons for Google apps, notifications, and your Google account
Form Page Navigation
When you open a form, you will notice a different set of navigation options at the top. These are specific to form creation, editing, sharing, and more. And, some of the buttons you see are dynamic and we will explain how they work below.
Top Left Navigation
Here you will see the back arrow, which you can click to return to the Google Forms home page. Next, you will see the name of your form. To change the default name displayed for blank forms or templates, just put your cursor in that spot and type.
If you start with a Blank form, you will not see the next icon when you first open it. But, once you begin work on your form and it saves to Google Drive, a folder icon will appear. You can then move the form within Google Drive or create a new folder for it.
Finally, you will see a star. You can select this option to keep those important forms handy. Then, when you open a file on the Google Forms home page, you will see a tab for your Starred forms.
Top Right Navigation
The top right navigation begins with another dynamic button for Add-ons. If you have not installed any Add-ons for your Google Forms account, you will not see this option. But, as soon as you install an Add-on, a puzzle piece button will appear for you to access those tools.
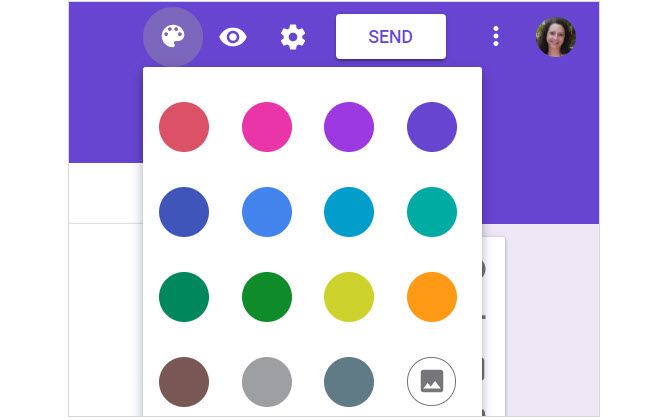
Next, you will see a palette button. This option gives you a quick way to change the color or theme for your form. You can pick a color and see it change immediately. Or, click the image icon to select a theme or upload one of your own photos. Whatever you decide, this is a good way to spruce up the appearance of your form.
The eye icon you see next is for a preview of your form. As you work on it, you can click that preview button to see your form out of edit mode and as a participant will see it when you share it.
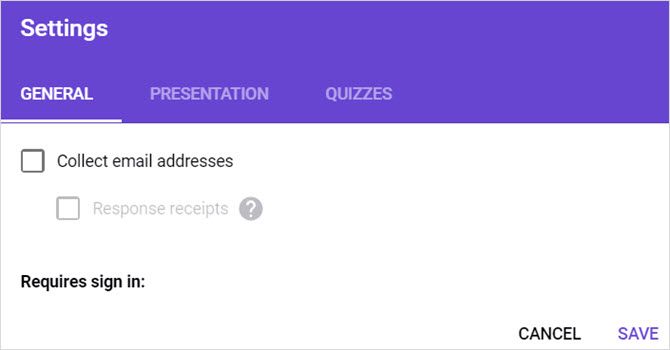
To the right of the eye, is the gear icon to access your form settings. This section has a bit more detail than the others and is divided into three sections.
- General: Collect an email address on the form and choose to enable response receipts, require a sign-in and optionally limit to one response, and allow respondents to edit and view response details.
- Presentation: Enable items to display on your forms like a progress bar, a link to submit another response, or shuffle the question order.
- Quizzes: Turn the form into a quiz and then release the grade immediately or later and let respondents see missed questions, correct answers, and point values.
Be sure to click the Save button after any changes you make to the form settings.
Next, to the settings, you will see a large Send button. This is what you will use once your form is complete and ready for you to distribute. We will go into further detail for your options in the Sending and Sharing Forms section below.
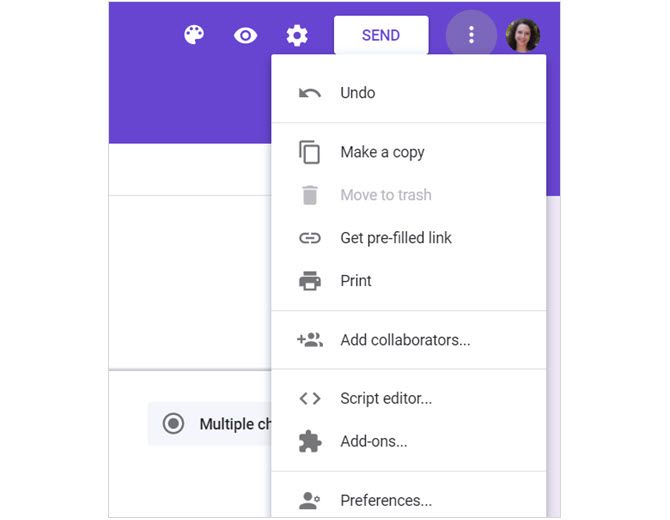
The More (three-dot icon) option is the button you need to print, delete, and adjust your preferences. But, you may also need to access other features, so here is a complete list for the More button.
- Undo: Undo the last change to your form.
- Make a Copy: Duplicate the current form.
- Move to Trash: Delete the current form.
- Get Pre-Filled Link: In a new tab, populate form questions with sample answers and submit the form.
- Print: Print your form.
- Add Collaborators: Obtain a link or enter email addresses for your collaborators.
- Script Editor: Open the script behind the form in a separate window (normally for developers).
- Add-ons: Open the Google Forms Add-ons Store.
- Preferences: Adjust default settings for email addresses and quiz questions.
Check Out the Form Features
Now that you know your way around the Google Forms sections and navigation, let’s walk through the features.
Explanation of Form Sections
Each form is divided into two sections for Questions and Responses. The Questions area is where you build your form and the Responses area is where answers from participants reside (discussed in detail in Form Responses below).
Section Features
The form title is shown at the top of your form and can be edited there. This is the title your participants will see and will automatically populate with the name you gave the form. However, it can be different than the form name if you prefer. You can then add a description to your form if you believe it will be beneficial.
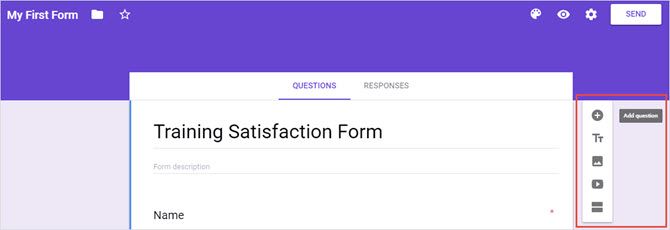
While you are building your form, you will see a small Floating Sidebar on the right. These little buttons come with actions to create your forms faster.
- Add a Question
- Add a Title and Description (for a question or section)
- Add an Image
- Add a Video
- Add a Section (to the form)
Question Types
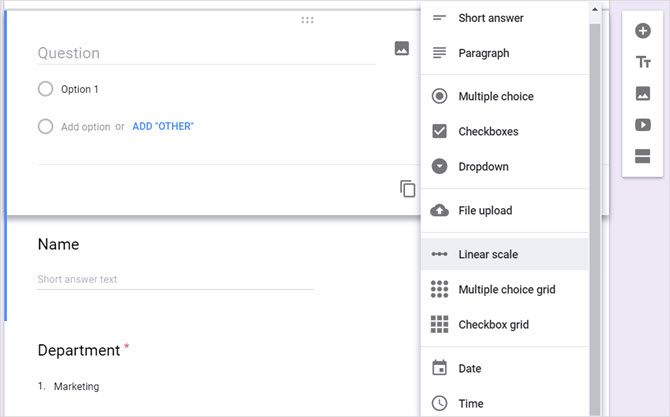
Google Forms offers several question types giving you a great amount of flexibility. Here is a description of each question type and example of when or how to use it.
- Short Answer: Allows the participant to enter a small amount of text. This is ideal for inputting their first and last name, company or school name, or few-word note.
- Paragraph: Lets the participant enter a longer amount of text. You can use this for customer feedback, special delivery instructions, or a product problem explanation.
- Multiple Choice: Limits your participant to one answer. Use it for a small list of answers such as quiz questions, selecting an appointment time, or picking a prize.
- Checkboxes: Allows participants to select more than one answer from the list. You could use this for choosing multiple types of pets, owned devices, or product brands used.
- Dropdown: Limits your participants to one answer. This is useful for choosing an answer from a long list, unlike the Multiple Choice type. It works well for selecting an employee name, a country or city, or a career or type of business.
- File Upload: If you want participants to be able to upload a file, this is the option you would choose. You can then adjust the file types, number files, and the maximum file size. You can use this for educational assignments or project teams.
- Linear Scale: For questions where participants can choose from a numbered scale, this works well. Pick the scale numbers from one to 10 and add labels to the lowest and highest numbers if you like. This is great for satisfaction surveys, feedback, or opinions.
- Multiple Choice Grid: For rows and columns of boxes, pick this type. Your participants can select multiple answers in one spot, but only one per row. You might use this instead of the Linear Scale type which is for just one question at a time.
- Checkbox Grid: This is similar to the Multiple Choice Grid except that participants can pick multiple answers per row and
- Date: For a convenient way to add a date question, this option includes a drop-down calendar for participants to pick from easily.
- Time: If you want participants to choose a time for one of your questions, they can simply enter the hours and minutes and then pick AM or PM from a drop-down list.
Form Bottom Buttons
When you are on one of your forms and select a question, you will notice these options show up on the bottom of the block.
- Duplicate: Create another block with the exact same question and settings.
- Delete: Remove the question from the form.
- Required: Participants cannot submit the form without answering the question.
- More: Add a description or response validation.
Sending and Sharing Forms
After you complete your form, you will obviously want to distribute it for others to participate. Google Forms offers a few ways for you to share your form.
Email the Form
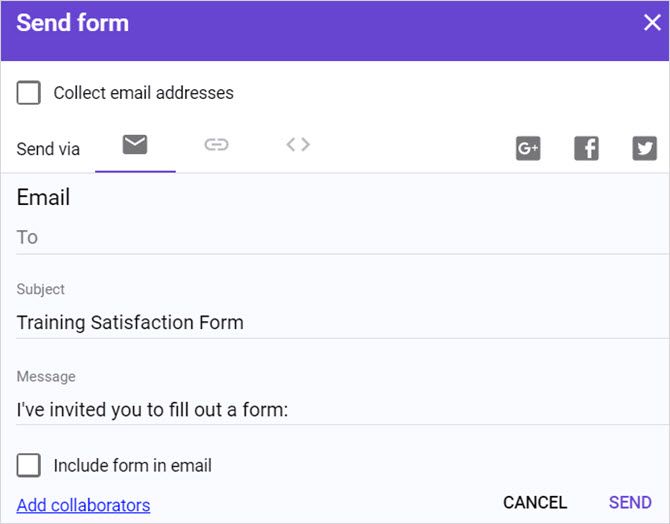
If you choose the email option, you can enter multiple email addresses to invite people to fill out the form. The subject and message populate by default, but you can edit these fields. When you finish, click Send.
The email area also includes a link for you to Add Collaborators. You can then grab the link, share via social media, or invite others by email. This is a handy feature for team members or coworkers to provide their input on the form. You will notice a checkbox to prevent form editors the ability change access or add new people. If you want to limit these items, be sure to mark the box.
Obtain a Form Link
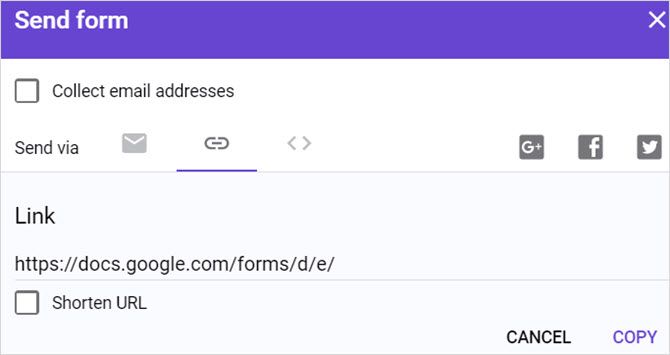
When you just want a link to your form, select that icon in the sharing options. You can then click Copy to copy the URL to your clipboard. If you prefer a simpler link, click the Shorten URL box and get a shorter link before hitting Copy.
Create an Embedded Link
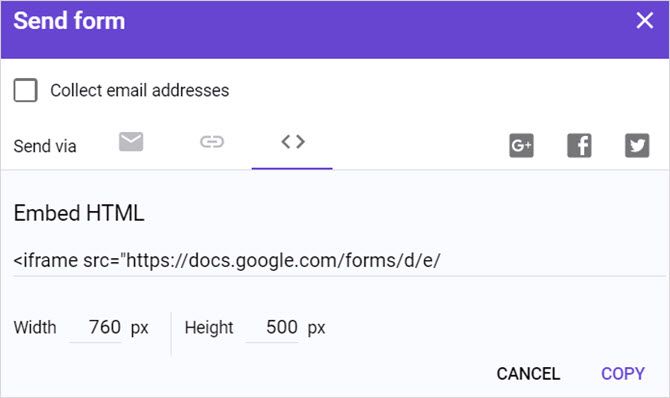
If you plan to embed the form on your blog or website, you can select that option instead. You will see the embed HTML and have the option to adjust the width and height first. When you finish, click Copy to copy the embed link.
More Options
On each screen for sharing via email, obtaining the URL, or receiving the embed link, you will notice other sharing options.
You can mark the box to collect email addresses from the form or share your form on Google+, Facebook, or Twitter. If you plan to share your form on these social media networks, just click one of the buttons, sign in, and post it instantly.
Form Responses
Google Forms offers terrific options for the data your forms collect. At the top of your form, click Responses to view the options. In addition, you will see a number indicating how many responses you have received so far.
Data Options
On the Responses tab of your form, you have an option to create a spreadsheet. This is convenient if you have a large number of responses and want an easier way to analyze the data later. Click the green spreadsheet icon at the top and choose from creating a new sheet or adding the data to an existing one. New spreadsheets are automatically created in Google Sheets.
Next to the spreadsheet icon, you will see the More (three-dot icon) option. If you click this, you have options to receive emails for new form responses, select a spreadsheet destination, unlink the form, and download, print, or delete all responses.
Summary
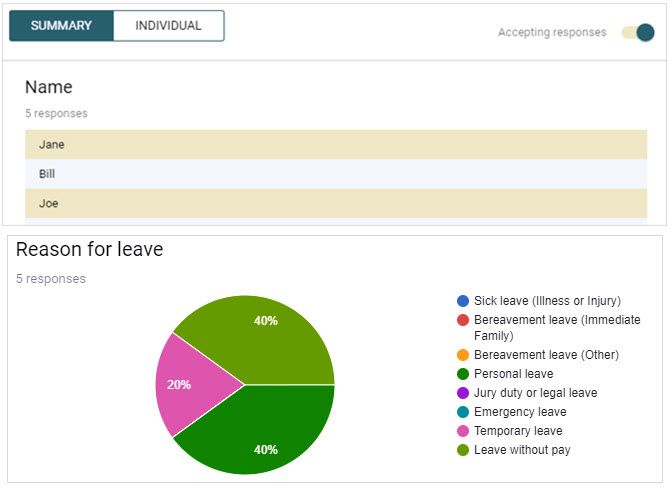
You can also get a nice summary of your responses received so far by clicking Summary on the Responses screen. Depending on the types of questions you use, the summary can include tables and charts of responses. The charts make it simple for you to view data at a glance.
Individual
If you want to view how each participant responded rather than a summary of all responses, select Individual. You can then see how each form was completed and move through responses with the arrows at the top. If you want to print or delete any one in particular, those buttons are available next to the arrows.
Stop Responses
When you want to stop participants from responding to your form, just slide the Accepting Responses button. This is located at the top of the Responses screen. You can enter a custom message for people to see when they visit the link to your form.
Let’s Build a Simple Form
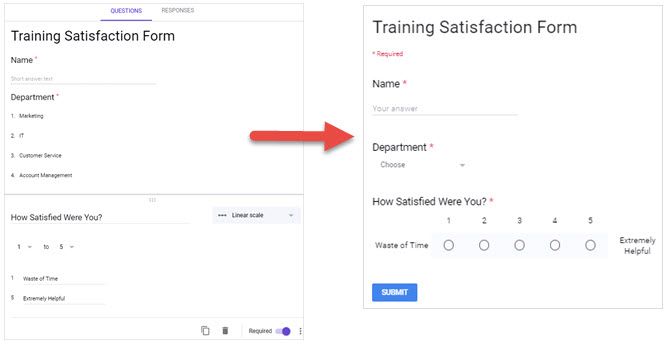
Just to show how easy it is to build a form in Google Forms, here are the steps to create a basic one from scratch. For this example, we will use a Training Satisfaction Form to get overall feedback on a business training session.
- Log into Google Forms and click the Blank form type.
- Name the form in the top left navigation spot as described above. We will call this one "My First Form".
- Give your form a title. This form’s title will be "Training Satisfaction Form".
- Click the first question block and choose a question type. We will pick Short Answer and title the question Name.
- Since we want to require an answer for this, we will mark it as Required in the question navigation.
- Click the Add Question button in the sidebar to add the next question and select the type. We will choose Dropdown and title the question Department.
- Fill in the labels for each answer. We will use a short list for demonstration purposes: Marketing, IT, Customer Service, and Account Management. Mark the question as Required.
- Click the Add Question button in the sidebar to add the next question and select the type. We will pick Linear Scale and title the question How Satisfied Were You?.
- Select the number range you would like to use from one to 10. For this question, we will use one to five.
- Then, add labels for the lowest and highest numbers. We will label 1 as Waste of Time and 5 as Extremely Helpful. Mark the question as Required
- Click the eye icon from the top right navigation to preview the form.
That’s it! If you are happy with the preview of your form, click Send from the top and share it with your participants.
Start with a Template
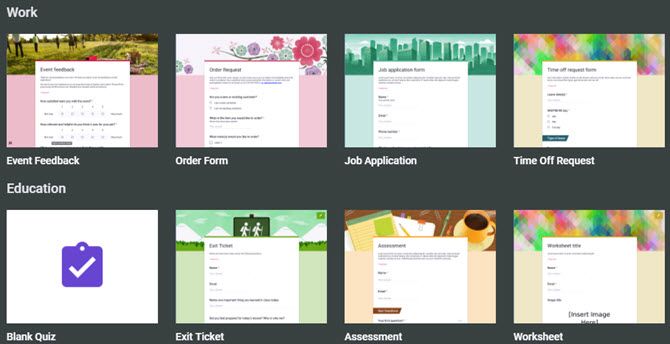
While creating a form from scratch is super easy with Google Forms, you can optionally start with a template instead. The templates give you a great way to get used to the tool and a quick method for creating a form in a hurry. At the top of your Google Forms home page, click Template Gallery at the top.
When the page expands, you will see a decent selection of template types organized by category. Choose from personal, work, or education. The most common kinds of templates are there for you to pick from and each is easily editable with the information in this article. And, if you would prefer to create your very own form, just click the Blank option.
Template Tips
- Name the Form Template: The first thing you should do if you choose to use a template is give it a name. By default, the template name will display. To avoid future confusion, name your form immediately on the top left of the form navigation.
- Change the Appearance: You may see a template and like the questions, structure, or layout, but not the appearance. Remember that you can change the colors and background easily using the Color Palette button at the top of the form.
- Create Your Own Template: If you begin with a Google Forms template and make numerous changes, you can reuse and edit it for future forms. Basically, you are creating your own template. On the form page, click the More (three-dot icon) option from the top navigation, select Make a Copy, and give it a new name. You can do this for each new form you create.
Get Some Handy Add-Ons
Add-ons are terrific tools that you can use to enhance your Google Forms. They range from those that can remove answers that participants choose to those that pull in data dynamically. You can also check out add-ons that provide you with email notifications and more detailed summaries.
If you are ready to browse the Add-Ons Store, head to Google Forms and sign in. Select an existing form or create a new one. Then, click the More (three-dot icon) option from the top menu and select Add-ons.
When the store opens, you can browse add-ons by category, but if you know which one you want, just enter the name into the search box. To add it to your Google Forms account, click the blue Free button and then confirm your Google account. Close the store window and the add-on will appear in your Add-ons list.
Add-Ons and Examples
Here are just a few of the add-ons you can get and how they can help your Google Forms.
- Advanced Summary: This add-on provides you with colorful and helpful graphs of your form data. This is ideal for quick glances or business presentations.
- CheckItOut: This add-on is terrific if you need a form for checking in and out items. Use it for checking out work equipment or classroom supplies.
- Email Notifications: This handy tool gives you an easy way to receive email or mobile notifications when your form is submitted.
- FormLimiter: This tool lets you stop form submissions on a specific date or after a certain number of received responses. If you have a deadline for orders or expiration for a promotion, this is the add-on you want.
Use Your Add-Ons
Once you install a new add-on, you can access it easily. Create or open your form, click the Add-ons button at the top, and select it from the list. If it is the first time you are using the add-on, you may have to go through a setup process. This completely depends on the add-on.
What’s Your Favorite Google Forms Feature?
Depending on what types of forms you create, there may be some features you use or prefer over others. Do you take advantage of the various question types, make your forms stand out with graphics, create quizzes, manage finances, or use dynamic data add-ons?
Let us know what your favorite Google Forms feature is and why in the comments below!

