
As you progress through your physics career, you’ll start noticing that the problems continue getting harder. While it would be lovely if every problem consisted of a singular object being acted upon by a singular force, that will rarely be the case. You’ll often have multiple vectors pointing in multiple directions and you’ll need a way to keep all of those forces organized. Thankfully, we have a tool for that – the free body diagram. In this article, we’ll cover what a free body diagram is, how to draw one, and see how they can help us understand physics problems.
What We Review
Review: Types of Forces
We reviewed all of the different types of forces you’ll encounter during your time in high school physics, but we’ll recap a few points briefly. First, you’ll want to recall that there are two main categories of forces – contact forces and field forces. For the purposes of this post, we’ll only be utilizing the gravitational force (\text{F}_{\text{g}}), the normal force (\text{F}_{\text{N}}), air resistance (\text{F}_{\text{air}}), applied forces (\text{F}_{\text{p}}), the force of static friction (\text{F}_{\text{s}}), and the force of kinetic friction (\text{F}_{\text{k}})
How to Draw Free Body Diagrams
If you’re starting to feel the onset of “I’m not an artist” panic settle in, don’t worry. Almost any physics professor you meet will apologize for their diagrams because they aren’t artists either. A free body diagram requires very little of you artistically. You’ll usually only be focusing on one object that will be represented as a square-ish box. If you have something rolling or something circular (like a planet or an atom) then you can draw them as circles. You’ll also want to include the surface your object is on, especially if it’s an inclined plane or the object is hanging from something. This is usually done with one straight line with shorter ones coming off, as shown.
The next thing you’ll need in your free body diagram are the forces, with arrows labeled with the symbol that matches the type of force you’re showing. It’s important to note that the arrows start at the edge of the objecr and point away from the object in the direction they would cause it to move.
Free Body Diagram Symbols
Surface |  Object |
 Circular/Rolling Object | 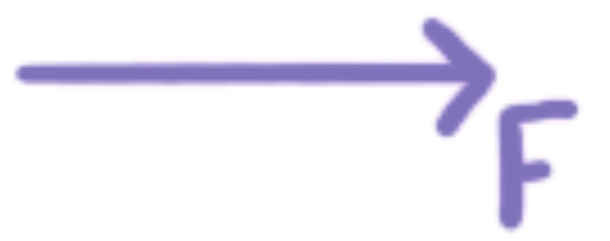 Force |
In general, you’ll want to start by drawing your surface, then your object, and then your forces. This isn’t a hard rule and there may be times you want to reverse the first two. As you progress throughout your physics career, you may even begin to skip drawing flat surfaces altogether. For now, though, we’ll stick to completing these steps as we draw our free body diagrams.
Free Body Diagrams in 1 Dimension
A one-dimensional free body diagram is one where all of the forces act in the same line. You can think of this as simply a straight line or that each force will be at 0^\circ or 180^\circ relative to all the other forces.
Example
Construct a free body diagram showing the forces on a skydiver who has just opened their parachute.
Drawing the Object & Surface
Because we’re moving through space, we don’t have any surfaces to worry about. We can skip straight to drawing our object in this case.
Adding the Forces
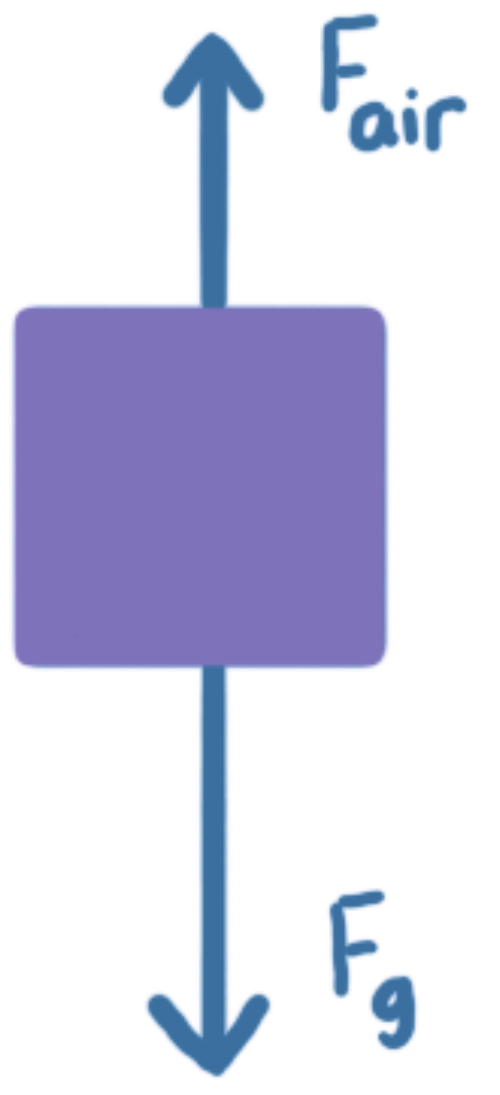
Next, we need to add the arrow showing the force. We know that the skydiver just opened the parachute so there will be some air resistance and they couldn’t be falling without the force of gravity. In this case, we’ll have two forces acting on our object and our free body diagram will look like the one below.
Free Body Diagrams in 2 Dimensions
You may be thinking to yourself that showing forces in one dimension is great, but you’ve already noticed problems getting a bit more complex and introducing a second dimension.
For two-dimensional free body diagrams, we’ll follow the same steps of drawing our surface and then our object, and then our forces. The difference here, however, is that the forces will act over one plane instead of just in one line. This means that all of the different forces can be at an angle relative to each other, but you should be able to draw one circle that encompasses all of them.
Example
A worker attempts to push a box across a factory floor but isn’t able to overcome the force of static friction acting on the box. Draw a free body diagram showing all of the forces at play.
Drawing the Object & Surface
In this case, our box is on a surface, so we’ll have the same box we did in our one-dimensional free body diagram, but we’ll also include the floor in this one.

Adding the Forces
We were told in our problem statement that we have a pushing force and a static friction force. The static friction force will act opposite to the direction of the push, so let’s add this pair of forces first.
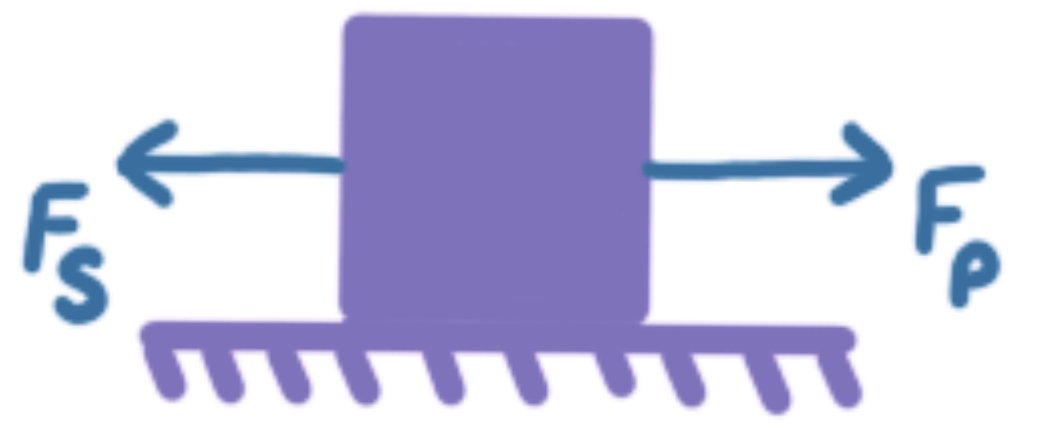
Remember what we said about how forces always start on the edge of the object and point in the direction they would make the object move? There’s an example of that here. Our worker would be applying his force to the left side of our box, but that’s not where we drew the force coming from because, mathematically speaking, it doesn’t matter. It doesn’t matter precisely where the force was applied, only the direction in which it would make the box go, and drawing your forces coming from different locations would get rather messy and confusing quite quickly.
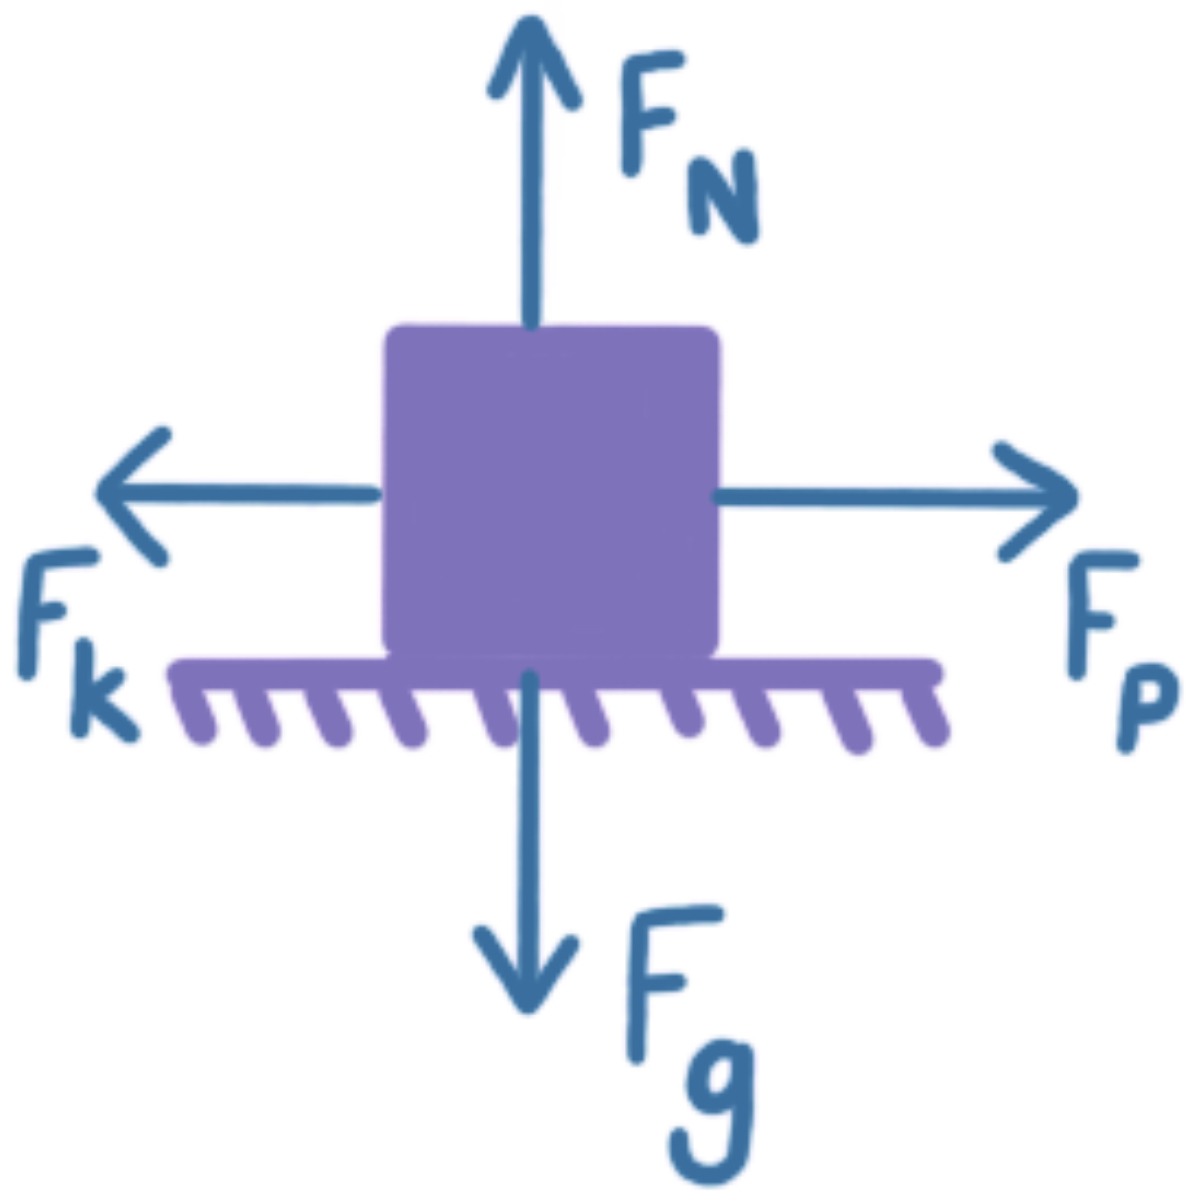
We know we’re supposed to be working in two dimensions now, though, so we need to finish drawing two more forces. A frictional force can’t exist without a gravitational force and a gravitational force should always come with a normal force (provided your object is resting on a surface). So, we will draw these two forces into our free body diagram and call it complete.

Again, we can point out that we have four forces acting in four separate directions, but because they all act on the same plane we still have a two-dimensional free body diagram.
How to Find Net Force
With so many forces moving around in different directions, it can become difficult to know what values you should be using and when. Force allows us to know what direction an object will move in, but if there are multiple forces some will add together while some will cancel each other out. In order to find the value we actually need, we need to introduce the idea of a net force. The net force on the object is the sum of all of the forces acting on that object and it takes into account both magnitude and direction. Remember, forces are vectors, and adding vectors always results in a vector. This leaves us with the question of how to find net force.
Net force is written as F_{\text{Net}} and can be defined by the equation:
| Net Force Formula F_{\text{Net}}=\Sigma F |
If you haven’t seen the \Sigma symbol before, it simply means “the sum of” and will likely come up more frequently as you progress into higher-level physics and mathematics classes. The really important thing here is that you add up all of the forces acting on the object regardless of if they’re the same type of force or not. So, gravitational forces can be added to air resistance forces can be added to spring forces can be added to normal forces can be added to tension forces, and so on. You can add any two values together as long as they have the same units so you can always add any two forces together.
Net Force in Practice
Now that you know what a net force is, you need to know how it comes into practice. If we remember Newton’s Second Law, we know that the amount of force applied to an object determines that object’s acceleration. When multiple forces act on the same object, acceleration depends on the object’s mass and the net force acting on that object. So, in the case of an object with multiple forces, the F value in F=ma will be the net force.
Now that we know what the net force is and how it comes into play with what we’ve learned previously, let’s put what we know into practice.
Net Force in 1 Dimension
Just like when we were working with free body diagrams, we can find the net force for as many dimensions as we want. Finding the net force in one dimension is the easiest and you likely won’t go beyond two dimensions in high school physics. To find the net force in one dimension, you’ll follow the process below.
- Identify all of the forces acting on the object.
- Draw a free body diagram of the object.
- Decide which direction is positive and which is negative.
- Subtract the forces in the negative direction from those in the positive direction.
- If the problem asks for it, use the net force to find mass or acceleration.
Example: Net Force on a Skydiver
Let’s look back at the skydiver who just opened his parachute. Let’s say that as the parachute opens they are experiencing a gravitational force of 100\text{ N} and an air resistance of 150\text{ N} and that the skydiver has a mass of 25\text{ kg}. What acceleration does the skydiver experience as they open their parachute?
Step 1: Identify the forces
In this case, we have two forces:
- F_{\text{g}}=100\text{ N}
- F_{\text{air}}=150\text{ N}
Step 2: Draw the Free Body Diagram
We drew a free body diagram for this situation before, so we can recreate it here.
Step 3: Decide Which Way is Positive
In physics, there is no constant definition of which way is positive and which way is negative. You’re able to define your axes however you want. In general, it’s best to define up and right positive and down and left negative. There are a few exceptions to this rule – mainly if the problem statement has already defined the different directions or if it will be easier to define things differently. For this problem, though, we can define up as positive and down as negative.
Step 4: Complete the Calculation
In one-dimensional motion, you only have forces in two directions so you’ll be subtracting the negative forces from the positive forces. This comes directly from our net force equation and the calculation is shown below.
F_{\text{Net}}=\Sigma F=F_{\text{air}}+F_{\text{g}}
F_{\text{Net}}=150\text{ N}+(-100\text{ N})
F_{\text{Net}}=50\text{ N}
Before we continue, it’s worth noting that a positive value here means the net force is pointing upwards. This means that the acceleration will be upwards. If you think about what happens when a skydiver first opens their parachute, this makes sense. The parachute catches on the air and causes the skydiver to slow down considerably which means they have to be experiencing an upward force. Making sure the direction of your answer makes sense can be a key step to double-checking that you’ve set up your problem correctly.
Step 5: Find the Acceleration
Our problem statement asked us to find the acceleration of our skydiver so we’ll pull the equation for Newton’s Second Law and follow our standard problem solving steps to find the answer.
- F_{\text{Net}}=50\text{ N}
- m=25\text{ kg}
- F_{\text{Net}}=ma
F_{\text{Net}}=ma
a=\dfrac{F_{\text{Net}}}{m}
a=\dfrac{50\text{ N}}{25\text{ kg}}
a=2\text{ m/s}^{2}
One last note before we move on is that your acceleration should always be in the same direction as your net force. Mass is a scalar quantity, which means it can’t influence the direction of motion. So, the acceleration has to go in the same direction as the force. If one is negative, the other will also be negative or (as is the case here) if one is positive, the other will also be positive.
Net Force in 2 Dimensions
Finding net force in two dimensions can be a bit trickier than in one dimension. In two dimensions, you’ll need to be able to account for the components of different forces. Sometimes, there will be obvious force pairs (forces acting along one line of motion), but other times forces will act at random angles relative to one another.
Example
A worker pushes a box across a factory floor with a force of 50\text{ N} directed along the positive x-axis. The box experiences a kinetic friction force of 30\text{ N} and a gravitational force of 80\text{ N}. Assuming the box began at rest, what direction will it be moving in?
Step 1: Identify the forces
In this case, we have four forces:
- F_{\text{p}}=50\text{ N}
- F_{\text{k}}=30\text{ N}
- F_{\text{g}}=80\text{ N}
There is one more force that’s really important here, which is the normal force. The value for the normal force wasn’t given to us in the problem, but it will always be equal to the y-component of the gravitational force. Because we weren’t told we’re on an inclined plane, we can assume that we’re on a flat surface which means that the normal force will actually be equal in magnitude to the gravitational force. So, we can add our fourth force to the list.
- F_{\text{N}}=F_{\text{g}}=80\text{ N}
Step 2: Draw the Free Body Diagram
Next, we’ll draw a free body diagram. We drew one incredibly similar before, but with a force of static friction instead of kinetic friction. We’ll pull that same diagram but replace the appropriate force.
Step 3: Decide Which Way is Positive
Again, there’s no correct way to define positive and negative in physics, but we’ll stick to the standard convention of calling the right and up as positive and down and left as negative.
Step 4: Complete the Calculation
We were asked to figure out which way the box ends up moving, assuming it starts at rest. We can figure this out based on which way our acceleration is pointing. To know that, we’ll need to know our net force – the magnitude and the direction of it. We have forces moving in four different directions and we can’t work with each of them all at once. Instead, we’ll simplify things into force pairs. You can start wherever you’d like, but we’ll be starting with the forces in the y-direction.
Our force pair in the y-direction consists of the normal force and the gravitational force. The magnitude of both of these forces is 80\text{ N} and they’re pointing in opposite directions which makes them what we call balanced forces. Balanced forces essentially cancel each other out when we start looking for the net force. We can see this visually, but we can also prove this mathematically.
F_{\text{Y-Net}}=\Sigma F=F_{\text{N}}+F_{\text{g}}
F_{\text{Y-Net}}=80\text{ N}+(-80\text{ N})
F_{\text{Y-Net}}=0\text{ N}
Next, we’ll look at the x-direction. Here we have a pushing force and a force of kinetic friction. They are pointing in the opposite direction, but they don’t have the same magnitude. In this case, we have a pair of unbalanced forces. Unbalanced forces are forces that can’t cancel each other out. This tells us that we will have to have some amount of net force in the x-direction.
F_{\text{X-Net}}=\Sigma F=F_{\text{p}}+F_{\text{k}}
F_{\text{X-Net}}=50\text{ N}+(-30\text{ N})
F_{\text{X-Net}}=20\text{ N}
Step 5: Find the Direction
Because our net force in the y-direction is zero, finishing this question up is easy. We’ll only need to account for the net force in the x-direction. Because our net force along the horizontal axis is a positive value, we know that the overall net force on the box is directed to the right. That means the acceleration of the box is directed to the right. So, because the box began at rest, it must now be moving to the right, along the positive x-axis.
In theory, this should make sense. We were told the worker was pushing the box in the positive x-direction. Friction can’t send objects flying backward any more than the normal force can pull them to the ceiling so, we should’ve been able to predict the box would be moving in the direction it was being pushed. Taking a moment to check your answers with logic when solving problems is always an important step in physics.
Inclined Planes
Another common use for free body diagrams in physics is looking at forces on a block on an inclined plane. The introduction of inclined planes is also often the introduction of looking at forces that act at odd angles to one another. You’ll often have one or more forces acting along the plane, but the gravitational force and normal force will be at an angle to one another.
The direction of the normal force is always perpendicular to the surface the object is on. It can be tempting when inclined planes are first introduced to continue drawing the normal force parallel to the gravitational force, but in this case, we can’t. The gravitational force will always point directly downward, but you have a normal force at an angle relative to the gravitational force equal to the angle of the inclined plane. To get a better idea of what this actually means, let’s look at an example.
Example of Forces on an Inclined Plane
Draw the free body diagram of an object sliding down a plane inclined 30^\circ above the horizontal and experiencing a force of kinetic friction.
Drawing the Object & Surface
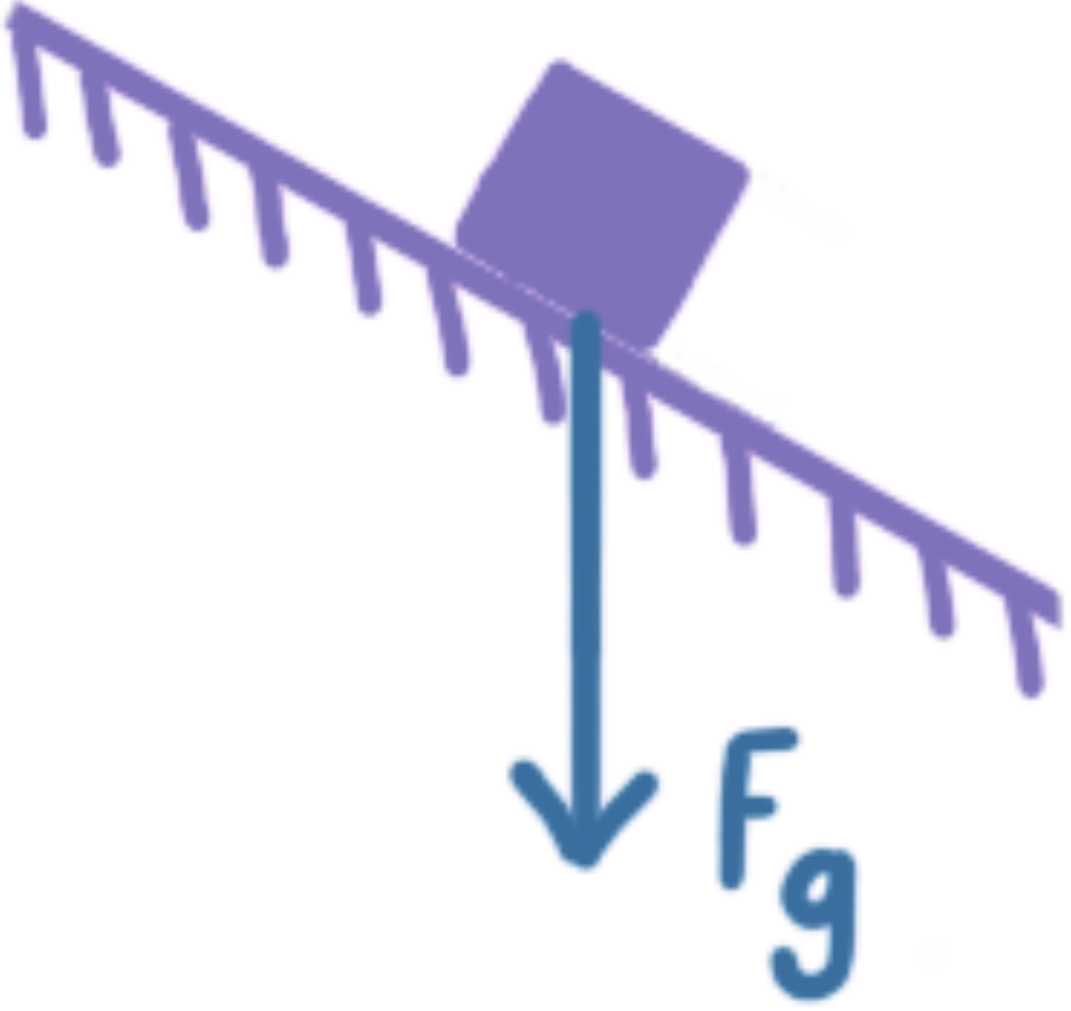
We’ll start this free body diagram the same way we would any other by drawing in the surface and the object it’s resting on. The angle of your incline doesn’t need to be perfectly accurate, but you should try to get it close to make sure your diagram is helpful when trying to understand a problem.

Adding the Forces
We’ll start with the easiest force to draw, which is the gravitational force. This one will, as always, be directed straight down from the object.
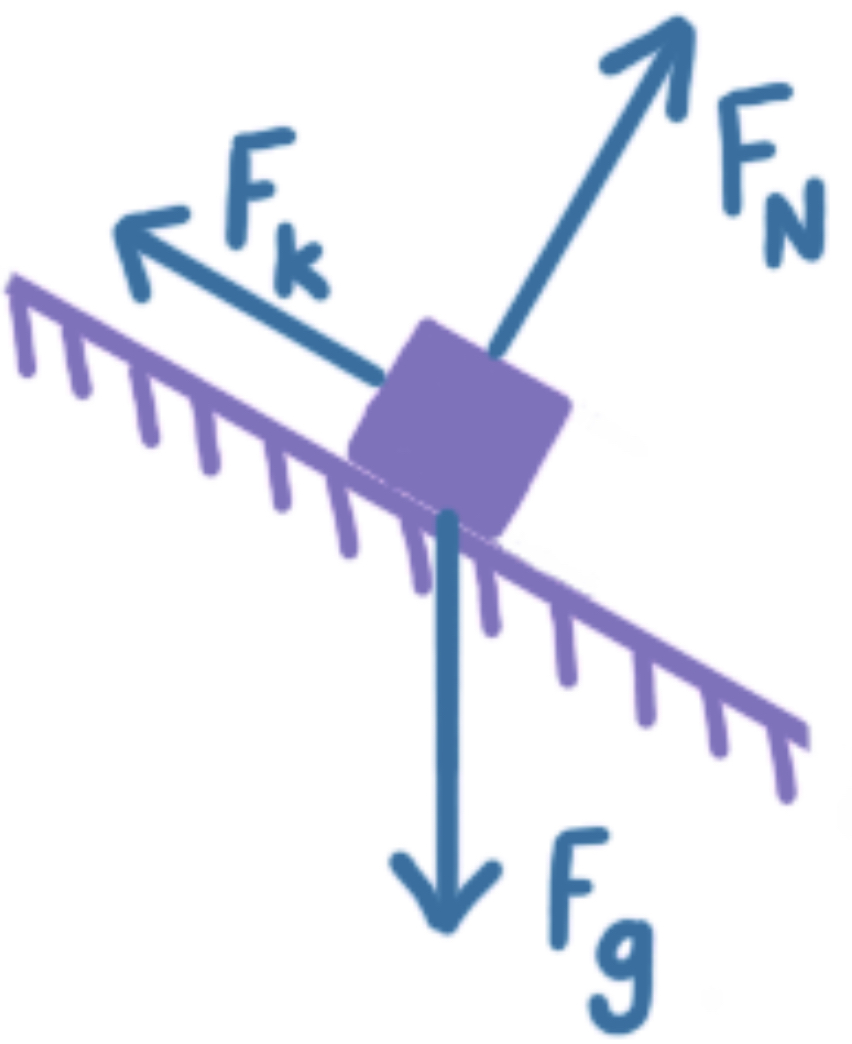
Next, we’ll move to the force of kinetic friction. Kinetic friction will always point opposite to the direction of motion. If the block is sliding down the ramp, then the direction of motion is parallel to the ramp pointed down and to the right. Therefore, the force of kinetic friction will be parallel to the ramp pointed up and to the left.

We don’t have any forces pushing our box down the ramp so the only force we have left to draw is the normal force. As we said, the normal force will be perpendicular to the surface and pointing away from that surface. So, we’ll draw it pointed up and to the right.
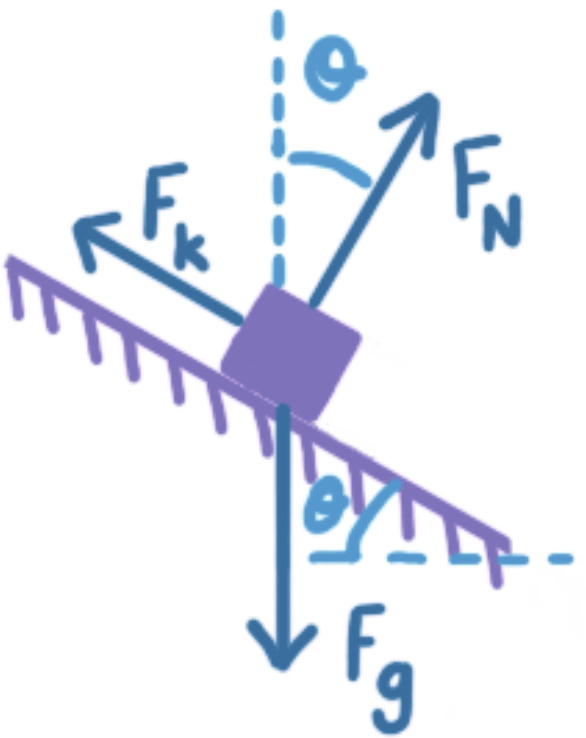
It’s worth noting that if you were to imagine a dotted line continuing up from the gravitational force, it would be 30^\circ from the normal force – the same angle as the incline of our inclined plane. This point isn’t particularly relevant for just drawing the free body diagram but is extremely important during questions about net force and acceleration.
Conclusion
Free body diagrams are important tools in solving complex physics problems. As you continue on your physics journey, you’ll see them becoming more and more important over time. The more you practice drawing and understanding these diagrams the more useful you’ll see them become.