Table of Contents
Advertisement
Advertisement
Table of Contents

Related Manuals for ION Electronic Drum Kit


Summary of Contents for ION Electronic Drum Kit
- Page 1 Electronic Drum Kit Quick Start Owner’s Manual...
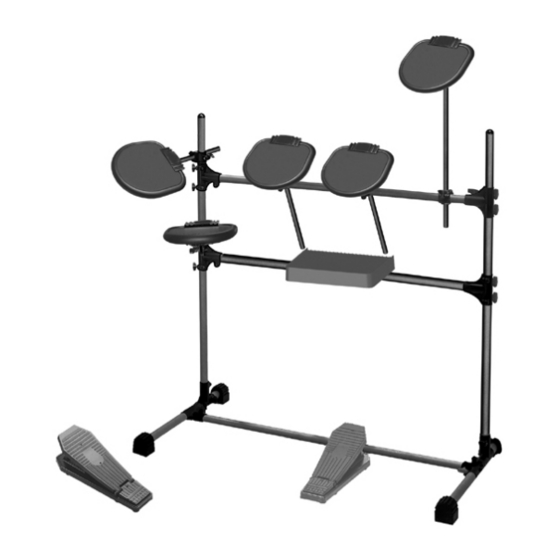
- Page 3 Stand Assembly Instructions Install rubber feet (A1) to the end of each stand base bar (B1). The flat part of the rubber faces the floor. Install one horizontal bar (B2) to the preinstalled horizontal clamp (C) as shown in the picture.
- Page 4 Insert three clamps (D) on to a horizontal bar (B2) and put two horizontal clamps (C) on the end. Slide the assembly onto the two vertical bars as shown. Now slide another clamp (D) down the left hand vertical bar which is going to be used for the Hi-Hat. Then slide one small bar (B3) into the clamp (D) as shown.
- Page 5 Attache the mounting bracket (G) to the back of the iET01 Trigger Box as shown in the figure. Attach to lower horizontal bar as shown in figure and angle accordingly. The iDM01 Drum Machine will rest on top of this. This is how the finished assembly will look.
- Page 6 Quick Setup Guide Make sure all items listed on the front of this guide are included in the box. READ SAFETY INSTRUCTION BOOKLET BEFORE USING THE PRODUCT Study this setup diagram. Place drum set in an appropriate position for operation. Make sure all speaker devices are turned off and all volume/faders are at “zero.”...
-
Page 7: Getting Started
Getting Started This section will cover how to begin using your electronic drum kit. Be sure that your electronic drum kit setup matches the diagram shown in the Quick Setup Guide as previously shown. • Be sure that both the iET01 Trigger Box and the iDM01 Drum Machine are both powered on. - Page 8 Reference Manual Stereo Drum Machine...
-
Page 9: Table Of Contents
TABLE OF CONTENTS CHAPTER 1: INTRODUCTION ............. 1 1.1 WELCOME TO THE IDM01 DRUM MACHINE! ............1 1.1A If You Just Can't Wait…................1 1.1B IDM01 Quick Description................1 1.1C About this Manual..................1 1.2 GROUND RULES ....................2 1.2A The Pattern/Song Recording Method............2 1.2B The Four Different Types of Patterns ............3 1.2C How "Looping"... - Page 10 3.1I Record a Pattern ..................22 3.1J Select New Patterns and Fills While in Compose (Record) Mode ...22 3.1K Using Fill to Create Repetitive Drum Hits..........23 3.2 ERASE FUNCTIONS ....................24 3.2A Erase Mistakes While Recording .............24 3.2B Erase an Entire Pattern ................24 3.2C Erase All Events Played by a Particular Drum Pad..........24 3.3 COPY FUNCTIONS ....................25 3.3A Copy, Append, and Double Patterns............25...
- Page 11 CHAPTER 6: MIDI SETUP ..............41 6.1 PAGE 1: SELECT MIDI CHANNEL (MIDI CH)............41 6.2 PAGE 2: RECEIVE MIDI DRUM NOTES (DRUM IN) ..........42 6.3 PAGE 3: TRANSMIT MIDI DRUM NOTES (DRUM OUT)........42 6.4 PAGE 4: ASSIGN MIDI NOTE NUMBERS TO DRUM PADS (NOTE) ....43 6.5 PAGE 5: ACCEPT EXTERNAL CLOCK DATA (CLOCK IN)........44 6.6 PAGE 6: SEND CLOCK DATA TO OTHER DEVICES (CLOCKOUT)....44 6.7 PAGE 7: MERGE MIDI IN WITH MIDI OUT (MIDITHRU) ........45...
-
Page 12: Chapter 1: Introduction
CHAPTER 1: INTRODUCTION 1.1 WELCOME TO THE IDM01 DRUM MACHINE! 1.1A If You Just Can't Wait… Turn to section 1.4, 10 Steps to Instant Gratification, and start making sounds. Some of the terms in that section may not make sense, but just follow the instructions, and get ready to hear some great grooves and have a good time. -
Page 13: Ground Rules
7. Backup: Now that you've come up with some great Songs and rhythm Patterns, it's time to save them to a cassette recorder or MIDI system exclusive storage device. 8. Applications: This additional information will help you get the most out of the IDM01. 9. -
Page 14: B The Four Different Types Of Patterns
• Program a list of Patterns, in the order in which they are to be played. • Select Patterns in real time, and the IDM01 will remember your performance. The IDM01 stores up to 100 User-programmable Songs. Breaking a song into Patterns saves time since elements of a song often repeat. Example: The second verse might have the same drum pattern as the first verse. -
Page 15: C How "Looping" Simplifies Recording
1.2C How "Looping" Simplifies Recording To simplify recording in Compose mode, a Pattern will "loop" over and over again. Example: Suppose you want to record an 8-beat pattern. While recording, the pattern will record through all 8 beats, then immediately jump back to the beginning and continue recording through all 8 beats again. -
Page 16: F Physical Layout
1.2F Physical Layout The IDM01 includes seven main types of controls, along with a group of connectors (located on the back panel). The control groups (see diagram) are: • Pads (play buttons). Tapping each button triggers an IDM01 voice. • Function buttons. These six buttons select various functions, some of which include multiple "pages"... -
Page 17: G Display Layout
1.2G Display Layout The LCD is divided into several "windows." Each window contains information that helps you monitor the IDM01's status, and/or indicates what type of data should be entered. • Name, "dialog" box, real time Song/Pattern readout, beat counter. This is the most commonly-used area of the display. -
Page 18: A Entering Numbers
1.3A Entering Numbers The IDM01 identifies Patterns and Songs, as well as many other parameters, with numbers. You need to type in (enter) these numbers in a specific way (as described below). 1.3B The Cursor When the IDM01 wants you to enter a number in the "Dialog" box, the display will show the previously-entered number (or the default number), and the first digit will have a small underline called the cursor. -
Page 19: F Buttons That Toggle
1.3F Buttons that Toggle The Mode buttons, FILL button, and several function buttons (DRUM SET, RECORD SETUP, MIDI SETUP, and BACKUP) "toggle" between two states. Each button press sets the switch to its alternate state. Example: Press the PATTERN/SONG button once to change from Pattern to Song;... - Page 20 8. Press PLAY, and you'll hear a Preset Pattern. (In case the IDM01 has already been played with, make sure that the display shows PERFORM and does not show USER before continuing. To choose Perform mode, press the PERFORM/COMPOSE button until the Perform/Compose section of the display shows PERFORM).
-
Page 21: Chapter 2: Record Setup
CHAPTER 2: RECORD SETUP Several parameters are often adjusted prior to recording a Pattern, such as metronome, Pattern length, etc. General instructions are: 1. Press the RECORD SETUP button. 2. Use the PAGE (up and down) buttons to select different "pages" of functions; the display's lower right window shows the page number. -
Page 22: Select The Swing Value (Swing Select)
Quantization shifts your playing to the specified beat while you play, so choose the desired value before tapping out your rhythms. Remember that you can also change quantization while recording if, for example, you want to record snare with eighth note quantization but high-hats with 16th note quantization. -
Page 23: Enable Click (Metronome) And Set Rhythm (Click Select)
2.3 PAGE 3: ENABLE CLICK (METRONOME) AND SET RHYTHM (CLICK SELECT) The display shows CLICK SELECT; the Click window shows the click's rhythmic value. CLICK SELECT SETUP RECORD PAGE CLICK Enter the click value with the INC/DEC or number buttons (1 = quarter note, 2 = quarter note triplet, 3 = 8th note, 4 = 8th note triplet, 5 = 16th note, 6 = 16th note triplet, 7-0 = Click Off). -
Page 24: Adjust Velocity Response (Velocity)
2.5 PAGE 5: ADJUST VELOCITY RESPONSE (VELOCITY) There are 11 ways in which a pad's output level can respond to the force with which you tap it: soft, medium, loud, and eight fixed responses. VELOCITY LOUD SETUP RECORD PAGE PERFORM The display says VELOCITY. -
Page 25: Add/Remove Beats From Pattern End (Length)
2.6 PAGE 6: ADD/REMOVE BEATS FROM PATTERN END (LENGTH) This option either adds beats to, or subtracts beats from, the end of the Pattern. The Pattern length can be set prior to, or after, recording. Shortening a Pattern's end point erases any drum events that fall outside the remaining part of the Pattern;... -
Page 26: Offset A Pattern Or Drum Part
The display says ### BEAT and START. This indicates a Pattern's length in beats (quarter notes). Enter the desired length with the INC/DEC or number buttons (this must be a three digit number; enter leading zeroes if necessary). A smaller value compared to the original length will remove the difference, in beats, from the beginning of the Pattern. - Page 27 one drum event occurs on the same sub-beat, the PAGE UP/DOWN buttons step forward or backward respectively through each drum one at a time. 001/00 DRUM STEP EDIT SWING OFF QUANTIZE If no drum event exists on this beat/sub-beat, the display will show no pad number, and EMPTY in place of volume data.
-
Page 28: A Add A New Drum To A Step
2.9A Add a New Drum to a Step Use the PAGE buttons to select the step where the drum is to be added. Press the pad that corresponds to the sound you want to add. That drum, along with its volume (how hard the pad was hit), will be recorded into the displayed step. -
Page 29: Chapter 3: Playing Back/Recording Patterns
CHAPTER 3: PLAYING BACK/RECORDING PATTERNS 3.1 PLAYBACK/RECORD BASICS Please make sure you've read section 1.2B, which explains the different types of IDM01 Patterns. It is important to understand the differences between these Pattern types. The PATTERN/SONG button chooses between Pattern and Song modes. For all of the following Pattern operations, Pattern mode must be selected, as confirmed by the display. -
Page 30: C Set Pattern Tempo
BEAT 001 PATTERN USER TEMPO RECORDING QUANTIZE SWINGOFF COMPOSE CLICK To listen, choose Perform (this de-activates the click). You can drop in and out of these two modes as you record. While the IDM01 is in either mode, you can change Pattern quantization, swing, click rhythm and volume, pad velocity response, name, drumset, drumset parameters, and MIDI parameters. -
Page 31: E Stop/Restart A Pattern
When a Main Pattern reaches its end, it will loop back to the beginning and continue playing from that point unless you select a new Pattern, selected a Fill Pattern initially, or stop the Pattern (section 3.1E). If you select a User Pattern that contains no data, the display says EMPTY PATTERN. If you select a User Pattern that contains data but has not yet been named, the display says NO NAME. -
Page 32: H Select Fill Patterns In Perform (Playback) Mode
Notes • If you change your mind or select the wrong Pattern, you can select a new Pattern number at any time before the next Pattern begins. • If you press STOP before the next Pattern begins playing, the IDM01 will stop and remain on the currently selected Pattern. -
Page 33: I Record A Pattern
Pattern repeating until the solo is about to end, at which point you select the Fill that leads out of the A Main Pattern. 3.1I Record a Pattern An empty Pattern defaults to an 8 beat length, with 16th note quantization and swing off (50%). If you need to change the length, it's best (though not essential) to do so before recording. -
Page 34: K Using Fill To Create Repetitive Drum Hits
As mentioned earlier, the FILL button performs two different functions. We've already covered how to use the FILL button for Pattern selection, however, it can also trigger a drum sound at the current quantization rate (e.g., eighth notes, 16th notes, etc.; if quantization is off, though, this function is inactive) and swing value. -
Page 35: A Erase Mistakes While Recording
5. While continuing to hold the ERASE button, press PLAY again. The display will read FILL ERASED. 6. Release both buttons. Note: To retain the Drum Set assignment, length, and name when you erase a Pattern, hold ERASE and tap each drum pad. This erases the drum events, but retains all other Pattern parameters. -
Page 36: B Copy (Merge) One Drum Pad's Part To Another Drum Pad (Soundstacking™)
• Copying a Pattern to a blank destination Pattern replaces the blank Pattern with the original Pattern data. • Copying to a Pattern that already contains data appends the original data to the end of the data in the destination Pattern. If this would result in a Pattern with more than 128 beats, the display will say TOO MANY BEATS. -
Page 37: C Copy A Single Drum Pad's Part To A Drum Pad In A Different Pattern
6. Tap the destination pad to which the source part will be merged. Often when copying to a different Pattern, this will be the same drum pad number as selected in step (5). As long as COPY is held down, the destination pad can still be changed by selecting another drum pad. -
Page 38: F Copy A Drum Set To Another Idm01 Via Midi
3.3F Copy a Drum Set to Another IDM01 Via MIDI The IDM01 can send Drum Set system exclusive information to another IDM01 via MIDI. If you have only one IDM01, you can skip this section. 1. The source IDM01 should be in Pattern mode and stopped. Connect the source IDM01 MIDI out to the destination IDM01 MIDI in. -
Page 39: Chapter 4: Creating Drum Sets
CHAPTER 4: CREATING DRUM SETS The IDM01's 12 pads can be assigned to various drum sounds, with different levels, tuning, panning, triggering mode, and output jack assignment. Each set of pad parameters is given a number and collectively are called a Drum Set; each A and B user Pattern can have its own Drum Set assignment. -
Page 40: Assign Sounds To Pads
4.2 PAGE 2: ASSIGN SOUNDS TO PADS The display shows the currently selected pad number and the sound assigned to that pad. FATSNARE DRUM DRUM SET PAGE You can assign any of the IDM01's sounds to any of the pads, or to more than one pad. Each individual Drum Set can have its own drum sound assignment. -
Page 41: Set Pad Stereo Position (Panning)
To change the volume associated with a given pad: 1. Press the pad (the display will show the pad number). 2. Enter the desired volume, from 00 (full off) to 99 (maximum volume), with the number or INC/DEC buttons. 3.When the display confirms your choice, either store the edits you've made (see section 4.8) or do more assignments by tapping another pad to select it, then assigning the pad volume. -
Page 42: Set Pad Tuning (Tuning)
4.5 PAGE 5: SET PAD TUNING (TUNING) The display shows TUNING, the currently selected pad number, and the tuning assigned to that pad. TUNING DRUM DRUM SET PAGE To change the tuning associated with a given pad: 1. Press the pad (the display will show the pad number). 2. -
Page 43: Choose Output Jacks (Output)
3. When the display confirms your choice, either store the edited Drum Set (see section 4.8) or do more assignments by tapping another pad to select it, then changing the new assignment mode. Background Each mode affects triggering in a different way: Multi: When hitting a pad repeatedly, each hit will cause the sound to go through its entire decay. -
Page 44: Save Drum Set (Save Set)
Mono: Plug into one of the output pair jacks; the IDM01 is smart enough to know that plugging in one plug means you must want mono. Any pan settings are ignored. Do not plug into both outputs, or stereo will be activated. Stereo with Fixed Placement: Plug the left Main output into the left channel of your amp (or mixer), and the right Main output into the right channel. -
Page 45: Manual Drum Set Override (Set Mode)
To save the Drum Set to a different location, enter the new Drum Set number with the INC/DEC or number buttons (allowable range is 00-49), then press PLAY. The display will say DRUMSET SAVED for as long as PLAY is held down. If you were editing a Preset Drum Set and want to save it, you will be given the option to save it to a User Drum Set since you cannot overwrite a Preset Drum Set. -
Page 46: Chapter 5: Song Mode
CHAPTER 5: SONG MODE 5.1 SONG MODE BASICS After creating the Patterns that make up a Song, it's time to string those Patterns together in a musically useful way. You can incorporate Preset Patterns, or a combination of Preset and User Patterns. -
Page 47: C Continue, Re-Start, Or Jump To Next Song Step
Background While in Pattern mode, the tempo remains as is until changed. If you switch over to Song mode and the programmed Song tempo is different, the IDM01 will assume the Song's tempo—even if you switch back into Pattern mode—until the tempo is changed again (either manually, or by selecting a different Song). 5.1C Continue, Re-start, or Jump to Next Song Step •... -
Page 48: G Change Song Tempo As The Idm01 Plays
5.1G Change Song Tempo as the IDM01 Plays To change the Song tempo as it plays, press the TEMPO/PAGE UP button to increase the tempo, and the TEMPO/PAGE DOWN button to decrease the tempo. 5.2 REAL TIME SONG CREATION To create a Song in real time (this assumes an empty song): 1. -
Page 49: Manual Song Creation
5.3 MANUAL SONG CREATION 5.3A Enter a Pattern 1. Select Song mode and the desired Song number. 2. Select Compose mode. The display will show STEP 01 and the contents of the step, which is currently END (if the first step says END, that indicates that the Song is empty since it contains no data. -
Page 50: E Delete A Step
5.3E Delete a Step 1. The IDM01 should be in Song and Compose modes. 2. Use the INC/DEC buttons to select the step number to be deleted. 3. Press and hold ERASE. The display says ERASE STEP? 4. While continuing to hold ERASE, press PLAY. The step is deleted, and all subsequent steps are automatically re-numbered to reflect the deletion of the inserted step (e.g., what used to be step 06 is now step 05, what used to be step 07 is now step 06, etc.). -
Page 51: J Copy A Song To Another Idm01 Via Midi
3. Press and hold the COPY button, and keep holding it down until step (6). The display says COPY TO SONG with the number of the currently selected Song. 4. While continuing to hold the COPY button, enter the destination Song number to which the source Song should be copied using the number or INC/DEC buttons. -
Page 52: Chapter 6: Midi Setup
CHAPTER 6: MIDI SETUP This menu accesses important MIDI functions. General instructions are: 1. Press the MIDI SETUP button. 2. Use the Page (up and down) buttons to select different "pages" of functions; the display's lower right window shows the page number. These pages are described below. 3. -
Page 53: Receive Midi Drum Notes (Drum In)
6.2 PAGE 2: RECEIVE MIDI DRUM NOTES (DRUM IN) DRUM IN ON V1 SETUPMIDI PAGE PERFORM The display shows DRUM IN. This page features two different MIDI input velocity curves (ON V1 and ON V2). To have the IDM01 receive note messages at its MIDI input, use the INC/DEC buttons to select ON V1 or ON V2. -
Page 54: Assign Midi Note Numbers To Drum Pads (Note)
6.4 PAGE 4: ASSIGN MIDI NOTE NUMBERS TO DRUM PADS (NOTE) This page determines which MIDI in NOTE will trigger a pad, or MIDI out note will be produced if you play a pad. The display shows the note number/name in the upper left, and the drum pad number in the upper right window. -
Page 55: Accept External Clock Data (Clock In)
6.5 PAGE 5: ACCEPT EXTERNAL CLOCK DATA (CLOCK IN) CLOCK IN SETUPMIDI PAGE PERFORM The display shows CLOCK IN. To have the IDM01 recognize clock (timing) messages present at its MIDI input, use the INC/DEC buttons to select ON (if no clock messages are present, the IDM01 will follow its internal clock tempo). -
Page 56: Merge Midi In With Midi Out (Midithru)
Background The IDM01 can generate timing signals to which other devices can synchronize if: • The external device (sequencer, drum machine, etc.) can respond to MIDI timing signals. • These signals go from the IDM01's MIDI out to the external device's MIDI in. •... -
Page 57: Select Drum Sets Via Midi Program Changes (Prg Chng).46
49) in MULTI-DRUMSET mode. Any of these drumset groups can cover MIDI notes 000 through 119. This makes the IDM01 ideal for use as a drum sound module, triggered by either an electronic drum kit or set of electronic drum pads, or by notes from a sequencer. - Page 58 Drum MIDI Drum MIDI Drum MIDI Note Note Note Drum note map in MULTI-DRUMSET mode NOTE: In this chart, Pad and MIDI note number values for drumset 00 also apply to drumsets 10, 20, 30, and 40; values for drumset 01 also apply to drumsets 11, 21, 31 and 41, etc.
-
Page 59: Chapter 7: Backup
CHAPTER 7: BACKUP 7.1 BACKUP BASICS This function allows you to save the IDM01 Pattern, Song, and Drum Kit data to cassette tapes or MIDI system exclusive storage devices. General instructions are: 1. Press the BACKUP button. 2. Use the Page (up and down) buttons to select different "pages" of functions; the display's lower right window shows the page number. -
Page 60: Tape Interface Hookup
7.2 TAPE INTERFACE HOOKUP To save to tape: Connect a mini phone plug cable (male-to-male) from the IDM01 tape in/out to the recorder's tape in. If you are using a standard cassette recorder rather than a data recorder, plug into the recorder's Aux or Line Level input. If your only option is to plug into the microphone input, you may still be able to achieve satisfactory results. -
Page 61: Receive Data Directly From Another Midi Device
4. Press the DD DO/YES button. The IDM01 automatically senses the presence of this data; no button-pushing is required. The DD display says SENDING: ION IDM01 (filename), the IDM01 display says LOADING MIDI. Note that loading sys ex data overwrites all existing IDM01 memory. -
Page 62: Save All Memory Contents To Tape (Store To Tape?)
7.5 PAGE 2: SAVE ALL MEMORY CONTENTS TO TAPE (STORE TO TAPE?) STORE TO TAPE? PRESS PLAY PRESS PLAY BACKUP PAGE This function saves all Patterns, Songs, and Drum Kits to tape. The display shows STORE TO TAPE? Put the cassette recorder into record mode. After the tape has gone past the leader (if present), press PLAY on the IDM01. -
Page 63: Load Data From Tape (Load In Tape?)
Press the recorder's Play button. While checking, the display shows the current Pattern or Song being verified, until all data has been checked. When the tape has been verified, the display says DONE. To cancel the verifying operation at any time, press STOP. The display says TAPE IN CANCEL. -
Page 64: Load One Pattern From Tape (Load In Patt)
7.8 PAGE 5: LOAD ONE PATTERN FROM TAPE (LOAD IN PATT) LOAD IN PATT01 PRESS PLAY BACKUP PAGE This loads a single Pattern from a tape dump. The display says LOAD IN PATT00. Enter the desired Pattern number with the number or INC/DEC buttons, press the A or B button to specify the desired variation, then press PLAY;... -
Page 65: Check Available Memory (Free Mem)
Background You may just want to load one Song from tape rather than all data. A Song being loaded from tape will take its original position in memory (e.g., SONG 32 will reload back into SONG 32) and will overwrite any data currently stored in that location. -
Page 66: Clear Memory/Re-Initialize Parameters
This will let you know whether you have the enhanced software or not. • Should you experience problems with the IDM01 and call ION for technical support, it is important to know which software your machine is using. -
Page 67: Chapter 8: Applications
CHAPTER 8: APPLICATIONS 8.1 MIDI SYNC APPLICATIONS 8.1A IDM01 As MIDI Timing Master The IDM01 can control several other slave MIDI drum machines or sequencers by turning on MIDI Clock Out, which sends IDM01 timing information down the MIDI line. 1. -
Page 68: B Idm01 As Midi Timing Slave
8.1B IDM01 as MIDI Timing Slave The IDM01 can slave to a MIDI master clock source by turning on Clock In. Example: This lets you slave the IDM01 to a MIDI sequencer on which you have recorded other instruments. 1. Set the IDM01 Clock In to on (Section 6.5). 2. -
Page 69: Strategies For Assembling Patterns And Songs
8.2 STRATEGIES FOR ASSEMBLING PATTERNS AND SONGS Ideally, you should be able to translate your inspirations into tangible form with a minimum amount of effort. The following tips and techniques help speed up the process of creating Patterns and Songs. 8.2A Create Fills Quickly with the Copy Function Many times a Fill will simply be a variation on another Pattern, but with a few minor differences to add variety or serve different musical purposes. -
Page 70: Sound Stacking
8.3 SOUND STACKING™ 8.3A Basics Sound Stacking™ was introduced by Alesis on its two earlier drum machines, the HR-16 and HR-16:B. It is a quick and efficient way of layering drum sounds to create thicker drum textures and gives the user wide capabilities for experimenting with new, personalized drum sounds. Through some intelligent software manipulation, a drum sound's rhythm pattern can be copied to any other drum pad thereby simultaneously triggering the drum sounds assigned to both pads. -
Page 71: Understanding Rhythmic Notation
8.4 UNDERSTANDING RHYTHMIC NOTATION Measures A piece of music is divided into smaller units called measures (also called bars), and each measure is divided into beats. In the IDM01, each beat is further sub-divided into 96 sub-beats. Rhythmic Values for Notes With a measure written in a 4/4 time signature, there are 4 beats per measure, and each beat represents a quarter (1/4) note.