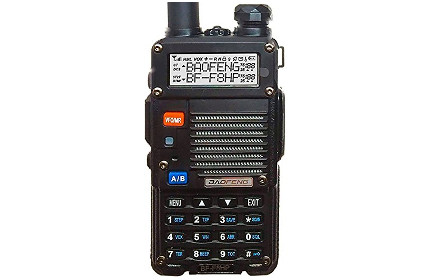
Most radios, including models popular in prepping such as the BaoFeng UV5R and BF-F8, have a built-in digital address book. But they’re about as user-friendly as a 1990’s VCR — it’s a big pain to manually program the settings via the keys on the radio.
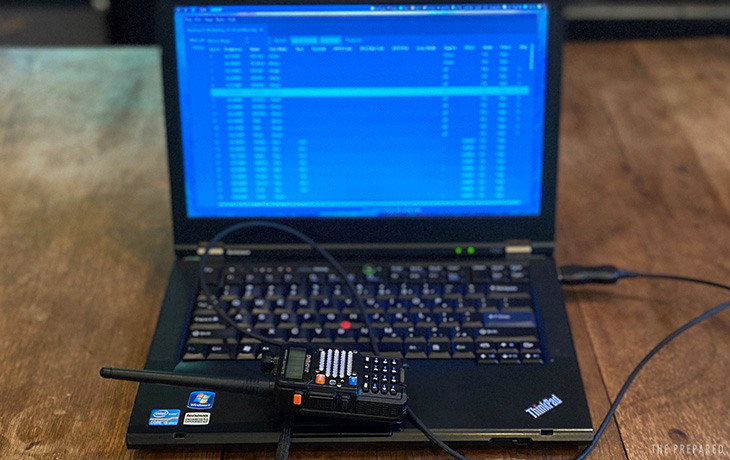
CHIRP is free Ham radio programming software that manages the radio’s address book by plugging the radio into your computer. It’s open source and works with the three major desktop operating systems (Windows, macOS, and Linux), but if you have a choice, use Windows because it avoids some minor frustrations.
CHIRP works with most common radios. The full list is on their website.
All you need is an FTDI cable that works with your radio and a little bit of patience — it’s wonderful that CHIRP exists, especially as free open-source software, but it’s outdated and frustrating to use for people who want Ham in their preps but don’t want to “be a Ham.”
New to Ham? Check out the beginner’s guide to amateur radio and best handheld ham radios
This guide walks you through setting up and using CHIRP for common prep tasks like saving your personal contacts and importing local repeater, weather, and first responder stations. We use common BaoFeng radios, but the steps are basically the same for any model and across computer operating systems.
Popular entry-level:
BaoFeng BF-F8HP 8 Watt Dual Band Handheld Ham Radio
- Basic goals
- Get the right cable
- Installing CHIRP
- General CHIRP tips
- 1st: Connect the radio and make a backup
- Importing basic frequencies
- Adding weather stations
- Adding local repeaters
- Adding first responders
- Adding FRS and GRMS
- Changing general radio settings
- Uploading changes to the radio
- Changing radio models in CHIRP
The goal: channels and settings, what to save, and backups
Common types of contacts you want to have saved in your radio:
- Direct contacts like family members, friends, coworkers, or your prepper group
- Local repeaters, which are special ham stations that rebroadcast messages over wider areas
- Weather stations, like the always-on NOAA weather alerts
- Local first responders, such as police, fire, and EMS
- FRS and GMRS frequencies, so you can talk with people on those style of radios (eg. common walkie-talkies)
Each specific thing you want to contact has a frequency. But instead of remembering 155.415 and who it matches to, you can simply give it a friendly saved name like “Fire Dept”.
Each entry is saved in a channel. The word is used for the same reason as television channels, which, back in the day, were each associated to a frequency. So instead of remembering that NBC was on 187.25, people just needed to remember NBC = channel 4.
Saving your preferred frequencies in channels also makes it easy to scan on your radio. Just hit the scan button and the radio will continually cycle through your list of saved channels until it finds something with activity. That’s a core use-case you will use in an emergency.
CHIRP isn’t just for saving your address book. You can easily create backups on your computer, cloud storage, or USB drives. You can share the same configuration file across everyone in your prepper group so they’re on the same page. If you lose or upgrade your radio, boom, it’s easy to reprogram.
Getting the right radio-to-computer cable
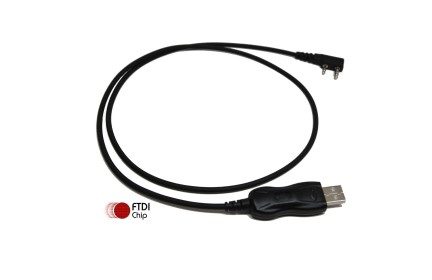
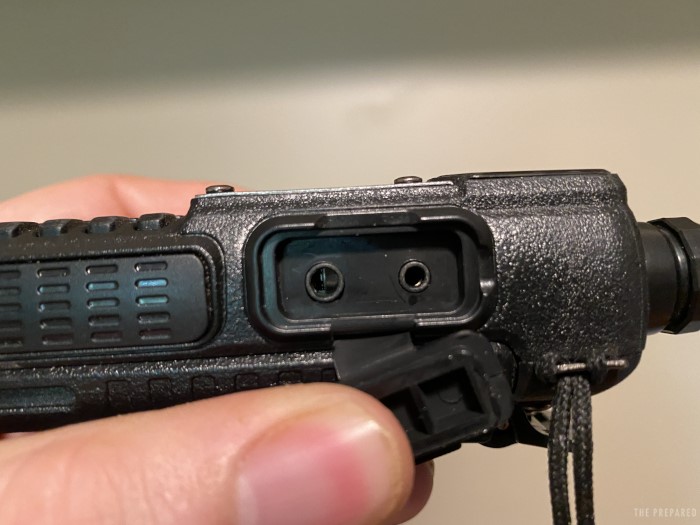
Some radios like the Icom IC-7300 have USB ports, but others don’t, like the cheaper BaoFengs. In those cases, you need an FTDI cable that connects the radio’s mic and speaker jacks to the USB port on your computer.
There are many reports of errors with cheaper knockoff cables, so try to buy authentic cables from the manufacturer. The extra few dollars are worth it.
Essential product:
BaoFengTech Pc03 FTDI Genuine USB Programming Cable
A common error is not seating the plugs all the way into the holes. You should feel an obvious click once the cable is fully engaged.
There’s a chance your computer doesn’t already have the capability to communicate with the cable. If that’s the case, you’ll need to download and install a “driver” that lets the two talk to each other.
We haven’t run into this driver problem for a while though — this probably won’t matter if you’re on a modern computer. If your computer has a hard time recognizing your radio when it’s connected to your computer, you might need to manually install a driver from FTDI.
In our testing, the driver installed automatically in Windows 10. The driver was already pre-installed on macOS and Arch Linux (Arch is a barebones Linux version, so it should also be pre-installed on more-popular Linux distributions like Ubuntu and Fedora).
The FTDI driver provided by most operating system vendors will not work with counterfeit chips. Often, when someone has a problem with CHIRP, a counterfeit cable is the cause.
How to install CHIRP
The installation and initial configuration tend to be some of the trickiest parts, so let’s take it step by step.
Windows
Download the Windows installer, open it, and click through the usual Windows prompts. In testing, we found that CHIRP seems most at home on Windows.
Mac
CHIRP offers both legacy and unified packages for macOS but recommends the unified package. (Green highlight, bottom of list.)
Once downloaded, you’ll unzip the file, then drag and drop the CHIRP application to your `/Applications/` folder.
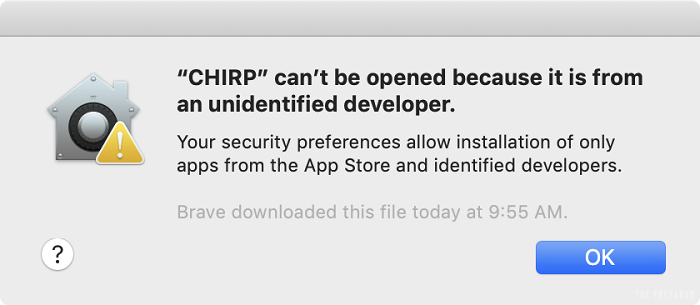
The first time you launch it, you need to Control-click the app icon and choose Open. If you try to open it by double-clicking, you will receive an error since Apple hasn’t given CHIRP its stamp of approval. (Don’t worry, it’s still safe.)
We’ve tested CHIRP on both macOS 10.14 Mojave and macOS 10.15 Catalina, and despite some warnings from the CHIRP developers, experienced no problem using CHIRP in Catalina.
Linux
CHIRP offers Linux installation packages for Ubuntu and Fedora, and a “tarball file” for other distributions. If you use an Arch Linux-based distribution, you can install CHIRP from the Arch Linux User Repository.
After installing CHIRP, you can launch it from the command line with the chirpw command. It may also show up in whatever program launcher you use.
The installation is straightforward enough, but you might get a permissions error. The developers suggest adding your user to the dialout group with this command:
sudo usermod -aG dialout USERNAME
Where USERNAME is your name.
In testing with a ThinkPad running Arch, CHIRP had a hard time seeing the FTDI cable, which maps to /dev/ttyUSB0. Rebooting the ThinkPad with the cable inserted made it show up, and we haven’t had any connection problems since.
General tips
You can do most of these tasks just on the computer without the radio plugged in or turned on. Of course, the radio needs to be connected and on when you’re moving data between the devices.
Any changes you make on the computer don’t change the radio until you specifically tell it to.
Loose cable connections and counterfeit cables cause most CHIRP problems.
The cable talks with the radio through audio tones. So whenever doing this work, make sure your radio is tuned to a quiet frequency with no noise coming through (even with the volume at max). We suggest removing the antenna from the radio before connecting it to your computer.
Most people want to end up with an organized channel list, like this very rough example:
- Ch 1-10 are for personal contacts
- 11-20 for repeaters
- 21-30 for weather stations
- 31-50 for local services
- 51+ for FRS/GMRS
It’s helpful to keep some unused spaces. Imagine you start off with only five personal contacts. Instead of starting the repeaters on Channel 6, you could leave 6-10 empty and start the repeaters at Channel 11. That way, as you add more over time, you don’t have to rework the whole system. This is all just personal preference, though.
But the software is clunky when it comes to keeping your channels the way you want them as you add/import more to the list.
As you go through the steps below, you’ll want to keep track of which channels you have already filled in your overall plan. You might have already saved Channels 1-14, but when you go to import another chunk of channels, the import screen will show the first line at Ch 1, the next as Ch 2, and so on.
You’ll need to tell CHIRP what channel numbers you want the imports to take, that way you avoid any accidental overwrites. Examples below.
Get started: connecting the radio and making a backup
If you’ve got a blank radio or one fresh out of the box, this step isn’t super valuable, but it’s a good place to start the overall lesson: get CHIRP and your radio talking to each other and make a backup image of what’s currently saved on the radio.
Once the radio is properly connected, launch CHIRP. In the menu, go to Radio > Download from Radio.
A dialog box will appear prompting you to choose your port, radio vendor, and model. The vendor and model are relatively straightforward; for a BaoFeng UV5RV2+, choose BaoFeng for the vendor and UV-5R for the model. The port, however, is a bit trickier.
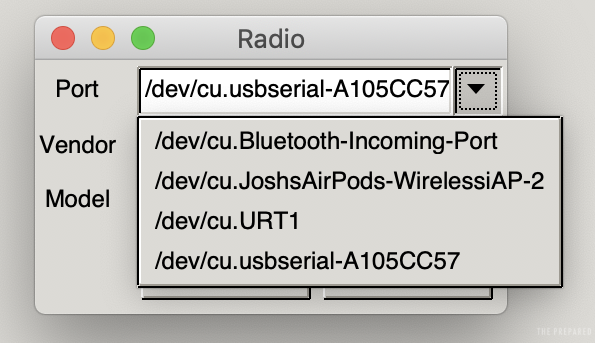
It might take some trial and error to pick the right port from the list of poorly-labeled options — but don’t worry, you can’t harm anything, and you’ll know if it fails because CHIRP won’t be able to talk to your radio.
You should first look for a port with USB somewhere in the name. Click download. If the process fails, try another port.
Once you’ve done this step, you shouldn’t have to go through it again on the same computer.
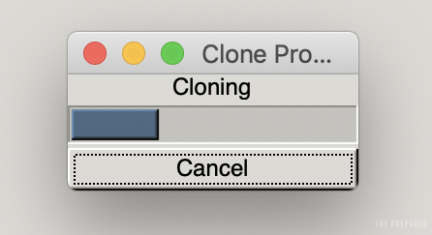
Move through all the prompts and warnings that appear. Don’t be too nervous about the warnings. In our tests, the warnings told us that the driver was experimental and there weren’t any guarantees about whether it would work. (These are common warnings in this kind of community-driven software.)
If everything works as it should, you’ll see a dialog box that indicates cloning has begun. CHIRP is now copying frequencies from your radio to the CHIRP system.
After a few seconds, a table will appear listing the frequencies programmed into your radio.
Problem? Just start the process over again. In our experience, problems pop up in the initial handshake between the computer and radio. Once you’re past this point, it tends to be smooth sailing.
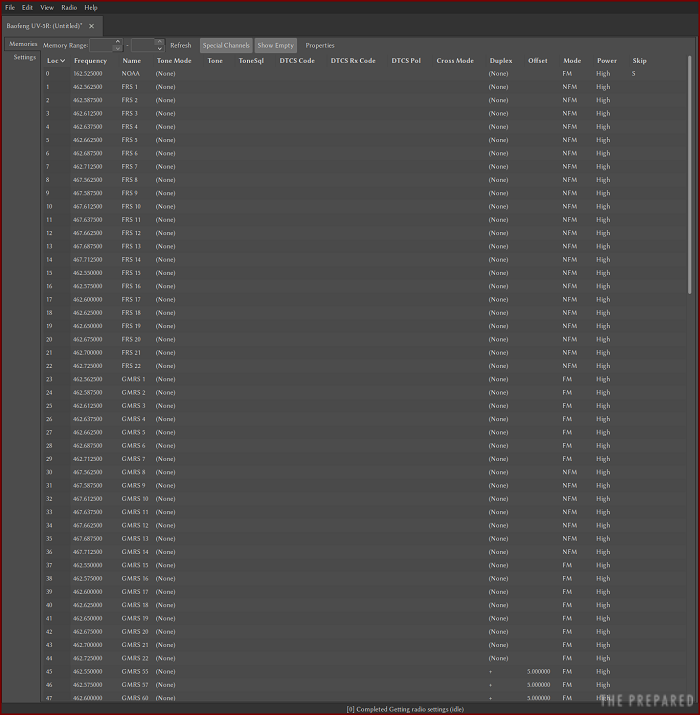
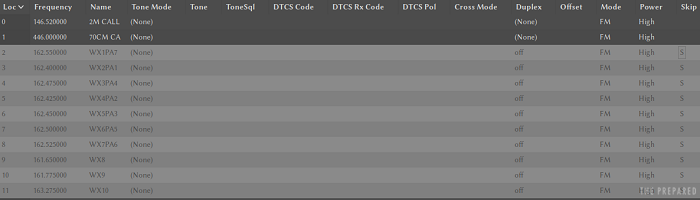
CHIRP’s interface uses tabs. When you download your radio’s frequency list (shown above), all of that info will appear under one tab (called “Memory” in the screenshot). It’s possible you end up with multiple tabs, so just be aware.
Within each tab, radio frequencies appear in a table. Experienced Hams should recognize many of these settings, but a few key columns require an explanation for beginners:
- Loc: The channel number assigned to each frequency. Loc 0 will be Channel 0 on your radio, Loc 10 will be Channel 10, etc. Note that your radio only has so many available channels you can program. For instance, the BaoFeng UV5RV2+ can have 128 total channels programmed into it.
- Frequency: The actual frequency assigned to each channel.
- Name: A label you’ll assign to each channel. You’re restricted to just a handful of characters, so each one needs to count. Use a repeater callsign, like KY4BG; a nickname, like 2M CALL; or a standard channel name for a frequency, like FRS 1.
- Duplex: Lets you fiddle with transmission settings, and is a whole topic in and of itself. Put simply, if you set Duplex to Off, you won’t be able to transmit to that channel. You’ll probably want to turn Duplex to Off for weather stations and emergency response frequencies like police and fire.
- Skip: Setting Skip to S will make it so that the radio will automatically skip over that frequency when scanning. Enable Skip for any weather stations you program in since they’re always broadcasting.
It’s good practice to first make a backup whenever you are going to make changes to your radio.
Choose File > Save, give your image a memorable name (such as today’s date + “backup”), choose where to save the file, and click Save.
Images vs exports
What you just saved is an “image” of your radio. It’s a moment-in-time snapshot of everything digital stored on that radio — not just the address book — such as your general settings.
That’s helpful for cloning all of the setup info across other radios of the same model. For example, if you lose your radio but replace it with the same model, you just use that image file and everything about the new radio will be like the old one. But those images are specific to the radio model since they touch things like radio-specific settings.
Saving just your address book is slightly different. It doesn’t include the radio-specific settings, just the contact info table, which means you can upload the address book to any radio. That comes in handy when you have multiple models in your family or prepper group.
Those address-book-only backups are explained in the last section.
Importing basic frequencies
One of the big advantages of CHIRP is the built-in directory of common frequencies. You could use CHIRP to manually enter your address book, but that’s still tedious and error prone.
There are a few menu items for importing frequency presets. Radio > Import From Stock Config is a good place to start, as this menu item offers common universal frequencies to import. Here you’ll find US calling frequencies, NOAA weather stations, and US FRS and GRMS frequencies.
From Import From Stock Config, select US Calling Frequencies to import the Ham calling frequencies outlined in the American Radio Relay League’s band plan.
Across the entire radio spectrum, most preppers end up using frequencies in just two chunks of the spectrum: 2m and 70cm.
But if you are just trying to call out into the void looking for random connections, which specific frequency would you use? The radio community has set informal standards, such as “calling frequencies” that are kind of a general-purpose chat room. Those are some of the frequencies you’d dial into to try and reach random people in an emergency.

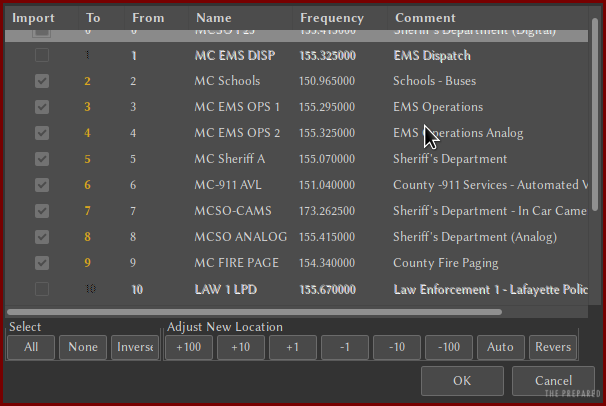
In the above dialog example, you’ll notice that the first column, Import, is checked only for the second and fourth entries. That’s because the BaoFeng UV5RV2+ radio in our demonstration only supports the 2m and 70cm bands (ie. VHF and UHF). CHIRP will not import frequencies your radio can’t handle.
Next, look at the To column. That’s the channel number CHIRP will assign to your address book, ie. where it is sending that imported entry to. In the above example, channel two is the 2m Call, and channel four is the 70cm Call.
Change the automated channel settings
The automated channel settings CHIRP assigns to each frequency aren’t optimal. In the above example, CHIRP would create channels two and four but skip over channels zero, one, and three. Even if we started from a totally-blank address book and didn’t have to worry about conflicts, that ordering might be frustrating.
To fix the channel numbers, look to the bottom of the dialog under Adjust New Location. If you click Auto, CHIRP will set the 2m Call channel to channel zero and 70cm Call to channel one.
Alternatively, you can double-click the number for the channel under the To column to set it manually.
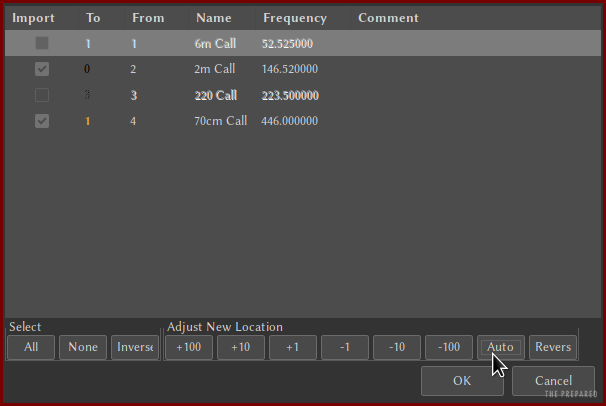
The advantage of using the buttons under Adjust New Location is that it will update all the channel assignments in one go.
You only want to use Auto for the first frequencies you import into a blank address book. You’ll use the numbered buttons (+1, +10, +100) below Adjust New Location the next time you import, so that the next import starts where the current address book ends, or further down if you want to leave some channels empty.
Check each channel manually to avoid overwriting the channels you’ve already set.
A simple example:
- You already have Channels 1-8 saved and don’t want to mess with them.
- You then go to import a batch of 14 frequencies, such as the weather examples below.
- If you don’t manually intervene, CHIRP might place those 14 new frequencies in Channels 1-14.
- But since 1-8 are already taken, you need to tell CHIRP to import the new batch starting with Channel 9 in the “To” field.
Adding weather stations
To add weather frequencies, use the same process: Radio > Import From Stock Config > NOAA Weather Alert.
For weather channels, two configurations are important:
- Unless you’re a meteorologist, you won’t want to transmit to weather frequencies. So make sure Duplex is Off on all of your weather frequencies.
- Tell your radio to skip scanning those stations by putting S in the Skip column. If you leave them as-is and set your radio to scan, it’s going to stop at every weather station your radio can pick up. And since the weather stations are always broadcasting, your scan will get stuck there.
Problem? If you accidentally set Skip on the wrong station, click the S and choose the blank gray block above the S. This will turn off Skip for that channel.
Adding local repeaters
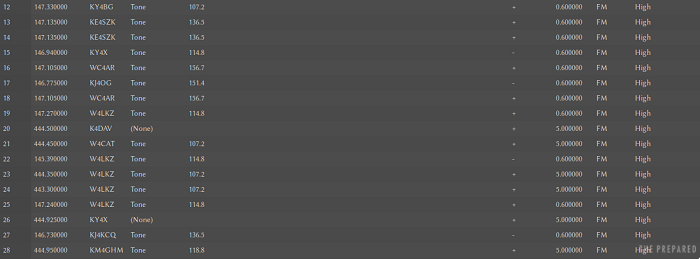
CHIRP is especially handy for entering Ham radio repeaters. A repeater is a particular Ham radio station, usually on a tall hill or mountain, that listens for signals and then “repeats” them out over a wider area. Many repeaters require special settings, such as a frequency offset (since they usually listen on one frequency and transmit on another) and a PL tone. Not only does CHIRP let you enter frequencies, offsets, and PL tones manually, but it can directly import frequencies from popular online repositories to make programming a snap.
To connect to the repeaters around you, choose Radio > Import From Data Source > RepeaterBook > RepeaterBook Proximity Query.
That brings up a dialog where you’ll enter your ZIP Code, search distance in miles, and available bands. To maximize the number of repeaters CHIRP finds, keep Band set to All. CHIRP won’t import frequencies incompatible with your radio.
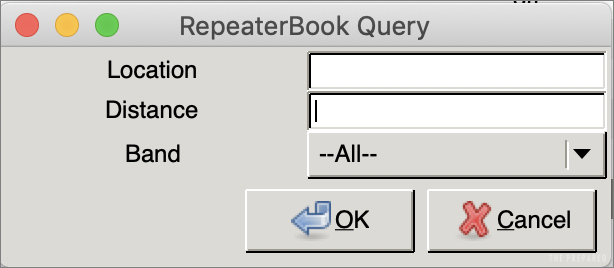
It’s tempting to make a really wide search area. But you don’t want to clutter your address book to the point it’s unhelpful. You might consider the distance between your work and home, how far apart core family members might be on a typical day, how far you’ll travel to a bug out location, etc.
You might notice that the Ham repeaters have some extra settings in the columns, such as tone and offset. These are crucial for being able to transmit to the repeater.
Adding emergency and first responder frequencies
There are two types in this bucket:
- Standard frequencies that people can use to call for help. Think of it like dialing 911 — it doesn’t matter where you are in the US, you can call 911 and get help. Similarly, most boaters know that Channel 16 is the universal call-for-help channel on marine radios.
- The specific frequencies used by your local responders, such as police and fire.
Wikipedia lists several international distress frequencies that are good to know and have programmed in your radio. Here are just a few:
- 2-meter calling frequency is 146.520 in the Americas, 145.5 in Europe, and 145 MHz in the Philippines, Indonesia, and Thailand.
- 70-centimeter calling frequency is 446 in the Americas and Asia, 433.5 in Europe.
- Marine VHF channel 16 (156.8 MHz), which you can import into CHIRP in Radio > Import from Stock Config.
- FRS channels 1, 3, and 20. Scroll down the page to learn how to program FRS and GRMS channels with CHIRP.
The prepping community has made various attempts to create their own agreed-upon universal channels. We’ll cover that in a separate guide.
Programming your local first responder frequencies can get complicated. You can do it manually by scanning until you find what’s active in your area. You can manually browse websites like RadioReference and copy-paste the info over. Or you could call a local radio group or even the police/whatever directly and ask.
There are databases with this info that can be imported directly into CHIRP, namely from RadioReference com, but you must have a registered account and purchase a premium subscription to import those frequencies directly.
Some people using CHIRP on Linux and macOS run into an error here about a “missing Suds package.” Steps to fix are at the end of this section.
Tip: You can test that the RadioReference import/connection will work before you pony up the cash. To test it out, choose Radio > Import From Data Source > RadioReference.com. At the dialog that prompts you for your username, password, and ZIP Code, just put in gibberish and click OK. If you get an error that your username or password is invalid, you’re all set. Feel free to sign up with RadioReference.com and continue with the import.
Assuming the import connection is fine, choose Radio > Import From Data Source > RadioReference.com. Input your real username, password, and ZIP Code.
Just as with the other import types, you’ll see a list of frequencies to import. Use the check boxes on the left (under “Import”) to decide which ones you want to bring in.
You’ll be in a world of hurt if you transmit on official responder frequencies without a bona fide emergency. Maybe your kid grabs a radio and decides to play cops and robbers. To prevent outbound transmissions, set the Duplex column to Off.
Fixing the Suds package: a brief detour into Python hell
Skip this if you haven’t received an error just about Suds.
Python is a programming language. The current version is 3, but CHIRP is still based on version 2, which is discontinued. That makes it a little tricky to fix, because if you install the current version of Suds meant for Python 3, it won’t work.
macOS
Open the Terminal in /Applications/Utilities and enter:
sudo easy_install -z suds
This fix works in both macOS 10.14 Mojave and 10.15 Catalina.
Linux
Things are a bit dicier on Linux since every distro is different. The above command might work, but it didn’t on the ThinkPad we used. In Arch Linux, these commands could work:
sudo pacman -S python2-pip
pip2 install suds
pip is a package manager for Python modules. As you might have guessed, there’s a version for Python 2 and one for Python 3. The above commands use Pacman, Arch Linux’s package manager, to install the Python 2 version of pip and then invoke it to install Suds. Check your distro’s package manager for the Python 2 version of pip and then run the second command above.
You may find that to be more trouble than it’s worth, and instead opt to copy the information from the RadioReference website and paste it into CHIRP, which will cost you nothing. That’s fair, but it’s also a tedious, error-prone process. You’ll have to individually copy each frequency, name, PL tone, etc.
You could also export a CSV file of frequencies from the RadioReference website and import it into CHIRP, but that’s no less difficult than a direct import into CHIRP. RadioReference.com doesn’t export a CSV file formatted how CHIRP expects.
Adding FRS and GRMS
This part is easy, but you may not want to do it. As explained in the intro to Ham radio, Family Radio Service (FRS) and General Mobile Radio Service (GMRS) are special non-Ham bands. FRS is essentially meant for walkie-talkies. GMRS is a souped-up version of FRS that requires a license.
Bottom line: FRS and GMRS are for purpose-built radios. Transmitting on those frequencies from a normal Ham radio is technically illegal. However, in an emergency, you may want to have as many frequencies available to you as possible, and the FCC rules let you transmit on any frequency in the event of a life-or-death-emergency. A Ham operator might not be nearby, but there might be someone with an FRS walkie talkie or a GRMS radio you can reach. Also, it’s good to have these frequencies on your radio to scan through just in case someone calls from these frequencies for help.
Choose Radio > Import From Stock Config > US FRS and GMRS Channels.
Just as with the others, you’re presented with a list of frequencies. This time, all of them should work with your radio. As always, you’ll need to adjust the channel numbers.
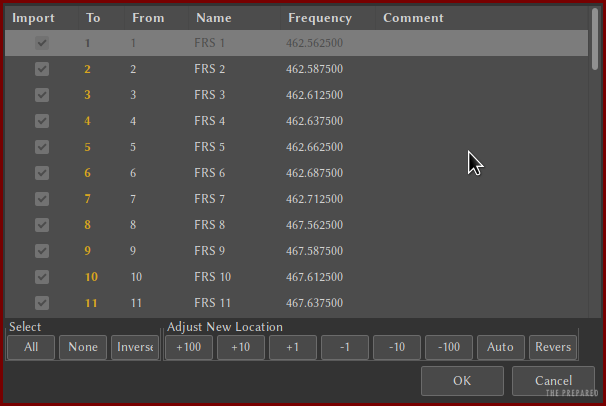
If you have empty channels left over, you can add more if you like, such as marine bands or MURS channels.
Changing general radio settings
You can also adjust many of your radio’s settings in CHIRP. We can’t cover all settings since some settings depend on the model of your radio. When in doubt, don’t change stuff.
Look for the Settings tab. To return to viewing your channel list, click Memories, just above the Settings tab.
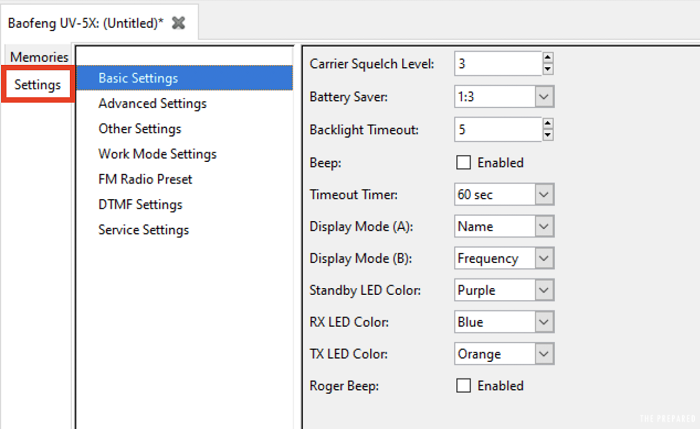
An example customization some people like to make through these settings is how the channel labels are displayed on the screen. You could display the human-friendly name (eg. “2M Call”) or the frequency. Instead of having both rows using the same labeling scheme, you can set one row to use one method and the other row to use a different one.
Many radios, like the pictured BaoFeng, can tune into two channels at once that you quickly flip back and forth between. It’s similar to how many TV remotes have a button that flips between your two most-recent channels. In the picture below, the two main lines shown on the screen are the two channels currently active. You can see the channel number on the right (in this case both are set to Ch 0), and the blue “A/B” button by the thumb is what flips between the two. The up arrow by the “2M” shows which one is currently active. If the bottom row were active, the arrow would be by the “146”.
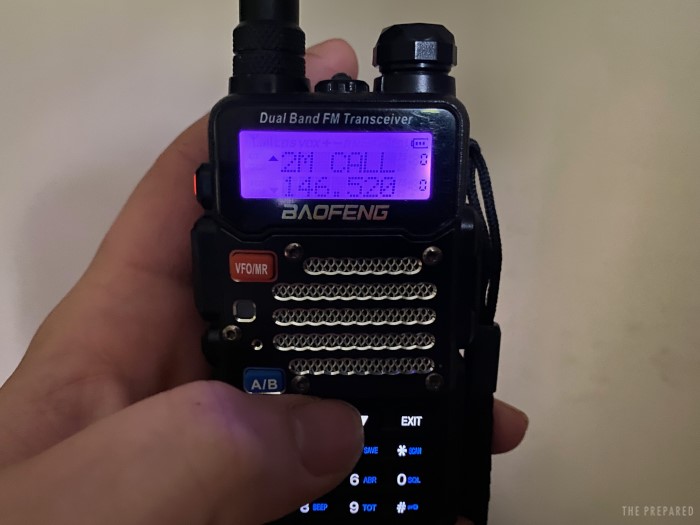
Imagine you’re in an emergency and you’re flipping through your address book via the top row on the screen. You’re seeing labels like “2M CALL”, “FIRE DEPT”, etc scroll by. You eventually find the one you want.
But your buddy also wants to dial into the same frequency, except she doesn’t have the same address book on her device that you do. If you just have your radio, it would be hard to reverse-engineer or back-out what the frequency is for “2M CALL” that your friend would then punch into their radio.
By having the second row programmed to show the frequency instead of the human label, you could then pull up the same channel (Channel 0 in this case) in the second row, but this time it shows the numbers your friend can copy.
Saving changes to the radio
Once you’re satisfied with your channel list, you’re ready to upload it to your radio. If you unplugged your radio, you’ll want to turn it back on, crank up the volume, turn to a silent station, and plug it back in.
Make a backup of your work by saving the channel list to your computer using the same steps from before.
Choose Radio > Upload to Radio. At this point, you should have your port, vendor, and model set correctly. Click OK and click through any prompts to clone your new channel list to your radio.
Sharing your address book with others or changing radio models
When you make a backup of your radio’s “image”, it saves the info in an actual IMG file that’s specific to your radio because it includes both the address book and the custom/general settings specific to your model.
Since you can’t just import that IMG file to a different radio model (such as moving from a BaoFeng UV-5R to a BF-F8), that means you have to do an intermediary step if you want to apply the data to a new model or share your frequency list with people who have different radios.
To open a radio image, choose File > Open and choose it from the directory.
To export your radio’s frequencies, choose File > Export.
The exported file will be in CSV format, a standard format for spreadsheets. You can then import those frequencies to another radio model by opening your new radio’s image and choosing File > Import. Select the CSV file you exported.
Exporting to CSV is handy for syncing frequencies between different radio models. However, if you maintain multiple configurations for a single radio, it’s easier just to save them as images. You can make multiple images for your radio and switch between them. For instance, you might have a set of frequencies to scan at home and another set while you’re on vacation.