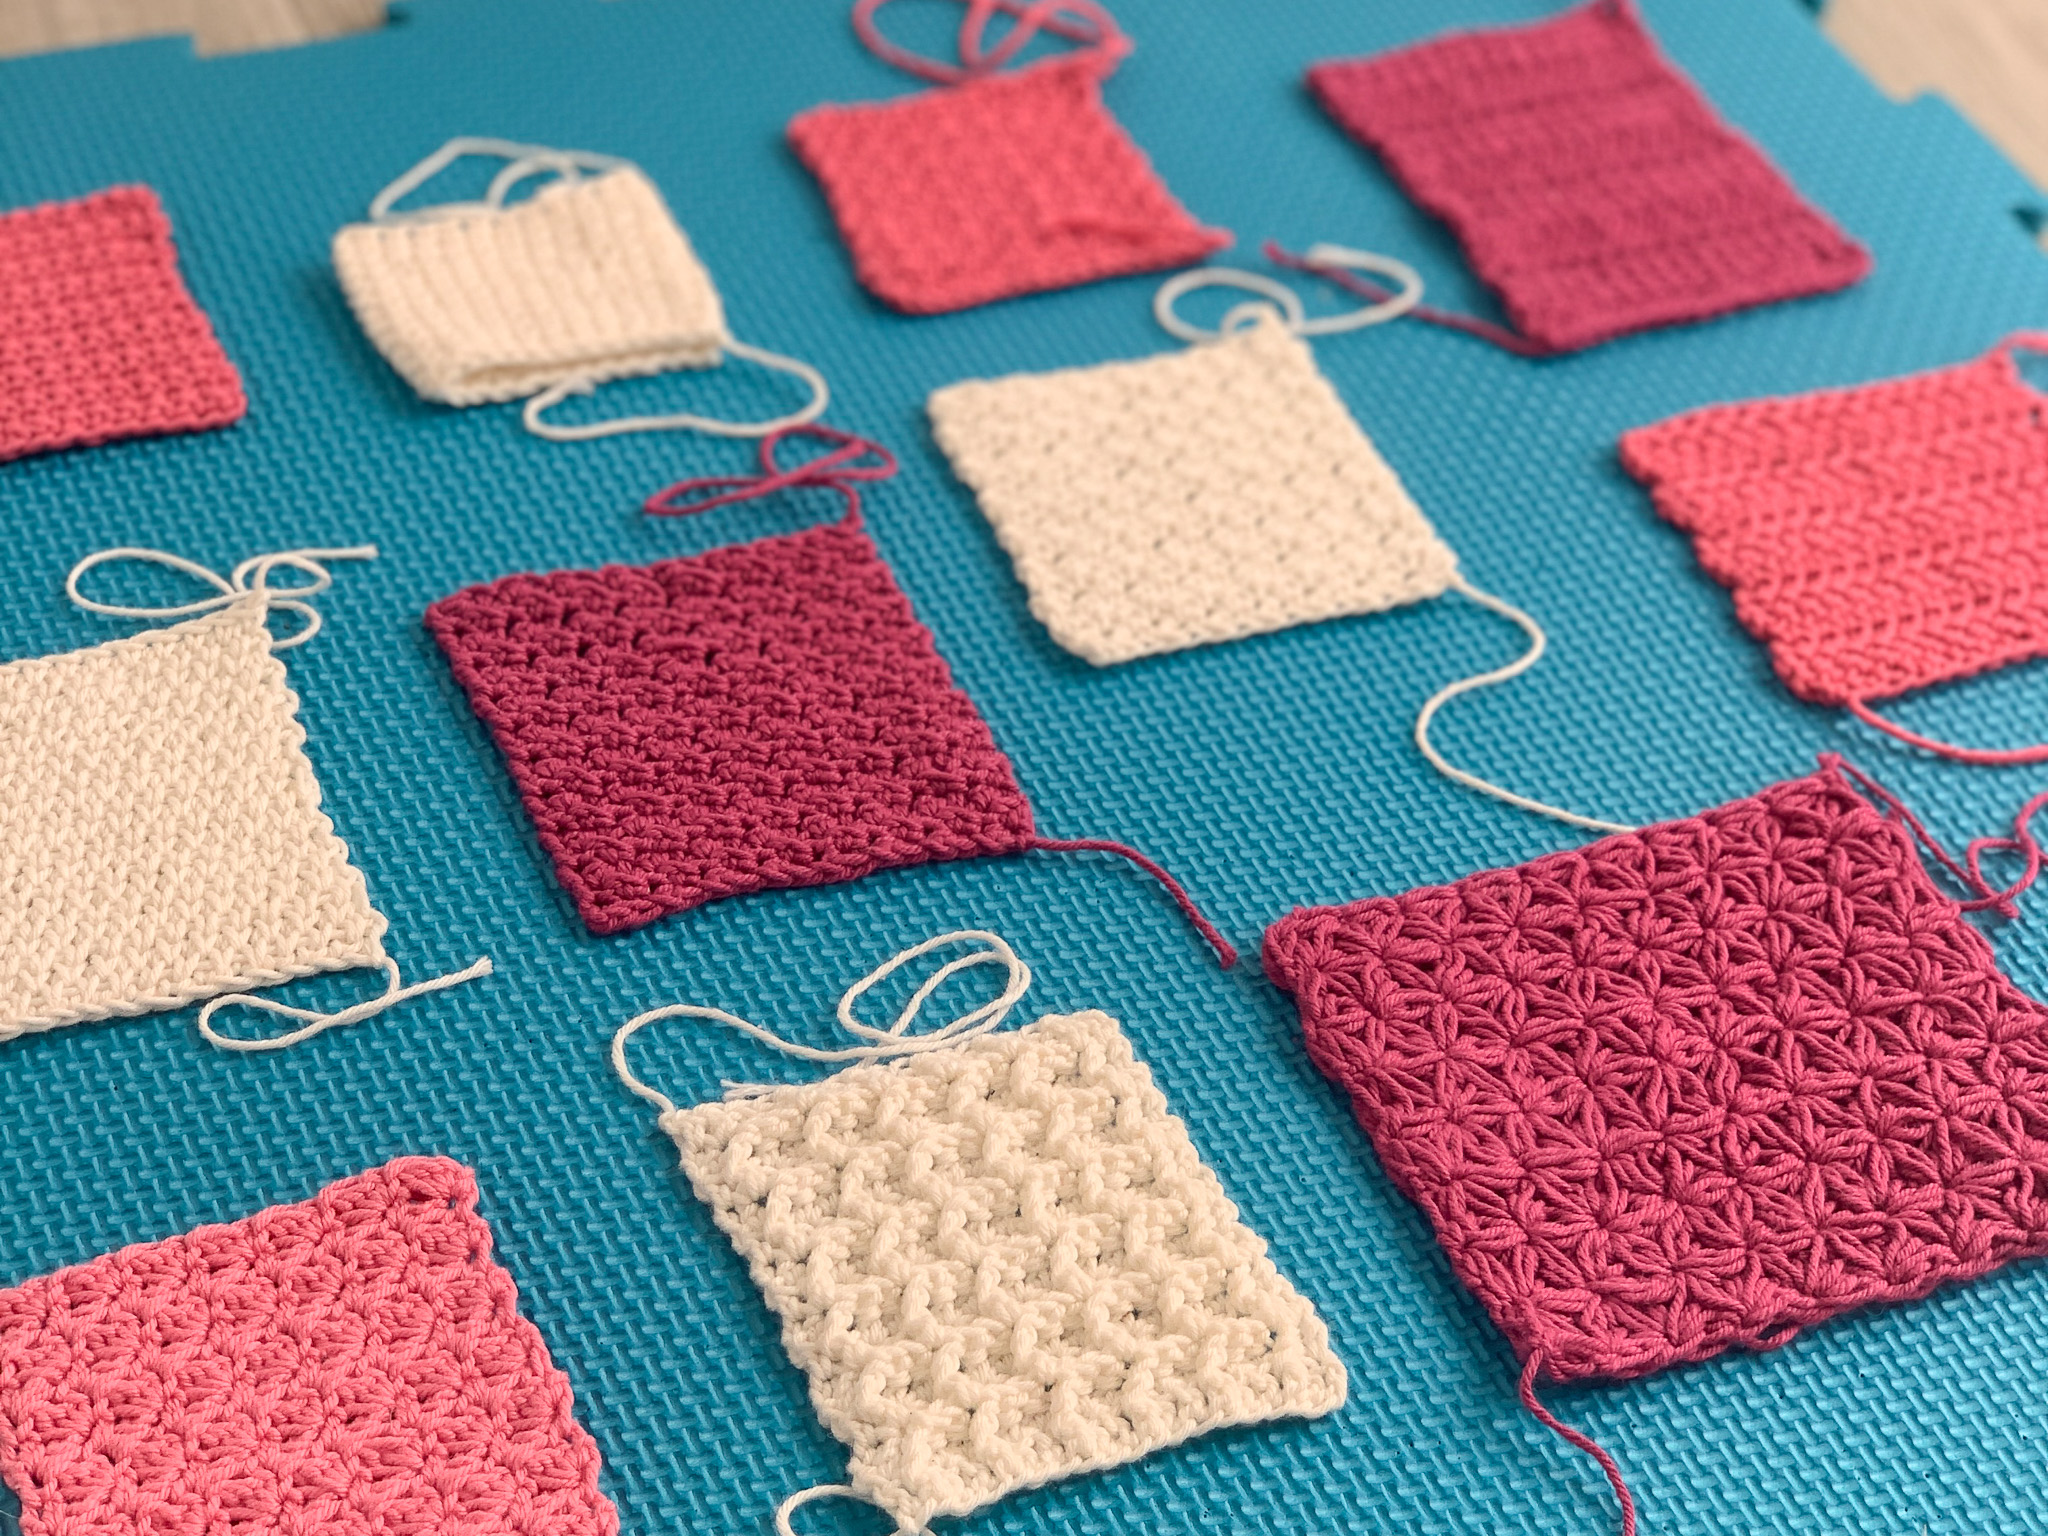
10 opaque crochet stitches ‘without all the holes’
Something that I have seen asked in my facebook group as well as many others, and indeed something I asked myself when I started crocheting; “What crochet stitches don’t have many holes in?”
This post will share my 10 favourite opaque crochet stitches / stitch patterns
People often find it hard to find a succinct way of saying opaque, dense or solid fabric, using terms like tightly woven, indeed I struggled with the best way to word it when writing this post!
Essentially, I think ’not see through’ (opaque) is what the question is getting at, but that doesn’t exactly roll off the tongue!
A lot of crocheters word this by asking about knit-look crochet stitches and there are some of those listed here.
Crochet is naturally more ‘holey’ than standard knit stitches and when you’re making a garment or maybe some home decor items like cushions, you may want a more opaque fabric.
Despite what some think, crochet offers those options in spades and I wanted to use this post to celebrate my favourites. It’s worth noting that all crochet stitches are going to have some holes in – it’s the nature of the craft – but some stitches have larger ones than others.
Because you may have a different crochet project in mind when reading this post, I’ve split my list into 4 categories: Easy (basic), good for garments, textured stitches and yarn eaters!
Note that you can now purchase an extended, 34 page ebook version of this blog post (available from Etsy) which includes written instructions for each stitch, an idea of what each might be used for and other additional notes.

Pattern notes for stitch instructions
For each stitch, I give basic written instructions and link to a fuller tutorial where available.
- This ebook uses standard US crochet terminology (UK terms given in brackets in the abbreviations list)
- Knowledge of basic crochet stitches, techniques and terminology is assumed
- Unless otherwise indicated, stitches should be worked in consecutive stitches
- Turning chains do not count as stitches, unless otherwise specified
- Instructions written after *asterisks should be repeated as indicated
- Instructions written between [square brackets] should be worked the specific number of times instructed
Stitches & Abbreviations: US terms
(UK Equivalent in Brackets)
- Stitch
- ch = chain
- ch-sp = chain space
- dc = double crochet (UK treble crochet)
- fpdc = front post double crochet (UK raised treble front, for waffle stitch)
- fps = foundation puff stitch (for jasmine stitch)
- HBdc = herringbone double crochet (UK herringbone treble)
- HBhdc = herringbone half double crochet (UK herringbone half treble)
- hdc = half double crochet (UK half treble crochet)
- ldc = linked double crochet (UK linked treble crochet)
- lhdc = linked half double crochet (UK linked half treble crochet)
- ltr = linked treble crochet (UK linked double treble)
- rep = repeat
- RS = right side
- sc = single crochet (UK double crochet)
- sk = skip (UK miss)
- sp = space
- ss = slip stitch
- st(s) = stitch(es)
- tr = treble crochet (UK double treble)
- WS = wrong side
- yo = yarn over
Easy crochet stitches without holes
Single Crochet
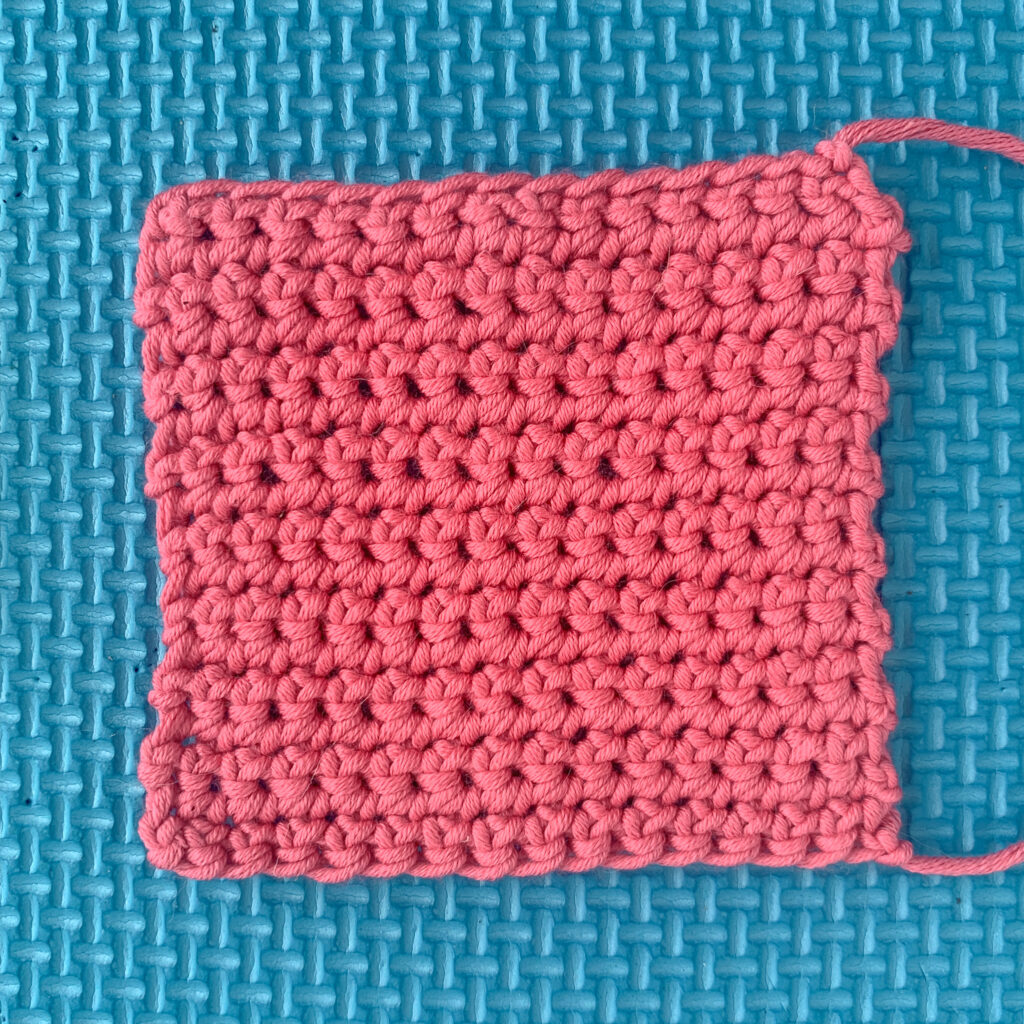
If you want to keep it simple, start with a single crochet (sc) (UK double crochet). This creates a tightly woven fabric which is almost completely opaque.
This, and the ease with which it can be increased and decreased, is one of the most popular reason it’s used for amigurumi. You need a stitch which won’t allow the stuffing to pop out!
If you’re new to crochet, you can find the tutorial for single crochet in my crochet basics section here.
Skill Level: Beginner
Stitches used: Chain (ch), single crochet (sc)
Stitch Multiple: Work with an any number of stitches and rows
Stitch description: Insert hook, yo, pull up a loop (2 loops on hook), yo, pull through two loops to complete the stitch
Written instructions
Work a chain of any number plus 1 for the turning chain;
Row 1: Work 1sc into second ch from hook and each ch to end, turn
Row 2: Ch1 (does not count as a stitch), 1sc in each st to end, turn
Rep Row 2 for pattern
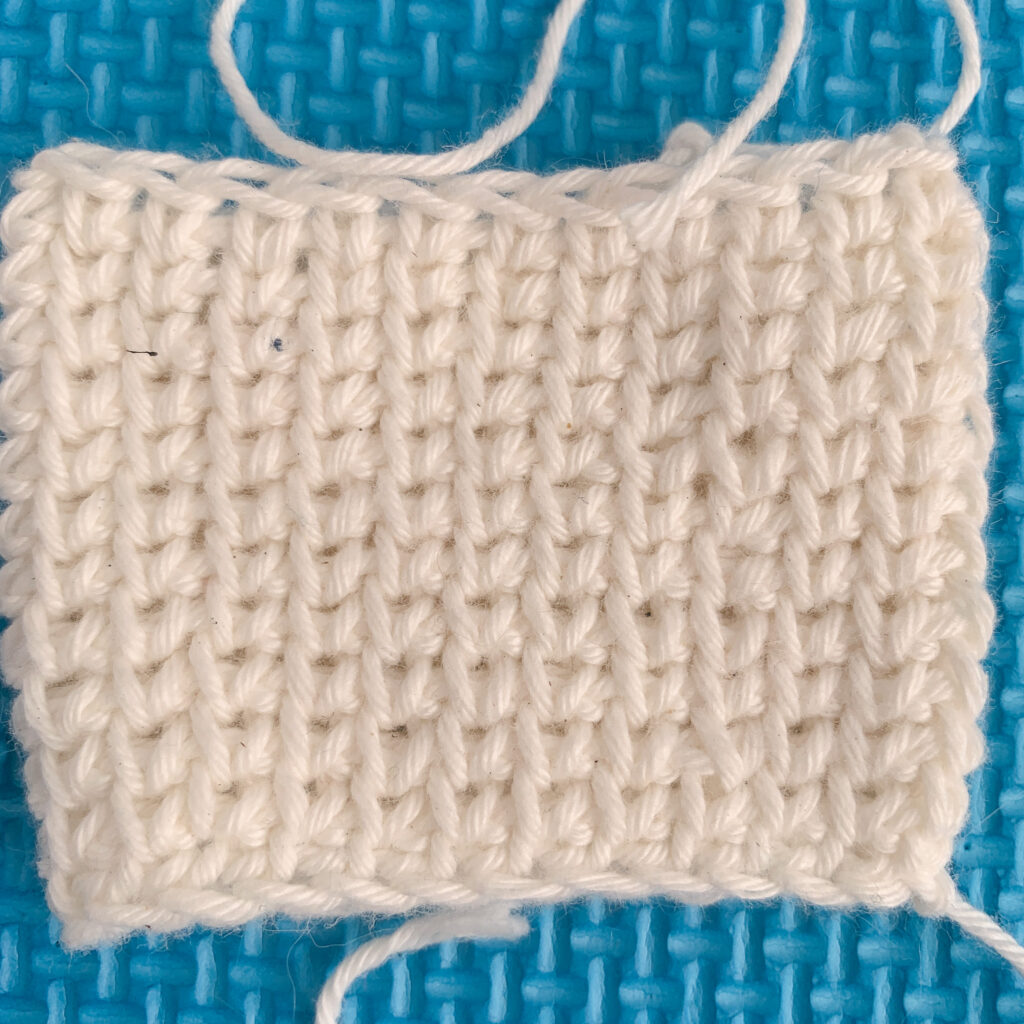
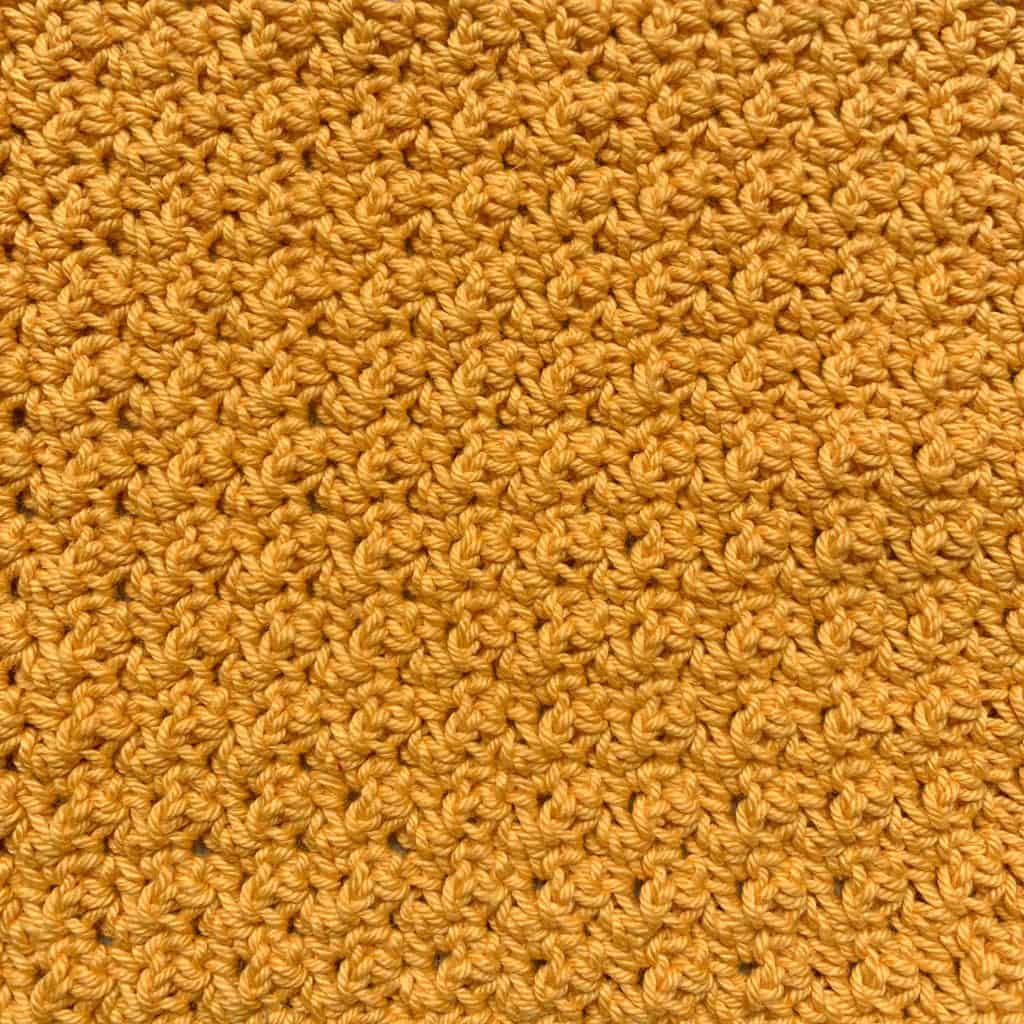
Waistcoat Stitch
This is sometimes also known as the split single crochet.
Essentially it is worked as a single crochet, but instead of inserting the hook into the top of the stitch, you insert it right through the centre of the stitch, splitting it in two.
This is a beautiful stitch and has a knit-look about it. I wouldn’t class it as a yarn eater but it does use more yarn than a typical single crochet because the rows are shorter.
It’s often used for baskets and homewares which need some stability because it creates a very sturdy fabric with minimal stretch. For more movement with this stitch, I advise going up at least 2 hook sizes!
I love the look of this stitch, but controversially, I don’t really enjoy working it because I find it pretty fiddly to get the hook in the right place every time! Less so with the bigger hook though, and it does come with practice!
Skill Level: Advanced Beginner
Stitches used: Chain (ch), single crochet (sc), slip stitch (ss)
Stitch Multiple: Work with any number of stitches and rows
Waistcoat stitch instructions (in the round)
Work a chain of any number and slip stitch to first chain to make a loop;
Round 1: Ch1 (does not count as a stitch), 1sc into each ch to end, ss to top of first st, do not turn
Round 2: Ch1, 1sc into the centre of each sc from the previous row, working between the ‘legs’ of the stitch rather than the top ‘v’, ss to top of first st, do not turn
Rep Round 2 for pattern
Moss stitch
Moss stitch is another of my staples, used in many of my patterns including the Chaucer twist cowl, the Upsidedown Sweater and the Underdog cardigan. It could easily fall into the garment category below but is such a good basic all round stitch pattern I’ve kept it with the basics!
If you’ve never used it before, check out the tutorial here. You might have also heard it called the linen stitch or the tweed stitch.
Here you see it in the Upsidedown Pullover using a tweedy yarn. Isn’t it a beaut!
Because moss stitch uses chain spaces, you wouldn’t think that it creates a solid fabric but it does. It’s counterintuitive but it works!
Skill Level: Experienced Beginner
Stitches used: Chain (ch) and working into chain spaces, single crochet (sc)
Stitch Multiple: Work with an odd number of stitches and any number of rows
Moss Stitch Instructions
This is the set up I prefer to use for this stitch. There are other modifications to start and finish rows, so other patterns may vary. You can find a moss stitch tutorial (including video) here.
Make a chain of an odd number of stitches plus one for the turning chain;
Row 1: 1sc in second chain from hook and each ch to end (so that you have an odd number of stitches)
Row 2: Ch2 (counts as 1sc and ch1 throughout), sk first 2 sts, 1sc in next st, *ch1, sk 1 st, 1sc in next st; rep from * to end, turn
Row 3: Ch2, 1sc in first ch1-sp, *ch1, sk next sc, 1sc in next ch1-sp; rep from * to end, turn (the last sc will be worked into the ch2 at the beginning of the previous row as this is equivalent to 1sc and ch1)
Rep Row 3 for pattern
Great solid crochet stitch patterns for garments
Opaque stitches do not always have to be tightly woven or thick and chunky.
In my early days of crochet garment design, I sought out stitch patterns which would create a fabric that wasn’t see through, but also that draped well on the body.
In my view, these are the unicorns of the crochet stitch world!
Here are my two favourites:
Linked Crochet stitches
Linked crochet stitches can be made in half double (UK half treble), double crochet (UK treble) and any taller stitches.
Instead of yarning over to start the first stitch, you insert your hook into the horizontal bar in the post of the previous stitch, yarn over and pull up a loop (to get your 2 loops on the hook), then work the rest of the stitch as normal.
This links the two stitches together, reducing the gaps between the stitches. You can find full tutorials for the linked half double and double crochet here and the linked treble crochet here.
I used this stitch in my corona summer vest top. (An unfortunate choice of name, but little did I know back in spring of 2019!).

It’s worth noting that linked stitches have a very different right and wrong side so when working with it you need to take this into account. It can look quite different worked with a turn at the end of the row vs working in the same direction in the round.
Fun fact: The taller linked stitches are essentially the same as Tunisian crochet short rows worked at a right angle!
The principle of linked stitches is the same whether you’re working half double, double or treble stitches. Here I will share the instructions for the linked treble (US) which will allow you to extrapolate to other stitches.
Skill Level: Advanced Beginner / Intermediate
Stitches used: Chain (ch), can be worked with variations of half double crochet (hdc), double crochet (dc), treble crochet (tr) and taller stitches to create their linked equivalent; linked half double crochet (lhdc), linked double crochet (ldc), linked treble crochet (ltr) etc
Stitch Multiple: Work with any number of stitches on the foundation chain plus 3 for your starting chain for the beginning ltr. Can be worked in any number of rows.
Linked treble crochet instructions
You can find full tutorials for the linked half double and double crochet here and the linked treble crochet here.
Essentially the ltr is worked the same as a normal treble, BUT you change the way you add loops to your hook before you insert it into the stitch you’re working in.
With a standard US treble, you yarn over twice (so you have 3 loops on your hook), insert your hook into the stitch you’re working into, yarn over, pull up a loop, then [yarn over and pull through two loops] 3 times.
With a linked treble, you get those 3 initial loops on your hook by linking to the previous stitch, then you work the treble as normal.
Chain any number for your foundation chain;
Start with a beginning linked treble (beg-ltr)
Step 1: Start the row with a ch3 to create your ‘beginning ltr’ or beg-ltr
Step 2: Insert hook into the second chain from hook, yarn over, pull up a loop, insert hook into the third chain from hook, yarn over, pull up a loop (3 loops on hook)
Step 3: Insert hook into first stitch of the row, yarn over, pull up a loop (4 loops on hook)
Step 4: [Yarn over, pull through 2 loops] 3 times to complete the beg-ltr
How to crochet a standard linked treble (ltr)
For each stitch moving forward;
Step 1: Insert hook into the top horizontal bar of the previous stitch, yarn over, pull up a loop insert hook into the next horizontal bar (below the first), yarn over pull up a loop (3 loops on hook)
Step 2: Insert hook into next stitch (or the stitch you’re working into), yarn over, pull up a loop (4 loops on hook)
Step 3: [Yarn over, pull through 2 loops] 3 times to complete the stitch
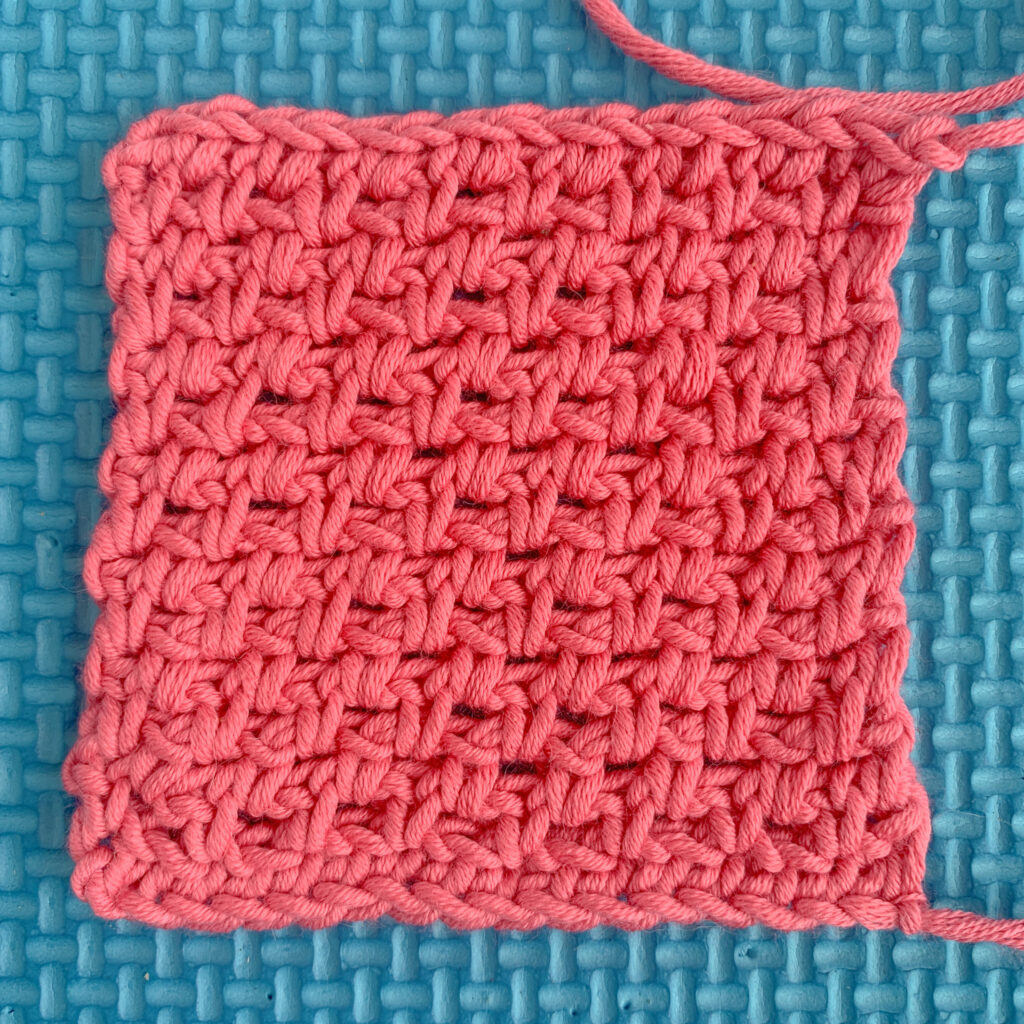
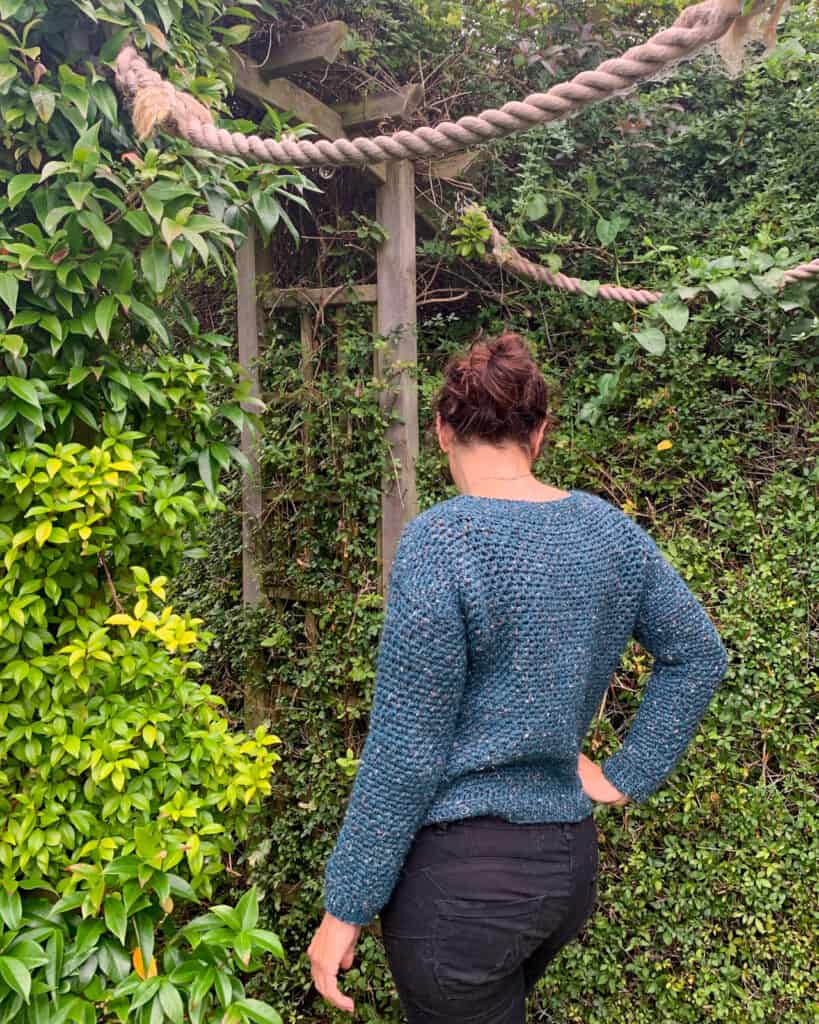
Herringbone double crochet or half double crochet

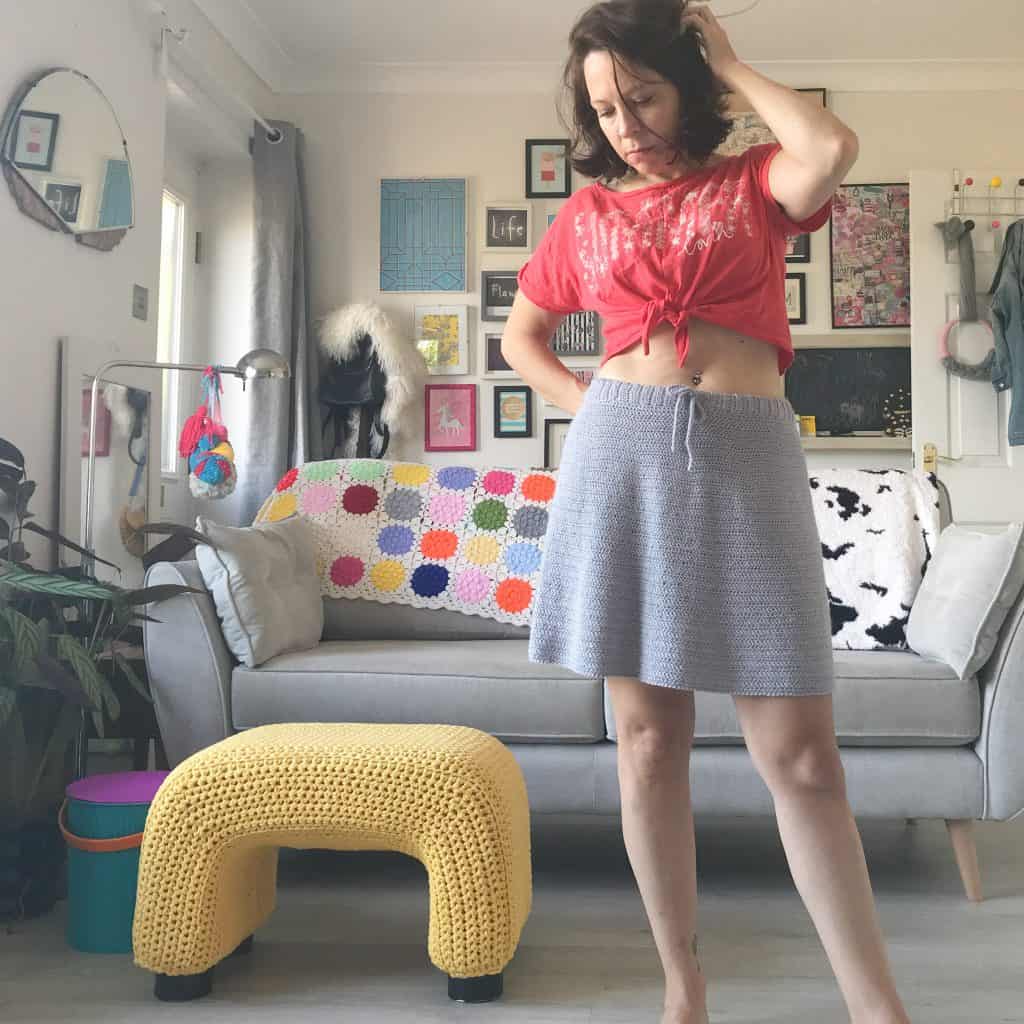
Herringbone stitch is another firm favourite of mine having used it both in the Slow Living Skirt and the Light Fandango Sweater.
Like linked stitches, it can be worked with half double crochet (UK half treble) or double crochet (UK treble), or taller stitches now I think of it, though half double and double are the most common.
The stitch is made by essentially adding a slip stitch when you pull the yarn through the stitch you’re working into. You can see a full tutorial here, but what this does is to join rows closer together and to create a little slant on the stitch.
When you work in rows, this slant will alternate which is what gives the stitch that beautiful herringbone pattern.
It takes a little getting used to but once you get into the swing it has a lovely rhythm to it, which is why it’s also included in my list of mindful crochet stitches!
It really does have the most fabulous drape to it, especially when worked with a smooth silky yarn! Just look how the slow living skirt hangs!
The herringbone half double crochet will likely create a tighter fabric than the double, but the double is dense enough to make a skirt with so both are great for garments!.
Skill Level: Advanced Beginner / Intermediate
Stitches used: Chain (ch), half double crochet (hdc), double crochet (dc) and taller stitches to create their herringbone equivalent; herringbone half double crochet (HBhdc), herringbone double crochet (HBdc), herringbone treble crochet (HBtr) etc
Stitch Multiple: Work with any number of stitches and rows
Below I will include the instructions for herringbone half double crochet and for herringbone double crochet after that. You can find a written, photo and video tutorial for Herringbone Double crochet here.
In both cases, start with a chain of any number of stitches plus 2 for the turning chain and start in the third chain from the hook;
Herringbone half double crochet
Step 1: Yarn over, insert hook into stitch
Step 2: Yarn over, pull a loop through the stitch and continue to pull through the next loop on the hook (2 loops left on hook)
Step 3: Yarn over, pull through 2 loops to complete the stitch
Herringbone double crochet
Step 1: Yarn over, insert hook into stitch
Step 2: Yarn over, pull a loop through the stitch and continue to pull through the next loop on the hook (2 loops left on hook)
Step 3: Yarn over, pull through 1 loop (2 loops left on hook)
Step 4: Yarn over, pull through 2 loops to complete the stitch

For more details visit the Crochet Calling event homepage
Opaque textured crochet stitches
Many textured stitch patterns produce beautiful opaque fabrics, which are thicker than single stitch repeats but I wouldn’t put in the yarn eating category. Here are a few of my favourite examples.
Lemon Peel Stitch
This is a lovely simple way to work a solid fabric. It has a gently pitted or dappled kind of texture, hard to capture in a photo.
It’s like the skin of a lemon (hence the name) and is great for when you want something simple and not attention seeking!
To work it, you simply alternate single crochet and double crochet across your row and on the next row work the single crochet into the double and vice versa!
You can work this pattern with any number of stitches but in this example we’re working with an odd number so the starting chain will be an even number to allow for the single turning chain.
Row 1: 1sc in second ch from hook, *1dc in next ch, 1sc in next ch; rep from * to end, turn
Row 2: Ch2, 1dc in first stitch, *1sc in next stitch, 1dc in next stitch; rep from * to end, turn
Row 3: Ch1, 1sc in first stitch, *1dc in next stitch, 1sc in next stitch; rep from * to end, turn
Repeat rows 2 and 3 for the pattern
It’s a lovely simple stitch to work and after a while you get to see which stitch you work where so you don’t get your singles and doubles mixed up!
Skill Level: Experienced Beginner
Stitches used: Chain (ch), single crochet (sc), double crochet (dc)
Stitch Multiple: Work with any number of stitches and any number of rows
Lemon peel stitch instructions
You can work this pattern with any number of stitches but in this example we’re working with an odd number.
Make a starting chain of an odd number plus one for the turning chain;
Row 1: 1sc in second ch from hook, *1dc in next ch, 1sc in next ch; rep from * to end, turn (so you have an odd number of stitches)
Row 2: Ch2 (does not count as a st), 1dc in first stitch, *1sc in next stitch, 1dc in next stitch; rep from * to end, turn
Row 3: Ch1 (does not count as a st), 1sc in first stitch, *1dc in next stitch, 1sc in next stitch; rep from * to end, turn
Rep Rows 2 and 3 for pattern
If you choose to work this stitch with an even number of stitches, you can simplify the instructions given above. Simply start each row with a single crochet and end with a double and repeat the same instructions each row (rather than using a two row repeat which alternates between starting with a single and double).
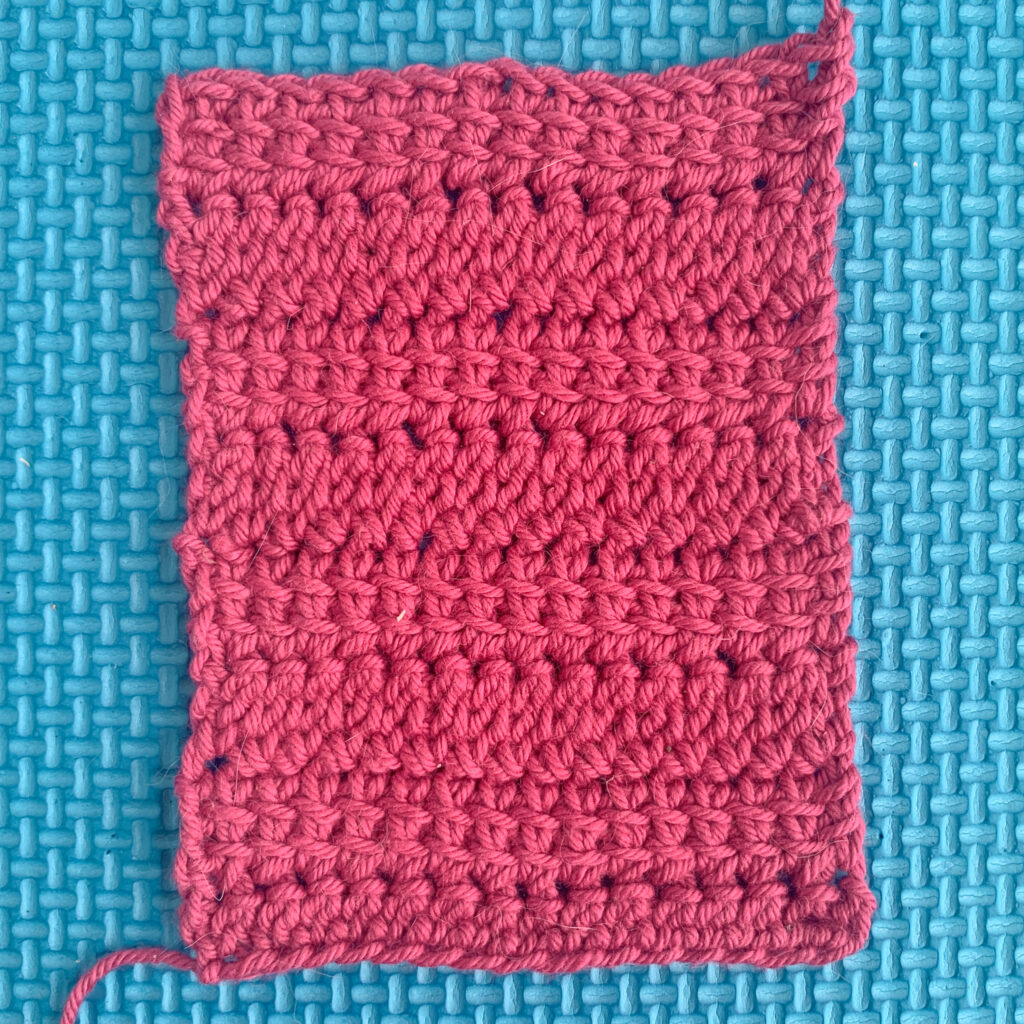
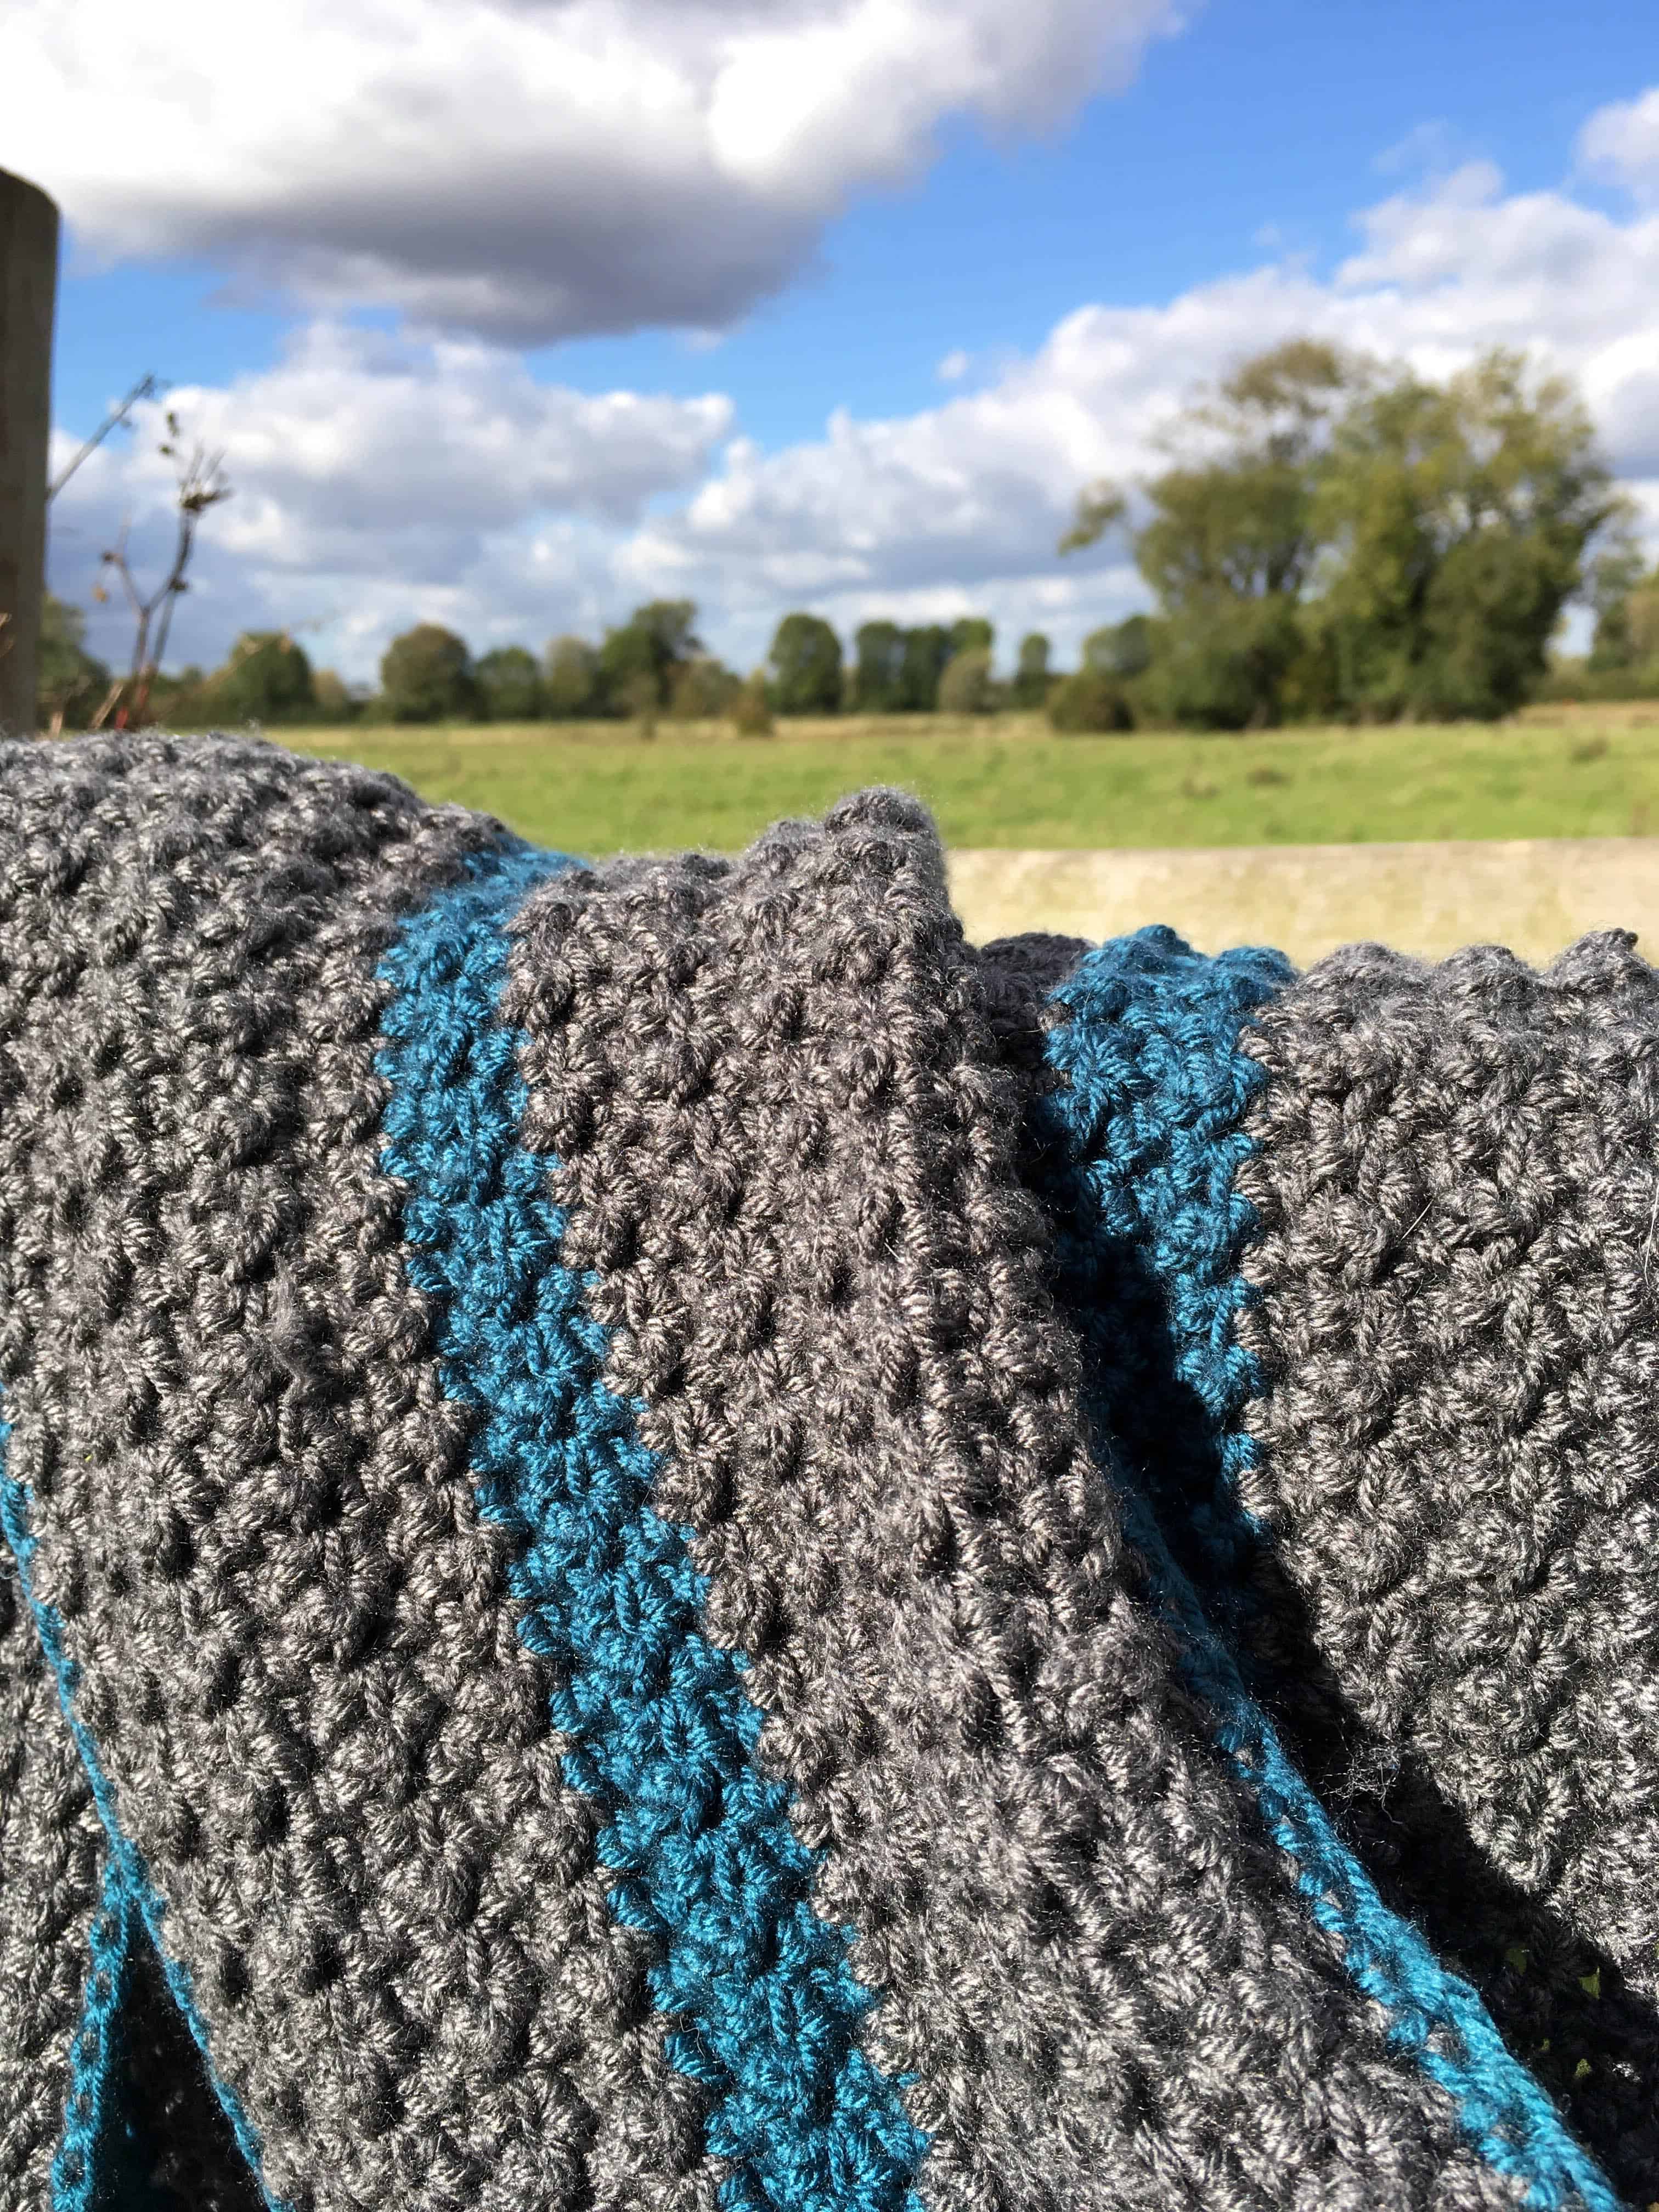
Crunch Stitch
Combining tall and short stitches is a great way to create texture and a solid fabric. The lemon peel stitch is a simple way of doing this but for more texture, you can work with a larger difference between the stitches which is what crunch stitch does.
There are various versions of this stitch but essentially it’s working a tall stitch then a short stitch next to each other – so the tall stitch ‘crunches’ down.
Typically it’s worked by alternating a half double crochet (hdc) (UK half treble) and a slip stitch (ss) as show here.
The slip stitch pulls the half double down. Then on the next row it evens out as you work the half double into the slip stitch and vice versa.
Skill Level: Experienced Beginner
Stitches used: Chain (ch), half double crochet (hdc), slip stitch (ss)
Stitch Multiple: Worked using an even number of stitches and any number of rows
Crunch stitch instructions
Make an even number of chains plus 2 for the turning chain;
Row 1: 1hdc into third chain from hook, ss in next chain, *1hdc in next ch, ss in next ch; rep from * to end, turn
Row 2: Ch2, 1hdc into the first st (the ss from the end of the previous row), ss into next st, *1hdc in next st, ss into next st; rep from * to end, turn
Rep Row 2 for pattern
It’s easy to modify this stitch to work with taller stitches. I use an amended version of this in my free studio stripe scarf pattern. Just look at that chunky texture!!
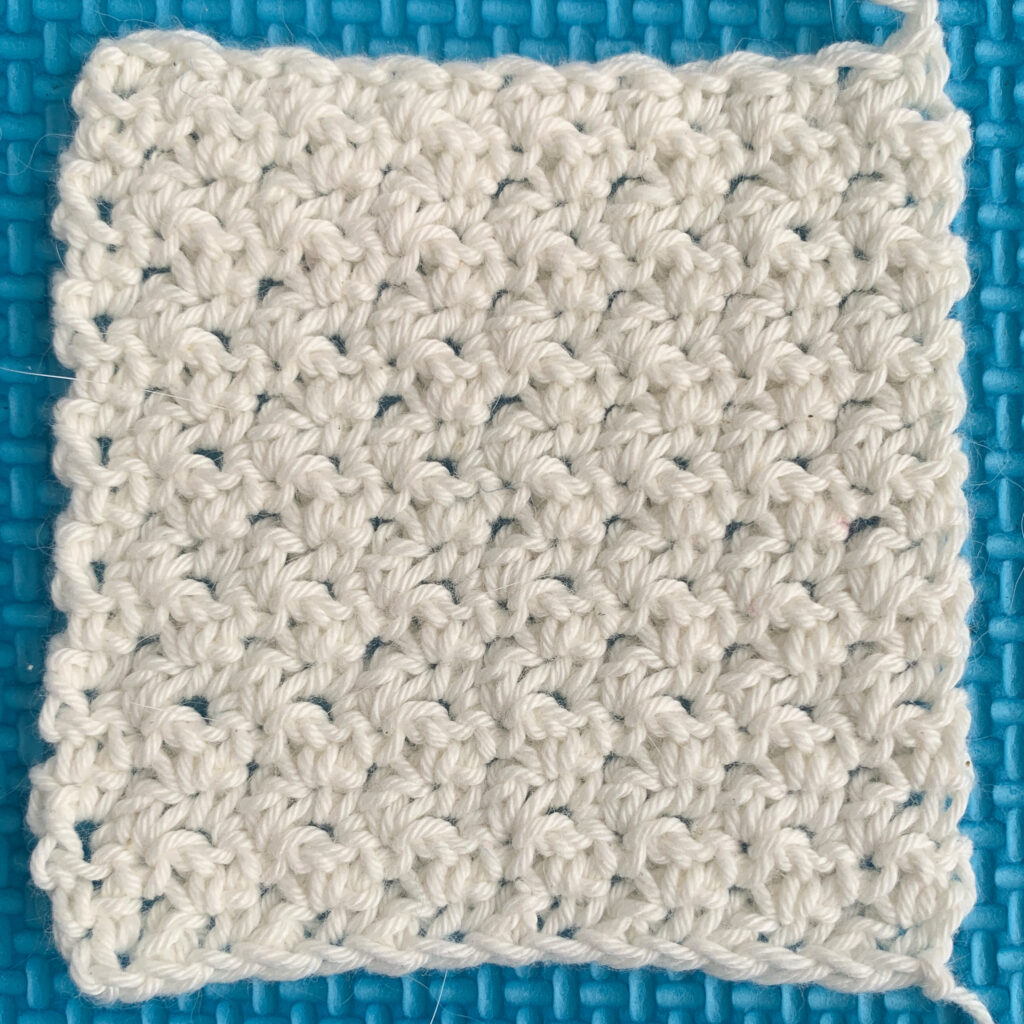
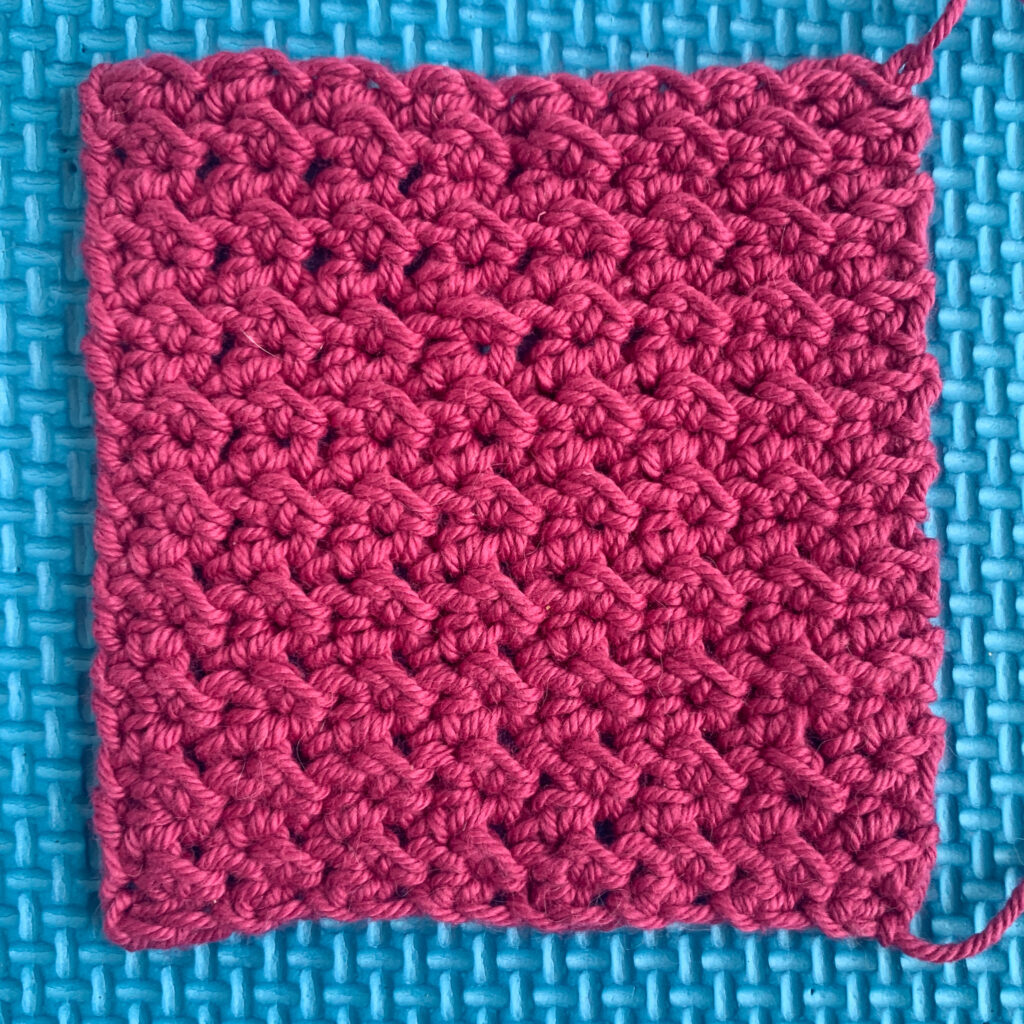
Suzette Stitch

This is another type of stitch pattern which mixes tall and short stitches together, but here you work them both in the same stitch.
This time you’ll work 1 single crochet (sc), 1 double crochet (dc) in one stitch, skip a stitch, then repeat.
Skill Level: Advanced Beginner
Stitches used: Chain (ch), single crochet (sc), double crochet (dc)
Stitch Multiple: Work with an odd number of stitches and any number of rows
Suzette Stitch Instructions
Make an odd number of chains plus one for the turning chain;
Row 1: Work 1sc and 1dc into the second ch from hook, skip the next ch, *1dc and 1sc in next ch, skip next ch; repeat from * to the last ch, 1sc in last ch, turn
Row 2: Ch1, 1sc and 1dc in the first sc, skip next dc, 1sc and 1dc into next sc, sk next dc; rep from * to last stitch, 1sc into last st, turn
Rep Row 2 for pattern
I have also seen this stitch pattern referred to as the grit stitch, or mixed grit stitch. More commonly, the grit stitch works 2 single crochet in the same stitch, skips a stitch then repeats. So it would make sense that substituting one of the single crochet for a double crochet (as above) would be mixing up the basic grit stitch!
I mix this stitch up even further in my Got your six cardigan by working 1 single crochet and 2 double crochet into the same stitch and skipping two stitches. This gives and even bolder texture.
I’m sure there is a name for this stitch combination too but honestly, I can’t find anything that consistently suits!

Skill Level: Advanced Beginner
Stitches used: Chain (ch), Single crochet (sc) (UK double), Double crochet (dc) (UK treble).
Stitch Multiple: Work with any number of stitches on the foundation row.
Yarn eating crochet stitches you can’t see through
One way to ensure your crochet fabric doesn’t have many holes is to layer up the yarn in tight or overlapping stitch patterns. This often creates thick fabrics, perfect for winter accessories, homewares or solid bags.
But, these will use up a lot of yarn because you create such a thick layer – hence the yarn eating status!
Jasmine Stitch

This is an absolute favourite of mine. It is just delicious to work and looks amazing with any yarn, solid, variegated or ombré!
It is pretty similar to the star stitch (another lovely opaque stitch), but worked with modified puff stitches. Check out the full jasmine stitch tutorial here (which includes a written, photo and video tutorial).
Have a look at the shifting sands snood and you’ll get an idea of how chunky and cosy this is!
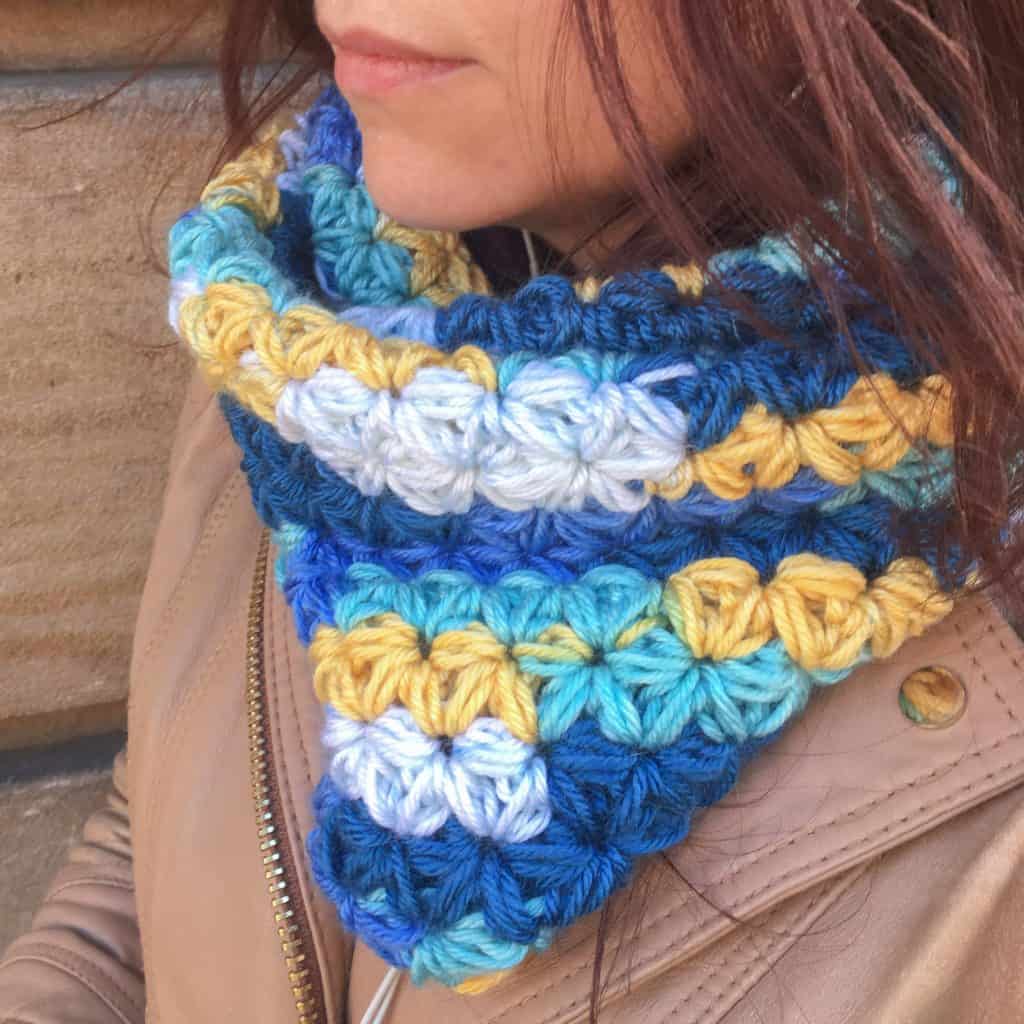
It’s perfect for winter accessories and would make a great skirt if you’re into garments or a beautiful chunky pillow.
Skill Level: Intermediate
Stitches used: Chain (ch), foundation puff stitch (fps), jasmine stitch (which is essentially a modified puff stitch)
Stitch Multiple: Work with an any number of foundation puff stitches on the foundation row plus one fps to use as a turning chain. Work any number of rows.
Jasmine Stitch Instructions
Check out the full jasmine stitch tutorial here (which includes a written, photo and video tutorial).
To work the jasmine stitch, you need to create a foundation row /chain of puff stitches, worked on their sides (or half puffs really as you only yarn over twice). Once you have the foundation row, the jasmine stitch begins.
The Foundation Puff Stitch (fps)
This stitch will also be used to create the turning stitch each time you start a new row of jasmine stitch.
Step 1: To work the first fps, ch1, pull up your loop a little and insert hook into ch1
Step 2: Pull up a tall loop to (you can use a rule of thumb of around about twice the width of your hook, depending on what yarn weight you’re using)
Step 3: [yo, insert hook, yo, pull up a tall loop] twice (5 loops on hook)
Step 4: Yo and take hold of the yarn you just wound over and, whilst holding this, pull through all 5 loops
Step 5: Insert hook under the bit of yarn that you’re holding, yo and pull up a loop (2 loops on hook), let go of the yarn, yo and pull through 2 loops to seal the stitch
That’s your first foundation puff stitch completed. To start the next one, insert the hook into the last part of the previous fps (which is essentially a single crochet used to seal the stitch), then rep steps 2-5 for each fps.
Work as many fps as desired plus one more to use as a turning stitch.
Then you’re ready for the jasmine stitch
The Jasmine Stitch
The stitch itself creates 3 half-puffs worked over 3 sts. To keep the st count the same, the next st will work into the top, then the bottom of the previous st (above and below the last half-puff) and then the next st in the row. This will make more sense as you progress so don’t worry if it doesn’t yet.
To make it easier to work, ensure you pull all your loops up high enough to maintain enough space to pull the yarn through and keep an even tension. Getting the loop height ‘right’ for your tension and yarn may take a little practice.
Step 1: Pull up a tall loop as with the fps, [yo, insert hook into top of the last st, yo, pull up a tall loop] twice (5 loops on hook)
Step 2: [yo, insert hook into the base of the same st (the other side of the half-puff) yo, pull up a tall loop] twice (9 loops on hook)
Step 3: [yo, insert hook into st between next 2 half-puffs, yo, pull up a tall loop] twice (13 loops on hook)
Step 4: This is the fiddly bit… yo and grab hold of the bit of yarn behind the hook, just like you did with the foundation puff, only you may want a bit more slack. Carefully pull through all 13 loops
Step 5: Insert hook into the piece of yarn you are holding, yo, pull up a loop (2 loops on hook), let go of the yarn, yo, pull through 2 loops to complete your first jasmine st
To make the second, and subsequent jasmine stitches, rep steps 1-5, starting by inserting your hook into the top of the stitch you just made (rather than the fps).
Continue working jasmine stitches to the end of your row and check your stitch count matches that of your foundation row.
At the end of the row, turn, create a new fps as your turning stitch and continue to work the pattern.
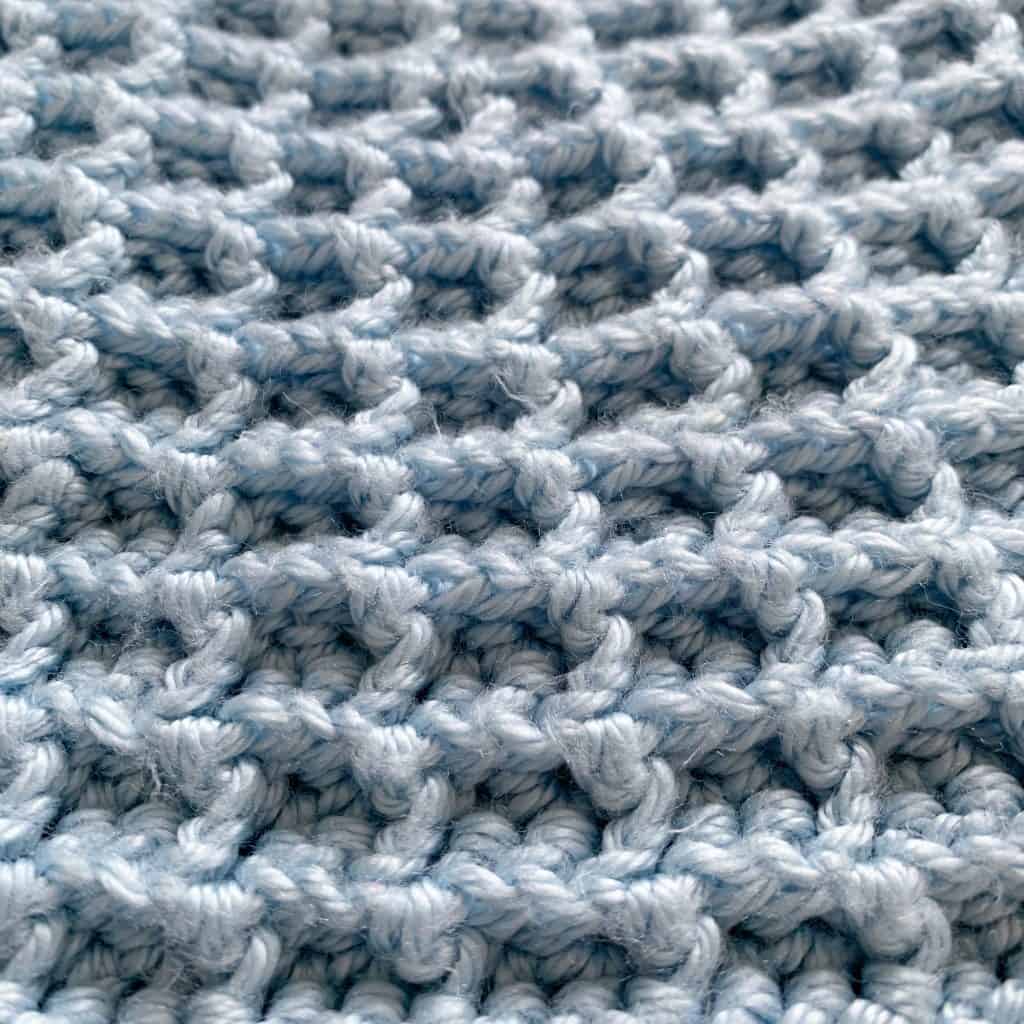
Waffle Stitch

Waffle stitch does exactly what it says on the tin!
It uses a combination of double crochet (dc) and front post double crochet (fpdc) (UK raised treble front) to create a thick, 3D waffle type texture.
It’s also a lot simpler than it looks!
Skill Level: Advanced Beginner / Intermediate
Stitches used: Chain (ch), double crochet (dc) (UK treble crochet), front post double crochet (UK raised treble front)
Stitch Multiple: Works with a multiple of 3 stitches and any number of rows once the pattern is established
Waffle Stitch instructions
Note that you can find a full tutorial for the waffle stitch here.
Make a chain of a multiple of 3 stitches plus 2 for your turning chain;
Row 1: 1dc in third ch from hook and each ch to end, turn
Row 2 (RS): Ch2 (does not count as a st), 1dc in the first st, *1fpdc in the next stitch, 1dc in the next 2 stitches; repeat from * to 2 stitches from the end, 1fpdc in the next stitch, 1dc in the last stitch, turn
Row 3: Ch2, 1dc in the first stitch, *1dc in next stitch, 1fpdc in the next 2 stitches; rep from * to 2 stitches from end 1dc in each of last 2 stitches, turn
Rep Rows 2 and 3 for pattern
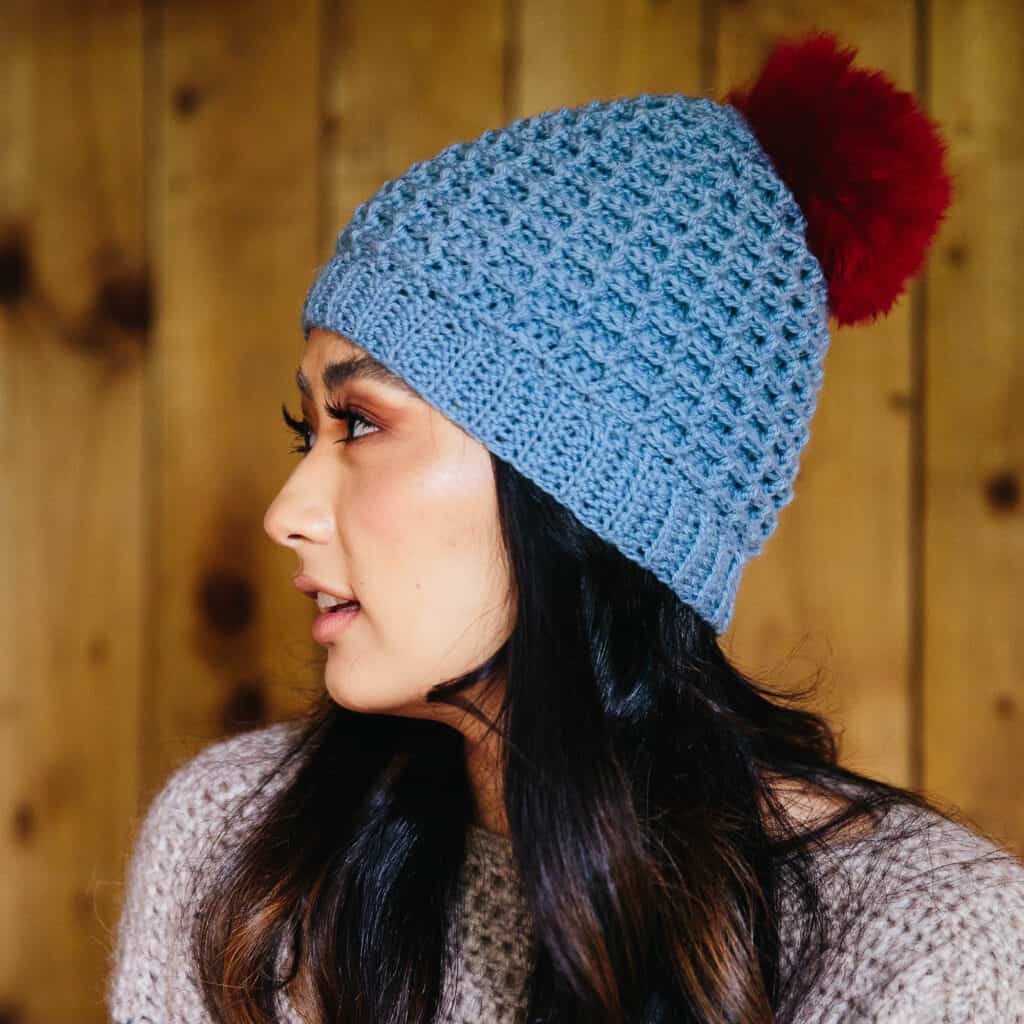
I used it in the free off-piste hat pattern seen above. This is a winter beanie hat which works increases into the stitch pattern in the crown, so is great for someone looking for a challenge.
So there are your 10 opaque crochet stitches; I hope you see some you like.

I could have made this list a lot longer and basket weave stitch (another yarn eater), alternating shell stitch and camel stitch also deserve a mention. I’ll get to those in another post perhaps!
I hope I have introduced you to some new stitches and allowed you to see opaque crochet stitches in a different way. There is more than just. knit look stitches!
If you have a favourite solid crochet stitch I haven’t mentioned, why not drop a note in the comments and maybe introduce me to a new one too!
Happy Hooking
Dx


Hi!
Thank you so much for these great recommendations!! I’m a beginner in crochet and I was looking for a sturdy stitch to make a crochet bag as a gift for someone. Can you advise me on which one is best for a sturdy bag that wouldn’t stretch overtime?
Hi there,
I don’t have a ton of experience with bags but am happy to share some initial thoughts. If I were making a small bag for myself I would think about using simple single crochet or the thermal stitch to start. In terms of stretch, all crochet is going to stretch to some degree if weight is applied to the fabric. It all depends on the type of bag you’re looking to create. It’s important to make sure that the stitches chosen are compatible with the construction style used. If it’s a small clutch purse that isn’t going to carry much weight there should be less of an issue with potential stretch, but if it’s a larger bag which will hold more weighty items then you’ll need to think about how to structure the weight baring parts such as the base and handles or handle attachments if you’re using pre-made handles / straps. As an example,yrou will often see market bags constructed as a mesh type fabric made for mostly chains as these have much less stretch and the mesh, if done right, can distribute the weight more evenly throughout the bag. I hope that helps!
Dora
This is a great resource! Thank you! My daughter does not like most items with “holes” as she puts it, not wanting her fingers (or toes, if a blanket) poking through. It was also an important design feature when I crocheted scads of caps for children whose illness or treatments caused hair loss, because they generally do not want bare spots peeking through. I recently learned the herringbone and linked stitches and have a blast with them. Same for the whatever-named one with SC-DC in one stitch, next stitch skipped. Your list will be a great help as I improvise new patterns for my daughter and granddaughter. The Alpine stitch is another wonderful opaque stitch with great texture.
I’m so glad this is helpful to you. I think your daughter is not alone! I love alpine stitch too – the texture is wonderful!
Hello. I enjoyed this pattern. Can i use different colors in this???
Hi, yes, you can use whatever colours and yarn you prefer!
Thank you so much for your great resources😊. Good to know that if I need assistance , all I need to do is ask my personal crochet guru 😁. Love the yellow stool , by the way!
Thank you – and you’re welcome!! 🙂
I feel like I’ve found the holy grail!!! I’ve recently gotten into making garments but hated the thought of having to put a liner in. Thank you for putting this together for the rest of us!!
Oh wow. What a lovely comment! I’m so glad your found this useful. I feel the same about lining!!!
Great information! Is there a printer friendly version somewhere? I’d like to print it and put it in my crochet pattern book.
Hi, I’m so glad you found it helpful. I don’t have a printer friendly version of the content at present, but will consider creating something in the future. Thanks for the comment.
I love the look of #2 Waistcoat stitch, but it is different from other Waistcoat stitches I’ve seen. Is there a link to the version you posted? Thanks!
Thanks. I don’t have a separate tutorial for this one. It’s worked by working a single crochet between the posts of the stitch below instead of into the top. The only thing that might make a difference is whether or not you turn at the end of the round. I hope that helps!
Great article. I like knitted garments better than crocheted, because it creates fine fabric without any holes. I prefer stitches without holes for winter garments. Spider stitch is also great. But larger hook should be used.
Thank you, i think it’s possible to achieve similar textures in terms of solid fabric whilst retaining drape with crochet, but it takes some creativity. My Light fandango sweater was designed with this in mind. I agree that opaque fabrics are great for winter, which was largely the inspiration behind this post. I’m glad your found it interesting.
This was extremely helpful as I was trying to come up with a more solid ear warmer pattern that didn’t let any air through. Thank you!
That’s exactly the kind of thing I had I’m mine when I wrote it – here’s to cosy crochet!! I’m glad you found it helpful (and have warm ears!!) 😊
Thank you so much for sharing these amazing stitches. I’m new to crocheting and am yet to come across information as good as yours!
I can’t wait to try some of the stitches.
❤️From India!
Ahh. You’re welcome. I’m glad you find them useful! Happy hooking 😊
You make a good waffle, Michelle ! 🙂 And I LOVE your little amendment to Suzette – it looks so much better than the original ! I was getting anxious as I read down the page .. but then, phew ! – there it is, my very favourite, Crunch. Sometimes I think I would like to make a huge blanket using Crunch; but the yarn would need to be some beautiful variegated colourway, and I haven’t yet come across one that grabs me.
I laughed at the yellow stool. Sorry if I wasn’t meant to; but it’s delightfully funny !
I love the texture of a crunch. And the stool is meant to bring joy so no apology needed. It was a very old and battered sheepskin footstool originally which I just covered in crochet to bring new life. (Don’t tell anyone but it needs a really good wash… only I stitched it on 🤦🏽♀️)
It’s so unusual ! A terrific bit of renovation. 😀
Thank you! I bought it in the Ikea bargain corner waaaaay back when I was at uni so it’s been with me a while!!! And THANK YOU for using the donate button at the bottom of my page. You’re so generous. A true gem x
Oh, that was only because you’re so generous with your knowledge and time. 🙂
😊🙏🏼😘