The Longest Journey

The Longest Journey

372 ratings
100% Complete walkthrough guide
By Stacy's mom and 1 collaborators
A complete and spoilerless guide to The Longest Journey. Rate, comment and mostly, enjoy! :) If you dislike my guide or find any imperfection, please let me know in the comment section, I'll be more than happy to improve it for the better!
6
22
2
3
3
2
3
   
Award
Favorite
Favorited
Unfavorite
Introduction
The Longest Journey is a game mostly about listening to dialogs, watching April run around, collecting items, reading about history and solving some impossible puzzles. If you didn't run away until now, I wish you a lot of fun and good times in this 16-year-old masterpiece.

I'll try to keep my guide spoilerless and simple. Pointing out necessary things with the help of pictures and description.

Note:
I will not include details of the conversations! If you are stuck, you've probably just missed some important option in conversation so go back and talk some more until the diary icon flashes!
Also, spoilerless means that I will not describe everything that happens because of your actions, that's up to you to experience first hand. I will only tell you what to do to proceed.

Silly yet painfully true joke:
Do you know what's the only thing longer than The Longest Journey?
...
...
...
Making a guide to it.

- Kris
Basics
Since this is a point & click adventure, your mouse cursor will change accordingly to what action you can take on the object you're pointting at.

Dark blue arrow framed in stone – walking to/run to (double click, very handy)
Red arrow – exit the area
Light blue arrow – able to be used/collected/talked to
Blue eye arrow – looking, April comments
Empty arrow – no action while in animation

In the top toolbar on the left, there is your inventory.
On the right, there are options and exit.
When the options picture flashes, it means you've reached an important checkpoint.

Always look at everything in the area, it might be crucial to your progress.
Always talk to people, some conversation options unlock after asking repeatedly and so. Your progress depends on it!

I'll write important storable objects in capitol letter.
If an object from your inventory flashes when put over an outside object, it means you can use them together.
To store an item back to your inventory, right click.
Esc to skip dialogs.
X to show all exits.
Prologue – A Lion is in the Streets
The house in between:
Listen to the old lady telling the story

Unknown place:
First off, look around. Then go right.
Take a huge SCALE from the nest next to the tree.
Take a TWIG from the tree and talk to it.
Continue going to the right and you'll find a stream of water.
Combine the TWIG and SCALE in your inventory and make a FUNNEL.
Place the FUNNEL on the stream.
Talk to the tree again.
Chapter 1 – Penumbra
April's room:
A CASH CARD will automatically appear in your inventory.
Take the PHOTOGRAPH and April's DIARY from the night stand. (Reading the diary will give you a better idea about the story)
Open the closet and take the MONKEY toy (in a box).
Open the window and look down, release the CLOTHESLINE (you'll deal with this later).
Exit the room.

Hallway:
Talk to Zack and then take an ORGANIC LEAF from the plant next to the door to April's room.
(Taking the leaf is optional, it'll unlock Extras & Bloopers in chapter 4 that would normally be unlocked after completing the game. Has no effect on the story whatsoever.)
Continue downstairs.

Border house hub:
Look at the bulletin board, take and read the PINK NOTE, a PIN will also be collected by this.
Give Fiona the PINK NOTE and you'll receive your lost GOLD RING. Keep talking to her to learn about the plumbing problems.
Take the MATCHES from the table.
Exit the house.

Outside of the Broder house:
Go to the left and find a broken water pump machine, which you must fix.
Look closely at the machine and use the GOLD RING to connect the ripped cable up on right side.
Save the game.
There are 2 handles on the right side, your goal is to make all the blue lines under them stay in a horizontal position.

(This is not a hard puzzle, learn what each does and solving it shouldn't be a problem.)
Or you can follow this direct tutorial: (since you saved the game)
1) Turn the left handle twice and move the red light two steps to the right, turn the right handle twice.
2) Turn the left handle once, then turn the right handle thrice.
3) Turn the left handle once, then turn the right handle once.
Now turn the knob on the gas valve (left side).
Turn the wheel and take the CLAMPS.
Do not forget to recover your GOLD RING!!!
Keep walking across the bridge and talk to Cortez.
Continue walking to the Bridges area or your right (away form the house).

Bridges:
Run to the park – an alleyway between white and red brick buildings on your left.

Park:
Run to the Academy – under the rusty bridge in the middle.

Academy:
Enter the Academy.
Take a RUBBER GLOVE from the trash can and go up the stairs to your studio.
Take PALETTE & PAINTBRUSH from the counter with the sinks and then use it from your inventory on the canvas.
Talk to Emma and then go to the Fringe Café (return the same way to the bridges and then choose the only exit on the right side).

Fringe Café:
Talk to Charlie, ask him about Cortez. Charlie reminds you you should get paid today.
Take some HARD CANDY from a jar on the bar where Charlie is standing.
Inspect your DIARY in your inventory and there you'll find your TIMESHEET necessary for your boss (Stanley at the bar.)
Talk to him and get paid.(You must threaten to quit so as to get paid)
Look at the poster next to jukebox, take the complimentary TICKET to Roma gallery in the downer right corner of it.
Inspect the ticket in your inventory for the location.
Take BREAD from the table in front of Emma.
Talk to Emma then go back to the Border house.

Border house:
Saving private RUBBER DUCKY!!!(You can do this in chapter 2 but let's get it over with.)
Go upstairs to April's room and look out of the window.
Use BREAD on the RUBBER DUCKY and watch what happens.
Pull the chain up and get the CLOTHESLINE.
Go back to Fringe Café.

Fringe Café:
You'll find the RUBBER DUCKY in the middle of the screen, stuck next to the huge death star thingy, grab it.
Inspect it in your inventory and get BAND-AID from it.
Now go to the subway (return to bridges and take the exit on your far left.)

Subway:
Go to the East Venice station.
Use the GENE SCANNER, choose a weekly pass and then use your CASHCARD on the camera with red objective.
Run to the train that stops on the right side. When inside, click on the map above April.
Choose Watertown bridge.

Roma Gallery:
The entrance is on the right side, walk in and talk to Cortez.
Go back to subway and go to East Venice.

Now it depends on what you told Stanley about working tonight.
If you said you would work, go to the Fringe Café and tell Stanley you're ready to work.
If you said you wouldn't, go home to the Border house and watch tv.
Either way, a cutscene will send you to chapter 2!
Chapter 2 – Through the Looking Glass
Border house:
Talk to Fiona.
Talk to Zack upstairs (door in front of April's room)
Promise him some loving in order to get the location of Cortez.
Go to the subway station.

Inside the East Venice station:
On your far left, there is something sparkling, come close to look at it, it's a KEY that you'll need later.
In your inventory, combine CLAMPS with the CLOTHESLINE.
Inflate the RUBBER DUCKY using the mouth option in your inventory.
Now combine the infated DUCKY with the CLAMPS on CLOTHESLINE that you created before.
Very fast use that on the KEY hanging in the train track and here you are.
Enter the train on the right and go to Mercury theater, take the Metro circle exit.

Metro circle:
On the right side, there is a sign with latters NTS, it's an exit to East Gateway, you have to go there.

East Gateway:
Continue down the street, where the drinking bum and a liquer store is and you'll get to the ancient Mercury theater.
Talk to the fat guy sweeping the floor and note the electricity problem.
Move the trashcan and find some green OOZE under it.
Now, use the HARD CANDY on the OOZE and get STINKY CANDY.
You can also suck the HARD CANDY and get STICKY CANDY that will come in handy much later in the game.
Talk to the guy in coat resting by the street light, until he tells you about his appetite.
Give him the STINKY CANDY and watch what happens.
Go back to the East Gateway and grab the guy's HAT in the middle of the street.
Come back to the theater.
Now check out the fuse box in front of the street light.
Use the iron KEY you found in subway to open it.
Combine BAND-AID and the RUBBER GLOVE.
Use the patched GLOVE on the sparkling connection, watch what happens and then follow the fat Freddie guy to the alleyway.

Theater Alley:
Look at the fire alarm by the door and the scary shadow on the wall opposite to you.
Put the HAT on the garbage bag.
Inspect the MONKEY toy in your inventory, its eye should fall out, take the EYE and wind its key.
Put the MONKEY next to the garbage.
Open the trash can under the fire alarm and put MATCHES in it and enjoy the show.
After that, enter the theater through the fire exit.

Mercury Theater:
Talk to Cortez and stare with awe.

Temple:
Keep going to the right until you bump into a priest.
Talk to the priest, you actually must only listen (red options) at first to be able to understand him.
You can look around the city, then come back to the temple and talk to the priest, learn about the story behind this all. (15 minutes of monolog)
Ask Tobias about Brian Westhouse. You must do this repeatedly to unlock the next step in the story.
Exit the temple.

Mercuria:
Go to the stalls down on the right side of the square.

Marketplace:
Talk to the map merchant until he gives you a job.
You'll receive DELIVERY LIST and a MAP.
Leave the marketplace and click on the far buildings which are marked as an exit to the City.

City map:
Choose the City Gates exit down there.

City Gates:
Continue to the right where the Docks are.
Then keep going farther to the Ship.

The Ship:
There is an old-ish sailor standing near by, talk to him and give him the MAP.
He'll give you a COIN in return.
Give him the DELIVERY LIST to sign although that won't come easily.
Go back to the City Gates (eixt is behind the ship).

City Gates:
There is a musical instrument stall next to the gate, go there and get one for the COIN.
Return to the Ship.
Talk to the Captain about bad weather, then give him the DELIVERY LIST.
Now return to the marketplace.

Marketplace:
Give the merchant the DELIVERY LIST.
Then he shows you the way to your next goal.
There is a new location on the city map, go there.

Westhouse's bungalow:
Talk to Brian and then give him the MAP.
Also make him sign the DELIVERY LIST.
Try to leave back for the city but receive an old POCKET WATCH instead.
Inspect it in your inventory and use the PUSHPIN on it. Voila!

Theater Alley:
Talk to Cortez until you exhaust all conversation options.
Go to the Fringe Café.

Fringe Café:
Talk to Charlie.
Go further inside the Café and talk to Emma.
Now you can choose to go on the date with Zack or stay and watch the concert with Emma and friends. Either way you're gonna wake up in chapter 3!
Chapter 3 – Friends and Enemies
Border house:
Exit April's room and listen to the sleazeball.
Then you'll need to visit Hope street through subway.

Hope street:
Go to the cathedral (exit in the back) and talk to Father Raul, who's standing at the confessionals (right side of the cathedral) about Warren.
Go back outside and then to the bulding entrance on the left – Building 87.
There is a boy sitting on the staircase, talk to him and learn what to do to earn his help.
Exit the building and take the subway to Metro West.

Metro west:
Go down the street to the police station. You're in for some breaking news!
After the cutscene, go to the station entrance and talk to the cop in there to learn how to get in.
Now you must go back to the street and read the street signs, there are only two, you can't miss them. They are up on the street lights in the middle of the screen.
Check out the roadblock and then use the hand option on it.
Climb into the garbage can.

Police station
Prepare for some bureaucracy.
Talk to the woman at the counter to learn why there's nobody working on the door problem.
Talk to the fat worksman until you know what form is needed to proceed in working.
Go to the broken door and look at the toolbox on the ground.
Pick up the piece of paper – OLD PETITION.
Give the OLD PETITION to the fat worker.
Go back to the woman behind the counter and ask her for the REQUISITION FORM.
Give it to the fat man again.
Yet go to the woman again and ask for a correct FORM.
Pass it to the lazy fat guy and there you go.
Now you'll have to get both of the men away from the door.
Go to the weird looking Videophones, the left one will tell you its number.
You can use the right one for your own call, or just call the number you just got from the other stand.
Then tell both men they have a call on the line. (Several times to the tall guy)
Go to the abandoned opened panel and connect the WIRES that are just hanging outside.
To be able to sneak through the door, you must distract the woman by asking her for an inconveniently stored form.
Get number of that kind of a form by looking up on the shelves behind her.
I'm pleased to say: welcome to the restricted area!

Deep in the police station:
There is a vending machine, use the CASH CARD on it to get a SODA CAN.
Proceed left to the locker room.
Read the names on the lockers. Note no.4
Talk to the guy struggling in the toilet stall and get a LOCKER KEY from him.
Use it on locker no.1.
In the locker, take the MEDICINE bottle with pink liquid.
Look at the mirror and get the SHARD from it.
Read the information hidden under the SHARD.
Use the MEDICINE on the stall.
Talk to Minnelli about his wife's birthday.
After the conversation, he'll sneeze and drop his eye.
Quickly switch off the light in his stall and swap his eye with the toy EYE from your inventory. (Light switch is right next to the stall on the wall)
Run outside and to the archives! (The door next to the soda machine)
Use Minnelli's EYE on the retinal scanner to get in.

Archives:
Log in and search for Warren and EDIT his file.(You can DELETE his file too, try it if you want)
In Warren's file, look at the name of his sister.
PRINT the file.
Search for Erica (no result) and the colony number and PRINT the file.
Search for Church of Voltec and click on the name of Jacob McAllen.
Search for Jacob McAllen and look at the code on the bottom, memorize it.
Log out and go to the other computer – control panel.
Now you're supposed to enter the code you found before, or just click the symbols with numbers 11, 16, 1, 8.

Take what the computer gives you and inspect it in your inventory, say hello to the DATA CUBE.
Take what you've printed - PRINTOUT, next to the upper computer and exit the room.
Go back to the reception area and take a SCREWDRIVER that is now lying in front of the toolbox.
Leave the station (Exit is near the criminal with blue bandana who's picking his nose).

Metro West:
There is a wreck scene outside, come close to it and check out the thing hanging out of the ship.
Go back to Hope street to see Warren, give him the PRINTOUT in exchange for his piece of info.
Go to the Newport docks via subway.

Newport Docks:
Go upstairs and across the bridge getting yourself in a large parking lot area.
Come to the Garage, put SODA CAN to the paintshaker machine and then knock on the door thrice.
Go into to hole in the ground that is inside.
Talk to Flipper and give him the DATA CUBE.
Keep talking to him until the ANTI-GRAV CONTROL UNIT is mentioned.
Go back to the wreck scene in front of the police station.

Metro West:
Talk to the guard at the wreck scene and give him the inflated SODA CAN.
Put the mirror SHARD to the laser fence.
Loosen the ANTI-GRAV UNIT with your SCREWDRIVER and take it.
Go back to Flipper, give him the ANTI-GRAV UNIT.
Go to the cathedral on Hope Street to talk to Cortez.
Go home.

Border house:
Go to April's room and talk to whoever is there.
Go to sleep and wake up in chapter 4!
Chapter 4 – Monsters
Go inside the pub on your left.

Journeymann Inn:
Talk to the woman in an apron and then to the weird creature by the fireplace.
Sleep in the comfy chair next to the fireplace.
Try to leave but help Benrime clean in stead.
She'll give you COINS.
Exit the pub and go to the city, there is a new location – City Green!

City Green:
(optional) If you collected the ORGANIC LEAF, put it to the flower in the background and watch what happens.
Go inside the house and take a seat.
Talk to Abnaxus.
Exit the house and go to the temple to talk to Tobias, he tells you to see Brian Westhouse, do so and then leave for the Enclave.

The Enclave:
Look around and then talk to the priest downstairs.
Ask him to give you all the books available as options, one after another and have fun reading!
You have a new destination that can only be reached over the sea!
Go to the Pier.

Pier:
Talk to the captain by the ship.
Go to the small pier (exit on the right side).
Talk to the old sailor and promise him help.
Now go to the city – marketplace.

Marketplace:
Give the map merchant the DELIVERY LIST and receive another MAP for delivery.
Ask the cupholder to play a game.
Put the COIN on the table and start the game.
Use your SCREWDRIVER on each cup when the screen closes up.
You'll receive a CALCULATOR.
Use your SCREWDRIVER on the cupholder to trade it for the talking BIRD.
Return to the pier.

Pier:
Give the old sailor the BIRD.
Go back to the ship and talk to Captain Nebevay.
There is a new location on the map – Road North!
Proceed to the city map and off you go to the Forest.

Forest:
Keep walking to the right and enjoy a pleasant surprise.
After that, keep walking to the right until somebody stops you.
Promise them your help and then continue walking until you see that the bridge had been busted.
Go back the same way you came.
Help the lady on the ground and do what she insists on.

Old woman's place:
Check the place out.
Take the BROOM on far right and use it on the chain closed cabinet and watch what happens.
Take the SKULL from the table and break the little circular window with it.
Pick up the Bandu and help him through the window.
Now use the hand option on the loose plank under the dining table by the fireplace.
Escape this place.
Talk to the Mole outside.
There's a new location to your map – Banda Village, proceed.

Banda Village:
Speak with the elder mole who's resting together with Crow by the front campfire.
Talk to Ben-Bandu in the background.
Go to the spirit dig and sleep on the bed.
Enjoy what's coming to you and wake up in chapter 5!
Chapter 5 – There and Back Again
Banda village:
Speak with the elder again and receive the FIRST STONE.
Wake up Crow.
Leave for the swamps (exit in the right downer corner).

Swampy area:
Keep going right and then take the purple FLOWERS close to the screen.
Continue walking down the cliff.
Talk to the statue.
Summon Crow by playing the FLUTE.
Use Crow on the BERRIES on the right.
Combine BERRIES and FLOWERS in your inventory.
Talk to the statue again and use MOISTURIZING CREAM on him.
Go up to the castle.

Floating castle:
Give COIN to the gargoyle on the bottom right.
Blow off the fire in his both hands.
Give him another COIN.
Take SALT and PEPPER.
Go up to the upper ramp and turn the hour glass.
Rush up the stairscase that just appeared.
Now that you're up, go to the mirror door and try to take the PARCHMENT, you cannot though.
Go to the stone door and knock, that makes another hour glass appear.
Turn the second hour glass and run to the door on far left and enter.
Use PEPPER on the gargoyle face and go down the ramp.
Meet Roper Klacks and challenge him in algebra.
Use the CALCULATOR on him.
Go up the tower.

Klack's study:
Check everything out, especially the magic lexicon.
Take GREEN ESSENCE which is hidden behind the curtain.
Take WHITE ESSENCE down in the shelves.
Take BLUE ESSENCE which is hidden under the skull on the table.
Take YELLOW ESSENCE by the couldron.

Now, sniff, touch and listen to each of them, that should give you an idea about what they stand for.
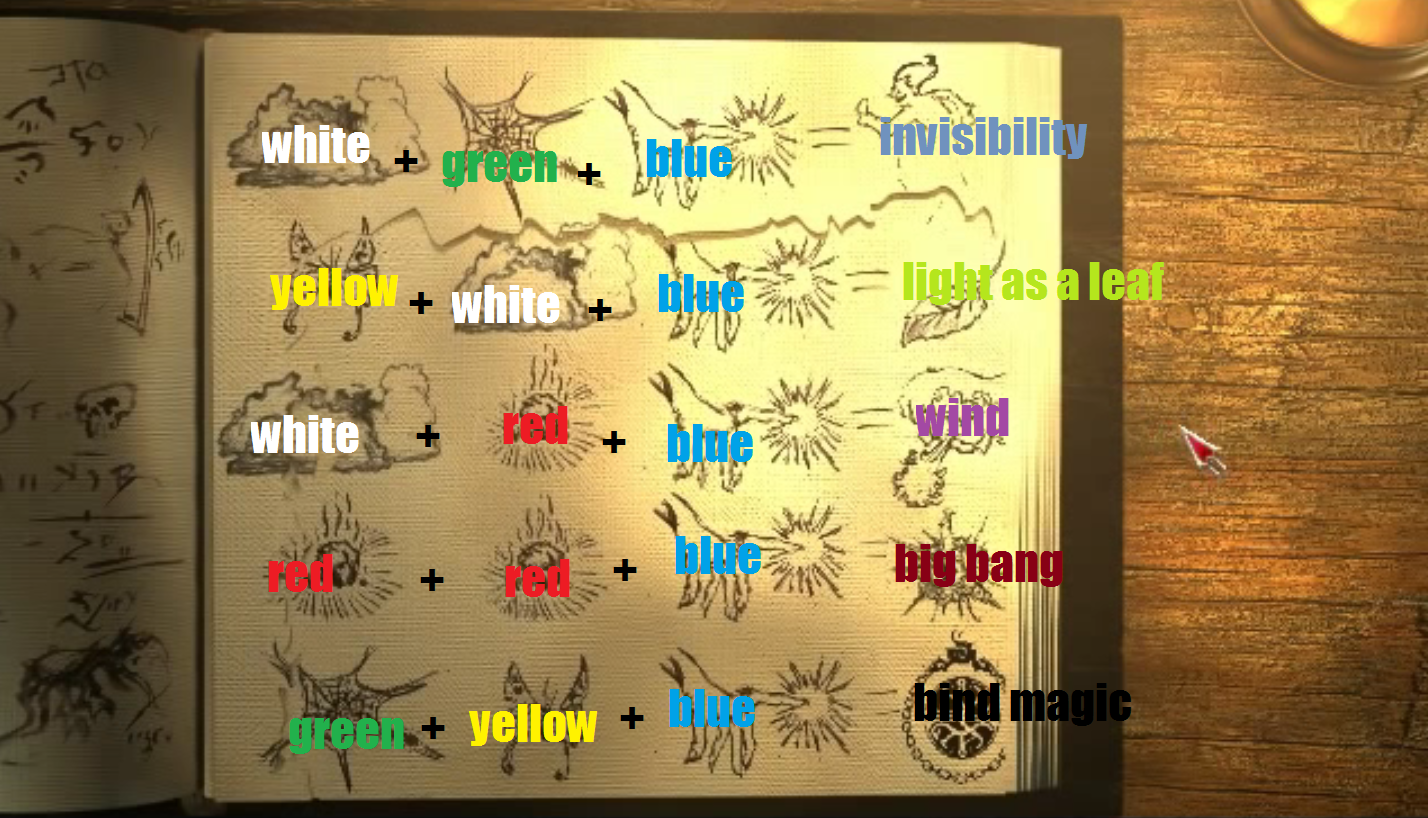
WHITE = clouds
GREEN = spider web
BLUE = sharp claw
YELLOW = butterfly

Cooking:

Go to the cauldron.
The magic lexicon had only one recipe so let's make it.
Use WHITE + GREEN + BLUE vial on the cauldron in this order and make the INVISIBILITY potion.
This potion will come in handy to collect the PARCHMENT from the labyrinth.
Use the INVISIBILITY potion on April and fetch it, come back afterwards.
Use the PARCHMENT on the lexicon and read 4 more recipes.
Go to the cauldron.
Use YELLOW + WHITE + BLUE vial and make the LIGHT AS A LEAF potion.
Now go to the window in the study and look up left on the shelves, there is RED ESSENCE.
Use the LIGHT AS A LEAF potion on April and jump for it.
Inspecting the RED potion tells you:
RED = hot coal
Go back to the cauldron.
Use WHITE + RED + BLUE to make a WIND potion.
Use RED + RED + BLUE to make a BIG BANG potion.
Use GREEN + YELLOW + BLUE to make BIND MAGIC potion.

Go to the crystal on the desk and use BIND MAGIC and BIG BANG potion on it, you're welcome.
Open the window and summon Crow via your FLUTE.
Use the WIND potion on him.
Take Crow and use him on the window.

Pier:
Talk to Captain Nebevay and show him the WIND potion.
You need a navigator, run to the Journey Man Inn.

Inn:
Give the blue woman her MAP.
Tell her about the job opportunity.
Go to the map merchant at the marketplace.
Go to the temple.

Temple:
Talk to Tobias (he's in the back) and receive TALISMAN OF BALANCE.
Go to the pier, talk to Nebevay and sail away to chapter 6!
Chapter 6 – The Chaos Storm
Take an APPLE from the barrel on the left side of the ship (your right).
You can go up and talk to the people, check out the magical compass.
Go down below.
There is a sack in there, use STICKY CANDY on it.(You'll get a CANDY WRAPPER)
Take the WORM.
Combine the WORM with the APPLE in your inventory.
Now go back up and to the captain's bridge.
Give the captain the invaded APPLE.
Ask the navigator to take the wheel.
Use the TALISMAN on the magical compass.
When the navigator returns, tell her to correct the course.
Take your TALISMAN back and then go down below again.
Look at the chest on the right.
Take the AXE on the opposite side and use it on the chest.
OUPS your way to chapter 7!
Chapter 7 – A Deep Blue Mirror
Try to pet the head peeking from the water.

Under the sea:
Look at the drawings.
Take the blue polyp on the wall and use it on April.
Jump into the pit in the middle of the floor.
There is a shell outside, take the BLACK PEARL from it.
Swim to the city behind.
Try to talk to the mermaid.
Take the BLACK CRYSTAL on the wall.
Look and take some of the GREEN STUFF on the wall on the left.
Go back to the place with air.
Use PUSHPIN on April, getting yourself some BLOOD.
Mix BLOOD with GREEN STUFF and combine this loveliness with the BLACK PEARL.
You got the GOLDEN PEARL, use it on April.
You can talk to the mermaid, so head back to the city and do so.
Show her the BLACK CRYSTAL.
Swim out of the city and search seaweed on left, you'll find the RED CRYSTAL.
Enter the revealed cave and collect 2 more crystals – YELLOW and GREEN.

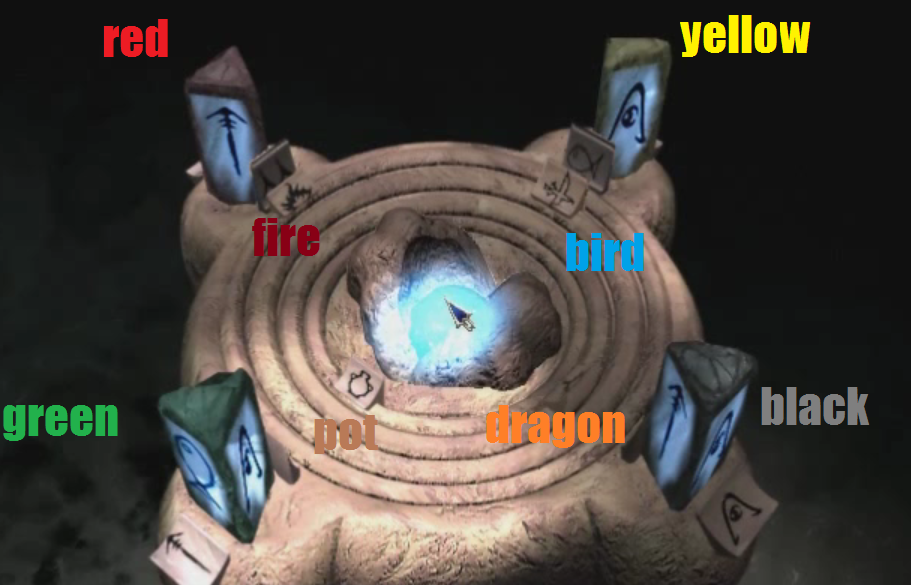
Now look at the altar. The picture below displays how it looks solved - when everything is already in its correct position.
You must put the CRYSTALS on the proper place so that symbols on their sides are pointing towards the same symbol on the altar.

Put them onto the symbols on the altar in following order:
BLACK to the mountain
RED to the water
YELLOW to the fish
GREEN to the harpoon
(The crystals must be turned properly on their spots according to the instructions above.)
Now you need to turn the circles beside their opposites outside the circle:
Fire beside water
Bird beside fish
Dragon beside mountain
Pot is already stuck correctly by the harpoon.

Look at the walls and return to the queen to have a talk.
Take the SPEAR afterwards and swim out of the city.
Swim to where the oxygen room is but continue swimming to the right.
Try to enter the wreck.
Use SPEAR on the Snapjaw.
Take a TOOTH from Snapjaw and swim inside the wreck.
Take your TALISMAN OF THE BALANCE and return to the cave.
Use your TALISMAN on the symbol on a niche on the left – there's the MAERUM STONE.
Go to the queen and show her all three last collected items.
Talk to the queen again and let yourself be taken to chapter 8!
Chapter 8 – Reunification
Beach #1:
Take ROPE that is in the broken wooden pieces next to April.
Go left to the path.

Old city ruins:
There is a hole in the ground, use ROPE on the tree near it.
Climb down and take a STONE KEY from some rubble on the floor.
Climb back up and recover your ROPE.
Now look at the stone statue.
Insert the KEY in its lock and inspect what it can do.
Take back your KEY and go back to the beach, then continue going right.

Beach #2:
You'll reach another beach with a crab in pain on it, go up the cliff in the background.
There's another statue, repeat what you've done with the first statue.
Come back to the beach #1 and try to go to the jungle behind.
Summon Crow and use him on the jungle.
There is a new location in you map – Volcano, go there.

Volcano:
Enter the big head's mouth.
Use your KEY to change sights of the system and mark symbols that are set when you actually see something. City ruins, cliff, large trees and volcano.
Take back your KEY and exit the head.
Look on the left, there is a large tree not so far away.
Travel there.

Large trees:
Look at another statue that is there and listen to it.
Talk to the stickmen.

To wake up Q'aman via the statue sound system:
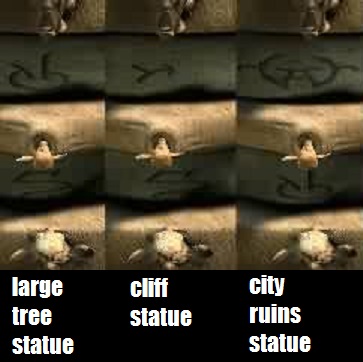
You must turn the wheels on each statue using your KEY so that your voice can be transfered correctly.

Large trees statue:
-top wheel = cliff (bowl symbol)
-bottom wheel = large trees (S symbol)
Cliff statue:
-top wheel = city ruins (arrow symbol)
-bottom wheel = large trees (S symbol)
City ruins statue:
-top wheel = volcano (capitol A in brackets symbol)
-bottom wheel = cliff (bowl symbol)
When you manage to do this, return to the large trees and talk to the statue.
Travel to a new destination – Quiet giant's glade

Q'aman's lair:
Talk to the giant and make him help the crab.
Go up the cliff

Cliff:
Talk to Q'aman and give him the CANDY WRAPPER.
In the meantime, go to large trees.

Large trees:
Climb up the tree and inspect everything up there.
Climb back down and talk to the stickmen.
Follow them up and ask them what they need to finish.
Go back to the cliff

Cliff:
Take the FISH BONES and the FISHING LINE.
Return to the large tree.

Large tree:
Climb up on the tree again.
Give Wick the FISHING LINE.
Talk to Wick.
Combine ROPE and FISH BONES in your inventory and place it on the cannon.
Pull the lever near the 2 stickmen. Voila!

Busted road:
Look at the updraft in between.
Use the WIND potion on the updraft.
Drink the LIGHT AS A LEAF potion.
Speak with the winged person on the other side.
Walk to the village, just stop to talk to the old person before the city.

Tama'a:
Talk to the little girl and the young lady in the village.
Go talk to the guard but turn down the test.
Go to every Alatien that you've met and listen to one story from each of them.
The young lady on the right tells you the story of homecoming. (You can hook her up with the guy who tells you the story of winds)
The little girl tells you the story of stars.
The old man by the village gates tells you the story of sea.
The young man by the tunnel entrance tells you the story of winds.
Go back to the guard and answer his questions correctly. (It's always the 3rd option)
When you're let in, talk to the old Teller
Receive the ALATIAN STONE.

Under the sea:
Look and touch the large rock.
Uncover the sand in the middle.
Touch and talk to the small blue hole.
Enter the big blue hole.
Inspect the circular object in front of you.
Talk to the sleeping god.
He gives you the BLUE DRAGON'S JEWEL.
Let him take you elsewhere.

The dark people's ship:
Talk to the dark person.
Receive the STAR MAP and the DARK PEOPLE'S STONE.
Go to sleep and wake up in chapter 9!
Chapter 9 – Shadows
Try to enter the city.

Cathedral at Hope street:
Talk to father Raul.
Go to the Border house.

Border house:
Talk to your house guests.
Run upstairs as soon as you can.
Get into your room and jump out of the window.
When outside, drink the INVISIBILITY potion and pass the guard.
Run to the Fringe Café.

Fringe Café:
Jump into the mystery door.

House in between:
Talk to the old lady.
Go through the door to chapter 10!
Chapter 10 – Rebirth
Check the Inn and the temple.
Visit city green where you talk to Abnaxus and receive the last VENAR STONE.
Go to Brian Westhouse's and talk about the war with him.
Go to the Enclave.

The Enclave:
Talk to Minstrum Yerin.
Go downstairs to the pool and look at the rusty wheel.
Ask the priest about the wheel.
Go upstairs to the Enclave entrance.
Look at the floor's pattern.
Place the STONES on their places. (They start flashing over their correct spot.)
Look at the dragons head and summon Crow.
Use Crow on the dragon's head.
Ask Yerin to unlock the rusty wheel.
Turn the wheel.
Take the STONE DISC out of the water.
Go to the city gates.
After a few attempts, shift your way to chapter 11!
Chapter 11 – Kin
Take the PALETTE & BRUSH and use them on the canvas.
Talk to the Mother and watch what happens.
Get the WHITE DRAGON'S JEWEL.
Go to the docks to Flipper's.

Flipper's hideout:
Talk to Flipper and receive your FAKE ID.
Give Flipper your STAR MAP.
Leave and take the subway to Metro circle.

Metro circle:
This time go left to the tower.
There's an alevator, take it up.
There is a tiny man throwing away a perfect pizza.
Go to the trashcan and pick up the PIZZA BOX.
Go shopping to the butique on left.
Take the shuttle to MTI now. (exit in the middle on the background)

MTI:
Talk to the tardy behind the desk.
Give him the PIZZA BOX.
Touch and look at everything where the alevator took you, especially the desk.

Evil lab:
Look at the computer as soon as you're able to.
Run to it and use it to open the door.
Rush through the door.
Run to the right downer corner of the scene outside and watch.
Go back to the lab and use the computer again.
Recover your STONE DISC.
Exit the area and visit Flipper again.

Flipper's:
Talk to him and learn where you need to travel next.
Exit and take the subway to Metro circle and take the alevator up.

Tower:
When you arrive up, go to the tubes behind you.
Talk to the receptionist and register as a colonist.
Take off and land in chapter 12!
Chapter 12 – Dreamland
Look around and enter the men's toilet.

Men's restroom:
Use your CASH CARD on the dispenser on the left and get PILLS.(Try to eat them :D)
Move the garbage can in the background.
Unscrew the duct's grill using your COIN.
Enter the duct.

Restricted area:
There's a control panel on your left, inspect it.
Choose service duct #1.
Now you see a camera close to your screen.
Take the cable off of it and RUN immediately back into the duct you came from.
Choose service duct #2 on the control panel.
Put your PILLS to the mug on the desk.
Get caught
Enter the restriced area the same way as before.
Go to the guard office again and enter when it's empty.

Office:
Look at the computer in the back, the guardian's cell is no. 5.
Search the coat in front of the same computer and get the KEY.
Now look at the surveillance map on the left wall.
Green light means the place is not being guarded at the moment,
Red is the opposite.
Click the red light marked as prison cells and make the guard go off duty.
Walk outside and to the far corridor.

Cell block:
Go to the cell no.5 on your left.
There is a magnetic lock, move the cover and use your KEY on it.
Meet the guy and lead him back to the office. (He'll wait outside though)

Office:
Look at the surveillance map again.
Click on the rest area and make the guard go on duty.
Click on airlock and make the guard go off duty.
Exit the office and go to airlock – to the far corridor then continue going right and down the hallway.

Airlock:
Talk to the guardian.
Press the red button close to your screen.
Look at the space-robot-suit on your right, expecially the red ligtht.
Go back to the office.

Office:
Look at the surveillance map again.
Make the resting guard go on duty.
Click on cargo and make its guard go off duty.
Go outsite and to the left, you should reach the cargo.

Cargo:
Inspect the computer on the right.
You can examine all the boxes though the correct on is in the back.
Click on the correct box and get the OXYGEN supply.
Go back to the Office.

Office:
Yet again, look at the surveillance map.
Click on the resting area and make the guard go back on duty.
Click on airlock and make the guard go off duty.
Go to the airlock.

Airlock:
Put the OXYGEN on the space pod.
Press the yellow button that appeared close to your screen.
Talk to Adrian.
Fly to the last chapter 13!
Chapter 13 – The Longest Journey
Always walk to the tower.

Trial #1:
Combine TALISMAN and BIND MAGIC potion in your inventory.
Use it on the blue chaos vortex.
Click on the other side of the pit and continue walking.

Trial #2:
Give the man your GOLD RING.
Go to the tower.

Trial #3:
Check everything out.
Summon Crow with your FLUTE.
Use Crow on the pit and the statues.
Use Crow on the well of making.
Use Crow on the pit again.
Cross the bridge and go up to the well.
Place the STONE DISC on the well.
Touch the mysterious hand.

Tower:
Use the TALISMAN on the agrressor and enjoy the show.
Epilogue - Threads
Listen to the lady.

Check out the Book of Secrets that is now (or possibly since chapter 4) unlocked in main menu! There is some cool stuff in there!
Conclusion
Thank you for reading my guide, I hope it helped you on your journey through this awesome game. Feel free to rate and comment. Be sure to report any wrong or misleading piece of information, I'll correct/polish it and mention you in this thank you section. I apologize for all grammatical errors and mistakes for I'm not a native speaker. My huge thanks goes to MaGtRo[www.gameboomers.com] and MegaZina[www.gamebhttp], who helped me solve some of the illogical puzzles throughout my first gameplay. I also thank my sweet boyfriend who simply was there during the long hours that this guide took me and corrected my english several times and therefore I marked him as a contributor ♥

Thanks to b6ph6m6t for helping to improve this guide on Chapter 7!

Thanks to Great_OLAF3 for pointing out an easy-to-miss detail in Chapter 2!

Thanks to user "nobody" for pointing out a mistake in Chapter 7!

Sincerely Kris
74 Comments
Gagasomnia Apr 12 @ 1:15am 
Definitely deserves a remake, the story in this game would blow everyone away, it's just so good! Hopefully one day we will get that ☺️
Stacy's mom  [author] Apr 11 @ 9:47pm 
@Пятнистая Рысявка I'm glad my guide makes your journey smoother! @Gagasomnia April Ryan is awesome, I remember how sad I was about what happens with her in the later game. And this masterpiece of a story is deserving of a remake. I'd love it if it could reach a much wider audience. Good luck with your replay!
Gagasomnia Apr 11 @ 9:17pm 
This is my favorite game of all time! The story is an absolute mind blowing experience and April Ryan is such a wonderful protagonist, I loved following her every step of the way, everyone needs to play this masterpiece! I played it when I was still a kid and I remember crying at the very end, I was not expecting that at all, cried like a baby! Thank you so much for this because I plan to replay it because I really want it on my YouTube channel! ☺️
Пятнистая Рысявка Dec 25, 2023 @ 12:38am 
@charlie i know its been half a year, but you gotta read pink note itself first
Пятнистая Рысявка Dec 25, 2023 @ 12:34am 
Thanks, g, exactly type of guide i needed.
Honestly, cba playing it by myself, solving puzzles, clicking through everything, but i like enjoying point n click games with walkthroughs like this one
Vachi Dec 12, 2023 @ 7:16am 
Awesome guide! Thanks.
Stacy's mom  [author] Dec 12, 2023 @ 7:16am 
Warms my heart ❤️ you're welcome!
Stacy's mom  [author] May 14, 2023 @ 5:44am 
It's possible, luckily you're in the beginning :)
Chance May 14, 2023 @ 2:46am 
Thanks for the response. I have exhausted all dialogue options and approached her at least fifteen times. I think my playthrough might just be bugged.
Stacy's mom  [author] May 14, 2023 @ 1:19am 
#Chance You may have to exhaust all dialog options or approach her repeatedly. If you have followed all steps of my guide, it should work. Try to mess around a bit and experiment, I did not encounter any issues at this point of the game.