Plumbers putty is a versatile and reliable product that can be a game-changer when it comes to tackling bathroom sink repairs and installations. Whether you're replacing a drain, sealing a leak, or installing a new faucet, plumbers putty is an essential tool in any plumber's kit. In this guide, we will explore how to effectively use plumbers putty for your bathroom sink projects, providing you with the knowledge and confidence to tackle any plumbing job with ease.
| Characteristic | Value |
|---|---|
| Type | Plumbers Putty |
| Recommended Use | Bathroom Sink |
| Application Method | Apply a thin layer evenly |
| Setting Time | 24 hours |
| Curing Time | 2 to 7 days |
| Waterproof | Yes |
| Resistant to Chemicals | Yes |
| Longevity | Can last for many years |
| Easy to Use | Yes, simple application process |
| Non-Toxic | Generally considered safe for use |
| Versatile | Can be used on various surfaces |
| Moldable | Yes, can be shaped and molded easily |
| Easy to Remove | Yes, can be easily removed if necessary |
What You'll Learn
- What is plumbers putty and why is it used for bathroom sinks?
- How do I apply plumbers putty to seal a bathroom sink?
- How long does plumbers putty take to set and dry?
- Can I use plumbers putty on all types of bathroom sinks, or are there specific materials it should not be used with?
- Are there any special instructions or precautions to follow when using plumbers putty for a bathroom sink?
![]()
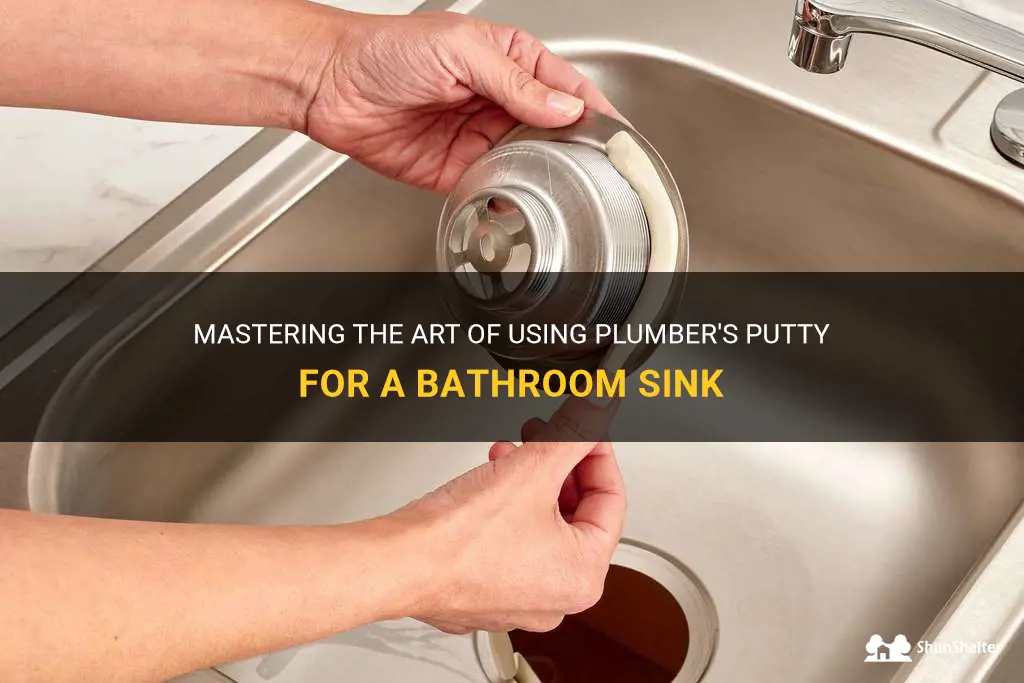
What is plumbers putty and why is it used for bathroom sinks?

Plumbers putty is a type of sealant that is commonly used for bathroom sinks and other plumbing fixtures. It is a soft, pliable substance that is easy to mold and shape, making it perfect for filling gaps and creating watertight seals.
The primary purpose of plumbers putty is to create a waterproof barrier between the sink and the drain or faucet. It prevents water from leaking out and causing damage to the surrounding area. Plumbers putty is particularly useful for sealing around the base of a faucet or the top of a drain, where water is most likely to escape.
One important thing to note about plumbers putty is that it is not suitable for use on surfaces that will be in constant contact with water, such as the inside of a sink or bathtub. Instead, it is designed to be used on the underside of a fixture, where it will be protected from water exposure.
Using plumbers putty is a relatively simple process. First, you will need to clean the area where you will be applying the putty. This will ensure that the putty adheres properly and creates a strong seal. Use a mild detergent and warm water to scrub away any dirt or debris.
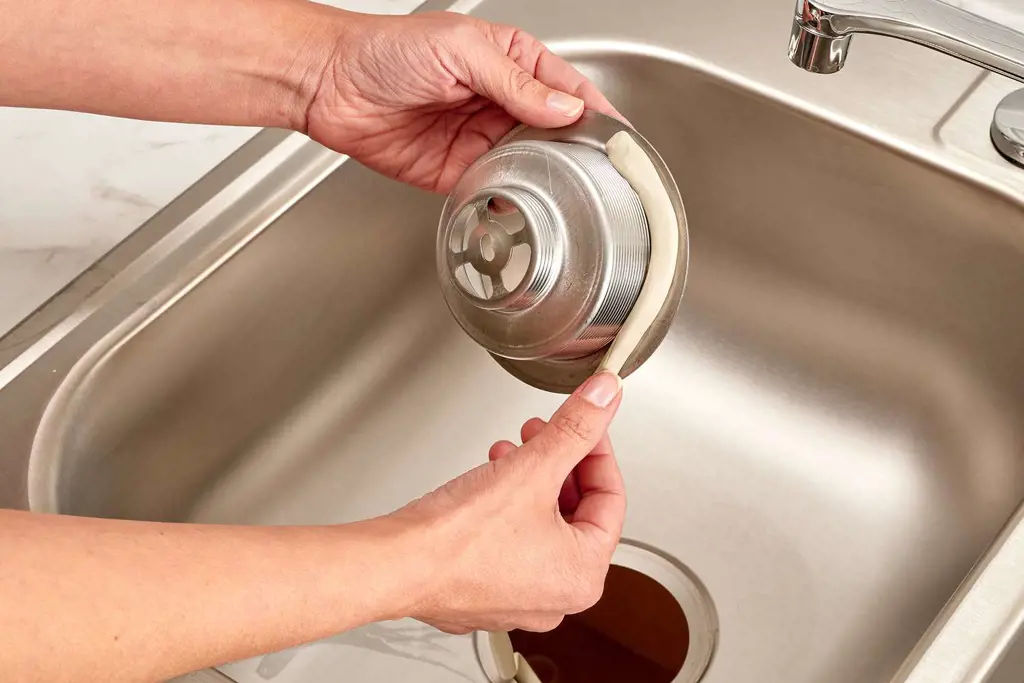
Next, take a small amount of plumbers putty and knead it in your hands until it becomes soft and pliable. Roll it into a thin rope-like shape and then press it onto the area where you want to create a seal. Use your fingers to smooth it out and ensure that it fills any gaps completely.
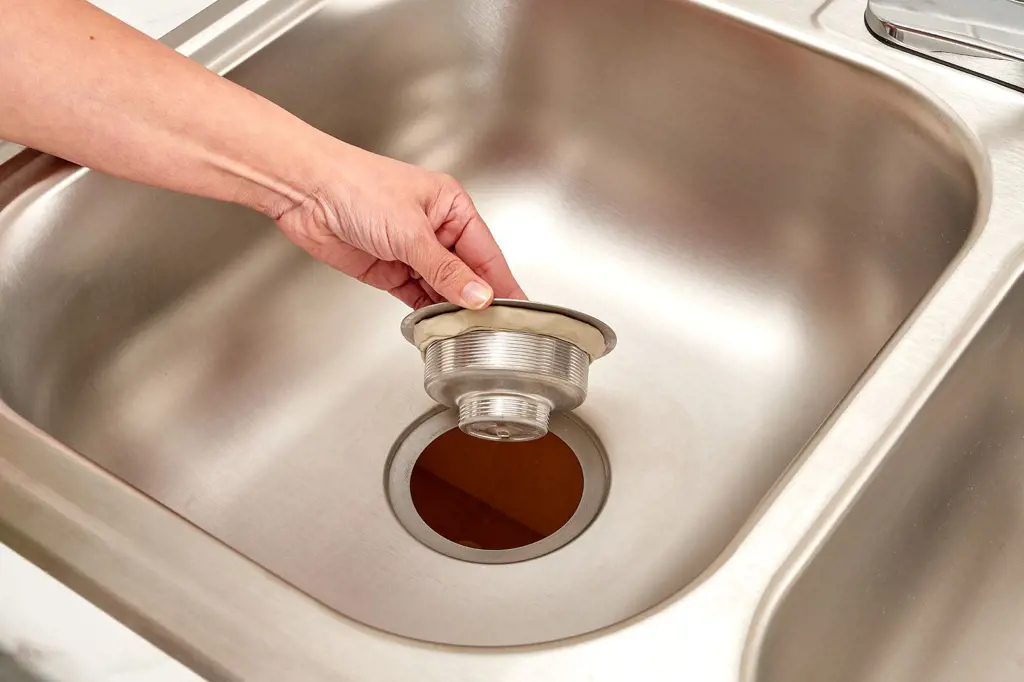
Once the putty is in place, you can install the fixture. For example, if you are sealing around the base of a faucet, press it down firmly onto the sink until it is secure. If you are sealing around a drain, place the putty on the underside of the drain flange, then press it into the drain hole and tighten the locknut.
Finally, wipe away any excess putty with a damp cloth to create a clean, finished look. Be careful not to disturb the seal as you do this. Once the putty is dry, you can turn on the water and check for any leaks. If you do notice any leaks, tighten the fixture or adjust the putty as necessary.
To provide a real-world example of plumbers putty in action, let's consider a common issue that many homeowners encounter: a leaky bathroom sink drain. Often, the cause of the leak is a faulty or degraded seal between the sink and the drain pipe. By applying plumbers putty to the underside of the drain flange before tightening it into place, you can create a tight, waterproof seal that prevents any water from escaping.
In conclusion, plumbers putty is a versatile and essential tool for anyone working with bathroom sinks or plumbing fixtures. Its ability to create watertight seals helps to prevent leaks and water damage, keeping your bathroom dry and functional. By following the simple steps outlined above, you can easily use plumbers putty to solve common plumbing problems and ensure the longevity of your fixtures.
Is It Possible to Oversize a Bathroom Exhaust Fan?
You may want to see also
![]()
How do I apply plumbers putty to seal a bathroom sink?
Plumbers putty is a versatile and handy material that is commonly used to seal various plumbing fixtures, including bathroom sinks. It is a flexible, waterproof compound that prevents water and other liquids from leaking through gaps and joints. If you are tackling a bathroom sink installation or repair project, knowing how to properly apply plumbers putty will ensure a reliable and long-lasting seal. Below are the step-by-step instructions on how to apply plumbers putty to seal a bathroom sink.
Step 1: Gather the necessary tools and materials
Before starting, gather all the tools and materials you will need. These include plumbers putty, a putty knife, a clean rag or towel, a wrench, and any necessary plumbing fixtures or connections.
Step 2: Clean the area
Ensure that both the sink surface and the area where the sink will be installed are clean and free from debris, dust, and any existing putty residue. Use a mild soap and water solution to clean the surfaces thoroughly. Dry them off with a clean rag or towel.
Step 3: Prepare the plumbers putty
Take a small portion of plumbers putty and knead it in your hands until it becomes soft, pliable, and easy to work with. You can warm the putty in your hands to make it easier to manipulate.
Step 4: Apply the putty
Take a portion of the prepared plumbers putty and roll it into a rope-like shape. The size of the putty rope should be slightly larger than the gap or joint you need to seal. Starting from one end of the gap, press the putty rope firmly into place along the entire length until the entire gap is filled.
Step 5: Smoothen the putty
Using a putty knife or your fingers, gently smooth out the putty to create an even and consistent seal. Make sure to remove any excess putty that may have squeezed out during the application process.
Step 6: Secure the sink
Carefully position the sink onto the mounting surface, ensuring that it aligns properly with the drain and any other plumbing fixtures. Use a wrench to tighten any necessary connections, ensuring a secure and watertight fit.
Step 7: Wipe off excess putty
After securely installing the sink, use a clean rag or towel to wipe off any excess plumbers putty that may have squeezed out during the installation. This will give your sink a clean and professional appearance.
Step 8: Allow the putty to cure
Allow the plumbers putty to cure for the recommended period specified by the manufacturer. This will typically take a few hours or overnight. During this time, it is important to avoid using the sink or applying any pressure to the seal.
By following these step-by-step instructions, you can effectively apply plumbers putty to seal a bathroom sink. Remember to always read and follow the manufacturer's instructions for the specific plumbers putty product you are using. With a properly sealed sink, you can enjoy a leak-free and well-functioning bathroom for years to come.
Exploring the Feasibility of Mandating Employees to Clean Bathrooms: Pros and Cons
You may want to see also
![]()
How long does plumbers putty take to set and dry?
When it comes to plumbing repairs and installations, plumbers putty is a valuable tool that helps create a watertight seal. It is commonly used for tasks such as installing sinks, faucets, and drains. One common question that arises regarding plumbers putty is how long it takes to set and dry. In this article, we will explore the factors that affect the drying time of plumbers putty and provide a step-by-step guide for its application.
Plumbers putty is a sealing compound that is made up of a combination of clay, talc, and linseed oil. The primary purpose of plumbers putty is to create a water-resistant seal around joints and fixtures to prevent leaks. Unlike other sealants, plumbers putty remains flexible even after it has dried, allowing for easy removal if needed.
The drying time of plumbers putty is influenced by several factors, including temperature, humidity, and the thickness of the application. Generally, it takes about 24 hours for plumbers putty to fully set and dry. However, this can vary depending on the specific brand and type of putty used.
Temperature plays a significant role in the drying time of plumbers putty. Higher temperatures can accelerate the drying process, while colder temperatures can slow it down. If you are working in a colder environment, it is advisable to wait a longer period for the putty to dry properly before testing for leaks.
Humidity is another factor that can affect the drying time of plumbers putty. High levels of humidity can prolong the drying process, while low humidity can speed it up. It is crucial to consider the humidity levels in the area where the putty is being applied to ensure proper drying.
The thickness of the application can also impact the drying time. Thicker layers of putty will take longer to dry compared to thinner layers. It is essential to apply an even layer of putty to ensure proper sealing.
Here is a step-by-step guide for applying plumbers putty:
- Clean the area: Before applying plumbers putty, make sure the surface is clean and free from any dirt, grease, or debris. This will help achieve a better seal.
- Soften the putty: Take a small amount of putty and knead it in your hands to soften it. This will make it easier to work with and apply.
- Roll the putty: Roll the putty into a thin rope-like shape with a diameter slightly larger than the joint or fixture you are working on.
- Apply the putty: Gently press the putty onto the surface, ensuring that it covers the entire area where the seal is needed. Make sure to apply an even layer without any gaps or bubbles.
- Install the fixture: Once the putty is applied, install the fixture or joint on top of it. Apply gentle pressure to ensure a secure and watertight seal.
- Wait for drying: Allow the putty to dry for at least 24 hours before testing for leaks or using the fixture. This will ensure that the putty has fully set and formed a proper seal.
In conclusion, the drying time of plumbers putty can vary depending on the temperature, humidity, and thickness of the application. Generally, it takes about 24 hours for plumbers putty to fully set and dry. By following the step-by-step guide mentioned above, you can ensure a proper seal and minimize the risk of leaks in your plumbing installations.
Upgrade Your Bathroom: Replace Your Sink with a Vessel Sink
You may want to see also
![]()
Can I use plumbers putty on all types of bathroom sinks, or are there specific materials it should not be used with?
When it comes to installing a bathroom sink, plumbers putty can be a handy tool to have. It is a dough-like substance that is used to create watertight seals between the sink and the countertop. However, it is important to note that not all types of bathroom sinks are compatible with plumbers putty. In this article, we will discuss the types of bathroom sinks that can be used with plumbers putty and the ones that should not.
Plumbers putty is typically safe to use with most types of sinks, including porcelain, fiberglass, and stainless steel. It is a versatile material that can adhere well to these surfaces, creating a reliable seal that prevents water from leaking. The putty is also easy to mold and shape, making it perfect for filling in gaps and irregularities between the sink and the countertop.
However, there are some types of sinks that should not be used with plumbers putty. For example, sinks made from natural stone, such as marble or granite, should not come into contact with plumbers putty. The chemicals in the putty can react with the stone and cause discoloration or damage to its surface. In this case, it is best to use silicone caulk or a specialized adhesive designed for stone surfaces.
In addition to natural stone sinks, sinks with plastic or rubber gaskets should also not be used with plumbers putty. These gaskets are typically found in newer sinks and are designed to provide a watertight seal without the need for additional sealants. Using plumbers putty in these cases can actually interfere with the proper functioning of the gasket and cause leaks. In these instances, it is recommended to follow the manufacturer's instructions and use the specified sealant or adhesive.
Now that we have discussed the types of bathroom sinks that can and cannot be used with plumbers putty, let's go over the steps involved in using it. Here is a step-by-step guide to applying plumbers putty to a compatible sink:
- Clean the sink and countertop: Before applying the putty, make sure that both the sink and the countertop are clean and free from any debris or residue. This will ensure a proper bond between the putty and the surfaces.
- Prepare the putty: Take a small amount of plumbers putty and knead it in your hands until it becomes soft and pliable. This will make it easier to work with and mold into the desired shape.
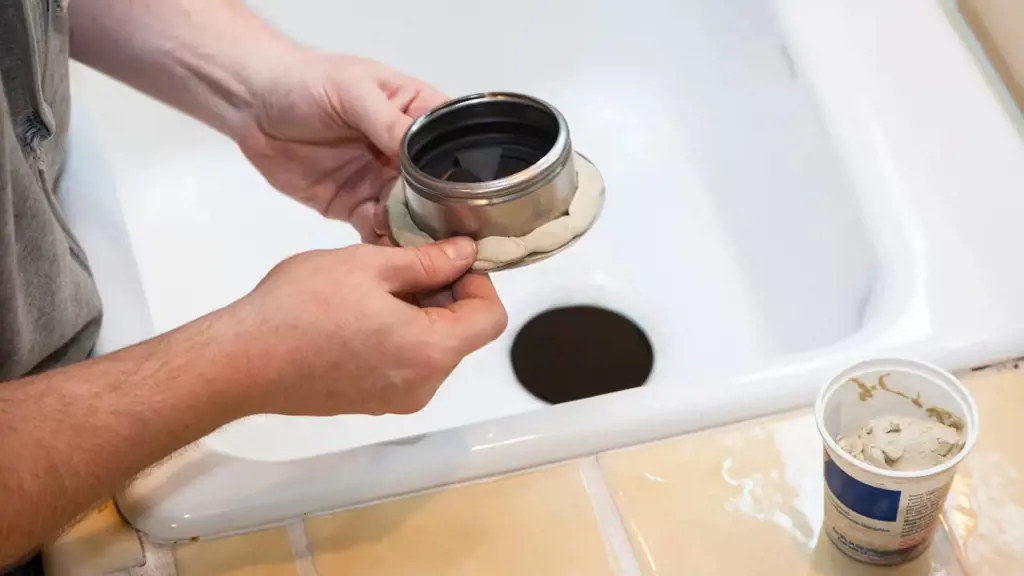
- Apply the putty: Roll the putty into a thin rope and place it around the perimeter of the sink's flange. Press the putty firmly against the countertop to create a seal. Make sure that the putty is evenly distributed and fills any gaps or irregularities between the sink and the countertop.
- Install the sink: Carefully lower the sink into the countertop, making sure that it aligns properly with the drain opening. Apply gentle pressure to ensure that the sink is fully seated on the putty.
- Secure the sink: Depending on the type of sink you have, you may need to use additional hardware, such as brackets or clips, to secure the sink in place. Follow the manufacturer's instructions for your specific sink model.
- Clean up: Use a damp cloth to remove any excess putty that may have squeezed out during the installation process. This will give your sink a neat and professional-looking finish.
In conclusion, plumbers putty can be used with most types of bathroom sinks, including porcelain, fiberglass, and stainless steel. However, it should not be used with sinks made from natural stone or those with plastic or rubber gaskets. By following the steps outlined in this article, you can ensure a secure and watertight seal for your bathroom sink installation.
Struggling to Remove Your Bathroom Mirror? Here’s What You Need to Know
You may want to see also
![]()
Are there any special instructions or precautions to follow when using plumbers putty for a bathroom sink?
Plumber's putty is a commonly used material in bathroom plumbing projects. It is a type of adhesive sealant that is used to create a watertight seal between sink fixtures and the countertop. While using plumber's putty is a relatively straightforward process, there are some special instructions and precautions that should be followed to ensure a successful installation.
- Preparation: Before using plumber's putty, it is important to ensure that the surfaces to be sealed are clean and free of any debris or old putty. Use a scraper or putty knife to remove any existing putty residue or caulk. Wipe the surfaces with a cloth to remove any remaining particles.
- Application: Take a small amount of plumber's putty and roll it into a thin snake-like shape between your hands. Place the putty around the base of the faucet or drain, ensuring that it covers the entire area where the fixture contacts the countertop. Press the fixture firmly in place, allowing the excess putty to squeeze out.
- Removal of Excess Putty: Once the fixture is in place, use a damp cloth or sponge to remove any excess putty that has squeezed out. Be careful not to dislodge the fixture while doing this. It is important to remove the excess putty promptly, as it can harden and become difficult to remove.
- Tightening the Fixture: After removing the excess putty, tighten the fixture securely. Use a wrench or pliers, if necessary, to ensure that the fittings are snugly tightened. Be careful not to overtighten, as this can damage the fixture or the countertop.
- Drying and Curing: Allow the plumber's putty to dry and cure according to the manufacturer's instructions. This usually takes around 24 hours. Avoid using the sink or applying any pressure to the fixture until the putty is fully cured.
It is important to note that plumber's putty should not be used on porous surfaces such as granite, marble, or any other natural stone. Plumber's putty contains oils and components that can stain or damage these types of surfaces. In these cases, a silicone-based caulk should be used instead.
Using plumber's putty for a bathroom sink can provide a reliable and long-lasting seal. By following the proper instructions and precautions, you can ensure a successful installation that will prevent leaks and water damage.
Understanding the Importance of RH on Bathroom Cans: A Comprehensive Guide
You may want to see also
Frequently asked questions
To use plumbers putty for a bathroom sink, first, clean the area where you will be applying the putty. Make sure the surface is dry and free from any dirt or debris. Then, take a small amount of putty and roll it into a thin, snake-like shape. Apply the putty around the base of the sink drain or faucet, pressing it gently into place. Finally, wipe away any excess putty with a damp cloth.
Plumbers putty is not always necessary for installing a bathroom sink, but it can be helpful in creating a watertight seal. It is commonly used when installing sinks with drain baskets or faucets that do not have built-in rubber gaskets. If your sink or faucet comes with a rubber gasket, you may not need to use plumbers putty. However, if you are unsure, it is always best to consult the manufacturer's instructions or a professional plumber.
Plumbers putty can be used on most types of bathroom sinks, including porcelain, ceramic, and stainless steel. However, it is not recommended for use with certain materials, such as natural stone or marble, as the putty can cause staining or discoloration. In these cases, it is best to use a silicone-based caulk or adhesive specifically designed for use with the material of your sink. Always check the manufacturer's recommendations before applying any type of sealant or putty to your bathroom sink.


