

Whoah! Where did the time go?
It’s only 8 months before 2023 ends and a brand new year enters!
But, before we all get sentimental and all, there’s one thing that we shouldn’t forget to get for next year — calendars!
But, what if you want to add a creative touch to your usual calendars? Is that even possible?
If you know how to create tables in Canva or edit templates, then this calendar-making activity’s a cinch!
How to Make a Calendar in Canva
One way to make a calendar in Canva is by searching for a template from the “Templates” gallery. You can also make one using tables. But, with “Magic Design,” you can simply upload images to Canva and choose a calendar template generated by the tool.
Once done, you can select “Share” and choose “Download” to print your newly-crafted calendar.
Making Calendars in Canva: Spice Up Your New Year with These Steps
2024’s just a stone’s throw away, and it’s high time for you to start thinking about how you’ll come up with stunning calendar designs.
But, worry no more, as we’ll learn how to create calendar designs in 3 ways.
Use of Canva Calendar Templates
Step 1: Tap on the search bar found and type in “Calendar”


Then tap the “Enter” key to be redirected to the calendar template gallery.
Step 2: Scroll down the template gallery and click on a calendar template


You can choose to go with the planner type of calendar or more of the wall calendar style.
For demonstration purposes, I’ll go with a calendar design that highlights the graphic or art part more than the calendar itself.


Step 3: Replace the photos used on the said calendar template


First, select photos. You can either take advantage of Canva’s “Photos” gallery or choose to import your own images by tapping the “Upload” tab on the left side menu.
Then click and drag to picture you selected to the photo grid to replace the image inside it.
Step 4: Adjust the crop positioning of your photo


Just double-tap on it and drag it sideways until you get the look that you want.
Step 5: Edit the photos by adding filters, adjusting their transparencies, or tweaking the photo settings


Step 6: Swap out the colors of the placeholders (if there are any) in the calendar template


To do this, just tap on the text box (which is a rectangular or square shape) to activate the color picker tool.
Then, click on that colored tile so you can select from the default colors that Canva offers through its gallery.
If, however, you prefer a more customized color option, then you can choose to type in that particular hue’s hex code.
Or, you can choose to use the eyedropper tool and select a color from any of the images on your calendar design.
You can read about how to use the eyedropper tool in the How to Draw in Canva text in this blog.
Step 7: Resize the textbox by dragging the white circles and pills surrounding it


Just click and drag it diagonally or horizontally to alter the textbox’s size.
Step 8: Edit the font text, colors, and lines used in the template


Simply drag the cursor to highlight the text and activate the text editor toolbar found above the editor page.
From there, you can choose to select another font style, increase or decrease the font size, or even change the font color.
Just let your creativity loose and play around with the options available. There’s no hard rule set on this.
Then make any lines in the calendar template thinner or thicker.
Simply highlight the line or lines on the design and tap on the “Weight” button to adjust its thickness.
Keep going until you successfully customize the entire 12 months of the calendar template.
Step 9: Download the calendar template


Head to the “Download” (now “Share”) button, click “Download,” and select “PDF Print” as the file type before you start printing it through your printer.
Make sure to tick the Crop marks and bleed box so you’ll have a guide when cutting your calendar out.
You can also avail of the Canva Print option, which is discussed in detail in the Creating and Printing Business Cards article of this blog.
Impressed by the ease of creating a calendar in Canva using templates?
Wait until you’ve discovered how awesome it is to design one with Canva’s table feature.
Creating Calendars Using Canva’s Tables Feature
Now, if you prefer to create a calendar that doubles as a planner, you’ve got to get a good grasp of the tables feature in Canva.
Step 1: Type “Calendar” in the search bar on Canva’s homepage


Step 2: Select the “Create a blank calendar template” option


Step 3: Add either color or a photo as the calendar’s background


If you opt to use plain colors, tap on the canvas and click the color picker tile on the toolbar. Then, choose what color or colors you’ll use for your calendar design through:
- Color slider
- Inputting hex code
- Eyedropper tool
Whichever method you choose, pick out the hue you’ll use by tapping on it. Automatically, the color spreads across the canvas.
Step 4: Select from the “Photos” gallery or upload from your device through the “Uploads” tab


This is if you prefer using a photo as a background. Right-click on the photo after dragging it to your project.
Then, choose “Set as Background Image.”
Step 5: Play around with the transparency settings or add filters


But, if you prefer to turn your calendar into a mini photo gallery, you only need to add grids on the canvas and insert photos you’d like to use in them.
Step 6: Add some text boxes so you can input the names of the months


One way of doing this is by tapping the “Text” button on the left panel menu and selecting the font style or font combinations available.
Or, just press the “T” button on your keyboard for a blank text box to appear on the canvas. You can then just type away the months’ names if you’re done.
Tweak the font styles and colors accordingly.
If you want, color up the text boxes by adding a fill into them. Read on about adding fill color to text boxes so you won’t have a hard time doing it.
Step 7: Go to the “Elements” tab and tap the “See All” button of the “Tables” category


From there, you can select what table format you’ll use. Click it so you can tinker with it on the canvas.
Step 8: Add columns and rows to your table until you reach the desired number


You’ll need at least 4-7 rows, 7 columns, and 31 boxes.
Step 9: Resize the table size by dragging on the white circles found at its corners


Step 10: Tweak the table’s transparency


This will make the calendar blend in more with the background you added.
Step 11: Add the names of the days to the cells allotted as header rows and numbers for the dates in the succeeding cells


You can do this by double-tapping on that particular cell and typing in the name of the day or the number.
Step 12: Tap on the “Duplicate” page button


You’ll find this on the upper right of the current page.
This will automatically copy the entire formatting you created. From there, you simply have to repeat steps 3 until 6 to further customize the look of your calendar.
Then click the “Share” button to begin the process of downloading your newly-created calendar.
Then click “Download,” select the “PDF Print” file type, and tick the “Crop marks and bleed” box to save your design on your device.
Using Canva Magic Design Feature
Canva’s “Magic Design” is part of the new features added that makes use of AI to generate designs. Gone are the days when you have to manually sift through the hundreds (or thousands) of calendar templates to make one.
With the following steps, Canva can magically create customized templates that suit your needs.
Step 1: Click “Try out Magic Design”
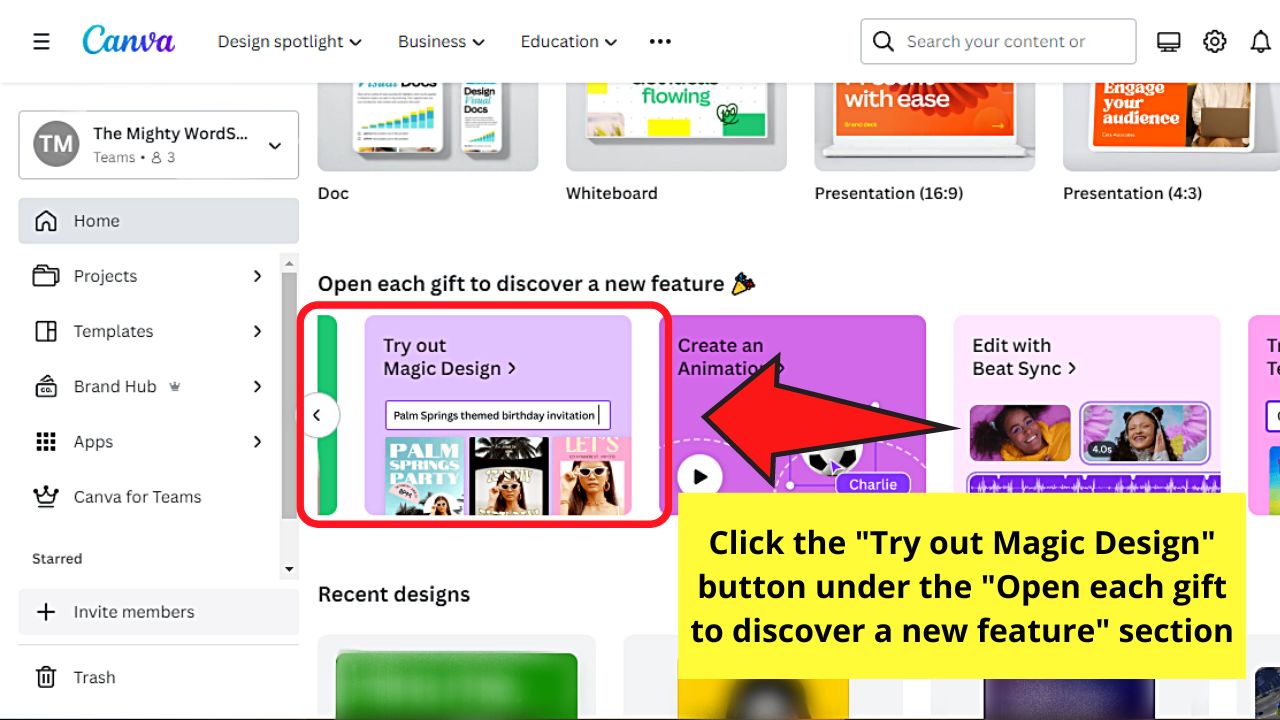

You’ll find this option in the “Open each gift to discover a new feature” section.
Step 2: Select the “Try it out” button
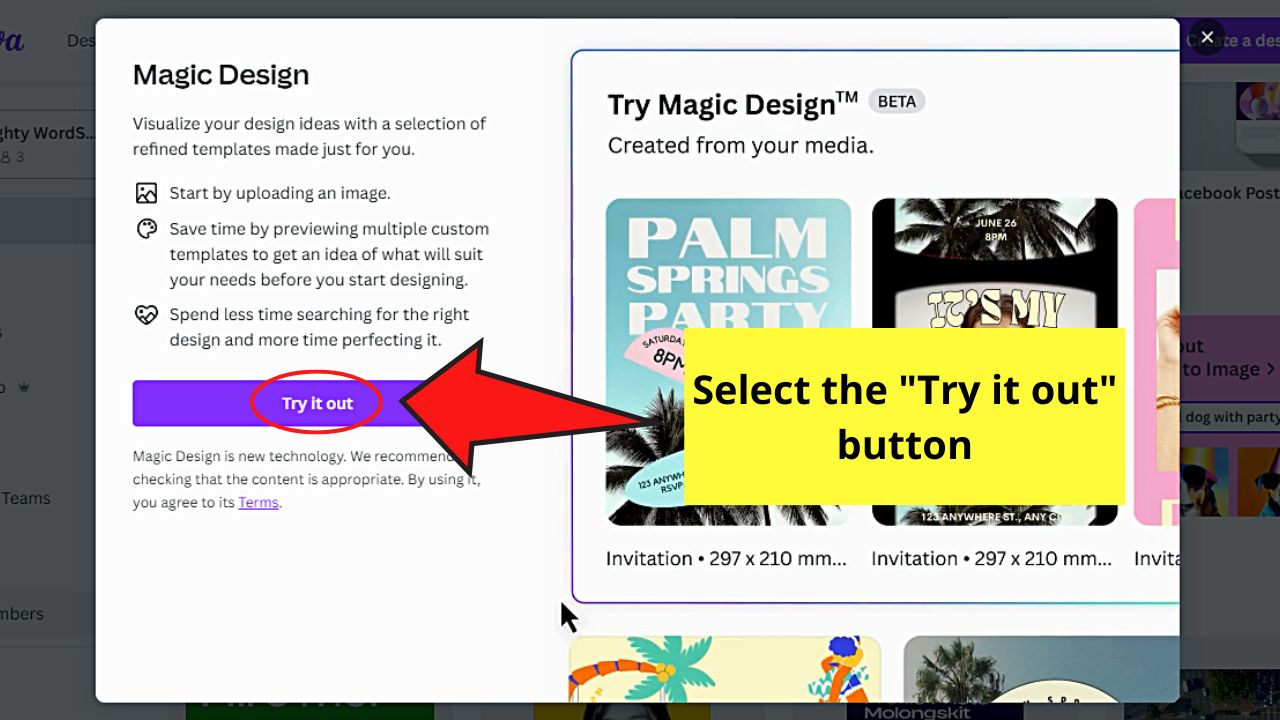

You will then see the “Try Magic Design (Beta)” section appear above the “Templates” gallery.
Step 3: Click “Insert Media”


A window then prompts you to either drag the image file directly or click the “Choose files” button.
I opted to select the “Choose files” button to find the image I’ll use for the calendar I’ll create.
Step 4: Select the “Down” button for “Category”
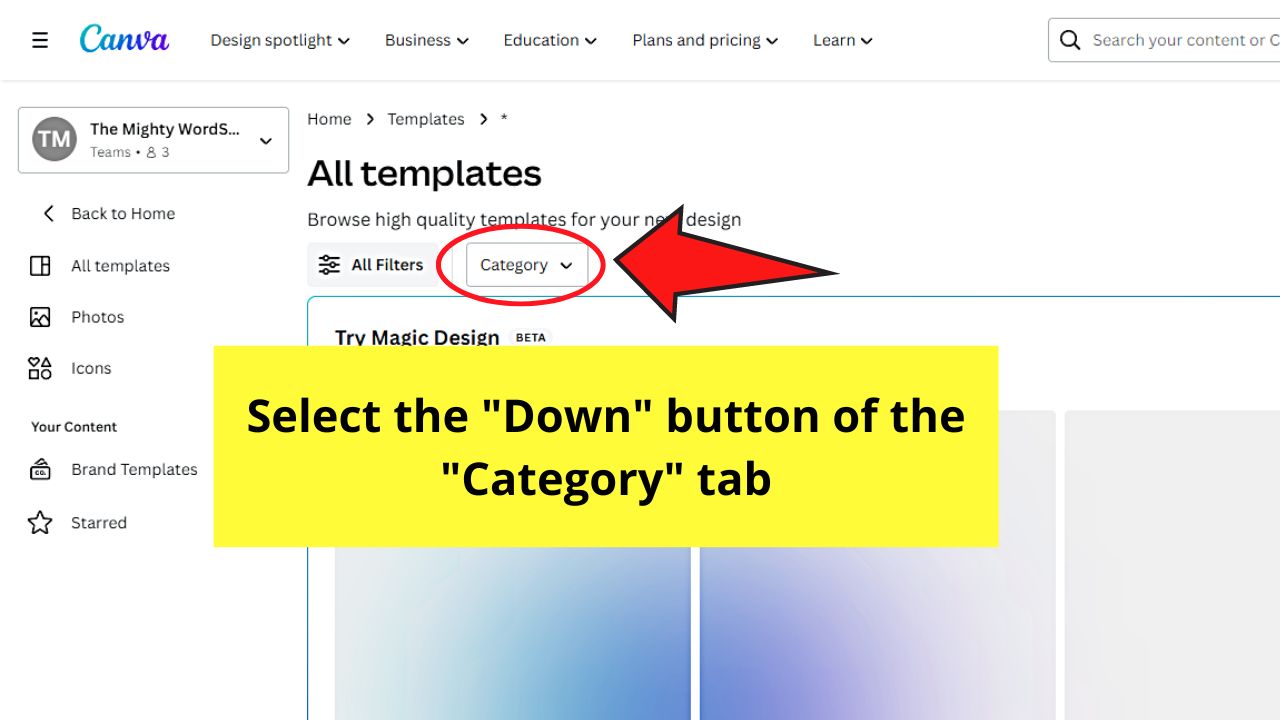

By now, Canva’s “Magic Design” has generated social media post template suggestions.
But since we’re making a calendar, clicking the “Category” button allows you to find the option in creating one.
Step 5: Click the “Down” button for “Business”


A list of the categories under “Business” will appear.
Step 6: Click “Calendar”
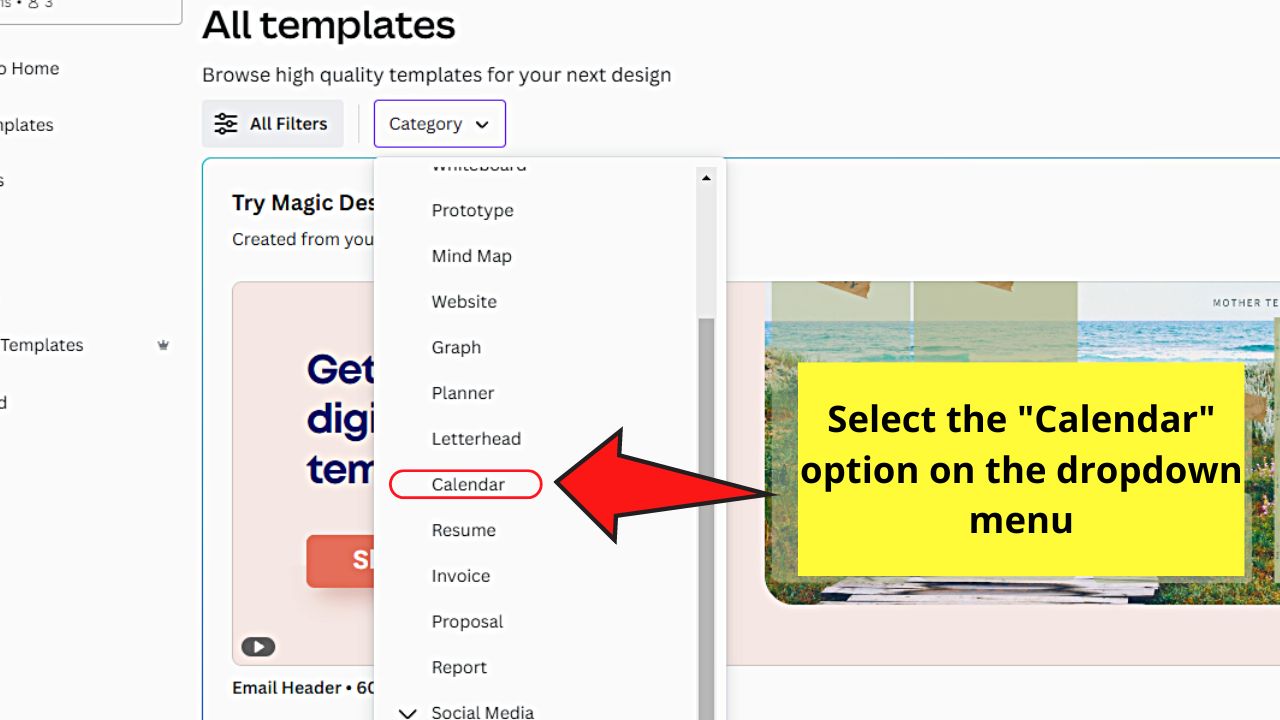

You’ll find this option after scrolling down between “Letterhead” and “Resume.”
Canva will then load and process the image to generate the calendar templates.
Step 7: Click “Style”

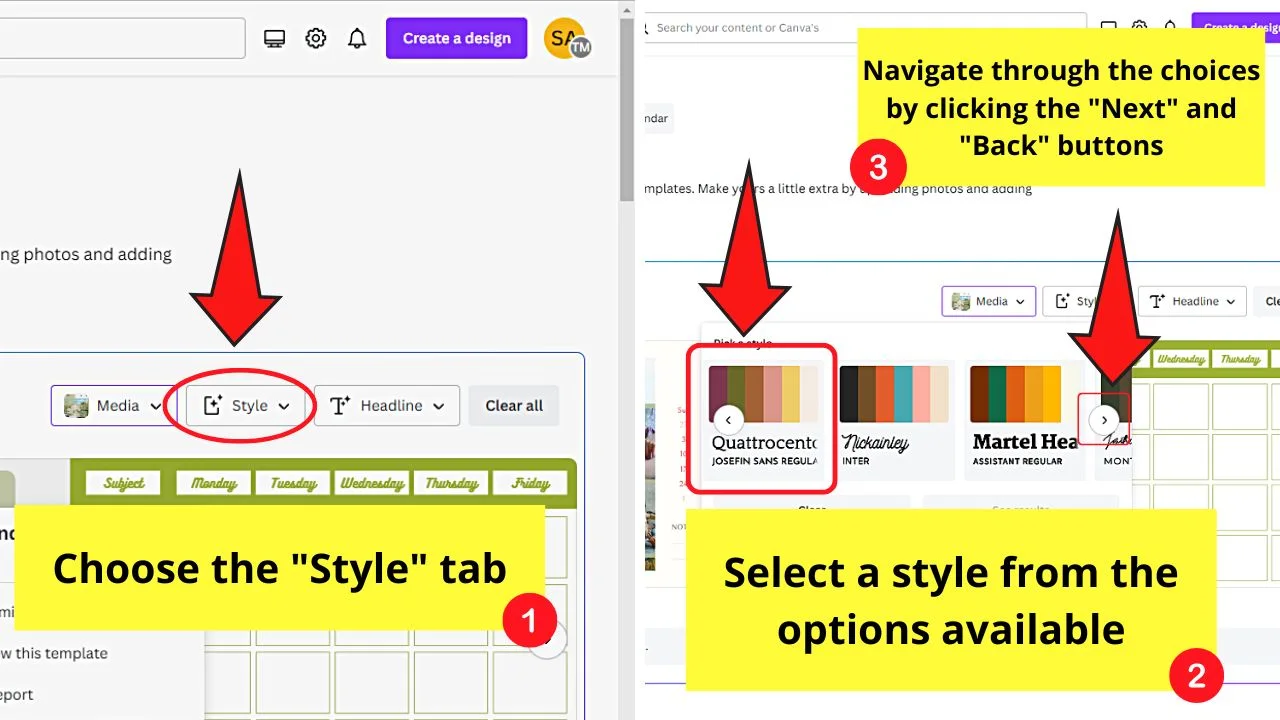
You’ll find this button between “Media” and “Headline.”
This category allows you to choose the color scheme and the font style that you’d want to use for your calendar.
In this case, I’ll select “Quattrocento.” The “See results” button will then be highlighted; click it.
Step 8: Select the calendar template you will use
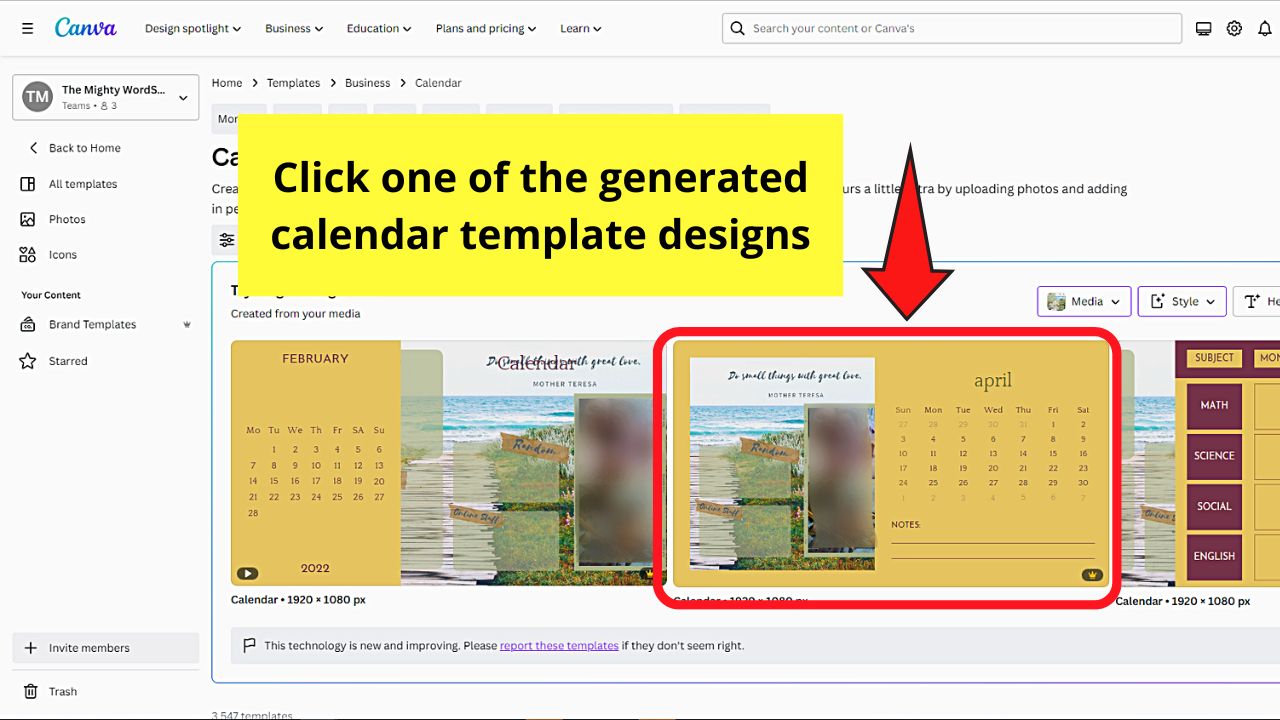

Just click the “>” button to view the other calendar templates generated by Canva.
Step 9: Choose “Customize this template”
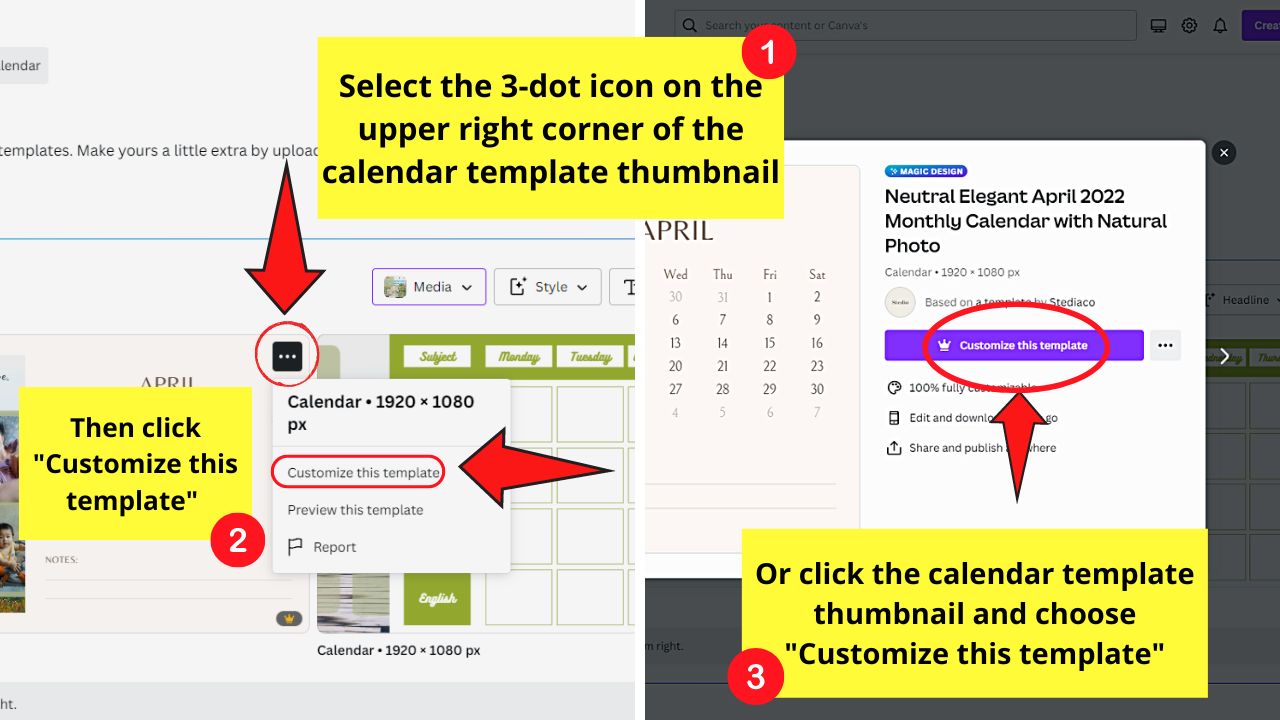

You can find this option either by clicking the 3-dot icon on the upper-right of the calendar template or by clicking the template itself.
Then, select the same button in the window popping out on the screen.
Step 10: Edit the calendar template you selected

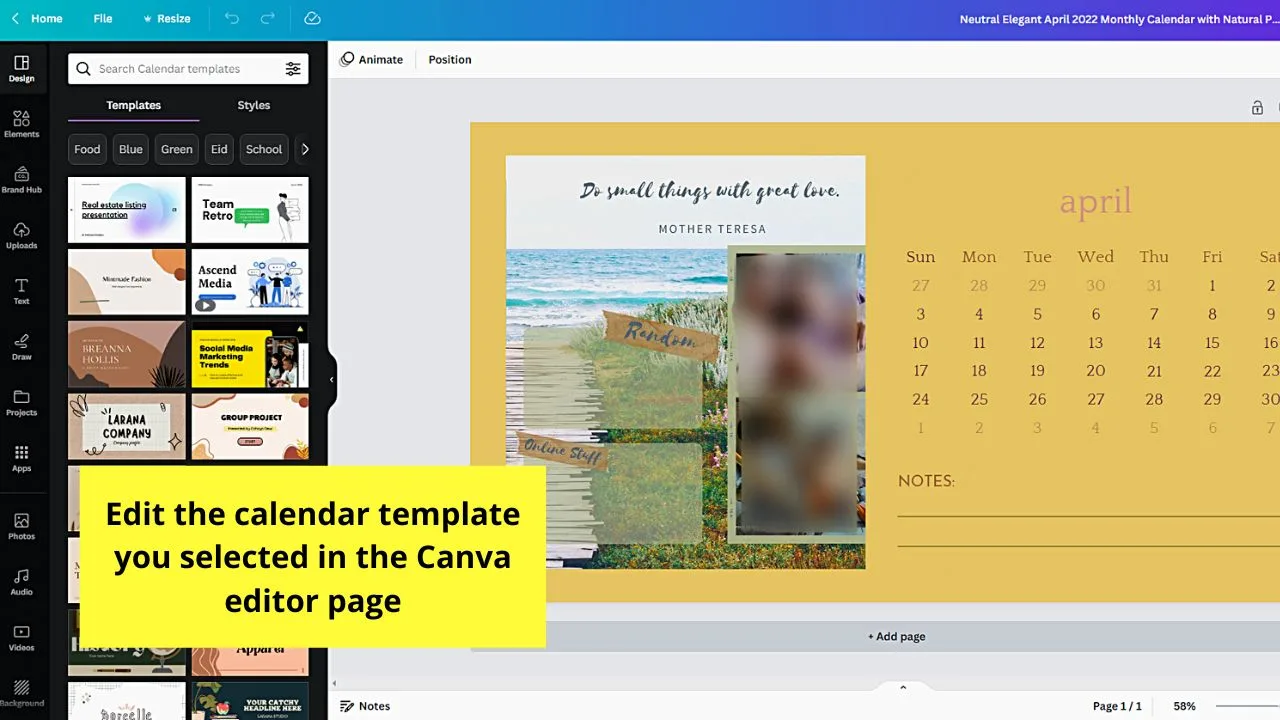
After clicking “Customize this template, you will be directed to the editor page. Here, you can change the graphics, images, font style, and size of the text elements according to your design.
Then, simply click “Duplicate page” to add more pages until all 12 months of the year are complete.
If you’re good with how your calendar turned out, click “Share” and select “Download.”
You can now choose the format (preferably “PDF Print”), the pages you’ll print, and the color profile (CMYK is best for printing) in their respective sections.
You can also tick the “Crop marks and bleed” option to guide you on where to cut after printing the calendar.
Excited to create your own calendar? Go ahead and begin making one now!
Frequently Asked Questions about How to Make a Calendar in Canva
How do you proceed with printing your calendar from Canva?
Whether you opt to use a personal printer or order through Canva Print, always choose the double-sided printing option and pair the months. Start printing with the months on the front side first (January to June) before printing the back (July to December).
Can I opt to share my calendar digitally instead of printing it?
You definitely can. Instead of hitting the Download button, just tap on the Publish button to post it on your social media account. Clicking on the Share button for other Canva users to see your work is another option you have as well.
What’s the recommended size of a calendar?
The best size to use when creating a calendar is 1920 x 1080 pixels. But, you can change this depending on the style of the calendar or the purpose of creating one. You can find these template sizes when you search for calendar templates through the search bar.


Hey guys! It’s me, Marcel, aka Maschi. On MaschiTuts, it’s all about tutorials! No matter the topic of the article, the goal always remains the same: Providing you guys with the most in-depth and helpful tutorials!

