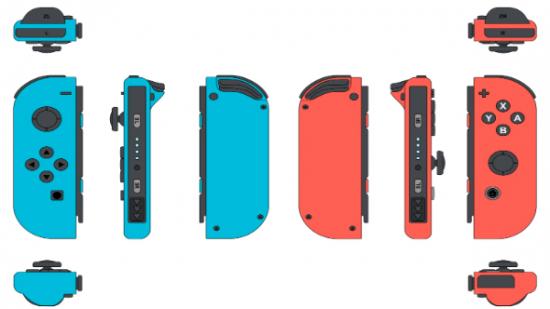
Back in May, when French site Nintendo Actu discovered the Nintendo Joy-Cons could be connected via Bluetooth to most computers, people asked for a way to use two Joy-Cons as one controller. Most of us assumed that the internet would work it out eventually. Well, now it has! In fact, there are two methods to get the dual Joy-Cons working as one controller.
Need more options? Check out our guide to the best PC controllers.
First, some disclaimers: this guide is based on my personal experience of getting dual Joy-Cons to work as one controller on my computer. There’s a chance that the methods that worked for me won’t work on your computer. Both methods are for Windows PCs only, since vJoy, an integral program, is only available in Windows. You will be consulting images throughout this guide. If, for some reason, you can’t see any of the images on this page, they can also be found in this Imgur album in the correct order.
As mentioned, there are two methods to cover in this guide. Method One is based on this Reddit post and instructions from this other Reddit post by Jayzizzle1234. Method Two is also based on a Reddit post leading to this github page from mfosse. There are common steps between both methods, so let’s detail those first:
1 – Buy a Nintendo Switch or a set of Nintendo Joy-Cons.
2 – Connect both Nintendo Joy-Cons via Bluetooth to your computer of choice, as long as it isn’t a Mac.
3 – Download vJoy.
Method One
1 – This is the easier and, in my experience, more successful option. After downloading vJoy, open Configure vJoy and Monitor vJoy.
2 – Format two devices in Configure vJoy by making your Configure vJoy tabs one and two look exactly like the image below. Active devices are displayed by the green highlighting on those boxes.
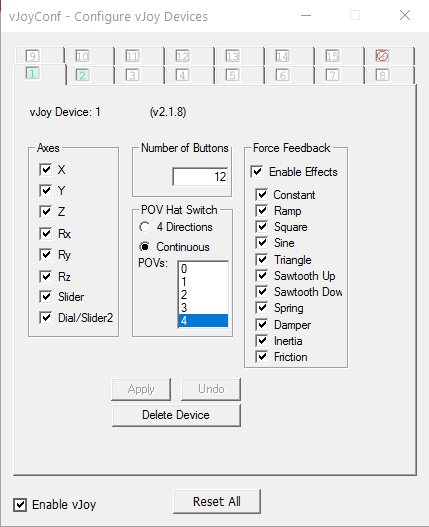
Courtesy of Jayzizzle1234
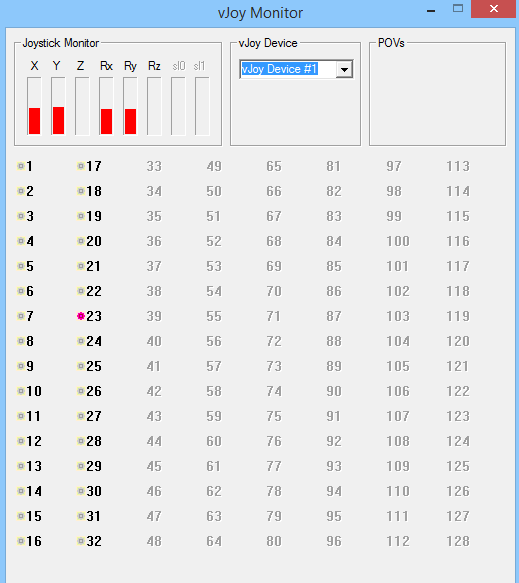
3 – Switch to Monitor vJoy and press all the Joy-Con buttons to confirm that they are communicating with the computer and vJoy. When pressing a button, the light next to the number of that button in vJoy will light up as shown.
4 – Download UCR, an input remapping software.
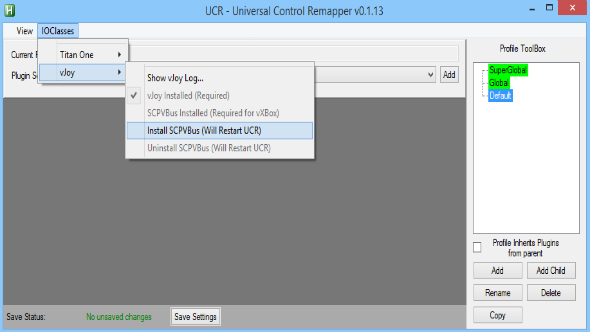
5 – To get vJoy and UCR communicating with each other, the vJoy SCPVBus must be loaded into UCR. With vJoy still running, start UCR. In the UCR GUI click ‘Show vJoy Log’ from the ‘IOClasses’ drop down menu as below.
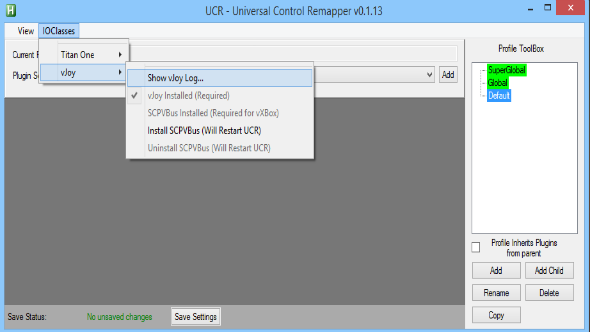
If the window pictured below appears, you are clear to go to the next step.
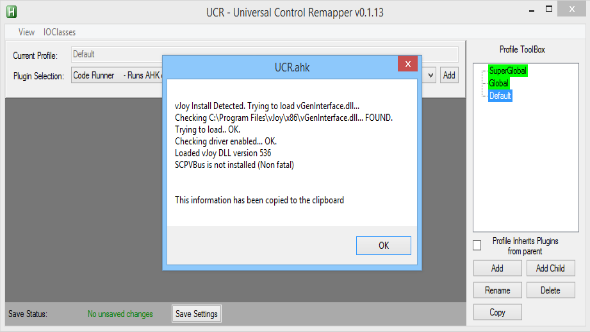
6 – Click ‘Install SCPVBus (Will Restart UCR)’ from the same menu.
7 – A custom Joy-Con template will need to be added into UCR. The custom template is made by Jayzizzle1234 and is found here. It might look super sketchy, but I’ve downloaded it and can assure you it’s not a virus. It’s a file named ‘UCR.ini.’
8 – Move that file into the folder that contains the UCR icon (the green H). Run UCR again as an administrator. UCR will look like it crashed – it hasn’t. It should be hiding in the Notification Area, the bottom right of your screen where battery and Wi-Fi are displayed. The GUI should change from what it looks like above to what’s displayed in the image below.
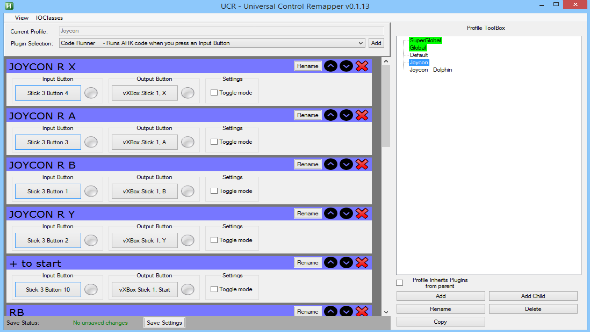
9 – From here, the Joy-Con inputs can be mapped to a virtual Xbox 360 controller. The ‘Input Button’ column on the left is the Joy-Con button command. The ‘Output Button’ column next to it is what the input will correspond with on the Xbox controller. There are suggested layouts found in the blue rows, but Joy-Con commands can easily be paired with any output.
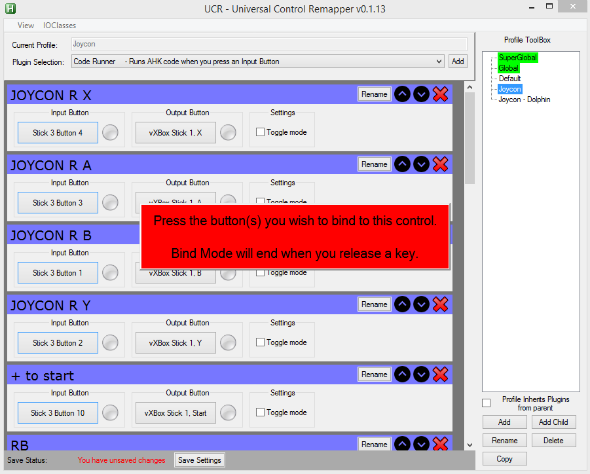
Example: click ‘Stick 3 Button 4.’ On that drop down menu click ‘Select Binding.’ The window from below will appear. Press the Joy-Con button to be assigned with the Xbox X button. Press the assigned Joy-Con button again and both circles should light up green. That means it works!
10 – All that’s left is to assign the remaining Joy-Con buttons.
Note: While Method One is the more reliable of the two, it does have its problems. Each stick is configured as a d-pad, which means camera controls are not as sensitive as I would like.
I tested this set-up with four games. Three in Steam Big Picture Mode: Battleblock Theatre, Firewatch and Deadly Premonition. And one in Ubisoft’s Uplay: Beyond Good & Evil. Both Battleblock Theatre and Firewatch worked great. I could move and control the camera simultaneously. In Deadly Premonition, however, the camera wasn’t controllable at all. I could move York, the protagonist, around the 3D space, but the camera stayed in a static position.
Beyond Good & Evil has a more minor issue than Deadly Premonition: I could move the camera and the player character, but the menu system in Beyond Good & Evil is circular. This makes some menu icons inaccessible due to not having analog sticks on the Joy-Cons. It’s not a big problem since most games don’t use circle menus. Although, if you were hoping to play Prey with twin Joy-Cons, well, my condolences.
The last thing to know before we move onto Method Two is that, every time Steam Big Picture Mode is opened, the Joy-Cons need to be configured as an Xbox 360 controller. Uplay doesn’t require configuring.
Method 2
Method Two is the less reliable of the pair. This is due to it having horrible input lag. Not even consistent input lag – it ranges from zero to two seconds. So why would anyone try to make this work?
First, it’s possible that the cause of the input lag is that I ran it on a Windows 8.1 computer. The script it uses was written on Windows 10 so it might not be optimised for other Windows versions. Second, the previous problem of not having analog sticks is fixed here. If this method works, you should be able to navigate Prey’s circular menus until your heart’s content! All that said, let’s get started:
1 – Go to this github page. Before downloading anything, open ‘ReadMe.md;’ in a new tab. That contains the instructions. They will be useful as a reference. Next, click ‘Clone or Download’ on the right side of the screen, then ‘Download Zip.’ Extract that whole folder.
2 – If you successfully completed Method One the next step will be familiar. Two devices have to be formatted in vJoy by making your Configure vJoy tabs look exactly like the screenshots below. Tab one will look like the left screenshot. Tab two will look like the right screenshot.
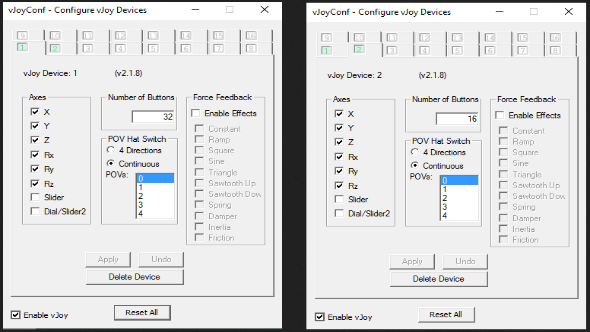
Courtesy of mfosse
3 – This part is a little intimidating if you’re not much of a computer person. The Joy-Con driver has to be run from the command prompt. The command prompt will be in different places depending on what operating system you are using. Typing ‘command’ in your search bar will bring it up. It might be spooky, but you will feel like a programmer for a second, which is pretty cool. I couldn’t get the 64-bit version to run. I have no idea why – it should work with my computer. The 32-bit version does function, however, so navigate to that if you encounter the same issue.
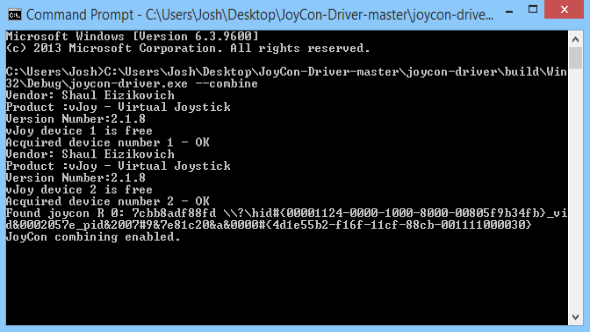
My path begins at ‘C:\” and ends at ‘–combine’ – as seen in the above image. Your path should look similar. Obviously the user will not be ‘Josh’ on your computer.
What you need to do is tell your computer where to find the Joy-Con driver. As you can see, my path says which drive it is in (C:), what user I am (Josh), what folder on my desktop to look in (Joycon-Driver-master) and where in that folder the executable file is located (everything between JoyCon-Driver-master and joycon-driver.exe). The command line argument ‘–combine’ is necessary for the joycon-driver to combine both Joy-Cons to one controller. All other lines you can see in the screenshot above are what appear if the script runs successfully.
When I initially ran the Joy-Con driver I encountered a ‘vcruntime140D.dll is missing’ error. Luckily, I did a lot of testing to discover how to fix that. You cannot just download a vcruntime140D.dll. It is contained in other packages. I tested downloading Visual C++, which didn’t work. I downloaded the Windows 8.1 SDK. That didn’t work either. I downloaded Visual Studio Core. Unsuccessful. Then, I downloaded Visual Studio Community with the following inclusions:
- .Net Framework 4.6.1 SDK
- .Net Framework 4.6.1 Targeting Pack
- Static Analysis tools
- C++/CLI support
- VC++ 2015.3v140 toolset
- VC++ 2017v141 toolset
- Windows Universal CRT SDK
- C++ profiling tools
That finally worked. I am unsure if it was a combination of downloading everything or just Visual Studio Community. I do know that Visual Studio Core is skippable. Everything still works after uninstalling it. In the Reddit thread by mfosse, one user noted that downloading the Windows 10 SDK cleared up their vcruntime140d.dll problems. It seems worth trying before downloading everything I did.
4 – Hopefully, after all that, your command prompt looks like the command prompt example pictured above. That should mean both Joy-Cons are acting as a single controller. To actually use both Joy-Cons in a game, a third-party application is needed to remap inputs again. Script creator mfosse recommends x360ce.
After opening x360ce, the pop-up window pictured below will appear
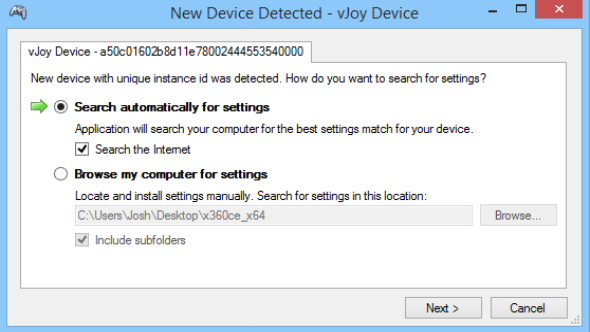
Select ‘Search automatically for settings’ then press next for each window that pops up until they stop appearing. From the ‘Controller 1’ tab, click the ‘Auto’ button at the bottom of the window. This won’t create a functioning controller, but the buttons should start lighting up when pressed.
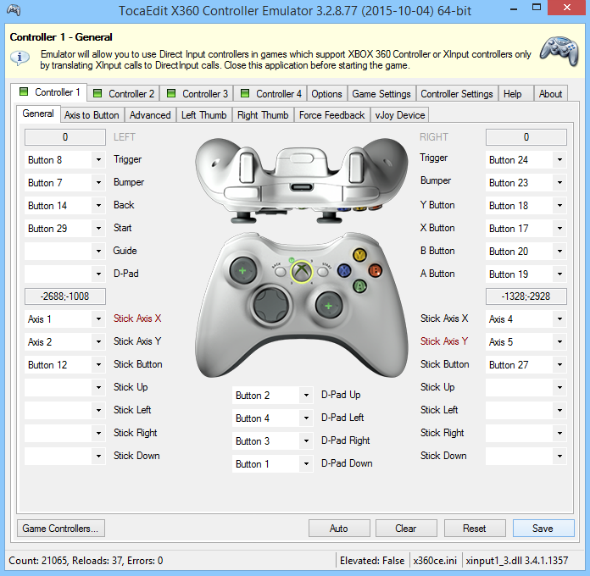
5 – Above is pictured the mapping blueprint I use. Every button is mapped to a place that I think makes sense and feels comfortable. If this is uncomfortable, remapping is easy. Slide back to Monitor vJoy. Pressing the desired Joy-Con button will light up the number associated with that button. Select that number from the drop down list next to the preferred Xbox 360 button.
Method Two was not tested with any games, unfortunately. It didn’t seem worth it with the random input lag I experienced. On Reddit, mfosse messaged me to say that they would fix the lag soon. It was finals week for them at the time. You can understand that passing their finals is top priority. In case you don’t encounter input lag, here is a set of instructions for how to use x360ce.
So there you have it! Two mildly painful ways to use dual Joy-Cons as one controller. I hope that one of the two methods works for you. If some steps of this guide were troublesome or not clear, feel free to post your experience and specific issues in the comments – hopefully I, or someone else, will be able to help you out. You can also post questions in the Reddit thread for Method One or Method Two. The comment should go directly to the inbox of either Jayzizzle1234 or mfosse.
