Accessing your domain emails using Windows 10 Built-in Mail App
Windows 10 comes with a built-in Mail application. You can find the Mail application from the Start menu, or by typing in Mail in the search box on your Windows taskbar.
Mail supports most popular mail services, including Gmail, Yahoo! Mail and any account that supports POP or IMAP. In other words, you can setup your Windows 10 Mail application to access your domain email accounts. In this article, we will show you how to configure your Windows 10 Mail app to access your domain email account(s).
Getting started
Pre-checklist:
![]() Create your domain email address
Create your domain email address
![]() Obtain your email client configuration settings from Member Zone
Obtain your email client configuration settings from Member Zone
Your email client configuration info
In order to successfully setup your domain email accounts on your Windows 10 Mail app, you will need to have the following information:
- Domain email address and password
- Incoming mail server and port information
- Outgoing mail server and port information
You can find all these information in your Doteasy Member Zone, under View Email Client Info.
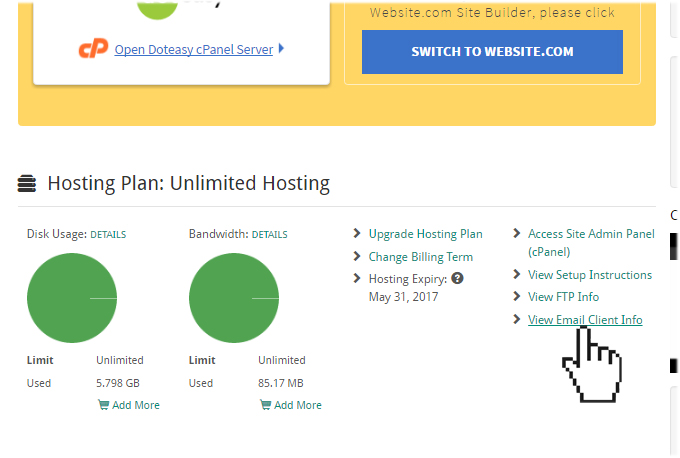
For more information on your email client configuration info, please refer to our article Your Email Client Configuration Info.
Adding your domain email account to your Windows 10 Mail application
There are two ways to add an email account in Windows 10 Mail. If this is the first time you’ve setup mail, you will get a Welcome window inviting you to add an email account. If mail has already been setup, you will have access to the mail settings options and create a new email account.
- Click on Add Account on the Welcome window.

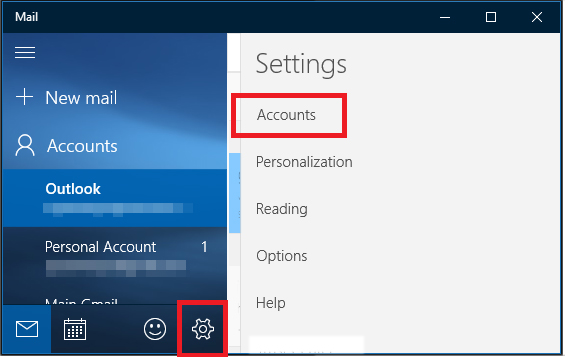
If you have already setup Windows 10 Mail to access another email account, you will not see the Welcome window. If this is the case, simply click on the Settings icon in the lower left-hand corner of the app and select Accounts from the right menu.
- On the Accounts window, select + Add Account.
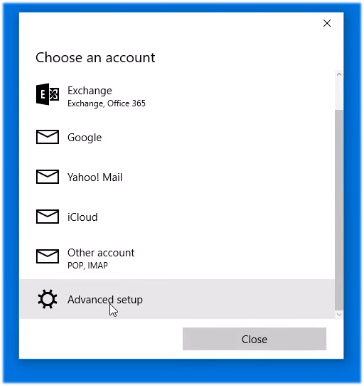
- On the Choose an account window, select Advanced setup.
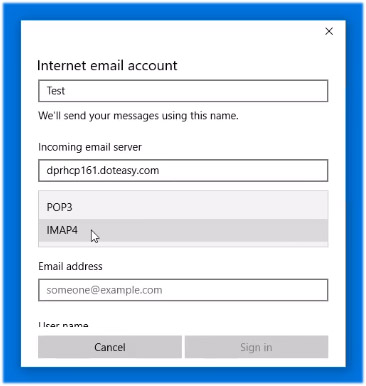
- On the Advanced setup window, select Internet email.
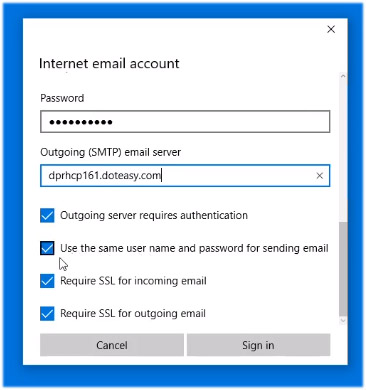
- Next, on the account setup window, enter all the required information:
- Account Name – enter your Doteasy domain email address
- Your name – this is the name your email recipients will see when you email them
- Incoming email server – you will need to enter the incoming mail server settings that is provided to you in your View Email Client Info panel in your Doteasy Member Zone
- Account type – choose POP3 or IMAP4. If you are not sure which one to pick, you can refer to our article POP3 and IMAP
- Email address – enter your full domain email address, for example, you@yourdomain.com
- User name – enter your full domain email address
- Password – enter your domain email account password
- Outgoing email server – again, you will need to enter the outgoing mail server settings that is provided to you in your View Email Client Info panel in your Doteasy Member Zone
- By default, the four checkboxes at the bottom of the account settings window will be checked. You can simply leave the first two options checked.
For the last two options, Require SSL for incoming email and Required SSL for outgoing email, if you are currently on the Doteasy SmarterMail platform, you do not have the Secure SSL option. If this is the case, you will need to uncheck the last two checkboxes.
If you are on the cPanel mail platform and you have opted to use the Secure SSL settings information in your View Email Client Info panel, then you can leave the last two checkboxes checked.
- When ready, click Sign in.
- If you have entered all information correctly, you will see the All Done! confirmation window.
This means your Windows 10 Mail app is now configured to access your Doteasy domain email account. If you want to use Windows 10 Mail to access another domain email account, simply click on the Settings icon in the lower left-hand corner of the app and select Accounts from the right menu and follow Steps 2 to 8 to add a new domain email account to the Windows 10 Mail app.


This completes the Windows 10 Mail configuration process. If you have any questions about this article or our video tutorial, or if you should run into any problems, please do not hesitate to contact us. You can reach us by email, phone and live chat. We also offer a call back service.
