How to Setup and Use Windows Live Mail as Email Client for your Messages
InformationAn Email Client is an application used to manage (receive, send, archive, sort) your email messages. Today almost any email account can be used with a browser, without an external email client. You can check your Hotmail.com or Outlook.com email messages, compose new messages and reply to incoming messages simply by signing in to www.outlook.com, your Gmail messages can be handled at www.gmail.com. An email you have from your Internet service provider or if you have set up email accounts on your own domain by a hosting provider, these service providers (almost always) have a web client and user interface for you to handle your email.
Using an email client application on your computer adds an extra layer of functionality. You can archive copies of messages locally, you can use just one interface (email client) to handle several email accounts from various providers and so on.
This tutorial will show you how to set up and use the Windows Live Mail email client to handle your email messaging. The tutorial shows the very basics of Windows Live Mail client, feel free to post your questions about the additional features in this thread.
From Wikipedia:
Windows Live Mail (formerly named Windows Live Mail Desktop) is a freeware email client from Microsoft. It is the successor to Outlook Express on Windows XP and Windows Mail on Windows Vista. The application is available for download via the Windows Essentials suite.
Contents:
Use these links to jump to the part you are interested in:
Part One: Install Windows Live Mail
Part Two: Add an email account
Part Three: Compose & send a new email message
Part Four: Reply or Forward an email message
Part Five: Email notifications
Part One
Install Windows Live Mail
1.1) Download the Windows Live installer from Windows Essentials - Download Windows Live Essentials
1.2) Run the installer, select if you want to install all Windows Live applications or click Choose the programs you want to install:
1.3) If you chose to select the applications you want to install, be sure that you select Mail. Click Install
1.4) When installed you can find the Windows Live Mail in your Start Menu:
Part Two
Add an email account
In most cases the user does not have to think about email protocols, most modern email clients including Windows Live Mail can set up an email account without user entering the server and protocol information. If you do want to set the server and protocol information manually, here's the email protocols explained very shortly:
InformationMost email services use either IMAP, POP3 or Exchange ActiveSync email protocols to handle incoming mail, usually all email services allow you to choose which protocol to use although not all services support all protocols.
IMAP and Exchange ActiveSync are quite similar regarding their function and features allowing the same email account being accessed from multiple clients on multiple computers; the messages are always stored on a server and synced with the client.
A POP3 email retrieves the messages from the server and the local message storage may be different than the server message storage. Deleting a message from an IMAP account in Windows Live Mail will also delete it from the server and all other email clients on all other computers and deleting a message server will delete it from any client on any computer, whereas when using POP3 the user can decide if the messages are always left on server when read to client, always deleted from the server when read to client, deleted from the server X days after they have been retrieved to client, and kept in server even when deleted from the local computer.
SMTP is the protocol to handle outgoing mail.
More information:
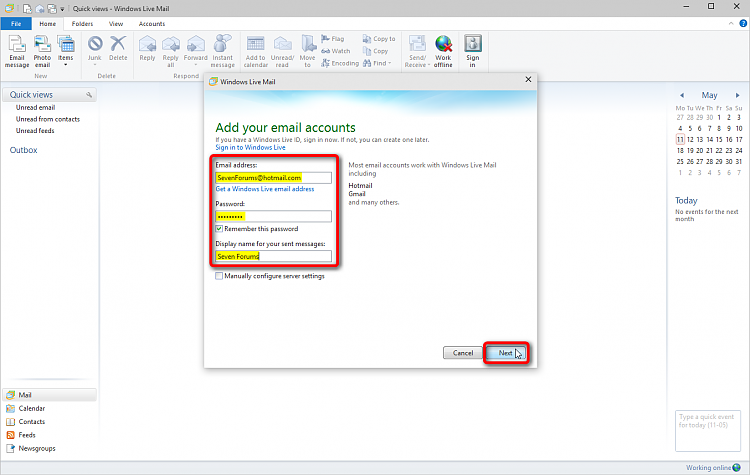
2.1) When Windows Live Mail is run the first time and no email accounts are set up yet, it opens directly to New Email Account wizard. Simply enter your email address, its password and the name you want to be shown as sender name when you send email from this account, and click Next:
If the Windows Live Mail does not automatically find the settings for your email account and you are asked to add the incoming and outgoing server settings manually, consult the help and support pages of your email provider to get the instructions.
NoteIf your email is set up to use Two-Step Verification, you have to use a separate App Password here instead of your usual email account password. Using any Microsoft free email (Hotmail, Outlook.com, Live.com, MSN.com) see these tutorials to set up the Two-Step Verification and create App Passwords, for all other email services consult the help and support pages for your service:
Click Yes:
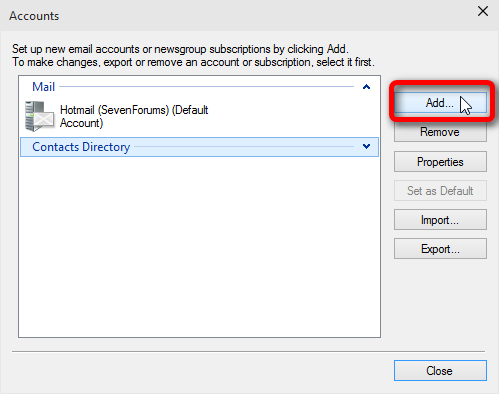
2.2) When you want to add additional email accounts, click File > Options > Email accounts, click Add, select Email Account and do as in step 2.1 above:
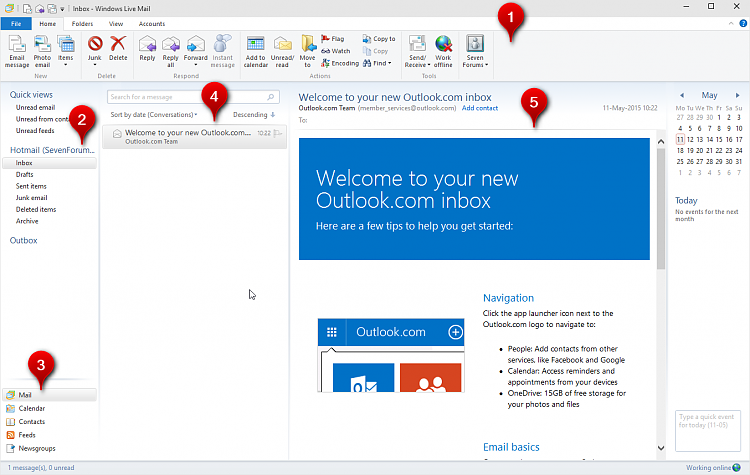
2.3) The WLM user interface is simple and quite self-explanatory:
Main parts of the user interface, list numbers referring to screenshot above:
- The Ribbon and Menu bar
- Folders for current email account
- View switcher (Mail, Calendar, Contacts etc.)
- The inbox (list of received messages)
- Selected (in #4) email message
Part Three
Compose & send a new email message
3.1) To compose (write / create) a new email message, click the Email message button, insert the receiver's email address and the message subject, select possible CC (Carbon Copy) and BCC (Blind Carbon Copy) receivers, type your message and click the Send button:
If you want to send the same message to several receivers, please separate the email addresses with a semicolon. For instance sending this message both to EightForums@outlook.com and TenForums@outlook.com you need to write to TO field both addresses like this:
3.2) The CC and BCC are terms originating in the snail mail era but still used in electronic mail. The difference between the CC and BCC:Code:EightForums@outlook.com; TenForums@outlook.com
- CC:
- Carbon Copy; the original receiver or receivers of the email message and all CC receivers will see all other receivers (TO) and other CC receivers (CC)
- BCC:
- Blind Carbon Copy; the original receiver or receivers of the email message and all CC & BCC receivers will see all receivers (TO) and all CC receivers (CC) but not the BCC receivers
- An example:
- A message sent by email user Vista to receiver Seven. Vista added Eight as CC and Ten as BCC
- Seven gets the message seeing that Eight was sent a CC of the same message
- Eight gets the message as CC, seeing that the message was sent to Seven and he / she was sent a copy
- Ten gets the message as BCC, seeing that the message was sent to Seven and that Eight got a copy of the message as CC
- The original receiver Seven or the CC receiver Eight will not see / know that Ten got the copy, too
- BCC is very practical when you want to send yourself a copy of an email you have sent but do not want to show the receiver that you sent a copy to yourself
- BCC is also very practical when you want to send an email to someone and notify another person about your sent email without letting the original receiver to know you have sent it to someone else, too
Part Four
Reply or Forward an email message
4.1) If you want to reply the sender of an email message you have received or forward the email message to another person, select the message in your inbox and select one of the three options:
The difference between these three options is:
- Reply:
- Reply to original sender only
- Only the original sender will get your reply, regardless of how many receivers the message was originally sent to
- Reply to all:
- All original receivers of the message will get your reply. If the original message was sent to 10 different receivers, all 10 will get your reply
- Forward:
- The original sender will not get a reply but the message is instead forwarded to people you add to TO, CC and BCC
Part Five
Email notifications
That's it! You know now how to set up your email account in Windows Live Mail and how to use it to send and receive email messages, and how to reply and forward your messages. If you have any further questions, any issues in using the Windows Live Mail client, please post in this thread and we will try our best to solve your issues.NoteThe Windows Live Mail application must be running and signed in to your email in order to get the notifications.
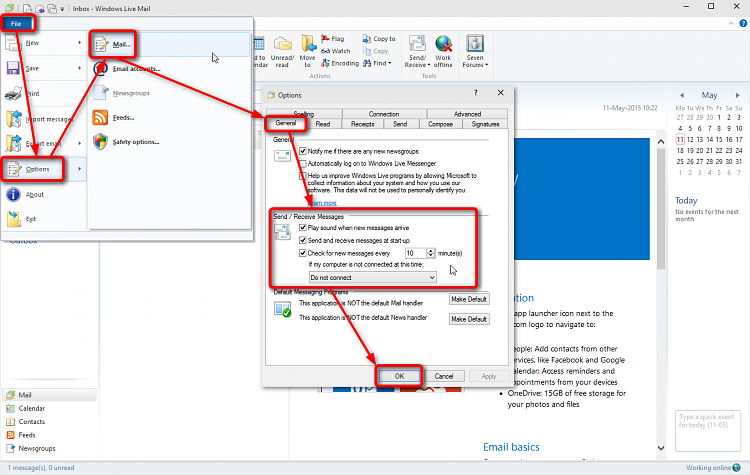
5.1) Select File > Options > Mail, select the General tab, select if you want to be notified when a new mail message is received. You can also select how often your Windows PC will check if there are new messages. Click OK to save your selected settings:
Kari
Related Tutorials
- How to Export and Import Email Accounts in Windows Live Mail
- How to Import Vista and Windows 7 Contacts and Contact Groups into Windows Live Mail
- How to Export and Import Contacts in Windows Live Mail
- How to Import "Windows Mail" Messages into Windows Live Mail
- How to Export and Import Email Messages in Windows Live Mail
- How to See Messages in Conversation or List View in Windows Live Mail
- How to Hide or Show the Ribbon Toolbar in Windows Live Mail
- How to Minimize Windows Live Mail to the System Tray in Windows 7
- How to Backup and Restore Signatures in Windows Live Mail
- How to See All Email in One Inbox Folder in Windows Live Mail with "Quick Views"
Windows Live Mail - Setup and Use

Windows Live Mail - Setup and Use
How to Setup and Use Windows Live Mail as Email Client for your MessagesPublished by Kari
Related Discussions


