
- Adobe Premiere Pro User Guide
- Beta releases
- Getting started
- Hardware and operating system requirements
- Creating projects
- Workspaces and workflows
- Frame.io
- Import media
- Importing
- Importing from Avid or Final Cut
- File formats
- Working with timecode
- Editing
- Edit video
- Sequences
- Create and change sequences
- Set In and Out points in the Source Monitor
- Add clips to sequences
- Rearrange and move clips
- Find, select, and group clips in a sequence
- Remove clips from a sequence
- Change sequence settings
- Edit from sequences loaded into the Source Monitor
- Simplify sequences
- Rendering and previewing sequences
- Working with markers
- Source patching and track targeting
- Scene edit detection
- Cut and trim clips
- Video
- Audio
- Overview of audio in Premiere Pro
- Edit audio clips in the Source Monitor
- Audio Track Mixer
- Adjusting volume levels
- Edit, repair, and improve audio using Essential Sound panel
- Enhance Speech
- Enhance Speech FAQs
- Automatically duck audio
- Remix audio
- Monitor clip volume and pan using Audio Clip Mixer
- Audio balancing and panning
- Advanced Audio - Submixes, downmixing, and routing
- Audio effects and transitions
- Working with audio transitions
- Apply effects to audio
- Measure audio using the Loudness Radar effect
- Recording audio mixes
- Editing audio in the timeline
- Audio channel mapping in Premiere Pro
- Use Adobe Stock audio in Premiere Pro
- Overview of audio in Premiere Pro
- Text-Based Editing
- Advanced editing
- Best Practices
- Video Effects and Transitions
- Overview of video effects and transitions
- Effects
- Transitions
- Titles, Graphics, and Captions
- Overview of the Essential Graphics panel
- Graphics and Titles
- Graphics
- Create a shape
- Draw with the Pen tool
- Align and distribute objects
- Change the appearance of text and shapes
- Apply gradients
- Add Responsive Design features to your graphics
- Install and use Motion Graphics templates
- Replace images or videos in Motion Graphics templates
- Use data-driven Motion Graphics templates
- Captions
- Best Practices: Faster graphics workflows
- Retiring the Legacy Titler FAQs
- Upgrade Legacy titles to Source Graphics
- Fonts and emojis
- Animation and Keyframing
- Compositing
- Color Correction and Grading
- Overview: Color workflows in Premiere Pro
- Color Settings
- Auto Color
- Get creative with color using Lumetri looks
- Adjust color using RGB and Hue Saturation Curves
- Correct and match colors between shots
- Using HSL Secondary controls in the Lumetri Color panel
- Create vignettes
- Looks and LUTs
- Lumetri scopes
- Display Color Management
- Timeline tone mapping
- HDR for broadcasters
- Enable DirectX HDR support
- Exporting media
- Collaborative editing
- Collaboration in Premiere Pro
- Get started with collaborative video editing
- Create Team Projects
- Add and manage media in Team Projects
- Invite and manage collaborators
- Share and manage changes with collaborators
- View auto saves and versions of Team Projects
- Manage Team Projects
- Linked Team Projects
- Frequently asked questions
- Long form and Episodic workflows
- Working with other Adobe applications
- Organizing and Managing Assets
- Improving Performance and Troubleshooting
- Set preferences
- Reset and restore preferences
- Recovery Mode
- Working with Proxies
- Check if your system is compatible with Premiere Pro
- Premiere Pro for Apple silicon
- Eliminate flicker
- Interlacing and field order
- Smart rendering
- Control surface support
- Best Practices: Working with native formats
- Knowledge Base
- Known issues
- Fixed issues
- Fix Premiere Pro crash issues
- Unable to migrate settings after updating Premiere Pro
- Green and pink video in Premiere Pro or Premiere Rush
- How do I manage the Media Cache in Premiere Pro?
- Fix errors when rendering or exporting
- Troubleshoot issues related to playback and performance in Premiere Pro
- Extensions and plugins
- Video and audio streaming
- Monitoring Assets and Offline Media
Learn how to get the most out of Premiere Pro by configuring preference settings for several things from appearance to playback, audio, and more.
You can customize the look and behavior of Premiere Pro, from determining the default length of transitions to setting the brightness of the user interface. Most of these preferences remain in effect until you change them. The preferences you set for scratch disks, however, are saved with your projects. Whenever you open a project, it automatically defaults to the scratch disks you selected for it when you set up that project.
- To open the Preferences dialog box, choose Edit > Preferences (Windows) or Premiere Pro > Preferences (macOS), and select the category of preferences you want to change.
- To restore default preference settings, hold down Alt (Windows) or Option (macOS) while the application is starting. You can release the Alt key or Option key when the splash screen appears.
- To restore default preference settings and plug-in cache at the same time, hold down Shift-Alt (Windows) or Shift-Option (macOS) while the application is starting. Release the Shift-Alt keys or Shift-Option key when the splash screen appears.
Preferences are stored in the following location:
For Windows: <drive>\Users\<user name>\Documents\Adobe\Premiere Pro\<version>\Profile-<user name>
For macOS: <drive>/Users/<user name>/Documents/Adobe/Premiere Pro/<version>/Profile-<user name>
Set general preferences
In the General pane of the Preferences dialog box, you can customize settings for several things from transition duration to tool tips, like the following:
You can choose to display Premiere Pro's Start screen or display the files that you most recently opened.
Specify whether you want to see the Start screen or the Open dialog when opening a project.
Bin behavior when double-clicking a bin, or double-clicking with the Shift or Option keys can be controlled in the Bins preference.
Project behavior when double-clicking a project, or holding the Alt key while clicking a project.
To turn off the event notification pop-up window that appears in the lower right-corner of the user interface, deselect this preference. For more information, see Event notification.
Lets you turn tool tips on or off.
When this option is turned on, Premiere Pro reads the ICC profile selected in your operating system and does a conversion to display colors perfectly on the monitor. This feature applies to the Premiere Pro Program and Source monitors, thumbnail previews in the Project panel, Media browser in Premiere Pro and Media Encoder, and export and encoding previews in Premiere Pro and Media Encoder.
By default, color management is disabled in Premiere Pro and Media Encoder.
Leave Color Management off if your screen matches the media on the timeline. This works well for Rec. 709 and sRGB and YouTube delivery.
Turning Color Management on is useful for scenarios where you want your display to reproduce the color appearance of the timeline on a reference monitor.
Premiere Pro does not color manage external transmit monitors hooked up through video cards from companies like AJA or Blackmagic. Configure that hardware outside Premiere Pro.
Premiere Pro, however, does color manage a secondary computer monitor used as a transmit monitor. It is part of the desktop of the operating system - hooked up through HDMI, Display Port, DVI, or Thunderbolt.
Enabling Display Color Management does not change the colors in your exported files. It only manages the colors that you see displayed on your monitor. It is necessary so that you can accurately judge what the colors look like on a true Rec709 display (HDTV for example). In the past, it was necessary to manually set your OS display profile to Rec709 to view accurate colors, and sometimes it was not possible. Display color management takes the guesswork and displays correct colors no matter what ICC profile your display is set to in the OS.
For more information, see Color management in Premiere Pro.
Set Appearance preferences
In the Appearance pane of the Preferences dialog box, you can set the overall brightness of the user interface.
You can also control the brightness and saturation of the blue highlight color, interactive controls, and focus indicators.
Set Audio Preferences
The Automatch Time preference specifies the time, in the Audio Mixer, for any control that has been adjusted to return to its previous setting. Affected controls are Volume, Pan, Effect, and Send parameter knobs in Audio, Submix, and (except sends) Master track. Automatch Time preference affects properties in Touch mode, and in Read mode for effects with keyframes.
To let Premiere Pro automatically renders audio previews whenever it renders video previews, select this preference. For more information, see Render audio when rendering video.
Select this option if you experience audio dropouts during playback. By default, this option is off.
- Off: Faster playback start but there may be audio dropouts when playing huge sequences with lot of audio clip effects.
- On: Premiere Pro does all the preroll computations before playback starts. So, there is a larger delay before playback actually starts. However, there are less audio dropouts during playback.
Creates keyframes only at points that don’t have a linear relationship to the start and end keyframes. For example, if you are automating a fade from 0 dB to –12 dB. With this option selected, Premiere Pro creates keyframes only at the points that represent an increase in value from the beginning (0 dB) and ending (–12 dB) keyframes. If you don’t select this option, Premiere Pro creates several incremental keyframes of identical values between those two points, depending on the speed at which you change the value. This option is selected by default.
Launches the Audio Plug-in Manager dialog box to let you work with third-party VST3 plug-ins, and Audio Units (AU) plug-ins on Mac.
Set Audio Hardware preferences
In the Audio Hardware pane of the Preferences dialog box (Edit > Preferences > Audio Hardware), you can specify the computer audio device and settings. You can also specify the ASIO and MME settings (Windows only), or CoreAudio setting (macOS only) that Premiere Pro uses for audio playback and recording. When you connect an audio hardware device, the hardware settings for that device type, such as default input, default output, master clock, latency, and sample rate are loaded in this dialog box.

Configure audio inputs and outputs
When you configure inputs and outputs for recording and playback, Adobe Premiere Pro can use these kinds of sound card drivers:
In Windows, ASIO drivers support professional cards, and MME drivers typically support standard cards.
In macOS, CoreAudio drivers support both professional and standard cards.
ASIO and CoreAudio drivers are preferable because they provide better performance and lower latency. You can also monitor audio as you record it and instantly hear volume, pan, and effects changes during playback.
- Choose Edit > Preferences > Audio Hardware (Windows) or Preferences > Audio Hardware (macOS).
- From the Device Class menu, choose the driver for the sound card you want to use.
- Choose a Default Input and Output from the card. See Assign audio inputs and outputs to tracks in Adobe Audition Help.
- (MME and CoreAudio) For Master Clock, choose the input or output to which you want other digital audio hardware to synchronize (ensuring accurate alignment of samples).
- For I/O Buffer Size (ASIO and CoreAudio) or Latency (MME), specify the lowest setting possible without audio dropouts. The ideal setting depends on the speed of your system, so some experimentation is necessary.
- Choose a Sample Rate for the audio hardware. (For common rates for different output mediums, see Understanding sample rate in Adobe Audition Help.)
- (Optional) To optimize the performance of ASIO and CoreAudio cards, click Settings. For more information, consult the documentation for the sound card.
- Under Output Mapping, you can specify the target speaker in your computer sound system for each supported audio channel.
By default, Premiere Pro automatically saves your project every five minutes and retains the last twenty project file versions on the hard disk.
You can revert to a previously saved version at any time. Archiving many project iterations consumes relatively little disk space because project files are much smaller than source video files. It’s best to save project files to the same drive as your application. Archived files are saved in the Premiere Pro Auto-Save folder.
Enter the number of versions of a project file you want to save. For example, if you type 10, Premiere Pro saves the ten most recent versions.
When you specify auto-save to occur at regular intervals, Premiere Pro auto-saves a project on detecting changes to the project file.
The auto-save occurs irrespective of whether you manually save the changes to the project or not. Earlier, Premiere Pro would not execute auto-save if you manually saved within the interval setting. If the system goes idle for a period beyond the interval setting, Premiere Pro forces an auto-save.
This feature is no longer supported for Creative Cloud individual accounts.
To let Premiere Pro auto-save your projects directly to your Creative Cloud-based storage, select this preference.
When Premiere Pro auto-saves a project, a directory named "auto-save" is created in your Creative Cloud online storage. All the backed-up projects are stored in the "auto-save" directory.
When this setting is enabled, Auto Save creates an archived copy of your current projects, but also saves the current working project. This setting is off by default.
Auto saved versions have a suffix with the date and time it was saved (yy-mm-dd-hh-mm-ss) appended to the project name (for example, ProjectName-2018-08-31_09-53-41.prproj).
When an auto save occurs, Premiere Pro creates a new backup project file and adds it to the auto-save folder as an emergency project backup. This file is always the latest saved version of that project. Here are some of the characteristics of the emergency back project file:
- The backup file has the same name as the project, it does not have any suffix.
- Premiere Pro produces only one emergency backup file per project, and it is overwritten at each Auto Save interval and when you save the current project.
Set Control Surface preferences
In the Control Surface panel of the Preferences dialog, you can configure your hardware control device.
The Edit, Add, and Remove buttons let you add, edit, or remove control surfaces in your configuration.
Under Device Class, click Add to select the device. You can add either EUCON or Mackie. Or you can add both.
To specify configure settings like MIDI Input Device and MIDI Output Device for the selected control surface, click Edit.
For more information on using control surface controls with Premiere Pro, see Control surface support.
Set Graphics preferences
If you need Ligature support, select Ligatures. If you want support for Hindi numerals, select Hindi Digits. You can also choose if you want the text to flow left to right or right to left.
You can define a custom replacement font in the Graphics tab. This font is set as the default font when the fonts in a Motion Graphics Template cannot be synced.

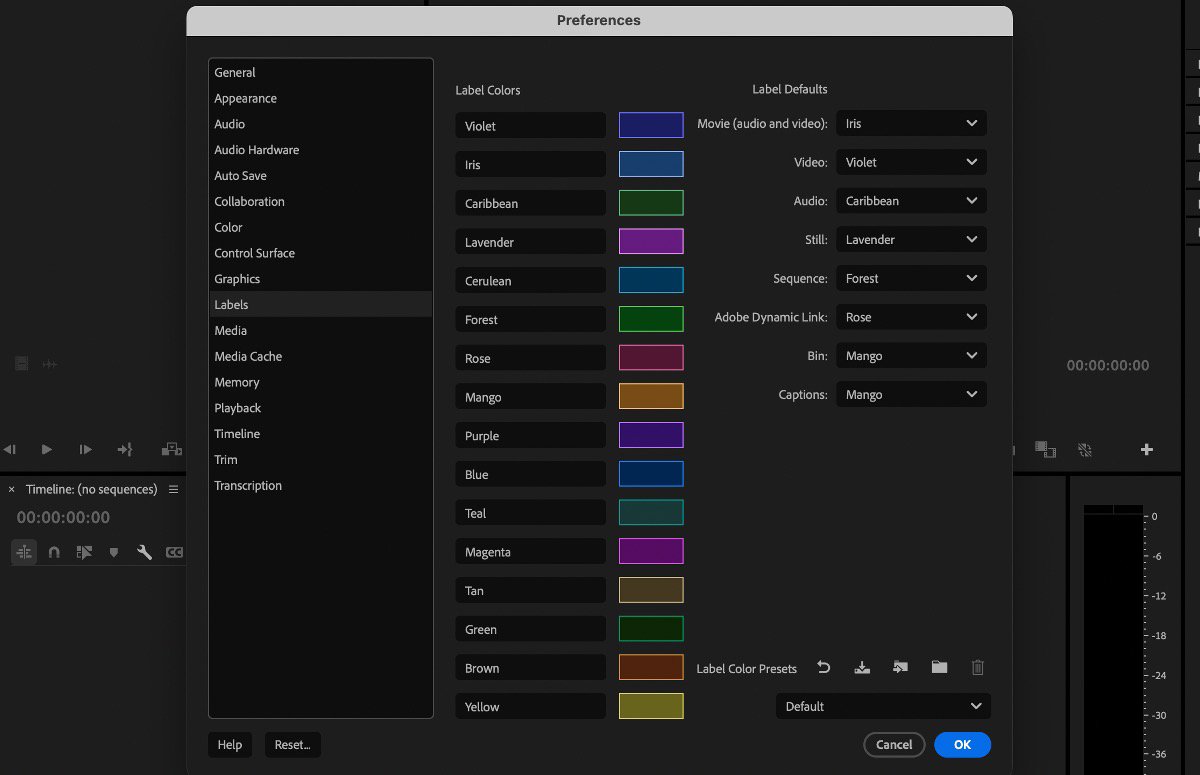
Clips, sequences, and bins in your project have a label color by default that you can change at any time. These preferences allow you to set colors you like and choose what colors are used by default for certain types of project items.
Use label color presets to select, name, and share your project’s unique label colors. Associate colors to label defaults and create a preset you can share with your whole team so you can stay organized together.
To access label color presets, go to Settings > Labels. Adjust your label colors and defaults, then select Save label color preset. To import someone’s preset, select Import label color preset.
You can click on the folder icon to navigate to where your label color presets are saved on disk. You’ll find those presets in:
- macOS: /Users/<username>/Documents/Adobe/Common/Assets/Label Color Presets
- Windows at Users\<username>\Documents\Adobe\Common\Assets\Label Color Presets
Aside from Default, Classic, and Vibrant presets, you’ll also find an Editorial preset created by TV and film editors with colors named for assets frequently used by post-production teams.

Specifies the frame rate for imported still-image sequences.
Specifies whether Premiere Pro assigns a 0, or a 1 to the first frame of an imported clip, or assigns a number by timecode conversion.
To specify whether you want to Scale to frame size or Set to frame size, set this media preference. If you select scale to frame size, then Premiere Pro automatically scales imported assets to the project’s default frame size.
To write ID information into XMP metadata fields, select this check box.
To specify where you want Premiere Pro to save clip marker, set this option. If you select this option, clip markers are saved with the media file. If you turn off this option, clip markers are saved in the Premiere Pro project file.
To link clip metadata to XMP metadata, so that changing one changes the other, select this check box.
To detect and automatically import embedded closed caption data in an embedded closed caption file, select this check box. Deselect this check box to not import embedded captions, which helps save time while importing.
If you want Premiere Pro to automatically switch to displaying the proxy video in the timeline after a proxy job is complete, select this option.
If you want to allow duplicate media while importing a project, select this option. Deselect this option if you don't want multiple copies while importing.
When you select this option, Premiere Pro hides the master clips when dragging in a sequence from another project.
Premiere Pro supports growing files for OP1A MXF files. The preference allows users to opt whether Premiere automatically refreshes as they grow, and if so, how frequently. This preference allows you to edit with these files in your project immediately.
This preference allows you to enable and disable hardware decoding.
This option allows you to enable ProRes which a type of high-quality video codec.
Set Media Cache preferences
The Media Cache is where Premiere Pro stores accelerator files, including peak files (.pek) and conformed audio (.cfa). Premiere Pro. Clearing old or unused media cache files can help maintain optimal performance. Deleted cache files are recreated whenever source media requires them.
For more information on setting Media Cache preferences, see How do I manage the Media Cache in Premiere Pro?
In the Memory pane of the Preferences dialog box, you can specify the amount of RAM reserved for other applications, and for Premiere Pro. For example, as you reduce the amount of RAM reserved for other applications, the amount of RAM left available for Premiere Pro increases.
Set Playback preferences
In the Playback pane of the Preferences dialog box, you can select the default player for audio or video, and set preroll and postroll preferences. You can also access device settings for third-party capture cards.
Premiere Pro uses the player to play media from clips and sequences for the following:
- Source Monitor
- Program Monitor
- The preview area at the top of the Project panel
- Trim mode
- Trim Monitor
- Multi-Camera Monitor
- The video transition preview in the Effect Controls panel.
You can choose the default player for your computer, or a third-party plug-in player for Premiere Pro. Third-party players are installed with some capture cards.
Preroll: The number of seconds before an edit point when playing back footage for several editing functions.
Postroll: The number of seconds after an edit point when playing back footage for several editing functions.
Step forward/Back Many: Specifies the number of frames to move when you use the keyboard shortcut Shift+Left or Right arrow. The default is set to ten frames.
Pause Media Encoder queue during playback: Pauses the encoding queue in Adobe Media Encoder when you are playing back a sequence or a project in Premiere Pro.
Audio Device: Choose an audio device in the Audio Device menu.
Video Device: Set up DV and third-party devices for output by clicking the Settings button. If a third-party capture card is installed, click the Settings button to access the Mercury Transmit dialog box for video formats, and pixel formats.A check box is available for disabling video output when in the background.
Set Timeline preferences
Audio, video, and still images have a default duration in Premiere Pro.
Specify the default duration for audio and video transitions.
To display still images, specify the default duration.
When a sequence is longer than the visible timeline, you can select from different options to auto-scroll the timeline during playback.
- Page Scroll moves the timeline automatically to a new view after the playhead moves offscreen. Selecting this option ensures that playback is continuous and doesn't stop.
- Smooth Scroll keeps the playhead in the middle of the screen, while the clips and time ruler move by.
You can choose vertical or horizontal scrolling. By default, mouse scrolling is horizontal for Windows and vertical for macOS. For Windows, press the Ctrl key to switch to vertical scrolling.
Defines the type of track in which the clip audio channels are presented when a clip is added to a sequence—Mono, Stereo, 5.1, or Multichannel Mono. Premiere Pro imports and renders each of these track types in the source format (if you select the Use File option) or converted to another track format (if you select one of the track types other than Use File). The following list describes the compatibility between tracks and clip types:
- Mono tracks can hold mono and stereo clips.
- Stereo tracks can hold mono and stereo clips.
- 5.1 tracks can hold only 5.1 clips.
- Adaptive tracks can hold mono, stereo, and adaptive (multichannel) clips (but not 5.1).
The following definitions describe how each track type is interpreted in Premiere Pro and presented when dropped into a sequence:
Mono Media
Lets you specify how mono files must be interpreted inside Premiere Pro. The mapping works as follows:
- Use File imports the file in the same format, mono.
- Mono imports the file as mono, as what happens when you select Use File as the source file and your preference being mono.
- Stereo imports the mono media file as stereo. The mono channel in the file is assigned to one channel in stereo and the other channel is left as silent for the media to be interpreted as stereo.
- 5.1 imports the mono file as a 5.1 surround clip. The mono channel in the file is mapped to one channel in 5.1 format along with five silent channels to interpret the file as 5.1 surround media.
- Adaptive imports the file as an N (Max N is 32) channel clip with the mono channel as the first channel.
Stereo Media
Lets you specify how files that are inherently stereo must be interpreted in Premiere Pro. Here are the possibilities:
- Use File imports the file as in the source format, in this case, stereo.
- Mono imports the file as mono. The L-R channels in the stereo are interpreted as two mono channels.
- Stereo imports the file as stereo with the channel mapping exactly as the source format.
- 5.1 imports the file as 5.1 surround clip. The stereo channels in the file along with the four silent channels are interpreted as 5.1 surround media.
- Adaptive imports the file as an N (Max N is 32) channel clip with the stereo channels as the first 2 channels.
5.1 Media
Lets you specify how Premiere Pro must treat 5.1 media files. The options are:
- Use File imports the file in the source format, in this case, as 5.1 channel surround media.
- Mono imports file as mono, which results in six mono channels.
- Stereo imports file as stereo, mapping the six channels to three stereo pairs.
- 5.1 imports the file as 5.1 media, with the mapping kept exactly as in the source file. In this case, it works the same as the Use File option.
- Adaptive imports the file as an N (Max N is 32) channel clip with the first six channels and the rest of them as silent.
Multichannel Mono Media
Lets you specify how files that have N discrete channels are interpreted inside PPro. The options are:
- Use File Imports the file in the source format, in this case, as multichannel mono media with the same number of channels as in the source.
- Mono Same as Use File, that is, all N channels are kept as N mono tracks.
- Stereo The N mono channels in the source are grouped into (N/2) stereo pairs.
- 5.1 Imports a multichannel mono file as sets of one or more 5.1 tracks by adding extra silent channels (if needed) to complete sets of 5.1 configuration.
- Adaptive Imports the file as an N (Max N is 32) channel clip with the channels mapped to the same number of mono channels in the source media.
Select this preference if you want the timeline to be active, not the Source Monitor, after you make an edit.
To turn on snapping, select this preference.
With snapping turned on, moving the playhead in the timeline, makes the playhead snap or jump to an edit directly. For example, you can align the playhead to a specific marker with snapping enabled.
Toggle snapping on and off by pressing S on the keyboard.
Use this option to control what happens when you are at the end of a sequence and you restart playback. If this option is not selected, Premiere Pro stops. If you select this option, Premiere Pro jumps back to the beginning.
If you want Premiere Pro to play the whole project from the beginning after rendering, select this preference.
To let Premiere Pro automatically renders audio previews whenever it renders video previews, select this preference. For more information, see Render audio when rendering video.
When you drag a clip into a sequence, Premiere Pro detects if the attributes of the clip match the sequence settings. If the attributes do not match, the Show Clip Mismatch Warning dialog box appears.
When you have different In and Out points set in the Source Monitor and Program Monitor, a Fit Clip dialog box appears. The Fit Clip dialog lets you choose the In and Out points to use. Select this preference to let Premiere Pro remember your choice and not display the Fit Clip dialog box every time.
When you enable this option, Premiere Pro opens the master clip in the Source Monitor and adds a point at the current time indicator (playhead) instead of showing the clip in and out points.
Large Trim Offset
The Trim Monitor includes Large Trim Offset buttons. Clicking one of these buttons moves a trim point earlier or later. In the Trim pane of the Preferences dialog box, you can specify the number of frames that the Large Trim Offset buttons move trim points.
Allow Selection tool to choose Roll and Ripple trims without modifier key
Enable this preference if you want to make Ripple and Rolling edits without using a modifier key.
Shift clips that overlap trim point during ripple trimming
Enable this preference to shift the overlapping track items during a ripple delete.
Ripple trim adds edits to keep both sides of trim in sync
Enable this preference to add edits to clips that overlap a trim. These added edit points will then be trimmed alongside the selected edit points you are trimming to prevent clips from shifting out of alignment on either side of the edit.
Playhead position determines trim monitor loop playback
Enable this preference to loop playback around the playhead position instead of the entire edit point selection.
Set transcription preferences
Transcription preference refers to the settings and configurations related to the transcription of audio clips within Premiere Pro.
Automatically transcribe clips: Select this checkbox to transcribe clips automatically.
Transcription preferences: Select Auto-transcribe all imported clips or Auto-transcribe only clips in sequence based on your requirements.
Speaker Labeling: Select Yes, separate speakers to have labeling for separate speakers. Select No. Don’t separate speakers from having any distinctive speaker labeling.
Enable language auto-detection: Select this checkbox to enable language auto-detection to transcribe clips.
Default language: Lets you choose the desired language to transcribe clips.
Related resources
Talk to us

If you have questions about Premiere Pro preferences, reach out to us in our Premiere Pro community. We would love to help.