Mega Man X released for the Super Nintendo in 1993. Despite it being almost three decades old, playing it today still feels fresh. It doesn’t matter if it is through the original cartridge or through one of the various collections either.
Another great thing about this, and other Mega Man games, is that it offers players a choice in stage order, thus allowing for each playthrough to be different than the last. That said, this article will determine the “perfect” order to play the game, allowing users to maximize playtime and eliminate backtracking. Each entry will go over weaknesses along with secret upgrades.
Updated on March 24, 2021, by Reyadh Rahaman: By analyzing each boss's attacks, players can better dodge them. Offense is immensely important, as one should almost always be letting off shots in one of these mighty foe's directions, however, evasion is crucial to survival. For a better chance at victory, patience should be practiced along with one's jumping and blasting skills.
8 Chill Penguin

No matter what boss strategy guide one might find on a website, or in a YouTube video, Chill Penguin is often picked first. He’s easy, but on top of that, his stage has the all-important boot upgrade that allows X to dash.
It’s important to get these boots early because they are needed for almost every secret in the game. Dashing can also help with dodging boss attacks. The Heart Tank in this stage can only be acquired after getting Flame Mammoth’s weapon, but other than that, this stage is simple to handle.
Chill Penguin's Attacks
- Ice Breath
- Stay out of the linear hitbox of ice particles (this is a great time to blast away at the boss with impunity)
- Ice Sculptures
- These simple obstacles will form from the Ice Breath attack and will soak up a few shots, though are very weak
- Sliding Charge
- The most common attack that the boss will use in which they will slide around and try to bump the player, thought can be easily avoided by jumping (leaping towards a wall is often safer, though not always)
- Jumping Attack
- A simple arcing leap that can be dodged by not standing where Chill Penguin is going to land, as this attack's trajectory is easy to predict
- Snow Screen
- The boss will jump up to the ring-shaped trigger in the center of the room's ceiling and activate it while hanging there for a few seconds in order to summon a 2-second long blizzard that barely obstructs the screen and deals no damage, though will push the player towards a wall (no way to dodge this, nor is there a need to)
7 Launch Octopus

The boots can help a lot when it comes to dashing past areas or dodging enemies, but they aren’t necessary for this area. This could also work as a first stage although fighting Launch Octopus without the boots is tricky.
The boss' tornado attack can suck X in quickly and the boots definitely help out with evasion. Anyway, the only optional thing to get in this stage is another Heart Tank that can be found at the bottom of the sea. Destroy the battleship about mid-stage, float down to the bottom, fight the sea dragon, and voila – there is the Heart Tank.
Launch Octopus's Attacks
- Floating Leaps
- The boss will slowly leap through the water at the player; easy to see coming and run under
- Tornado Attack
- Launch Octopus will diagonally jump to an upper corner of the room and begin spinning, which will cause a short-lived vortex to appear, though can be dodged by dashing away when one sees the boss head to an upper corner
- Torpedo Barrage
- The boss will shoot many small projectiles just over the player's head and can be easily avoided by standing still and not jumping (this would be an ideal time to shoot the foe repeatedly)
- Fish Torpedos
- A sneaky attack that the boss will mix in with the Torpedo Barrage that will send out a couple of fish-like projectiles that travel in a linear pattern toward the player and must be jumped over
- Whirpool Suction
- Not an attack, but an annoying maneuver that the boss uses to pull the player towards them, though can be countered by dashing in the opposite direction
6 Boomer Kuwanger

Boomer Kuwanger is probably the hardest boss in the game to tackle as the first encounter, mainly because he is incredibly fast and goes invisible. He can appear at random and if he does, he will grapple X, which hurts, and then tosses him for even more damage.
Getting the Homing Torpedo from Launch Octopus, though, makes this boss a cinch. Like Chill Penguin, players do have to come back to this stage again to get the obvious Heart Tank that is out of reach before the boss encounter. The Boomerang Cutter will get that.
Boomer Kuwanger's Attacks
- Foward Charge
- Boomer Kuwanger will rush quickly at the player in a straight line, which can be jumped over
- Horn Boomerang
- The boss will toss his horns at the player, which will travel in a loop shaped like an oval
- Teleport Grab
- Impossible to predict, but constantly moving will prevent the boss from locking onto the player's position
5 Spark Mandrill

The Boomerang Cutter is also needed to get the Sub Tank at the beginning of the stage along with a Heart Tank about halfway through the area. Because Storm Eagle hasn’t been destroyed yet, Spark Mandrill’s stage is at full power.
This means that there are more obstacles to overcome. That said, some find it easier as the paths are better lit, which helps when it comes to getting the gear. Anyway, Spark Mandrill is weak against Chill Penguin’s ice so his ability will finally come into play here.
Spark Mandrill's Attacks
- Charging Punch
- Use Chill Penguin's ice attack to freeze Spark Mandrill mid-charge, which will cause them to become vulnerable to other attacks for a couple of seconds (the freezing blast will make this fight trivial, as one can stun-lock the boss)
4 Armored Armadillo

Armored Armadillo's stage is a fun ride, literally, as players will shoot around on mine carts for a good portion. Now, toward the beginning of the stage, there is a tank that chases players, and behind it is a Sub Tank.
Later on, there is another one that players will have to either destroy quickly or get ahead of in order to get the Heart Tank. If the machine goes first, it will destroy the walls needed to reach the item. As for the stage's boss, Spark Mandrill’s Electric Spark will shoot off his armor, making this fight a piece of cake even with all of Armored Armadillo's crazy rolling.
Armored Armadillo's Attacks
- Rollout
- The boss will roll up into a ball and swiftly rush towards the player along the ground, though this can be dodged by jumping
- Ricochet
- Following the Rollout attack, Armored Armadillo will bounce off of a wall and will begin to fly around the room in a chaotic pattern, however, this can be avoided by standing in the corner opposite of the one they initially bounce off
- Head Blasts
- The boss will shoot slow-moving balls of energy from their head at the player, which can be dodged by jumping over them (fire the spark attack at the boss between their volleys for easy hits and huge damage)
3 Storm Eagle

First of all, this level’s Heart Tank is a bit trickier to get. Simply ride the elevator from the beginning to the top, dash off at full speed, and veer to the left of the screen.
That should put players on the tank’s platform. Soon after that, there is a glass observation point where the Sub Tank is located. Right after that, there is the secret room past the flame tanks. Destroy those and X can get his next armor piece, the helmet. As for Storm Eagle, he’s a piece of cake. Just dodge like the wind and use the standard Buster.
Storm Eagle's Attacks
- Gust
- The boss will use their wings to push the player back with the wind, which deals no damage, and can be dashed into to not get blown away (a great time to fire a few shots)
- Diving Strikes
- Storm Eagle will fly up into the air and then dive in diagonal lines at the player from either the upper left or upper right corners of the screen, which can be dodged by moving left or right, though jumping is not advised
- Bomb Drop
- The boss will drop a small explosive as they are hovering mid-air, though this can be avoided by simply not standing under the boss
- Hurricane Beam
- This will appear as a horizontal cyclone that will emerge from the boss's arm, though will only push the player back and not deal damage (another great time to shoot the boss)
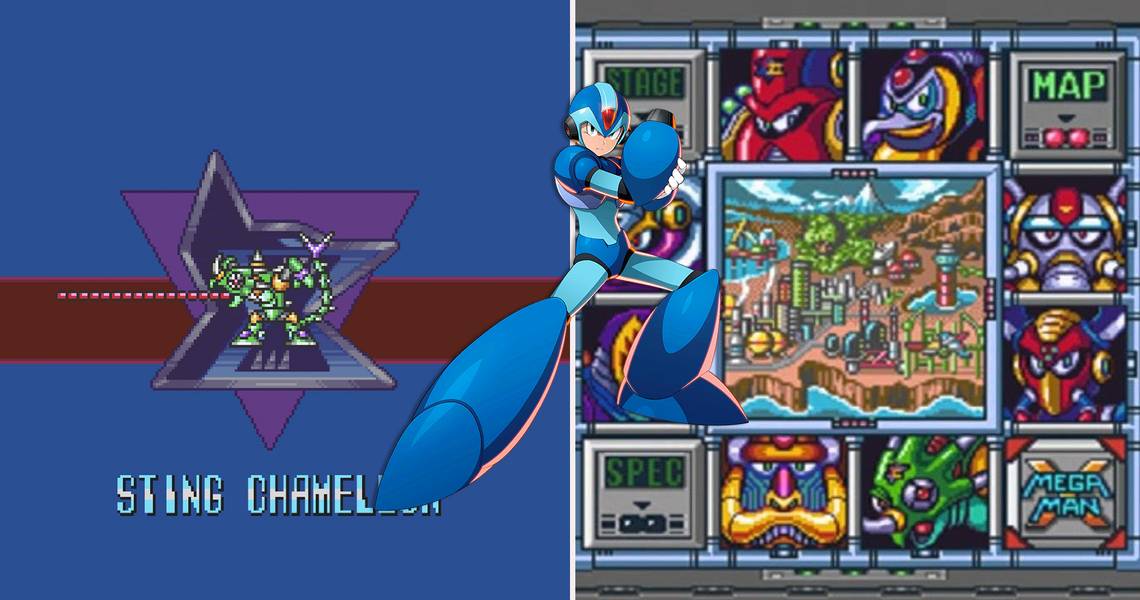
2 Sting Chameleon

Destroying Launch Octopus first causes Sting Chameleon’s stage to flood. Therefore, first, follow the forest until a cave appears.
However, do not enter. Below, in what looks like a death pit, is a Heart Tank that is accessible thanks to the water. Above the cave is a mini-boss who is guarding X’s armor. Get to the end of the stage to fight Sting Chameleon, who is weak against the Boomerang Cutter and that’s that.
Sting Chameleon's Attacks
- Spike Shot
- The boss will jump onto the background wall of the room above the player and fire downward 3 spikes in a cone pattern, which are tough to dodge but can be avoided by dashing to the left or right
- Tongue-Hang
- Sting Chameleon will attach themself to the roof with their tongue and hang there for a moment, though, if one uses Boomerang Cutter on them at this point, it will interrupt them (players can use the cutting boomerangs to stun-lock the boss, making this fight remarkably easy)
1 Flame Mammoth

Finally, Flame Mammoth is ready to get blasted away by Storm Eagle’s Storm Tornado weapon. However, before reaching that point is a litany of upgrades; all of them are in the same area too. There is the Buster upgrade, a Heart Tank, and Sub Tank all in the middle of the stage’s factory.
As beating Chill Penguin prior to entering this stage freezes the lava, the whole process is made much easier. The only thing left to do after beating Flame Mammoth is to go back to Chill Penguin’s stage in order to use the Fire Wave to bust through a secret bunker, which is just after X can get a mech suit. Now, one should be ready for the game’s final linear gameplay gauntlet.
Flame Mammoth's Attacks
- Jumping Attack
- The big boss will leap in a slow arc at the player, which is easy to dash under or jump away from, even with the annoying conveyer belt-floor
- Oil Shot
- Flame Mammoth will shoot a glob of dark oil from their trunk, which will cause the area it lands to be sticky, though does not do any damage (just don't step in the goo)
- Fire Shot
- The boss will raise an arm and shoots fireballs at the player in a linear pattern that arcs slightly downward, which can be dodged by jumping (repeated wall jumping is the safest)