'CHAPTER 1 - Death Row' is, as stated, the first introductory chapter in the prison campaign stories.
This chapter of the campaign is intended to teach the player the basics of the game.
Walkthrough[]
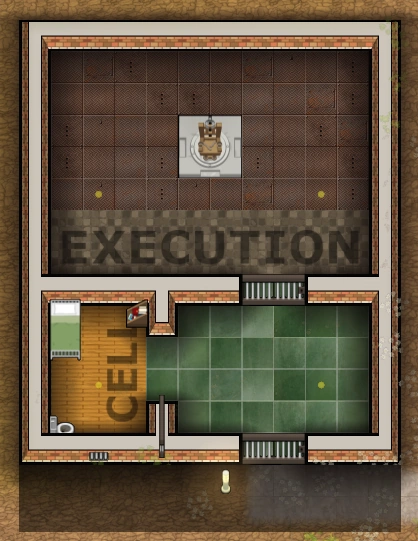
We've been contracted to build an Execution Chamber at this prison, in time for the scheduled execution of one of their inmates.
| You can skip cutscenes and dialogues at any time with the 'Skip' button in the bottom right corner of the screen. |
Building the Execution Room[]
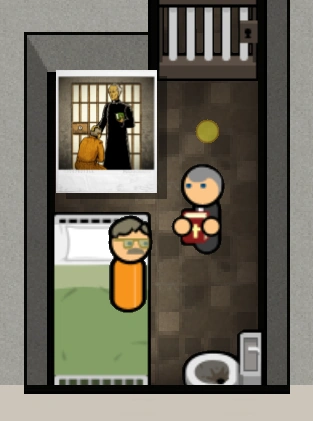
In the first sequence of the chapter, you'll have a quick overview of what life in a prison looks like. The last area shown is a cell with a priest and a prisoner in it, both of them important characters in this story.
As soon as the cutscene ends, you'll receive a call from the CEO.
The CEO: "This is a tough one. There's a prisoner incarcerated at this facility who's been convicted of a double murder, and sentenced to death. That's where we come in. We've been contracted to construct an execution chamber in time for the guy's big day."
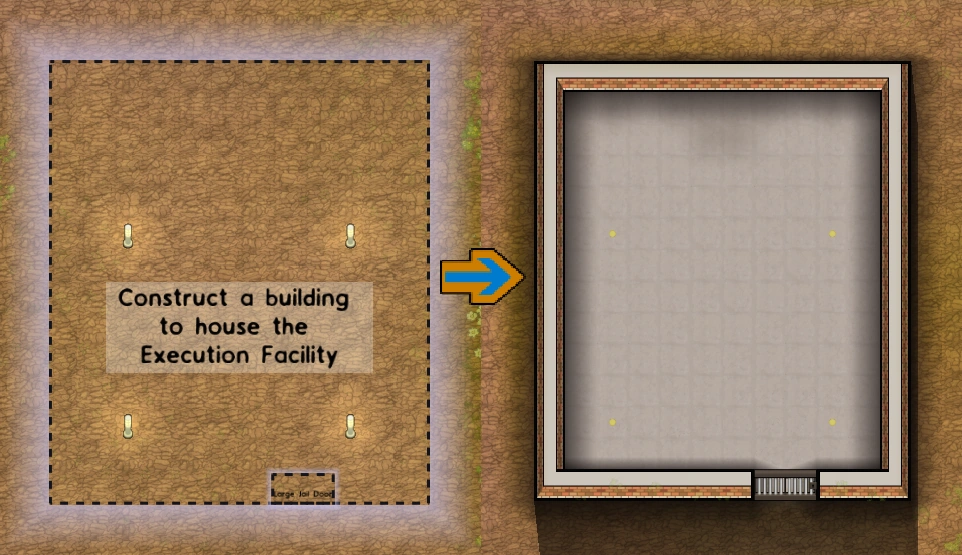
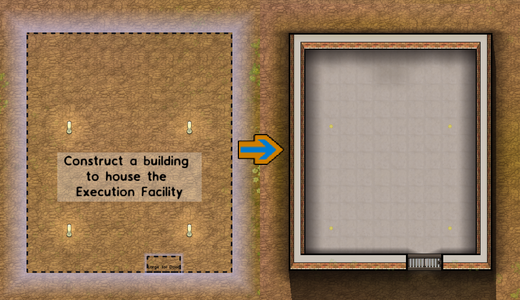
The camera will pan over an area marked with lights.
The CEO: "This is where I want the new facility to be built. The first step with any project like this is to construct the building itself - with enough space inside to fit an execution room and a holding cell. So let's get started. Construct a new building here. We will also need an entrance to the new Execution Facility. Build a Large Jail Door into the south wall."
|
You can use the highlighted icons in the bottom left corner of the screen to do so. Using the Foundations menu, select either 'Building (Brick)' or 'Building (Concrete)', then click on the top left corner of the building side and drag the cursor to the bottom right corner, then release. If the 'Auto Lights' option is on in the Foundations menu, Lights will be automatically placed every time you build a room (not that it matters right now, as lights are already placed on the ground, and will automatically be moved inside once the room is complete).
| You have plenty of funds, so don't worry about saving up if you want to use fancy materials, as any type of wall will count for the objective. |
| This is how you build foundations in game. Foundations are essential for any indoor area, as they not only build walls, but also a floor and a roof, as opposed to the walls built with the 'Walls & Doors' menu, which only delimit outdoor areas. If 'Indoors' is listed as a requirement for a room, you need to build foundations for it. |
As soon as you lay down the foundations for the room, the CEO will call again.
The CEO: "Your Workmen are responsible for the construction of buildings. They'll collect the steel and concrete from this store room and take it to the construction site. They'll use those raw materials to build the foundations and framework of your new building. This is the slowest part of construction, so you should plan ahead when building new facilities. While we wait, take a look around. Use WASD or the arrow keys to more around, and use the mouse wheel to zoom in and out."
Remember to add the Large Jail Door in the marked area of the construction site, so that the building can be finished: open the Walls & Doors menu, click 'Doors' on the top to see the doors tab, then select 'Large Jail Door' and place it where shown (other kinds of door won't work for the objective).
| If you don't want to wait, you can fast forward time by clicking on of the buttons under the clock. You can also press the first button (or use the Space bar) to stop the time while building, but remember to un-pause the game once you're done or your workmen will never start working at what you plan. |
As soon as the room is ready (foundations and door) the CEO will talk to you again.
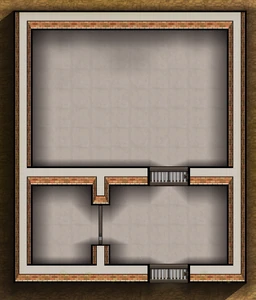
The CEO: "Inside the building I want a Cell and an Execution Room. Partition the space by constructing some Brick Walls."
|
Open the Walls & Doors menu and build the 4 Brick Walls shown in the building site (it has to be Brick Walls, or it won't count towards the objectives).
The CEO: "Now add Large Jail Doors to those dividing walls. You can rotate an object before placement by clicking the middle mouse button (or press R)."
|
Open the Walls & Doors menu, select 'Doors' and then build the two Large Jail Doors.
This is how the building should now look:

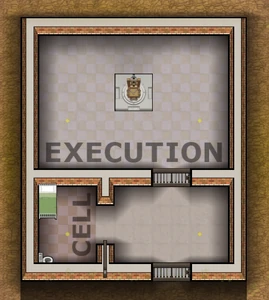
The CEO: "That's looking good. We now need to designate Rooms within those spaces. Designate a Cell in the smaller area where our condemned inmate will live. Then designate the Execution Room itself in the larger area."
|
To designate a room, open the Rooms menu, then select 'Cell' and click, drag and release to draw a rectangle in the small room area to designate it as Cell. Do the same with the bigger room and designate it as 'Execution Room'. The rooms will now look like a checkered area with the name of the room along one of the sides.
| You can remove the 'checkered look' of the rooms by pressing 'Esc', going 'Options' > 'Game' and deselect 'Room Checkerbox'. You will still see the rooms checkered while you are in the Rooms menu. |
The CEO: "Those new Rooms have requirements before they become functional. The Cell needs a Bed and a Toilet. The Execution Room requires the Electric Chair."
|
You can find all the required items in the Objects menu. The right icons will be highlighted so they're easy to find. Select them one at a time and place them in the indicated areas of the Cell and the Execution Room (they have to occupy at least part of the designated area for them to count towards the objectives).
The CEO: "That's the essentials taken care of. But there are still a few improvements you could make. It's up to you though, these aren't strictly required. It depends how much you care about your prisoners and their environment. The Cell itself could be improved with an outward facing Window, and a small Bookshelf. And the facility would look better with a higher quality floor material - like Wooden Floorboards of Mosaic Tiles. Outside you could add some lighting, and a paved pathway if you think it needs it."
The camera now pans towards the other cells.
The CEO: "This is the man in question, Edward Romsey. A teacher once, would you believe. It's not our place to decide if he deserves this. The Law has made that decision. We're just here to do a job. Once you are satisfied the facility is ready, you can begin the Prisoner Transfer to his new cell. Simply click on the polaroid in his cell to initiate the transfer."
|
This is how the facility should look like with the bare necessities:

It's up to you, but completing the optional objectives can give you some more practice with the building menus.
- You can find the Window and the Bookshelf in the Object menu. Only a normal Window will do (a Large Window or any other kind of window won't be accepted).
- You can select the floor you like in the Flooring menu and applying it in the same way you designated the rooms. Any kind of floor inside the building is accepted as 'higher quality materials', even if it's cheaper than the Concrete Floor (which is the default one of any foundation); you need to cover with floor at least 15 tiles inside the whole building area to complete the objective.
- In a similar way, click and drag to create a path outside. You need 10 tiles of Paving Stone in the area in front of the facility (near the Large Jail Door) to complete the relative objective (other floor types won't do).
- The Light item is in the Objects menu: it looks like a yellow dot when placed indoors, and like a lamp when placed outdoors. You need to place 1 Light outside the facility to complete the relative objective.
You can add as many extra items you want, but do not spend too much time on it, as the prison you are currently in is not very functional and the prisoners will start complaining in a couple of days if you take too long (although the campaign prevents them from rioting).

Once you're satisfied with your creation, click on the polaroid in Edward's cell.

Wiring the Electrical Chair[]
The Chief will come collecting the prisoner, and a flashback will follow, showing Edward killing both his wife Susan and her lover after catching them together in bed. As the guards escort him to his new cell, the Priest will try to persuade them to spare his life but with no results.
After the cutscene, the CEO will call you once again.
The CEO: "Good work so far. However there is one problem - the execution room isn't functioning yet, because it doesn't have any power. We need to connect it to the electrical supply."
It will now show you the map of the prison in Utilities mode, which is always activated whenever the Utilities menu is open.
The CEO: "We are now viewing the prison in Utilities mode, which shows us the electrical wiring layout for the entire prison. Each building in the prison is connected to the Power Grid by these thick underground electrical cables.
The view will pan to a Power Station.
The CEO: "Power is provided to the prison by this substation, which draws electricity from the national grid. As you can see, this entire wing of prison cells is without power. All the lights are out. To fix this problem, we first need to switch into Utilities mode to understand why the lights are without power."
As you can see in Utilities mode, the thick Electrical Cables are surrounded by a green area, which shows you how far they can provide electricity. The end of the wing the CEO is showing you is grey, and the small flashing thunderbolts indicate that there are unpowered devices that need electricity to work properly (in this case: Lights).
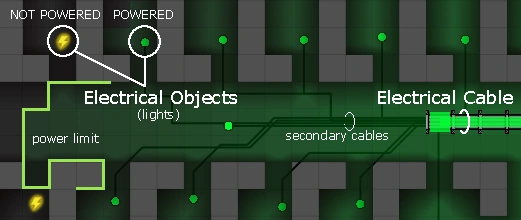
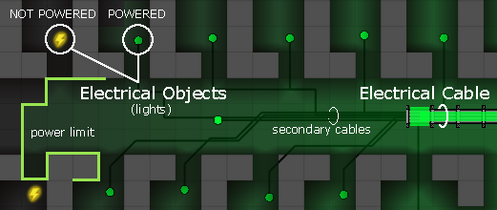
The light green line shown in the diagram above indicates the limit of how far electricity can currently run: if you place an electrical object anywhere within it, it will be connected to a nearby Electrical Cable through secondary cables. Secondary cables can only extend up to 15 meters away from an Electrical Cable.
| Electrical Cables can run through walls, while secondary cables cannot, nor can they run between indoor and outdoor areas, unless the Electrical Cable is placed between them. Secondary cables can't be built or destroyed, as they automatically run between Electrical Cables and installed electrical objects when these are in reach. Secondary cables cannot run outdoors. |
The CEO: "The nearest electrical cables are too far away - our engineers can't complete the wiring for this area. Extend the electrical cables nearby to cover this wing of the prison.
|
Open the Utilities menu and select 'Electrical Cable', then click, drag and release to extend the pre-existing cable to the end of the corridor, until all rooms are lit.
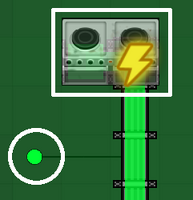
The CEO: "Lights aren't the only thing that needs power. Your new Electric Chair does too. Use the Power Cables to connect the execution facility to the power grid. The Electric Chair itself is a special type of electrical item. It requires its own dedicated power line. You'll need to connect it up directly with mains cables.
|
| Small electrical items, like Lights and TVs, will automatically connect to power through secondary cables as long as an Electrical Cable is nearby. Large items, such as Laundry Machines or Water Pumps, will need to be connected directly to the cable. You can distinguish the two by the caption 'High Powered' only present in the tooltips of objects requiring a direct connection. NOTE: Low Powered objects still need direct Electrical Cable connection when outdoors, since secondary cables can only run indoors. |

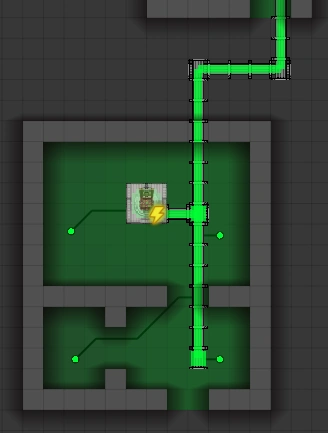
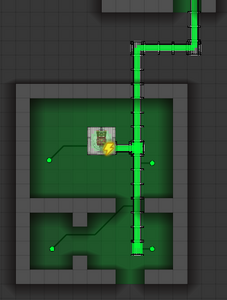
To complete the current objectives, extend the Electrical Cable you just built so that it runs down to the Electrical Chair and beyond, so that all rooms are lit. Remember you can build Electrical Cables through walls. It should look like this:
The CEO will promptly call you back.
The CEO: "We are almost done I think. We should test the new Execution room at lest once before we try to use it though. I'm just going to turn it on or a few seconds, make sure everything is ok."
The moment the CEO turns on the Electrical Chair, the power goes out.
The CEO: "Well, that didn't work. Looks like we drew too much power, and tripped a circuit breaker in the power station. The whole prison is dark. We're going to need more juice to be able to handle the power spike that the electric chair generates. First, we need to turn the power back on. This is a two step process: switch the power station back on by clicking on it, and selecting Switch On in the menu that appears. Then build three more capacitors so we have enough Power Capacity to handle the electric chair. Once you've done that, test the electric chair again by clicking on it and selecting 'Switch On' in the menu."
|
The CEO has been pretty clear on what to do. Switch the Power Station back on by clicking on it, and selecting 'Switch ON' in the menu that appears. This should give the power back to the whole prison.
| In a normal game when the power runs out due to an overload, you need to remove the cause of it before turning the Power Station back on, or you will get another black out. To do so, some devices can be turned off manually like the Electrical Chair; if you can't do that, you'll have to remove some Electrical Cables. |
Note that if you hover your cursor on the Power Station a tooltip appears saying:
- Current Power Output: 171 units
- Max Power Production: 250 units
This means that the Power Station is currently producing 250 units of power and that 171 of those 250 are already used by electrical objects in your prison. The Electrical Chair requires 100 units of power to be operative, but you currently only have 79 spare. Placing a Capacitor adjacent to a Power Station adds 50 more units of power, so that's what we're going to do. You can find it in the Utility menu: add three of them where shown next to the Power Station.
| A Power Station with no Capacitors provides 50 units of power; you can attach up to 16 Capacitors to it, rising the units of power produced to 850. You can visually see how much power the Power Station produces by the number of notches in the station itself, one every 50 units. |
Now that the Power Station provides a total of 400 units of power, turn the Electric Chair back on (click on it, and select 'Switch On').
The CEO: "Well done. I believe we are finished with this job. What happens now is out of our hands. We did a professional job, and that's important in our business. Try not to worry about what happens next."
You will see a cutscene showing a flashback of Edward confessing his crime to the Priest, who told him to turn himself in. Then you will be back to the present, when Edward is escorted to the Execution Room and killed.
| The process to execute Death Row prisoners is a bit more complicated then what is shown in this chapter of the campaign. For more information about it, check Execution. |
Gallery[]
")
")
")
")
")
")
")
")
")
")
")
")