What is Oil Painting?

Oil Painting: Centuries Old & Still Going Strong
Oil painting dates back for centuries and is an incredibly far-reaching artistic practice. The earliest discovery of its usage goes as far back as the fifth century A.D. to the Bamian Valley of Afghanistan, where Indian and Chinese artists created hundreds of paintings in the nexus of caves there.
But oil painting art did not achieve widespread prominence and usage until it arrived in Northern Europe in the 15th century. Netherlandish artist Jan Van Eyck is most often credited with “discovering” the practice, having experimented with oil painting techniques in his wood panel works, including his famed Arnolfini wedding portrait. Eventually oil painting swept through the rest of Europe, replacing tempera painting as the most prominent medium of choice and becoming the painting practice most closely associated with the art of the High Renaissance.

What initially made oil painting art so appealing was the brightness and richness of its colors. What has allowed it to stand the test of time is its adaptability to an artist’s whims and requirements. For instance, Renaissance oil painting artists tended to use oil paints in layers, working fat over lean (which means adding more oil to the pigment as you go through each successive layer to allow for proper drying or curing so the final surface of the painting won’t crack) and dark to light. This is usually called indirect painting and allows an artist to build up the painting surface from toned underpainting to finishing glazes.
During the Impressionist period, much of that changed. Oil pigments were put into tubes and artists were free to move outdoors, where they often painted “wet into wet,” mixing paint directly on the surface and not waiting for a layer of paint to dry before going into the painting again. Nowadays artists often combine one or both of these methods in their oil art.
And oil painting’s further appeal lies in the fact that its translucence, sheen, and thickness can all be adjusted. It can also be used with waxes, resins, and varnishes, proving that the process and possibilities inherent in fine art oil painting are as varied and faceted as the artwork that has been made with over the centuries.
How to Oil Paint: Brushes, Brushwork 101, and Beyond
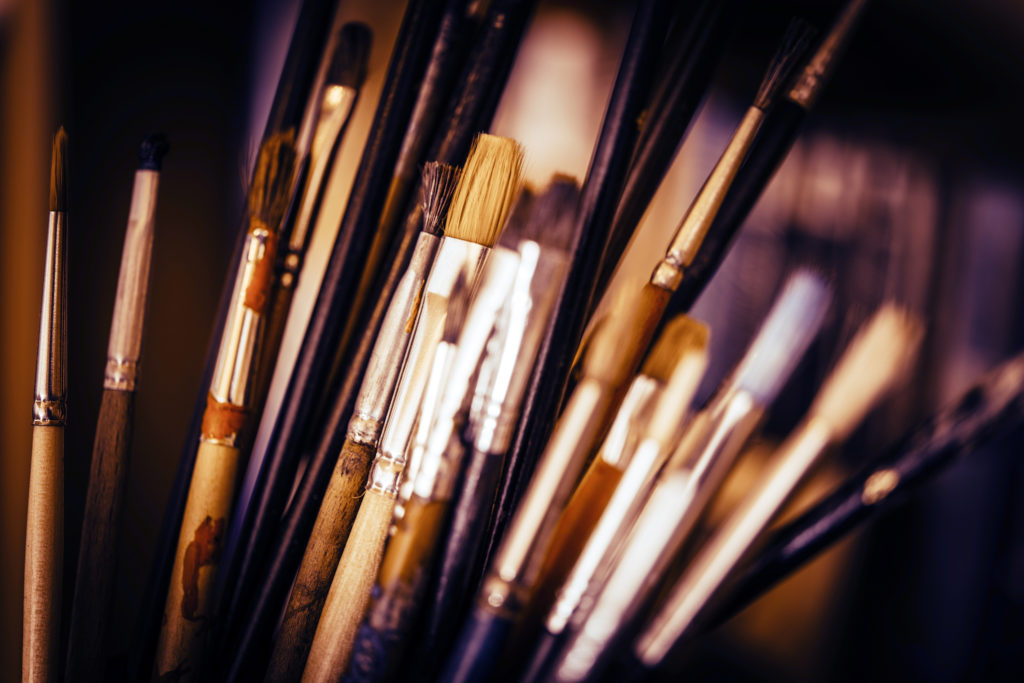
Buy oil painting brushes with bristles that are firm and don’t bend too sharply over the ferrule, and watch for loose or splayed hairs. In terms of types of brushes, flat brushes are often used when applying large areas of oil on canvas. Filberts soften edges; brights are short flat brushes and usually used when figuring out how to texture the surface of a painting for bold impasto effects. Round brushes are versatile and can be used almost anywhere and on anything during the painting process. Fan brushes take after their name and feather away brushstrokes and soften tone gradations.
You can approach oil painting brushwork in a number of ways. You can apply the paint in thin layers, working fat over lean. The key to success is to apply paint that contains more oil with every successive layer. Impasto techniques are quite different. You can apply oil paint straight from the tube, working with a brush or a palette knife. To heighten the textural effects on the surface of the painting, you can also try mixing the paint with sand or sawdust.
For subtle textures and soft transitions, scumble your paint, whereby you apply a thin film of dry (no oil added) paint to a dry surface. This will give a painting a delicate mist of color, revealing the underpainting color and optically merging it with the scumble layer. To scumble, start with an old or worn brush and scrub the surface of the painting freely and in any direction that suits the nature of painting.
Learn Oil Painting: Color Temperature & Color Charts
Landscape artist Timothy R. Thies teaches his oil painting workshop students how to capture the elusive and nuanced temperatures of light and shadow in their work.
Cool Light, Warm Shadows
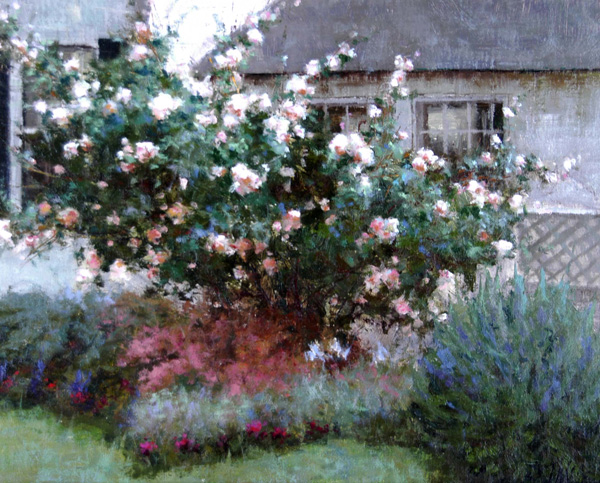
“Overcast Roses illustrates the principle of cool light and warm shadows,” said Thies. “What I want to convey here is that every object in the light has been painted with cool colors–the coolness being the light temperature of an overcast day. All of the shadow areas in this painting are painted in warmer colors, especially in comparison to what surrounds them. Color temperature is always about comparing two colors next to each other. For instance, in this painting, the colors in the light areas are cooler in comparison to the colors in the shadow areas.
Warm Light, Cool Shadows
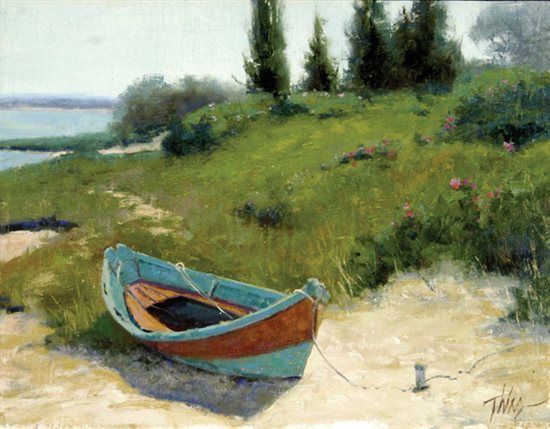
“In Hunky Dory, we have just the opposite,” Thies continued. “You still want to contrast all the shapes in your painting that are in the light of a sunny day to those in the shadows. On a sunny day, as in Hunky Dory, all the color notes in the light are warmer than those in the shadows–the shadows being predominantly cooler. Also, on a sunny day you produce paintings that have lighter, brighter colors and more contrast than in paintings done under cool light or overcast conditions. Compare the paintings side by side. The overcast painting has very subtle color changes. In Hunky Dory, the sunny-day painting, you can see more distinct color changes and a wider range of value changes. Most artists prefer the sunny-day paintings because the color changes are more obvious and the overcast paintings can appear to be very gray and unappealing. If you take a closer look, however, you will begin to see the subtle color shifts of the cool light and warmer shadow concepts, very similar to painting under north-light conditions in a studio. By painting in both lighting conditions, you will add variety to your finished paintings.”
Color Chart Art
A few weeks before a workshop, Thies sends each of his students a packet of information about how to make color charts before arriving for the three-day event. He encourages the artists to complete the color charts to better understand not only the colors they were using but also how they interact with one another. “How many times have you looked at an object in nature and thought, ‘What color is that and how do I mix it?'” Thies asked in his letter to students. “By mixing two colors plus white from your palette, you will begin to learn and then memorize color mixtures that are quite beautiful. What could be more satisfying and fun?”
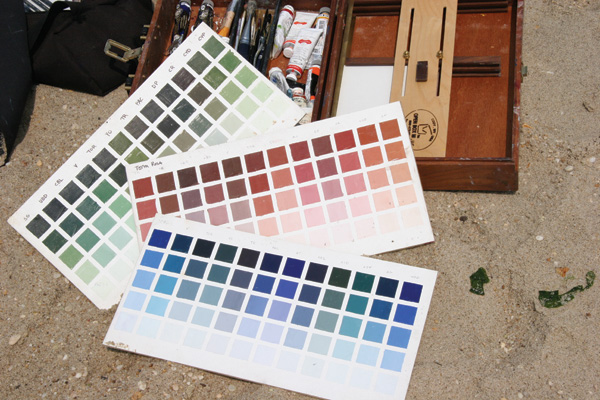
Each color chart focuses on a dominant color–sap green, for example–and how it interacts with each of the other colors on a palette. Thies’ charts–which he recommends painting on canvas panels, one square inch for each color block, sectioned off with 1/8″ white graphic arts tape–are always five horizontal rows deep, with the top row always the darkest value and the bottom row always the lightest. The number of vertical columns depends on the number of colors experimented with–ideally, enough to accommodate the number of colors on the palette. The horizontal color rows are composed of mixtures of each color on the palette combined in varying percentages with the dominant color.
The first column of paint in every chart is the dominant hue mixed with only white. Begin by painting Box 5–the top box–right out of the tube so it is the solid dominant color. Next, mix the dominant color with a lot of white, so the mixture is only slightly darker than white. That mixture goes in Box 1 at the bottom of the chart. Now Box 5 and Box 1 are complete. Box 3 is an even mixture of white and the dominant color–say, sap green. Boxes 2 and 4 are in between the values of 1 and 3 and 3 and 5, respectively. Squinting at the column should reveal an even gradation of colors from top to bottom. Now mix colors for column two.
The rest of the columns are combinations of the dominant color with other colors, for instance sap green with ultramarine deep, sap green with cobalt blue light, sap green with viridian, and so on. “There is no perfect way to paint color charts,” Thies reminded the students, “just be patient with yourself. It’s a lengthy process, but the results are beautiful and very satisfying.”
Source: From an article by Edith Zimmerman, Fall 2006 issue of Workshop
Top Ten Oil Painting Tips
Artist Randall Sexton has inspired countless students with his oil painting lessons. Here are a few of his favorite oil painting tips sure to trigger best practices in your art.
- Keep your oil painting palette organized with the paints laid out the same way each time you work.
- Premix piles of paint that represent the big “puzzle pieces” or large masses of your composition, starting with the colors you know and working toward the ones you don’t.
- Be aware of changes in color at the edges of shapes, which will give your shapes form and volume.
- If you want to see shapes flatly, close one eye.
- Make color relationships on your palette first, and then try test spots on your canvas.
- Work on very small panels on location to experiment with color rather than on your final surface.
- Make color charts that relate the various colors on your palette.
- Stick to a limited palette.
- Keep one hand on the wheel, glance at the mirror, and coast. In other words, relax!
- To judge both value and color, step back from your painting to make final judgments.
Source: From an article written by Steve Doherty, Fall 2006 issue of Workshop.
Building a Center of Interest in an Oil Painting
Call it the focus, the focal point, or the center of interest. For Doug Higgins, it’s a crucial part of planning his paintings. Once a scene strikes him and he has a clear image of the composition in his mind, he sets up his easel but Higgins says he never accepts nature as she comes. “I know I can change the scene–make things up, eliminate some things, simplify others, move elements, brighten or neutralize colors–to serve the idea of the painting,” he says. “I carefully balance and design the elements. My goal is simplicity. Complexity is easy–anyone can achieve that through thoughtless copying of details. You need intelligent strategies to keep it simple.”
Because Higgins begins with an image of a painting in his mind, he has no need for thumbnail sketches. His first considerations are establishing the focal point, locating the horizon line, and placing the largest masses. “A painting is not a collection of parts, but a construction,” he says. “I establish masses early on, stick to those decisions, and retain those masses by using close values.”
Higgins next sketches in the main elements with a small, soft brush. The next step is applying a thin turpentine wash with a big brush using transparent colors–alizarin crimson, burnt sienna, ultramarine blue, and viridian for the shadows and warm local colors in the light areas–to establish the major shapes. With this step done, the artist wipes down his board with a paper towel, creating an interesting variety of colors. Using thicker paints, he begins with the focal point, completing that before moving on to other areas. By establishing his lightest light, darkest dark, and highest level of detail and contrast in the center of interest, he sets standards by which to judge the subordinate parts of the painting.
Because the eye is attracted by contrast, Higgins uses the strongest contrast in values, colors, edges, textures, and degree of detail in his center of interest. Linear elements lead the viewer’s eye toward the focal point. To keep the viewer from being distracted by the foreground he simplifies and abstracts that area. Sometimes Higgins makes figures the secondary focus. The artist also uses secondary focal points to balance the oil painting and avoid weighing down one part of the image.
Source: From an article for Artist Daily written by Linda S. Price
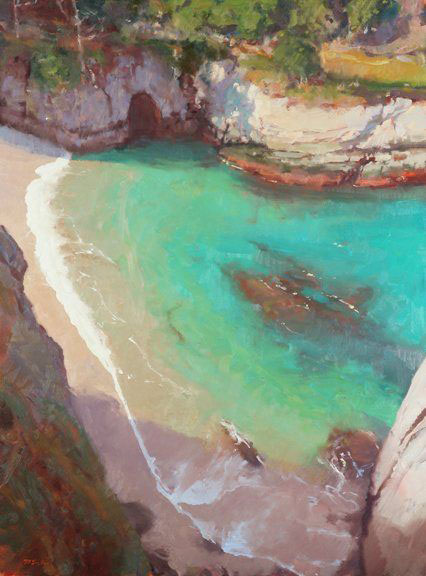
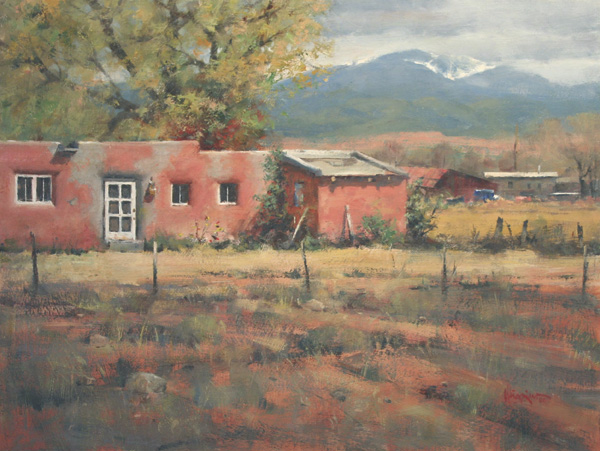
Oil Painting Gallery
Take a look at a handful of the oil painting offerings that have been created by some of the most famed and lauded artists throughout history, and learn a little bit about why each painting is worth a further look.
And be sure you with Everything You Need to Know About Oils course — available now.
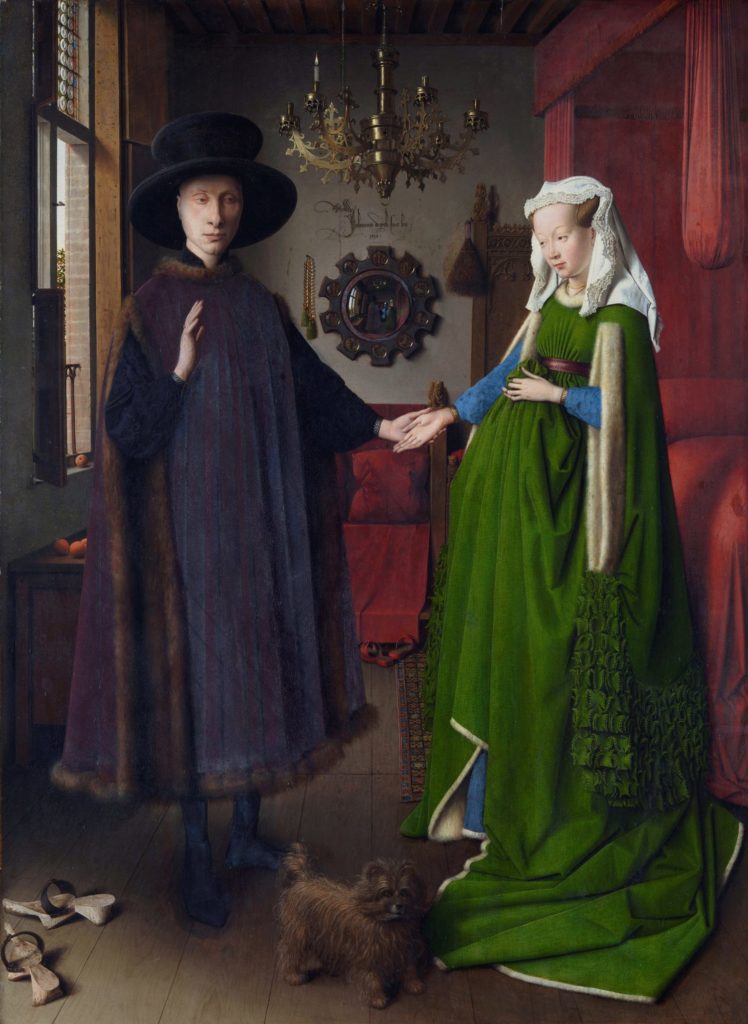
and cherries on the window sill to the figures’ joined hands–give rich symbolism and multiple interpretations to the work.

An emblem of French Romanticism, this incredibly large fine art oil painting is based on the horrific aftermath of an 1816 shipwreck and also serves as an example of how complex a composition can be–two overlapping pyramids direct the viewer’s eye in, around, and through the work. (Above, a detail of the work.)
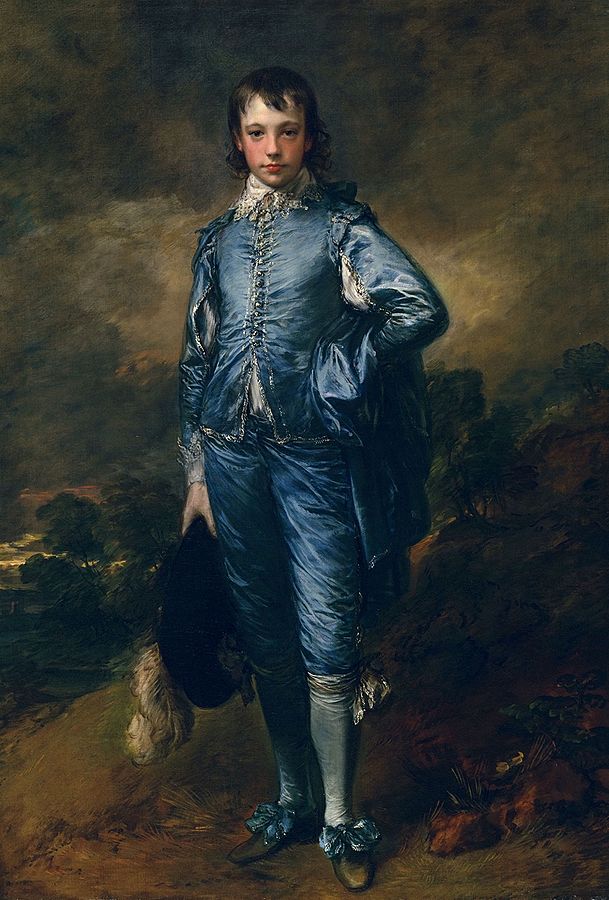
some 140 years prior to when the work was painted.
Have all the info you want and need about oils?
No? Check out Everything You Need to Know About Oils Course. This course is designed for the true beginner. Are you excited to start painting, but don’t know what materials to get? Did someone give you a set of paints and you need help using them? This course is right for you. Enjoy!


got it, it is very useful!!!