
This post may contain affiliate links.
Granny squares are one of my favorite crochet projects, and they’re surprisingly easy to make. Let me show you how!


Granny squares are some of the most popular things to crochet. They’re quick to make, super colorful, and a great way to use up small scraps of yarn. Plus, once you’ve got a stack of squares, you can assemble them into blankets, bags, sweaters, and more.
Although there are lots of different granny square patterns out there, the classic design is made with just a few basic stitches: double crochet clusters (aka granny clusters) and chain stitches.
In this beginner-friendly tutorial, I’ll walk you through every step of crocheting a classic granny square. The pattern is easy to follow (and easy to memorize!)
We’ll start with a single-color granny, then make a multi-color version. After that, I’ll show you some fun variations, like a solid granny square and a sunburst granny square.


Why I like this particular pattern
There are many ways to make granny squares, and everyone has their favorite. Here’s why I prefer this pattern:
- Sharp Corners: Using 3 chain stitches in the corners creates clean, sharp corners, making it easier to sew the squares together later.
- Reversible: In this pattern, you’ll turn the square over after each round – which means it will be reversible.
- No skewing: Turning also prevents the square from “vortexing” or looking skewed.
Getting Started
A few things before we get started.
Grab Your Supplies
Here are the materials and tools you’ll need:
- Yarn – Choose a worsted-weight yarn in your desired colors. (A smooth texture and lighter colors will make it easier to see your stitches.) I’m using Lion Brand Basic Stitch acrylic yarn, but feel free to use something from your stash.
- Crochet hook – Choose a crochet hook that matches your yarn size. If you’re not sure, check the yarn label for recommendations. I’m using a size H (5.0mm) hook.
- Other notions – Scissors for cutting yarn and a tapestry needle for weaving in ends.
Know Your Stitches
You’ll need to know a few basic crochet stitches to make a granny square. If you’re new to these techniques, click the links below for full tutorials.
- Magic Ring
- Chain stitch (ch)
- Double crochet (dc)
- Slip knot
- Slip stitch (sl st)
- Granny cluster (3 dc cluster): A granny cluster is a group of 3 double crochet stitches, all worked into space.
- Chain-space (ch-sp): In this pattern, all of the granny clusters are worked into the large spaces between the clusters, created by the chain stitches in the previous round.


Starting the Granny Square
First things first, we need to create a loop in which to work our first round of stitches. Here are the three most common ways to do that:
Option 1: Start in a single chain.
This technique is simple and fast – but it can be tricky to fit all of the stitches into one chain stitch.
Chain 3. Make the first round of stitches into the first chain stitch.
Option 2: Chain Stitch Ring
This method is quick and easy, but it will give you a more pronounced hole in the center of your square.
Chain 4. Insert your hook into the first chain stitch. Slip stitch to join the chain stitches into a circle. Then, work your first round into the circle.
Option 3: Magic Ring (aka Magic Circle)
This is my preferred method, and will give you a tightly closed center with no visible hole.
To learn how to start your granny square with a magic ring, read this magic ring tutorial.


Crocheting a Single-Color Granny Square
Here’s how to make a granny square in one solid color. First, I’ll give you the long-form written instructions. Then, I’ll give you the same instructions in the standard abbreviated format you’re used to seeing in crochet patterns.
Note: The pattern is written in US terms.


Round 1
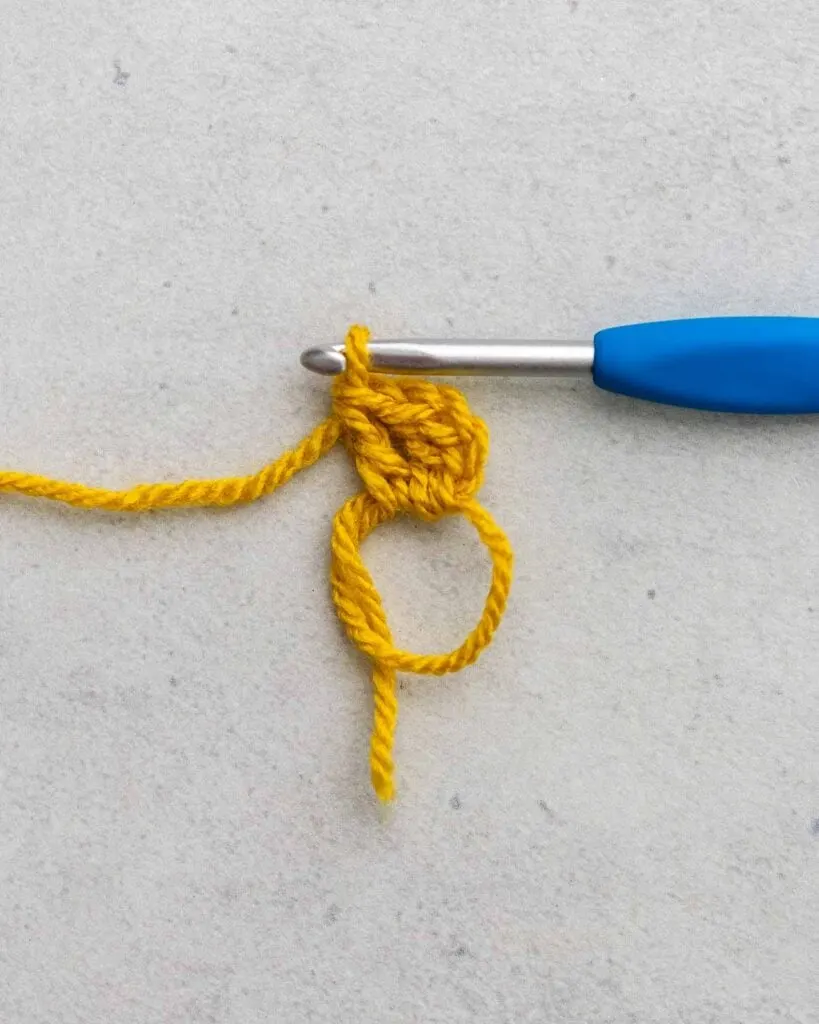
- Make a magic ring.
- Make the first granny cluster: Chain 3. (This counts as the first double crochet.) Then, working into the magic ring, make 2 more double crochets. (This completes the first granny cluster.) Chain 3.
- Make the second granny cluster: Working into the magic ring, make 3 double crochets. Chain 3.
- Make the third cluster: Working into the magic ring, make 3 double crochets. Chain 3.
- Make the fourth cluster: Working into the magic ring, make 3 double crochets. Chain 3.
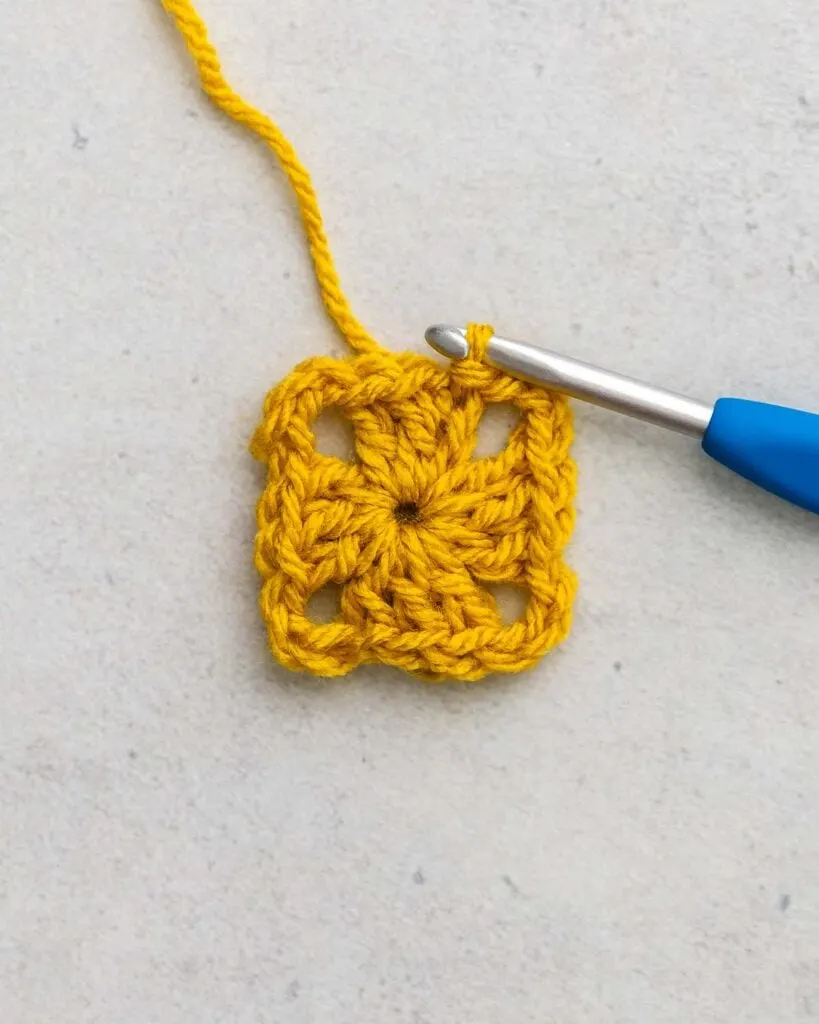
- Join the round: At this point, you should have 4 granny clusters separated by ch-3 spaces at the corners and the last ch-3 space at the end. To join the round and create the square shape, slip stitch into the top of the first chain-3. This completes the first round.
Tip: You will now have 4 granny clusters separated by 4 chain-3 corner spaces.


Round 2
- Turn your work over so that the “wrong side” is facing you.
- Chain 3 (As before, this counts as a double crochet). Make 2 double crochets in the next chain-3-space, chain 3, and make 3 double crochets in the same chain-3-space. Chain 1. (First corner completed.)
- Into the next chain-3-space, make 3 double crochets, chain 3, 3 double crochets. Chain 1. (Second corner completed.)
- Repeat Step 3 two more times. (Third and fourth corners completed.)
- Slip stitch into the top of the first chain-3 to join the round.


Round 3
- Turn your work over so that the “right side” is facing you.
- Chain 3. (This counts as 1 double crochet.) Make 2 double crochets in the next chain-1-space, chain 1.
- Into the next chain-3-space, make 3 double crochets, chain 3, 3 double crochets. Then, chain 1. (First corner completed.)
- Into the next chain-1-space, make 3 double crochets. Then, chain 1.
- Repeat Steps 3 and 4 two more times.
- Into the last chain-3-space, make 3 double crochets, chain 3, 3 double crochets. Then, chain 1.
- Slip stitch into the top of the first chain-3 to join the round.


Round 4
- Turn your work over so that the “wrong side” is facing you.
- Chain 3. (This counts as 1 double crochet.) Make 2 double crochets in the next chain-1-space, chain 1.
- Into the next chain-3-space, make 3 double crochets, chain 3, 3 double crochets. Then, chain 1. (First corner completed.)
- Into the next chain-1-space, make 3 double crochets. Then, chain 1.
- Into the next chain-1-space, make 3 double crochets. Then, chain 1.
- Repeat Steps 3-5 two more times.
- Into the last chain-3-space, make 3 double crochets, chain 3, 3 double crochets. Then, chain 1.
- Slip stitch into the top of the first chain-3 to join the round.


Round 5
- Turn your work over so that the “right side” is facing you.
- Chain 3. (This counts as 1 double crochet.) Make 2 double crochets in the next chain-1-space, chain 1.
- Into the next chain-3-space, make 3 double crochets, chain 3, 3 double crochets . Then, chain 1. (First corner completed.)
- Into the next chain-1-space, make 3 double crochets. Then, chain 1.
- Into the next chain-1-space, make 3 double crochets. Then, chain 1.
- Into the next chain-1-space, make 3 double crochets. Then, chain 1.
- Repeat Steps 3-6 two more times.
- Into the last chain-3-space, make 3 double crochets, chain 3, 3 double crochets. Then, chain 1.
- Slip stitch into the top of the first chain-3 to join the round.
Abbreviated Format
And here are the same instructions in the standard crochet pattern format.
Round 1: Make a magic ring. Ch 3, 2 dc, ch 3, (3 dc, ch 3) three times. Sl st to top of ch-3 to join round.
Round 2: Turn. Ch 3, (2 dc, ch 3, 3 dc) in next ch-3-sp, ch 1, *(3 dc, ch 3, 3 dc) in next ch-3-sp, ch 1; repeat from * twice more, Sl st into top of ch-3 to join round.
Round 3: Turn. Ch 3, 2 dc in next ch-1 sp, ch 1, *(3 dc, ch 3, 3 dc) in next ch-3-sp, ch 1, 3 dc in next ch-1-sp, ch 1; repeat from * twice more. (3dc, ch 3, 3 dc) in last ch-3-sp, ch-1, sl st into top of ch-3 to join round.
Round 4: Turn. Ch 3, 2 dc in next ch-1 sp, ch 1, *(3 dc, ch 3, 3 dc) in next ch-3-sp, ch 1, [3 dc in next ch-1-sp, ch 1] two times; repeat from * twice more. (3dc, ch 3, 3 dc) in last ch-3-sp, ch-1, sl st into top of ch-3 to join round.
Round 5: Turn. Ch 3, 2 dc in next ch-1 sp, ch 1, *(3 dc, ch 3, 3 dc) in next ch-3-sp, ch 1, [3 dc in next ch-1-sp, ch 1] three times; repeat from * twice more. (3dc, ch 3, 3 dc) in last ch-3-sp, ch-1, sl st into top of ch-3 to join round.
Crocheting a Multi-Color Granny Square
Now, let’s talk about how to make a granny square in multiple colors. The general pattern is the same, but we’ll attach a new color of yarn in the corner to start each round. Here’s how to do it.


Round 1
Round 1 is the same as Round 1 of the single-color square, so I’ll give you the short version of the instructions here.
Round 1: With Color A, make a magic ring. Ch 3, 2 dc, ch 3, (3 dc, ch 3) three times. Sl st to top of ch-3 to join round.
Cut yarn and fasten off. Now, at this point, I will go ahead and weave in the yarn tails. You can do that, too, or save them until the end.


Round 2
- Turn your work over so that the “wrong side” is facing you.
- Pull up a loop of Color B in any corner. Chain 3 (As before, this counts as a double crochet). Make 2 double crochets in the same chain-3-space, chain 1.
- In the next ch-3 space, make 3 double crochets, chain 3, 3 double crochets, chain 1.
- Repeat step 3 two more times.
- In the beginning ch-3 space (the same corner space we started in), make 3 double crochets, ch 3, and slip stitch into the top of the first chain-3 to join the round.


Tip: When attaching a new color of yarn, you have two options:
- Simple Loop Method: Pull up a loop in the corner with your new color, then continue with the chain stitches. This is what I tend to do, but I know it can feel too loose for some.
- Slip Knot Method: For more control, you can make a slip knot with the new yarn, place it on your hook, and attach it with a slip stitch before chaining.

Round 3
- Turn your work over so that the “right side” is facing you.
- Pull up a loop of Color C in any corner. Chain 3 (counts as a double crochet). Make 2 double crochets in the same chain-3-space, chain 1.
- In the next ch-1 space, make 3 double crochets, chain 1.
- In the next ch-3 space, make 3 double crochets, chain 3, 3 double crochets, chain 1.
- Repeat Steps 3 and 4 two more times.
- In the next ch-1 space, make 3 double crochets, chain 1.
- In the beginning ch-3 space (the same corner space we started in), make 3 double crochets, ch 3, and slip stitch into the top of the first chain-3 to join the round.

Round 4
- Turn your work over so that the “wrong side” is facing you.
- Pull up a loop of Color D in any corner. Chain 3 (counts as a double crochet). Make 2 double crochets in the same chain-3-space, chain 1.
- In the next ch-1 space, make 3 double crochets, chain 1.
- In the next ch-1 space, make 3 double crochets, chain 1.
- In the next ch-3 space, make 3 double crochets, chain 3, 3 double crochets, chain 1.
- Repeat Steps 3-5 two more times.
- In the next ch-1 space, make 3 double crochets, chain 1.
- In the next ch-1 space, make 3 double crochets, chain 1.
- In the beginning ch-3 space (the same corner space we started in), make 3 double crochets, ch 3, and slip stitch into the top of the first chain-3 to join the round.
Round 5
- Turn your work over so that the “right side” is facing you.
- Pull up a loop of Color A in any corner. Chain 3 (counts as a double crochet). Make 2 double crochets in the same chain-3-space, chain 1.
- In the next ch-1 space, make 3 double crochets, chain 1.
- In the next ch-1 space, make 3 double crochets, chain 1.
- In the next ch-1 space, make 3 double crochets, chain 1.
- In the next ch-3 space, make 3 double crochets, chain 3, 3 double crochets, chain 1.
- Repeat Steps 3-6 two more times.
- In the next ch-1 space, make 3 double crochets, chain 1.
- In the next ch-1 space, make 3 double crochets, chain 1.
- In the next ch-1 space, make 3 double crochets, chain 1.
- In the beginning ch-3 space (the same corner space we started in), make 3 double crochets, ch 3, and slip stitch into the top of the first chain-3 to join the round.
Abbreviated Instructions
And here are the same instructions in the standard, abbreviated crochet pattern format.
Round 1: With Color A, make a magic ring. Ch 3, 2 dc, ch 3, (3 dc, ch 3) three times. Sl st to top of ch-3 to join round.
Round 2: Turn. Attach Color B in any corner. Ch 3, 2 dc in same ch-3-sp, ch 1, *(3 dc, ch 3, 3 dc) in next ch-3-sp, ch 1; repeat from * twice more, 3 dc in beginning ch-3-sp, ch 3, sl st into top of ch-3 to join round.
Round 3: Turn. Attach Color C in any corner. Ch 3, 2 dc in same ch-3-sp, ch 1, *3 dc in next ch-1-sp, ch 1, (3 dc, ch 3, 3 dc) in next ch-3-sp, ch 1; repeat from * twice more, 3 dc in next ch-1-sp, ch 1, 3 dc in beginning ch-3-sp, ch 3, sl st into top of ch-3 to join round.
Round 4: Turn. Attach Color D in any corner. Ch 3, 2 dc in same ch-3-sp, ch 1, *[3 dc in next ch-1-sp, ch 1] two times, (3 dc, ch 3, 3 dc) in next ch-3-sp, ch 1; repeat from * twice more, [3 dc in next ch-1-sp, ch 1] two times, 3 dc in beginning ch-3-sp, ch 3, sl st into top of ch-3 to join round.
Round 5: Turn. Attach Color A in any corner. Ch 3, 2 dc in same ch-3-sp, ch 1, *[3 dc in next ch-1-sp, ch 1] three times, (3 dc, ch 3, 3 dc) in next ch-3-sp, ch 1; repeat from * twice more, [3 dc in next ch-1-sp, ch 1] three times, 3 dc in beginning ch-3-sp, ch 3, sl st into top of ch-3 to join round.
Finishing
Here’s how to finish your squares.
Weave in the ends: Thread a tapestry needle with the yarn tails. Carefully weave the ends back and forth within the stitches on the wrong side of your square. Trim the excess yarn close to the surface of the square.
Blocking: Soak your squares in cool water with a bit of wool wash. Squeeze out the excess water, then lay the squares flat on a towel or blocking board. Pins the shapes to shape, then allow them to dry completely.
More Granny Square Variations
Once you’ve mastered the basic granny square, try some of these variations.
- Solid Squares: Want a solid granny square with no gaps? Try this solid square pattern.
- Sunflower/Sunburst Granny Square: These squares use puff stitches and clusters to make a floral design in the center of the square.
- Hexagons: You can make lots of different shapes with granny clusters, like this granny hexagon pattern.
- Granny Stipe: This granny stripe stitch pattern takes the same 3-dc clusters and arranges them into colorful stripes. Great for blankets and scarves!
Using Your Granny Squares
Here are some ideas for what to make with granny squares:
- Granny Square Blanket: Make a bunch of granny square, and then sew them into a cozy, colorful blanket.
- Granny Square Cardigan: In this pattern, you’ll turn two granny hexagons into a trendy cardigan.
Have questions? Join the Facebook Group!
I hope this tutorial was useful for you! If you have any additional questions, feel free to join my Facebook Group. I created this group for you to share your pictures, WIPs, ask questions, and help each other out.
What’s Next?
Pin this post: Save this tutorial to your Pinterest boards so that you can come back to it later.
Leave a comment: We love to hear your feedback. Tell me in the comments below!
Share on Instagram or Facebook: When you make this project, share it on social media and tag me @sarahmaker_. We love to see what you make!

Classic Granny Square Pattern
How to crochet a basic granny square pattern with an easy to follow, step-by-step tutorial.
Materials
- yarn
Tools
- crochet hook
- tapestry needle
Instructions
- Round 1: With Color A, make a magic ring. Ch 3, 2 dc, ch 3, (3 dc, ch 3) three times. Sl st to top of ch-3 to join round.
- Round 2: Turn. Attach Color B in any corner. Ch 3, 2 dc in same ch-3-sp, ch 1, *(3 dc, ch 3, 3 dc) in next ch-3-sp, ch 1; repeat from * twice more, 3 dc in beginning ch-3-sp, ch 3, sl st into top of ch-3 to join round.
- Round 3: Turn. Attach Color C in any corner. Ch 3, 2 dc in same ch-3-sp, ch 1, *3 dc in next ch-1-sp, ch 1, (3 dc, ch 3, 3 dc) in next ch-3-sp, ch 1; repeat from * twice more, 3 dc in next ch-1-sp, ch 1, 3 dc in beginning ch-3-sp, ch 3, sl st into top of ch-3 to join round.
- Round 4: Turn. Attach Color D in any corner. Ch 3, 2 dc in same ch-3-sp, ch 1, *[3 dc in next ch-1-sp, ch 1] two times, (3 dc, ch 3, 3 dc) in next ch-3-sp, ch 1; repeat from * twice more, [3 dc in next ch-1-sp, ch 1] two times, 3 dc in beginning ch-3-sp, ch 3, sl st into top of ch-3 to join round.
- Round 5: Turn. Attach Color A in any corner. Ch 3, 2 dc in same ch-3-sp, ch 1, *[3 dc in next ch-1-sp, ch 1] three times, (3 dc, ch 3, 3 dc) in next ch-3-sp, ch 1; repeat from * twice more, [3 dc in next ch-1-sp, ch 1] three times, 3 dc in beginning ch-3-sp, ch 3, sl st into top of ch-3 to join round.
Notes
- Pattern is written in US terms.
- Beginning ch-3 counts as a dc stitch.
- Pattern is turned after each round.


Sarah Stearns has helped millions of makers find their next craft project with free patterns and step-by-step tutorials on her blog, sarahmaker.com. Read more.
With over a decade of experience in knitting and crochet, she has been featured in prominent publications like The New York Times, Scientific American, Good Housekeeping, Vox, Apartment Therapy, and Lifehacker.
Alisha
Saturday 27th of April 2024
I really enjoy it and also it helps me a lot since i am a begginer. Thank you so much for these free pattern and for helping me.Love it ☺
ME
Saturday 20th of January 2024
This is very fun. Love it
Seun
Monday 27th of November 2023
I'm so happy this page really help me out, I can make a granny square now as a beginner
Georgie Evans
Friday 20th of October 2023
I have made many things crocheting on and off for 40 years but I still needed you granny square pattern it is the only pattern I have found that is easy to follow. I had no idea that there were more granny square patterns so now I am going to try them all to make my sofa throw and I will happily take pictures and post them.
Judy
Friday 16th of June 2023
Great info for a rank beginner- easily explained.