


How to Create Rules in Gmail on the Web
You can create a rule in Gmail in just minutes. Check out this video to learn how, and keep reading for more details.

Add Rules to Your Gmail: 2 Methods
You have two simple ways to begin the process:
Method 1. Click inside the Search box at the top and then select the Show search options button to the right.


OR
Method 2. Select the Settings icon (gear) and choose See all settings. Go to the Filters and Blocked Addresses tab and pick Create a new filter.
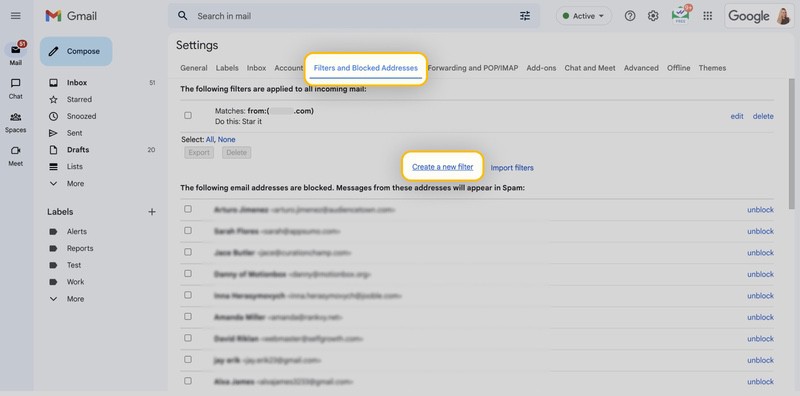
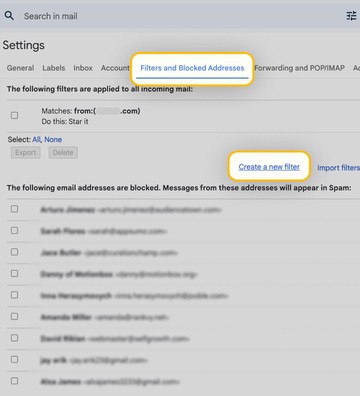
Both methods open the initial window or screen for you to enter the conditions for your rule.
You can create a rule in Gmail based on who an email is from, who it’s to, if it has or doesn’t have a keyword, if it’s less than or greater than a particular size, or if it has an attachment.
Follow the guides below to set up forwarding rules, label automations, and filters to mark emails in Gmail.
📌 Tip: For automatically removing messages, check out our guide about auto-deleting emails in Gmail.
Create Label Rules in Gmail
As you probably know, Gmail uses labels rather than folders. So, while you may be able to create a rule to move a message to a “Shopping” folder in Outlook, the equivalent in Gmail is to create a filter to assign a “Shopping” label to a message.
Using this example, you can apply the “Shopping” label to emails you receive from your favorite online retailers.
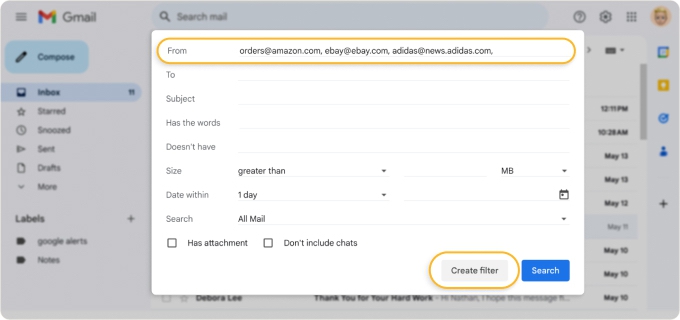
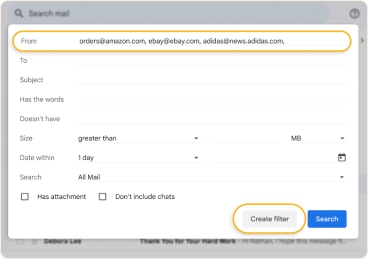
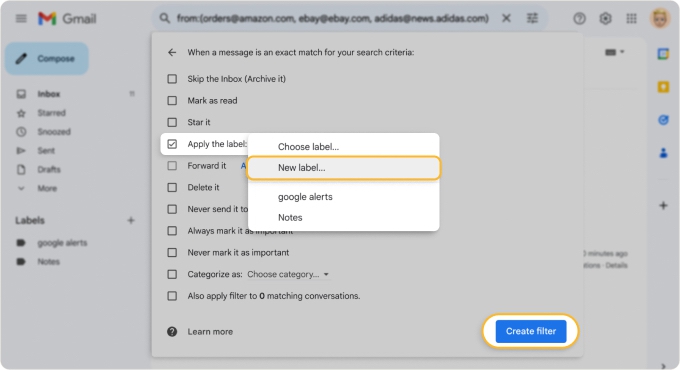
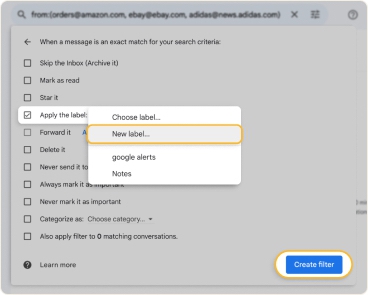
Step 1. In the filter condition window, enter the email addresses in the From field separated by commas.
Step 2. Select Create filter.
Step 3. In the action window, check the box for Apply the label and choose the label to the right. Pick New label to create one.
Step 4. Optionally, check the box to run the filter on existing messages in your inbox.
Step 5. Select Create filter to finish.
Luckily, labels in Gmail work the same way as folders. This means that you easily view labeled emails by selecting the corresponding label in the menu.
Set Rules in Gmail to Mark Emails
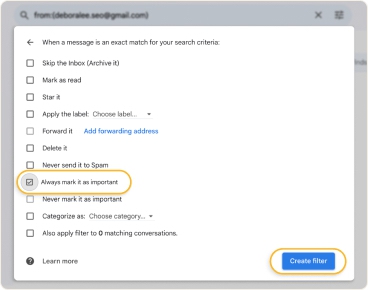
One more handy Gmail filter you can use is to automatically mark emails. You might mark messages as read, star them, or always set them as important.
For another example, you might mark messages with attachments from your boss as important so you can spot them quickly.
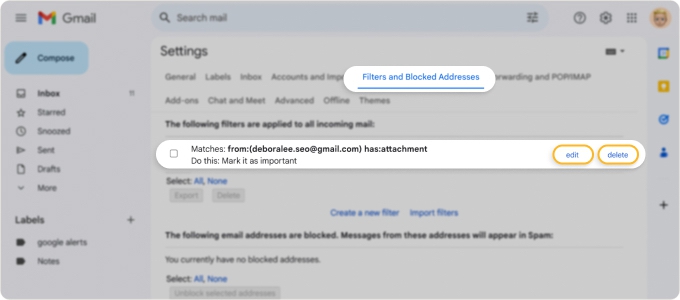
Step 1. In the filter condition window, enter the email address in the From field and check the box for Has attachment.
Step 2. Select Create filter.
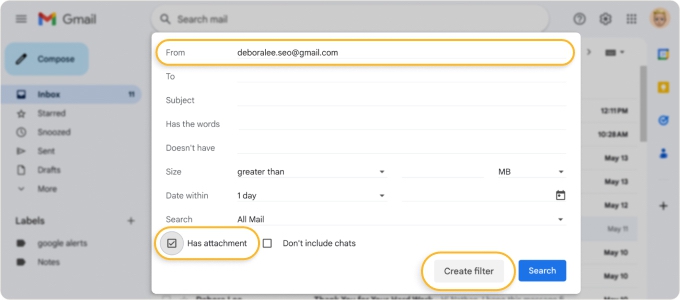
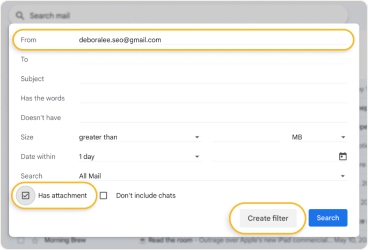
Step 3. In the action window, check the box for Always mark it as important.
Step 4. Optionally, check the box to apply the filter to existing messages.
Step 5. Select Create filter to finish.

Set Up Auto-Forwarding Rules in Gmail
If you frequently forward emails to a coworker or a different email account of your own, setting up a rule to do this is a huge time-save and a great way to clean your Gmail inbox.
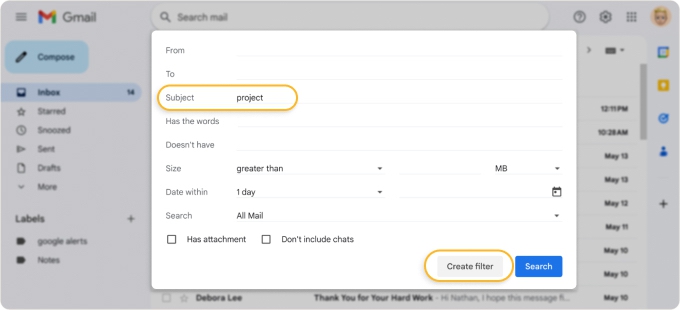
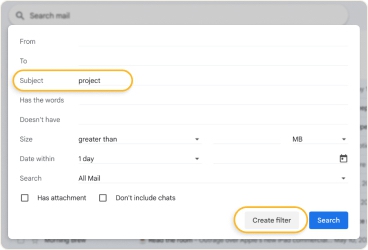
As an example, you may want to forward messages with the word “project” to a team member.
- In the filter condition window, enter the word “project” (without quotes) in the Subject, Has the Words, or both fields depending on where you expect to see the word.
- Select Create filter.
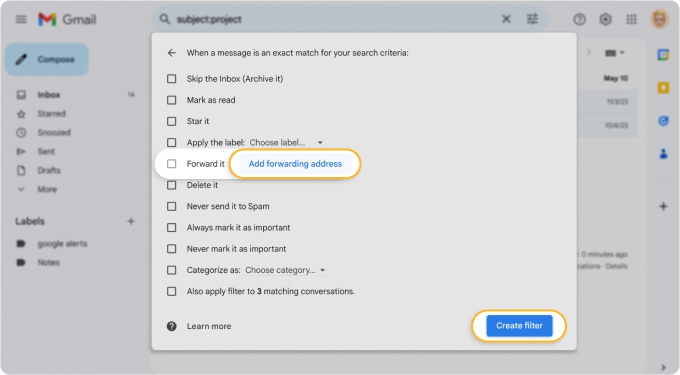
- In the action window, check the box for Forward it and choose the email address to the right. You can pick Add forwarding address if you need to connect one.
- Optionally, check the box at the bottom of the list to apply the filter to existing messages in your inbox.
- Select Create filter to finish.

How to Manage Gmail Rules for Emails
After you create rules in Gmail, you may want to view, edit, or even remove one.
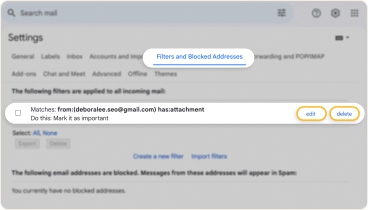
Select the Settings icon, choose See all settings, and go to the Filters and Blocked Addresses tab.
You’ll then see all the rules you’ve set up and can do one of the following:
- Change a filter: Select edit on the right. Make your changes to the conditions and/or actions and click Update filter.
- Remove a filter: Select delete on the right and confirm with OK.
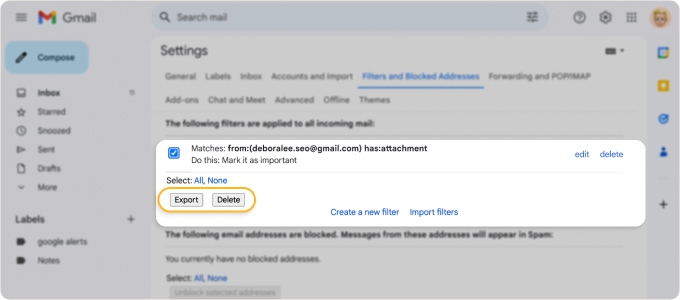
- Export or delete filters in bulk: Check the box to the left of each rule. Then, choose Export or Delete and follow the subsequent prompts.

How to Create Rules in the Gmail Mobile App
If you’re a mobile Gmail user, you’d probably rather create rules on your Android device or iPhone. Unfortunately, you can’t currently set up or manage filters in the Gmail mobile app.
As an alternative, you can use the Clean Email mobile app to create and adjust Gmail rules for emails. Plus, you can set up a variety of Gmail inbox rules with more flexibility and options.
Follow along below for creating and managing rules in Clean Email.
Use Clean Email to Create Gmail Rules
Although you can set up many common rules in Gmail, there are definitely limitations. For instance, you cannot create filters in the mobile app or pause rules temporarily. Additionally, it’s not easy to set up filters by date or without multiple steps.
With Clean Email, you can do things with filter rules that you cannot do in Gmail. Plus, you can do them more easily and with enhanced flexibility on the web, desktop, and your mobile device. Remember, Clean Email works with all IMAP email accounts, making it one of the best Gmail cleanup tools.
Create a Rule to Move Emails to a Folder
Using an earlier example, you can automatically move emails to a folder based on sender.
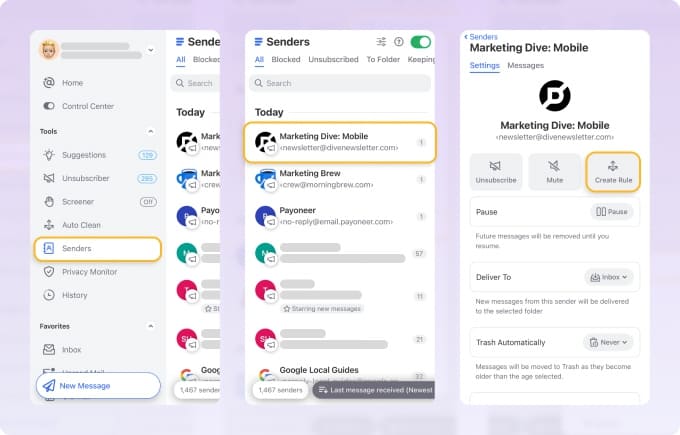
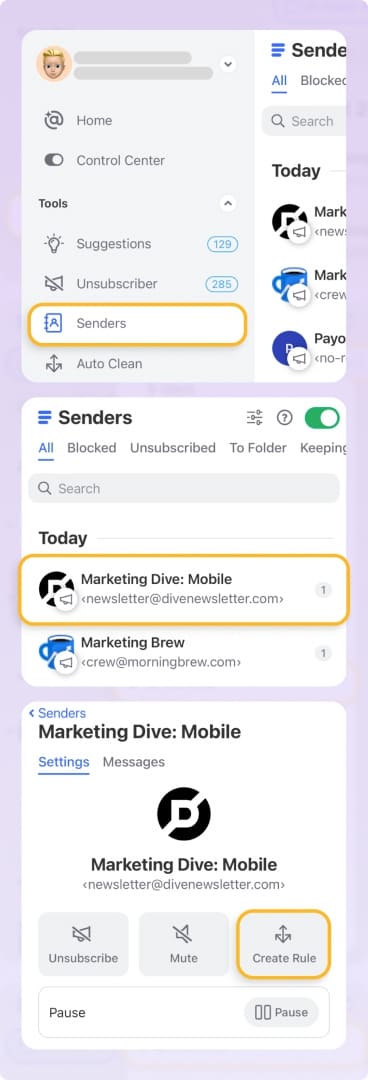
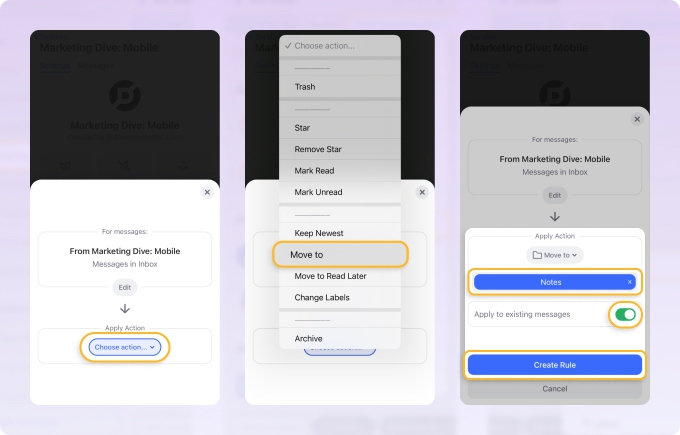
- Select Senders in the menu.
- Pick the sender and click Create Rule.
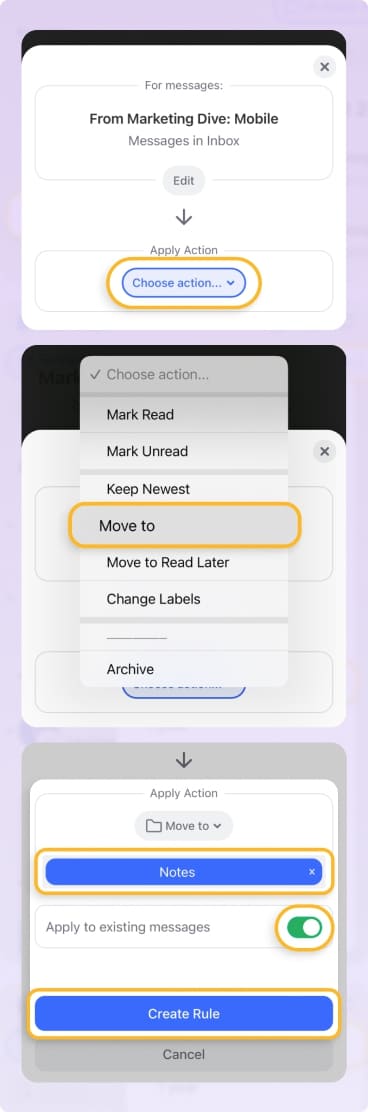
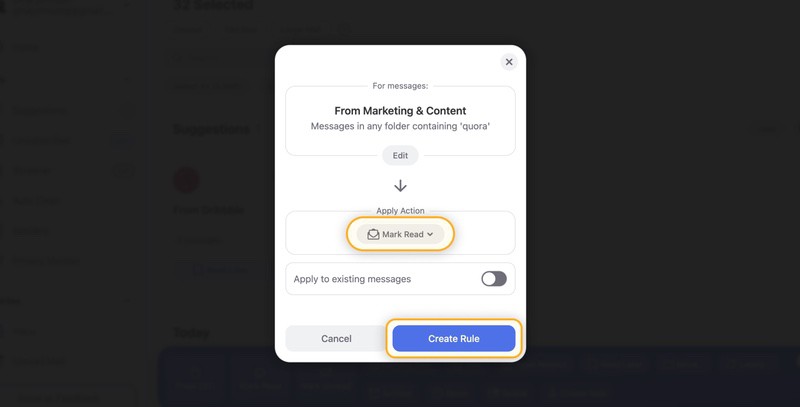
- In the Apply Action section, use the Choose action button to open the drop-down menu and select the desired action, such as Move To.
- Choose a destination folder where you want to move the messages.
- Optionally, turn on the toggle to apply the rule to existing messages and click Create Rule.
Set Up a Rule to Mark or Flag Messages
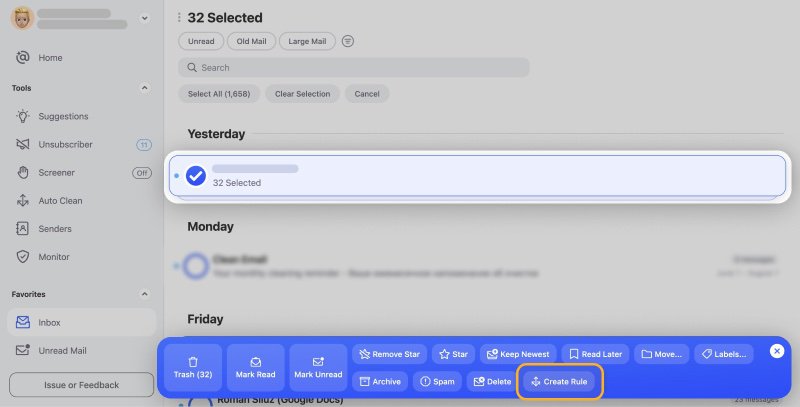
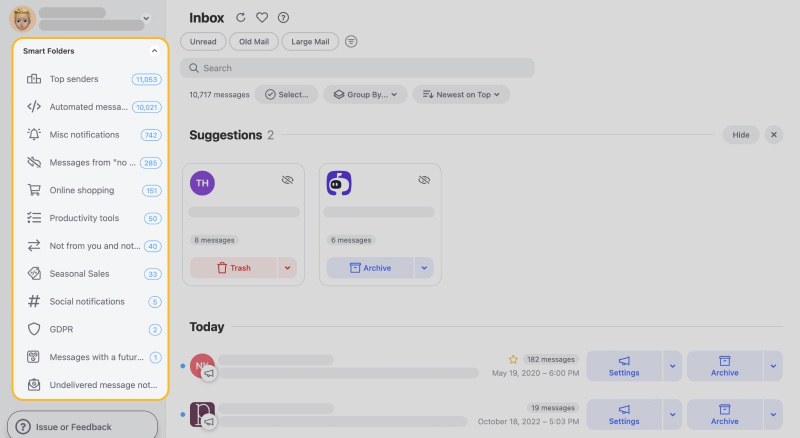
Want to easily mark emails as read or unread? Prefer to automatically flag or unflag related messages? Using Clean Email’s built-in Smart Folders (described below) you can create rules to mark or flag messages in bulk and in just a few steps.
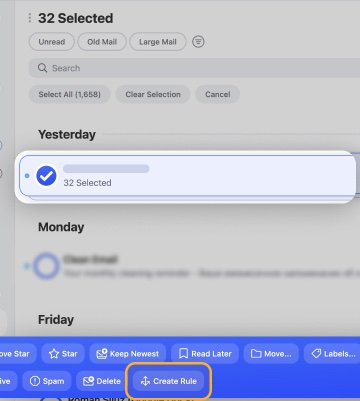
- Expand Smart Folders in the menu and choose a folder or directly go to your Inbox.
- Mark the groups of messages you want to automatically act on.
- Choose Create Rule in the blue action bar at the bottom.
- Use the Choose action drop-down menu to select the action like Mark Read or Flag.
- Optionally apply the rule to existing messages and click Create Rule.
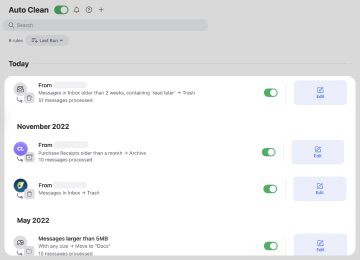
How to Manage Gmail Rules in Clean Email
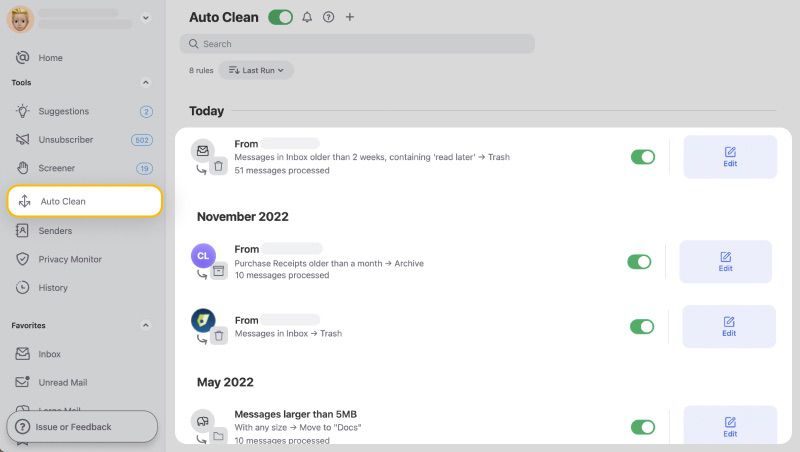
You can view your rules, make changes to them, or delete them completely in Clean Email. Unlike Gmail, you can also temporarily pause rules.
Select Auto Clean in the menu. When your list of rules appears, you can do any of the following:
- Change a rule: Select Edit on the right, make your changes, and click Save.
- Pause a rule: Turn off the toggle to the right of the rule.
- Remove a rule: Select Edit on the right, click Delete, and confirm with Delete.
Flexible Inbox Management with Clean Email
For doing even more with Clean Email, check out these additional mailbox management features.
Smart Folders: See all related emails automatically filtered into 30+ unique folders like Online Shopping, Food Delivery, Newspapers and Magazines, Travel, and more. Smart Folders don’t move your Gmail messages, they just make emails easier to find.
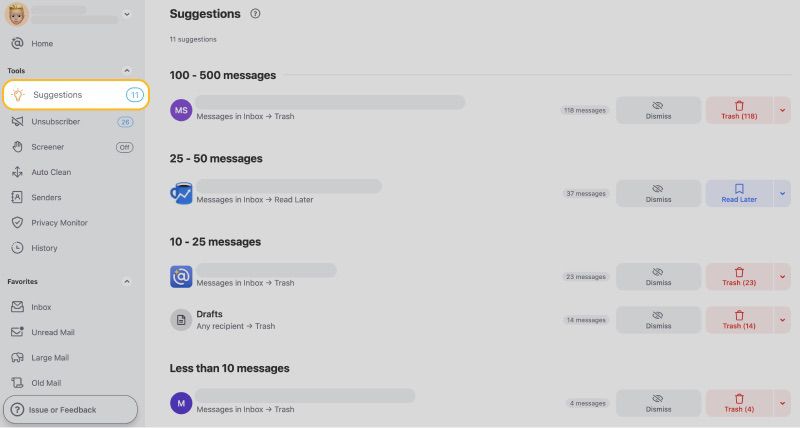
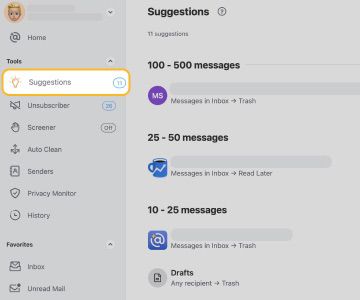
Cleaning Suggestions: Act on groups of messages in bulk with personalized recommendations based on previous behavior. Trash, archive, or mark spam for a group with a single click.
You can use all of the above features and more on all of your devices as well as appreciate Clean Email’s commitment to your privacy and security.
Most Common Rules You Can Apply in Gmail
Once you learn how to make rules in Gmail, you will be able to create all kinds of time-saving automations. Here are some examples:
- Trash: Move matching emails to the Trash folder so they don’t clutter your inbox. Perfect for reclaiming valuable storage space (just don’t forget to empty the Trash folder).
- Mark as spam: Protect yourself from spam and help improve Gmail’s anti-spam filter by marking annoying emails as spam.
- Block: Are there some senders who are bothering you with unwanted messages? Block them so they can’t bother you ever again.
- Archive: Messages you don’t want in your inbox but are not ready to delete them either can be moved to the Archive folder.
- Star emails in Gmail / unstar: Give important messages the Star label to make them stand out from the rest.
- Mark as read/unread: It’s a good idea to automatically mark emails you don’t read as read because it makes the messages you do actually want to read stand out more.
- Move/label: Gmail lets you create an unlimited number of folders (or labels to be exact), and you can move emails to them automatically with Clean Email.
How To Create Rules In Gmail - FAQs
Does Gmail have rules like Outlook?
Yes, Gmail offers a feature similar to Outlook's rules, but they're called filters. You can set up email filters in Google Mail using native features or with the help of an inbox organizer like Clean Email.
What does an email filter or rule do?
That depends entirely on you. An email filter or rule automatically processes incoming emails by sorting them into folders, labeling them, or deleting them based on criteria like sender, subject, or keywords.
Сan you create rules in Gmail?
Yes, you can create rules in Gmail by setting up filters to automatically sort, label, or delete emails based on specified criteria.
Why is it better to create Gmail rules with Clean Email?
It's better to set up Gmail rules with Clean Email because it offers a user-friendly interface and advanced features for organizing, automating, and managing your emails more efficiently than Gmail's native options.
How to export Gmail mail rules?
To export Gmail mail rules, use Google Takeout to download your Gmail data, including filters, as part of your account's settings. You can then import the filters to another Gmail account using the "Import filters" option in settings.


