Cluster-level Logging in Kubernetes with Fluentd
Logs are crucial to help you understand what is happening inside your Kubernetes cluster. Even though most applications have some kind of native logging mechanism out of the box, in the distributed and containerized environment (like Kubernetes), users will be better off with the centralized logging solution. That’s because they need to collect logs from multiple applications with different log formats and send them to some logging backend for subsequent storage, processing, and analysis. Kubernetes provides all the basic resources needed to implement such functionality.
In this tutorial, we explore Kubernetes logging architecture and demonstrate how to collect application and system logs using Fluentd. We also look into some details of the Fluentd configuration language to teach you how to configure log sources, match rules, and output destinations for your custom logging solution. Let’s get started!
Overview of Kubernetes Logging Architecture and Logging Options
Docker containers in Kubernetes write logs to standard output (stdout) and standard (stderr) error streams. Docker redirects these streams to a logging driver configured in Kubernetes to write to a file in JSON format. Kubernetes then exposes log files to users via kubectl logs command. Users can also get logs from a previous instantiation of a container setting the --previous flag of this command to true. That way they can get container logs if the container crashed and was restarted.
However, if a pod is deleted from the node forever, all corresponding containers and their logs are also deleted. The same happens when the node dies. In this case, users are no longer able to access application logs. To avoid this situation, container logs should have a separate shipper, storage, and lifecycle that are independent of pods and nodes. Kubernetes does not provide a native storage solution for log data, but you can easily integrate your preferred logging shipper into the Kubernetes cluster using Kubernetes API and controllers.
In essence, Kubernetes architecture facilitates a number of ways to manage application logs. Several common approaches to consider are:
- using a logging sidecar container running inside an app’s pod.
- using a node-level logging agent that runs on every node.
- push logs directly from within an application to some backend.
Let’s briefly discuss the details of the first and the second approach.
Using Sidecar Containers
Let’s assume you have an application container producing some logs and outputting them to stdout , stderr , and/or a log file. In this case, you can create one or more sidecar containers inside the application pod. The sidecars will be watching for the log file/s and an app’s container stdout/stderr and will stream log data to their own stdout and stderr streams. Optionally, a sidecar container can also pass the retrieved logs to a node-level logging agent for subsequent processing and storage. This approach has a number of benefits described in this great article from the official documentation. Let’s summarize them:
- With sidecar containers, you can separate several log streams from your app container. This is handy when your app container produces logs with different log formats. Mixing different log formats would deteriorate manageability of your logging pipeline.
- Sidecar containers can read logs from those parts of your application that lack support for writing to
stdoutorstderr. - Because sidecar containers use
stdoutandstderr, you can use built-in logging tools likekubectl logs. - Sidecar containers can be used to rotate log files which cannot be rotated by the application itself.
At the same time, however, sidecar containers for logging have certain limitations:
- Writing logs to a file and then streaming them to
stdoutcan significantly increase disk usage. If your application writes to a single file, it’s better to set/dev/stdoutas the destination instead of implementing the streaming sidecar container approach. - If you want to ship logs from multiple applications, you have to design a sidecar(s) for each of them.
Using a Node-Level Logging Agent
In this approach, you deploy a node-level logging agent on each node of your cluster. This agent is usually a container with access to log files of all application containers running on that node. Production clusters normally have more than one nodes spun up. If this is your case, you’ll need to deploy a logging agent on each node.
The easiest way to do this in Kubernetes is to create a special type of deployment called DaemonSet. The DaemonSet controller will ensure that for every node running in your cluster you have a copy of the logging agent pod. The DaemonSet controller will also periodically check the count of nodes in the cluster and spin up/down a logging agent when the node count changes. DaemonSet structure is particularly suitable for logging solutions because you create only one logging agent per node and do not need to change the applications running on the node. The limitation of this approach, however, is that node-level logging only works for applications’ standard output and standard error streams.

Deploying Fluentd to Collect Application Logs
Using node-level logging agents is the preferred approach in Kubernetes because it allows centralizing logs from multiple applications via installation of a single logging agent per each node. We now discuss how to implement this approach using Fluentd deployed as a DaemonSet in your Kubernetes cluster.
We chose Fluentd because it’s a very popular log collection agent with broad support for various data sources and outputs such as application logs (e.g., Apache, Python), network protocols (e.g., HTTP, TCP, Syslog), cloud APIs (e.g AWS Cloud Watch, AWS SQS) and more. Fluentd also supports a variety of output destinations including:
- Log management backends (Elasticsearch, Splunk)
- Big data stores (Hadoop DFS)
- Data archiving (Files, AWS S3)
- PubSub queues (Kafka, RabbitMQ)
- Data warehouses (BigQuery, AWS RedShift)
- Monitoring systems (Datadog)
- Notification systems (email, Slack, etc.)
In this tutorial, we’ll focus on one of the most popular log management backends — Elasticsearch, which offers great full-text search, log aggregation, analysis, and visualization functionality. The Fluentd community has developed a number of pre-set Docker images with the Fluentd configuration for various log backends including Elasticsearch.
We used the DaemonSet and the Docker image from the fluentd-kubernetes-daemonset GitHub repository. There you can also find Docker images and templates for other log outputs supported by Fluentd such as Loggly, Kafka, Kinesis, and more. Using the repository is the simplest way to get you started if you don’t know much about Fluentd configuration.
To complete examples used below, you’ll need the following prerequisites:
- A running Kubernetes cluster. See Supergiant documentation for more information about deploying a Kubernetes cluster with Supergiant. As an alternative, you can install a single-node Kubernetes cluster on a local system using Minikube.
- A kubectl command line tool installed and configured to communicate with the cluster. See how to install kubectl here.
Step 1: Grant Permissions to Fluentd
Fluentd will be collecting logs both from user applications and cluster components such as kube-apiserver and kube-scheduler, so we need to grant it some permissions.
The first thing we need to do is to create an identity for the future Fluentd DaemonSet . Let’s create a new ServiceAccount in the kube-system namespace where Fluentd should be deployed:
apiVersion: v1
kind: ServiceAccount
metadata:
  name: fluentd
namespace: kube-system
Next, let’s grant Fluentd permissions to read, list, and watch pods and namespaces in your Kubernetes cluster. The manifest for the ClusterRole should look something like this:
apiVersion: rbac.authorization.k8s.io/v1beta1
kind: ClusterRole
metadata:
  name: fluentd
  namespace: kube-system
rules:
- apiGroups:
- ""
  resources:
  - pods
  - namespaces
  verbs:
  - get
  - list
  - watch
Finally, we need to bind the Fluentd ServiceAccount to these permissions using the ClusterRoleBinding resource:
kind: ClusterRoleBinding
apiVersion: rbac.authorization.k8s.io/v1beta1
metadata:
  name: fluentd
roleRef:
  kind: ClusterRole
  name: fluentd
  apiGroup: rbac.authorization.k8s.io
subjects:
- kind: ServiceAccount
  name: fluentd
  namespace: kube-system
Let’s save these manifests in the rbac.yml separating them by the ---delimiter and create all resources in bulk:
kubectl create -f rbac.ymlserviceaccount “fluentd” created
clusterrole.rbac.authorization.k8s.io “fluentd” created
clusterrolebinding.rbac.authorization.k8s.io “fluentd” created
Step 2: Deploy a DaemonSet
Fluentd repository contains a working example of the Fluentd DaemonSet, which we can use with some tweaks.
apiVersion: extensions/v1beta1
kind: DaemonSet
metadata:
  name: fluentd
  namespace: kube-system
  labels:
    k8s-app: fluentd-logging
    version: v1
    kubernetes.io/cluster-service: "true"
spec:
  template:
    metadata:
      labels:
        k8s-app: fluentd-logging
        version: v1
        kubernetes.io/cluster-service: "true"
    spec:
      serviceAccount: fluentd
      serviceAccountName: fluentd
      tolerations:
      - key: node-role.kubernetes.io/master
        effect: NoSchedule
      containers:
      - name: fluentd
        image: fluent/fluentd-kubernetes-daemonset:elasticsearch
        env:
        - name:  FLUENT_ELASTICSEARCH_HOST
          value: "f505e785.qb0x.com"
        - name:  FLUENT_ELASTICSEARCH_PORT
          value: "30216"
        - name: FLUENT_ELASTICSEARCH_SCHEME
          value: "https"
        - name: FLUENT_UID
          value: "0"
        # X-Pack Authentication
        # =====================
        - name: FLUENT_ELASTICSEARCH_USER
          value: "abf54990f0a286dc5d76"
        - name: FLUENT_ELASTICSEARCH_PASSWORD
          value: "75c4bd6f7b"
        resources:
          limits:
            memory: 200Mi
          requests:
            cpu: 100m
            memory: 200Mi
        volumeMounts:
        - name: varlog
          mountPath: /var/log
        - name: varlibdockercontainers
          mountPath: /var/lib/docker/containers
          readOnly: true
      terminationGracePeriodSeconds: 30
      volumes:
      - name: varlog
        hostPath:
          path: /var/log
      - name: varlibdockercontainers
        hostPath:
          path: /var/lib/docker/containers
There are several parts in this configuration to pay attention to:
- The
DaemonSetusesfluent/fluentd-kubernetes-daemonset:elasticsearchDocker image specifically configured with the Elasticsearch as the Fluentd output. - You should provide some environmental variables in order to connect to your Elasticsearch cluster. These are your Elasticsearch host, port, and credentials (username, password). You can connect to either Elasticsearch deployed in the Kubernetes cluster or remote Elasticsearch cluster as in this example (we used a Qbox-hosted Elasticsearch cluster)
- Fluentd needs root permission to read logs in
/var/logand writepos_fileto/var/log. To avoid permission error, setFLUENT_UIDenvironment variable to0in yourDaemonSetmanifest
Let’s save the manifest in the fluentd-elasticsearch.yml and create the DaemonSet:
kubectl create -f fluentd-elasticsearch.ymlIf you are running a single-node cluster with Minikube as we did, the DaemonSet will create one Fluentd pod in the kube-system namespace. You can find its name using kubectl get pods --namespace=kube-system and use kubectl logs <fluentd-pod-name> to see its logs:
Almost immediately, Fluentd will connect to Elasticsearch using the provided host and credentials:
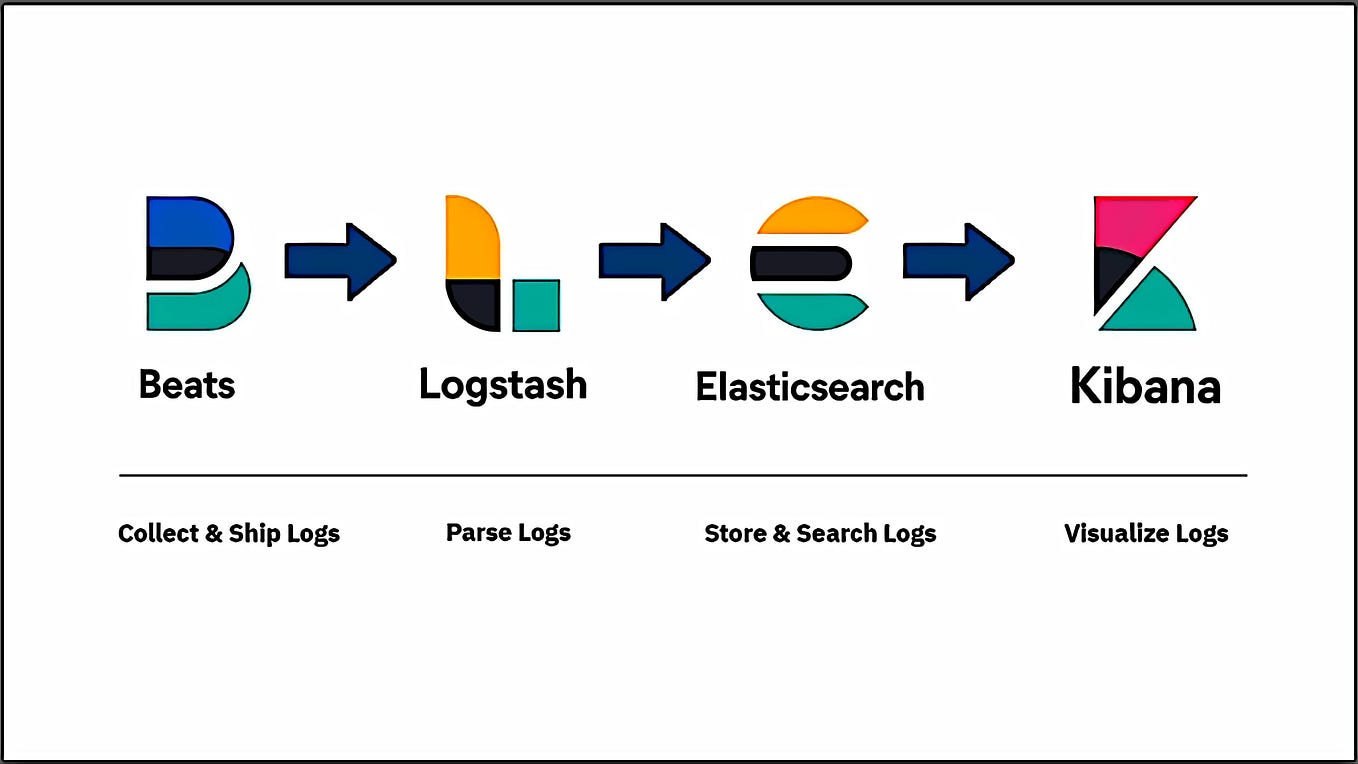
2018–09–11 09:20:05 +0000 [info]: Connection opened to Elasticsearch cluster => {:host=>”f505e785.qb0x.com”, :port=>30216, :scheme=>”https”, :user=>”abf54990f0a286dc5d76", :password=>”obfuscated”}To see the logs collected by Fluentd, let’s log into the Kibana dashboard. Under the Management -> Index Patterns -> Create New Index Pattern , you’ll find a new Logstash index generated by the Fluentd DaemonSet. Under the hood, Fluentd uses Logstash as the intermediary log shipper to pass logs to Elasticsearch. After configuring a new index pattern, you’ll be able to access your app logs under the Discover tab (see the image below).

Here, you’ll see a number of logs generated by your Kubernetes applications and Kubernetes system components. A common log document created by Fluentd will contain a log message, the name of the stream that generated the log, and Kubernetes-specific information such as the namespace, the Docker container ID, pod ID, and labels (see the example below).
log:INFO: == Kubernetes addon reconcile completed at 2018-09-11T09:31:39+0000 ==
stream:stdout docker.container_id:9b596c9195003246af0f71406f05ab4d339601dadc213048202992739fe9267e
kubernetes.container_name:kube-addon-manager
kubernetes.namespace_name:kube-system
kubernetes.pod_name:kube-addon-manager-minikube
kubernetes.pod_id:f6d8ff9d-8a6e-11e8-9e55-0800270c281a kubernetes.labels.component:kube-addon-manager
kubernetes.labels.version:v8.6
Making Sense of Fluentd Configuration Syntax
In the previous example, we used a pre-set Fluentd configuration for Elasticsearch, so we did not have to go into details of the Fluentd configuration syntax. If you wish to know more about how to configure Fluentd sources, output destinations, filters, and more, please consult the official Fluentd documentation.
Just to help you get a basic idea of the Fluentd configuration syntax, we’ll show you how to configure some log sources, outputs, and match rules and to mount a custom Fluentd ConfigMap to your Fluentd DaemonSet.
In general, The Fluentd configuration file can include the following directives:
- Source directives define the input sources (e.g Docker, Ruby on Rails).
- Match directives define the output destinations.
- Filter directives determine the event processing pipelines.
- System directives set system-wide configuration.
- Label directives group the output and filters for internal routing.
- @include directives include other files.
Let’s take a look at common Fluentd configuration options for Kubernetes. You can find a full example of the Kubernetes configuration in the kubernetes.conf file from the official GitHub repository.
<match **>
  @type stdout
</match>
<match fluent.**>
  @type null
</match>
<match docker>
  @type file
  path /var/log/fluent/docker.log
  time_slice_format %Y%m%d
  time_slice_wait 10m
  time_format %Y%m%dT%H%M%S%z
  compress gzip
  utc
</match><source>
  @type tail
  @id in_tail_container_logs
  path /var/log/containers/*.log
  pos_file /var/log/fluentd-containers.log.pos
  tag kubernetes.*
  read_from_head true
<% if is_v1 %>
  <parse>
    @type json
    time_format %Y-%m-%dT%H:%M:%S.%NZ
  </parse>
<% else %>
  format json
  time_format %Y-%m-%dT%H:%M:%S.%NZ
<% end %>
</source>
The first three blocks of the configuration above are match directives. These directives filter logs by name or provider and specify the output destination for them using the @type variable. For example, the first match directive selects all logs using ** glob pattern and sends them to the Fluentd stdout making them accessible via kubectl logs <fluentd-pod> command.
As in the second match directive, we can use the output @type null to ignore certain logs. In this case, we exclude internal Fluentd logs. Finally, in the third match directive, we filter Docker logs and write them to /var/log/fluent/docker.log . Inside the directive’s body, we can also set file compression type, log format, and other useful options.
The final block of the configuration above includes the source directive. This directive tells Fluentd where to look for logs. In our example, we tell Fluentd that containers in the cluster log to /var/log/containers/*.log . We set @type to tail , so Fluentd can tail these logs and retrieve messages for each line of the log file. Finally, we specify a position file that Fluentd uses to bookmark its place within the logs.
You can experiment with these configuration options configuring Fluentd to send various log types to any output destination you prefer. For example, to send all logs that match fluent pattern to the file /var/log/my-fluentd.log you can use the following match directive:
<match fluent.**>
  @type file
  path /var/log/my-fluentd.log
  time_slice_format %Y%m%d
  time_slice_wait 10m
  time_format %Y%m%dT%H%M%S%z
  compress gzip
  utc
</match>
For a full list of supported output destination, please consult the official Fluentd documentation.
The Fluentd Docker image we used in the first part of this tutorial ships with the default Fluentd configuration stored in the /fluentd/etc/ directory. To change the default configuration, you need to mount your custom Fluentd configuration for Kubernetes using the ConfigMap volume.
You can save the custom configuration we created above or your own config in the kubernetes.conf and create the ConfigMap with the following command:
kubectl create configmap fluentd-conf --from-file=kubernetes.conf --namespace=kube-systemNote: Fluentd ConfigMap should be saved in the kube-system namespace where your Fluentd DaemonSet will be deployed.
Once the ConfigMap is created, let’s modify our Fluentd DaemonSet manifest to include the ConfigMap .
apiVersion: extensions/v1beta1
kind: DaemonSet
metadata:
  name: fluentd
  namespace: kube-system
  labels:
    k8s-app: fluentd-logging
    version: v1
    kubernetes.io/cluster-service: "true"
spec:
  template:
    metadata:
      labels:
        k8s-app: fluentd-logging
        version: v1
        kubernetes.io/cluster-service: "true"
    spec:
      serviceAccount: fluentd
      serviceAccountName: fluentd
      tolerations:
      - key: node-role.kubernetes.io/master
        effect: NoSchedule
      containers:
      - name: fluentd
        image: fluent/fluentd:v1.2-debian
        resources:
          limits:
            memory: 200Mi
          requests:
            cpu: 100m
            memory: 200Mi
        volumeMounts:
        - name: config-volume
          mountPath: /fluentd/etc/kubernetes.conf
          subPath: kubernetes.conf
        - name: varlog
          mountPath: /var/log
        - name: varlibdockercontainers
          mountPath: /var/lib/docker/containers
          readOnly: true
      terminationGracePeriodSeconds: 30
      volumes:
      - name: config-volume
        configMap:
          name: fluentd-conf
      - name: varlog
        hostPath:
          path: /var/log
      - name: varlibdockercontainers
        hostPath:
          path: /var/lib/docker/containers
As you see, we created a new ConfigMap volume with our custom Fluentd configuration and mounted it at /fluentd/etc/kubernetes.conf path in the container. Before creating this DaemonSet, please ensure that the old one is deleted.
Conclusion
All things considered, Kubernetes platform facilitates implementation of full logging pipelines by providing such useful abstractions as DaemonSets and ConfigMaps . We saw how to easily implement cluster-level logging using node agents deployed as DaemonSets. Fluentd is one of the best logging solutions for Kubernetes because it ships with excellent Kubernetes plugins and filtering capabilities.
In this tutorial, we demonstrated how Fluentd can easily centralize logs from multiple applications and instantly send them to Elasticsearch or any other output destination. Unlike sidecar containers that should be created for each application running in your cluster, node-level logging with Fluentd requires only one logging agent per node.
In a subsequent tutorial, we’ll continue the discussion of Fluent log solutions focusing on the Fluent Bit, a lightweight alternative to Fluentd suitable for log collection in highly distributed compute environments with high CPU and memory constraints. Stay tuned to our blog to find out more!
Originally published at supergiant.io.