The Making of a GMO Crop
Summary
Overview
Students will compare and contrast methods of selective plant breeding, describe the scientific process of creating a genetically modified plant, compare genetically modified soybean seeds to conventional soybean seeds, describe the impact weeds have on plant growth, and understand how a genetically modified seed can help farmers manage weeds.
NGSS Alignment
This lesson helps students prepare for these Next Generation Science Standards Performance Expectations:- HS-LS1-1. Construct an explanation based on evidence for how the structure of DNA determines the structure of proteins, which carry out the essential functions of life through systems of specialized cells.
- HS-LS3-1. Ask questions to clarify relationships about the role of DNA and chromosomes in coding the instructions for characteristic traits passed from parents to offspring.
|
Science & Engineering Practices
Constructing Explanations and Designing Solutions.
Constructing explanations and designing solutions in 9-12 builds on K-8 experiences and progresses to explanations and designs that are supported by multiple and independent student-generated sources of evidence consistent with scientific ideas, principles, and theories.
Construct an explanation based on valid and reliable evidence obtained from a variety of sources (including students' own investigations, models, theories, simulations, peer review) and the assumption that theories and laws that describe the natural world operate today as they did in the past and will continue to do so in the future. Asking Questions and Defining Problems. Asking questions and defining problems in 9-12 builds on K-8 experiences and progresses to formulating, refining, and evaluating empirically testable questions and design problems using models and simulations. Ask questions that arise from examining models or a theory to clarify relationships. |
Disciplinary Core Ideas
LS1.A: Structure and Function.
Systems of specialized cells within organisms help them perform the essential functions of life.
All cells contain genetic information in the form of DNA molecules. Genes are regions in the DNA that contain the instructions that code for the formation of proteins, which carry out most of the work of cells. (Note: This Disciplinary Core Idea is also addressed by HS-LS3-1.) LS3.A: Inheritance of Traits. Each chromosome consists of a single very long DNA molecule, and each gene on the chromosome is a particular segment of that DNA. The instructions for forming species' characteristics are carried in DNA. All cells in an organism have the same genetic content, but the genes used (expressed) by the cell may be regulated in different ways. Not all DNA codes for a protein; some segments of DNA are involved in regulatory or structural functions, and some have no as-yet known function. |
Crosscutting Concepts
Structure and Function.
Investigating or designing new systems or structures requires a detailed examination of the properties of different materials, the structures of different components, and connections of components to reveal its function and/or solve a problem.
Cause and Effect. Empirical evidence is required to differentiate between cause and correlation and make claims about specific causes and effects. |
Materials Needed
Preparation Note: While not required, it is highly recommended (for a greater "wow" factor) that you plant and grow conventional and GM soybean seeds to the stage of first or second true leaves (about three weeks) and conduct the Leaf Test Lab as outlined in Activity 4. Many students have never grown a plant let alone conducted a test to determine if it contains a protein signifying that it has been genetically engineered. For this lesson to flow in your classroom, it is suggested that you plant the soybean seeds as you complete Activity 1 and then circle back to Activity 4 when the soybean plants have true leaves to complete the lesson. Planting instructions are found in Activity 4. If time does not allow you to grow the seeds, the GM Soybean Seed lab (in Activity 4) will also demonstrate the same concept, but with less "wow." Safety Note: Let students know that they will be working with soybeans and if they have a soybean allergy please take precautions.
Interest Approach:
- What is the Difference? survey (administered with Kahoot!) and student devices for participation
Activity 1: Crops vs. Weeds Simulation
- 3 different colored poker chips or fuzzy pompoms
- Blue = water (10-25)
- Red = sun (10-25)
- Black = fertilizer (10-25)
- 3 bags to hold chips/pompoms
- Basket
- Colored cards
- Red = weed (enough for 75% of your class)
- Green = planted crop (enough for 25% of your class)
Activity 2: Methods of Crop Modification
- Crop Modification Interactive Notebook Pages, 1 set of layered tabs per student, printed one-sided
- Note: page one is formatted to provide copies for 4 students per page; page two, 2 students per page; page three, 1 student per page
- Scissors and tape, glue, or staplers
- Interactive notebooks OR blank sheet of paper, 1 per student
- Comparing Methods of Genetic Modification in Plants Table
Activity 3: How Are GMOs Created?
- How to Create a GMO Interactive Notebook Page, 1 copy per student, printed front and back
- Scissors and tape, glue, or staplers
- Interactive notebooks OR blank sheet of paper, 1 per student
- Creating the Roundup Ready Soybean handout, 1 per student
Activity 4: How Do You Know it's a GMO?
GM Soybean Seed Test Lab
- GM Soybean Seed kit, 1 per class for a classroom demonstration, or 1 per group to allow students to perform test
- 1% PBS buffer or distilled water, 1 mL per test
- Access to tweezers/scoopula, paper towels, hammer/mallet, and 50-70% ethanol (to clean tweezers or forceps between sample preps if needed)
GM Soybean Leaf Test Lab
- GM Leaf Test kit, 1 per class for a classroom demonstration, or 1 per group to allow students to perform test
- Seed starting tray and insert
- Soil- peat based germination mix
Essential Files (maps, charts, pictures, or documents)
Vocabulary Words
Agrobacterium tumefaciens: a rod-shaped, gram-negative soil bacterium which can be used to introduce new genes into a plant cell
cross breeding: the intentional breeding of a plant or animal with another breed, species, or variety
farming: the activity or business of growing crops and raising livestock
genetically engineered (GE): an organism or crop whose characteristics have been deliberately modified by manipulating its genetic material
genetically modified (GM): an organism or crop containing genetic material that has been artificially altered so as to produce a desired characteristic
genetically modified organism (GMO): an organism whose genome has been altered by adding one or more genes
genotype: the genetic constitution of an individual organism
glyphosate: a synthetic compound (herbicide) commonly used to kill weeds (unwanted plants)
herbicide: a substance that is toxic to plants and is used to kill unwanted vegetation
mutagenesis: a process by which genetic information of an organism is changed, resulting in a mutation which can occur spontaneously or as a result of intentional exposure to mutagens
particle gun bombardment: a method by which foreign substances such as DNA are introduced into living cells and tissues via high-velocity microprojectiles
phenotype: the set of observable characteristics of an organism resulting from the interaction of its genotype with the environment
polyploidy: cells and organisms containing more than two paired (homologous) sets of chromosomes
protoplast: a plant, bacterial, or fungal cell that had its cell wall completely or partially removed using either mechanical or enzymatic means
protoplast fusion: a type of genetic modification in plants when two distinct species are fused together to form a new hybrid; also known as "somatic fusion"
Roundup herbicide: systemic herbicide and crop desiccant containing Glyphosate used to kill weeds especially annual broadleaf weeds and grasses
tolerant: ability of a plant or animal to endure
transformation: the introduction of exogenous genes into plant cells, tissues, or organs
transgenesis: the process of introducing an exogenous gene, called a transgene, to a living organism
transgenic: an organism that contains genetic material (DNA) from an unrelated organism
Background
There are many ways to modify the genes or genome of plants and other living things. These genetic modification tools vary based on which method is needed for acquiring specific traits. This lesson introduces various methods of plant modification and demonstrates a scientific process used to create a genetically modified organism (GMO). While GMOs are a topic of sociatal debate, this lesson focuses solely on the scientific method and biological processes involved in the development of a transgenic plant.
There are many terms and acronyms used to describe genetically modified organisms or biotechnologies applied in plant science. Genetically engineered (GE), genetically modified (GM), and transgenic are three adjectives used to describe an organism that has a copy of a gene not previously found in the species.
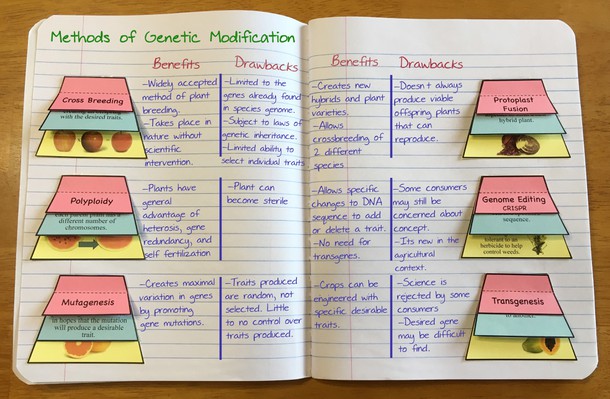
Methods of Crop Modification
Plant breeding and the domestication of plants dates back 9,000 to 11,000 years ago when humans initially began the practice of farming. The introduction of farming allowed civilizations to stay in one place, rather than hunting and gathering their food on a constant move. Early farmers selected food plants with desirable characteristics to cultivate and provide their food supply. With each generation, plants with the best characteristics were chosen and crops improved. Knowledge of science and genetics advanced through the work of scientists such as Gregor Mendel. The crops we eat today have been improved over the years using these crop modification techniques:
- Cross breeding has been practiced since the beginning of farming and utilizes the laws of inheritance to guide the specific selection of desirable traits in plants. After a desirable plant is selected, the pollen from one plant is placed on the female portion of the flower of another desirable plant which leads to the production of seeds that are hybrids of the two parent plants. This process is repeated with each generation of plants slowly moving toward an improved species. Plants with chosen characteristics are perpetuated and those without are removed.
- Genetic mutations occur naturally and randomly in the genomes of plants and animals. These result from the spontaneous deletion, addition, or insertion of base units in DNA. Mutagenesis is a plant breeding method which utilizes mutations as a method of creating genetic diversity. Plant breeders expose plants to mutating chemicals or radioactivity to increase the likelihood of mutations to occur which may create desirable characteristics in plants.
- Polyploidy is the occurrence of more than two sets of chromosomes. It can occur naturally or be induced through the use of chemicals. Polyploidy can increase fruit size or be used to create sterile varieties of a plant such as a seedless watermelon.
- Protoplast fusion is an artificial version of cross breeding that fuses the pollen of one plant species with the ova in the flower of another species. This allows the moving of beneficial traits from one species to another by fusing the protoplasts.
- Transgenesis is the process of introducing one or more genes into an organism from another entirely separate organism by finding and isolating a chosen gene and adding it to the genome.
- Genome editing uses an enzyme to change the DNA of a cell at a specified sequence. CRISPR-Cas9 is a specific gene editing tool that helps plant breeders integrate desirable traits with more efficiency and precision than before. It is a promising and developing technology. CRISPR is now being studied for its medical benefits to decrease human diseases as well as to improve the food we eat. An example of a food crop edited with CRISPR technology is the non-browning mushroom.
Plant breeders often use one or more modification methods before ultimately achieving their goal. Each method of plant modification comes with both advantages and disadvantages or limitations. Not every method will be effective in every situation. Regardless of the method or methods used, all plants are screened for overall safety before a seed variety is available on a commercial level.
| Modification Method | Advantages | Disadvantages/Limitations |
| Cross Breeding |
|
|
| Mutagenesis |
|
|
| Polyploidy |
|
|
| Protoplast Fusion |
|
|
| Transgenesis |
|
|
| Genome Editing (CRISPR) |
|
|
How GMOs Are Created
Every living organism is made from the instructions encoded in strands of DNA contained in its cells. Changes in this genetic code distinguish one species from another (a cow from a corn plant), as well as one trait from another within a species (a cow with a black coat verses a cow with a red coat). Found within the genome of every species is a series of traits and characteristics. Traits manifested through an organism’s phenotype include colors, sizes, and other observable characteristics. Other characteristics such as drought tolerance, resistance to disease, or resistance to chemicals (such as herbicides) are also found within the genotype of an organism. These genetic characteristics are passed from parent to offspring following the basic rules of inheritance originally discovered by Gregor Mendel.
The steps for creating a GMO, without CRISPR technology, include the following:
- The genetic trait of interest is identified in an organism. The gene must first exist in the genome of another organism such as a plant or bacteria.
- Once the gene responsible for the desired trait is found in a genome, it is isolated.
- The chosen gene is then inserted into a plasmid using enzymes.
- Using the process of transformation, the plasmid containing the new gene is inserted into the genome of the plant using protoplasts, plant embryo, or leaf tissue. There are two methods of introducing new genetic material.
- The particle bombardment method uses a device commonly known as a gene gun. The gene gun shoots metal particles coated with DNA (containing the gene responsible for the trait identified in step one and two above) into the plant tissue.
- Another method uses a bacteria called Agrobacterium tumefaciens. This bacterium naturally invades plant tissue and alters plants by inserting pieces of its own DNA into the plants genome. This natural process can be used to transfer the transgenic gene into the genome of the desired plant.
- Once the gene is inserted into the genome of the plant, it is grown. These early stages of plant growth take place in the controlled environment of a greenhouse. As the plant grows, it is carefully observed. In time, scientists will discover if the desired gene was successfully adopted into the genome of the plant.
- If the newly engineered plant variety contains the desired gene and the adopted trait is successful in its function, the newly engineered seeds are then cross pollinated and the resulting plant offspring are observed for the successful inheritance of the desired trait. The regulatory process will follow to make the seeds commercially available to farmers.
Regulatory Process
After a genetically engineered plant is developed, the plant goes through an in-depth series of regulatory tests and trials which are evaluated by the USDA, FDA, and EPA in the United States to determine that the plant and the transgenic gene does not impact the environment in an unintended way or negatively alter the nutritional qualities of the resulting food or animal feed. For example, non-target insects such as pollinators and butterflies are carefully observed to ensure there aren’t any unintended environmental consequences from the newly engineered genome of the plant. Once all regulatory processes are complete, the plant can be approved for commercial use. These regulatory processes are normally carried out by each country that may want to import the seeds to plant or even the foods made from the genetically engineered plant.
The entire process of creating a genetically engineered plant from discovery of the trait to the launch of the seed variety takes several years and can cost millions of dollars.
Weeds and Crop Growth
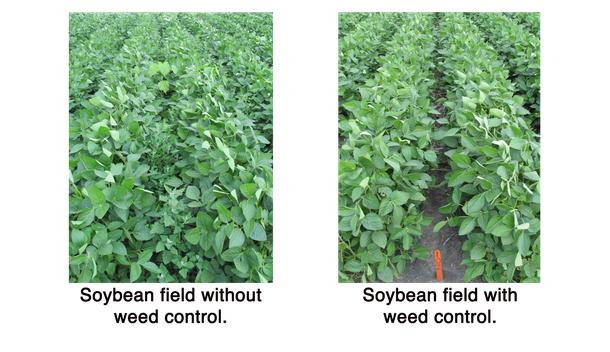
Weed management is an important factor in agricultural production that impacts crop yield (the amount of a crop that is produced and harvested). Uncontrolled weeds reduce the quantity and quality of a planted crop. Nutrients (found in the soil) and water are necessary, but limited, natural resources for healthy plant growth. Weeds (unwanted plants) compete with planted crops for water and nutrients, thus decreasing the overall harvest and decreasing the efficient use of natural resources.
Farmers can use a variety of weed control methods. There are five general categories of weed control: including preventative, cultural, mechanical, biological, and chemical (with or without biotechnology). Weeds are a constant challenge for farmers, and herbicides are a primary tool for farmers to control weeds and maximize crop yields.
The Roundup Ready® soybean was developed in 1990 using biotechnology and became commercially available to farmers in 1996, To develop the Roundup Ready® soybean, scientists isolated the 5-enolpyruvylshikimate-3-phosphate synthase (CP4 EPSPS) gene from a naturally occurring microbe (Agrobacterium sp. strain CP4) and used particle gun bombardment plant transformation to insert the gene into the genome of soybean (Glycine max). The gene allows the soybean to produce the CP4 EPSPS enzyme that confers tolerance to the herbicide glyphosate, commercially known as Roundup®.
The Roundup Ready® soybean was developed to help farmers manage weeds in their fields. When weeds are left to compete with soybeans for the entire growing season, yield losses can exceed 75 percent. Nearly all soybean fields receive some type of herbicide treatment. Scientists developed the Roundup Ready® soybean technology as a tool to help farmers control weeds in soybean fields. To develop the Roundup Ready® soybean, scientists isolated the 5-enolpyruvylshikimate-3-phosphate synthase (CP4 EPSPS) gene from a naturally occurring microbe (Agrobacterium sp. strain CP4) and used particle gun bombardment plant transformation to insert the gene into the genome of soybean (Glycine max). The gene allows the soybean to produce the CP4 EPSPS enzyme that confers tolerance to the herbicide glyphosate, commercially known as Roundup® In recent years there have been inquiries into the safety of glyphosate for humans. This lesson will not cover that aspect but can be expanded to have students read the literature and draw their own conclusions.
Comparing Conventional and GM Soybean
In this lesson students will be comparing the conventional and GM soybeans. Students will examine and compare the seeds as well as the growing plants. There is no visual difference between these two varieties of soybean. The seeds and growing plants will, from a phenotypic standpoint, appear fundamentally the same.
The key difference between the Roundup Ready® and the conventional seed is that the Roundup Ready® soybean contains the CP4 EPSPS gene. This gene makes the plant tolerant to glyphosate herbicide. The presence of the protein CP4 EPSPS can be verified through a lateral flow immunoassay test. This type of test indicates the presence of a protein and is used for many applications, including in-home diagnostic tests like a home pregnancy test. The biotech industry uses lateral flow immunoassay tests in the process of selecting traits in plant breeding, for quality control and purity testing of seed batches, and to support GMO labeling. The technique employs the use of protein specific antibodies that bind to a protein (antigen) that is produced by the GMO plant. This protein is produced as a result of the inserted DNA in the transgenic plant, and it is not present in the conventional plant.
Procedures
Activity 1: Crops vs. Weeds Simulation

- Ask students to brainstorm and list ways that farming could be considered a gamble. Students may list factors in agricultural production that are outside of the farmer’s control such as the weather, weed or insect infestation, and market prices. In addition, farmers make dozens of decisions each day that determine the success or failure of their crop. Unlike the weather, these factors are in their control. Examples include choosing which type of seed to plant, seed source, fertilizer type and application, equipment, herbicides, insecticides, and fungicides.
- Point out that some farmers choose a seed that helps control the weeds that would grow in their field.
- Explain to students that they are going to do a simulation illustrating why farmers need to control the weed growth in their fields. Each of them will represent a plant. Some will be a planted crop and others will be weeds. Distinguish between a desired plant and a weed by explaining that weeds are plants that are not desired in a specific growing area. For example, corn growing in a soybean field would be considered a weed.

It's critical for students to understand that weeds in a field of crops are not just undesirable for aesthetic reasons. Weeds reduce overall crop yield and use limited natural resources such as water and nutrients found in the soil. - Choose an open area to represent a field where your students (plants) are growing. A vacant hallway, outdoor space, or any other large space works well. Explain to students that plants have roots and cannot move to a new location. Throughout the simulation students cannot move their feet, but they can move their arms.
- Complete Round 1:
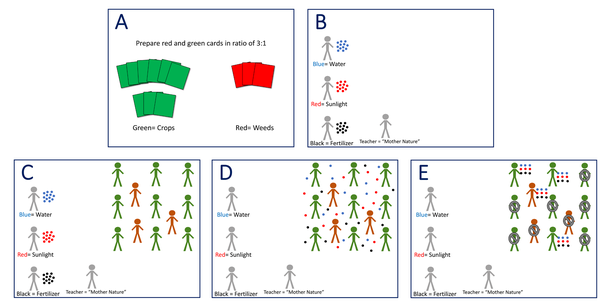
- Before class, prepare sample green and red cards in a 3:1 ratio to account for the number of students in your class. These cards will help divide your class by assigning 75 percent to be crop plants and 25 percent to be weeds (green=planted crop, red=weed).
- Explain that you (the teacher) will play the role of “Mother Nature.” Choose three students from your class to represent the resources of rain, sunlight, and fertilizer. Give each student the poker chips representing their resource (blue=water, red=sunlight, black=fertilizer).
- Pass out the green and red cards at random to the remaining members of your class. Line up the students with green cards in rows to simulate a field of planted crop. Students should be far enough apart that they cannot touch when arms are extended. Students with red cards will then “plant” themselves anywhere in the field at random.
- Instruct the three students representing resources to sprinkle their “chips” around the feet of the students representing crops and weeds. They should do so after your prompt. For example, “Water, you may make it rain a lot.” [wait a couple of seconds for students to drop blue chips on the floor]. “Okay, the rainstorm is over.” [water stops tossing blue chips.] Continue similar prompts for sunlight and fertilizer. Students (crops and weeds) will scramble to pick up as many poker chips as they can without moving their feet (roots).
- Note that the three students representing resources may move around as they please during the simulation. For example, one section of the field may receive a lot of sun but no water.
- At the end of the round, students who have exactly three of each color may stay standing and go to “harvest.” Students who did not collect three of each chip should sit down to represent the plant dying due to a lack of resources.
- Note that too much rain, fertilizer, or sun can damage plants.
- Round 2: Repeat steps outlined above, except begin with 50 percent of the students representing weeds and 50 percent representing planted crops.
- Round 3: Repeat steps outlined above, except begin with 75 percent weeds and 25 percent planted crops.
- Conclude the activity with questions such as:
- What resources/elements do plants need to survive? (Sunlight, water, and soil nutrients)
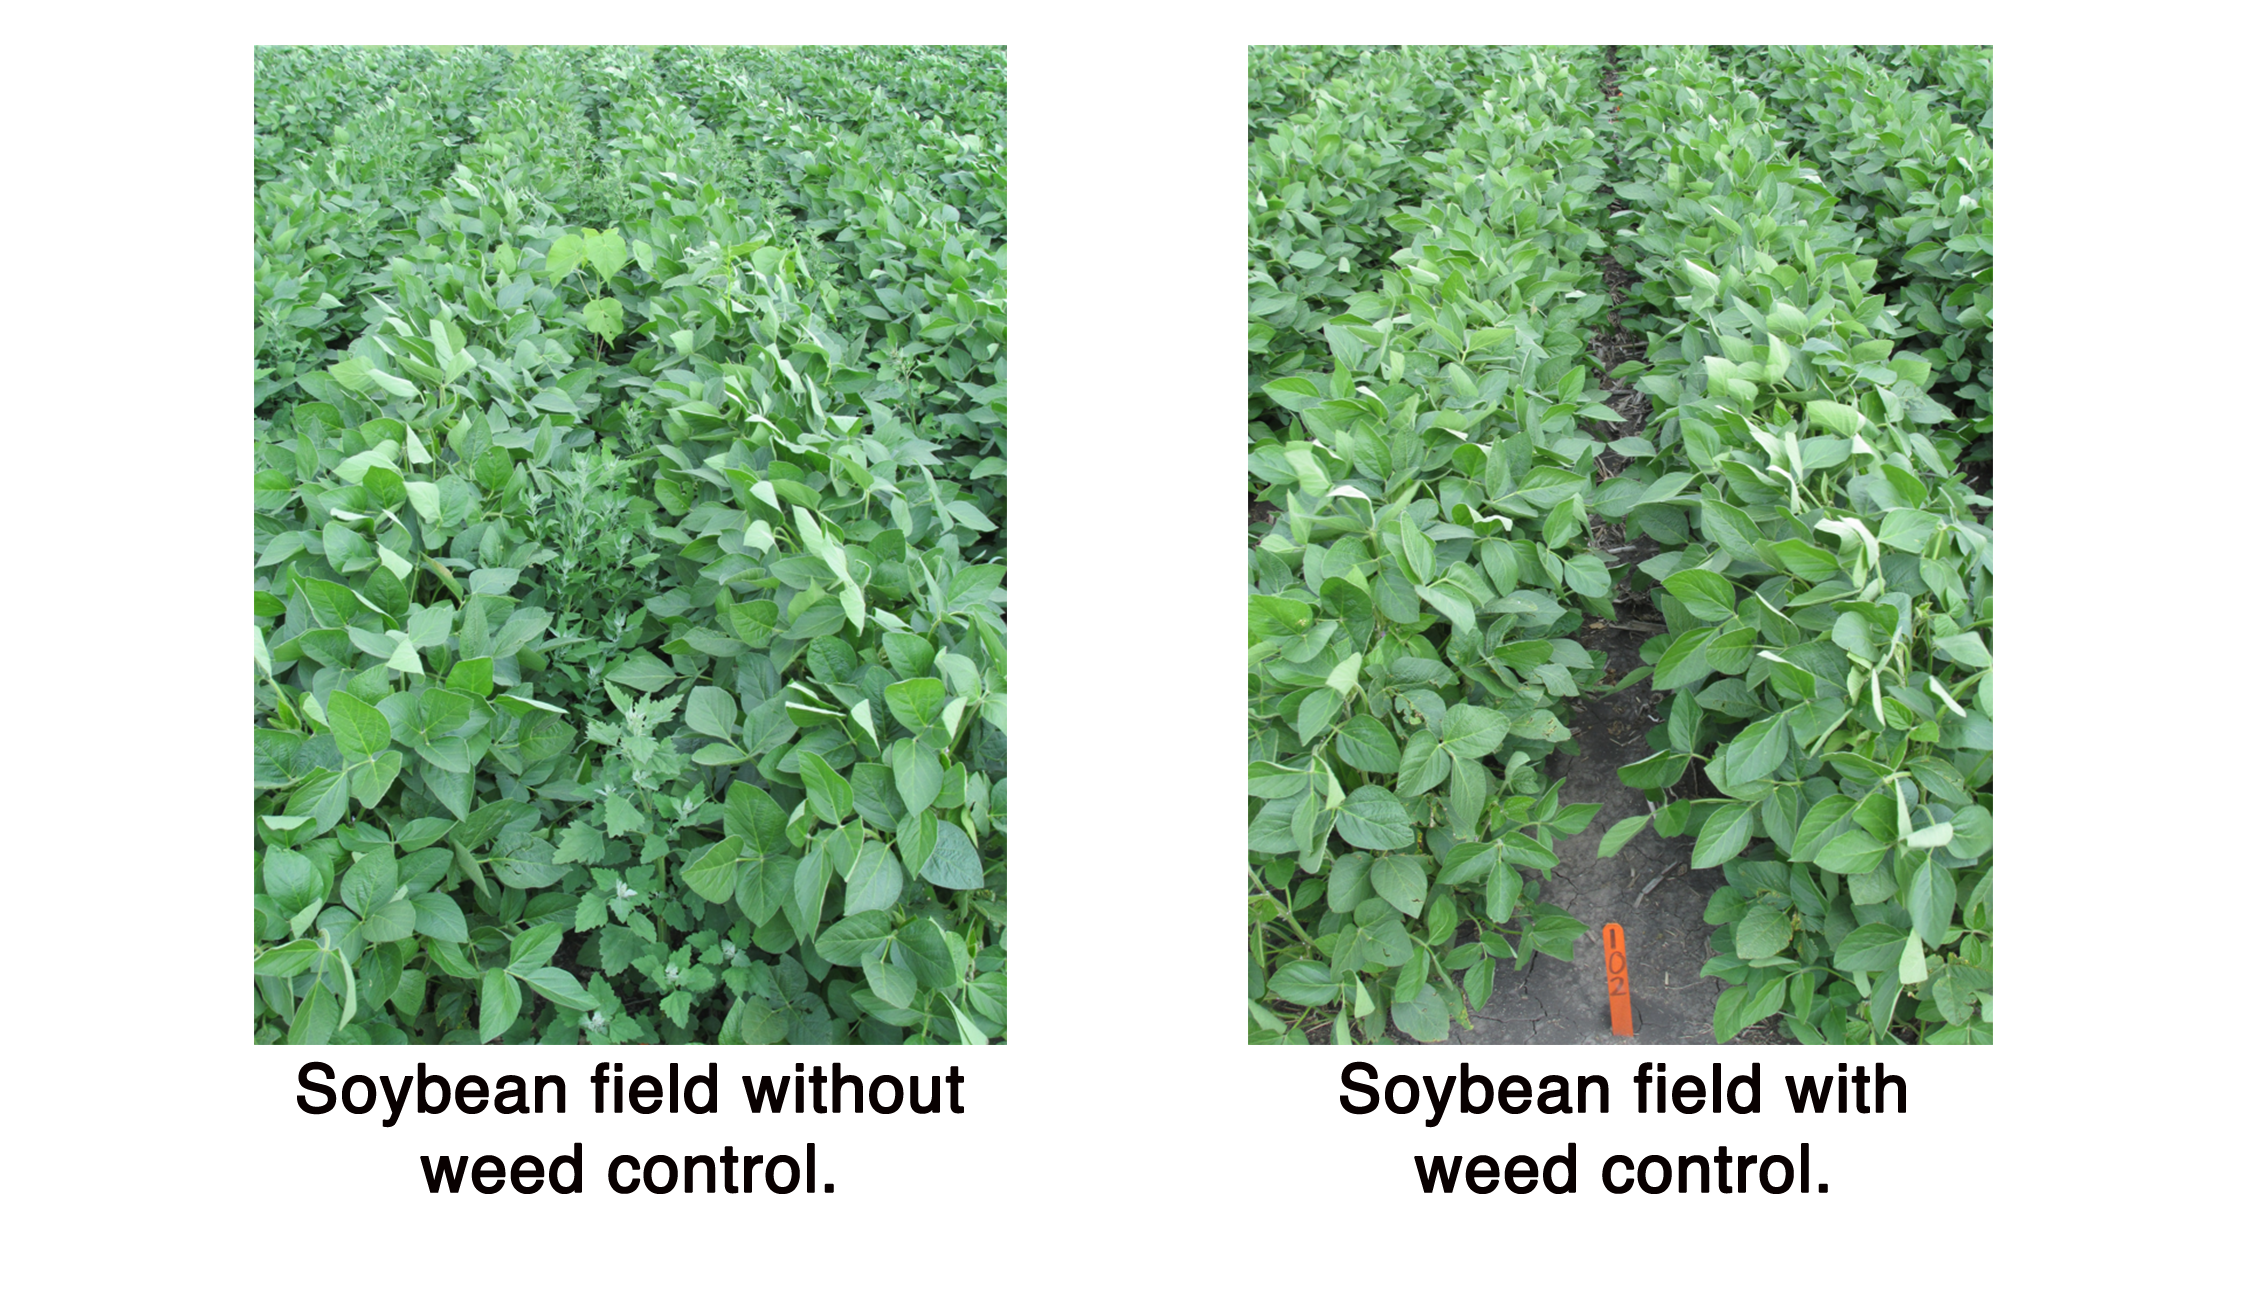
- Why are weeds a problem for farmers? (Water and soil nutrients such as nitrogen, potassium, and phosphorus are in limited supply. If they are consumed to grow weeds instead of food crops, it limits our ability to produce food in an efficient and effective manner.) Display the images of soybeans with and without weed control to illustrate.
- How can farmers control weed growth in their fields?
Activity 2: Methods of Crop Modification
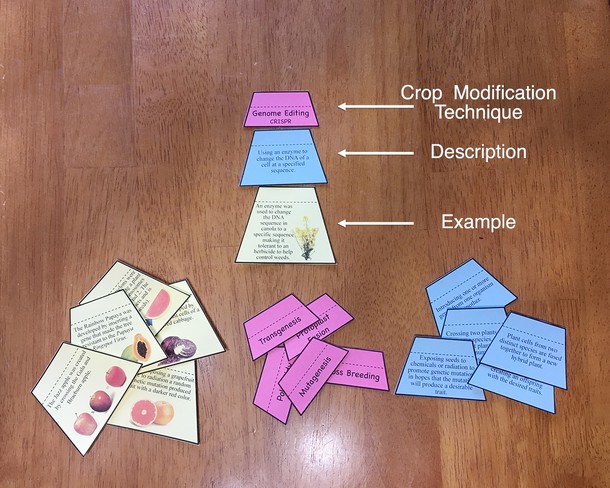
- Pass out one copy of the Crop Modification Interactive Notebook Pages. Instruct students to cut out the pieces of the layered tabs.
- As students are cutting out their layered tabs, draw on their prior knowledge and review basic concepts of inheritance and genetics. Students should be able to distinguish the difference between phenotype and genotype, understand basic principles of genetic inheritance from parent to offspring, and recognize the difference between dominant and recessive genes.
- After reviewing the vocabulary and principles above, explain to the class that there are numerous methods plant scientists can use to improve plants.
- Brainstorm examples of genetic traits that could be desirable in plants. Examples include:
- Drought tolerance
- Resistance to plant disease
- Resistance to pests
- Nutrition content of edible plant parts (fruits, vegetables, or grains)
- Flavor or texture
- Size or color of flowers or leaves (for ornamental plants)
- Instruct students to work individually or in groups to match the three layered tabs that represent: 1) crop modification technique, 2) its description, and 3) an example of each of the six different modification methods.
- After students have had a chance to match these to the best of their ability, review each method. Discuss each plant modification method, applying what students already know about genetic traits, DNA, and inheritance.
- Have each student place the layered tabs inside their interactive notebook OR on a blank sheet of paper (if you don’t use interactive notebooks), matching the correct modification method, description, and example.
- As a class, discuss the benefits and potential drawbacks of each plant modification method. Instruct students to keep notes about each method as you go about your discussion (see example pictured below). Share the Comparing Methods of Genetic Modification in Plants Table.
- Ask students the following questions to gather their thoughts and existing perceptions:
- Which method is best?
- Which method is least desirable?
- Which method do you think would be most efficient in creating plant varieties to produce a healthy and abundant food supply?
- Summarize with students that our scientific knowledge of genetics and inheritance has allowed us to improve and change crops to be healthier (more resistance to disease and pests), to utilize natural resources (such as water and soil nutrients) more efficiently, and to improve the overall quality and taste of our food. Review the benefits and drawbacks of each method, helping students understand that each method has limitations and applications for different circumstances.
|
It is critical for students to understand that no single modification method can be used successfully to reach the goals of ALL farmers and consumers. Each method has benefits and drawbacks unique to every plant. For example polyploidy is a benefit in the seedless watermelon, but it could be a drawback in another plant if it increases the size of the fruit and causes it to become watery in flavor. |
Activity 3: How Are GMOs Created?
- Write the following terms on the board: transgenic, genetically modified (GM), genetically engineered (GE), and genetically modified organism (GMO). These words are often used synonymously.
- There are many words associated with genetically modified organisms. Clarify the definitions of each term and acronym for better understanding.
- Ask students to share what these words and acronyms mean to them. Do they know what they mean? Do they have a positive or negative association to the words? Explain that this activity will focus on the science of the GMO and the steps used to create a genetically modified plant.
- Pass out the How to Create a GMO Interactive Notebook Page. Instruct students to cut out the diagrams and place them in their notebook or on a blank sheet of paper (if you don’t use interactive notebooks) using tape or glue.
- Beginning with the number one at the top of the diagram, go through each step of the process (left to right, top to bottom).

- After you have explained each step of the process, introduce students to an example of a transgenic crop, Roundup Ready® Soybeans.
- Give each student one copy of the handout Creating the Roundup Ready® Soybean. Instruct students to read the handout and create their own diagram representing the steps taken in the creation of the Roundup Ready® soybean by adding words and illustrations.

Activity 4: How Do You Know it's a GMO?
This final activity allows students a hands-on opportunity to see and handle the seeds and/or plants of both conventional soybeans and genetically modified soybeans. You may choose to complete just one, or both of the lab activities below. If time is short, choose the GM Soybean Seed Test. If you have additional time and resources to grow the soybeans, continue to the GM Soybean Leaf Test allowing students the unique opportunity to not only compare the seed, but the germination and growth of conventional and GM soybean plants.
GM Soybean Seed Test Lab
*This lab can be completed as a classroom demonstration or by placing students in small groups. For a classroom demonstration, you will need one GM Soybean Seed kit per class. To allow students to perform the test in groups, provide one kit per group.
- Using the seeds in the GM Soybean Seed Kit, allow students to observe and compare the seeds. Let them know they are the same type of seeds pictured in question #4 of the Kahoot they completed at the beginning of the lesson. Ask students to examine the seeds and look for observable differences in size, shape, and color. Little or no difference will be found in the seeds.
- Note: As students observe the seeds, be sure the two varieties are kept separate. Place seeds in ziploc bags for observation to help avoid cross contaminating the seeds during observation.
- Explain to the class that although the two seeds look the same, there is a difference between them, and you are going to do an experiment to discover it.
- Complete the following lab test for the class to see:
- Label the reaction vials for identification of the seed that will be tested by labeling one vial "A" and the other vial "B".
- Break the seed by placing one Roundup Ready® soybean seed between two small weigh boats and tapping it with a hammer. The seed should break into two to three pieces to allow enough surface area to be exposed for extraction. Do not crush the seed. Crushing can cause issues recovering all the pieces for extraction and may cause cross contamination of the testing area. Repeat this step with the conventional soybean, using separate weigh boats to avoid cross-contamination.
- Remove the top weigh boats and place the seed pieces into the correct reaction vial. If the seed is stuck to the boat, use tweezers to gently release it. Do not touch the seeds with your hands (clean tweezers with 50-70% ethanol to prevent cross contamination).
It's important to understand that GM seeds are perfectly safe to touch. The only reason you shouldn't in this experiment is to avoid altering the test results by cross contaminating the seed samples or contaminating the experiment with human microbiome. - Use pipette to fill reaction vial with 1% PBS buffer or distilled water (approximately 0.5 mL). Using the pipette as a pestle and the reaction vial as a mortar, stir the seed pieces and distilled water together for 20-30 seconds. Be sure to stir with separate pipettes to avoid cross-contamination.
- Let the vial with the seed/distilled water mixture stand for three to five minutes.
- Place one QuickStix test strip inside each reaction vial, with the arrow pointing down.
- Allow the test to incubate in the reaction vial at room temp for five minutes. While the test incubates, explain how the lateral flow test strip works using the information found in the Background Agricultural Connections section of the lesson. Conclude with students that the test will show a “positive” line if an additional protein is found in one or both of the soybeans. Both test strips should have a "control" line indicating that the test is functioning.
- Note: You may see positive results in less than five minutes, however the full incubation time will allow for the negative control to fully develop.
- Interpreting Results: If the sample contains CP4 EPSPS protein, a second line will develop between the control line and the tape with the arrow on it. If the sample does not contain the CP4 EPSPS protein, a second line will NOT be present on the test strip.

- Ask students, “Is there a difference between these two varieties of soybean?” Guide a class discussion for students to conclude that these two varieties of soybean are fundamentally the same. They are both soybeans. However, one variety has a protein that the other does not which gives the plant resistance to the herbicide glyphosate.
- Ask students, "How did this seed obtain the unique protein?" (transgenesis)
GM Soybean Leaf Test Lab
*This lab can be completed as a classroom demonstration or by placing students in small lab groups. For a classroom demonstration, you will need one GM Soybean Leaf Kit per class. To allow students to perform the test in groups, provide one kit per group.
- Gather the Roundup Ready® soybean seeds, conventional soybean seeds, and planting supplies outlined in the Materials section of the lesson. Plant the seeds using the following steps:
- Fill tray with soil media, level soil throughout the tray, and saturate with water.
- Use a pencil to press a hole into the moist soil 1/2 inch deep.
- Drop a soybean seed into each hole and sprinkle soil on top of all seeds.
- Note, you can label and separate the Roundup Ready® seeds from the conventional soybean seeds, or you could mix the seeds up and plant them randomly without labeling to see if students can distinguish one plant variety from the other.
- Place seed tray in a location that receives at least eight hours of bright light per day and maintains warm temperatures of 75-85°. For best results, add water to the bottom tray.
- Check plants daily for watering and growth. Water trays only if soil is dry. Avoid over watering, but be sure to keep plants from wilting.
- Students should make regular observations of the germination and growth of the plants. Have students record their observations in their interactive notebook or on a worksheet with column headings such as Date, Temperature, Plant Growth, and Observations.
- Allow the seedlings to grow for 2-3 weeks or until true leaves appear. (The first two leaf-like structures that emerge from the soil are cotyledons, not true leaves.)
- Once students have adequately observed the plants and compared them, complete the following lab to test the leaves of the soybean plants for the CP4 EPSPS protein:
- Label the microfuge tubes for identification of the plant (leaf) that will be tested by labeling one microfuge "A" and the other microfuge "B."
- Obtain 1 leaf from a conventional soybean plant and 1 leaf from a Roundup Ready® soybean plant. Use a true leaf, not a cotyledon (see diagram in Materials section).
- Take a leaf punch using the microfuge tube by placing the leaf between the cap and body of the tube. Close the lid of the tube and tear away extra leaf from around the outside of the closed tube. Allow the leaf punch to fall into the tube.
- Use the micropestle to push the leaf punch into the bottom of the tube.
- DO NOT grind the leaf tissue yet! Over extraction can cause chlorophyll to collect in the test band line of the strip and make it difficult to interpret the results.
- Throughout the lab, use separate tools (micropestle, stir stick, and pipette) for each sample. Cross contamination of the leaf samples will void the test results.
- Use pipette to add ~0.5mL of 1% PBS solution or distilled water into each microfuge tube containing leaf tissue.
- Macerate the leaf (smash up/grind) using the micro pestle until the leaf is broken into pieces. This doesn’t take much. Once you see some green color in the water the sample has been extracted.
- Use the stir stick to mix for 30 seconds. You may also close the lid and shake for 30 seconds.
- Place 1 QuickStrip test strip in each reaction vial with the arrow pointing down.
- Allow test strip to incubate at room temp for 5 min.
- Note: You may see positive results earlier than 5 min, however full incubation time will allow for the negative control to fully develop.
- Interpreting Results:
- A single control line should develop on both tests to indicate a successful test. If it does not, dispose of the strip and retest a new sample with a new strip.
- If the sample contains CP4 EPSPS protein, a second (positive) line will develop.
- If the sample does not contain the CP4 EPSPS protein, a second line will NOT be present on the test strip.
- Summarize results with students. Discuss the similarities and differences of the soybean varieties.
*Note: Formulations of Roundup® available to home owners for lawn and garden use typically have additional ingredients that will kill both the conventional and the Roundup Ready® soybean plant. Spraying the plants with Roundup® as a class demonstration is discouraged and will not be successful if the correct, glyphosate-only spray is not used.
Concept Elaboration and Evaluation:
- Discuss the crop modification methods. Ask the following questions:
- Which method uses an enzyme to literally change the genetic code (it has the ability to literally edit a genetic sequence like a typewriter)? (genome editing- CRISPR)
- Which method increases the number of chromosomes? (polyploidy)
- Which method promotes genetic mutations in hopes of randomly generating a new and desired gene? (mutagenesis)
- Which method transfers a desired gene from one species to another? (transgenesis)
- Which method takes place without scientific intervention and involves specifically cross pollinating two plants with the purpose of improving each generation of plants? (cross breeding)
- Which method uses biotechnology to fuse the cells of two different species? (protoplast fusion)
- Provide students with a scenario. Explain that they operate a farm with several hundred acres of crops. In groups or pairs have students discuss what type of weed control method they will use. Ask students to think, pair, share advantages and disadvantages of using GM seed to manage weeds.
Enriching Activities
- This lesson focuses on the science of a genetically modified seed and its benefit to a farmer to control weeds. While the science is clear, social, environmental, and economic arguments contribute to GMOs being a topic of controversy. See the Evaluating Perspectives About GMOs lesson to address and evaluate multiple perspectives.
- Ask students to find two YouTube videos or a website about GMOs. Using their knowledge of the science of a GMO, determine if the video or website is scientifically accurate.
- Assign students to visit the GMO Answers website. Assign students to ask a question by typing it into the "search" box on the website. After students read the Q&A forum, assign them to summarize what they learned as part of a "bell work" assignment or an "exit ticket" at the end of class.
- Watch the SciShow's episode Why are GMOs Bad?.
- Watch the video clip How are GMOs Created? to summarize and further illustrate the process of creating a GMO.
- For a lesson comparing the use of organic and conventional farming (GMO vs non-GMO) see FARMLAND: GMOs and Organic Agriculture. This lesson plan utilizes the documentary by James Moll titled Farmland which highlights the joys and challenges of three conventional farmers and one organic farmer.
- Watch The Journey to Harvest (3:01 mins) and learn about the 20-year journey of the Arctic Apple®. As a class discuss how arctic apples could decrease food waste and other consumer benefits such as convenient packaging and nutrition. Visit the Arctic Apple® website for more information.
- Define an "unintended consequence" with your students and brainstorm both positive and negative unintended consequences that could be associated with the use of GMOs. Assign students to read the article from NOVA, GMO Crops Have an Unintended Side-Effect: Protecting Non-GMOs.
- To demystify the science concerning molecular biology and genetics consider conducting "hands-on" experiments with PCR tools. The technique is used by scientists in agriculture, medicine, and criminal justice (to name a few). MiniPCR provides inexpensive hardware, software, and classroom tested curriculum resources for a deep dive into DNA. Other PCR machine options maybe found with a Google search.

Author
Andrea Gardner & Debra Spielmaker
Organization Affiliation
National Center for Agricultural Literacy

