
Leadwork or lead working is a practice which has been a mainstay of roofing applications for centuries.
The use of lead sheet to create weathertight coverings on an array of buildings is a skill.
Traditionally, this skill was practiced by plumbers, or Plombiers, who worked this malleable metal to form roof coverings that were designed to last.
Today however, the craft of leadwork has taken on a new guise and those who practice it are in high demand.
This article aims to provide the ultimate guide to leadwork when used for roofing. We will explore the material, its uses, the application of lead and compare this to examples of our work over time.
Interestingly, the use of rolled lead sheet comes with a comprehensive set of guidelines.
These guidelines have been set out in a manual.
It is this ‘manual’ or The Rolled Lead Sheet manual, that we intend to dissect in detail.
the Lead Lads will cover everything from the history of lead, examples of large and famous buildings which ouse it in abundance right down to how specific details should be executed.
Importantly, we should credit much of our learning with The LSTA or Lead Sheet Training Academy, who set the standard for leadwork in the UK.
Moreover, The LSTA are at the forefront of training for those wishing to use lead as a material in the UK.
Furthermore, there are an array of courses on offer and times can be tailored to suit individual requirements.
What is rolled lead sheet?
Rolled lead sheet is a material used for a range of roofing applications, From flashings, valley gutters to entire roof coverings, the versatility of this material is enviable.
In the UK, for lead sheet to be used for roofing applications, it needs to meet certain standards.
In short, for lead sheet to be a useable material, that can be guaranteed when applied, certain standards must be adhered to during manufacture.
The British standard for lead as a material isBS EN 12588.
The standard relates to thickness consistency and the formation of a knitted grain.
Adherence to this standard, coupled with exacting methods of installation, based upon guidance by The LSTA, allow the performance of the material over time to be accurately predicted.
As such, rolled lead sheet, when used correctly for roofing applications, can be expected to last for centuries, not decades.
Below are images depicting how the different codes of lead appear.
The colour coding on the labels depicts the code of lead.
So, what is each code for and what is the difference between them in terms of thickness and weight?
Code 3 lead has a thickness of 1.32mm and a weight of 14.97 kg/m2.
Common uses for code 3 lead are on areas which have limited exposure or are covered by further, thicker grade lead flashings. Often, owing to the thickness, code 3 lead is used for soakers which are interleaved between slates.
Code 3 lead can be identified by a green label.
This code of lead should not be used for flashings or where it is exposed as it will not provide longevity.
Code 4 lead has a thickness of 1.80mm and a weight of 20.41 kg/m2
This code of lead can be used in exposed areas for flashings, pitched valley gutters and vertical cladding.
Code 4 lead can be identified by a blue label.
However, it is important to recognise that you cannot install it in the same lengths as code 5 lead for example.
Maximum lengths for certain details will be examined later in this article
Code 5 is versatile, it can be used to form many lead details including lead flashings, valley linings, back gutters, aprons, bays, lead dormer roof coverings and more.
This code is is 2.24mm thick and weighs 25.4kg/m2.
Further, code 5 lead can be identified by a red label.
Code 6 lead is used for applications where there may be greater exposure or further longevity is required.
Used for flat lead roof coverings, lead gutter or valley linings, aprons, lead box gutters, lead channels, lead sumps or outlets.
Identified by a black label, code 6 lead is 2.65mm thick and weighs 30.5kg/m2.
Now we start getting up to the heavy mob.
Code 7 lead would normally be reserved for use on churches or stately homes for example.
Ideal for areas where increased bay lengths, versus code 5, is necessary or in locations of high exposure.
At 3.15mm thick and with a weight per m2 of 35.72kg code 7 rolled lead sheet, when installed correctly, will offer an extremely long lasting roof covering.
Code 7 lead would be identified by a white label.
This code of 8 lead is not used widely.
However, bay lengths increase versus code 5 lead which may allow for more versatility the it comes to installation.
Identified by a orange label, code 8 lead is 3.5mm thick and weights 40.26kg/m2.
Code 8 lead would be considered for use on large scale roof areas such as cathedrals and certain high profile public buildings.
The main advantages over code 5 lead is longevity and versatility in terms of bay sizes.
The differences between the codes of lead and how they can be used will be detailed later on.
What do the different codes of lead look like when on a roll?


Installing leadwork or lead roof coverings correctly is a unique skill set which requires training and experience.
Importantly, to consider using rolled lead sheet correctly, trining should be undertaken.
Training is available via The Lead Sheet Training Academy.
The training centre is nationally recognised and is located in East Peckham, Kent.
Full scale training rigs are available and students will carry out the practical installation of lead as part of the course.
Further, the training centre is CITB approved and the tutors are experienced in leadwork and training applications.
Moreover, they have had significant experience of using rolled lead sheet on construction sites.
Available courses on leadwork
There are a number of courses available for interested parties to learn more about using lead as a material.
Specialist applied skills programmes in lead (level 2&3)
In total, courses usually take around 18 months to complete and will require students to spend 30 days at the LSTA centre.
City & Guilds Accredited Programmes
Designed for applicants who want to undertake heritage roofing projects, three courses are offered in lead. Approved by CITB, they offer a recognised qualification for applicants to further develop their learning on site.
Each course is short duration and extremely focused on a particular discipline.
Traditional basic leadwork craft
5 days in duration or available as two three day courses, the content covers basing and welding of lead sheet.
Traditional intermediate leadwork craft
in total, this course runs for 35 days and is split into 4 modules of 5-10 days. Courses can be undertaken consecutively or split to suit your requirements around existing employment.
The contents of the course are comprehensive and will provide insight into the following elements, and include an assessment.
Assessments are undertaken based upon practical exercises and written questions and case studies. Work is marked against key criteria which is depicted by a task sheet.
At the end of the course, candidates are expected to be proficient in the theory and practice of working with rolled led sheet.
For reference, the contents of each module has been outlined below.
Leadwork Experience
Like many trades, there is little substitute for experience. Leadwork is no exception.
The relationship between facility based training and on site applications is close.
However, when executing Leadwork and lead detailing on site, you will need to develop skills which cannot be obtained in the classroom.
A big part of applying quality Leadwork to real life applications is thought.
Technical details will need to evolve to meet specific circumstances.
A Leadworker should have an ability to think outside the box to hone their craft.
Further, it is important to develop an understanding of substrates onto which lead details are formed.
Creating height, steps rolls, mechanical joints and interfaces will all develop with on site experience.
The content of this module is comprehensive. The most basic principals of leadwork and detailing are encompassed.
- Lead soakers and stepped flashings.
- Formation of bossed front aprons.
- Individual or single stepped flashings.
- Use of lead, stainless steel or copper clips to free edges. (remember 6mm expansion)
- Stepped and cover flashings integrated into a tiled roof.
- Lead back gutter, bossed.
- Apron flashings when using profiled tiles.
- Butt weld detailing.
- Lap weld details.
- Lead welding a cover patch.
- Corner gusset, welding on an incline or vertical.
- Welded front apron.
- Apron flashing with an internal corner.
- Lead saddle, usually formed at the apex of roof.
- Apron flashing below an area of glazing.
- Formation of a lead slate to make good a roof penetration.
- Chimney flashings to a stack or masonry roof penetration.
- Damp proof course in a chimney.
- Pitched valley gutter or lining.
- Lead ridge detail with clips in stainless steel, lead or copper.
This module includes an assessment. The term weatherings encompasses details which are used to prevent water ingress into a building using leadwork.
Such details include, but are not limited to:
- Welted parapet capping, the process by which a wall may be covered in lead using welted panels.
- Cornice with welt and led welded break corner. A cornice detail that runs to a corner that may need to be cut and a weld formed.
- Chute outlet, designed to direct water through a wall and away from a building, this would need to be welded.
- Catch pit, sometimes referred to as a sump, welded and often with an outlet.
- Gutter drips, bossed to form a step in a gutter.
- Gutter drips, welded, cut and welded to form drips on a gutter.
Som of the above details are fairly complex and mastering their execution would require significant practical experience.
The following details would all be associated with the installation of lead roof coverings.
They would apply to either flat or pitched lead roof areas.
- Roll end and roll ends to abutments, bossed detailing.
- The same as above but formed using a weld.
- Eaves to wall abutments, welded.
- Staggered wood rolled which have been bossed.
- Wood core rolls that are staggered and welded.
- In line wood rolls, bossed to form a finish.
- In line wood rolls which are cut and welded.
- Wood rolls to a drip on a pitched roof over 30°.
- Wood rolls to an abutment on pitched roof areas above 30°.
- In line hollow rolls and laps.
Lead dormers are an important part of lead roofing applications.
The use of lead on dormers is a mainstay of weatherproofing.
A number of details exist when using lead for dormers.
- Lead front apron to dormer window.
- Lead lined secret gutter, often formed at the interface with a dormer cheek.
- Jamb and head cladding components of dormers.
- Cheek and jamb interfaces and components.
- Lead back gutters.
- Complete cladding to a dormer window.
- vertical cladding, often to the faces and cheeks of a dormer.
- Pre formed cladding.
The above modules cover an array of leadwork details.
However, there is no substitute for practical open site experience.
Based upon the contents of the courses for anyone looking to undertake leadwork, we have provided some images of real examples of what we do every day at The Lead Lads.
A few of the lead details which are standard practice at The Lead Lads


Training done, let’s consider some of the details in focus.
So, we have so far outlined some of what this article is about.
Lead as a material has been considered and the training available for those looking to install it examined.
Further, we have provided some examples of our work which correlate with standard detailing.
However, we have not drilled down into any real detail.
Next, we will consider the basic tools needed to execute successful lead installations.
In short, you will need the following pieces of equipment to carry out leadwork for a roofing application.
Basic lead working tools
- Flat dresser | Required for dressing lead flat when setting out and finishing in position.
- Bossing stick | A time served piece of equipment for bossing rolled lead sheet around timber forms.
- Bending stick | Traditionally used by Plumbers for bending lead pipe. However, today, a bending stick is handy for bossing lead to roll ends for example.
- Bossing Mallet | Used in conjunction with the bossing stick and bending stick, this mallet can help create a neat finish to detailed areas.
- Setting in stick | used to form a crease in the lead at a fold. Used when forming a bay up to the edge of a wood roll or abutment.
- Chase wedge | Designed to setting in lead into creases or folds.
Lead welding tools
Further, in addition to the above, a Leadworker should possess the ability to weld lead.
Welding lead provides solutions to certain details that may not otherwise be possible using bossing methods.
Interestingly, the melting point of lead is 327.4°C.
However, lead welding equipment will need to produce much higher temperatures than this.
The process relies upon the combustion of Oxygen (O₂) and Acetylene (C₂H₂) being mixed in correct proportions to produce temperatures around 3200°C.
To undertake such welding you will need:
- Oxygen, usually contained in a small bottle or canister. Black in colour.
- Acetylene, a similar bottle or canister, Burgundy in colour.
- Welding Torch or gun, Model O is a good choice.
- Gauges to regulate the supply of each gas to the torch. usually, 1 bar oxygen to 0.5 bar Acetylene.
- A flash back adapter to prevent flames from reaching the gas in the bottles which may cause explosion.
SHORT VIDEO IMAGES OF EQUIPMENT
British Standards For Installing Leadwork
The manufacture of lead is undertaken to BS EN 12588.
However, the installation of lead as a roofing material is classified as follows:
This document provides recommendations for the design and construction of lead sheet roof coverings when applied to external surfaces. The guidance assumes that that materials will be fixed in accordance with conventional practice and traditional methods.
Details Details Details….
Attention to detail is paramount when it comes to completing proper and compliant lead sheet installation.
This section aims to outline some of the most commonly found details and compare them against real life edda plus as undertaken by The Lead Lads.
Although some of what you see may be a variation upon a theme, we strive to follow guidance so far as practicable on all projects that we we undertake.
So, enough words for the moment, let’s begin the process of extracting theory and comparing it directly with practice.
Please note, some of the imagery in this section is courtesy of The LSTA:
Substrates for lead should be capable of supporting the weight of the material and also provide adequate fixing strength.
Usually, plywood, a minimum of 18mm or softwood bearers of a simpler thickness are adequate.
However, the structure below will need to be considerably larger to support the load of the material and any further imposed load, such as snow, thereafter.
More about substrates for leadwork
Below we have outlined more details on the substrates required for installing leadwork to BS6915 and their characteristics.
Timber substrates for leadwork
Timber is a traditional substrate for supporting leadwork formed from rolled lead sheet.
The type of timber used can be tongue and grooved or plain edged boarding from softwood.
Importantly, gaps in the timber are acceptable but should not exceed certain parameters based upon the code of lead being used.
The following gaps should not be exceeded based upon the codes of lead sheet depicted below:
Code 5 & 6 = 5mm gaps.
Code 7 & 8 = 10mm gaps.
It is deemed that the thickness of the lead will self support over the gaps as outlined above without creating a visible deviation over time.
Importantly, the timber used should be well seasoned and provided maximum resistance to shrinkage and warping.
Further, factory made sun=bstrates can also be used such as plywood.
Plywood for leadwork should be a minimum. of 18mm thick. Further plywood should be exterior grade and of suitable quality.
When fixing plywood substrates in preparation for leadwork, any fixing points such as screw or nails should be punched below the surface of the timber substrate so that they do not show through the finished lead roof covering.
Concrete and masonry substrates for leadwork
Such surfaces should be smooth and an underlay should be installed.
The surface should allow the lead to move freely with temperature changes without abrasion to the underside of the lead sheet.
Concrete or masonry substrates should be reasonably dry and any fixings used to secure them should not be vulnerable to decay.
For example, if you were fixing a concrete coping stove to then cover in lead, the fixings used to secure the coping should be stainless steel.
Thermal insulation materials for leadwork
it is not usual to fix lead sheet covering directly on top of rigid Insulaiton boards for example.
if you intend to use thermal Insulaiton below leeadwork, it may be important to install Insulaiton fully bonded to plywood.
This may form, in conjunction with a sub deck and vapour control layer, a true warm roof build up and mitigate the requirement for ventilation when forming a lead roof area.
Bi Metallic Corrosion for leadwork
Lead sheet can be used in conjunction with other metals.
Such metals may be formed to provide rigidity at perimeters for example.
Commonly, alternative metals are used as clips.
Metals that can be used with lead include copper, stainless steel, zinc and aluminium.
Bi metallic corrosion is unlikely to occur when using these metals.
However, if mild steel, galvanised steel or iron were to be used, there is a risk of corrosion occurring at interfaces exposed to weather.
Interestingly, marine environments may need to be treated differently.
Aluminium clips should not be used in such environments due to the potential of corrosion being caused by sodium chloride which will attach the surface of the aluminium.
Oak for a Leadwork substrate
Certain timbers such as Oak and Cedar contain organic acids which may cause leadwork to slowly corrode if in direct contact.
This can be controlled though the use of building paper underlay and adequate ventilation.
Bossing
Derived from The Middle Ages, the term ‘To Boss’ describes the beating of metals to form shapes.
Shaping of malleable materials, such as lead, is no exception.
Traditionally, bossing tools for Leadwork, were made from hardwoods such as Beech, Hornbeam, and Boxwood.
However, these days you are more likely to find hard plastic alternatives, which are widely regarded as being appropriate.
Lead is the softest common metal and can usually be bossed without the applicantion of heat. However, if cold weather prevails. leadworkers often add heat using a small gas power blow torch to make the process of bossing easier.
Be a Bossing Boss | The Lead Lads
Good bossing can be achieved when lead is formed around a shape without creases or cracks.
Importantly, the thickness of a given code of lead sheet should not reduce by more than 25% when bossed.
Further, when bossing lead, you will need to trim the material after. Always ensure that sufficient additional width is allowed to create details such as splash laps.
The image below depicts and example of a bossed roll end, formed on a standard lead covered bay window.


Ventilation details for Leadwork
“Free movement of cold air beneath the surface of a cold lead roof will help mitigate underside corrosion caused by condensation between the surface of the lead and the substrate onto which it is formed.”
When installing a lead roof covering, making provision for a warm or vented roof is critical.
Ventilation can be formed in a number of ways and should be continue under the substrate onto which the lead sheet covering is fixed.
In the alternative, a warm roof can be constructed which negates the need for ventilation.
The main aim of either a warm roof or the provision of ventilation is to mitigate underside corrosion of the metal which may be caused as a result of condensation.
Forming Ventilation Details | Lead Roofing
The formation of vent details for lead roofing applications requires through and design.
A ventilation detail should provide a continuous flow of cold air beneath a substrate.
The term continuous, means that ventilation should have an inlet, usually at the eaves, and an outlet, usually towards the ridge or apex.
Alternatively, ventilation details can be formed between steps if required by increasing the height of each step.
There is room for creativity when forming ventilation details for Leadwork. Especially when it comes to refurbishment of existing roof areas or structures.
Although there are off the peg solutions available, these may not always apply to your given project.
When forming vent deals, there are a few key components that we recommend keeping close to hand.
- Stainless stel insect mesh. The best size is 150mm wide.
- Stainless steel coils, choose 600mm wide coils and allow time to form them in a bending machine.
- Timber, rough sawn softwood section can be a lifesaver when it comes to forming vent details. However, plywood can work equally well
- Importantly, ensure you allow enough time to form these details and get them right.
- A staple gun will also pay dividends when fitting ventilation details for Leadwork using stainless steel insect mesh.
How to mitigate the need for ventilation | Lead Roofing
Where it is not practical to form ventilation details, there are alternatives available.
Warm roof construction will eradicate the need to offer ventilation detailing.
In layman’s terms, a warm roof consists of the following key components. The main function is to stop warm, moist air from inside a property coming into contact with the cold surface of the underside of the lead.
- Sub deck, usually 18mm plywood or rough sawn timber.
- Vapour control layer, we like to use a bitumen product and create to create a seal.
- Insulaiton, above the vapour control layer, Insulaiton should be of the required thickness.
- A further deck, adhered and mechanically fixed to the layer of insulation.
Importantly, the critical component of a warm roof is the VCL or vapour control layer.
Lead underlays are usually formed using Building paper, a high strength bituminous paper designed to be placed under lead sheet.
Breather or vapour permeable membranes are not suitable for use under leadwork.
Fitting underlays for leadwork
Underlays should be installed onto a dry substrate. Trapping moisture can lead to underside corrosion of the lead sheet.
Lay underlays in strips and stop into position in line with the fall or pitch of the lead roof area.
Upstands at abutments are accepted and advised.
However, lead underlays should not drape over a drip edge, this could cause moisture to track between the underlay and the underside of the leadwork as installed.
General Guidance for leadwork underlays.
The type of underlay that should be specified will depend upon the substrate.
A substate is the area where the rolled lead sheet is to be installed.
The following description outlines the nature of the substrate and the specific leadwork underlays to be used for the same.
Exterior grade plywood | Class A Building paper to BS1521
Penny gap softwood boarding | Building paper as above or Geo textile underlay.
Penny Gap Oak Boarding | Building paper only.
Stone | Building paper underlay to BS 1521
Concrete | Building paper leadwork underlay.
Brick | Building paper underlay for leadwork.
If you are looking for building paper for beadwork, you can but online here.
Patination of external leadwork
When exposed to rain or damp, new lead sheet will produce an initial and uneven white surface carbonate.
Aesthetically, this is not acceptable when using lead for roofing and cladding applications.
This carbonate can also be subject to run off from rainfall and may stain other materials in the vicinity such as tiles, slates or other roof areas.
To mitigate the risk of staining, and provide an aesthetically pleasing surface finish, a coat of patination treatment should be applied to rolled lead sheet.
When to apply this treatment is key.
It may be argued, that lead sections should be patinated prior to installation on both sides of the material.
However, this may apply only to smaller sections of lead used for clipping or tabbing larger sections such as lead flashings.
Importantly, a surface finish, using patination oil, should be applied to any exposed lead sheet at the end of each working day.
Further, patination oil should also be applied between the laps of a roof area to prevent staining seeping out from untreated surfaces.
Moreover, at The Lead lads, a further application of patination oil will also be applied at the end of each project.
This application will help clean off the surface of the material which may have been subject to hand or foot traffic during installation.
The use of clips or tabs is an important part of being a leadwork and installing leadwork to BS 6915:2001+A1:2014.
Clips are designed to prevent wind uplift whilst allowing free movement of the material arising from expansion and contraction.
There are a number of materials suitable for use as clips when undertaking leadwork which have been outlined below.
Specifically, this section refers to individual clips and not continuous versions which would be applied differently.
Clips for leadwork
The thickness of clips for Leadwork will vary based upon the level of exposure in a given application.
Notwithstanding sheltered location on a roof area, lead sheet is not recommended for use as clips to secure free edges owing to its low mechanical strength, relative to alternative metals.
However, where lead sheet is used for clips, a thicker code of lead should be considered.
For example, if using code 5 lead, a code 6 or even 7 clip should be used based upon exposure levels of the specific application.
Alternatives to lead clips are copper, 0.6mm thick and 50mm wide, or stainless steel, 0.7mm thick and 50 mm wide.
Specifically, 50mm is the minimum. recommended width for a material used as a clip.
In contrast however, if the material is returned back on itself, greater strength can be achieved and a reduction in width may then be acceptable.
Stainless steel clips
Anneales stainless steel conforming to BS EN 10088 at least 50mmin width and not less than 0.375mm in thickness.
In the alternative, terne coated stainless steel is common and used when clips are visibly exposed.

Stainless steel clips
Used to secure a lead ridge capping and installed at 300mm centres. Stainless steel clips will be provide a contrast to the leadwork itself. Some do not like the aesthetic of this but such clips are extremely effective in the prevention of wind uplift on an edge that would be otherwise unsecured.
Copper Clips
Again, copper clips for use with leadwork should be a minimum of 50mm wide and not less than 0.6mm thick.
Such clips should conform to BS EN 1172.
Further, copper can be used to clip other no exposed areas such as welts, seams and rolls.
Importantly, copper will discolour over time and will eventually turn green as it weathers.
Moreover, the run off from copper may prevent algae or lichen growth in areas directly below the material so be prepared for some colour differentiation on a roof area where copper clips are used to secure leadwork.
Nails for Leadwork should also be annular ring, helical ring or serrated to provide a fast fixing into the substrate.
As a rule of thumb, careful not to hit yours, nails used for Leadwork applications are 25mm x 3.35mm ringshank copper or stainless steel.
Further, nailing patters also apply which will be detailed later in this article.
Screw it?
Furthermore, screw can also be used for fixing Leadwork. Screws should be brass or stainless steel and comply with BS EN 14592 + A1:2012. Screws for Leadwork applications should not be less than 19mm long and 3.35mm in diameter.
Moreover, when using crews, it is also common practice to introduce a stainless steel washer for added security.

The use of wood rolls is common place for lead roofing applications.
The image above depicts the standard dimensions of a wood roll used for leadwork.
They are used for the following applications:
- Flat and pitched lead roof areas.
- Lead dormers.
- Lead bay window coverings.
- Lead parapets.
- Vertical turrets and towers in lead.
Wood rolls are designed to prevent wind uplift and create separation between bays.
When forming lead over a wood core roll, you will fix and undercloak to the top of the roll using copper nails and your overlook from the adjacent bay will then cover this.
An appropriate splash lap is also required over the roll and tabs may be used for additional fixing strength.
Wood rolls can be two different sizes, appropriate to the scale of the roof are where they are to be fixed.
Standard wood rolls are smaller than King roll.
Further, wood rolls should be treated softwood and are undercut at the base.
The image below depicts a lead roof with wood roll details, nice!
Alternatives to Wood Rolls
When undertaking lead work, especially when forming details, it is not always possible to use a wood roll to form a mechanical joint.
As such, it is acceptable to use other timber sections to create mechanical joints where needed.
However, it is important to ensure that amber used for forming lead details is appropriate. Usually, it is best to source treated timber sections.
Where it is not possible to install a wood roll, it is sometimes appropriate, if a detail will cause a water trap, to use expansion joints instead.
Importantly, it should be noted that wood rolls are not just there for aesthetic reasons, they are there to ensure effective thermal movement of the material which may otherwise split if not correctly fixed.
When installing lead bays, lead bay windows, lead hips and ridges, there is no real substitute for a correctly sized wood roll.
The image below outlines. their use on a lead hip and ridge detail on a recent project carried out by The Lead Lads.
Lead Welding | Why Where How?
Why is it important to carry out lead welding?
Lead welding is a method of jointing and detailing rolled lead sheet.
Its importance relates to the formation of details for roofing applications.
Versus other methods, such as bossing lead, welding pieces together may provide s more robust detail.
If you were to boss lead into a corner for example, parts of the material worked would become thinner than the code of lead used. By thinning the lead through bossing, you may undermine its integrity as a material.
However, if instead a weld is used to provide a cover or patch to an area that has been cut, the integrity of the material at a given code is maintained in this location.
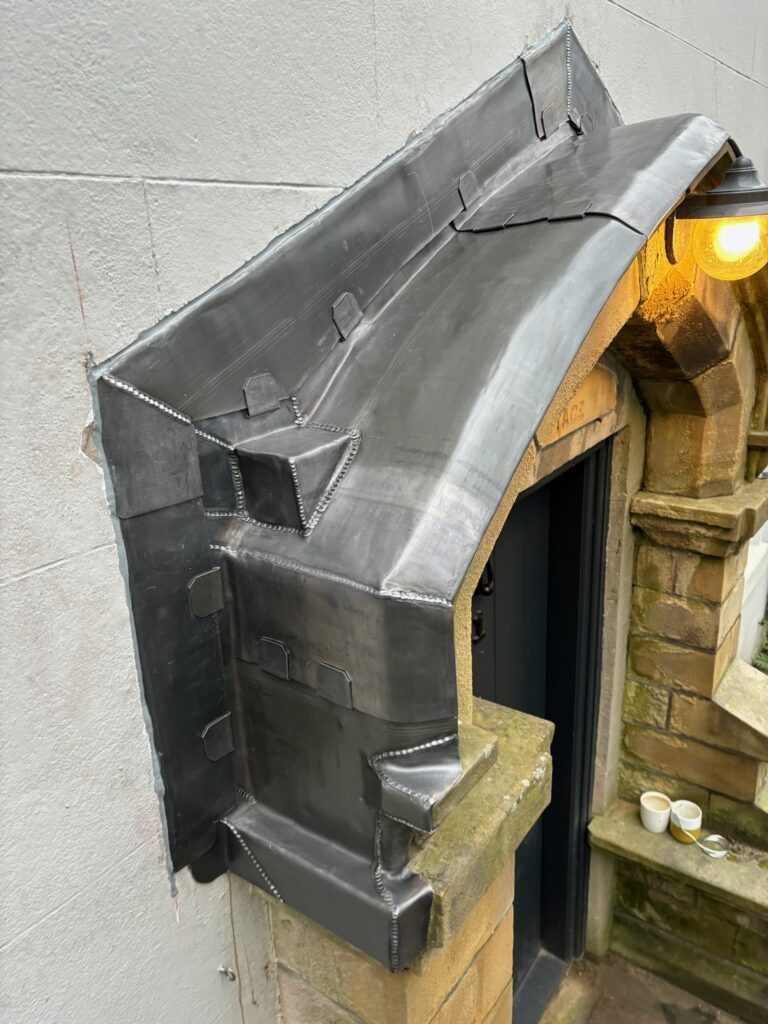
For example, when forming a corner, it may not be possible to boss the lead sheet in several different directions to achieve a detail. As such, a welded patch could be used to form the corner, as depicted in the image below.

Where would you use lead welding?
Lead welding would be used for a variety of applications.
Commonly however, lead welding is used at interfaces where there is a risk of weakening the lead sheet by bossing it.
The practice of bossing rolled lead sheet around a detail for example, will cause it to become thinner and subsequently weaker.
To counteract this, it is often advisable to cut the area in question, and weld a patch or gusset over the area to form the correct interface.
Further, lead welding is used to create expansion in lead gutters where expansion joints are used.
Welding in an expansion joint will facilitate thermal movement of the lead and prevent premature failure by splitting or cracking.
Examples of details that usually need to be lead welded are itemised below.
- Lead back gutters.
- Lead valleys, usually at an interface with a gutter.
- Lead aprons.
- Corners on lead bays.
- Tunnels over the top of lead roll details.
- Interfaces with windows on lead clad dormers.
- Table may be welded onto other sections of lead when used for cover flashings to prevent wind uplift.
- Roof apexes and interfaces when using lead hip and ridge details.
- Abutment interfaces where an upstanding is required.
- Around roof penetrations, such as lead slates, bat slates and SVP exit points.
The above list is not exhaustive, but is designed to provide an overview of where lead welding would be used commonly when carrying out lead roofing or detailing.


Pingback: Leadwork specialist near me | The Lead Lads