Introduction
When it comes to using your Android device as a portable hotspot, having a recognizable and personalized hotspot name can make the experience more enjoyable and convenient. Whether you're sharing your connection with friends, family, or colleagues, a unique hotspot name can add a touch of personality and make it easier for others to identify and connect to your hotspot.
In this article, we'll walk you through the simple process of updating your hotspot name on your Android device. By following these easy steps, you'll be able to customize your hotspot name to reflect your individuality or provide clear identification for those connecting to your hotspot.
So, if you've ever found yourself in a situation where multiple hotspots are available, each with generic names like "AndroidAP" or "Samsung Hotspot," you'll understand the value of setting your hotspot apart with a distinct and memorable name. Whether you're at a busy airport, a bustling café, or a crowded event venue, having a unique hotspot name can make it easier for your friends, family, or colleagues to find and connect to your hotspot without confusion.
Now, let's dive into the straightforward process of accessing your Android device's hotspot settings and customizing your hotspot name to better suit your preferences and needs. With just a few simple steps, you'll be able to give your hotspot a personal touch and make it stand out in the sea of available connections.
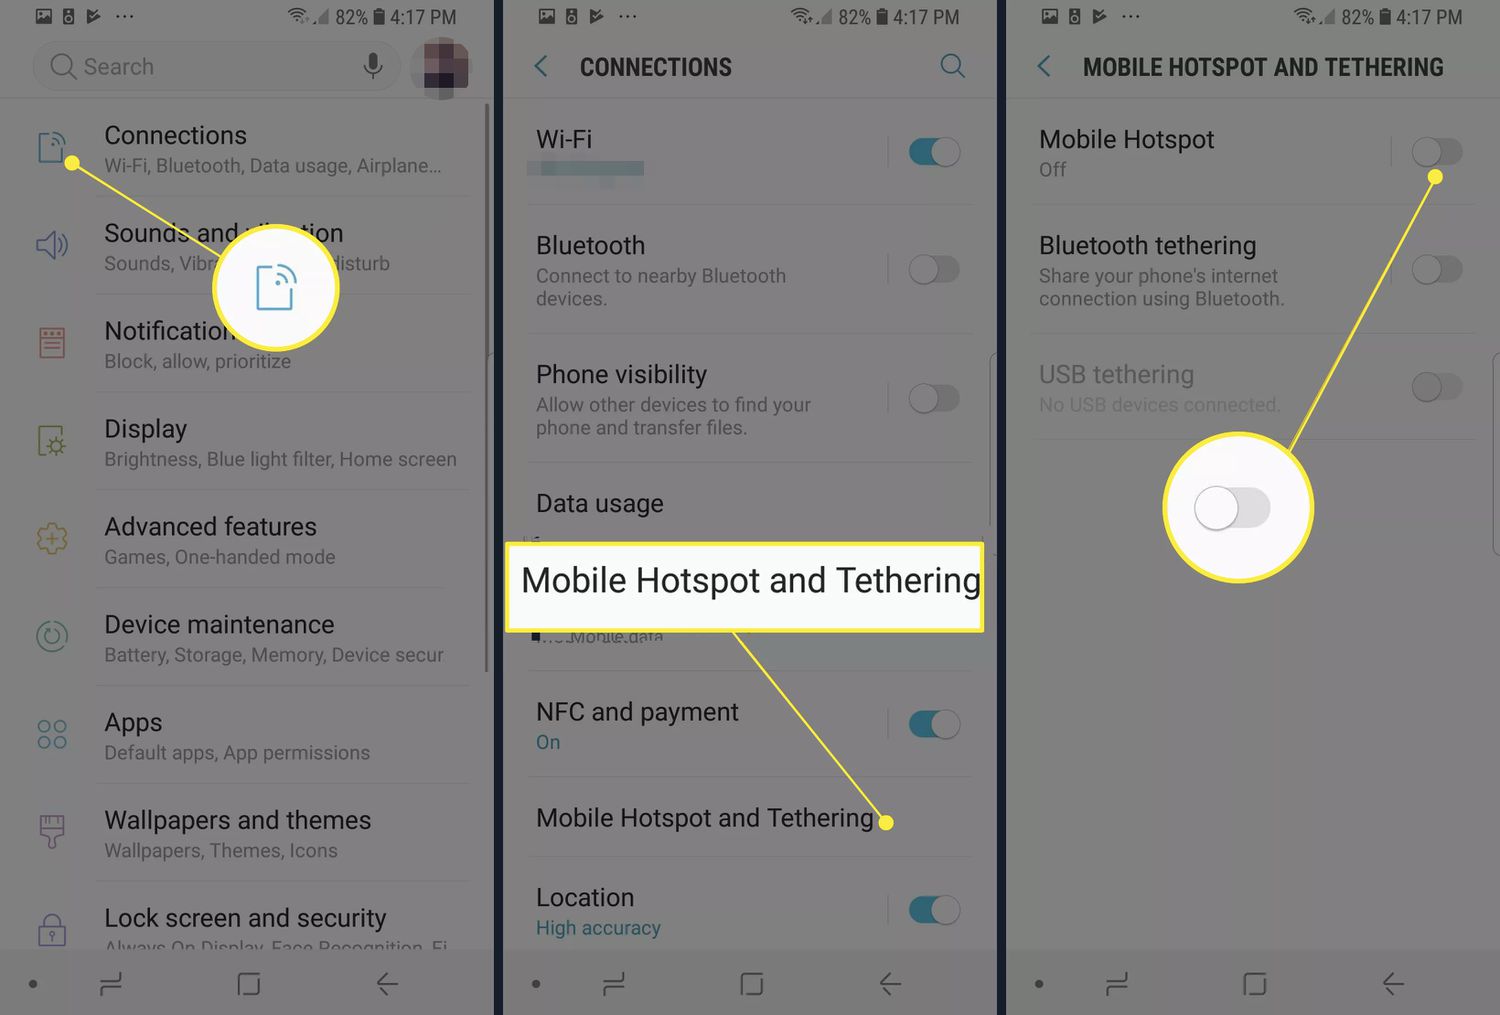
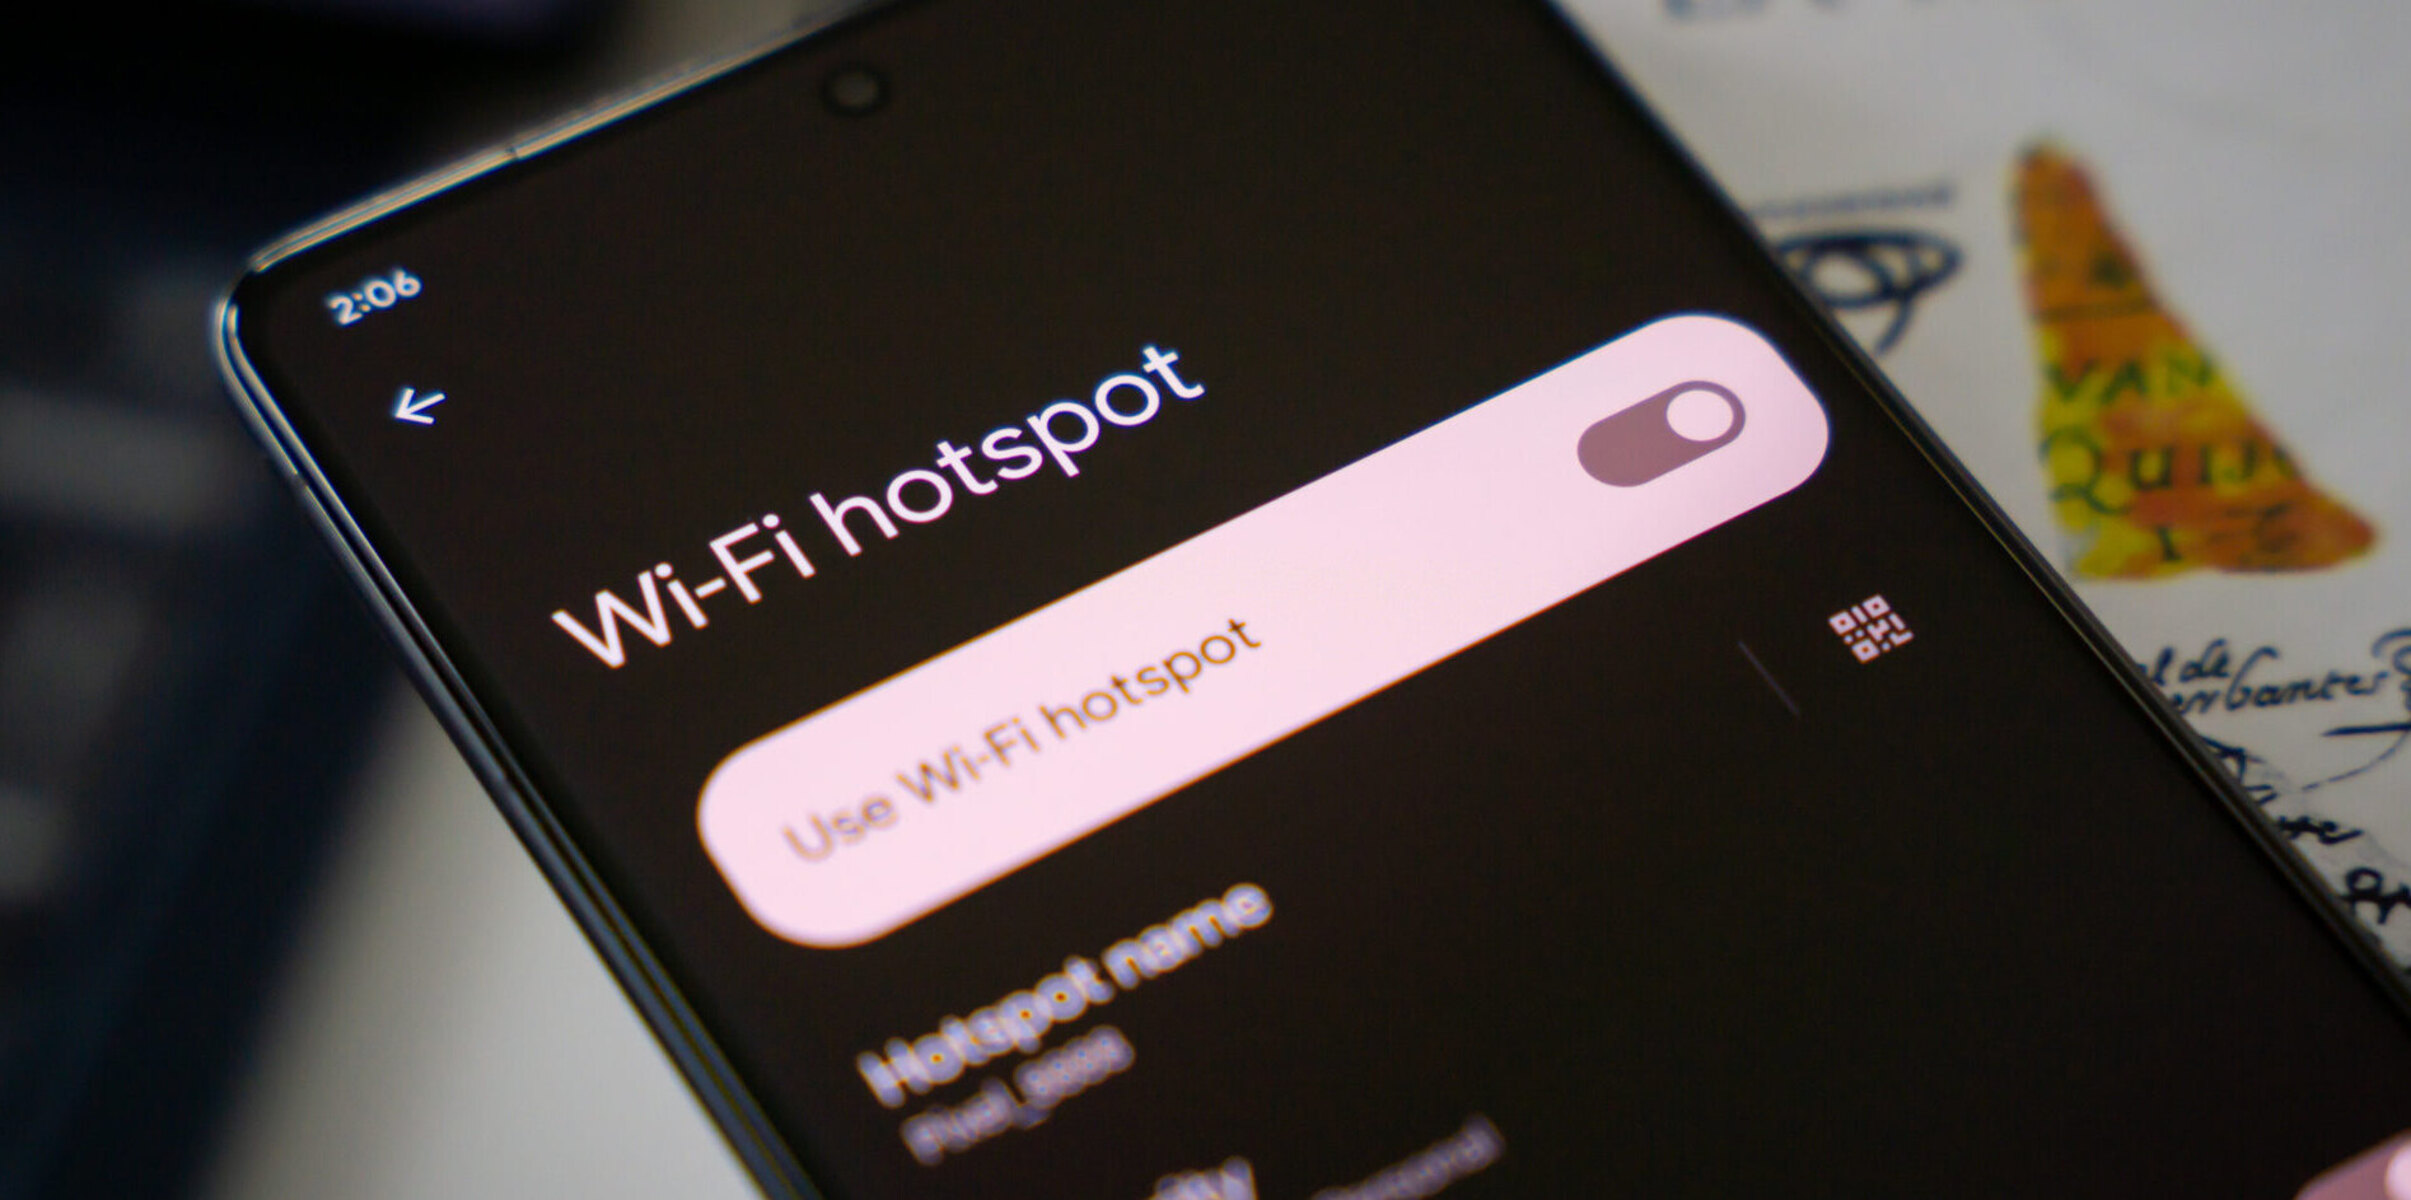
Step 1: Accessing the Hotspot Settings
Accessing the hotspot settings on your Android device is the first step towards customizing your hotspot name. Whether you're using your smartphone or tablet as a hotspot, the process to access the settings is relatively straightforward. Here's how to get started:
-
Open Settings: Begin by unlocking your Android device and navigating to the "Settings" app. This can typically be found on your home screen or in the app drawer. The gear icon is a common indicator for the Settings app.
-
Locate Network & Internet: Within the Settings menu, scroll down and look for the "Network & Internet" option. This section is where you can manage various network-related settings, including your device's hotspot functionality.
-
Select Hotspot & Tethering: Once you're in the "Network & Internet" section, tap on "Hotspot & Tethering." This will lead you to a screen where you can manage your device's hotspot settings, including the option to change the hotspot name.
-
Choose Hotspot Settings: Within the "Hotspot & Tethering" menu, look for the "Hotspot" option and tap on it. This will take you to the specific settings for your device's hotspot feature, allowing you to customize the hotspot name and other related configurations.
By following these simple steps, you can easily access the hotspot settings on your Android device, paving the way for the next phase of updating your hotspot name. With the hotspot settings readily accessible, you'll be well-prepared to proceed to the next step and personalize your hotspot name to better suit your preferences and needs.
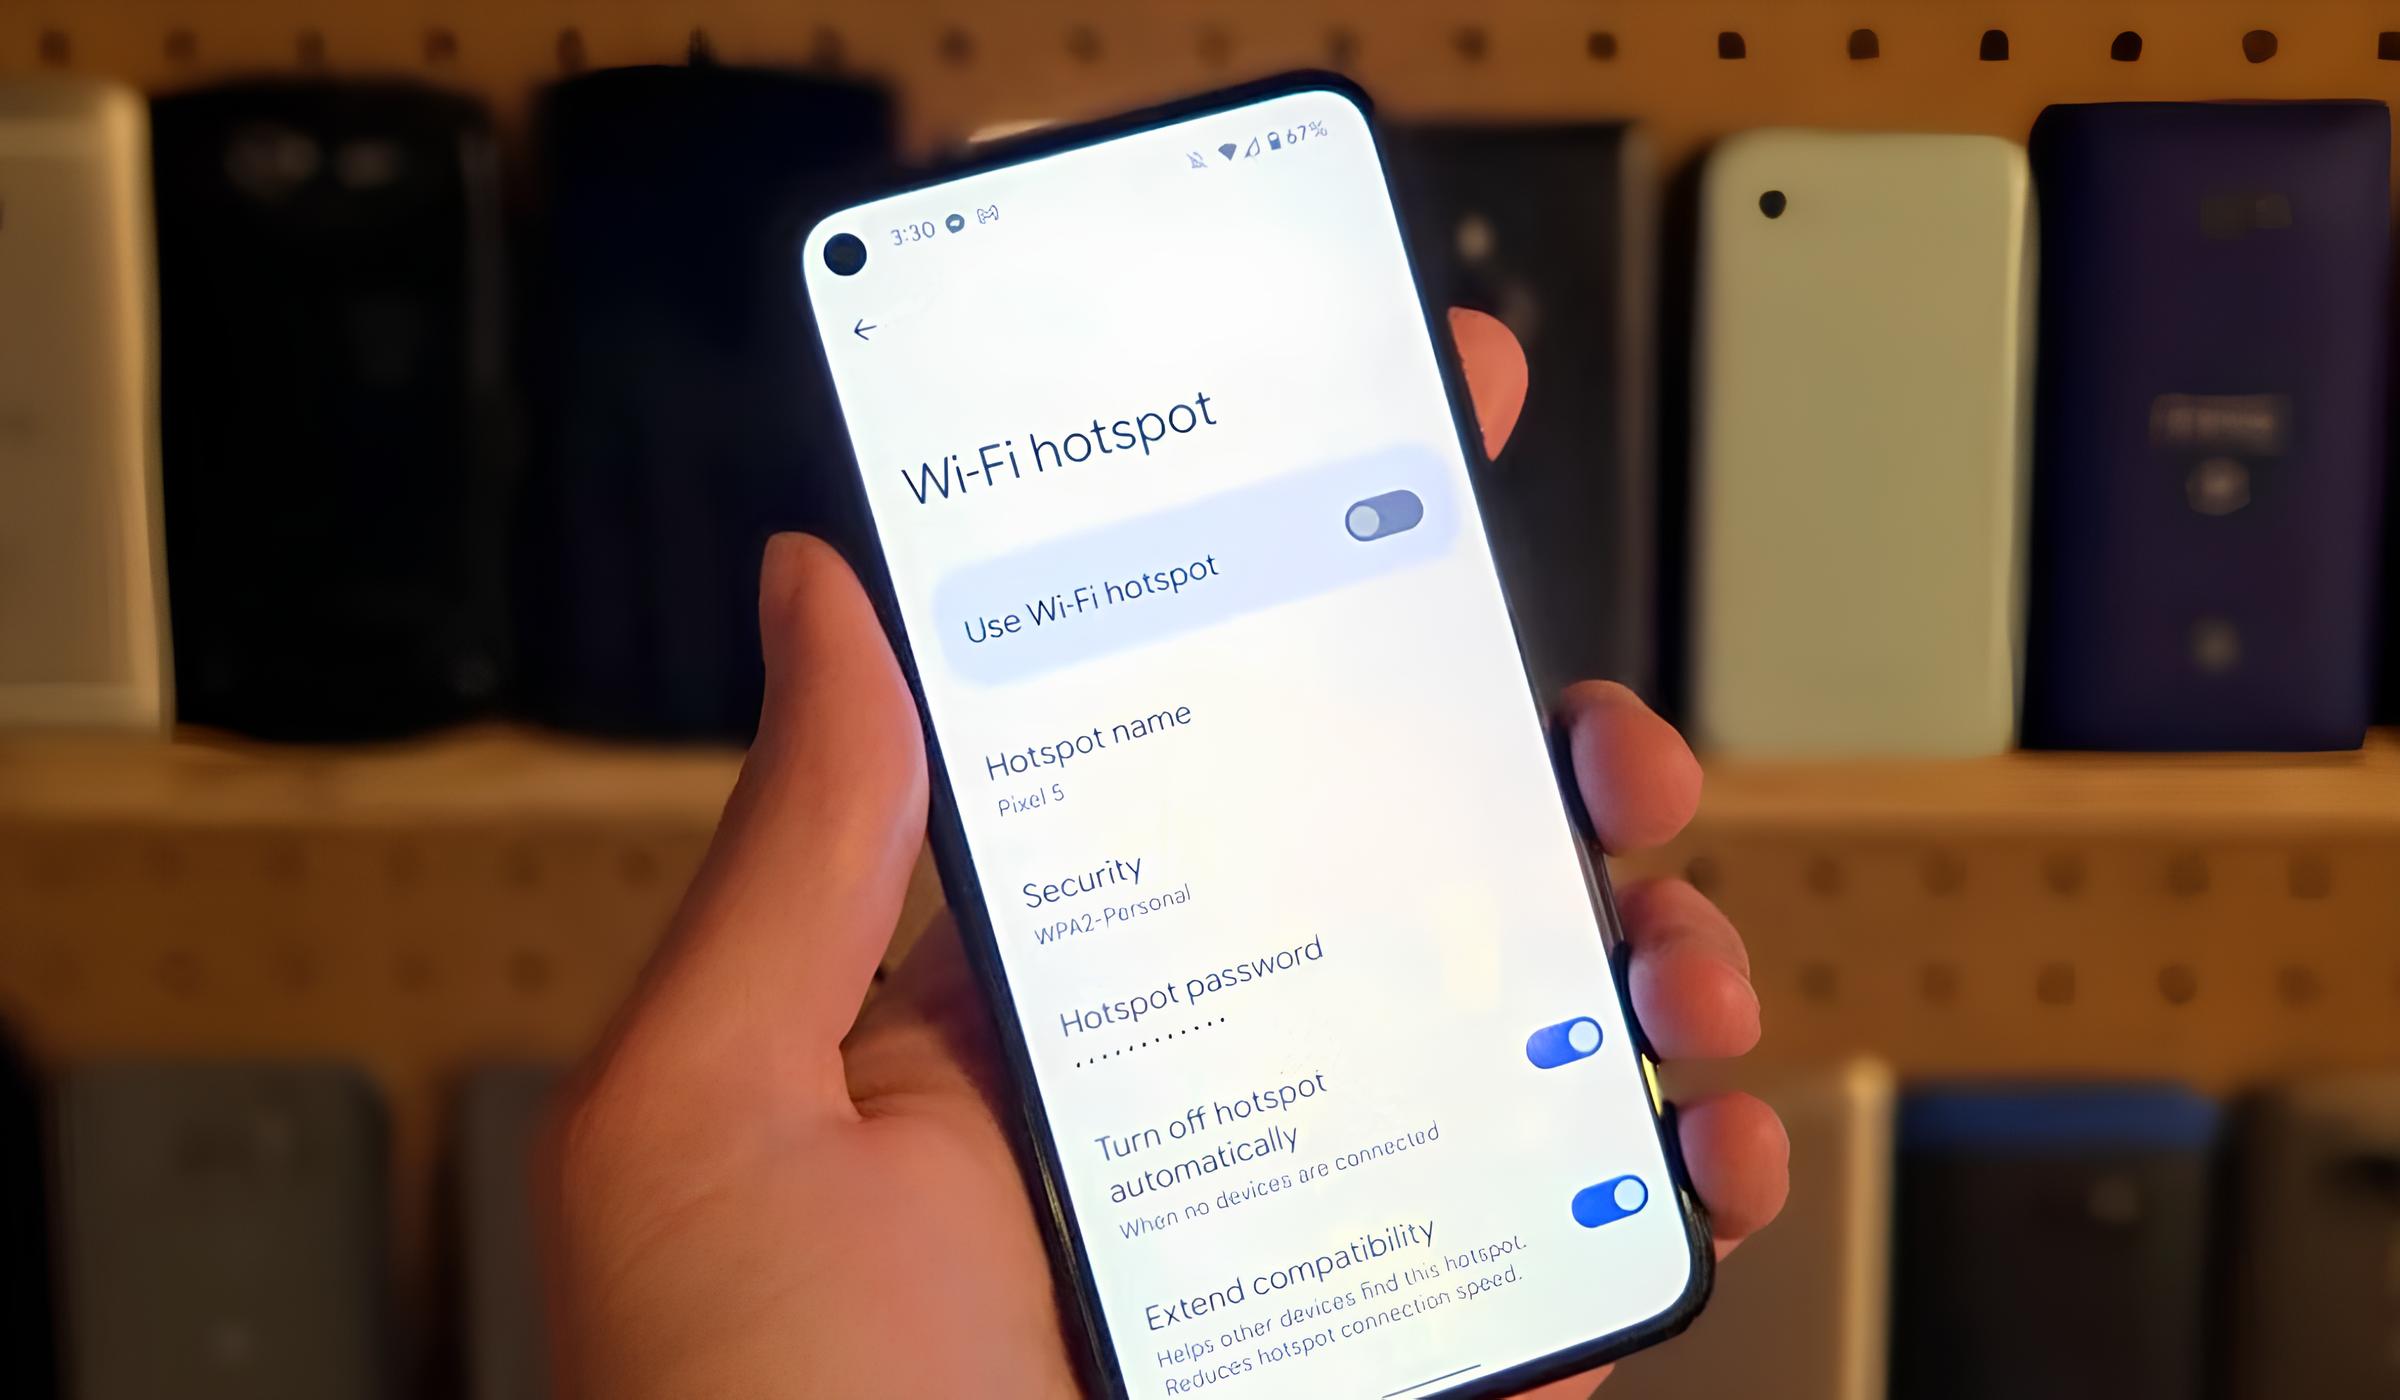
Step 2: Changing the Hotspot Name
Now that you've successfully accessed the hotspot settings on your Android device, you're ready to proceed with changing the hotspot name to reflect your personal style or make it easier for others to identify and connect to your hotspot.
-
Locate the Hotspot Name Setting: Within the hotspot settings menu, look for the option to change the hotspot name. This setting is typically labeled as "Hotspot Name," "SSID," or "Network Name." Tap on this option to enter the field where you can input your desired hotspot name.
-
Enter Your New Hotspot Name: Once you've accessed the hotspot name setting, you'll be prompted to enter a new name for your hotspot. Use this opportunity to get creative and come up with a name that resonates with you or provides clear identification for those who will connect to your hotspot. Whether it's a playful nickname, a reference to your interests, or simply your own name followed by "Hotspot," the choice is yours.
-
Consider Visibility and Clarity: When choosing your new hotspot name, it's important to consider visibility and clarity. Opt for a name that is easy to read and remember, especially in environments where multiple hotspots are available. A concise and descriptive name can make it effortless for others to identify and select your hotspot from the list of available connections.
-
Avoid Special Characters and Emojis: While it may be tempting to use special characters or emojis to make your hotspot name stand out, it's best to stick to alphanumeric characters and standard punctuation. This ensures compatibility and readability across a wide range of devices and operating systems.
-
Save Your New Hotspot Name: After entering your chosen hotspot name, look for the option to save or apply the changes. This may be represented by a "Save," "Apply," or "Done" button, depending on your device's interface. Once saved, your hotspot will now be broadcast with the updated name.
By following these steps, you can seamlessly change the hotspot name on your Android device, allowing you to personalize your hotspot and enhance the experience for those who connect to it. With a distinct and memorable hotspot name, you'll stand out among the available connections, making it easier for others to find and connect to your hotspot with confidence.
Step 3: Saving the New Hotspot Name
After you've carefully selected and entered your new hotspot name, the final step is to save the changes and ensure that your Android device begins broadcasting the updated name. This step is crucial to solidifying your personalized hotspot identity and making it visible to those in range who may wish to connect. Here's how to complete the process of saving the new hotspot name:
-
Locate the Save or Apply Option: Once you've entered your chosen hotspot name, look for the option to save or apply the changes. This may appear as a "Save," "Apply," or "Done" button, depending on your device's interface. It's essential to ensure that your new name is properly saved to activate the update.
-
Confirm the Update: Upon selecting the save or apply option, your Android device will confirm the update and proceed to implement the changes. This confirmation may be accompanied by a brief notification or visual cue, indicating that the new hotspot name has been successfully saved.
-
Verify the Broadcasted Name: To confirm that the new hotspot name is actively being broadcasted, you can check the available Wi-Fi networks on another device. Look for your updated hotspot name in the list of available connections to verify that the changes have taken effect.
-
Connect with Confidence: With the new hotspot name now in place, those wishing to connect to your hotspot can do so with confidence, knowing that they are selecting the correct network. Whether it's friends, family, or colleagues, the distinct and personalized hotspot name you've chosen will make it easier for them to identify and connect to your hotspot without confusion.
By completing these steps, you have successfully saved the new hotspot name on your Android device, ensuring that it is now being broadcasted with the updated identity. This simple yet impactful customization not only adds a personal touch to your hotspot but also enhances the overall experience for those who rely on your connection. With a clear and memorable hotspot name, you've made it effortless for others to find and connect to your hotspot, setting it apart from the generic and nondescript options often encountered in public settings.
Conclusion
In conclusion, updating your hotspot name on your Android device is a simple yet impactful way to personalize your portable network and enhance the experience for those who rely on it. By following the easy steps outlined in this guide, you've gained the ability to customize your hotspot name, making it easier for friends, family, or colleagues to identify and connect to your network without confusion.
With a distinct and memorable hotspot name, you've set your network apart from the generic and nondescript options often encountered in public settings. Whether you're at a bustling café, a crowded event venue, or a busy airport, your personalized hotspot name adds a touch of individuality and makes it effortless for others to find and select your network among the available connections.
Furthermore, the process of updating your hotspot name empowers you to express your personality, interests, or simply provide clear identification for your network. This personalization not only reflects your individual style but also contributes to a seamless and enjoyable connection experience for those who rely on your hotspot.
Additionally, the visibility and clarity of your updated hotspot name play a crucial role in ensuring that others can easily identify and select your network from the list of available connections. This is particularly valuable in environments where multiple hotspots are present, as a concise and descriptive name can make all the difference in swiftly connecting to the correct network.
By taking the time to customize your hotspot name, you've demonstrated a commitment to providing a user-friendly and easily recognizable network for those in your vicinity. This small yet meaningful customization can make a significant difference in the convenience and efficiency of connecting to your hotspot, ultimately enhancing the overall networking experience for both you and those who rely on your connection.
In essence, the ability to update your hotspot name on your Android device empowers you to infuse your network with personality, clarity, and individuality. By leveraging this simple customization feature, you've not only personalized your portable network but also contributed to a more seamless and enjoyable connection experience for everyone involved.