

Have you ever wanted to add an arrow to your Google Doc, but didn’t know how? Or maybe you’ve tried to insert an arrow, but it didn’t look the way you wanted it to.
If so, you’re not alone. Many people find it difficult to insert arrows in Google Docs, especially those who are relatively new to the free document editing platform.
Arrows are quite useful when it comes to editing documents because they serve as versatile symbols that can be used in a wide range of contexts.
On Google Docs, there are various methods that you can use to add different types of arrows to your documents. These methods include using the built-in drawing tool, exploring the Special characters feature, and utilizing various keyboard shortcuts amongst others.
If you’re looking to add arrows to your document on Google Docs, you’re on the right page. In this article, you will learn how to insert arrows in Google Docs in a few easy steps. We will also provide some tips on how to format your arrows so that they look great.
Quick Answer:
To insert a simple arrow into your Google Document, follow these steps.
- Open the document.
- Go to the Google Docs menu bar.
- Select “Insert” > “Drawing” > “New“.
- Select the arrow line.
- Draw the arrow line on the given canvas.
- Customize the arrow.
- Insert the arrow into your document.
How To Insert Arrows In Google Docs (3+ Methods)
On Google Docs, there are a couple of methods you can use to insert arrows into your documents and the method to consider will highly depend on what you what you want to use the arrows for.
Below, we explain all the methods you can use to insert arrows into your Google Document in detail.
Method 1: Using the Google Docs Drawing tool.
One method you can use to add arrows to your document, especially for illustrative purposes is to make an arrow in the Google Docs drawing tool, customize and insert the arrow to your document then set the appropriate text wrapping option.
Here is how to insert arrows in Google Docs using the Drawing tool.
Step 1: Sign into your Google account and open your document.
First, go to Google Docs the sign into your Google account.
If you’re already signed into Google Docs, then you should see a list of all your documents. Select the document you want to add the arrow(s) to and it should open up on a new Google Docs window on your web browser.
If you’re already signed into your Google account and have the document opened on your browser, you can skip this step.
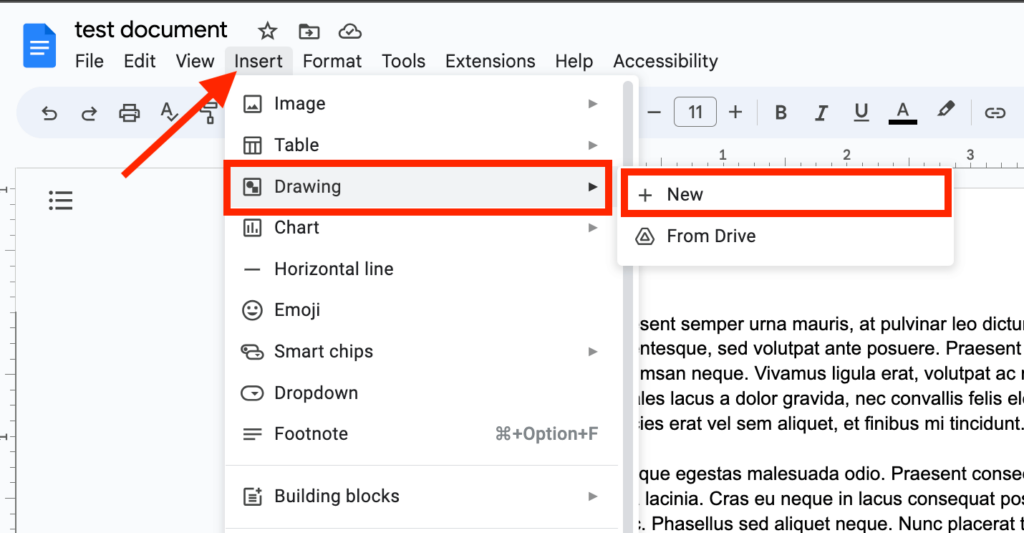
Step 2: Open the Google Docs Drawing tool.
Next, go to the Google Docs menu bar, click on “Insert” > “Drawing” then select “New” to launch the drawing tool.
Step 3: Add an arrow shape/line.
Now, you will need to draw an arrow in the drawing tool. There are 2 types of arrows on the drawing tool – the arrow shape and the arrow line. Depending on the type of arrow you want to insert into your document, you can use any of these two types.
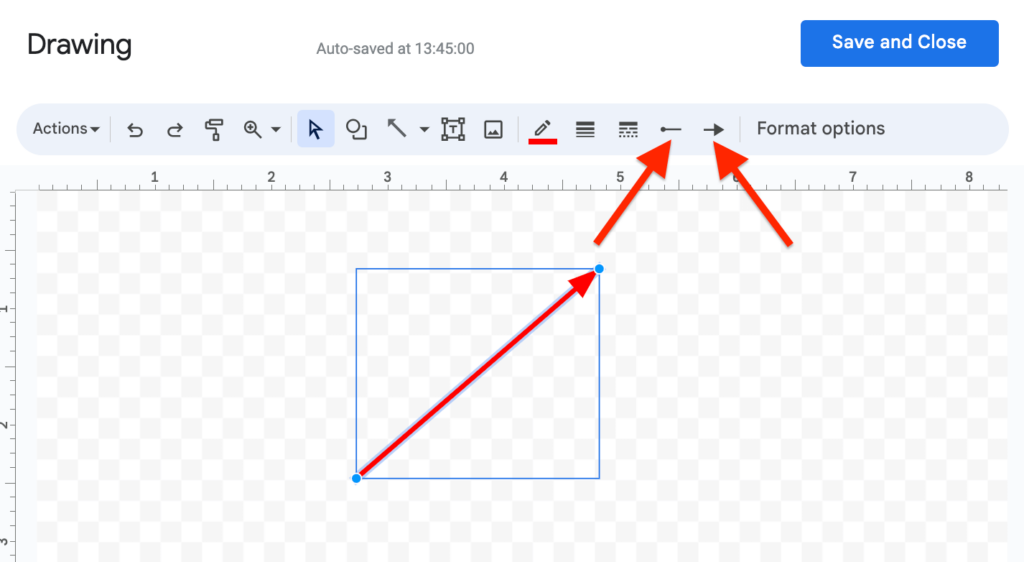
To add an arrow line, click on the small upside-down triangle next to the Line icon then select “Arrow” from the available line options.
After selecting the arrow line, go back to the canvas and draw an arrow of your desired length as shown in the screenshot below.
If you want to use a bigger/more advanced arrow shape instead, click on the “Shape” icon on the toolbar, select “Arrow” from the sub-menu then select any of the available arrow shapes of your choice.
After that, go to the canvas and draw the arrow shape you selected manually.
Step 4: Customize the arrow.
After drawing the arrow on the canvas, it will most likely not look like something you would like to insert into your document right away so to improve the visual appearance of the arrow, you will need to customize it.
On the Google Docs drawing tool, there are a handful of customization options which should be just enough for whatever appearance you want to achieve with the arrow.
Depending on the type of arrow you drew on the canvas (line or shape), you can change the line weight, line dash, line color, line start (and end), and fill color amongst others.
To change the line color of the arrow, select the arrow on the canvas then head over to the toolbar, click on the “Line color” icon then select any color of your choice.
To change the thickness of the arrow, click on the “Line weight” icon then select try out a couple of the values available on the dropdown until you get your desired line thickness/weight.
Also if you want to change the design of the line dash of the arrow to something like the dotted lines on the Google Docs drawing tool, click on the “Line dash” icon and select any of the available line dash designs depending on your preferences.
Lastly, you can customize the line’s start and end on your arrow. To do this, go to the toolbar and click on the “Line start” icon (to customize the start of the line) and “Line end” (to customize the end of the line) then select any of the available icon designs of your choice.
Step 5: Insert the arrow into your document.
When you’re done customizing the arrow, click the “Save and close” button at the top right corner of the dialog to save the design, close the drawing tool, and insert the arrow into your document.
Step 6: Set the text wrapping style and adjust the arrow.
Now after inserting the arrow into your document, you will notice that you cannot move it from the area where it was inserted and that is because the text wrapping style is set to “In Line” by default. You have to change this to move it.
To change the text wrapping style, simply select the arrow and then choose the “In front of text” option from the available text wrapping options.
After doing that, you should be able to move the arrow to anywhere you like on the document and also adjust the height and width of the arrow without issues.
And that’s how you can insert an arrow in Google Docs using the drawing tool.
Method 2: Using the Special characters tool.
Another way to insert different types of arrows to your document in Google Docs is by using the Special Characters tool.
If you don’t know by now, the Special Characters tool on Google Docs allows users to insert various special characters that are not available on the keyboard into their documents easily and this includes arrows too!
Here is how you can insert arrows in Google Docs using the special characters tool.
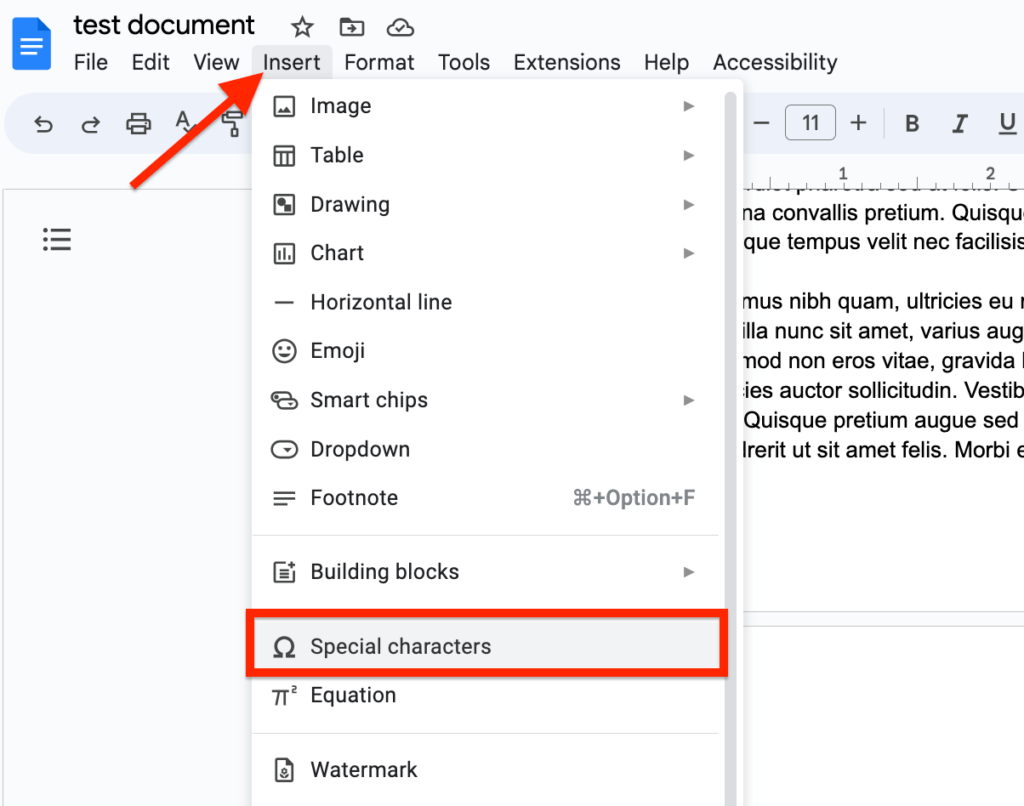
Step 1: Open up the Special Characters tool.
First, go to the Google Docs menu bar and click “Insert” then select “Special characters” from the available menu options. This should open up the Special characters dialog box.
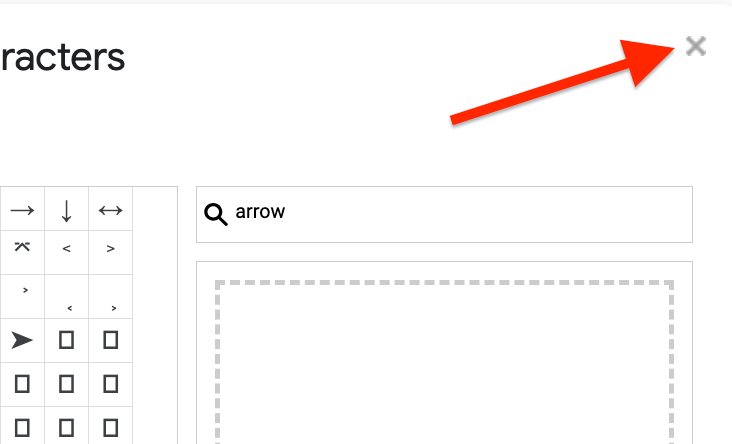
Step 2: Type in “arrow” in the search box.
On the dialog, go to the search box and type in “arrow” then wait for it to bring up the search results in the LHS of the dialog.
Step 3: Select your desired arrow style to insert.
Now you should see a list of arrows with different design styles. Click on any arrow of your choice from the search results to insert it into your document.
Step 4: Close the tool.
Finally, when you’re done with inserting the symbol into your document, click on the “X” sign in the top right corner of the dialog to close the tool.
And that’s how you can insert arrows into your document using the Google Docs special characters tool.
Method 3: Using keyboard shortcuts.
The final method of inserting arrows in Google Docs which we will be discussing is utilizing various keyboard shortcuts depending on the operating system you currently use.
This is probably the easiest method you can use to insert an arrow in your document since it only requires specific key combinations on your keyboard.
To type arrows on Google Docs, you can use any of the following keys outlined below.
| Arrow Type | Keyboard Shortcut (Windows) |
| ↑ | Alt + 24 |
| ↓ | Alt + 25 |
| → | Alt + 26 |
| ← | Alt + 27 |
| ↨ | Alt + 23 |
| ↔ | Alt + 29 |
On MacOS, there is no known method to insert arrows directly using keyboard shortcuts, but you can insert an arrow to your document in Google Docs on Mac by using the emoji keyboard.
To access the emoji keyboard, hit Control + Command + Space on your keyboard and the on-screen emoji keyboard should open up.
Now, type in “arrow” in the search box and then click on the arrow you want to use to insert it into your document. Easy!

Wrapping Up
In conclusion, there are a handful of methods you can use to insert arrows into your document on Google Docs.
Here in this article, we explored 3 methods of adding arrows in Google Docs in detail with additional screenshots to help you understand better.
The first method we discussed is by using the Google Docs drawing tool which allows users to create just about any shape/line and insert it into their documents.
Another way to insert arrows in your documents on Google Docs is by utilizing the special characters tool on the platform. Lastly, you can also use a couple of keyboard shortcuts to insert specific arrow types into your document.
