
Getting locked out of your iPhone, perhaps because you forgot the passcode or entered the wrong one too many times, can be frustrating, especially if you rely on it for day-to-day activities. Thankfully, it’s possible to unlock a disabled iPhone.
Keep reading, and we’ll show you four ways to unlock your iPhone without a passcode.
What happens if you forget your iPhone passcode?
iPhones and iPads offer four attempts to enter a correct passcode. If you forget your passcode and can’t unlock the device in four attempts, it will disable your device for one minute. During this time, you can’t enter a passcode, open the Control Center, access your notifications, place calls, or perform any other tasks. You can, however, place Emergency Calls on your device.
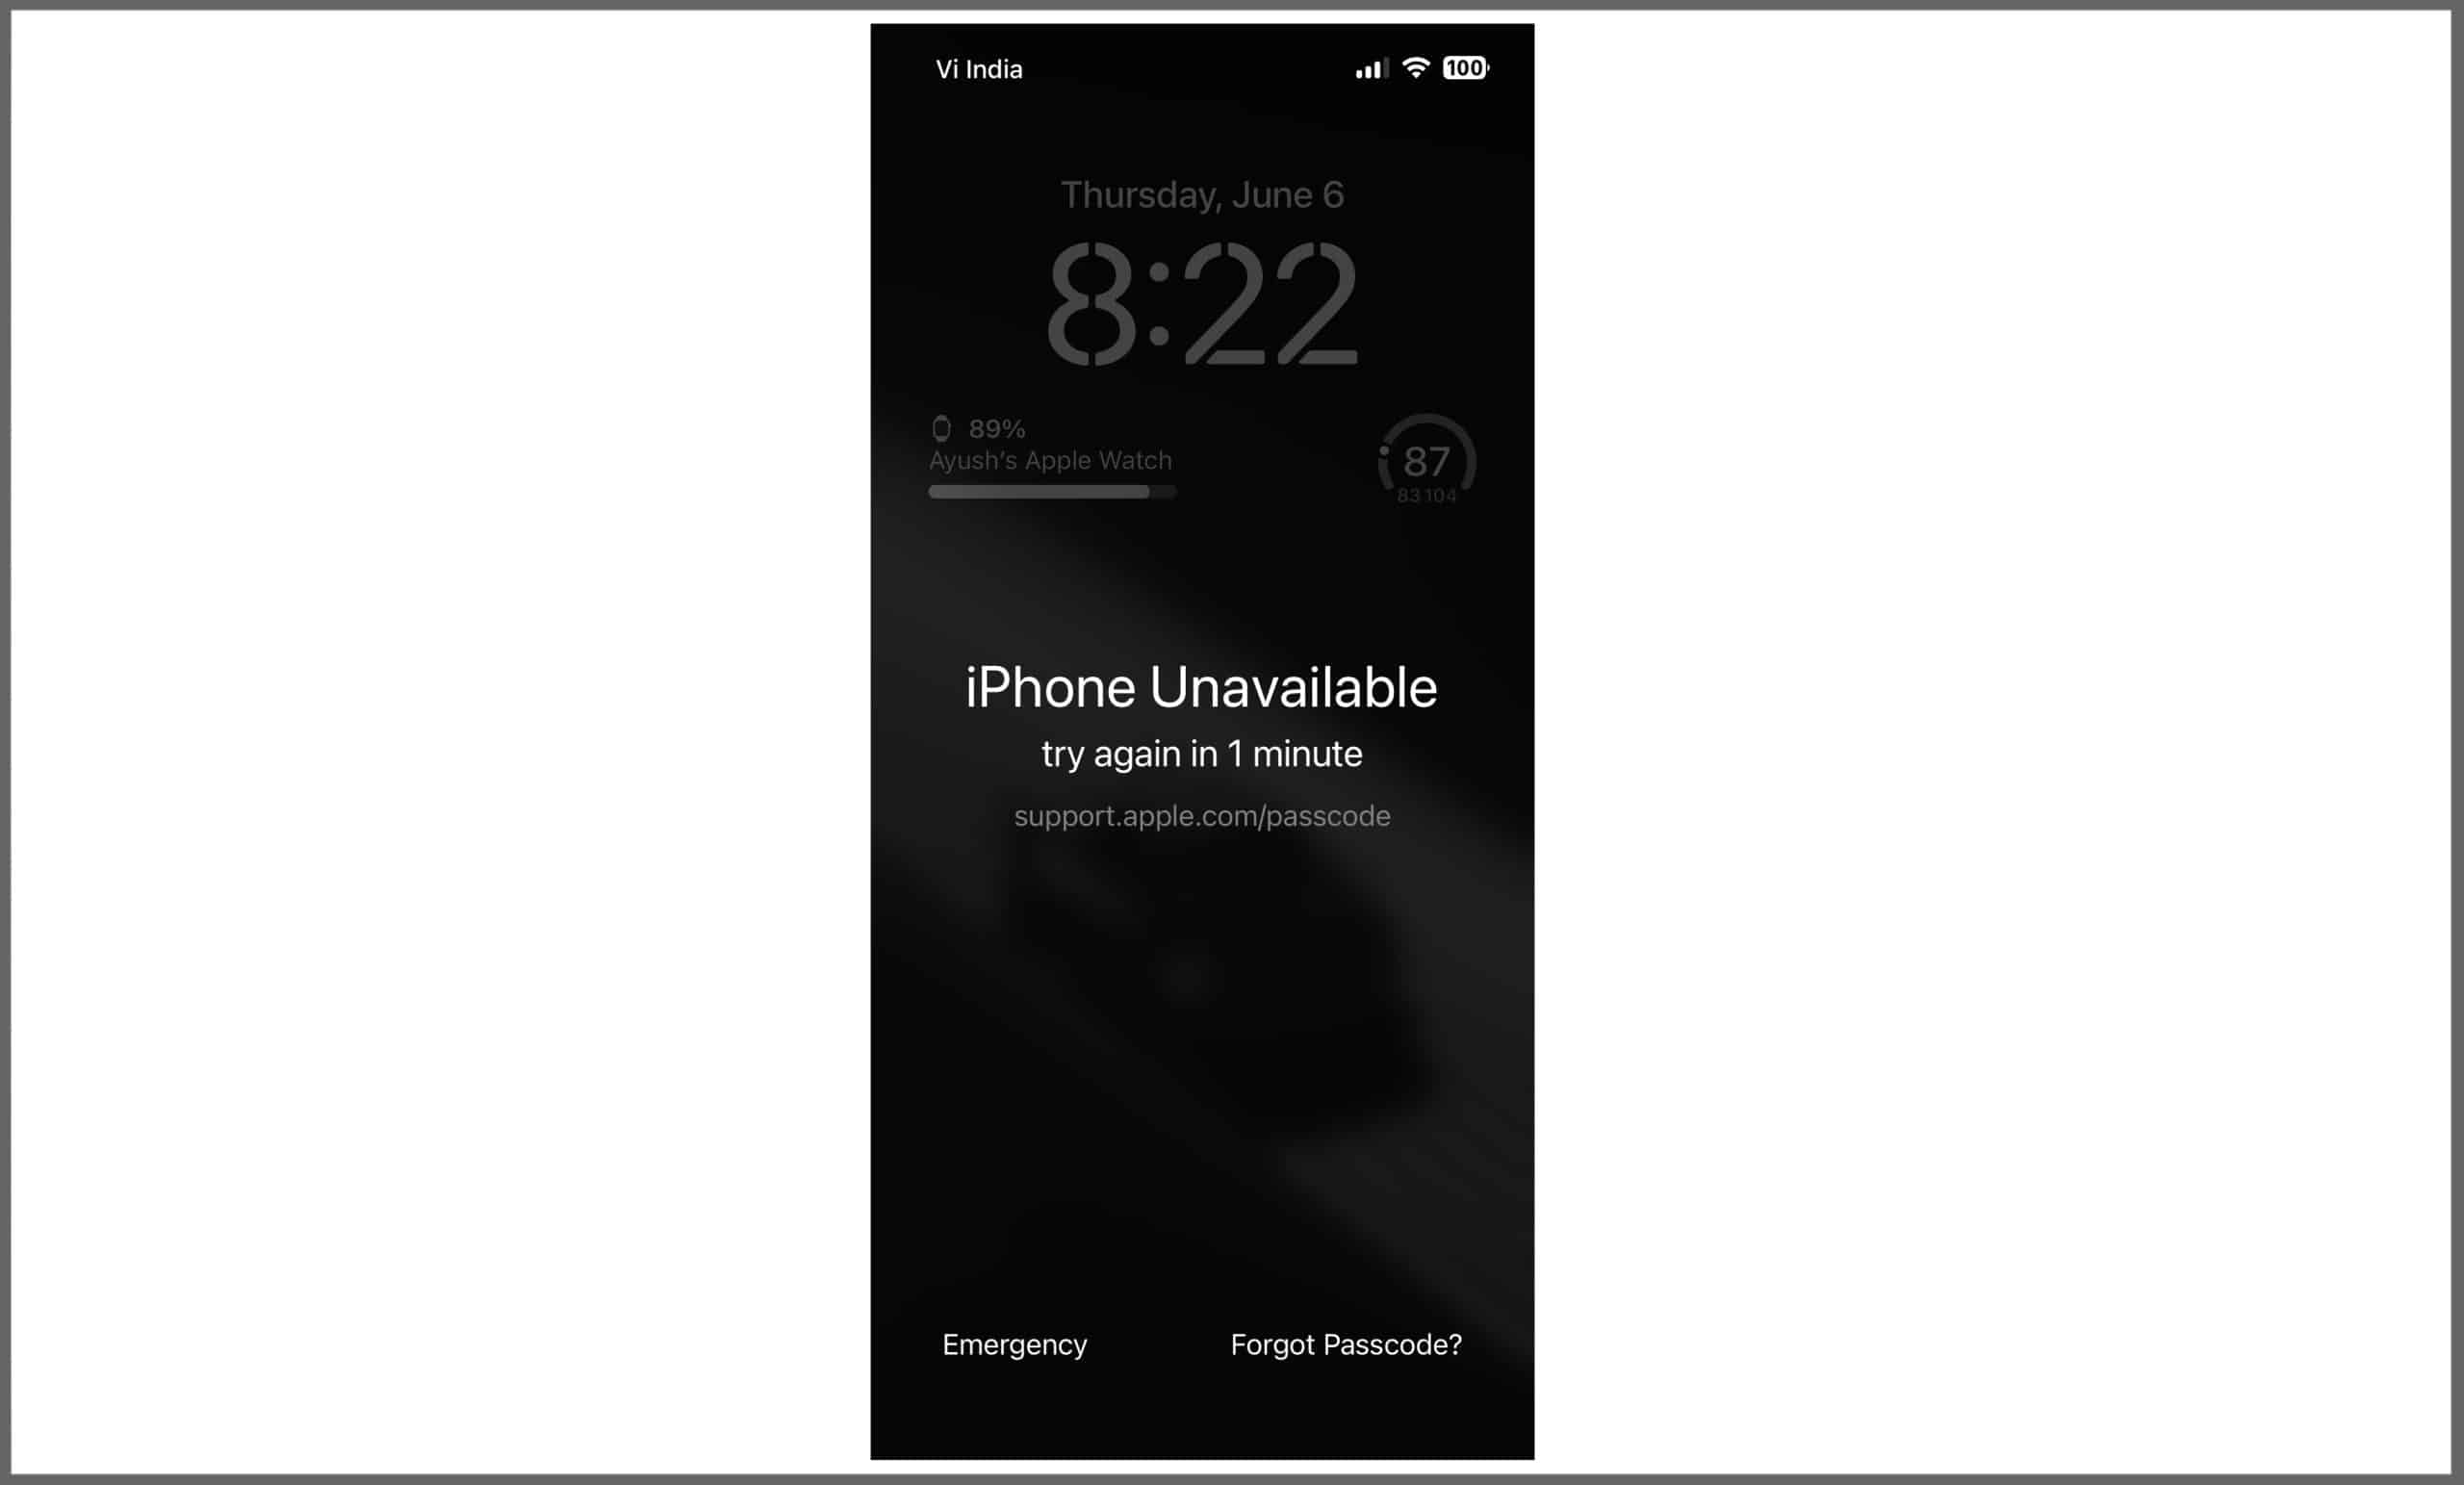
Once the timer ends, you get another chance to enter the passcode. However, every time you enter an incorrect passcode, the time limit increases to prevent brute-force attempts to guess the passcode. This means that if you enter the wrong passcode five times, your device will be disabled for five minutes. If you enter the wrong passcode six times, your device will be disabled for 15 minutes, and so on.
If you changed your password recently and can’t remember it, you can still use the old passcode to unlock your device for up to 72 hours. You’ll just need to tap Forgot Passcode and then tap Enter Previous Passcode. But if it has been more than 72 hours, you must erase your device to reset the passcode.
4 ways to unlock your iPhone if you forgot passcode
There are four ways to erase your iPhone or iPad if you forget its passcode. Let’s check them out.
How to unlock iPhone without passcode
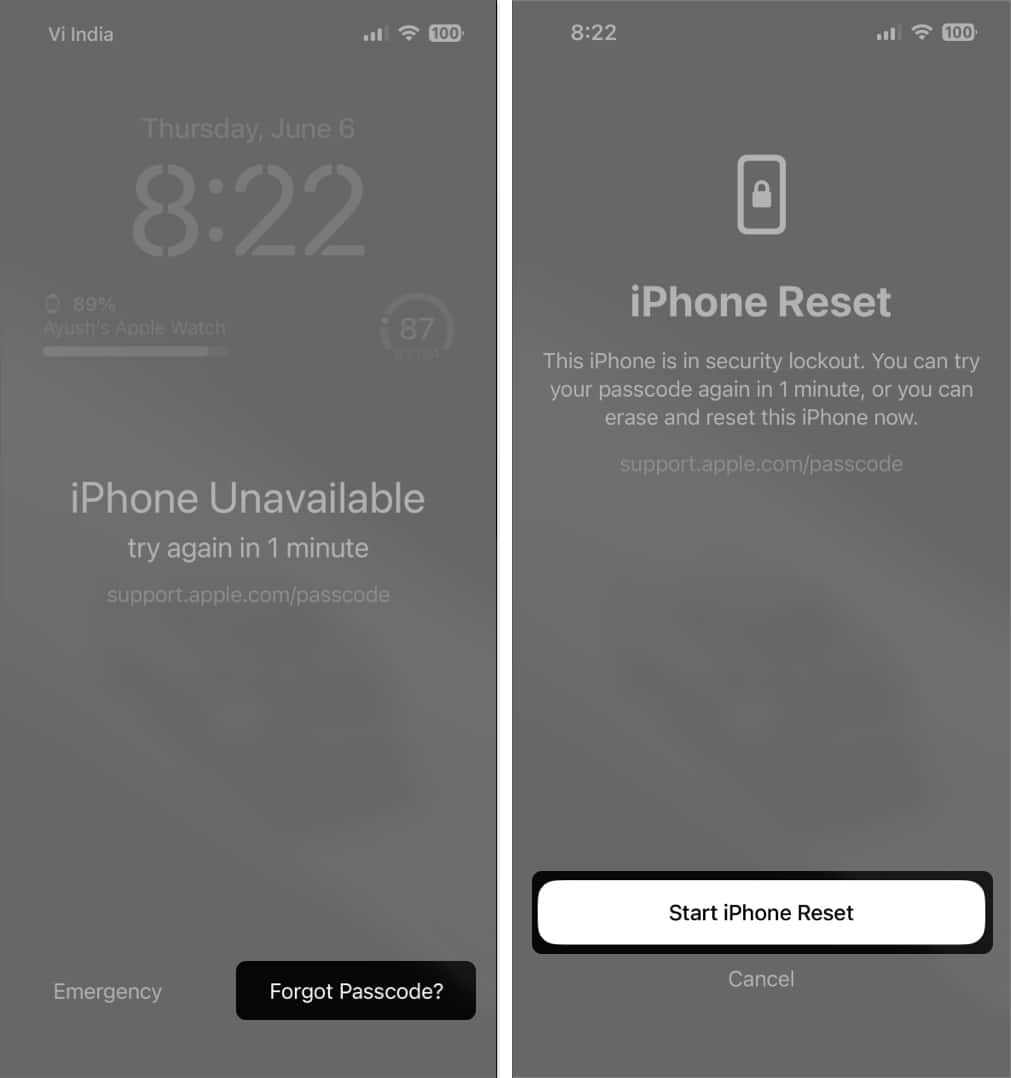
If your iPhone is disabled after you entered the wrong passcode too many times, you’ll see a Forgot Passcode option in the bottom-right corner of the screen. This option lets you erase your device and deactivate the passcode lock wirelessly without entering Recovery Mode. Here’s what you need to do:
- Press the Side button to wake up your iPhone or iPad.
- Then, tap Forgot Password in the bottom-right corner.
- Tap Start iPhone Reset.
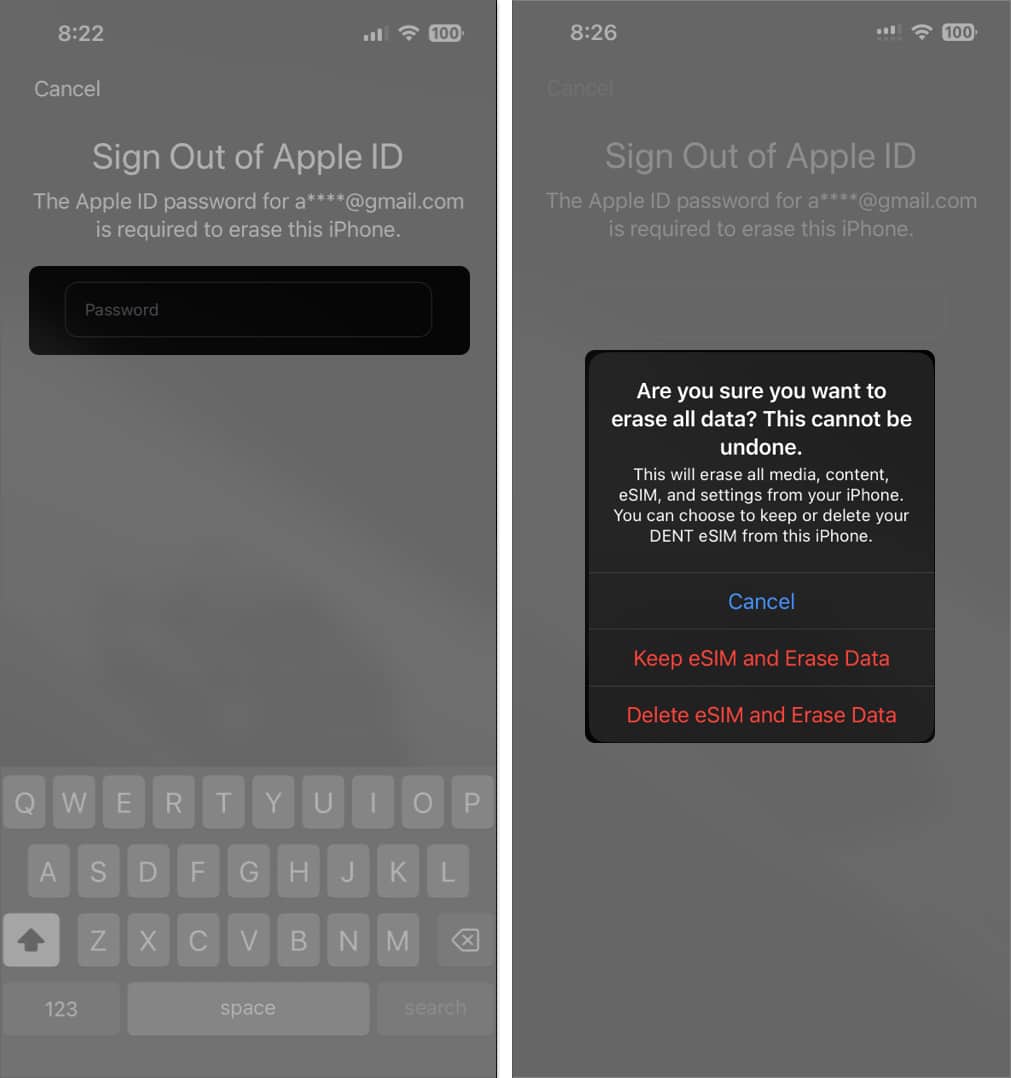
- Enter your Apple ID password.
- If your device uses an eSIM, tap Keep eSIM and Erase Data.
- On devices without an eSIM, hit Erase Device.
As soon as you do this, your iPhone or iPad will restart, and you’ll see an Apple logo along with a grey progress bar appear on the screen. After your iPhone or iPad boots up, you’ll be greeted with a Hello screen. From here, you can take over and set up your device.
How to reset iPhone passcode using Mac
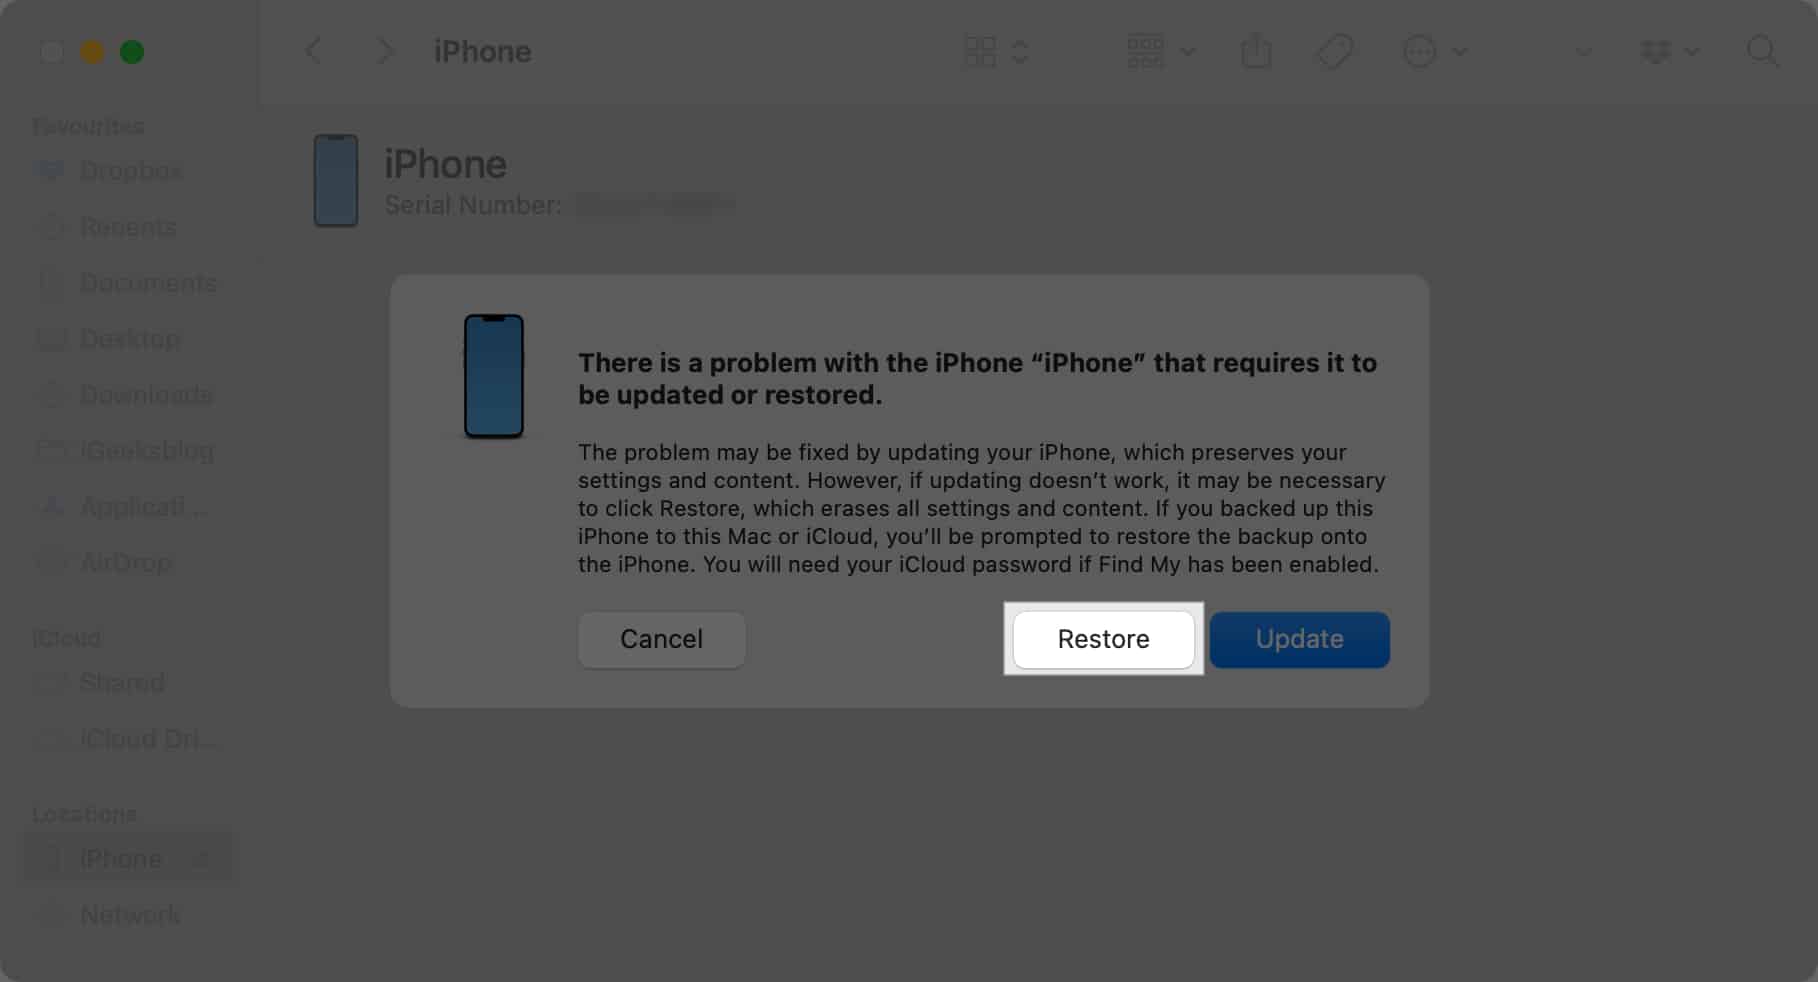
Another way to reset your iPhone or iPad passcode is to use a Mac to erase your iPhone via Recovery Mode. Here’s what you need to know:
- Connect your iPhone or iPad to your Mac using a compatible cable.
- Boot your iPhone or iPad in recovery mode using the appropriate steps.
- Locate your device in the Finder (or iTunes if you use an older Mac).
- Click Restore on the prompt asking you to restore or update your iPhone or iPad.
- Once your iPhone or iPad boots up, disconnect it from your Mac.
How to reset your iPhone passcode using Windows PC
Just like a Mac, you can also use a Windows PC to erase your iPhone or iPad and reset the passcode. However, in this case, you’ll have to use iTunes or the Apple Devices app instead of Finder. Here’s the step-by-step process you need to follow:
- Connect your iPhone or iPad to your PC using a compatible cable.
- Boot your iPhone or iPad in recovery mode using the appropriate steps.
- Now, locate your device in the Apple Devices app or iTunes for Windows.
- Click Restore when you see the option to restore or update on the PC.

- Once your iPhone or iPad boots up, disconnect it from your PC.
How to reset iPhone passcode using Find My
Besides finding your lost devices and keeping track of your belongings with an AirTag, you can also use Apple’s Find My app to reset your iPhone passcode wirelessly. The prerequisites are that you need to have Find My enabled on your locked device and that it’s connected to the internet over cellular or Wi-Fi. With that out of the way, here’s the process to erase your iPhone using Find My:
- Go to icloud.com/find using any web browser.
- Click Sign In and login using your Apple ID credentials.
- Then, select your iPhone or iPad from the list of devices.

- Select Erase This Device and tap Next to reset the device.

This will remove all your data and the passcode from your iPhone or iPad. You can use the device again after entering your Apple ID password to verify your identity and disable the iCloud Activation Lock.
What to do after resetting your iPhone passcode
You can’t use your iPhone or iPad right away after resetting the passcode. As your device will be erased during the process, you’ll need to decide whether to set it up as a new device or restore the data from a backup or old device. Here’s a closer look at all the things you need to do after resetting your passcode:
- Set up your device: After you reset the passcode, you’ll need to set up the iPhone or iPad before you can use it. This involves configuring the region, language, and privacy settings and setting up a new passcode or registering Face ID.
- Restore your data: During the device setup process, you’ll come across a screen labeled Apps & Data. If you have an iCloud backup or a physical backup on a Mac or Windows PC, you can restore your data from here.
- Re-download apps and other data: If you’re setting up your iPhone or iPad as a new device, you’ll need to download all the necessary apps from the App Store manually. However, if you restore your data from a backup, you don’t need to do this, as it will automatically download all your apps on the device.
Wrapping up…
As you’ve seen, there are several ways to reset your iPhone’s passcode. If you have access to a computer, you can reset the passcode by erasing your iPhone via Recovery Mode or the Erase This Device option in Find My. However, if you don’t, you can use the Forgot Passcode option on the Lock Screen. Regardless of how you do it, you’ll have an unlocked iPhone in the end, ready to use like it’s new.
No. Resetting your iPhone passcode without losing your data is impossible. Regardless of which method you use, it will erase all your data. You can only get your data back by restoring your device from an existing backup.
Also read:
- Forgot your Apple Watch password? Here’s how to reset it
- How to reset the Apple ID password
- How to reset your Mac password if you forgot it
🗣️ Our site is supported by our readers like you. When you purchase through our links, we earn a small commission. Read Disclaimer.