Cast Iron ToysBy Mark Chervenka
Cast Iron Toys
Cast iron was the 19th century equivalent of today's modern plastics — the raw ingredients were cheap, it could be made in almost any shape, and identical pieces could be mass produced in molds. Unfortunately, those are also the very reasons why so many toys are reproduced in cast iron. This article will discuss the ways to tell new from old cast iron toys beginning with an explanation of iron casting.
All cast iron toys, both new and originals were made with a foundry method called sand casting. The process is called sand casting because the molten iron is poured into molds made from tightly packed sand. Sand casting begins with a full sized three dimensional model or master pattern. Master patterns can be wood, plaster and other materials but most toys used brass or bronze masters for better detail and long life. Most toy master patterns were designed to make several parts at each casting.
Master patterns are placed in a wooden four sided box called a casting frame. The pattern is placed in the frame and tightly packed with a special sand called casting sand or foundry sand. When the pattern is removed, a hollow impression of the pattern is left in the sand (see Figs. 2 & 3). Each mold requires two frames-- one frame for the top half of the mold, a second frame for the bottom (for more details on casting see the glossary of foundry terms at the end of this article).
The frame halves are locked together and the molten iron is poured into the mold. The iron runs into the hollow impression and forms a copy of the master pattern. After cooling, the frames are separated and the cast piece is removed for finishing. Sand molds are generally used only once but may be used again. The number of times a mold can be used depends on the skill of the workers, the complexity of the master pattern and the level of quality acceptable in the finished casting.
Two other basic sand casting terms you should know are runner and gate. A runner (Fig. 4, A) is a channel usually down the center of a mold which feeds molten metal into the individual castings. The point where the runner branches off into the casting is called a gate (Fig. 4, B). A pattern which can make more than one piece at each pouring, like the master pattern in Fig. 3, is called a gated pattern. Gates and runners are important because the marks they leave can often be used to tell how and when the casting was made.
Separating New from Old
New cast iron toys are made in the same general way as old originals. However, there are certain differences that let you tell new from old.
Several important differences between new and old cast iron toys are related to the casting sand. Casting sand used in original molds was generally finer than the casting sand used in modern reproductions. This means that old cast iron almost always has a much smoother surface than new castings made with coarser sand. The surface of old cast iron both looks smooth and feels smooth to the touch. New cast iron generally has small prickly bumps that rise above the surface and holes or pits that go below the surface (Figs. 5-6). The rough texture is the most obvious on unpainted surfaces so try to look on the inside or underside of toys. Better yet, depending on the type of toy, ask the seller to take it apart for a thorough examination.
A second major difference caused by the casting sand is the amount of detail in new and old cast iron. The finer the sand, the tighter it could be packed around the master pattern which transferred more and smaller details to the sand mold. Old castings, therefore, almost always have sharper lines and more detail; new castings are generally less sharp, blurred and lack the fine details found in old pieces cast with finer sand. (Figs. 7-8). The finer sand also meant the two halves of the mold fit together tightly. Most new molds don't fit together very well and molten metal runs out through gaps where mold halves meet. This is called finning (Fig. 8) and is seldom found on old pieces but is common among reproductions.
Another reason old cast iron toys generally have sharper details is that they were cast from a mold made from an original master pattern. Most cast iron reproductions on the other hand, use actual antique toys as master patterns or copies of other copies. Cast iron shrinks 3/32 to 1/8 of an inch per foot between mold and casting; this means each time a piece is copied, a certain amount of distortion occurs which results in loss of detail. Even if an old piece is taken apart and used as a pattern, normal shrinkage will mean the reproduction will be smaller than the original. Although the shrinkage seems small, the effect is multiplied by the total number of pieces used. If a toy is assembled from 10 different parts, for example, each of those parts will be smaller than the original. Having each piece off just a small amount can greatly affect how the entire toy looks when it's assembled.
In one way, normal shrinkage is an advantage to a knowledgeable buyer. If you know the measurement of an authenticated original, you can compare the measurements of the original to the test piece. Most reference books on specific types of cast iron toys, like banks for example, list this information in detail. Some books go so far as to include base tracings of the original pieces to make identification even more precise (Figs. 10-11). Although tracings aren't always practical, you should get in the habit of checking measurements. Keep in mind that most reproductions are smaller due to normal shrinkage that results from copying. Some reproductions, however, may deliberately cast in sizes never originally made to avoid direct comparisons with originals.
Another difference between old and new cast iron toys is the amount of hand finishing; most all old pieces had at least some hand finishing, most reproductions have none. You can see evidence of this in the way the separate pieces are joined. The matching halves of original cast iron toys were often fitted together by hand filing or at least had the edges tumbled smooth in a machine. This extra attention to fit produced a very tight seam in original cast iron toys (Figs.14-15). The seams in new cast iron are typically very loose and carelessly made—gaps in seams are frequently 1/8" and more in width (Figs. 12-13). What little finishing work is done on reproductions is usually performed with modern high speed production tools which leave obvious grinding marks, (Fig. 6). Whenever you see these marks, especially if they are bright and shiny with no patina, it usually means the piece is a reproduction.
The way new and old iron is painted is another indication of age. Old iron usually was decorated with fairly heavy paint, most frequently some type of oil based enamel. New pieces are typically decorated with a much thinner paint which is usually a water based acrylic. Old and new paints were also applied differently. Many old pieces were dipped in paint, not painted with a brush (although small details may have been added by a brush). Many new pieces are painted with air powered spray guns to speed production. The use of thicker paint and the heavier coatings of paint produced by dipping produces a distinctive wear pattern in original painted cast iron toys.
This wear pattern is characterized by sharp edged paint chips (Figs. 16-17). New, thin paint on the reproductions does not chip even if you deliberately gouge it. If you look at the chips in Fig. 16 at the white arrows, you'll see a second color of paint show up as a light inner ring. This is another sign of the older, thicker paints—most chips will show one or more additional colors underneath the top layer of paint. The different layers of colors appear in the order they were applied.
Dipping also leaves paint on surfaces that are hard to reach with an spray gun or brush—like inside surfaces, hidden angles and along the edges where seams meet. Toy banks, for example, should usually show paint on both inner and outer edges of the coin slot. Likewise, old paint around a coin slot should show the typical ragged paint chips which would occur where normal wear would be expected.
Even unpainted, old cast iron appears a different color than new cast iron. Old iron usually looks dark brown or even black; new cast iron is typically gray or a dirty silver color. The color differences are difficult to show in black and white photographs, but are clearly seen by placing new and old side by side. But use caution when examining a piece that is uniformly colored. The paint and outside appearance of new cast iron is frequently altered to try and mislead you. High temperature can turn the surface of a new piece into a uniform dull brown or darker color. Burying a new piece or soaking it in various chemicals can also create a dark colored surface. Any piece that is a dull rusty brown, or overall dark and black, should be automatically considered a suspect piece. Check for repairs by going over the entire piece with a magnet. Many repairs and replacement parts are made with epoxies, brass and aluminum which have no magnetic attraction. A black light can help catch repaints.
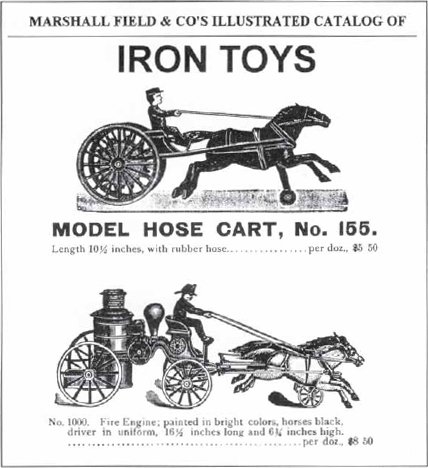
Fig. 1 Although original cast iron toys were cheap, they were skillfully made with a considerable amount of hand labor. Modern reproductions lack the quality and skilled work found on originals.
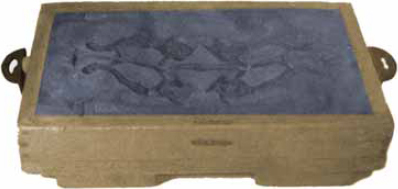
Fig. 2
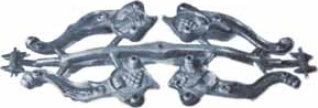
Fig. 3
Figs. 2-3 A rare master pattern, Fig. 3, and the impression is leaves in a sand mold, Fig. 2.

Fig. 4 The channel (A) that carries molten metal through the mold is called a runner. The point where the metal feeds into the individual casting (B) is called a gate.
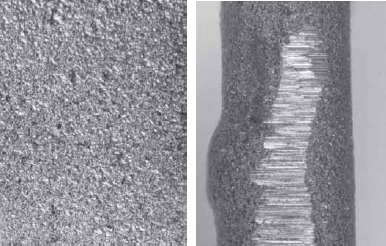
Figs. 5-6 Most new cast iron is very rough (Fig. 5, left). Notice the bumps and pits in these new examples. Coarse grinding marks, (Fig. 6, right), are also common in new cast iron.
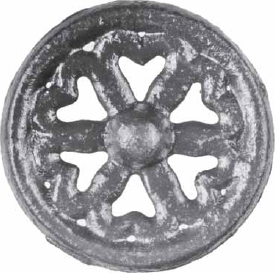
Fig. 7 (New)
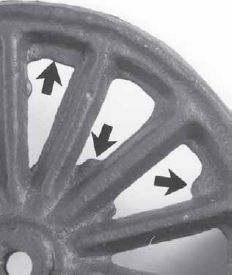
Fig. 8 (New)
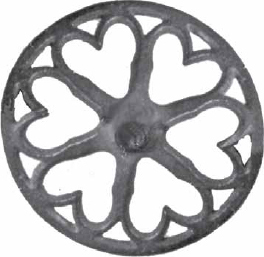
Fig. 9 (Old)
Figs. 7-9 Cast iron wheels - The heart pattern in the new wheel (Fig. 7) is thick and heavy. The original (Fig. 9) is thin and crisp. New molds seldom fit properly. The metal that runs through the gaps is called a fin or finning. (arrows Fig. 8). Finning is rarely found on originals but is typical on cast iron reproductions.
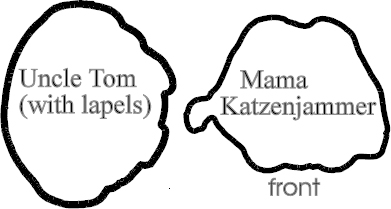
Fig. 10 Many cast iron toys like banks can be authenticated by comparing tracings of their bases. Reproductions are almost always smaller than originals.
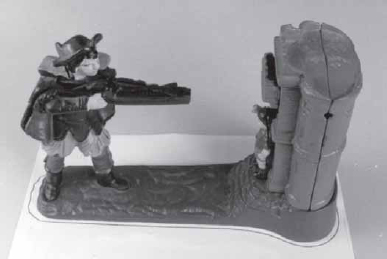
Fig. 11 This new William Tell mechanical bank has been placed on a base tracing of an original. Notice the difference in size.
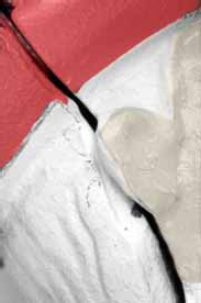
Fig. 12 (New)
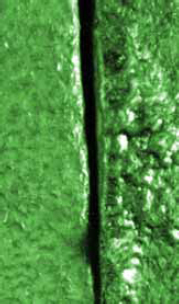
Fig. 13 (New)
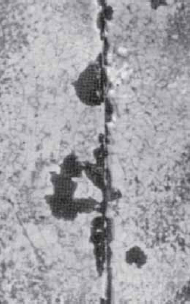
Fig. 14 (Old)
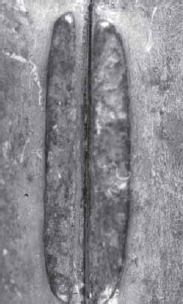
Fig. 15 (Old)
Figs. 12-15 The joints on new cast iron toys are typically loose and fit together poorly as seen in Figs. 12 & 13 above. The actual size of the gaps is about 1/16" to 1/8". Seams in old cast iron toys generally fit together very tightly. The seams shown in Figs. 14 & 15 are typical of the tight seams found in original iron toys.
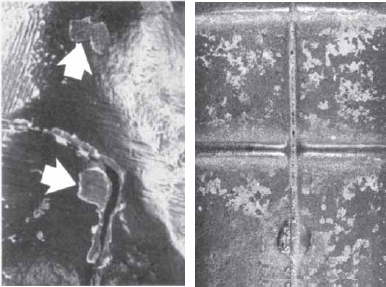
Fig. 16 Old original paint has distinctive jagged edge chips. Most old chips usually show more than one color, left. Even badly worn original paint shows the ragged chips, right.
Fasteners on Cast Iron
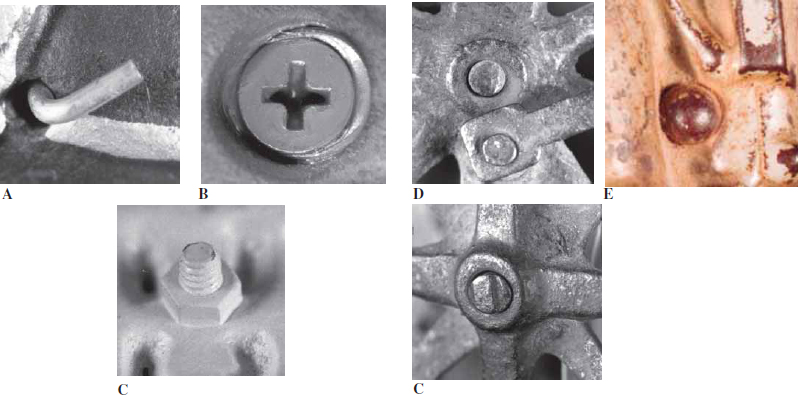
Three common fasteners used on new cast iron are shown in Figs. A-C. Odd bits of bent wire are found used to fasten horses to wagon tongues, to make connections in mechanical banks and a wide variety of awkward and strange connections. New cast iron toys commonly use exposed nuts and bolts as in Fig. C. Exposed threaded bolts are also used in new toys for axles, as well as to hold all sorts of parts together.
Another tell tale sign of a reproduction is a Phillips head screw. If in doubt about a screw or bolt use this test--the heads of most original bolts should be painted the same color as the area surrounding the bolt head. Likewise, if the paint surrounding a Phillips head screw matches the head of the screw, it means the head and toy were painted at the same time and generally means a reproduction.
The majority of old pieces are held together by steel shafts with flared or 'peened' heads as seen in Figs. D-F This method was commonly used for axles and moving parts. Where bolts were used on old pieces, they mated with a cast-in threaded post which was usually concealed. Some original screws may have been replaced over the years, but be suspicious if none of the screw heads show original paint. Paint wear on old bolt heads should match the paint wear in surrounding areas.
Common Flaws
Old cast iron toys have virtually no surface flaws. Modern castings generally have many flaws caused by unskilled workers, inferior quality materials and poor molds. The most common flaw is a blow (Fig. 17-A), a hole in the surface caused by escaping gas or steam. This is usually the result of a poorly vented mold or dampness or impurities in the casting sand. Another flaw, a scab(Fig. 17-B)is a crumbling of the surface caused by exploding gases trapped in the mold. Both flaws shown about actual size.
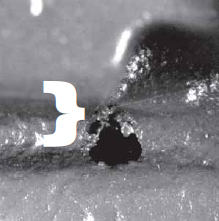
Fig. 17-A
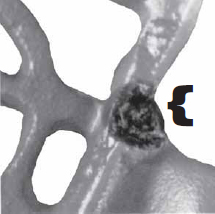
Fig. 17-B
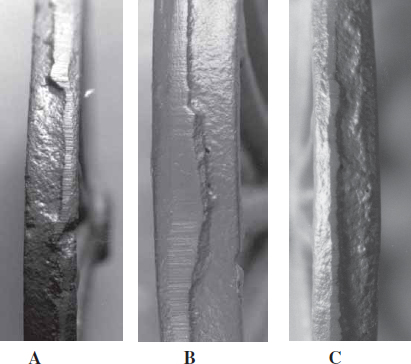
Fig. 18 (New)
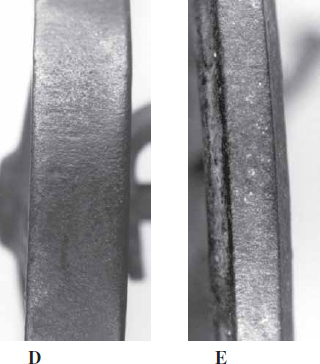
Fig. 19 (Old)
Wheels are a good place to check for quality. The circles of wheel rims and the intersecting lines of spokes are difficult shapes to cast. Unless the master pattern is perfectly proportioned, the sand in the mold properly packed and the metal skillfully poured, the casting will suffer in quality. Wheels A-C (Fig. 18) above are closeups of the edges of reproduction wheels. Note the grind marks, misaligned mold seams and roughness. New wheels also tend to fin (see Fig. 8). Wheels D & E (Fig. 19) are originals. Note the absence of mold seams, relatively smooth surface and lack of flaws. All wheels are shown about twice actual size.
Gate and Runner Marks
Gate and runner marks are tab-like formations found on the seam lines of castings (arrow, Fig. 20-A). The marks are formed when the casting is snapped off of the main channel that carried the molten metal. Below is a group of original wheels snapped off the runner; the small remaining tabs will now be snapped off the individual wheels. As a general rule, most old cast iron toys have these marks and most reproductions do not. Most gate and runner marks were left on old toys, that is not ground off, because they did not harm affect the toy's appearance. The gate marks (Fig. 21-B), for example, are on the bottom of a cast iron tractor where they can't be seen unless you pick the tractor up and turn it over. The toy swan pressing irons (Fig. 21-C) are virtually identical except for the runner mark (arrow) on the original.
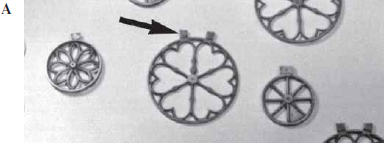
Fig. 20
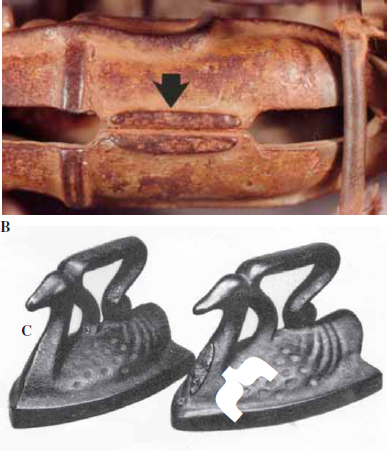
Fig. 21
Cast Iron–How it's Made
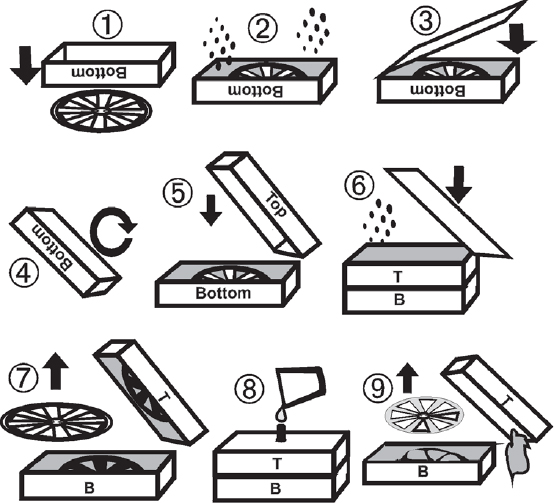
The first step (#1) in making a sand mold is to lay the master pattern, (the wheel) on a flat surface. A casting frame, usually made of wood, is lowered over the pattern. This first frame is the bottom half or drag of the 2 piece production mold. Next (#2) a special sand called casting sand is sifted with a riddle, or pan with a wire screen bottom, around the master pattern. Sand is added until it covers exactly one half the height of the pattern. After the final layer, the sand is firmly tamped with a rammer, a dumbbell shaped wooden mallet. The sand is smoothed off and a molding board is used to seal the bottom (#3).
Now the entire frame is carefully turned over (#4). A second casting frame, (#5) the cope or top half of the mold, is placed over the bottom frame. Sand is again packed and tamped around the top half of the pattern and another molding board seals the top. The two casting frames are separated (#7) and the master pattern is removed. This leaves a hollow impression in both halves of the mold in the shape of the master pattern. At some point between Steps 6 and 7 vents are added to carry away gases and steam which otherwise might distort the mold. A sprue opening or pouring hole is also cut into the top frame which is where molten iron enters the mold.
Before pouring the metal, the facing surfaces of the mold are dusted with a parting compound, usually talc, which makes the mold easier to open after casting. The metal is poured (#8) and the mold is allowed to cool, the time depending on the complexity and size of the casting. After cooling, the mold is separated (#9) and the casting is removed. Most sand molds are used only once because the sand is disturbed removing the casting. Some molds, depending on design and quality needed, may be used again.
Pouring the metal required two or more workers. The mold had to be tilted at the start of the pour to let gases from inside the mold escape. Towards the end of the pour the mold was returned to its upright position. The ladle with hot metal had to be held as close to the sprue opening as possible to avoid contamination and cooling by air. Pouring too fast produces slag; pouring too slow may allow the metal to become solid and cause a cold shut which blocks the flow of metal to some parts of the mold.
Glossary of Cast Iron terms
Cold shut: where two streams of molten metal meet but do not join because one stream has cooled; this produces a line which appears as a crack in the casting.
Blows: holes in a casting caused by trapped gas
Fin/Fins: metal which runs out gaps in mold seams
Loam: coarse sand used in crude sand molds
Parting Line: the line on a finished casting showing where the mold halves met; commonly called a seam or mold line
Riser: vent to allow hot gas to escape from the mold
Scabs: crumbling or other roughness on the surface of a casting caused by exploding gases
Shakeout: the removal of sand from the casting frame
Slush casting: used with metals which cool quickly-- the molten metal that touches the mold solidifies which forms a thin shell; the remaining liquid metal is emptied out leaving a hollow casting in the mold
Sprue: hole in which molten iron enters the mold
a vetted marketplace of dealers and winner of numerous
Ecommerce Bytes Sellers Choice awards
for Quality, Usability, Customer Service, Communications and Most Recommended Selling Venue
So now,
Our Ruby Lane Shop Owners
 invite You
to shop with them for the Real Deal on Ruby Lane ...


")


