How to Use Google Maps to Plan Your Next Road Trip (Step-By-Step Tutorial With Examples)
Post summary: A comprehensive guide on how to use Google Maps to plan a road trip itinerary and why Google Maps is the best tool/app for planning a trip. Includes a road trip planning tutorial!
Author’s Note: This post was originally published in 2020 and was updated in April 2023 for accuracy and comprehensiveness.
So, you want to plan a road trip. But, where do you start? Better yet: How do you start?
I’m often asked about my trip planning process. Where to go, what to do, and how exactly to fit everything into a cohesive itinerary that, well, makes sense.
Planning a road trip can be hard. But, with the right tools and resources, it doesn’t have to be. I’ve already put together a list of my most trusted travel booking resources, and the best apps for road trips, but now I want to talk about one of my favorite road trip planning tools: Google Maps.
Google Maps is like a trip planning goldmine, and it’s always my very first step in organizing my itinerary whenever I take a trip.
Google Maps is one of the best tools for planning a cohesive and successful road trip, because it allows you to create a highly customizable, visual representation of your trip (shoutout to all my fellow visual learners out there). And its FREE!
Basically, if you’re planning a road trip, knowing how to customize Google Maps is going to make your life so much easier.
So if you’re wondering how to get started, then you’ve come to the right place. I’m breaking the entire process down into an easy to follow step-by-step tutorial on exactly how to use Google MyMaps to plan your next road trip. So, lets get started!
GOOGLE MAPS TRAVEL PLANNING OVERVIEW
Here’s exactly what we cover in this guide:
- Create a new Google Map for your trip.
- Add location pins to your map
- Customize and color code your location pins.
- Create Google Map layers to plan your day-to-day itinerary.
- Add driving directions to your map.
- Download your custom Google Map to your phone.
- Share your map with friends.
- Calculate gas milage for your road trip.
Scroll down for a super detailed step-by-step guide to planning your own travel itinerary for free using Google Maps or skip ahead with the table of contents.
Need some road trip inspiration? Visit my most popular travel guides:
Las Vegas to Sedona Road Trip (3 Jam-Packed Itineraries to See it All in Less Time)
5-Day British Columbia Road Trip Itinerary
1-Day Yoho National Park Road Trip Itinerary
The Perfect 2-week Costa Rica Itinerary
.Don’t forget to grab my FREE Travel Expense Planner Download below to help you plan your next trip. Use it to easily and automatically calculate how much money you’ll spend on gas, flights, accommodation, food + more
WHY GOOGLE MAPS IS THE BEST TRAVEL PLANNING TOOL FOR YOUR NEXT TRIP
Google Maps is the best tool for planning your next trip, whether you’re just using it for adventure inspiration, to share ideas with your friends, or creating a detailed step-by-step road trip itinerary. Here’s why!
IT CREATES A VISUAL REPRESENTATION OF YOUR ROAD TRIP
If you’re a visual learner, Google Maps is going to be your best friend. But even if you’re not a visual learning, using Google Maps to plan your trip is still going to be incredibly helpful.
Planning your trip with Google Maps is the fastest way to familiarize yourself with the layout of an area. It allows you to wrap your head around how large an area is and where everything is in relation to each other, which, in my opinion, is the best way to start planning any trip.
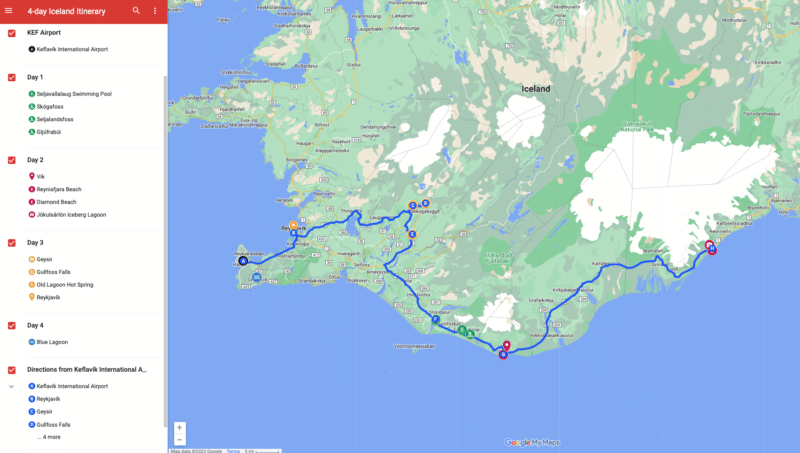
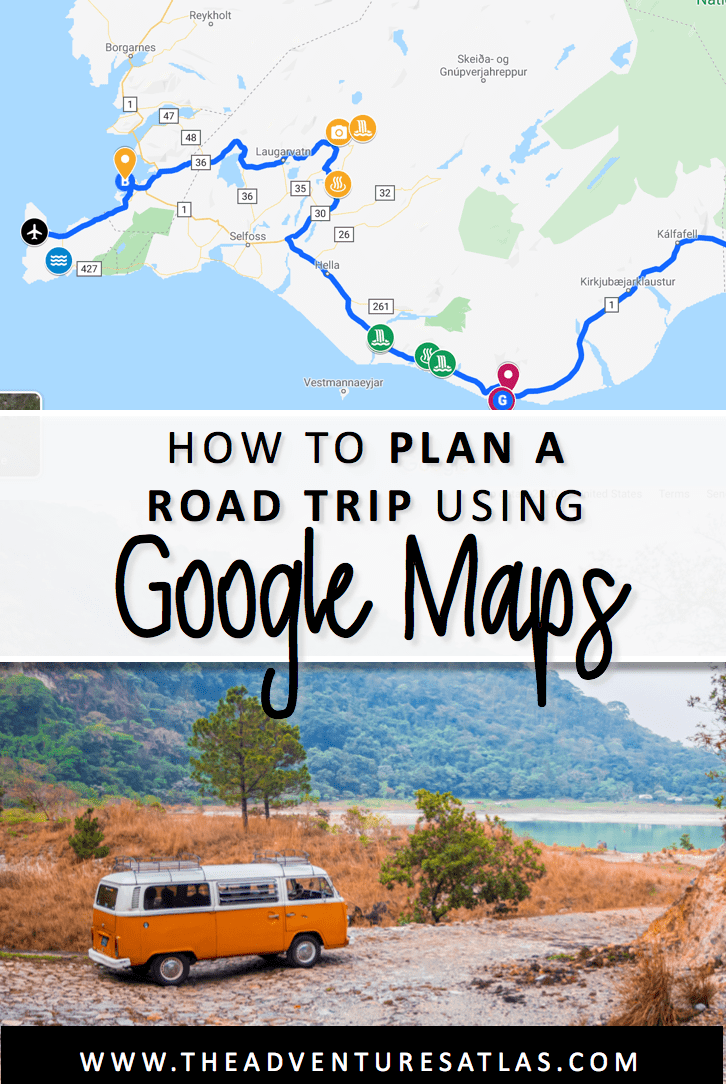
Here’s an example of the Google Map I created for our 4-day road trip in Iceland.
Click here to access the interactive map.
.
GOOGLE MY MAPS HELPS YOU FIGURE OUT WHERE TO SPEND YOUR TIME
Have you ever had a list of places you wanted to see, only to find out that they’re super far away from each other?
Pinning your locations to your custom Google Map will show you where your stops are. This will help you figure out where to spend your time and plan accordingly.
Are your pins clustered in one place? If so, then you might want to allocate more time to that area. Or maybe your pins are spread out all over the map? If this is the case, then it might be best to prepare yourself for a lot of driving or focus on a smaller area instead.
YOUR GOOGLE MAP IS HIGHLY CUSTOMIZABLE
Whether you’re touring NYC, road tripping cross country, or backpacking to Beaver Falls in the Grand Canyon, you can create a highly customizable Google Map to help plan your adventure.
Handy features like customizable locations, adding multiple stops, pinning by GPS coordinates, organizing by categories, and overlaying direction layers, all make it incredibly easy to customize your Google Map to plan your travel itinerary.
Need to remember entrance fees, operating hours, or best places to see? You can even add notes to your location pins so you don’t forget important details!
IT HELPS YOU NAVIGATE AND PLAN YOUR ROUTE
Quickly learn how to navigate between stops by adding directions between multiple locations to your map.
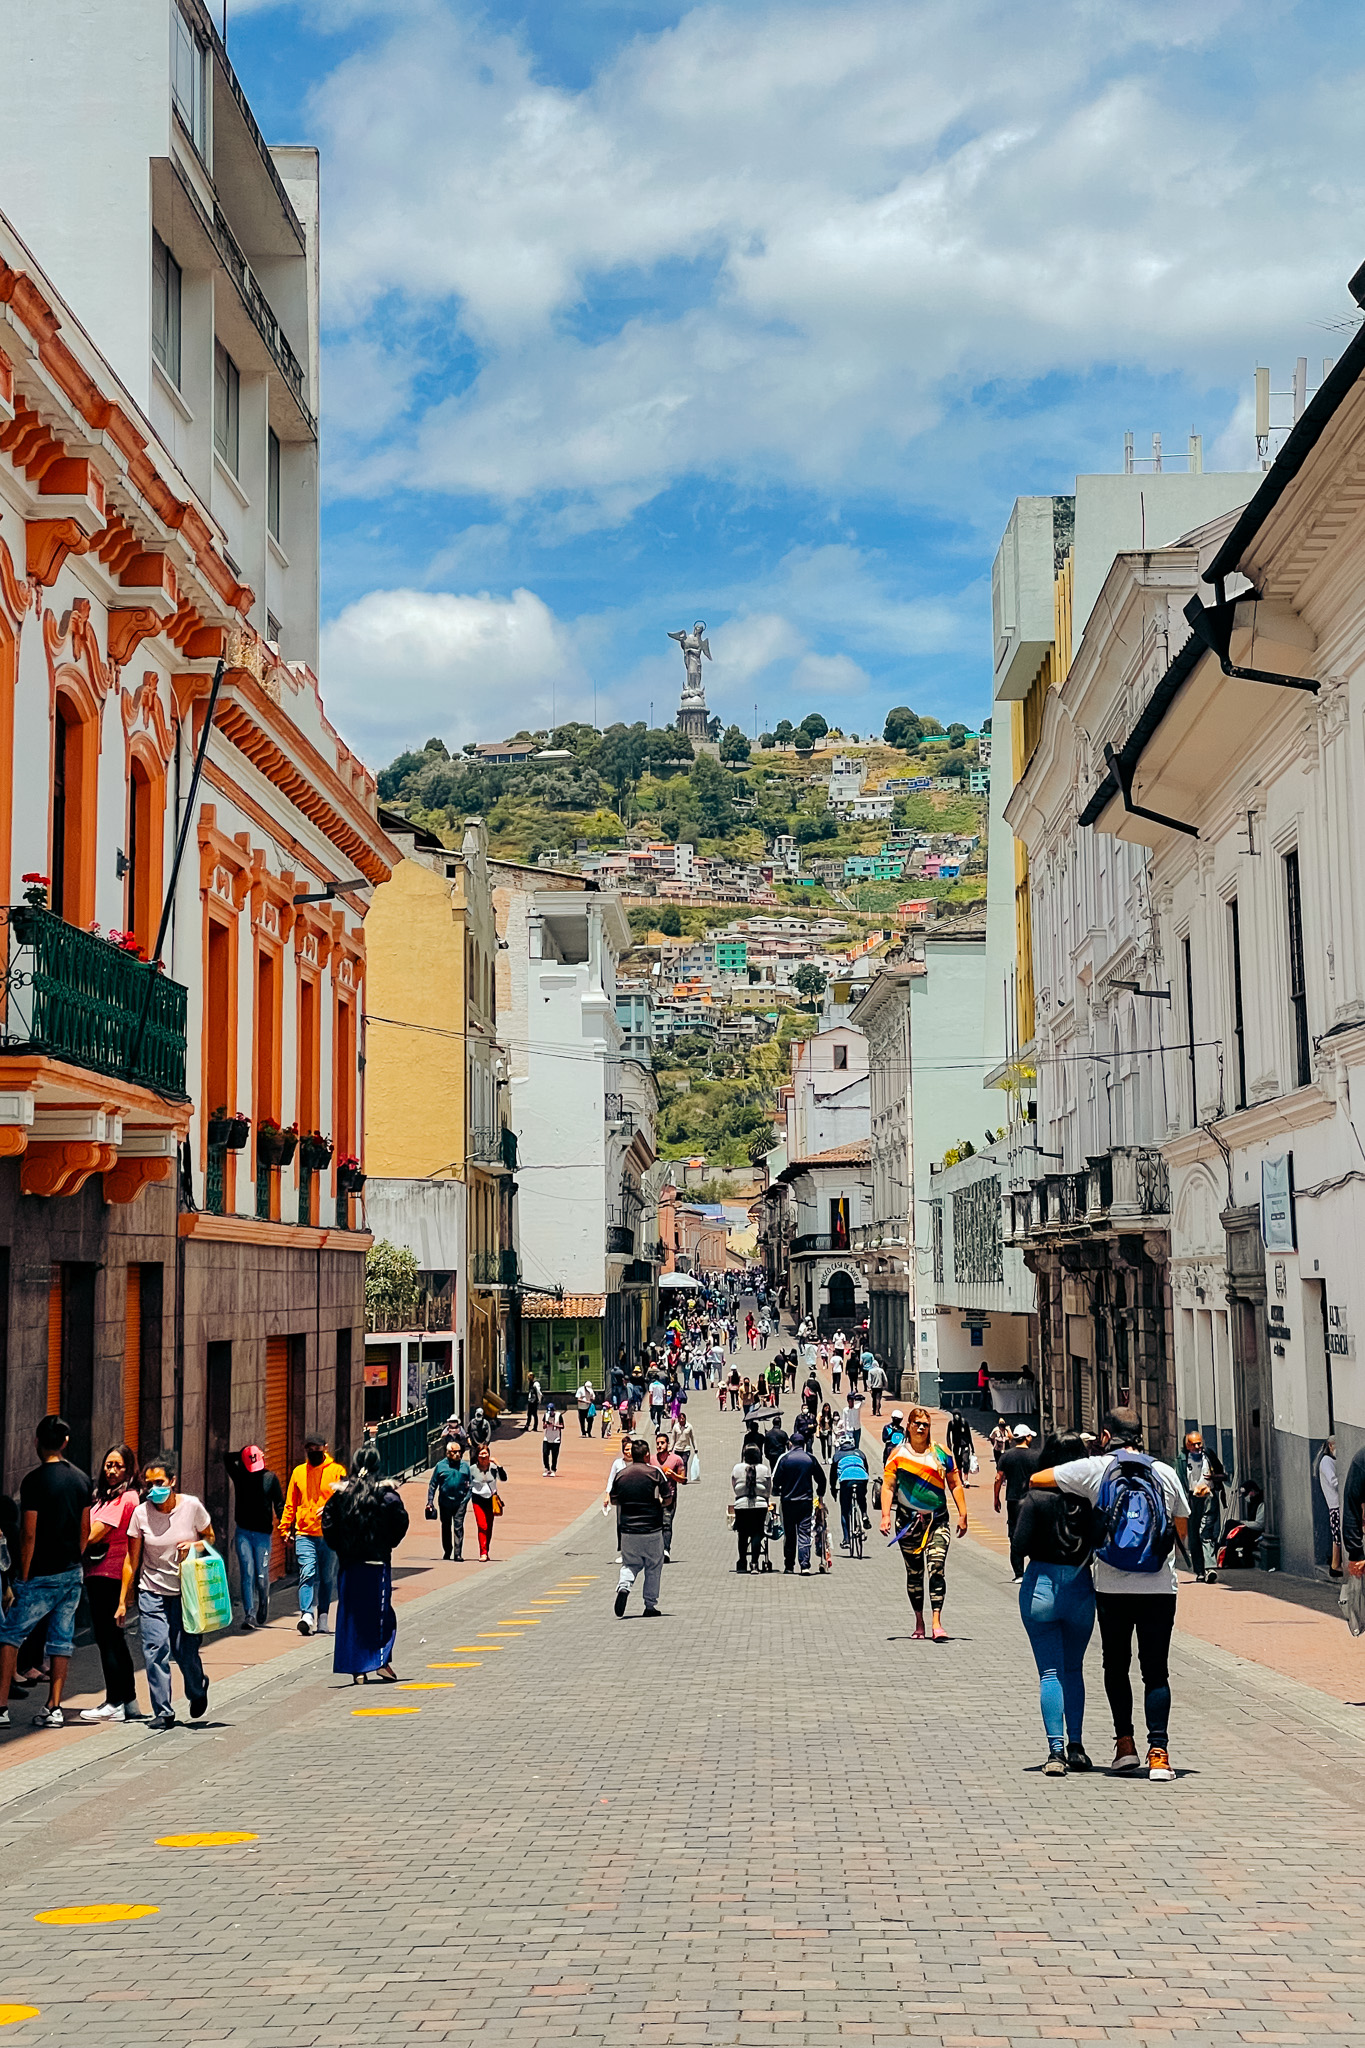
This is an incredibly useful tool for figuring out the best routes to take, roads to avoid, and to plan for drive time. You can even choose between walking, biking, or public transportation directions. This is especially helpful for choosing the best entrance to Yellowstone National Park, taking the scenic route on an Ecuador road trip, or mapping out the best Hudson Valley wineries.
IT’S EASY TO COLLABORATE AND SHARE YOUR TRIP
Traveling with friends? Google Maps makes it super easy to collaborate by allowing you to share your map with your travel partners. You can even give them editing access so that everyone can add their must-do’s to the map.
YOUR MAP IS EASY TO SHARE BETWEEN DEVICES
You’ll have to create your Google Map on desktop. But, luckily, you can seamlessly share your custom map straight to your iPhone or Android using the Google Maps App!
Sharing your custom map to your phone makes it super convenient to access your itinerary on the go. You can even set up your map for offline use if you’re traveling without cell phone service.
HOW TO CREATE A CUSTOM MAP IN GOOGLE MAPS: A STEP-BY-STEP GUIDE
1. CREATE A NEW GOOGLE MAP
LOGIN TO GOOGLE DRIVE ON YOUR DESKTOP
Before you start planning your road trip using Google Maps, make sure you’re signed into your Google Drive.
-
- Visit www.google.com/maps from your desktop and log in.
- If you don’t have a Google Drive account, create one now.
CREATE A NEW GOOGLE MAP
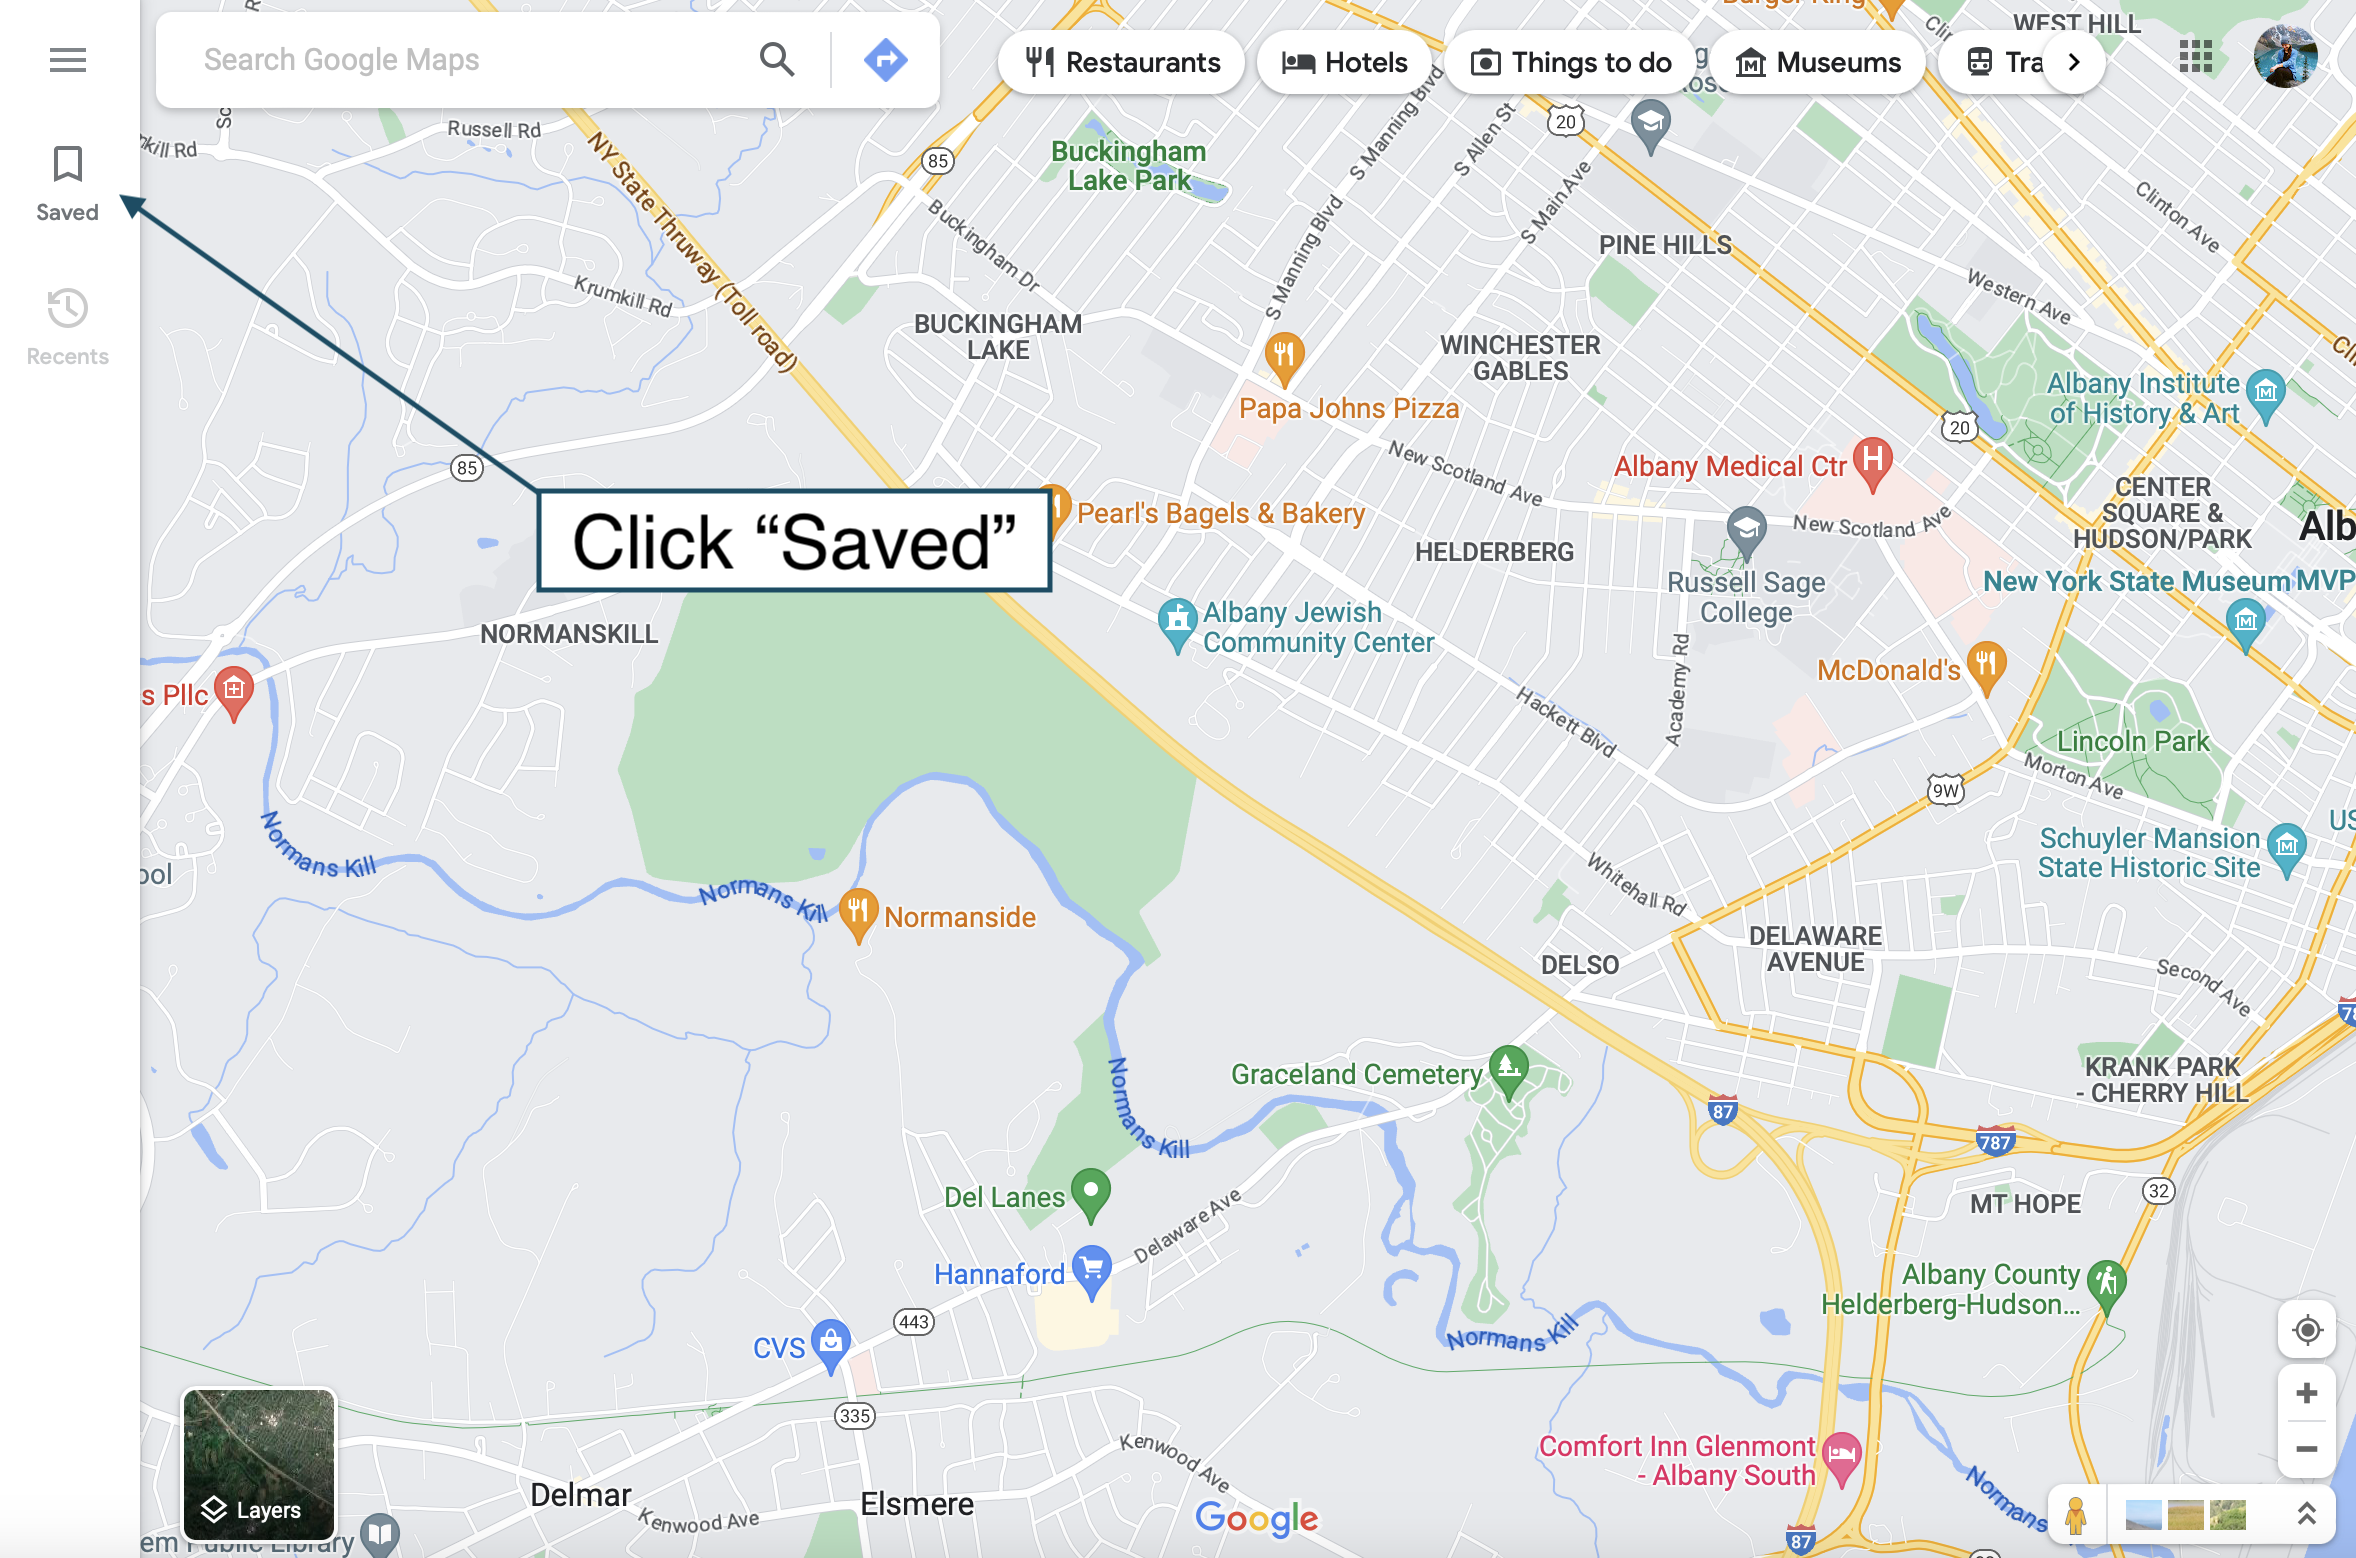
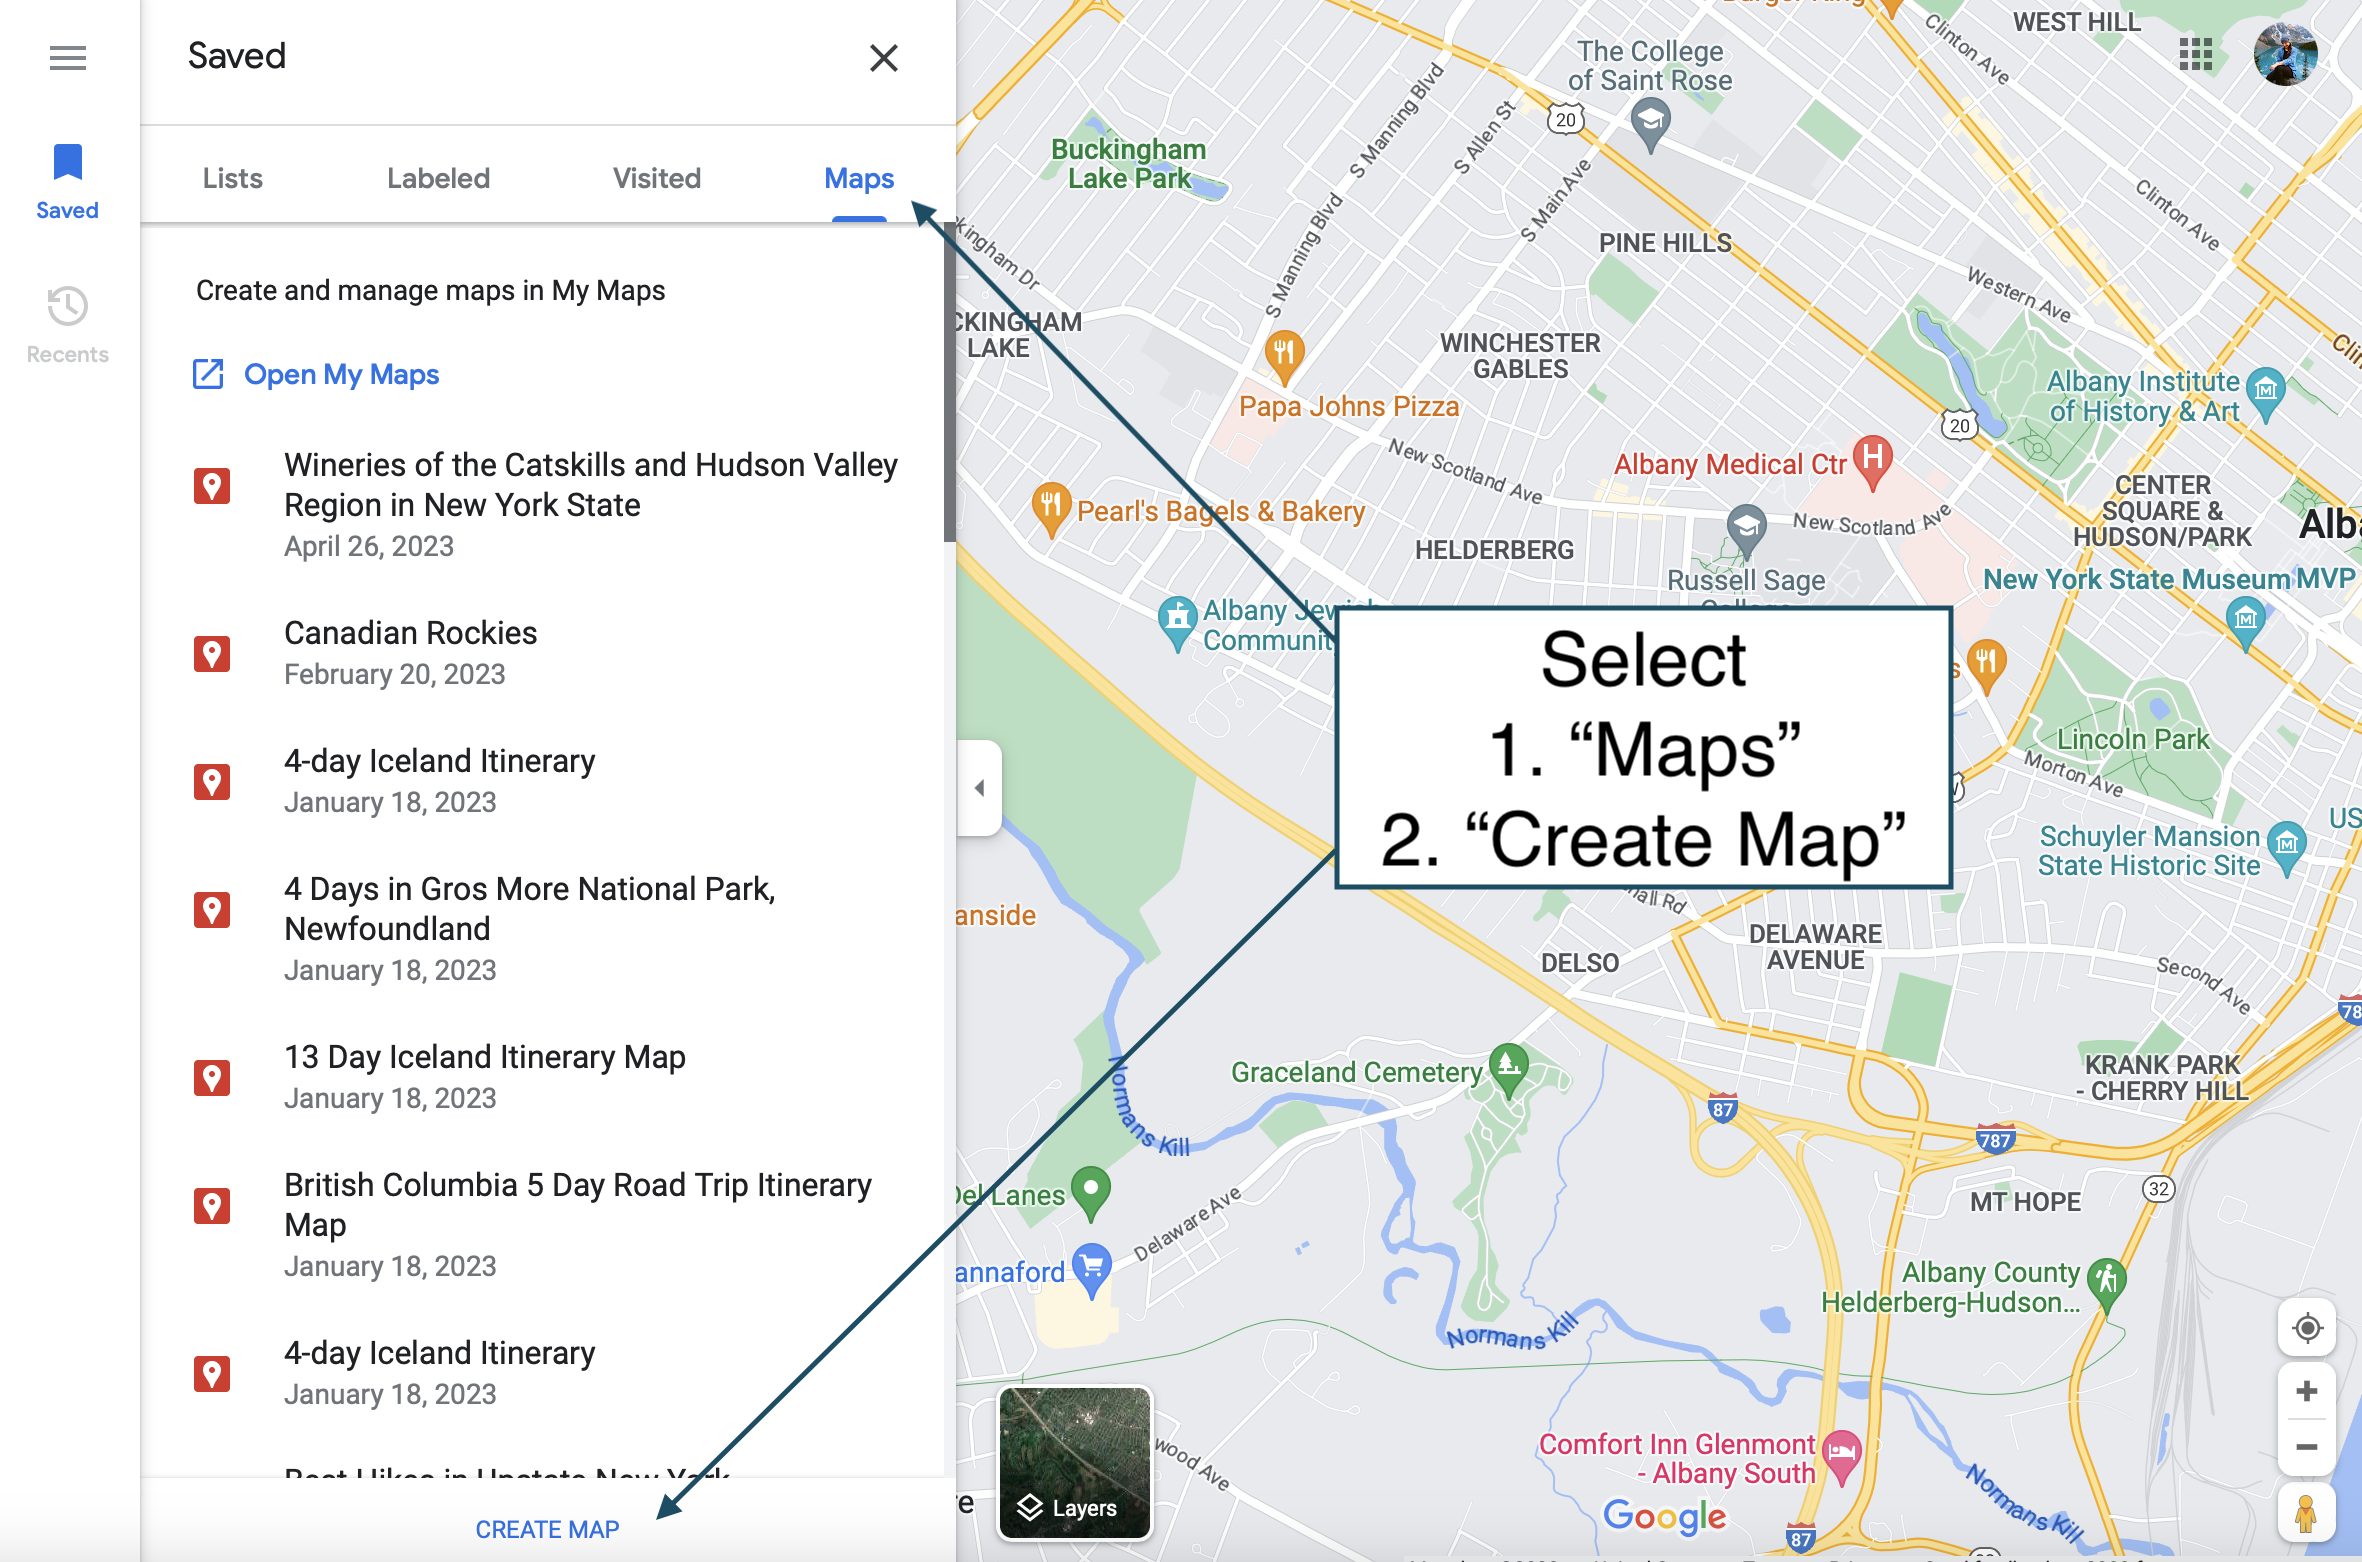
To create a new map, select “Saved” in the sidebar on the left > “Maps”. You can also click on the menu (the three lines) in the upper left corner > “Saved” > “Maps”.
For now, your list is probably empty. But as you create more maps, this is where they’ll be stored.
Begin creating your first custom map by selecting “CREATE MAP”
This opens a new blank map. Start by giving your map a title and a description.
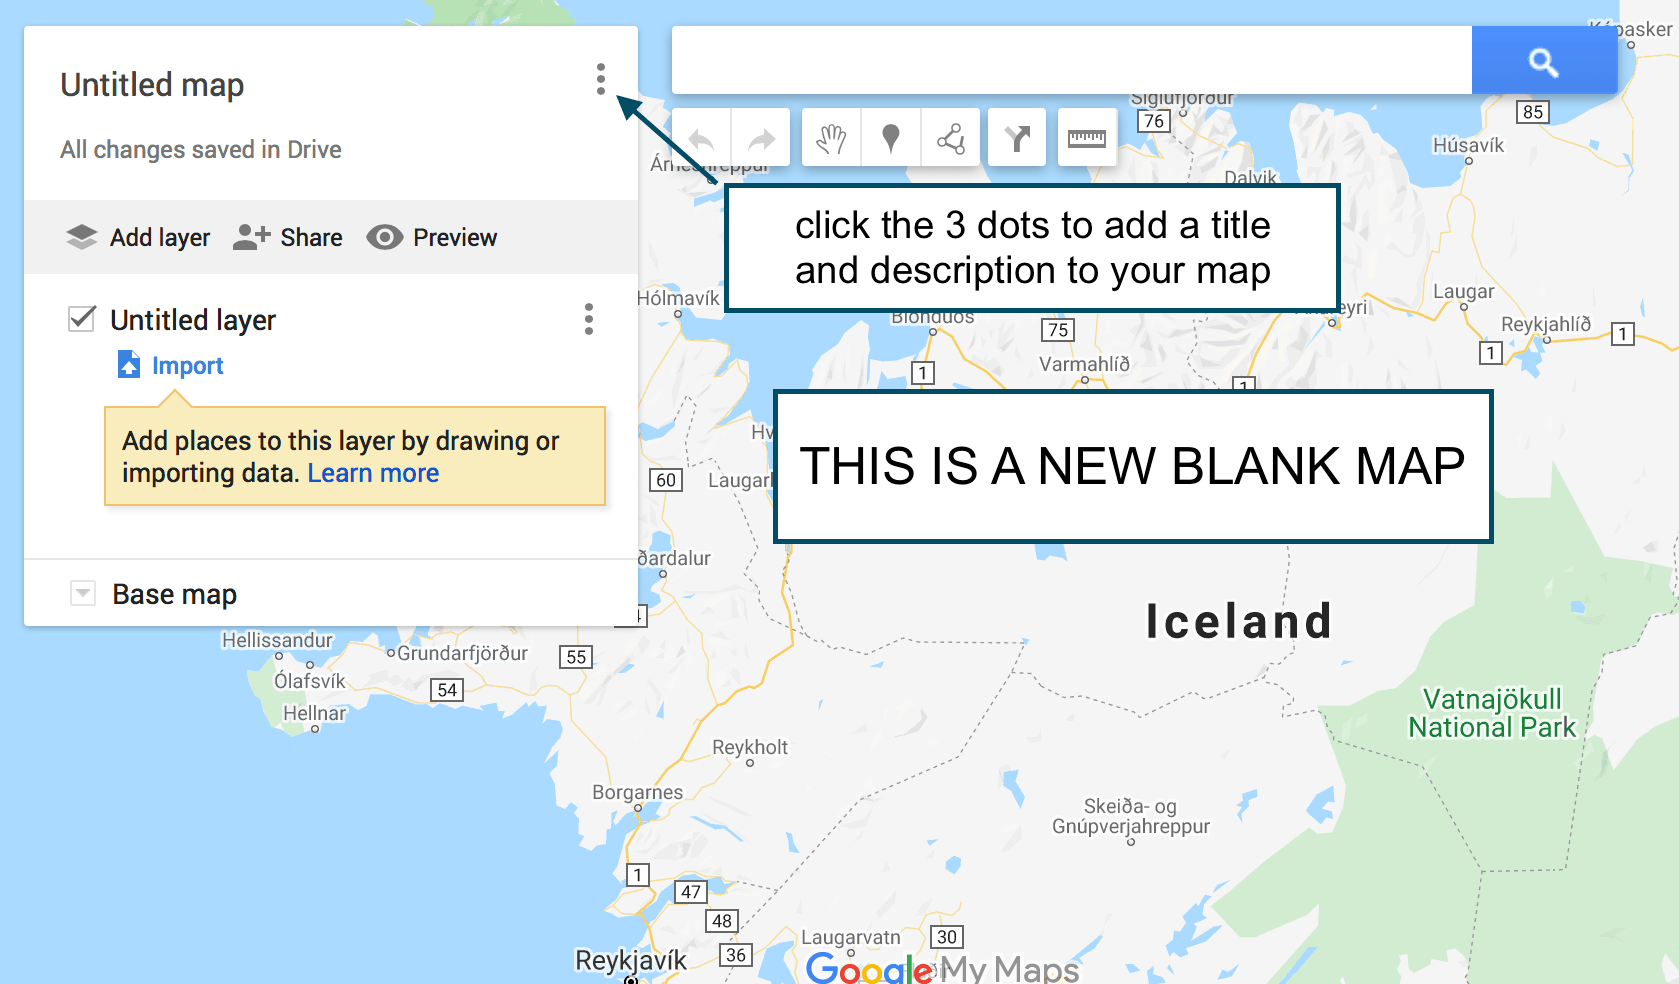
Once you’ve named your map, you’re ready to start pinning stops! Keep reading to learn about adding and customizing location pins.
2. ADD LOCATIONS TO YOUR GOOGLE MAP
This is where you start adding the places you want to go!
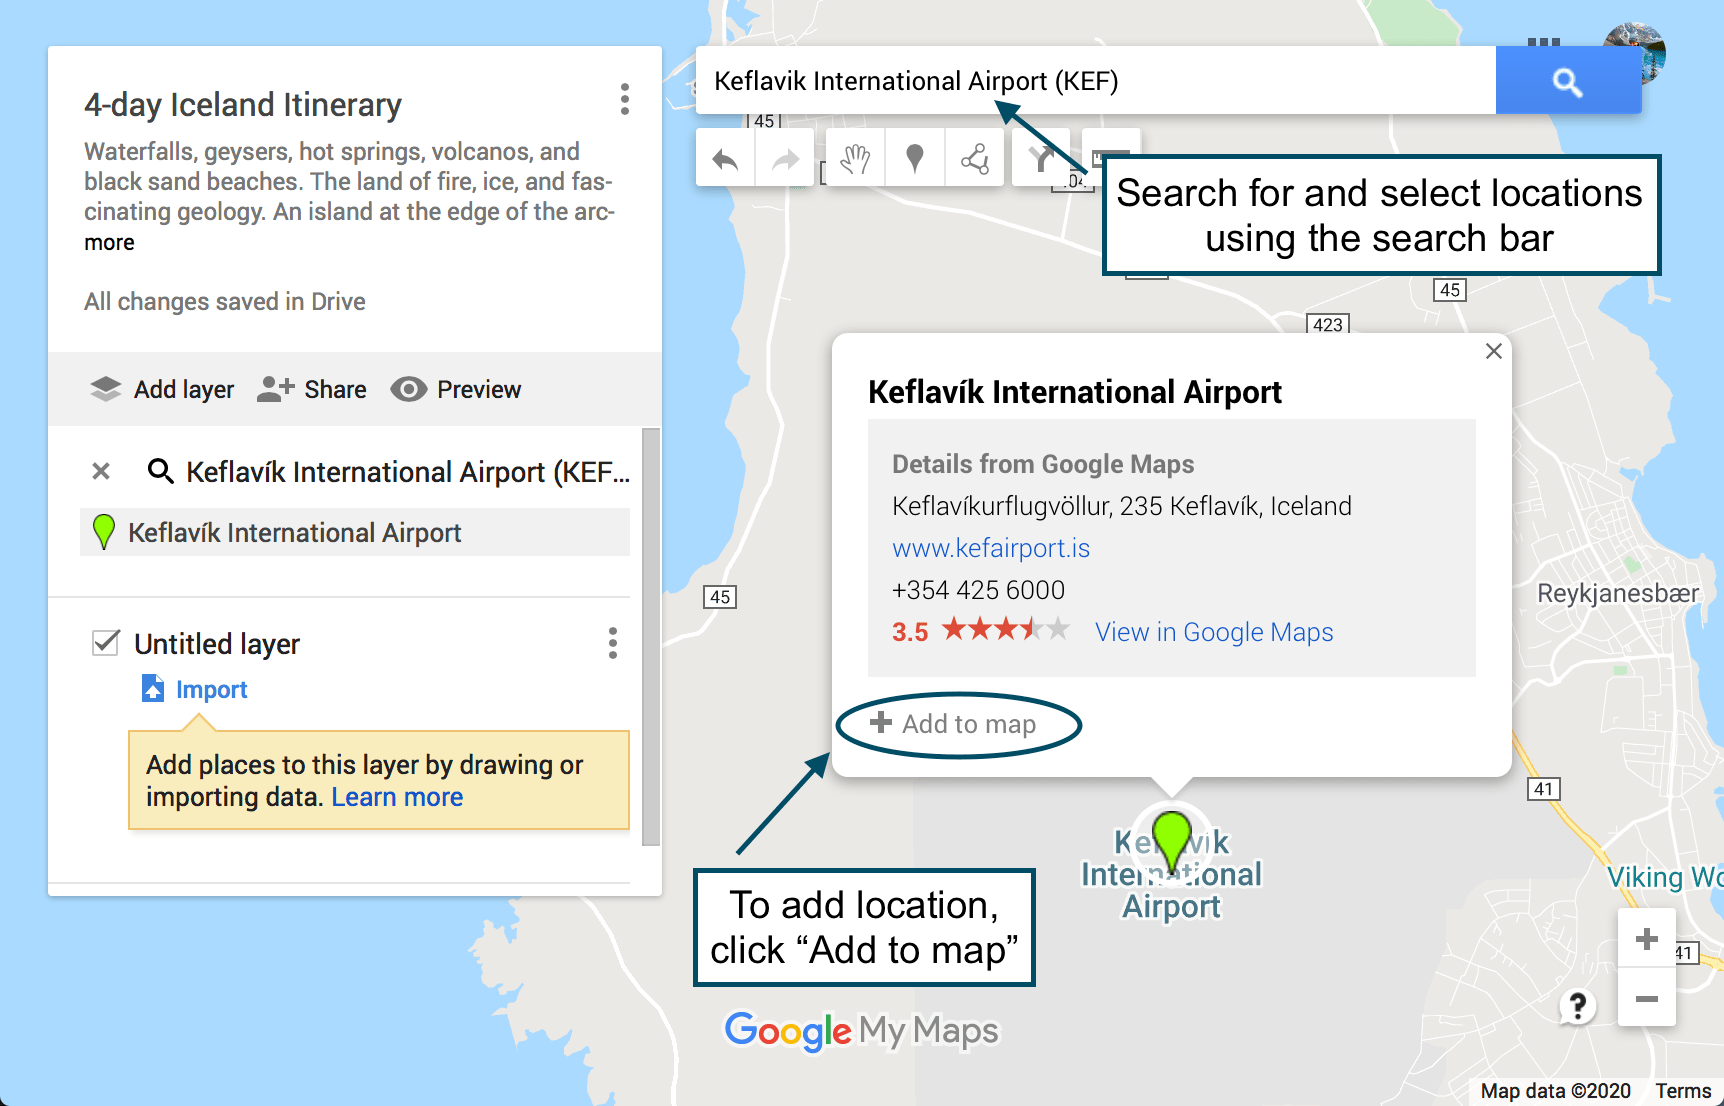
HOW TO ADD LOCATION PINS
Add multiple stops to your Google map by pinning their locations. There are a few different ways to add location pins to your Google Map:
-
- Type the location name or address into the search bar. Select the location from the drop down menu. Google Maps will then drop a green marker below a small text box containing the address details. Click “Add to Map” to save the location. The marker will turn blue. You’ll almost always pin locations using this method.
.
. - Add a pin using coordinates if you can’t find the exact location in the search bar drop down list. You may have to use this method for extremely specific or remote locations, such as a backcountry campsite or an unmarked trailhead. Simply type the location’s latitude and longitude coordinates into the search bar.
. - To pin a general area, click on the “Add Marker” button below the map search bar. You’ll be able to drop a blank pin by clicking anywhere on the map. A box will appear asking you to add a title and description
- Type the location name or address into the search bar. Select the location from the drop down menu. Google Maps will then drop a green marker below a small text box containing the address details. Click “Add to Map” to save the location. The marker will turn blue. You’ll almost always pin locations using this method.
NOTE: You’re allowed to pin 10 location pins per layer. Continue reading to learn how to use layers to add more than 10 location pins to your map.
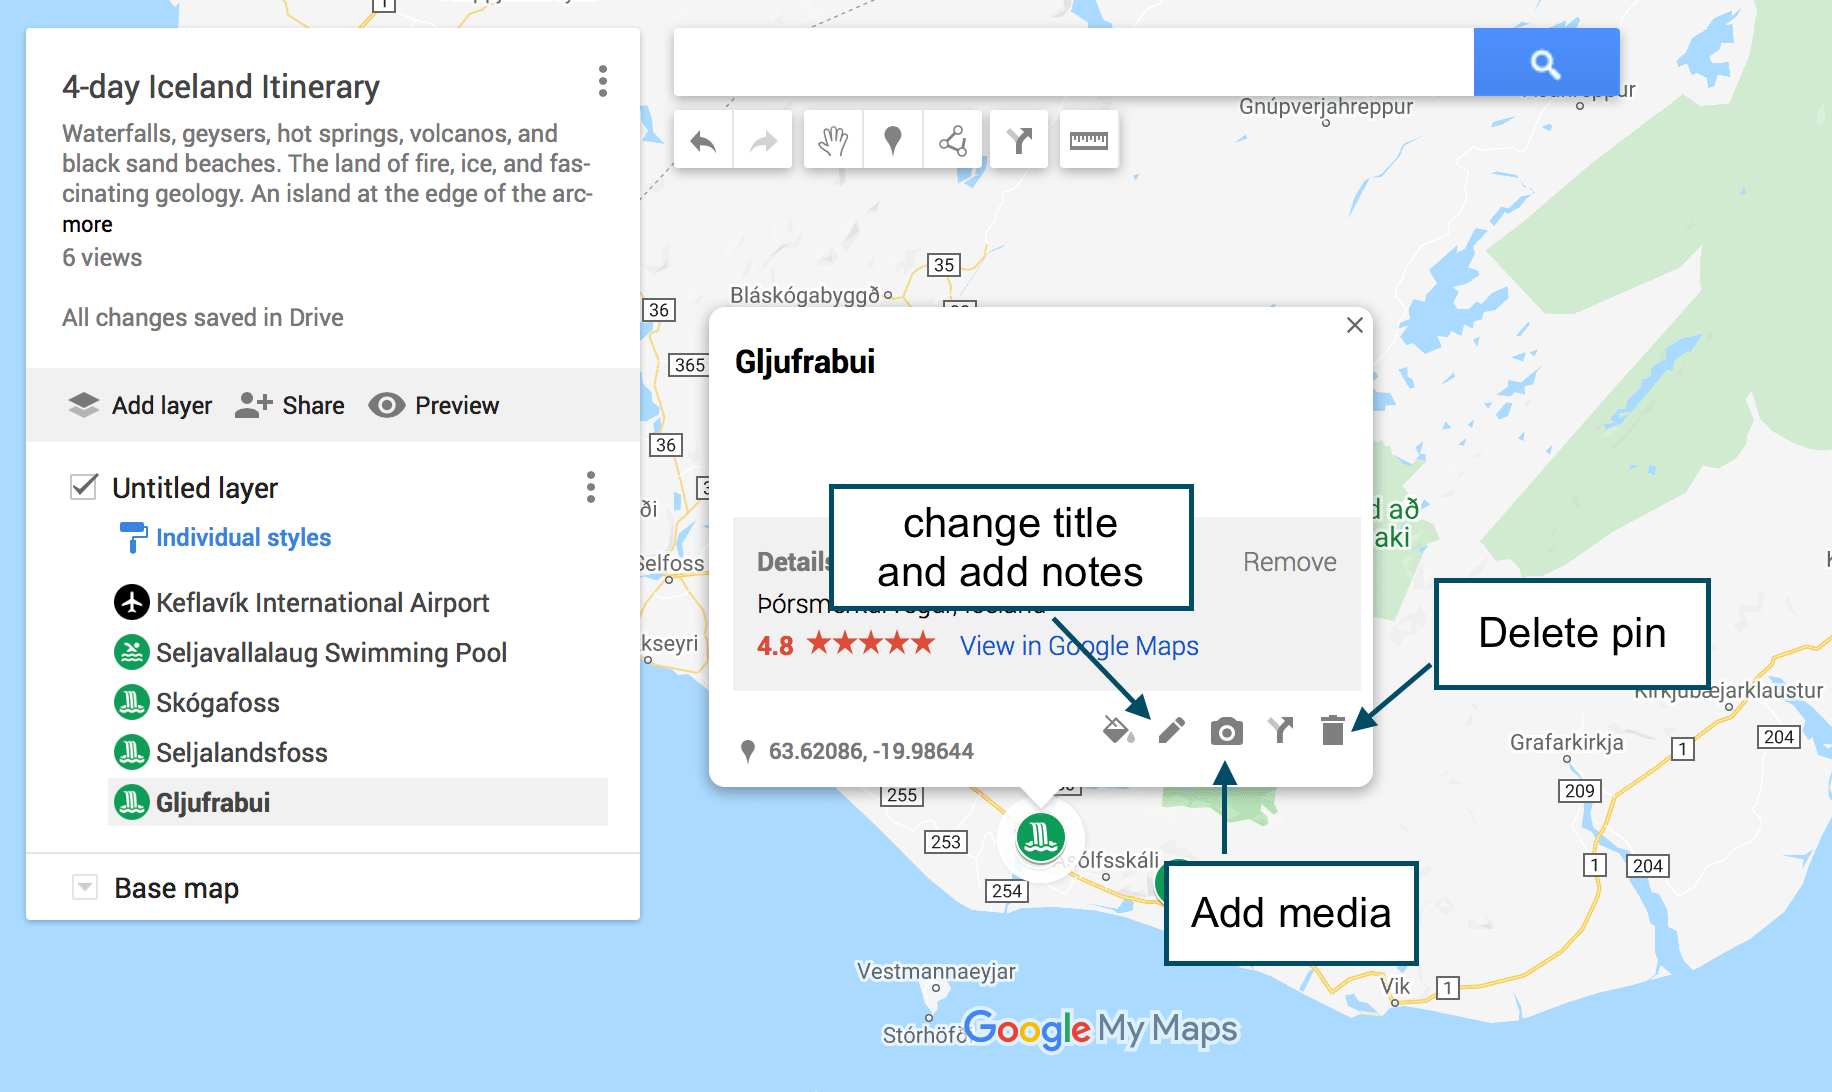
3. CUSTOMIZING LOCATION PINS
Once you save your pins to the map, they’ll be blue by default. However, you can customize a pin by changing the color, icon style, description, and title. You can even add pictures or videos if you’re feeling extra fancy.
To change the color and style, begin by clicking on your location pin (either in the list to the left or directly on the map) > “Style” (the little paint can) in the lower right hand corner of the text box. Click “More Icons” to view more options.

To change the location title, click”Edit” (the pencil icon) in the text box. You can also add notes in the “Notes” box. Use the notes box to add more details about finding trail heads, hiking logistics, packing reminders etc. I also like to use it to keep track of specific places to see within a general location, such as a National Park.
To add media (i.e. photos or videos), click “Add Image or Video” (the camera icon) in the text box. I found this especially helpful on my first Iceland road trip to remember which waterfall was which, since they all sound the same (if you’ve been there, you know what I mean!). You can also add your own photos and videos if you want to create a map to share with others.
To delete a pin, click on it and then click on the trash can icon.
.
.
4. CREATING MAP LAYERS TO PLAN YOUR TRIP IN GOOGLE MAPS
WHAT ARE GOOGLE MAP LAYERS?
Google Map layers are a really useful tool for organizing your road trip itinerary. But, what exactly is a layer? A layer in Google Maps is, by definition, a way to contain arbitrary geospatial data.
Okay, English please?
In other words, each layer can be used to display different types of information on your map. You can dedicate different layers to different types of places like restaurants, cafe’s, hotels, hiking trails, etc. Or you can dedicate layers to different days of your trip. Or you can stick to one layer. Its up to you.
Here’s an example of how I broke up my Iceland itinerary, using a different layer for each day of our road trip:
 Example of our road trip map using a different layer for each day of the trip
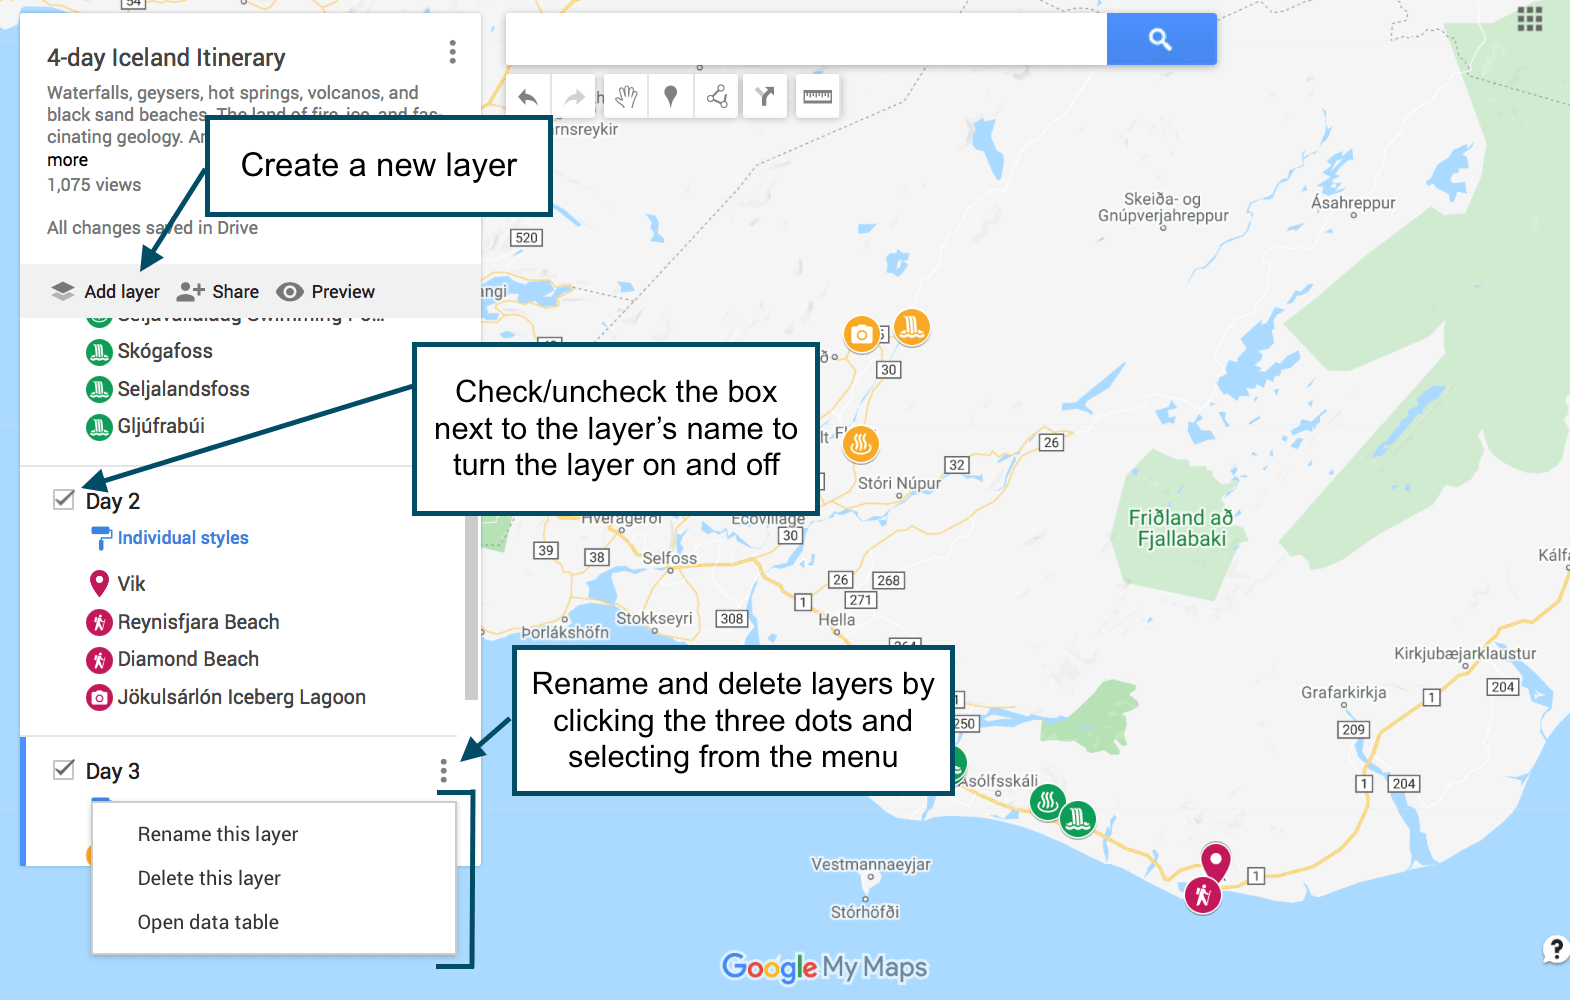
HOW TO ADD LAYERS
When you create your map, you’re automatically using one layer (“Untitled Layer”). This is the layer that your location pins are added to by default, unless you add additional layers. You can add up to 10 location pins per layer, and 10 layers per map.
To add a new layer to your Google Map, simply click “Add Layer”. This creates a new “Untitled Layer”, which you can rename accordingly. To rename layers, click on the title name or click the 3 dots next to the title > “Rename Layer”.
To move a pin between layers, click on the location pin in the list, then drag and drop it into the desired layer.
Choose which layers to display by turning individual layers “on” and “off”. You can do this by checking/unchecking the box next to the layer’s name.
To delete a layer, click the 3 dots next to the layer’s title > “Delete this layer” > “Delete”.
.
TIPS FOR USING LAYERS TO PLAN YOUR ITINERARY IN GOOGLE MAPS
When planning my road trip itineraries, I usually give each day its own layer (unless the trip is longer than 10 days, in which case then I’ll combine days or make another map). Then I color code all of my pins by day.
For example, all of my stops (i.e. location pins) on day 1 (layer 1) would be orange, all of my stops on day 2 (layer 2) would be red, and all of my stops on day 3 (layer 3) would be blue. Organizing pins and layers this way makes it a lot easier to visualize your day-to-day itinerary on the map.
That’s just what works for me, so obviously you don’t have to do it that way. You can organize your pins and layers in any way that makes sense to you.
WHEN TO MAKE SEPARATE MAPS
Personally, I prefer to make a single map for my road trip itineraries whenever possible. But that won’t work for everything or for everyone.
Sometimes maps can get confusing if you have a lot of stops to make. Other times you’ll find that you need more than 10 layers or directions between more locations than Google Maps allows.
To solve these problems, you may opt to create several maps. Perhaps you’ll find it easier to create a separate map for each day of your road trip, or create one map dedicated just to a certain type of location or activity.
For example, we created two separate maps for our road trip through New Zealand. One map for the North Island and one map for the South Island.
5. ADDING DIRECTIONS TO YOUR GOOGLE MAP
.What good would a Google Maps itinerary be if you couldn’t get driving directions?
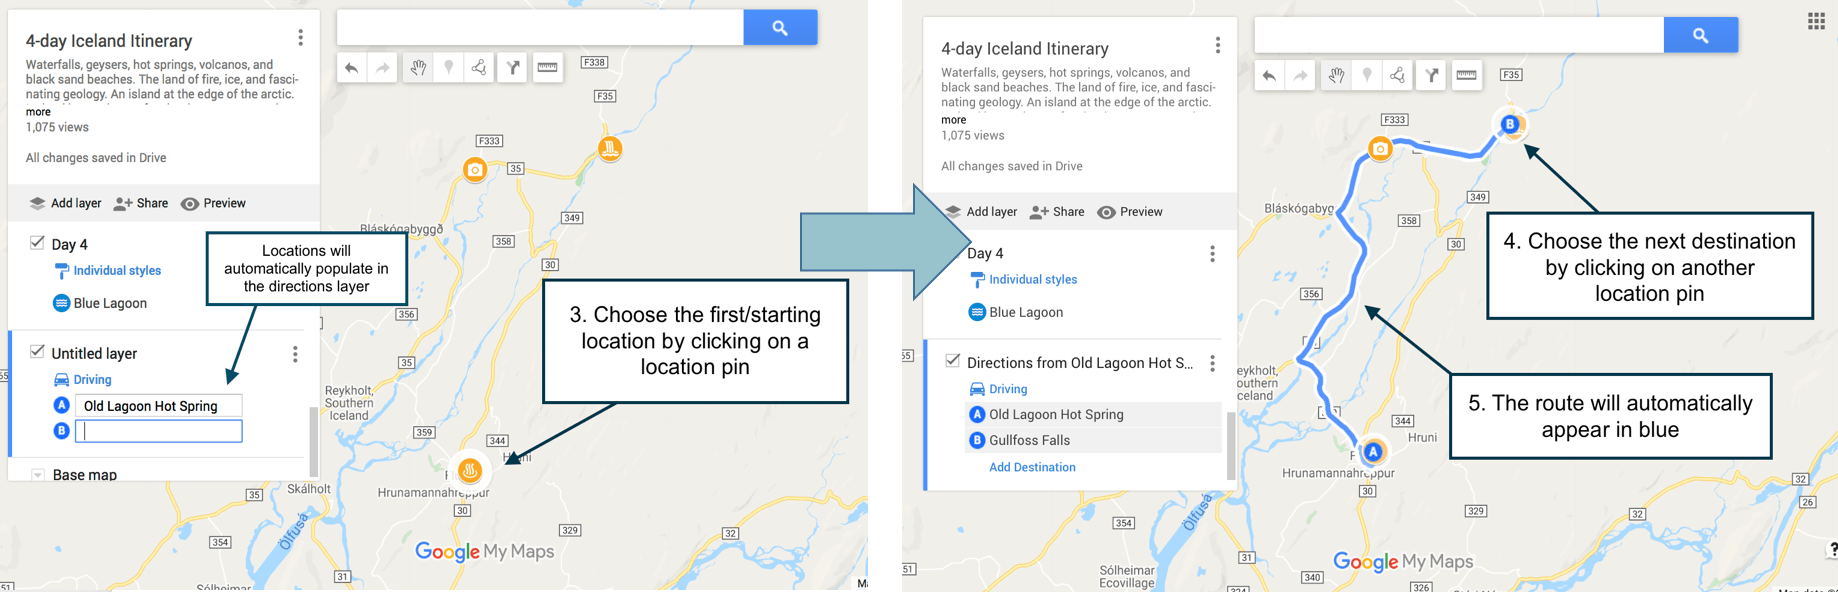
To add driving directions to your Google Map, click on “Add Directions” (the arrow icon) under the search bar. A new layer will appear (you cannot add directions without it adding a new layer).
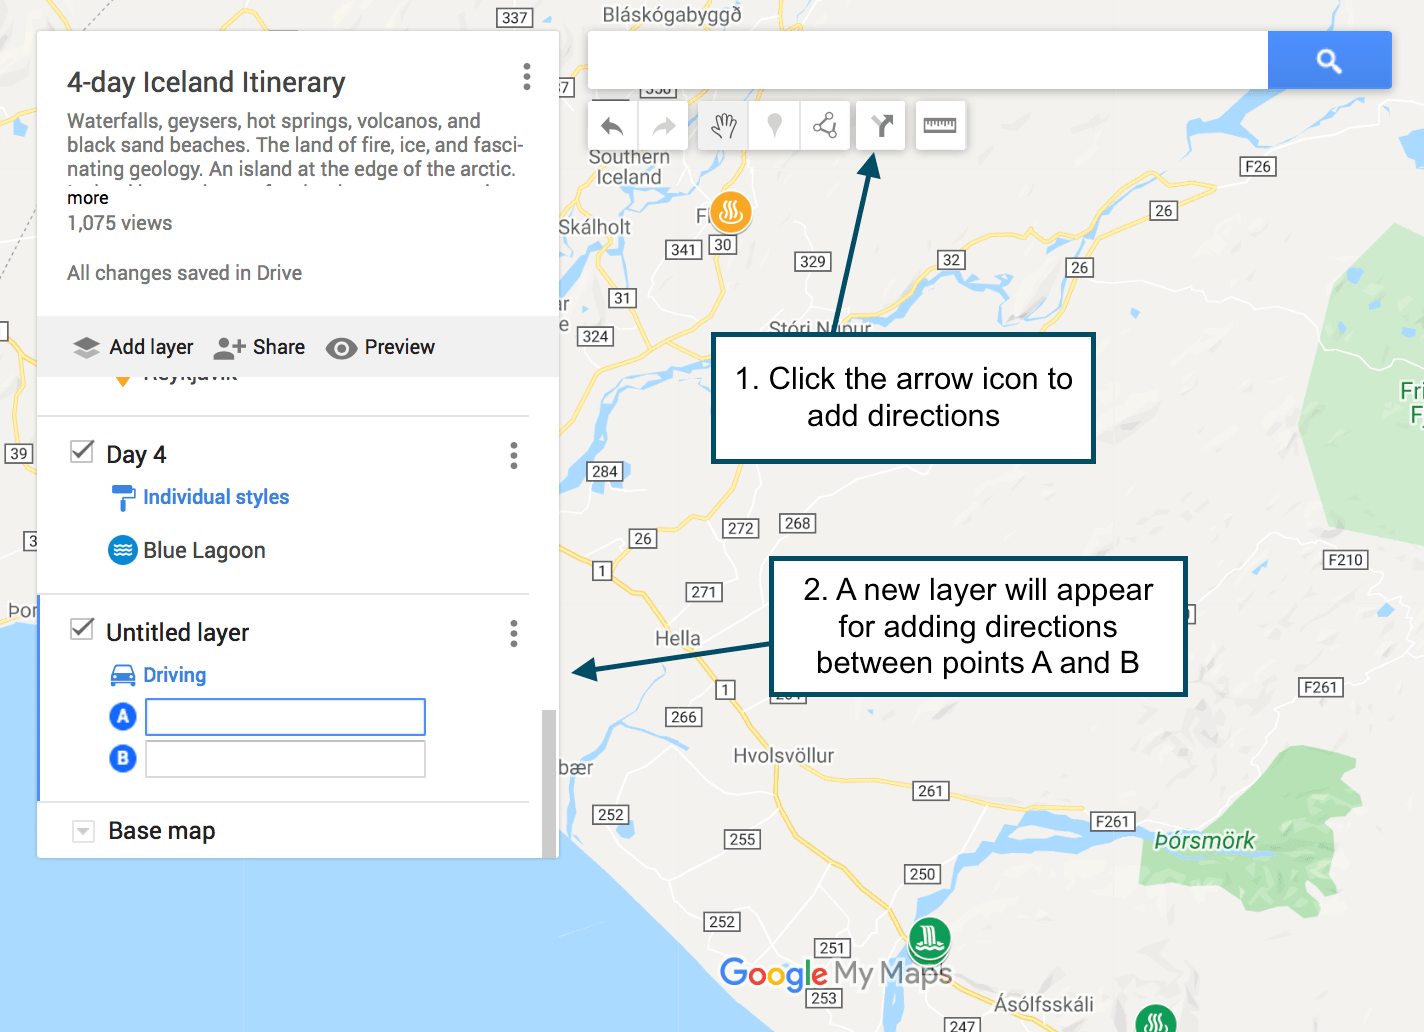
Click on “Add Directions” simply by clicking on a pinned location on the map. It will populate in point “A”. Click on a second location on the map, which will populate in point “B”. The route will show up as a blue line on the map.
The original directions will only give you the option to add points “A” and “B”. To add more destinations, click on “Add destinations”. You can add up to 10 destinations.
NOTE: This may seem obvious, but I’ll say it anyway: When you connect locations, make sure to do it in the order that makes sense. Don’t just add directions between two random locations. Make sure to do it in order!
To choose between driving, walking, or bicycle directions, click on the Directions button in the layer (the blue car icon). Then click on the appropriate mode of transportation.
VIEW STEP-BY-STEP DIRECTIONS
To view step-by-step directions, click the three dots to the right of the little of the directions layer > click “Step-by-step directions”.
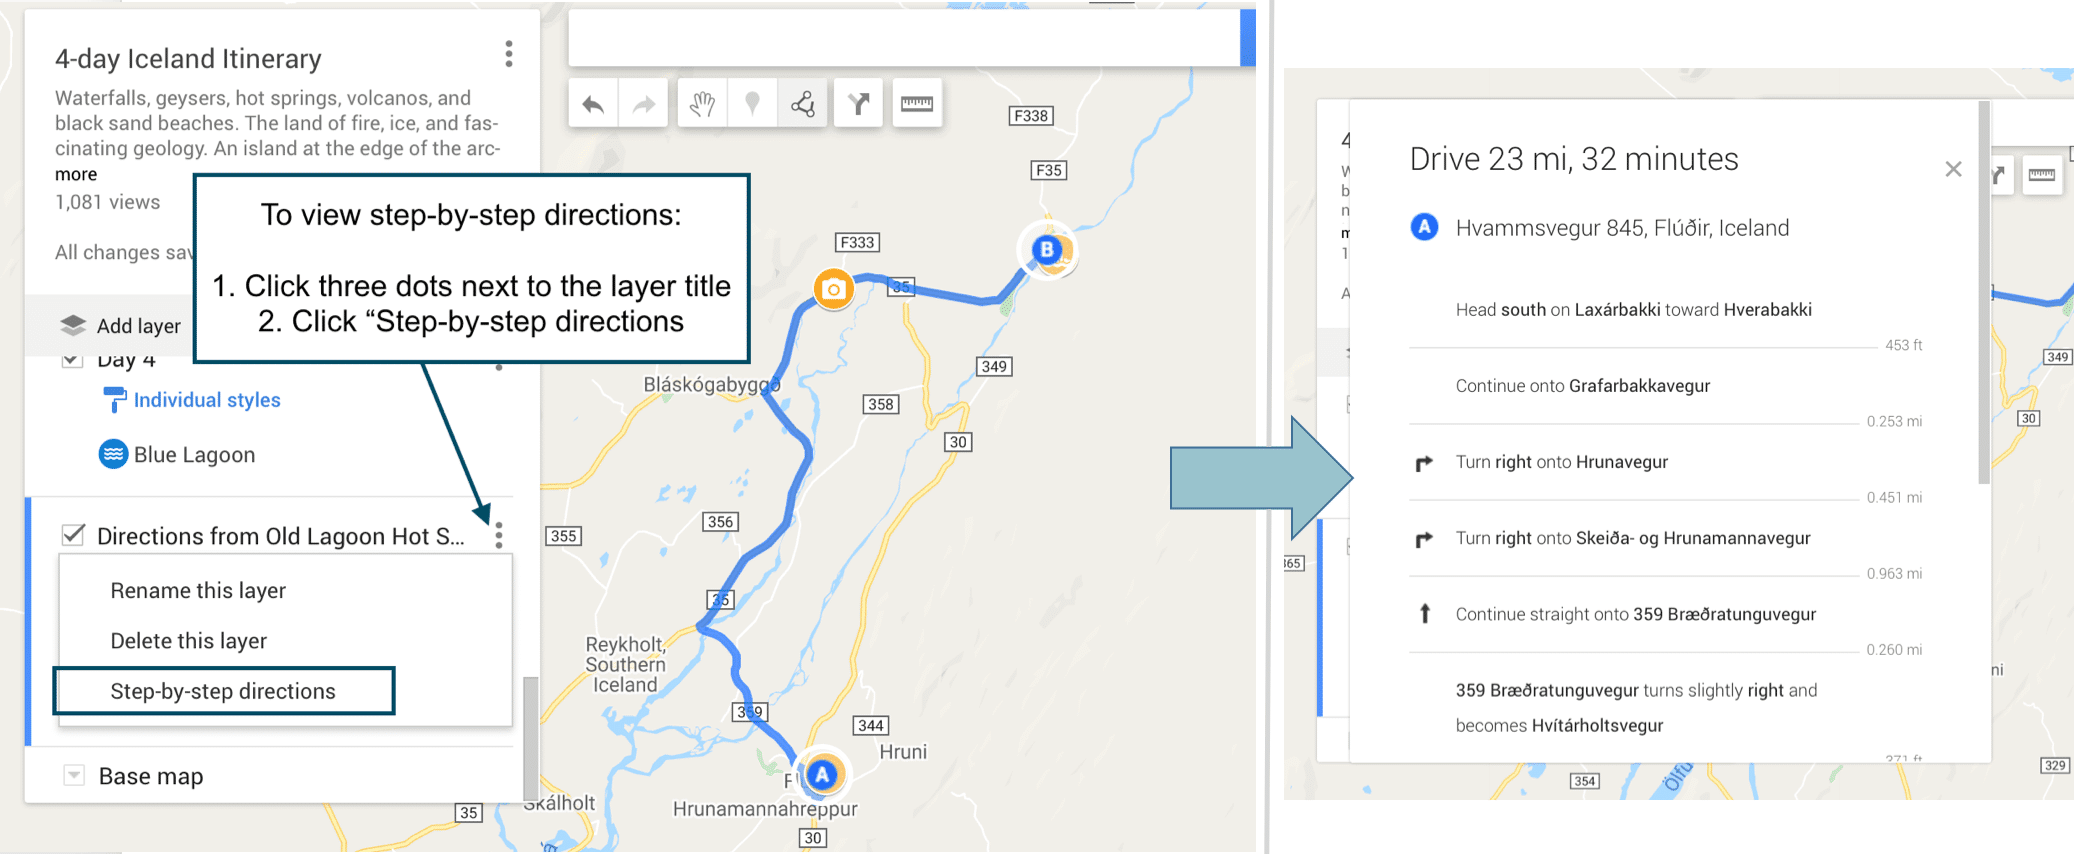 How to find step-by-step directions on your map
ADJUSTING YOUR ROUTE
Google maps will automatically calculate the shortest route between locations. But you can easily change the route if you prefer to take a different one (i.e. to take the more scenic route, avoid tolls/highways, etc.).
To adjust the route between two points, hover your cursor anywhere along the blue line. Your cursor will change from a hand to an arrow over a white dot. A dialogue box will say “Drag to change route”. Click and drag the white dot to the desired road or highway on the map.
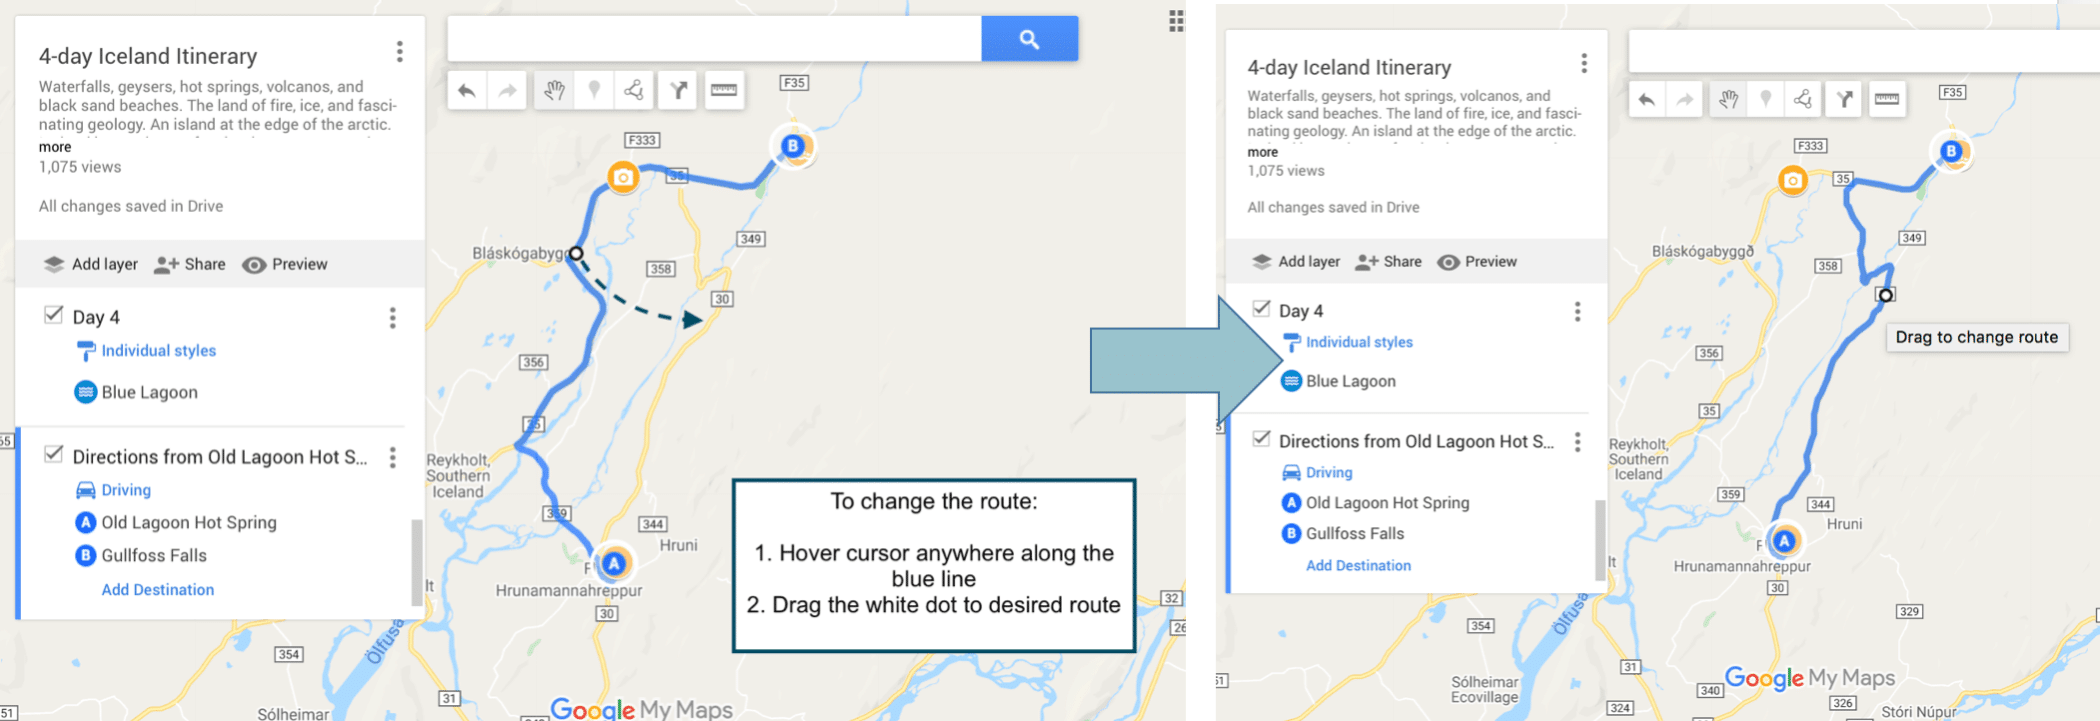 How to adjust your route
.
6. HOW TO ACCESS CUSTOM GOOGLE MAPS ON YOUR PHONE
.There are two ways to access your custom Google Maps on your phone. You can (1) reference your map through the Google Maps app or (2) export the entire map for offline access using Maps.me. Which method you use depends on your personal preference.
Steps are the same for iPhone and Android.
1. To view your maps in the Google Maps app:
-
- You will need to download Google Maps, if you haven’t done it already
- Sign into the same Google Drive account you used to create the map
- Click on the search bar > “…More” > scroll to the right and click “Maps”
- Select your custom map
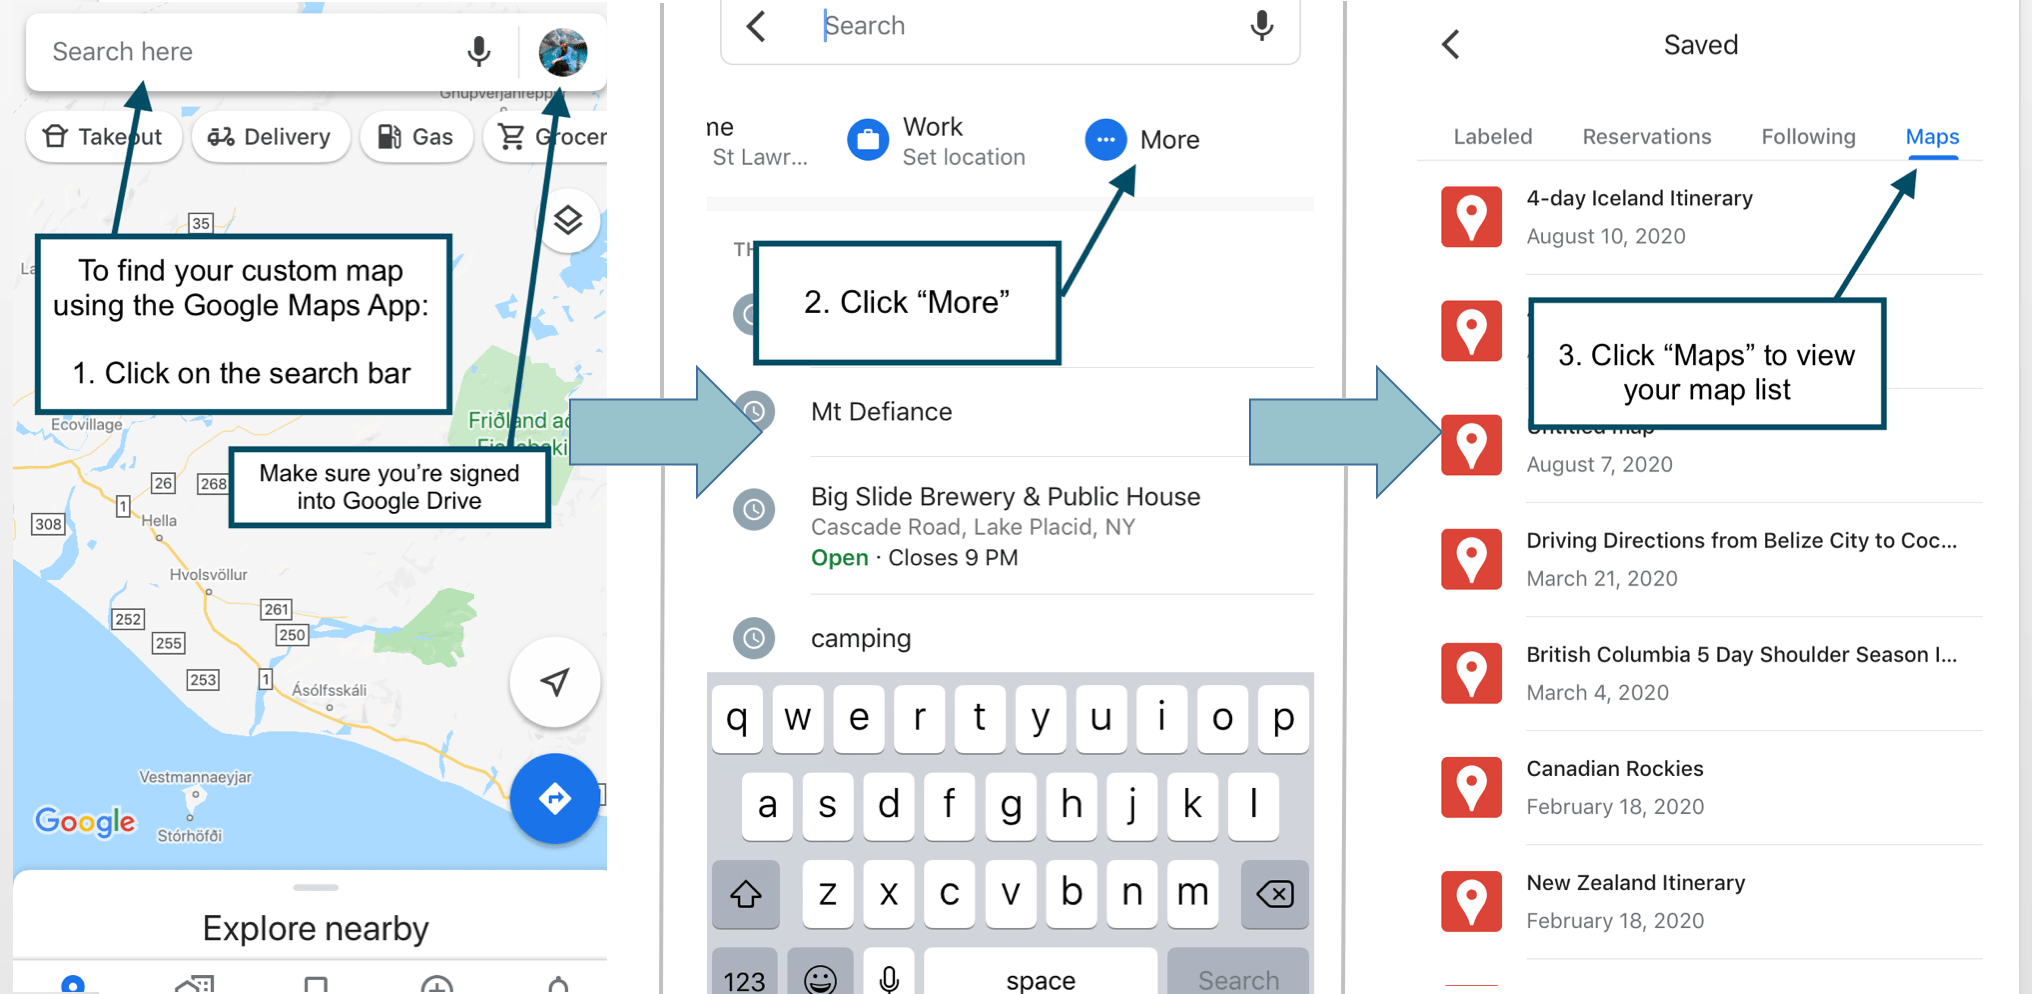
How to view your custom Google Map on your phone using the Google Maps app
.
Essential tips for using the Google Maps app:
- Accessing step-by-step directions: When you open your map in the Google Maps app, your directions layer will be visible, but you won’t be able to click on it and get the step-by-step directions.
.
Instead, navigate to the individual location pins on the map. Click the pin and the directions instruction will populate in the search bar. Click on the search bar and then hit “Search”. This will exit your custom map and open up the regular Google Maps navigation screen.
. - Accessing your map offline: You can’t. There is currently no way to access your custom map offline in the Google Maps app. Which is obviously not ideal if you’re traveling without cell phone service or wifi.
.
You can download an area for use offline by clicking on your photo (the circle in the upper right corner) > “Offline maps” > “select your own map”. However, when you do this, the map will be blank and you’ll have to repin/save all of your pins. You can repin/save locations by searching for the location > “save” > and then either add to an existing list or create a new list.
2. To export your custom map to Maps.me:
This method is quite a workaround, but (unlike the Google Maps app) it allows you to access your custom map offline without having to repin anything.
On your desktop:
-
- Open your map on desktop
- Click the 3 dots next to the map title > select “Export to KML” > check the box next to “Export to .KML file instead of .KMZ”.
- Make this file accessible through your phone by uploading it to Dropbox, Google Drive, email, or any other file sharing app.
On your phone:
-
- Download the Maps.me app
- Search for the city, state, or country your map is based in and then download
- Go to your photo sharing app and open your .KML file with Maps.me
- You’ll be directed to your custom map in Maps.me
Tips for using Maps.me
If you download your map in Maps.me, you’ll be able to use it offline. However, the major drawback is that you will only be able to access step-by-step directions from your current location. So, even though your directions layers will populate on your map, you’ll only be able to view the drive times and not the actual directions, unless one of those points is your current location.
That being said, I am not a Maps.me expert. So, if you have an update or workaround for this issue, please reach out and let me know :)
7. CREATE A SHARED GOOGLE MAP
You might want to share your map if you’re planning a trip with someone else, collaborating on an itinerary, or sharing your map on a website.
To share your Google Map, open the map > click “share” in the gray bar above the layers. Make sure the slider for “Anyone with this link can view” is set to blue. Then copy the link and send it to friends!
To embed your map on a website, check that your sharing sliders are set to “Anyone with this link can view” and “Let others search for and find this map on the internet”. Next, click the menu (the three dots) next to the map title > then click “Embed on my site”. Copy the HTML and paste it in the source code for your page.
8. BONUS: CALCULATE GAS MILEAGE
.Download my customizable Travel Expense Planner below for free. Use it to easily and automatically calculate how much money you’ll spend on gas, using your custom Google Map!
***
And there you have it! All the tips, tricks, and general instructions on how to use Google Maps as a road trip planning tool. As always, if you have any questions or have anything to add, leave a comment below. I love to hear from you!
Happy adventuring!
Did you find this Google Maps road trip planning tutorial helpful? Don’t forget to pin it for later!

Hi, I’m Jackie! I’m a travel photographer and content creator based near the Adirondack Mountains of Upstate New York. I’m also a millennial who works full-time, yet I still find ways to travel frequently without breaking the bank, because traveling is what makes me feel most alive. Now I help fellow travelers who also work 9-5 and are looking for ways to travel more with limited PTO.
Related Posts

27 Comments
Leave A Comment
WANT TO SAVE MONEY TRAVELING?
Check out my list of reliable budget-friendly travel resources that are guaranteed to save you the most money, without compromising your experience.
[…] Krawiecki, J. (n.d.). How To Plan Your Road Trip With Google Maps. The Adventure Atlas. Retrieved from How To Plan Your Road Trip With Google Maps (Tutorial With Examples) | The Adventures Atlas […]
[…] that an SUV or an RV is better suited for the whole family. Once you’ve secured your vehicle, map out your route, research the stops that you want to make, and make a list of the things that you’ll need to […]
[…] You won’t have service once you get there though, so I suggest downloading offline Google Maps of the area before you go. To learn how to download offline Google Maps, visit my blog post on How To Plan Your Road Trip Using Google Maps […]
[…] How to Plan Your Road Trip Using Google Maps […]
[…] How to Plan Your Trip Using Google Maps […]
[…] How to Plan Your Road Trip Using Google Maps […]
All I needed when I googled “how to plan a trip in google maps” was to be pointed in the right direction of where to look for the feature. This went WAY beyond what I could have ever asked for and helped SO MUCH! Thank you, thank you, thank you!
Hi Nicole – I’m SO glad to hear you found this post helpful!
[…] How to plan a road trip using Google Maps […]
Hello Jackie, and thanks for the very informative article! It was well written and I used Google Maps on my last trip to the Baja in Mexico. One other tool I used was the free trip planner from Geovea https://geovea.com/trip_plan/new_trip to create and share my trip, and estimate my trip budget. You can also take your itinerary with you on your phone for navigation. I really appreciate all of the great travel guides and already planning my next trip :-)
Thank you for sharing all of this valuable information! I see how to view the turn-by-turn directions, but is there a way to start the route so you can follow it while driving? Thanks!!
[…] How to Plan Your Road Trip using Google Maps […]
This literally just changed my life! Thank you for sharing how to use google maps to plan a road trip. I will use this all the time now!
Hey there – so happy to hear you found this post useful!
[…] Planning a Costa Rica road trip? Read: How To Plan Your Road Trip With Google Maps (Tutorial With Examples) […]
[…] a large geographical area you need to give your trip a bit of structure. You can start by using Google Maps to plot and plan your journey so you can make a note of all the destinations you are interested in. You can then agree on a few […]
[…] Read next: How To Plan Your Road Trip With Google Maps (Tutorial With Examples) […]
said no driving directions from point a to point b, so i couldn’t get started. E.G. Badland SD to Mt Rushmore to Custer Nat. Park, I need a little more direction, i’m not to good with comp. thanks
Hey Billy – Sometimes Google Maps won’t recognize directions to very general areas because it wants you to use something more specific. This most often happens with National Parks and wilderness areas. In those cases, Google Maps will generally present you with a list of specific locations you can choose from, such as the park’s ranger stations, visitors centers, etc. However, in your situation, I was able to pull up directions using “Badlands National Park”, “Mount Rushmore National Memorial”, and “Custer National Forest”. Hope that helps!
[…] necessary than you suppose to sleep, bathe and plan for slower days. A very good rule of thumb is to plan in rest time each three days. That method, you possibly can push your self however forestall exhaustion in your […]
[…] essential than you assume to sleep, bathe and plan for slower days. An excellent rule of thumb is to plan in rest time each three days. That means, you possibly can push your self however stop exhaustion in your […]
I’ve been a user of paper maps, since before the Internet, or color TV for that matter. For an up coming trip, basically Texas to FL, and back, I decided to make better use of Google Maps. A google search brought me to this page. Super helpful, and the pins per layer note answered a long standing confusion of mine. Thank you. I do have one question. Is there a way to to add waypoints based on distance or travel time? For example, this is going to be a two day trip. I want to find the halfway point (easily)? Or in the case of a longer trip, I want to drive X miles or Y hours? I know I can trial and error it, but what if I want the half-way point? What’s the easiest way to find it? Or where will I be in 8 hours of driving? Thank so much! Cheers, Eric
Hey Eric – thanks so much for your comment! Unfortunately, I don’t know of an easy way to calculate your half way point or location after x amount of hours. I typically eyeball it, which might be the only way to find your answer
Thanks very much, it is really helpful
This was most helpful for creating a personal map. I tried it and created a practice map on my laptop; named it and accessed it exactly like your instructions indicate. The part that has me puzzled is the accessing it from your phone. I have used Google maps on my phone for a long time and believe I am signed in using the same account. The Google Maps app on the phone identifies me (the right end if the search bar has my initial and shows the account when tapped.) When I tap the search bar I get to the … More but that is it. All I then see is the opportunity to set my Home and Work Locations but no listing of My Maps.
On the laptop going to the Menu (bars at left side of Search) allows access to Lists, Labeled, Visited, and Maps. (Maps is the one, as you indicate, to get to your personal Maps.) On my phone the only thing that seems to be available is the Labeled option. What am I missing to get to the Maps? I feel like there must be a switch somewhere to have the Maps come through … but I can’t seem to find it! Hoping you or someone can point me in the right direction. Thank you.
Without creating a custom map, is there a way to display a route in Google Maps and show attractions at the same time?
You’ve written a terrific guide and I’m learning a lot more about Google maps. Is there some way to print this guide or download a printable copy? Thanks.