My Assistant
6G Celicas Forums

 Site Message
(Message will auto close in 2 seconds)
  |

 Aug 17, 2008 - 12:38 PM Aug 17, 2008 - 12:38 PM
|
 
|
 Enthusiast  Joined Feb 3, '05 From USA/Virginia Currently Offline Reputation: 2 (100%) |
STATUS UPDATE: 2009.10.19: can now verify that the 10mm Neo - Wedge fits perfectly for the 3 back-lights (SMT lights things pretty evenly though the top button row is a little inconsistent). Can also verify the 8mm Neo - Wedge fits the rear-defog back-light (but the one i got had a slightly too wide led surface and had to be put through with some force.). added a rear-defog button section at the end.
========================================== How-To: Getting the Unit Out Required Tools: Philips-head screw-driver. ideally you want a very short one as well as a regular sized one. needle-nose pliers can be helpful. Required Parts: None, this is just getting the unit out. The first part of this howto is just a very detailed description on how to get the Heat/AC unit (often referred to as a Climate Control or CC Unit (where the context makes it obvious we're not talking about Cruise Control)) out of the 6th gen Celica. I've only done this to my 1999 Celica GT, which is an American car, some of the instructions may need to be adjusted if your car is right-hand drive. This howto borrows allot of wording from Coomer's howto. And allot of design from DmVinney's howto. Lets do the most intimidating step first. The Two Control Wires (no current flows through these, they're like bicycle brakes). Go under the hood and locate the black control wire. It should be near the top of the driver's side firewall. 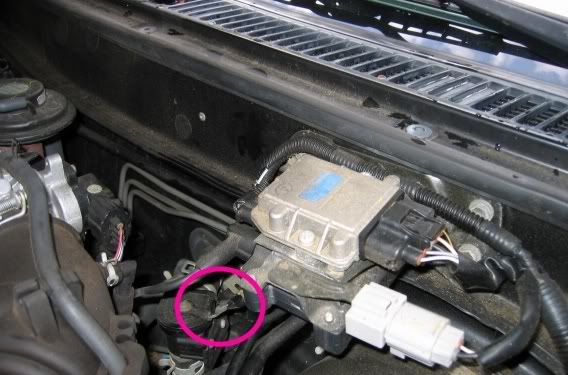 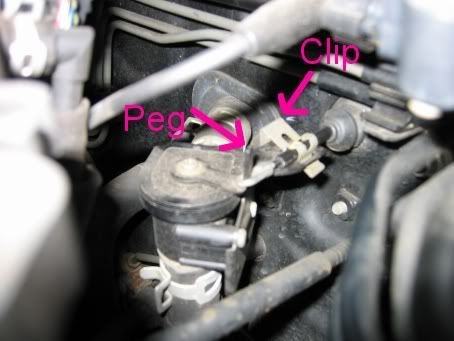 To get that wire off of it's peg you'll need to pop that clip up first. I recommend needle nose pliers.  After you get the clip off, the end of the wire should be able to just be lifted off the peg. Now lets move on to the blue control wire. If you shove your head under the dashboard by your pedals you should be able to see this to the *right* of the accelerator. 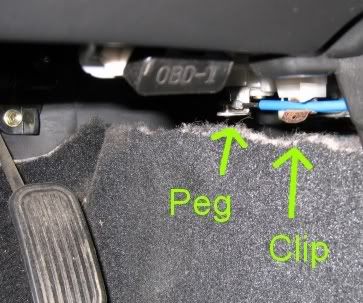 First free the cable from it's little clip (this is probably best done with your fingers). Then pinch the top of the little peg while sliding the end of the cable up over it. Ok, now for easier stuff. Remove the panel around the shifter (you may need to put the car in neutral to get this out of the way, please remember your hand brake), this panel is held in by four clips and pulls out relatively easily, the cigarette lighter is attached to it i would recommend just letting it hang over the *left* side (but be SURE not to klutz out and jerk on it). Then you remove the really big panel above. First take out the two screws on the bottom of the panel, then you can pull the panel out (i start at the bottom and finish with the top *left* side, which always wants to come out last). There are 2 wire harnesses up at the top of this panel. One is to the hazard light, the other the clock. Remove them and set this panel in the back seat. 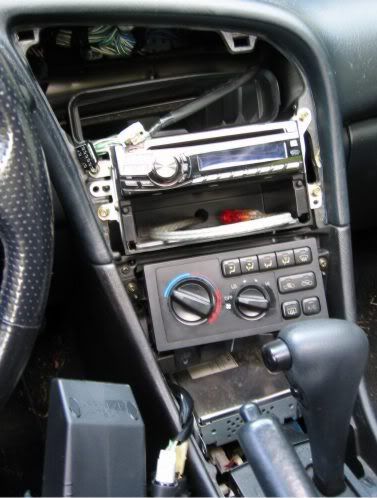 Now the climate control unit is nearly free. There are two screws holding it in (unscrew them). There are three wiring harnesses that are attached to the climate control. Slide the entire unit out a little bit, so you can un-hook the wire harnesses. Then, before sliding the unit out of the car, try to note the white tube and funnel that the black control wire is sliding out of. It may also help to note where the blue wire is sliding from (i forgot to make note of this but had no problems getting it back together later). Then slide the entire box out of the car. 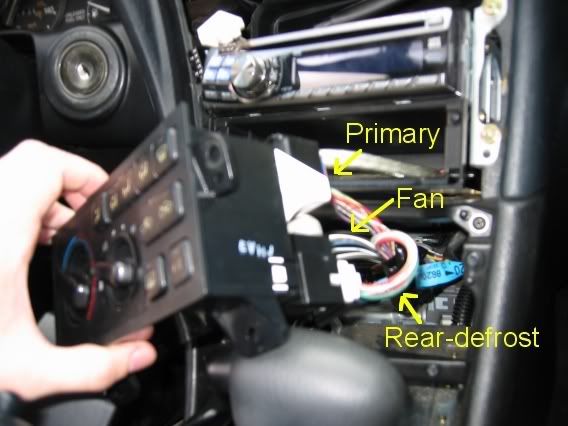 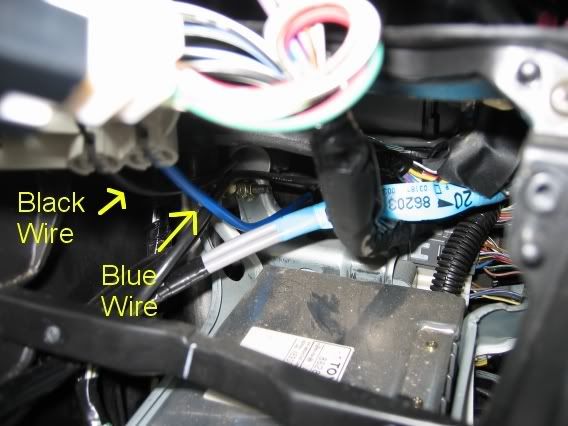 Now you can take it inside to dis-assemble it. ========================================== Howto: Disassembling the Unit Required Tools: Screwdrivers Required Parts: none (just disassembling) Norberto has made some great tutorial videos for this. you can watch them here: part 1, part 2 here's the text+pics version as a supplement. The rear-window-defrost is basically an entirely seperate module (one of the wire harnesses was for it alone). locate it's sub-structure behind the C.C. Unit and pull it out (it's held in by a single plastic snap, pull the tab back a little, then slide it out). 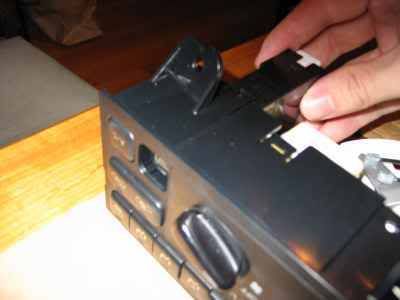 Now pull the knobs off the Fan and Blue <===> Red knob. the back of the fan knob (which also had it's own wire-harness) must now be unscrewed and set somewhere. 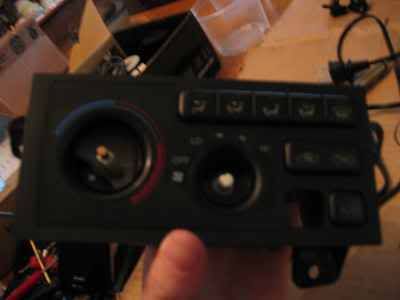 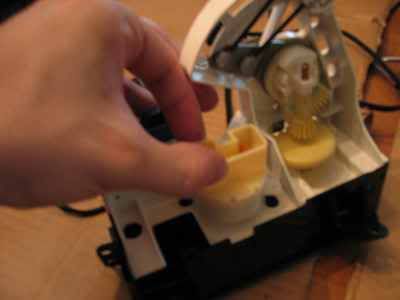 Next there is a the top wire-harness socket (this is one that hooks up to the circuit board and controls all the lights), you should unscrew the black guard on this and set it somewhere. 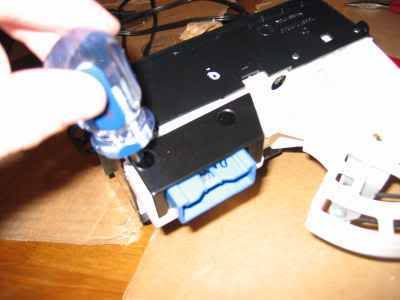 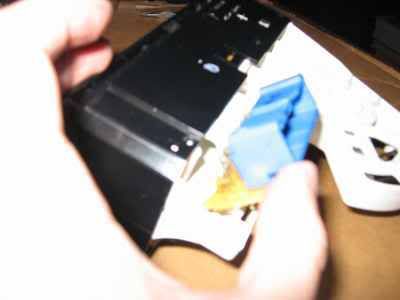 There about 5 screws that need to be taken out from the sides of the CC unit. now finally you can pull the white and black pieces apart. I recommend holding it like this. 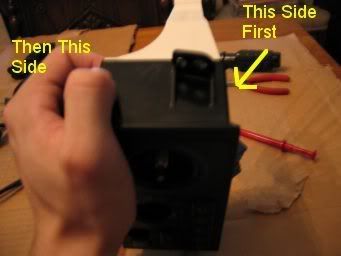 There are about 2 screws holding the cicuit board in (unscrew them). Then take the circuit board out. It may help to pry here with a small screwdriver. 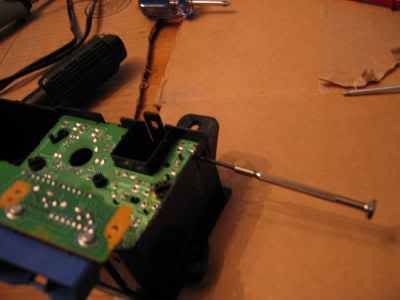 ========================================== How-To: Lighting Ovewview The 6th Gen Celica's CC unit is lit in the following ways. * The Back-Light is provided by 3 special toyota bulbs (Toyota part number is 84999-70007). These are incandescent and have little green condoms on them to make them a nasty shade of yellow-green. 10mm Neo Wedge fits too. * Under each button (except the rear-window-defroster) there is a small LED. * The rear-window-defrost is another strange toyota incandescent bulb w/ green condom (different than the others maybe). ========================================== How-To: Changing the indicator lights Required Tools: Pliers, Bastard-File, Soldering Iron, Solder Required Parts: 8x 3mm LEDs (in whatever color you like) First remove the black pieces from over each row of LEDs. The black piece on the biggest row (the top buttons) has a melted clip in place, i grabbed this with my needle-nose and ripped it off. The black piece can then be removed without too much work, and it will still hold plenty well. Each 3mm LED will have to be filed down a little bit. it's very important to file the LED lense down in a way that won't damage the diode inside it. To safely do this make sure the legs are side by side as you look down at the LED sitting on the file. Then, with your pliers, swipe the LED lense across the File (i used a big file). after 2-4 swipes (on each side) it should fit into the black piece with no hassle. Then desolder the old LEDs, and solder in the new ones. Remember, with LEDs the polarity matters! the longer leg of an LED is the anode(positive) the shorter leg is the cathode(negative). if you cut the legs already look at this image. + is the anode, - is the cathode  If you've never soldered before this might not be the best place to start. Circuit boards are pretty cramped, and a replacement from a dealer will probably set you back a bit. Here are some beginner tips. Get some practice using the iron on disposable parts (solder together wires and stuff). Don't use too much solder (everyone will tell you this), and try to keep your elbows or even your wrists braced on the table (this will keep your hands steady). To test your creation you can take the circuit board out to your car, plug it into the appropriate wire harness, and switch the lights on. You don't even have to plug it in all the way, i usually plug it in until it first starts hitting the clip. ========================================== How-To: Back Lighting: Modify the Toyota Bulbs (shouldn't need to do this anymore - the 10mm Neo-Wedge fits fine and costs 1/3 as much as the toyota bulb) Required Tools: Drill (something small, cordless, and not-so-dangerous is best), assorted bits (1mm & 2mm bits) Required Parts: 3x num 74 LEDs It may be a good idea to check out the 10mm Neo Wedge bulbs at the end of this Howto. They cost about $1.50 per, where the Toyota bulbs cost $10.00 a pop. It's important to do each bulb one at a time. Take one of the Toyota Bulbs out of the CC Unit. Then remove the bulb from it's little plastic twist-in housing. The way i did this was to crush the bulb with needle-nose-pliers (shut your eyes just in case), then yank the + and - leads out of the housing with the pliers. edit: you can also be much less destructive and unwrap the legs from the twist-base then pull the bulbs out. The next step is to remove the plastic base from the num74 LED. To do this bend the contact wires at the bottom downward (so they extend past the base. Then grip the LED lense in your pliers and then twist just a little bit on the base with your hand, once it's moved just a tiny tiny bit stop. Then pull the base off-of the LED. Now you should have an LED with a resistor on one leg and some other type of tube thing on the other. These will need to go down into those tiny holes on the black-plastic bulb base. but they won't fit until we widen the holes. first i'd recommend using a 1mm drill bit to widen the holes. Those weren't wide enough for my LED legs but the 1mm holes made drilling into the plastic with a 2mm bit much easier. you also might want to bore-out the top of the bulb-base a little to let the led lens sit nicer. Now bend the legs of the led apart just a little bit. just wide enough for the resistors to be guided into the holes we've drilled. If you get the LED lens flush with the top of the base, or just a little bit further in you're good. Now take out one of the other toyota bulbs. take a look at how the contact wires are wrapped on it. with you're needle nose pliers you should be able to wrap the legs of your led the exact same way. 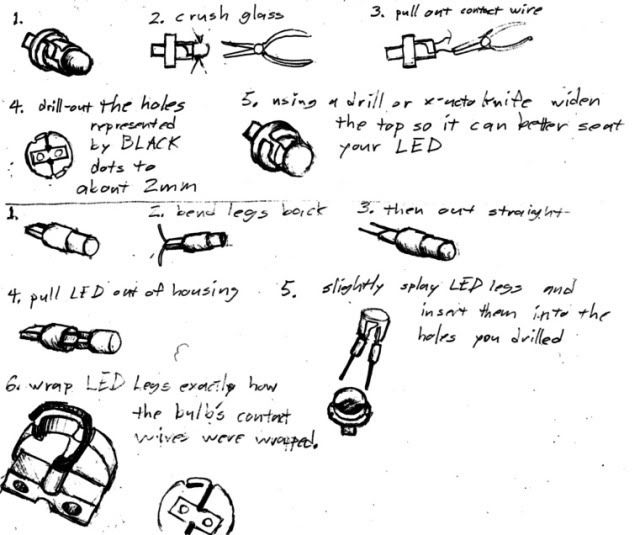 Now you want to insert this bulb into the CC unit. it should twist in just like the original bulb but it might take a little more force the first time. turn it with the pliers if you have to. since you still have one of the originals in there take a look at it's orientation if you want to know when to stop twisting. ok, you should have one of the original bulbs in there, and one LED bulb in there. take the circuit board out to your car. plug it most-of-the-way into the appropriate wiring harness (not enough to snap in because that will be a pain to get back out). and turn on your dash lights. LEDs must be plugged in with the correct polarity!! If the LED you just made doesn't work you'll need to turn it around. (so remove the circuit board from the car. Take the bulb back out, rotate it 180 degrees, and plug it back in. then test again.) When you've confirmed that the first one is working just repeat the appropriate steps for the next 2. After you've got them all plugged in and they all test out ok here's what you need to do. snap the circuit board back into the front of the CC-Unit. check your lights now. Odds are the top row of buttons isn't lighting up much. this is because there's a piece of clear plastic that the led needs to be angled towards. it was pretty easy for me to bend that one led a little bit to the side (aimed into the plastic piece) and then all my buttons lit up great. The AC button is a bit of a pain. mine lights up faintly, but not well enough. what i think will work is to take a bastard file and grind a 45 degree angle on that peticular led. then it will hopefully get more light to the clear plastic piece that lights up the AC button. 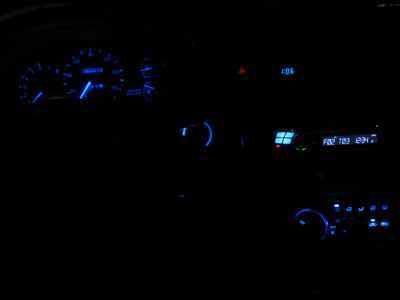 ========================================== How-To: Back Lighting: LED Series Required Tools: Soldering iron, Needle-nose, 2 sets of Helping Hands (strongly recommended) Required Parts: 3x 5mm LEDs (3.6V,20mA), Resistor (68ohm,1/4W), bendable, but strong insulated wire. here's how i did mine at first. I've since had lots of problems with these and don't really recommend them. First untwist all three Toyota bulbs If you look at the back of the circuit board you can match the polarity up with this. this is for the circuit board with the blue connector. pittfirefighter mentioned that the board with the white connector has the polarities reversed. in any case, it's probably best to plug the board back into your car and turn the lights on (no need to start the car) to see if you got all the polarities correct. 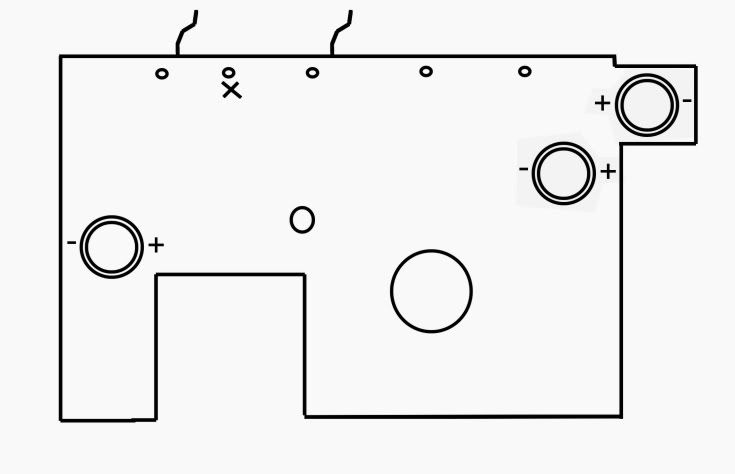 bend a resistor end so that it will hang down through the bulb hole to the front of the board, then solder it to the negative lead of that hole. Now messure up some insulated wire (stripping the rubber some 4-6mm at each end) so that it can make it over to where the next bulb was. now solder the cathode of the LED onto that wire. Solder the anode LED leg onto the next wire segment (which should reach over to the next bulb location). And then solder that wire end to the next LED cathode. anyways, after you have all 3 LEDs and the resistor soldered up in a series circuit you solder the anode of the last LED to the positive lead of the first bulb-socket (right beside the resistor you started with). always run the wire between the black pieces that cover up each button, and it will help you position each LED if the wire has some rigidity to it (braided wire isn't so good for this). 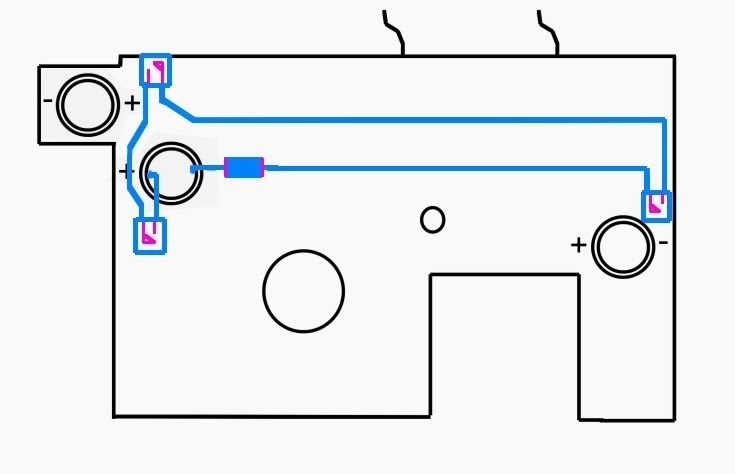 ========================================== How-To: Back Lighting: Other Options You should be able to solder in a 194 bulb(or led array) at each socket, with the 5-led matrix bulbs this'd probably be really nice. There are also 10mm "neo wedge" bulbs here, which *could* even be a perfect fit. A while back i found specs on the toyota bulbs that said they were 9.5mm. I have now tried the 10mm neo wedge, and found they fit wonderfully. i think i'll try the super star ones soon. Also Coomer has a good Howto for using spray paint. Here are some links for auto led buying http://superlumination.com/74.htm http://superlumination.com/194.htm ========================================== How-To: Lighting the Rear-Defog button Getting this thing apart is murder. i used a system of 2 flat-head screw drivers: got one side un-clipped first then shoved a screwdriver into it to keep it from re-clipping itself while i pry-ed at the other side with the other screwdriver. on the upside it seems like some really strong abs plastic that's pretty resistant to this sort of abuse. a 3mm LED fits in just fine for the indicator. take a look at your cathode(-) and anode(+) before de-soldering the old one. the 3mm blue that i got is a little too bright at night. unfortunately this indicator doesn't dim when your head-lights are on. as a result my 3mm LED was a little too bright for comfortable night-time use. so i re-positioned it so the side of the led points outward and it works ok. as for the defog back-lighting, i was wondering if this thing was even wired to light up. as my celica's bulb was burned from the time i got it. an 8mm Neo - Wedge fits great. the one i got wasn't perfect because the led was just slightly too bulky (it was an SMT LED and has good sideways visibility). but not too bulky to shove through the hole anyways. after dropping an LED in there it worked great. (even plenty of wiggle room to reverse polarity). This post has been edited by Zimluura: Jun 17, 2010 - 10:55 PM |

|
Aug 18, 2008 - 4:48 AM
|
|
|
Enthusiast Joined Aug 2, '05 From Guam Currently Offline Reputation: 15 (100%) |
This is really awesome - project for me. Zimluura - thanks for the help! My personal request. One thing, can't I just replace the bulbs with factory ones as well?
Also, how do you slide the cable back up? This post has been edited by trdproven: Aug 18, 2008 - 4:50 AM -------------------- 94 Celica GT
|Toyota OEM Japan|Toyota Racing Development|Tom's|Competition Clutch|5Zigen|Apexi| |Laille/Beatrush|Magnecor|Denso|Royal Purple|Optima|PIAA|PW JDM|Megan Racing|Nitto| |Work|Greddy|Samco|Project Mu|H&R|Gates|Moog|Rota|Yokohama|Epman|1320|Upgr8 04 Celica GT |Toyota OEM Japan|Toyota Racing Development|Tein|BC Racing|Greddy| |
|
Aug 18, 2008 - 9:14 AM
|
|
 Enthusiast Joined Apr 18, '05 From Calgary Currently Offline Reputation: 20 (100%) |
the end of the cable has a loop that attaches to the heater control valve. just put some sort of cable through that loop before pulling out the HVAC control unit so you can pull it back out after you've finished.
-------------------- -------------------------------------------------------------------------------- -------------------------------------------------------------------------------- |
|
Aug 18, 2008 - 1:00 PM
|
|
|
Enthusiast Joined Feb 3, '05 From USA/Virginia Currently Offline Reputation: 2 (100%) |
here's what i remember: i just slid it into the white funnel and then it would stop just before the unit was back in. so then you go around under the hood and push the little rubber piece a little and you can then grab the looped end of the black cable and pull it through.
after you get the unit screwed back in you want to re-attach the control wires to their pegs. then move the blue <==> red control left and right all the way to make sure it still has it's proper range of motion. if it doesn't move all the way back and forth you might need to check the pegs out and make sure they're moving properly. i had this problem once, but after pulling the black wire off, and then re-attaching it with the unit set to an extreme it was perfect again. i sorta want to put a link to Norberto's videos in here. let me send him a pm |
|
Aug 18, 2008 - 1:59 PM
|
|
|
Enthusiast Joined Jan 18, '08 From Houston Currently Offline Reputation: 7 (100%) |
STICKY!!
-------------------- QUOTE (presure2 @ Nov 6, 2010 - 6:16 AM) Via FB: fcuking awsome!!! D-man FTW! QUOTE (DEATH @ Nov 11, 2008 - 5:40 PM)  Damn D-Man - most impressive. QUOTE (99GT @ Nov 14, 2008 - 4:04 PM) D-Man's post should be a sticky QUOTE (samir0189 @ Nov 4, 2008 - 10:50 AM) LOL, oh boy, you can always count on D-Man for ridiculously hilarious posts. |
|
Aug 18, 2008 - 4:24 PM
|
|
|
Enthusiast Joined Jul 15, '08 From Norway Currently Offline Reputation: 5 (100%) |
AWESOME! Great thread! Exactly what I've been looking for sometimes!
 Now I finally can remove my AC and replace the bulbs! Now I finally can remove my AC and replace the bulbs!There is possible to use white leds, right? |
|
Aug 18, 2008 - 4:52 PM
|
|
|
Moderator Joined Oct 1, '02 From fall river, ma Currently Offline Reputation: 13 (100%) |
nice write up!
added to the sticky!
-------------------- Former Team 5SFTE pro member ;)
 13.6@108MPH, 5SFTE Powered |
|
Aug 18, 2008 - 5:31 PM
|
|
|
Enthusiast Joined Feb 3, '05 From USA/Virginia Currently Offline Reputation: 2 (100%) |
it is certainly possible to use white leds. though, in the day time i notice a little bit of a green tint to the buttons. so hypothetically, they might add some slight green filter that is insignificant when you use blue, but noticeable when you use white.
post some pics if you try it please if that does happen there are certainly some options to get your white setup. sanding or polishing (dremel) the backs of the buttons to get some of that green paint off. maybe spraying a light coat of purple (opposite of green on the visible light color wheel) or it could work perfectly without any issues. just don't remember seeing any pics of a white cc unit. |
|
Aug 18, 2008 - 5:55 PM
|
|
 Enthusiast Joined Feb 7, '07 From Portland, Oregon Currently Offline Reputation: 67 (96%) |
When I do this, I'll very likely use white LEDs with blue indicators; I'll post pix once it's done!
--------------------  |
|
Aug 19, 2008 - 7:50 AM
|
|
|
Enthusiast Joined Mar 15, '07 From Tennessee Currently Offline Reputation: 52 (100%) |
hey, use my videos, with your pics and get this sticky.
This post has been edited by njccmd2002: Aug 19, 2008 - 7:50 AM -------------------- Learned a lot in 10 years... I hardly log in anymore, last login Today Sept 6 2019, and I was forced just to clarify a post. LOL
If you PM me and I dont respond, dont fret or cry. Im alive, better post your questions in the thread below, maybe I log back in 2grfe Swapped... Why I chose the 2GR, before you ask read here... A great civilization is not conquered from without until it has destroyed itself from within. @llamaraxing in Instagram is the best way to find me. I hardly log here anymore. |
|
Aug 23, 2008 - 8:44 AM
|
|
|
Enthusiast Joined Jul 11, '08 From usa Currently Offline Reputation: 0 (0%) |
As a follow up you can get direct replacements for the three main back light bulbs at;
http://autolumination.com/74.htm Just scroll down to the neo wedge replacement bulbs. The direct swap is Type B (10mm) wedge bases. The bulb on the rear defroster (mechanical CC unit, it may be different for those of you with automatic units) looks like an 8mm base (Type A) but I have not tried to replace it. If you're okay with bulbs and not LEDs this is a no hassle direct swap. I believe you can swap them out without even taking the back of the CC unit off. I will post some pictures later this evening when the light is more favorable. I tried it out last night and the brightness was comparable to the stock unit, which is what I was hoping for. Thanks to Zimlurra for this post and njccmd2002 for the disassembly videos. |
|
Nov 15, 2008 - 4:06 PM
|
|
|
Enthusiast Joined Oct 20, '08 From Lima,Peru Currently Offline Reputation: 0 (0%) |
perfect! thanks ive been looking this for a while
 after my final exams i'll do this =) |
|
Jan 17, 2009 - 5:12 PM
|
|
|
Enthusiast Joined Nov 14, '06 From Northampton, UK Currently Offline Reputation: 5 (100%) |
Nice write-up. Could a mod please edit the title to make it obvious that this howto is about changing the illumination colour of the AC/CC unit.
-------------------- Davey
Items for sale |
|
Jan 20, 2009 - 9:02 PM
|
|
|
Enthusiast Joined Feb 3, '05 From USA/Virginia Currently Offline Reputation: 2 (100%) |
done.
not a mod, but for this thread... This post has been edited by Zimluura: Jan 20, 2009 - 9:03 PM |
|
Aug 1, 2009 - 7:00 AM
|
|
|
Enthusiast Joined Aug 2, '05 From Guam Currently Offline Reputation: 15 (100%) |
what is the oem bulb that we use 74?
-------------------- 94 Celica GT
|Toyota OEM Japan|Toyota Racing Development|Tom's|Competition Clutch|5Zigen|Apexi| |Laille/Beatrush|Magnecor|Denso|Royal Purple|Optima|PIAA|PW JDM|Megan Racing|Nitto| |Work|Greddy|Samco|Project Mu|H&R|Gates|Moog|Rota|Yokohama|Epman|1320|Upgr8 04 Celica GT |Toyota OEM Japan|Toyota Racing Development|Tein|BC Racing|Greddy| |
|
Aug 1, 2009 - 10:49 AM
|
|
|
Enthusiast Joined Apr 20, '09 Currently Offline Reputation: 4 (100%) |
BTW, you don't need to break the original bulbs to get them out of the plastic holder, you can just unbend the legs from the backside and slide the bulb out.
-------------------- ~Moving on to a 2002 Corolla S~ R.I.P Tom Celica - 1994-2010 |
|
Aug 5, 2009 - 1:28 AM
|
|
|
Enthusiast Joined Feb 3, '05 From USA/Virginia Currently Offline Reputation: 2 (100%) |
trdproven: the oem bulb is not a regular one. but probably a 10mm neo-wedge. when i searched for the toyota part number i found a japanese site refering to it as a 9.5ts bulb.
solidxsnake: i've heard that before. i should probably put an edit in there. |
|
Aug 8, 2009 - 4:23 AM
|
|
|
Enthusiast Joined Aug 2, '05 From Guam Currently Offline Reputation: 15 (100%) |
I have one that is real small could that be it? part # is 84999-70007. I think it might be the bulb, my whole top row of buttons burnt out, not the selector buttons that light up when you select a certain air flow.
This post has been edited by trdproven: Aug 8, 2009 - 4:25 AM -------------------- 94 Celica GT
|Toyota OEM Japan|Toyota Racing Development|Tom's|Competition Clutch|5Zigen|Apexi| |Laille/Beatrush|Magnecor|Denso|Royal Purple|Optima|PIAA|PW JDM|Megan Racing|Nitto| |Work|Greddy|Samco|Project Mu|H&R|Gates|Moog|Rota|Yokohama|Epman|1320|Upgr8 04 Celica GT |Toyota OEM Japan|Toyota Racing Development|Tein|BC Racing|Greddy| |
|
Aug 8, 2009 - 7:35 PM
|
|
|
Enthusiast Joined Feb 3, '05 From USA/Virginia Currently Offline Reputation: 2 (100%) |
that is the toyota part number for the unit's back-lighting. and it is just a single bulb that lights the top row.
|
|
Aug 9, 2009 - 3:29 AM
|
|
|
Enthusiast Joined Aug 2, '05 From Guam Currently Offline Reputation: 15 (100%) |
QUOTE (Zimluura @ Aug 9, 2009 - 10:35 AM) that is the toyota part number for the unit's back-lighting. and it is just a single bulb that lights the top row. oh great so i do have the correct bulb? -------------------- 94 Celica GT
|Toyota OEM Japan|Toyota Racing Development|Tom's|Competition Clutch|5Zigen|Apexi| |Laille/Beatrush|Magnecor|Denso|Royal Purple|Optima|PIAA|PW JDM|Megan Racing|Nitto| |Work|Greddy|Samco|Project Mu|H&R|Gates|Moog|Rota|Yokohama|Epman|1320|Upgr8 04 Celica GT |Toyota OEM Japan|Toyota Racing Development|Tein|BC Racing|Greddy| |
|
1 User(s) are reading this topic (1 Guests and 0 Anonymous Users)
0 Members:
| Lo-Fi Version | Time is now: June 10th, 2024 - 1:07 PM |