
Comprehensive Guide on Stringing a Classical Guitar: A Step-by-Step Tutorial
Restringing a classical guitar involves removing the old strings and installing a new set. This important maintenance task should be performed periodically to keep the guitar sounding its best and a player’s touch and expression most consistent. Old strings can distort and even corrode over time, affecting tuning stability, response, and tone. Stringing a classical guitar is not difficult, and in our tutorial, we’ll reference a demo photograph and a detailed video we’ve created to help you learn the technique.
Before learning how to string a guitar, you may want to learn more about the history of classical guitars.
What is a Classical Guitar, and How Did It Evolve?
A classical guitar is a type of acoustic guitar that is designed for playing classical and flamenco music. Unlike steel-string acoustic guitars, a classical guitar has what is referred to as nylon strings rather than metal strings. The treble strings are made of nylon or other synthetic materials and the bass strings have a threaded or composite core but are wrapped with a lightweight metal wire. These “nylon” strings produce a softer, more mellow tone than steel and other metal strings. Standard classical guitars have six strings and a wider neck than other types of acoustic guitars, which facilitates the technique required for classical guitar music.
Classical guitars have descended from Spanish luthier Antonio de Torres Jurado in the mid-19th century. Sometimes called the “Stradivari of the Guitar,” Torres introduced crucial structural refinements that established the shape, bracing patterns, body proportions, neck angle, and fan-style strutting that define the modern classical form, standardizing design aspects like body size/proportions. His design allowed for increased volume and projection while retaining characteristic nylon-string warmth and nuance. The great Spanish guitarist Francisco Tárrega, among many others, played Torres’ guitars.
What Kind of Strings Will You Need for Stringing a Classical Guitar?
Start with a new package of classical guitar nylon strings from Strings By Mail. These types of strings are what you need, as opposed to steel strings, which have too much tension for a classical guitar. Instead, your classical guitar should be strung using nylon strings, as these produce a warm, bright sound with excellent timbre and responsiveness for classical repertoire. The core benefit of nylon is that it allows control and clarity even when plucking or fingering notes with force and speed. Most top classical guitar string brands like Hannabach, D’Addario, and Augustine utilize special multi-filament nylon along with silver-plated copper winding on the lower three bass strings for superior tone, tuning stability, and longevity.
Strings By Mail can help you learn more about classical guitar strings. See our classical guitar string resource page, which includes answers to many FAQs.
Shopping at Strings By Mail for nylon classical guitar strings provides the best selection of all major brands. We offer you the best quality strings so you’ll always be able to restring your classical guitar, which is recommended every 2-3 months, or more often if you play usually. Concert and recording artists may change strings as frequently as every week.
Complete These Important Pre-Stringing Steps
We will provide you with a few pre-stringing maintenance steps before you learn how to change classical guitar strings. We recommend that you perform these pre-stringing steps so your guitar stays in top condition.
One of the steps you should include before the actual restringing process is cleaning the frets. Over time, skin oils, dirt, and grime can build up on the frets, leading to premature string wear. Use a small amount of fine-grained micromesh or steel wool to buff and shine the frets. Be careful not to scratch the wood surface. You can also use a specialized fret polishing cloth. Clean any polishing residue off with a dry paper towel or cloth. This periodic fret maintenance will allow the new strings to glide smoothly along the frets to avoid early wear.
Another key preparation step is checking the bridge. Inspect the bridge of the classical guitar, where the strings anchor near the bottom. Make sure the saddle is seated flush against the bridge. Look for any gaps where the saddle may have lifted. If so, press the saddle back down. The tension from the new strings will keep it in place later.
Watch Our Guitar Stringing Video, and Follow Along With the Steps Listed Below
We encourage you to follow along with John in his YouTube video, and he’ll walk you through all the steps to string your guitar. An important point he will make to speed the process is to do each step all at once, so while he shows you how to loosen one string at the head, how to tie one string at the bridge, etc., you will be performing these steps all at once. So, loosen all your strings at the headstock, cut them loose at the bridge, and remove them. Attach each new string at the bridge using the loop and wind method he demonstrates, bring each new string up to the headstock of the guitar, tie it off, and tighten it with your winder. You will see how this is done in the video, and we provide the steps in text format below for reference.
Once you are used to it, the whole stringing process should take only around 15 to 20 minutes. You start with the guitar resting on a stable surface with the head propped up so you can easily access it. The first thing you want to do is loosen the strings at the headstock. You can use a manual tool for this or a power tool that will unwind the pegs and allow you to loosen the strings. You can also use tools that fit on electric drills to allow you to loosen the strings.
During this tutorial, you’ll learn how to change one string, and the process is similar for all six strings. Use a Strings By Mail bridge bib to protect your guitar as you snip the string at the bridge after you’ve loosened the strings at the head. Leave it in place for the tying and tightening process as well in case a string “slips” and snaps against the face of the guitar.
Steps for Stringing Your Classical Guitar
Step One: Review How to Tie Classical Guitar Strings
To see how the new string is tied and knotted, you’ll observe John with a large demo unit, and he will show you the process of stringing and tying, so it will be easier to see how it is done. Below is a still photo from the video to illustrate the process.
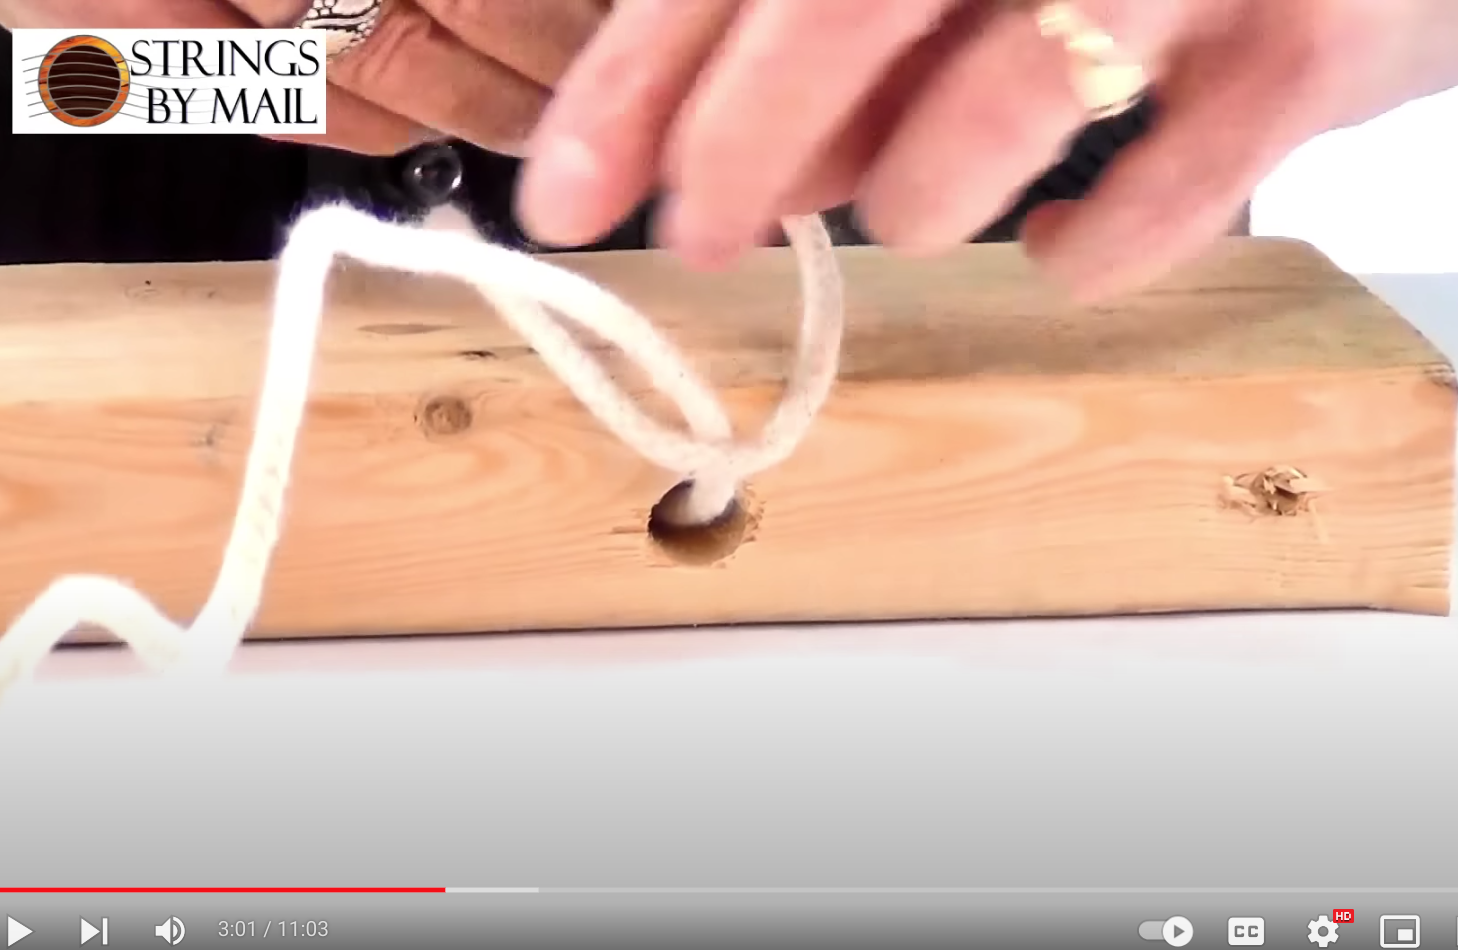
Observe how the string is tied. You will want to tie it down with at least one, and except for the thickest strings, likely even better, two winds of your guitar string, so the string is then securely tied down. Depending on the gauge of the string, you may wish to do a third wind to keep a thin string secure. For extra security, after you loop the string, you may wish to add a knot at the end of the string to ensure it stays tied down.
Now that you’ve observed the still photo, go back to the video and watch John use the demo unit to demonstrate the looping and tying technique. Once you’ve observed that, you will see next in the tutorial that he will show the same technique again, using the guitar.
Step Two
The next step is to bring the string up to the head of the guitar and through the barrel’s hole (which you should have lined up vertically). Loop and wind that string through the hole and around the barrel and around behind the string itself, then give that peg a bit of a turn. The tension will hold the string in place, and the video tutorial shows the process for one string for expediency. Complete the technique for all six strings, then turn the guitar back over, take out your Ernie Ball winder (or other winding tool) again, and wind the pegs to ensure the tension in all six guitar strings.
The key to efficiently stringing the guitar is to do all the steps at once; so loosening and removing all the old strings, then stringing all the new strings down at the bridge, then bringing each new string up and attaching it to the corresponding hole in its barrel, then tightening down each string with your winder tool. You can also use this opportunity to snip away any excess string.
Step Three
Next, you’ll want to ensure you use your Strings By Mail bridge bib again to protect the guitar and snip off any trailing extra bits of guitar string at the bridge. Inspect for any other short protruding string ends at the tuning posts, trimming these with snippers as well. Finally, use a polishing cloth to wipe off any dirt, skin oils, and grime that may have gotten on the guitar body, neck, or fretboard during restringing to keep your classical guitar’s finished surfaces glistening and protected.
We offer information at the end of our restringing video on how to string a 12-string guitar as well, so please refer to that should you wish to string a 12-string guitar.
After Stringing the Guitar, Tune It Up
A key point is to tune the guitar frequently over the first hour after you restring it; otherwise, you’ll have issues with the strings stretching and the pitch not being right over a few days. Work with your tuner and adjust the strings until they are at pitch. You can accomplish this within the first hour after restringing the guitar, so you can get it properly tuned immediately. With the strings stretched, do a final precision tuning using a tuner, making micro-adjustments to each string as needed to reach and hold the pitch. At this point, you may also want to check the intonation of your instrument. Play the natural octave harmonic tones at the 12th fret, followed by the fretted notes, they should match. If they do not match this indicates potential intonation issues at the nut or bridge saddles requiring adjustment. This can occur with any string but often occurs on the third string. If so, fine adjustments at the bridge can improve intonation accuracy but are best handled by an experienced luthier or repair technician.
Playing with New Strings
You did it! With fresh strings installed, it’s now time to play your classical guitar and enjoy the revitalized tone of the new strings! Brand new strings may take an initial break-in period to settle in tonally, so don’t worry if they sound overly bright, or do not hold pitch at first. After playing them for a while, the tone will mellow and even out. Make sure to keep nails filed properly to avoid excess string clicking and beveled for classical technique if you play with your right hand nails. Maintain the new strings by wiping them down after playing to keep skin oils and contaminants from quickly building up. Plan to replace them again in a few months. Since the change is so gradual you may not notice it but they will be likely to have lost volume, intonation, consistency of touch and brightness. You can shop online at Strings By Mail for quality nylon classical guitar string sets available for fast delivery!
Trust Strings By Mail for Everything You Need for Your Guitar
Knowing how to properly restring a classical guitar by yourself is an essential skill for any player. From removing old strings and cleaning frets to methodically installing and tuning new strings, you can now keep your classical guitar sounding its absolute best and keep your touch and expression at their best. Review John’s YouTube video and the steps we’ve listed here if you need to go over the process again. Be gentle on the delicate nylon treble strings and patient with the overall process. Take time to ensure strings wind cleanly, tuning accurately, and checking intonation. With quality string sets available to purchase online from Strings By Mail and periodic restringing maintenance, you will enjoy the warm, resonant, and colorful tones that the classical guitar is cherished for among musicians worldwide.
It’s possible that you’ll have questions. One of the top questions we get is, “Can I mix strings from different manufacturers?” Yes, and in fact, we offer a page called Custom Customer Concoctions, so you can learn from others some of the methods of mixing strings that work well. You can also submit your custom set to us so we can create a one-touch buy button for your own Custom Customer Concoction set.
If you have questions, our experts are available by phone or email to help you choose the perfect strings. You can call them at 800-513-8271 or email them. They’re available Monday-Friday from 9 a.m. to 3 p.m. EST.
