
Shipping takes patience in the world of eCommerce; literal patience from customers waiting for packages, and more psychological patience from merchants who have to deal with multiple carrier dashboards, shipping plugins, and variable rates. That’s why Prodigy strives to simplify the entire shipping process.
With Prodigy Commerce, WordPress developers can tap right into ShipEngine from one dashboard, as if it were a built-in feature. There’s no need for plugins, other dashboards, or payments for that matter.
The ShipEngine feature, like all of the features on the Prodigy platform, is completely free. Not to mention, store owners gain access to carrier discounts and free Stamps.com accounts.
Check out the sections below to learn about all of the Prodigy shipping tools, prices, and benefits. After that, we’ll show you how to configure your shipping settings.
A Free, ShipEngine Developer Account That Functions like a Built-in Feature
Prodigy Commerce includes what some might call an integration with ShipEngine, the popular shipping API for handling multi-carrier logistics, finding quality rates, and printing labels.
But it’s not exactly an integration. An integration would still require a separate ShipEngine dashboard.
The developers at Prodigy wanted to eliminate that extra dashboard, so they opted for a developer account with ShipEngine. This way, the fulfillment process is completed on one platform: Prodigy. There’s no need to open up another browser window or switch back-and-forth with a third-party extension to understand what’s going on with a store’s logistics.
So, Prodigy holds a developer account that taps into ShipEngine’s multi-carrier API, and all Prodigy users get to take advantage of that developer account.
What does that mean?
- All ShipEngine features are free.
- Your online store can fetch relevant shipping data like rates and address validation.
- All Prodigy users receive a free Stamps.com account (more on that in the next section).
Free Stamps.com Accounts
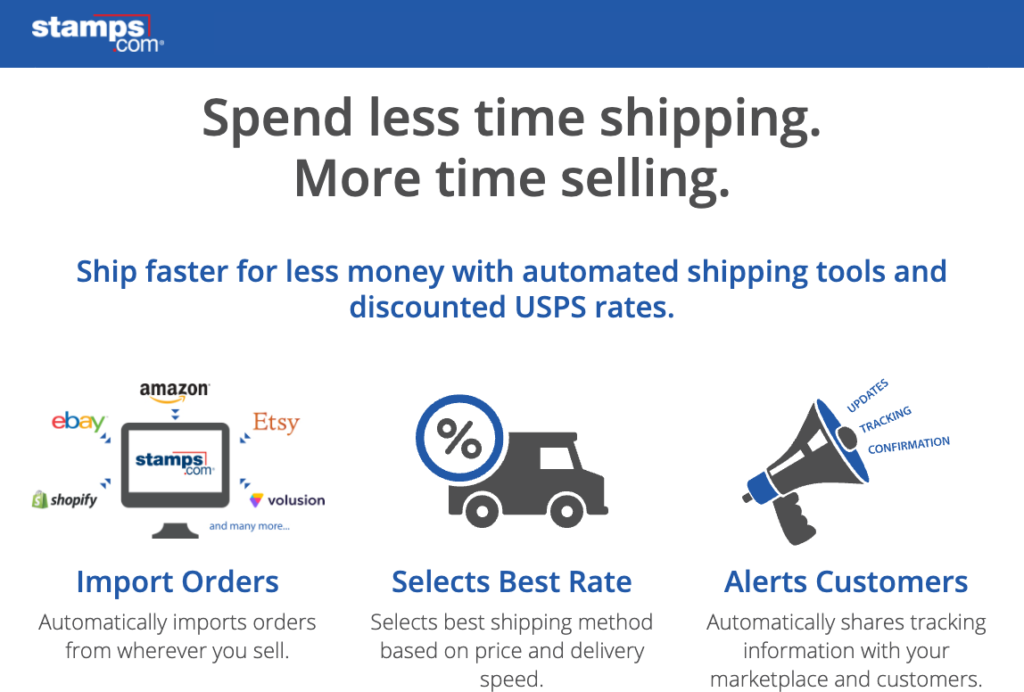
Due to Prodigy’s relationship with ShipEngine, all store owners have the opportunity to create a free Stamps.com account.
Stamps.com usually costs $17.99 per month for eCommerce stores, so you’re saving even more money with Prodigy.
With Stamps.com, users gain wonderful features for things like:
- Importing orders.
- Selecting the best rates for shipping.
- Alerting customers about shipments.
- Shipping orders from all sales channels.
- Printing discounted labels and obtaining incredible discounts from carriers.
- Sending products internationally, and at reasonable prices.
- Insuring packages for up to $10,000.
Up to 40% Off Shipping Discounts with USPS
Once paired with Prodigy, your free Stamps.com account offers discounts that store owners can’t obtain on their own as small businesses.
In fact, USPS shipping discounts reach up to 40% off through Stamps.com, making for yet another cost-savings through Prodigy.
WooCommerce users, on the other hand, must pay for both a Stamps.com account and maybe a ShipStation account, and it’s unlikely they could get a USPS discount on their own. They could, however, install a $79 per year WooCommerce USPS Shipping Extension to unlock carrier discounts. But still, there’s a cost attached to it.
Overall, WooCommerce users start off by paying at least $27.49 per month ($17.99 for Stamps.com and $9.50 for 50 shipments from an app like ShipStation). Or they could go with the $79 per year USPS Shipping Extension.
Bring Your Own Account to Prodigy Commerce
One final benefit of Prodigy Commerce shipping involves the ability to bring your own carrier account. By default, store owners have access to USPS for shipments to customers. That also includes whatever discounts you gain access to through Stamps.com.
However, users can also link to their FedEx, UPS, and/or DHL accounts for integrated fulfillment setups through all of those major carriers.
How Does Shipping with Prodigy Compare to Shipping with WooCommerce?
| Integration Type | Developer account. All shipment management is done on Prodigy. | Third-party plugin. Must use two dashboards for full shipment management. |
| Cost of Shipping Account | Free through ShipEngine. | Starting at $9.50 per month for 50 shipments with ShipStation extension. |
| Stamps.com Account | Free. | $17.99 per month. |
| USPS Discount | Up to 40% off. | You must also install the USPS Shipping Method extension ($79/year) and WooCommerce Shipping to get any discounts. The ShipStation extension (paid) is another option. |
| DHL Discount | None. | Up to 67% off. |
| Support for other Carriers like UPS, FedEx, and DHL | Yes, through a “bring your own” carrier system. The integrations are free. | Yes, by installing third-party apps. Most cost around $79/year. |
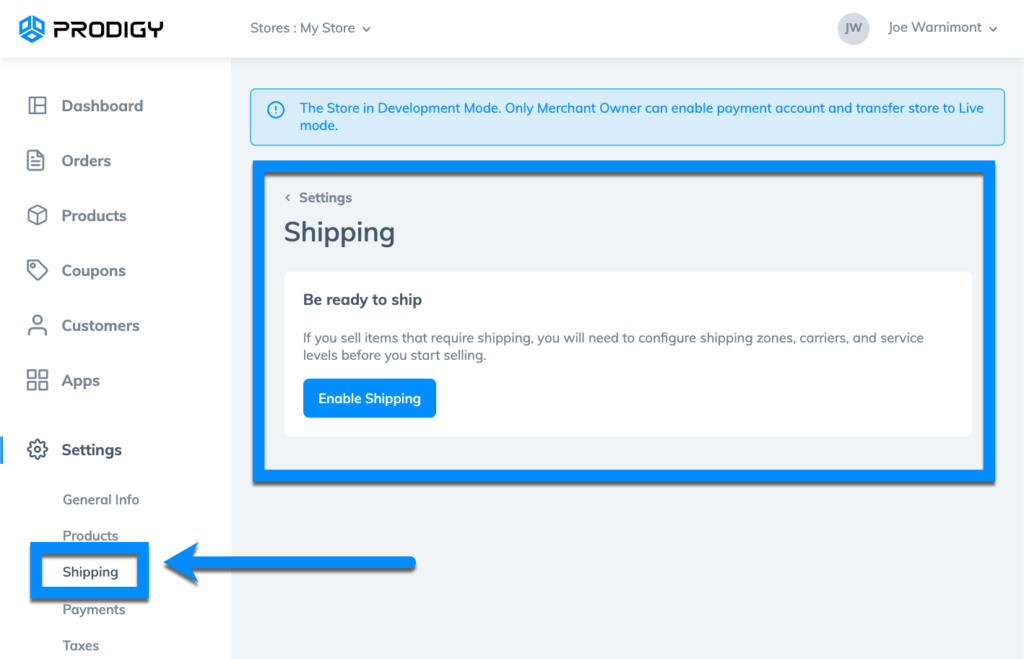
How to Enable Shipping on Your Store
As mentioned, everything from carrier to shipping zone management happens on the Prodigy dashboard. There’s no need to jump to a separate dashboard.
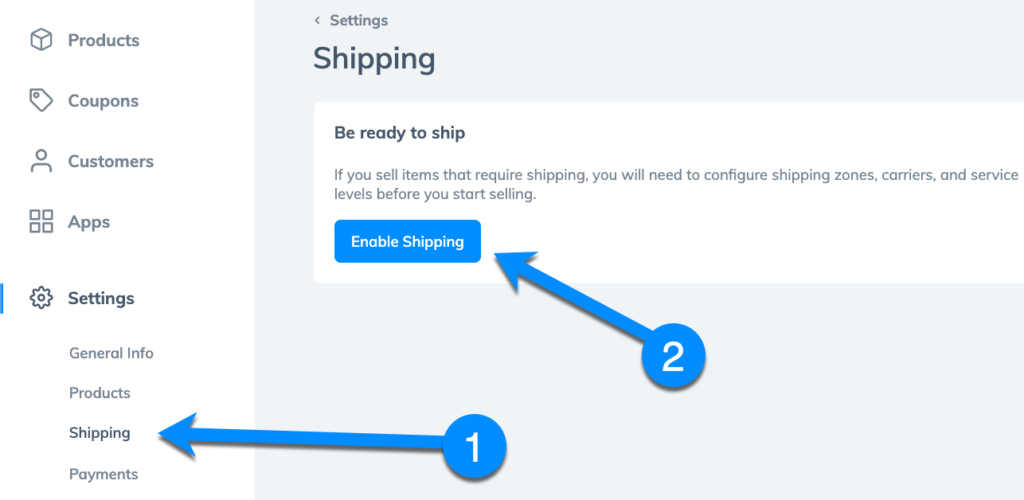
To enable shipping, open your Prodigy dashboard and go to Settings > Shipping.

Select the Enable Shipping button. That’s all there is to it for activating shipping features!
Adding Shipping Origins, Shipping Zones, and Carriers
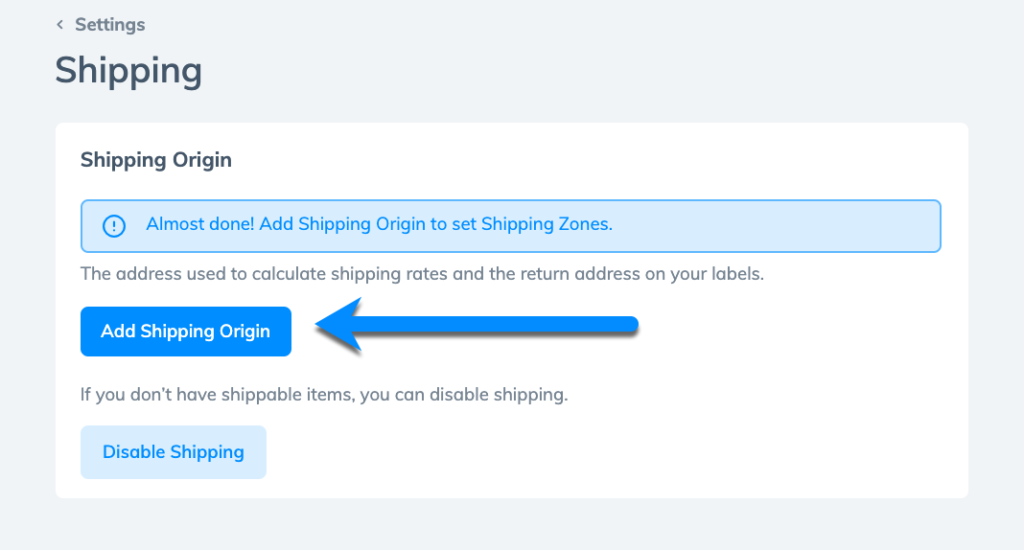
You can manage other elements like shipping origins, zones, and carriers in the same area of the dashboard.
After activating Prodigy Shipping, you should see some new buttons.
Click on the Add Shipping Origin option.
In the new popup, you can type in your company’s address information. This is used by ShipEngine to establish shipping rates, times, and potential carriers.
Type in details like your Name, Phone Number, and Address.
Choose the Add Shipping Origin button to complete the process.
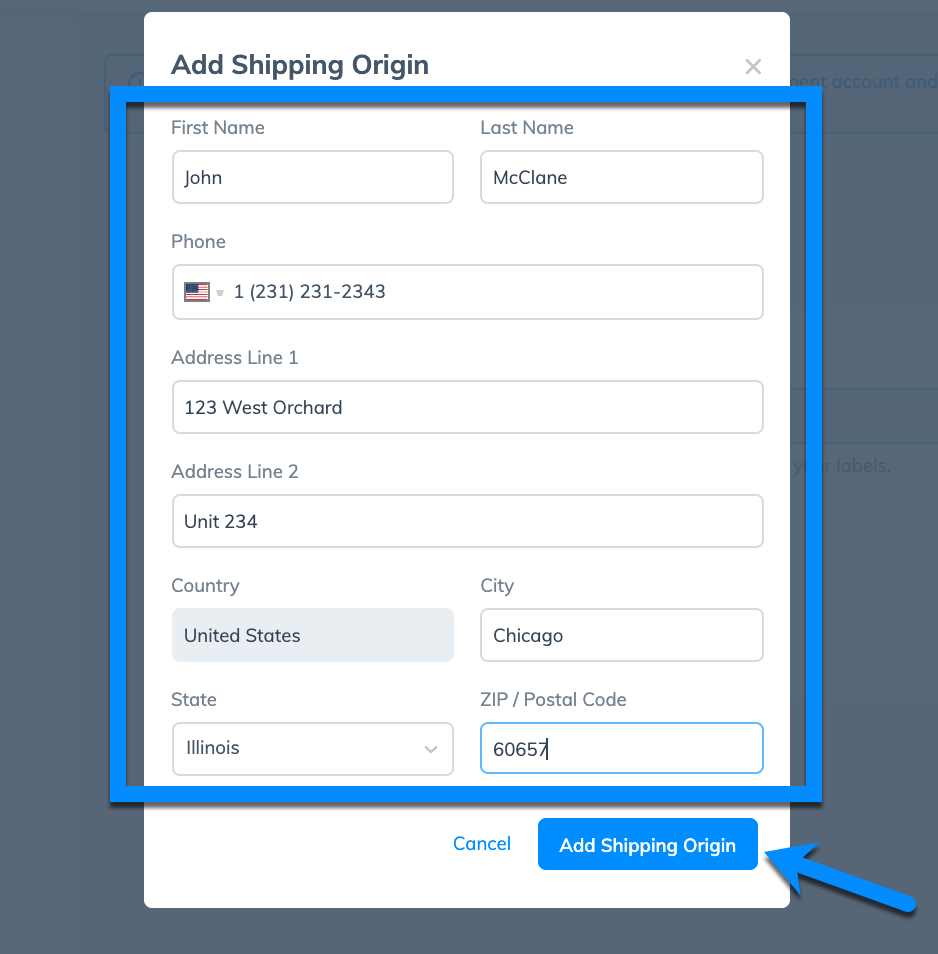
Note: Keep in mind that Prodigy searches to see if the address is valid.
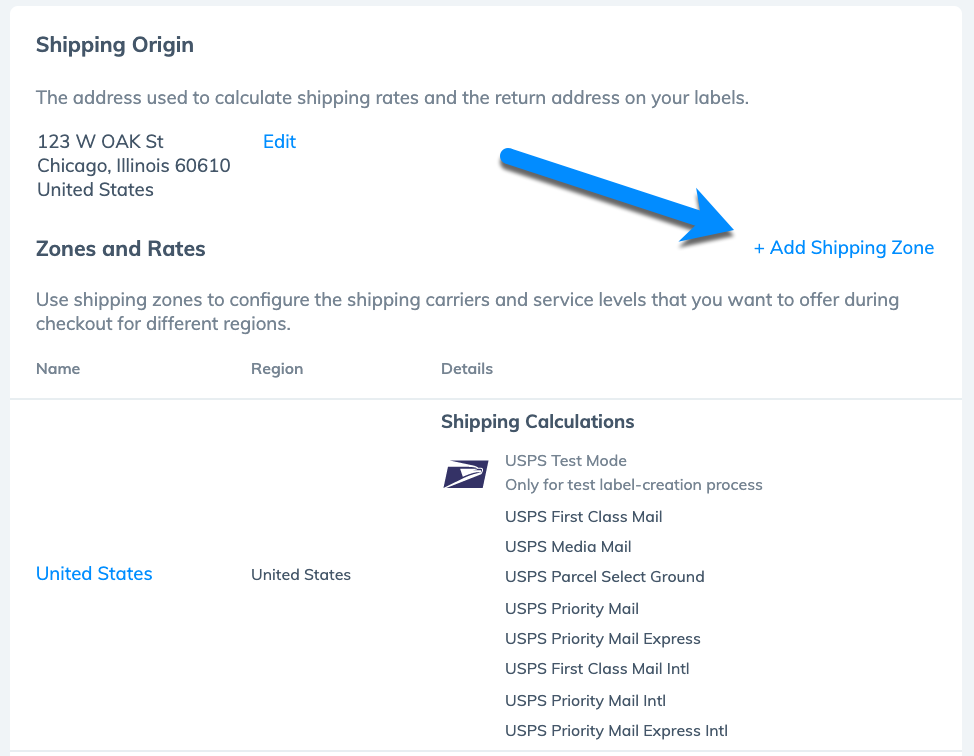
Next up, you’ll want to start making shipping zones based on where you plan to send products.
Prodigy already adds USPS as a Carrier and the United States as a Shipping Zone if your country of origin is the US.
If you plan to send products to other places, click on the Add Shipping Zone link.
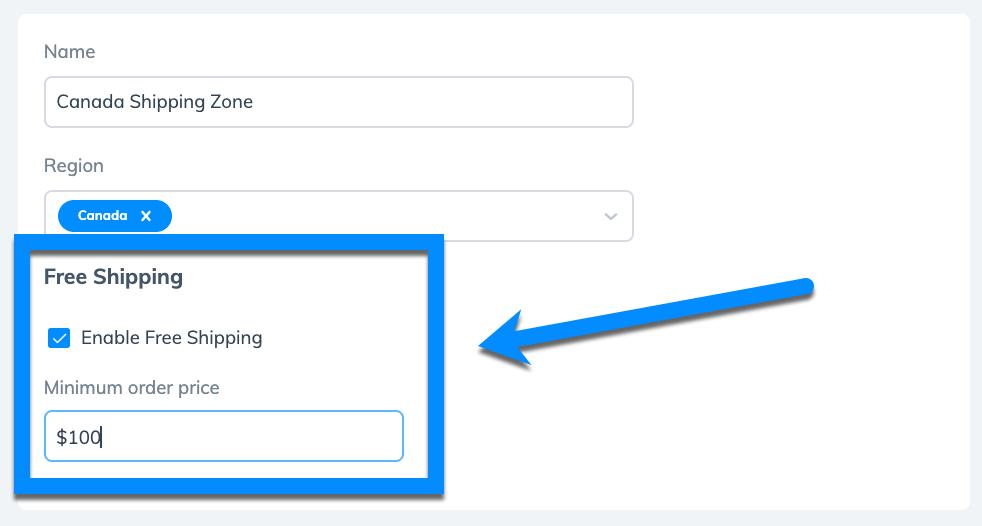
Type in a Name for your shipping zone: something that you’ll use for your own reference.
Fill in the Region field with whatever other countries or regions you want in your list of zones.
Finally, check the Enable Free Shipping box if you’d like to absorb the cost to send to certain regions.
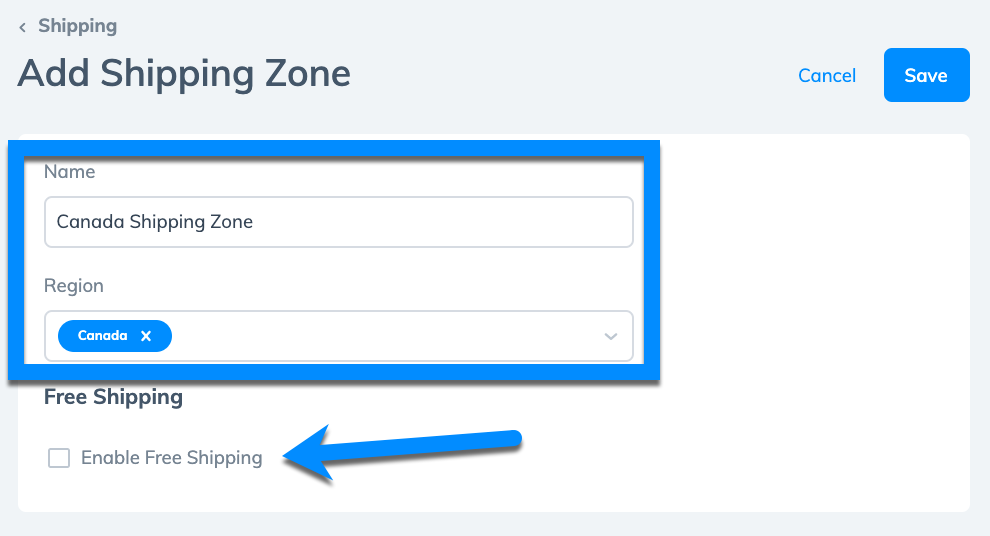
With the Enable Free Shipping box checked, you’re prompted to type in a MinimumOrder Price if you want.
For instance, you may only give free shipping to Canadian customers if they spend at least $100 on your store.
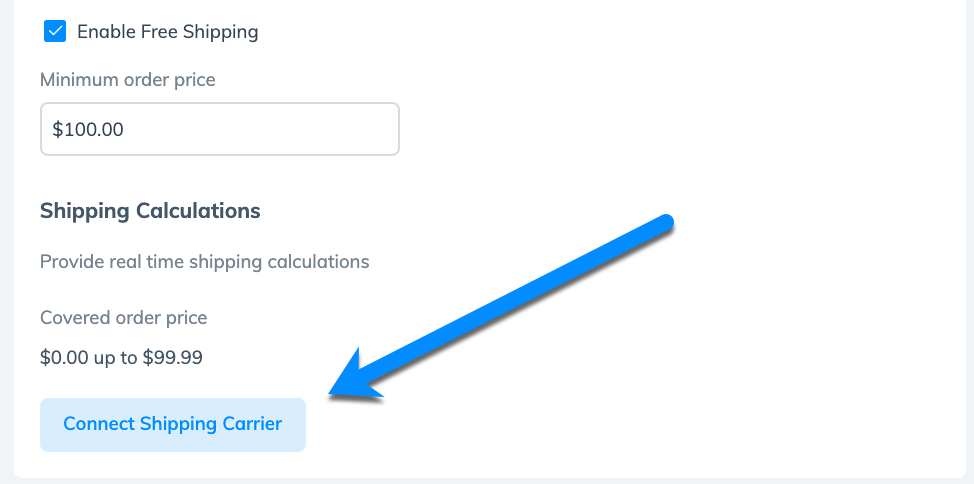
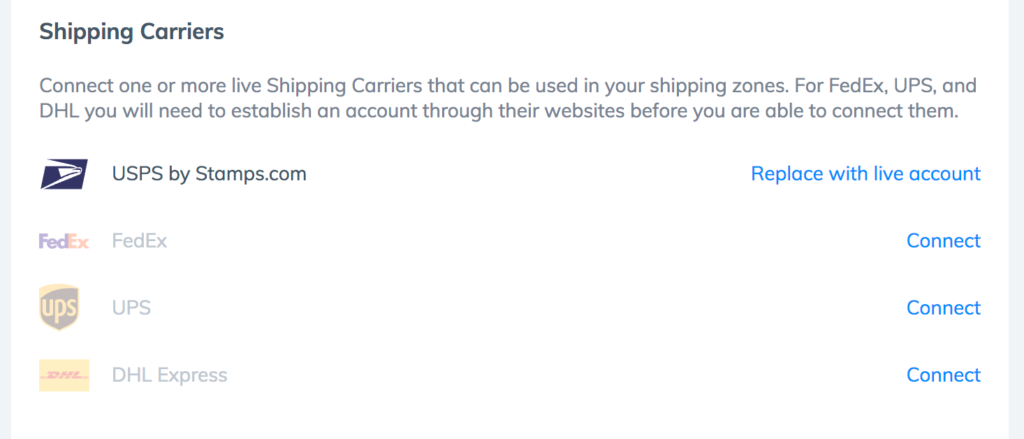
The final step is to link a shipping carrier.
Click on the Connect Shipping Carrier button to do so.
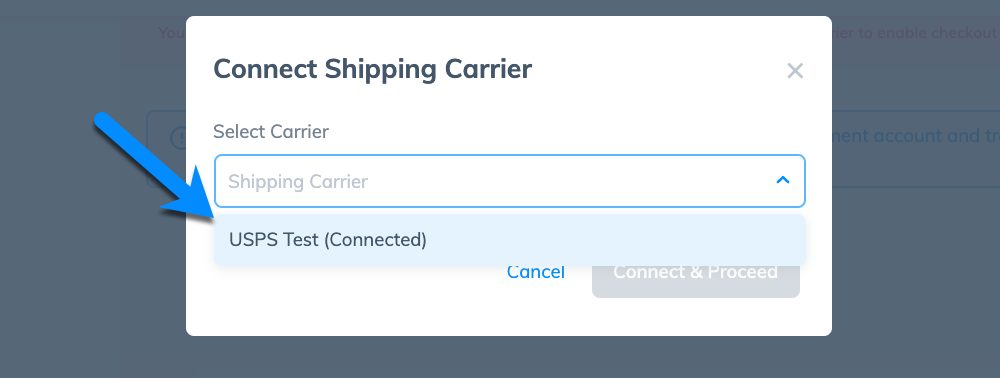
By default, Prodigy has USPS as its primary shipping carrier. You can also bring your own carriers like UPS, FedEx, and DHL by signing up on their respective websites.
Choose the Connect and Proceed button to link USPS as your carrier.
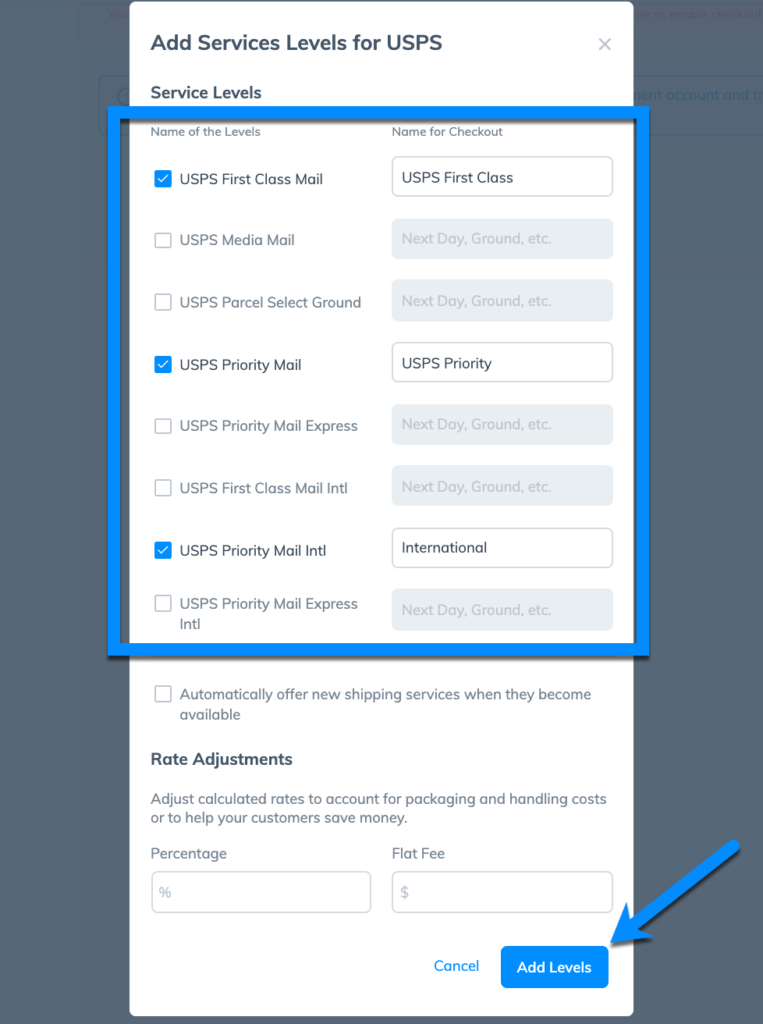
The next window asks you to choose which shipping methods from that carrier you’d like to offer your customers.
Mark the desired Service Levels, then give each of them a name that will appear in the checkout area.
You can add your own adjusted rates at the bottom to cover extra expenses or help customers save money.
Click the Add Levels button to finish the process.
Want to Bring Your Own Carrier?
Prodigy supports all major carriers like UPS, FedEx, and DHL. Although, outside of USPS, you need to create an account directly on each carrier’s website.
When you have the accounts ready, go back to the Shipping Carriers section in Prodigy. Click the Connect buttons next to the carriers you want to add. Walk through the unique setup guide from each one by filling out specific account information. You can also link to your Stamps.com USPS account when your site goes live.
Handling Shipping After Orders Come in Through Prodigy
A customer buys a product from your store. What’s next in your fulfillment/shipping process?
Prodigy makes it quick and easy.
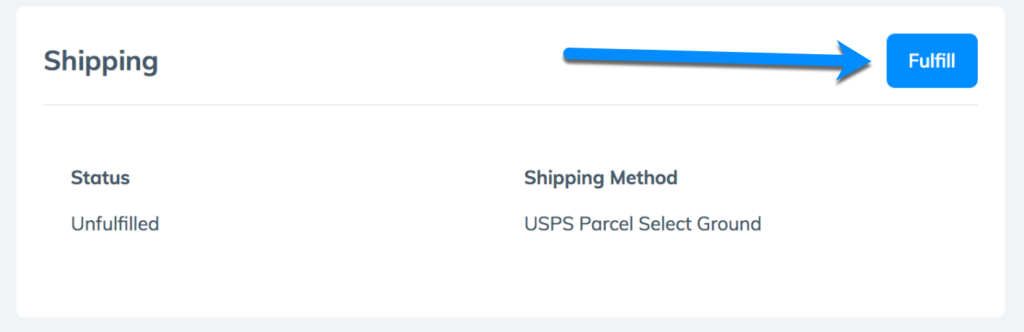
When you see order notifications, go to the Orders page in Prodigy and select the order you want to fulfill.
On the Order Detail page, find the Shipping section and click the Fulfill button.
Making Shipping Labels
After stating that you want to fulfill an order, two options appear: Create ShippingLabel and Fulfill Items and Mark as Fulfilled.
To make labels, mark the Create Shipping Label and Fulfill Items radio button. You can also type in the quantity of each item you need to fulfill.

Now you’ll need to choose packaging types. You can go with a Custom Package or a Flat Rate Package.

The Custom Package option reveals previously saved packaging types for you to choose.
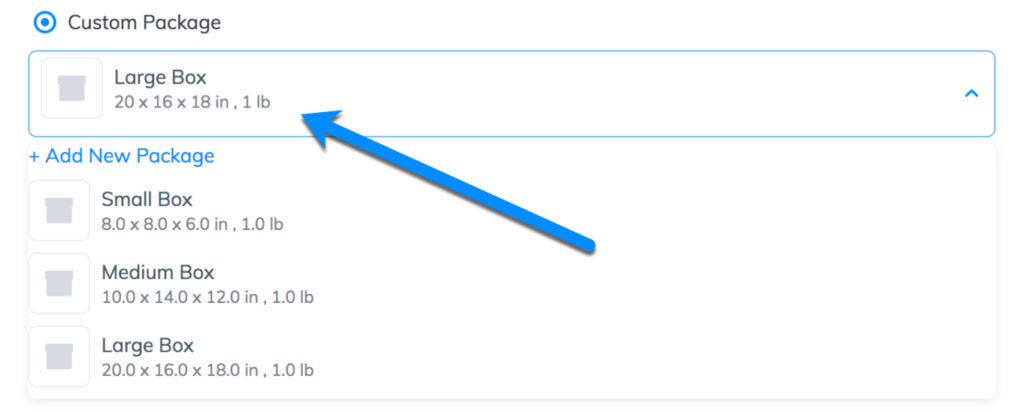
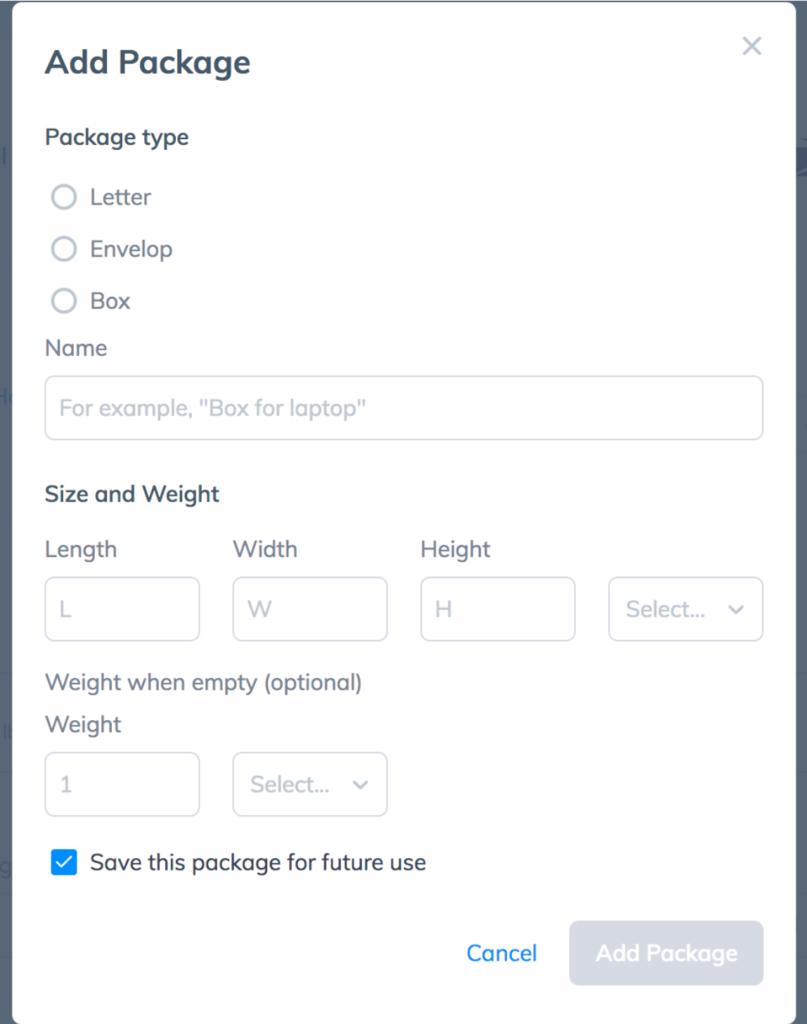
It’s also possible to click the Add New Package button to make a new package type for the current order you’re fulfilling, and to save it for future orders.
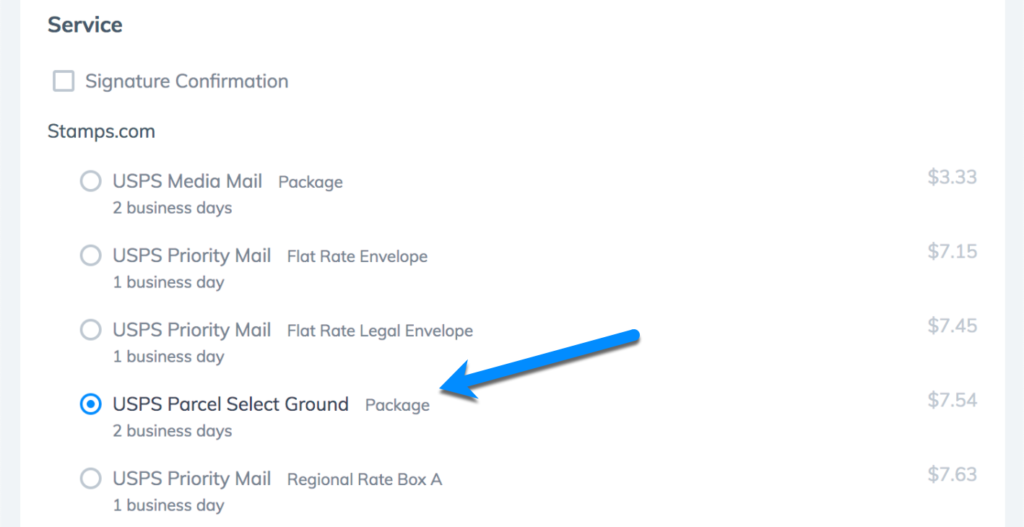
Since your carriers are already connected, Prodigy serves up the most accurate list of service levels from your chosen carriers.
The customer will have already marked a service level; it’s the one that’s shown to you by default. But you can change that if needed.
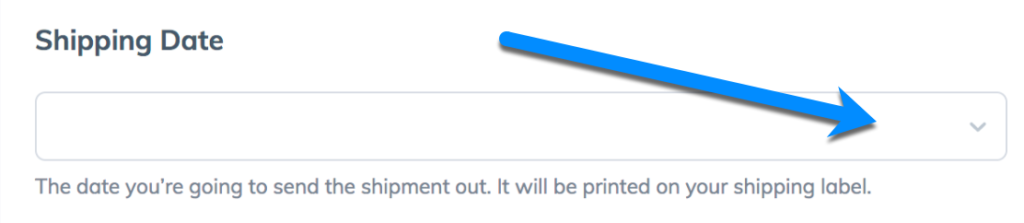
Moving forward, you must also select a Shipping Date, which is the date your package gets sent from the carrier.
Be sure to double check the pricing, then decide on a Label Format.
Click the Buy Shipping Label button if it all looks good.
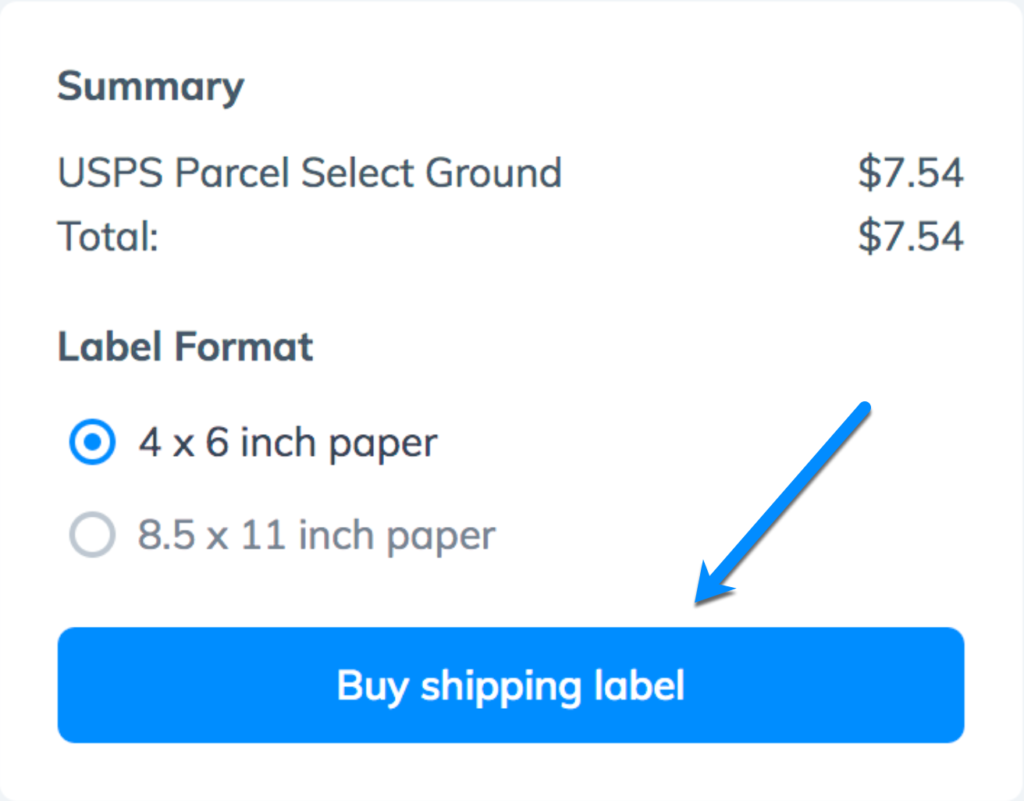
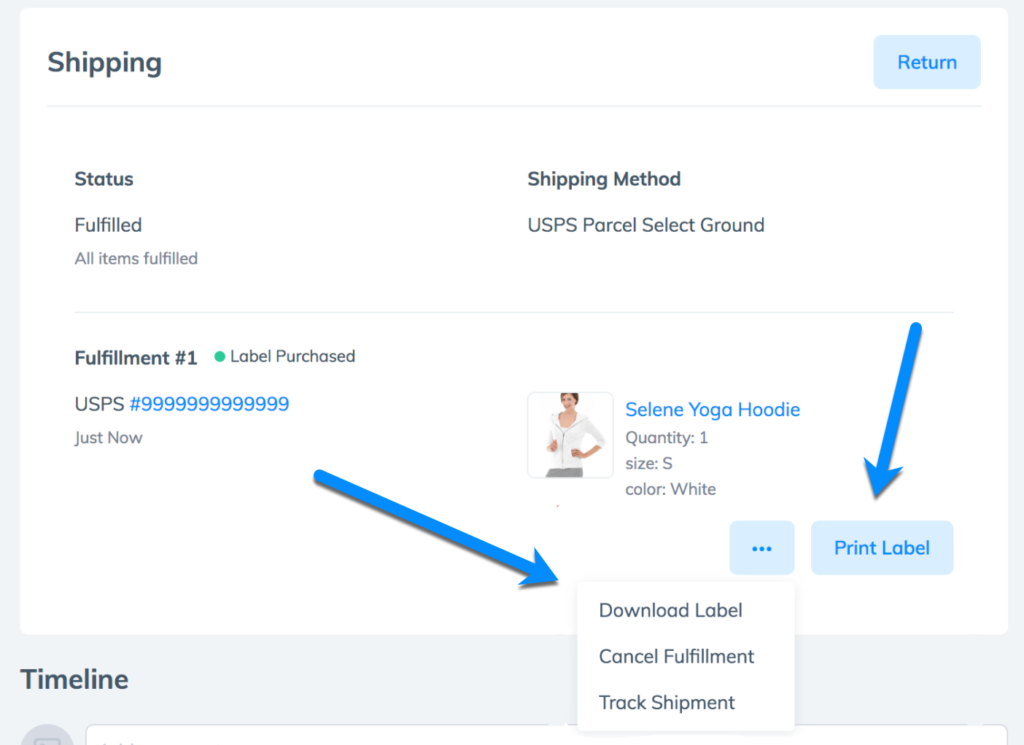
Finally, you get sent back to the Order Detail page to either click the Print Labelbutton or Download Label button.
Marking Orders as Fulfilled Without Creating a Shipping Label
What if you’re fulfilling an item but already have a shipping label? In that case, you should still mark the package as fulfilled, even though you’re not printing a label through Prodigy.
To complete this process, go to the Orders page and open the right Order Detailpage.
Under Fulfillment Method, select the Mark as Fulfilled radio button.
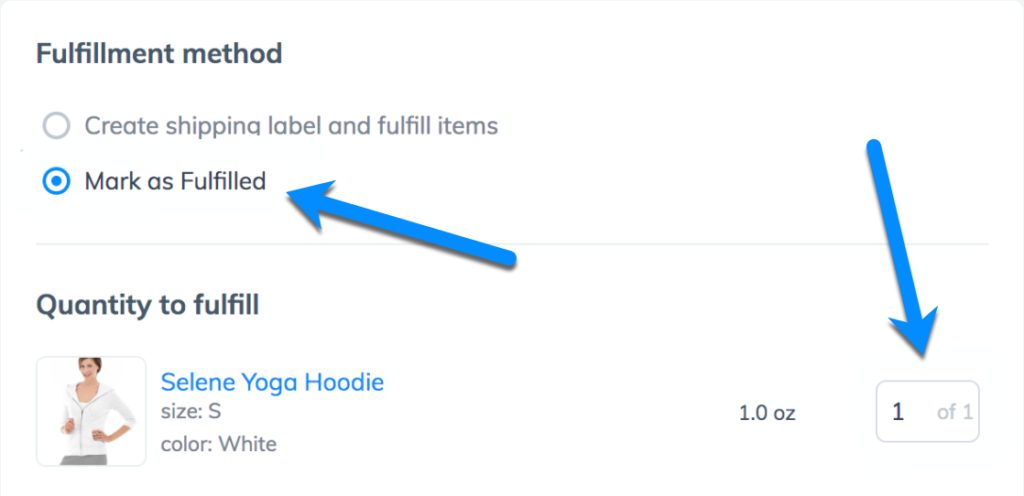
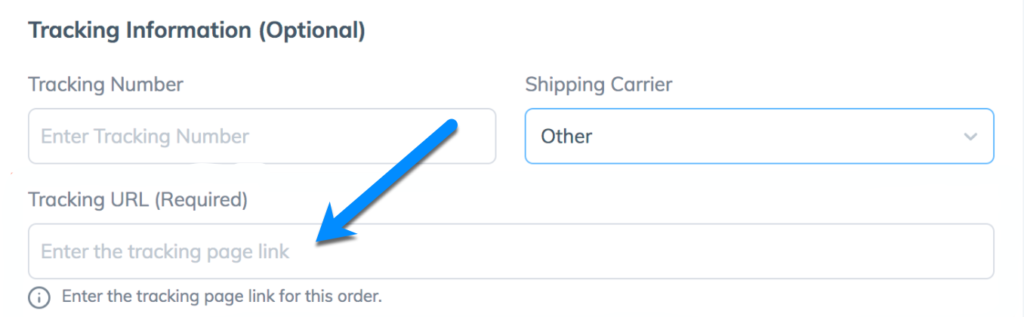
Feel free to fill in the Tracking Number and Shipping Carrier fields. These are optional and mainly for your own records.

The Other option under Shipping Carrier requires you to manually paste in the Tracking URL so that your customer receives a link to track the package.
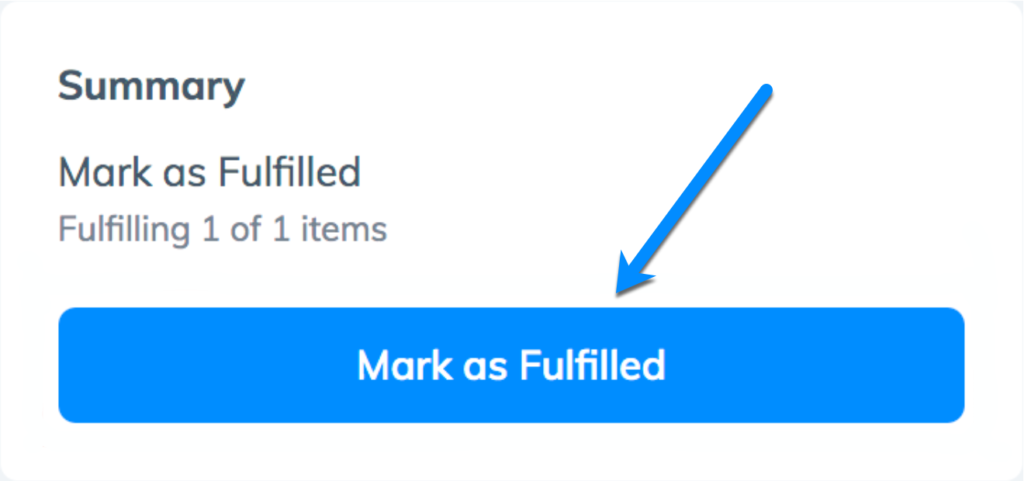
After that, click the Mark as Fulfilled button.
Try the Prodigy Commerce Platform for a Fully Integrated Shipping Process (And Steep Carrier Discounts)
Shipping with Prodigy Commerce means:
- You don’t have to install or pay for any third-party shipping extensions.
- There’s no need for multiple shipping dashboards.
- You receive a free Stamps.com account.
- You get up to 40% off USPS shipping rates.
- You can also bring your own FedEx, UPS, and/or DHL accounts.
- All ShipEngine features, such as live carrier rates, label printing, and tracking, are consolidated on Prodigy.
If you’re interested in providing your WordPress store owner clients with a one-dashboard, low-cost shipping experience, sign up for a Prodigy account today. You can also read the full introductory guide about Prodigy Commerce and contact the Prodigy team with any questions.