
This post may contain affiliate links.
Have you ever wanted to upload your own fonts to Cricut Design Space? Sure, Design Space has a ton of free Cricut fonts, but sometimes you just want to use one of your own fonts. (One of those beautiful cursive fonts you saw on Pinterest, perhaps?)
The good news? Uploading fonts to Cricut Design Space is a lot simpler than you may think. Hooray for a quick win! Keep reading to learn how.

Are you still scrolling through the font menu in Design Space, looking for just the right font to use for your project? (Yep, I’ve been there!)
Design Space comes with a bunch of fonts, it’s true. And if you have a Cricut Access membership, you have even more font options at your fingertips.
But sometimes, you need to search for that perfect font elsewhere. And if you want to be able to use downloaded fonts in your Cricut projects, you’ll need to know how to add them to Design Space.
Don’t worry; it’s actually pretty easy! In this blog post, I’ll show you how to upload fonts in Cricut Design Space so that your projects have that special personalized touch.
This guide takes all the guesswork out of adding new fonts to Cricut Design Space. I’ll break it down into four easy steps to make it super simple for beginners to get started using their favorite fonts in their designs today!
Keep reading to learn how to use all of those fun script fonts in your very own craft projects.
How To Upload Fonts To Cricut Design Space
In order to use a new font in Design Space, you’ll need to download the font and install it on your computer. Once you do that, the new font will be available for you to use in Cricut Design Space.
Where to find fonts to download?
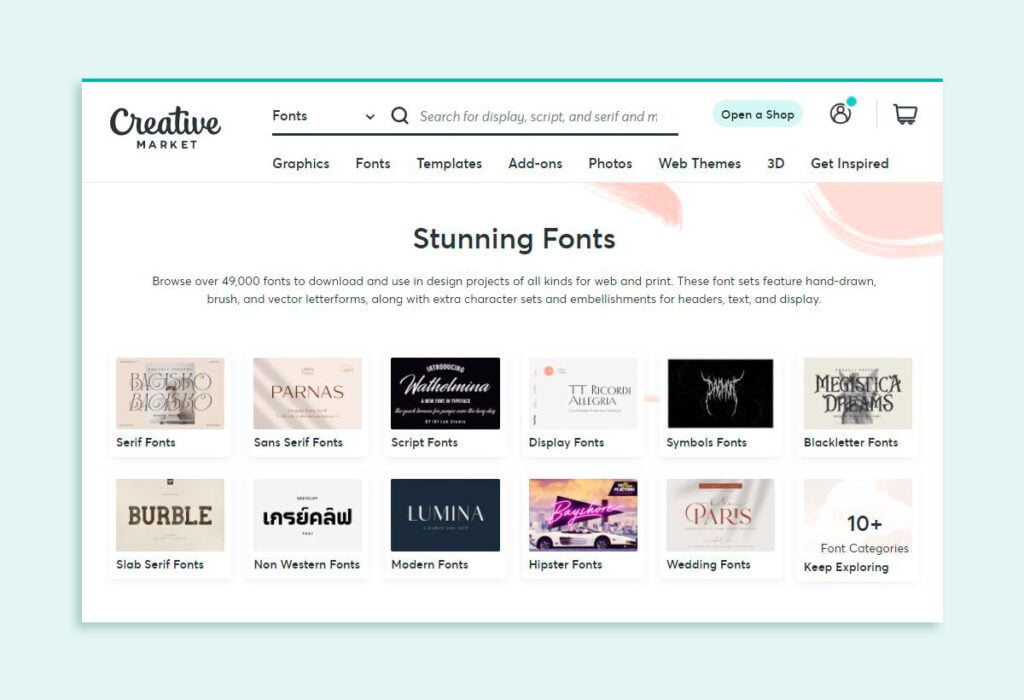
There are many places to find free and paid fonts to download. For example, you can find free fonts on websites like fonts.google.com and dafont.com. Some of my favorite websites to find beautiful, high-quality fonts are Creative Market and Creative Fabrica.
Most free font downloads come with a personal use license, which means you can use them for free in personal projects. On the other hand, if you want to sell items that you’ve made with a certain font, make sure that the font comes with a commercial use license.

What makes a good “cuttable” font?
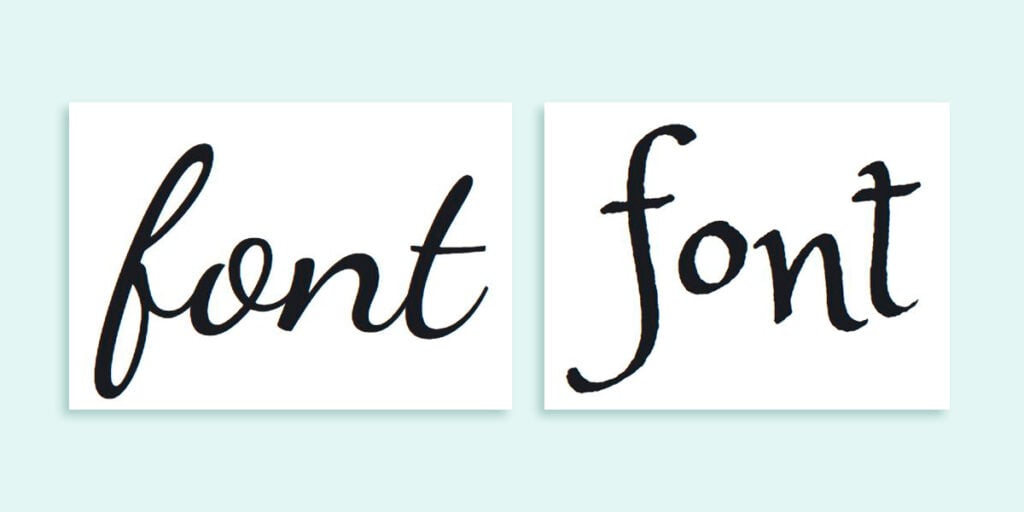
Some fonts are much easier to cut than others. When you are choosing fonts to download, look for fonts with smooth, solid edges. Think twice about using sketch fonts, brush fonts, or fonts that have a lot of texture. Your Cricut will thank you, and reward you with faster, cleaner cuts.
Here’s an example of a font with smooth edges, and a second font with textured edges.
While I like the second font, it will take your Cricut blade a long time to make all of the turns and pivots necessary to cut its rough edges.

What’s the difference between .ttf and .otf fonts?
Most fonts you download will be one of two file types: a .ttf file, or an .otf file. TTF stands for TrueType font, and OTF stands for OpenType Font.
The main difference between the two file types is that OTF fonts have more advanced features, such as special characters and embellishments, that give you more options when designing with type.
If you have the choice, install the .otf file. If you only have the .ttf file, it will work just fine.
How to Access Fonts in Cricut Design Space
Here are the basic steps to downloading a new font and accessing it within Cricut Design Space.
- Download the font that you want to use. Pay attention to which folder the font file is downloaded.
- Unzip the font file folder. Double click on the individual font file. (Most font files end in .ttf or .otf – I recommend installing the .otf file if you have the choice.) Follow the prompts on your computer to install the font file.
- Once the font is installed, open Cricut Design Space. (If Design Space is already open, you may need to close it and reopen it.)
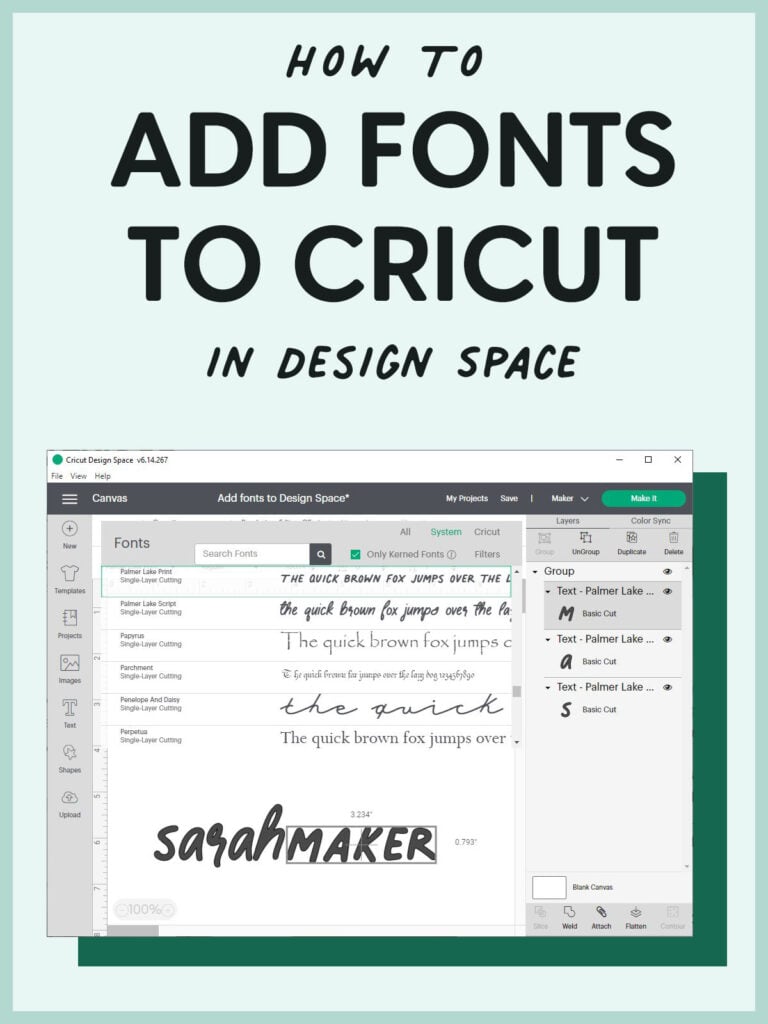
- Create a new project, and add a new text layer. Select the text tool to add a new text box to your Canvas. Then, click on the font drop-down menu in the top toolbar to change the font.

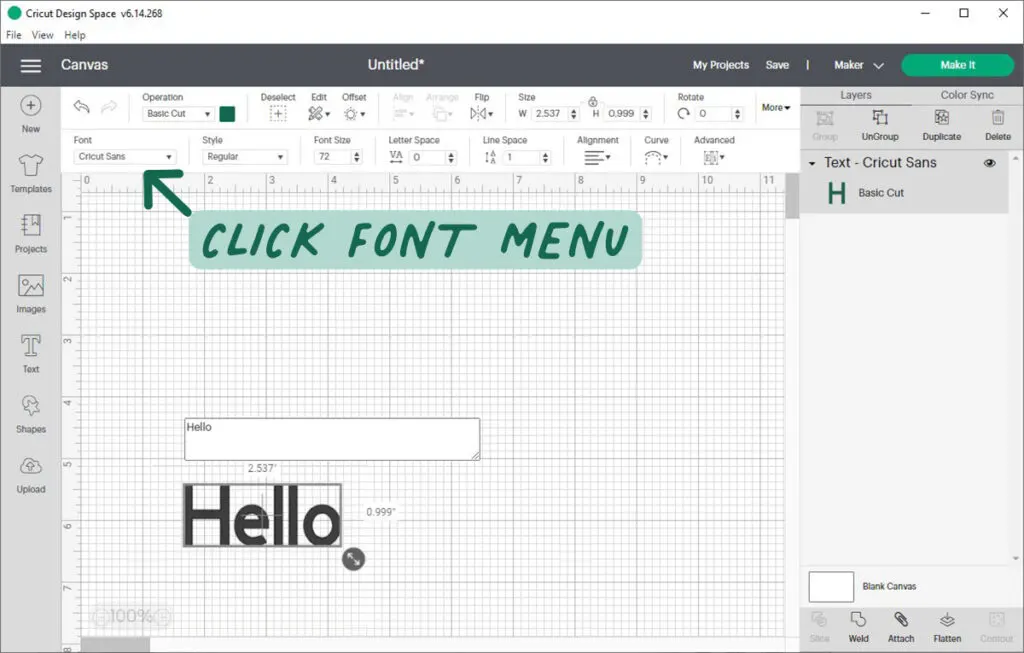
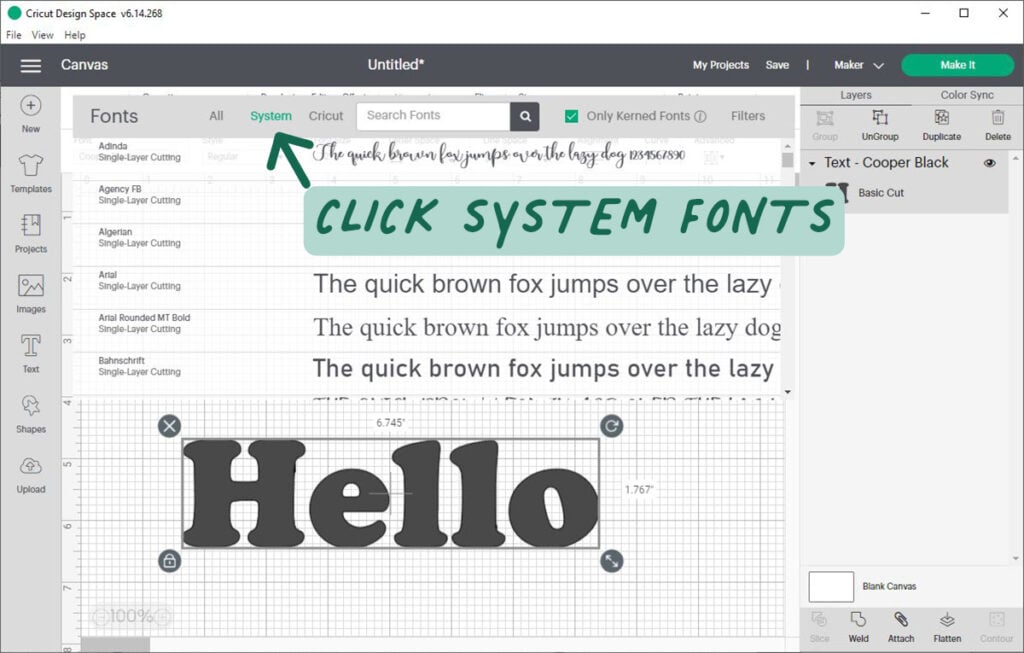

Tip: You can search for your font by typing in the name of the font. You can also click the “System” filter to show all of the fonts you have installed on your computer.
Don’t have a Windows computer? Not a problem. Scroll down for specific font installation instructions for Mac, iPad, iPad, and Android devices.
A quick note: The way we talk about “uploading” fonts to Design Space is kind of misleading. You see – Design Space only accesses the fonts that you already have installed on our computer (that’s why they’re called System fonts) So, what I’m really teaching you is how to install fonts on your computer and access them within Design Space.
Important: If you want the same font available across all of your devices (phone, computer, tablet), you will have to download and install the font onto each device. There is not currently a way to upload and store a font within Design Space, like there is with images.
How to Add Fonts to Cricut Design Space on Windows
- Download the font file. Navigate to your Downloads folder, and find the downloaded font file.
- If the file is compressed into a .zip file, right-click it and select Extract to extract the files.
- Right-click the font file, and then select Install.
(If you’re asked to allow the program to make changes to your computer, make sure you trust the source of the downloaded file, and then select Yes.)
Your font is now installed and will be available for you to use in Cricut Design Space.
Here is some more information about how to install a font on a Windows PC.
How to Add Fonts to Cricut Design Space on Mac
- Download the font file.
- If the file is compressed into a .zip file, double-click on the zipped file to unzip the files.
- Double-click the font in the Finder window, then click Install Font in the font preview window that opens.
Your font is now installed and will be available for you to use in Cricut Design Space.
Here is some more information about how to install a font on a Mac.
How to Add Fonts to Cricut Design Space on iPad
To install fonts on an iPad, you’ll first need to download and install a free font management app. I like the iFont app, which is available for free in the App Store.
- Download and install a font manager app, like iFont.
- Next, download the font file. Unzip the file if necessary.
- Open the iFont and select Font Finder. Select Open Files tab and naviagate to the font file you want to install. Select the file.
- Select the Installer tab. Press the Install button next to the font you want to install. Press Continue, then Allow.
- Close iFont and open your Settings app. Tap on Profile Downloaded. You will see the font you want to install. Press Install. If you see a warning “The profile not signed,” click Install.
- You should now see the message “Profile installed.” Click done.
Your font is now installed and will be available for you to use in the Cricut Design Space app.
How to Add Fonts to Cricut Design Space on iPhone
Like the iPad, installing fonts on the iPhone requires you to first install a free font manager app, like iFont.
- Download and install a font manager app, like iFont.
- Next, download the font file. Unzip the file if necessary.
- Open the iFont and select Font Finder. Select Open Files tab and navigate to the font file you want to install. Select the file.
- Select the Installer tab. Press the Install button next to the font you want to install. Press Continue, then Allow.
- Close iFont and open your Settings app. Tap on Profile Downloaded. You will see the font you want to install. Press Install. If you see a warning “The profile not signed,” click Install.
- You should now see the message “Profile installed.” Click done.
Your font is now installed and will be available for you to use in the Cricut Design Space app.
How to Add Fonts to Cricut Design Space on Android
To install fonts on an Android mobile device, you’ll first need to download and install a free font management app.
- Download and install a font manager app, like iFont.
- Download the font file. Go to the Downloads app, and find the downloaded file. If the file is compressed into a .zip file, extract the file.
- Open iFont and go to My> My Font. Open it to preview the font and install it on your device. Click Set to complete the installation.
Troubleshooting Fonts in Design Space
Here are some commonly asked questions about using downloaded fonts in Cricut Design Space. If you are having trouble finding your fonts, read through this section.
Why are my downloaded fonts not showing up in Cricut?
Can’t find your downloaded font in Cricut Design Space? Ah, so frustrating! Here are a few things to try.
Step 1: Type in the font name in the search bar.
Make sure that you have set the filter to All fonts or System fonts – not just Cricut fonts.
Then, try typing the name of the font into the search bar. Click enter. If your font is available, it will show up.
Step 2: Restart Design Space
If you can’t find your font, try restarting Design Space. Quit out of the program and open it again. This will usually fix any Design Space problems you have.
Step 3: Restart your computer.
If you still can’t find your font – and you are sure you’ve installed it correctly – you may need to restart your computer.
More Cricut Tutorials
If you like crafting with Cricut, you may be interested in the following articles about using Design Space.
- How to Upload Images to Cricut Design Space in 4 Easy Steps
- How to Connect Cursive Letters in Cricut Design Space
- When to Use Weld vs. Attach in Cricut Design Space
And here are some Cricut machine tutorials that are perfect for beginners.
- How to Set Up Your New Cricut (Maker, Explore, or Joy)
- Cricut Comparison: Which Cricut Machine is the Best for You? [2021]
- What is a Cricut Machine, and What Can it Do?
What’s Next?
Pin this post: Save this tutorial to your Pinterest boards so that you can come back to it later.
Leave a comment: We love to hear your feedback. Tell me in the comments below!
Share on Instagram or Facebook: When you make this project, share it on social media and tag me @sarahmaker_. We love to see what you make!
Have questions? Join the Facebook Group!
We hope this article was useful for you! If you have any additional questions, feel free to join my Facebook Group. We created this group for you to share pictures, ask questions, and help each other out.


How to Upload Fonts to Cricut Design Space
How to download fonts and access them in Cricut Design Space to use in your craft projects.
Materials
- Font file
Tools
- Cricut Design Space
Instructions
- Download the font that you want to use. Pay attention to which folder the font file is downloaded.
- Unzip the font file folder. Double click on the individual font file. (Most font files end in .ttf or .otf – I recommend installing the .otf file if you have the choice.) Follow the prompts on your computer to install the font file.
- Once the font is installed, open Cricut Design Space. (If Design Space is already open, you may need to close it and reopen it.)
- Create a new project, and add a new text layer. Select the text tool to add a new text box to your Canvas. Then, click on the font drop-down menu in the top toolbar to change the font.


Sarah Stearns has helped millions of makers find their next craft project with free patterns and step-by-step tutorials on her blog, sarahmaker.com. Read more.
With over a decade of experience in knitting and crochet, she has been featured in prominent publications like The New York Times, Scientific American, Good Housekeeping, Vox, Apartment Therapy, and Lifehacker.
Betty
Thursday 25th of April 2024
I just spent the last 2 hours trying to figure out how to upload a Design Bundles font I downloaded to my pc. I read and read, watched utube videos. In a few simple words you totally solved my issues. Ty, ty,ty I’ll be following you!!! Betty
Jenn
Friday 22nd of December 2023
This was soooooo helpful!! Thank you!
Donna
Sunday 1st of October 2023
Thanks for this article. All I had to do was change the setting to 'system'. Sheesh, never thought of poking around the text settings. Easy peasy.
Claudia
Monday 1st of May 2023
This tutorial was very helpful, thank you.
charlotte
Saturday 18th of March 2023
hey i managed to get the font i wanted into cricut but it only comes in "regular" and not "writing" and i'm wanting to use the pen instead of cutting out the letter, do you know if there's anyway i can import it to have the writing style?
Donna
Sunday 1st of October 2023
@charlotte,
You can still choose the pen/writing option - at least for many files, I don't know about all. You are left with an outline. I either colour mine in or...if I use a larger than .4 pen, it colours itself in.
Sarah Stearns
Saturday 18th of March 2023
No, unfortunately. We can't convert normal fonts into single-line writing style fonts.