Ringmaster - 724 Ring Master (Rating: 5)
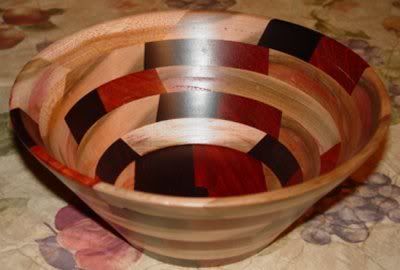
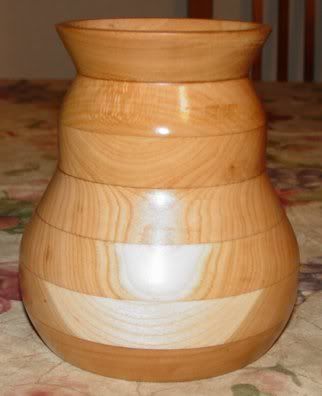
The Ringmaster allows you to create any bowl or hollow vessel that you can create on a lathe - without needing to know how to turn. You can take any flat board between 1/2" and 1" and about 12"x12" and create a bowl, lamp, vase, etc. - from a single piece of wood. You can also combine species to make interesting contrasting projects. Below are a couple of simple projects that I made a couple of years ago. These are simple - there are those out there using the Ringmaster that have completed very complex and interesting pieces.


The rings are individually cut and eventually glued up to complete your project. Individual rings are between 1/4" and 5/16" (I believe) and are all cut at a specific angle, depending on the thickness of the wood. Once the rings are all glued up you can mount it to your Ringmaster or lathe (using a special adapter) and sand to final shape and apply the finish of your choice. Creating a perfect finish can sometimes be a problem, since you are working with both end grain and long grain - in the same ring.
The learning curve for the Ringmaster is fairly shallow. You should be able to complete a successful project within a few hours of setting up the machine (which is very simple). The process begins with selecting a flat piece of stock - the flatter the better - you then mark an exact center location on the piece of wood - in this case we will use a 12"x12" piece. Find the center and using a compass draw the largest circle that you can, then drill a 1/2" hole in the center, cut off the corners. Using the supplied angle guide and directions you set the machine for the suggested angle and load your peice of wood. To load the wood you simply slide the board onto the 1/2" bollt and tighten down the nut to hold it in place. You move the 2 cutters in position on the first circle and cut the outer circle (moving the front cutter halfway in and the rear cutter halfway toward the front to make the cut.
There are some incremental holes on the machine which will determine the thickness of each ring. After determining the thickness that you want - you simply follow that set of holes in. After making the first cut, you move the indexing pin to the next hole (thickness hole) and make the next cut - this will release your first ring. Your bowl is underway - just keep cutting until you are out of rings to cut. The part that remains on your machine will become the base of your bowl.
Now you are ready for glue up. You have a board, mine is a piece of 3/4" plywood about 18"x18" with about an 18" piece 1/2" threaded rod running through it. You take the first ring off the machine (your largest ring) and lay it upside down, then line up your next ring - apply glue and work your way up to the last ring. Once you have that last ring in place you put the bottom on (the piece that was left after your last ring was cut) and glue it in place. Tighten down the nut and washer and let it dry for about an hour. I use Titebond II or III glue.
Once it's dry, load it back on the machine (or lathe) and begin sanding.
There may be several sources for purchasing the Ringmaster - I have dealt with The Wooden Post Gary Neely is so helpful and friendly that I don't think that I would go anywhere else to buy one. He also sell pen supplies - for you pen makers. There is also a Yahoo Users Group Forum that may offfer more insight if anyone is interested.
The Ringmaster allows you to create any bowl or hollow vessel that you can create on a lathe - without needing to know how to turn. You can take any flat board between 1/2" and 1" and about 12"x12" and create a bowl, lamp, vase, etc. - from a single piece of wood. You can also combine species to make interesting contrasting projects. Below are a couple of simple projects that I made a couple of years ago. These are simple - there are those out there using the Ringmaster that have completed very complex and interesting pieces.


The rings are individually cut and eventually glued up to complete your project. Individual rings are between 1/4" and 5/16" (I believe) and are all cut at a specific angle, depending on the thickness of the wood. Once the rings are all glued up you can mount it to your Ringmaster or lathe (using a special adapter) and sand to final shape and apply the finish of your choice. Creating a perfect finish can sometimes be a problem, since you are working with both end grain and long grain - in the same ring.
The learning curve for the Ringmaster is fairly shallow. You should be able to complete a successful project within a few hours of setting up the machine (which is very simple). The process begins with selecting a flat piece of stock - the flatter the better - you then mark an exact center location on the piece of wood - in this case we will use a 12"x12" piece. Find the center and using a compass draw the largest circle that you can, then drill a 1/2" hole in the center, cut off the corners. Using the supplied angle guide and directions you set the machine for the suggested angle and load your peice of wood. To load the wood you simply slide the board onto the 1/2" bollt and tighten down the nut to hold it in place. You move the 2 cutters in position on the first circle and cut the outer circle (moving the front cutter halfway in and the rear cutter halfway toward the front to make the cut.
There are some incremental holes on the machine which will determine the thickness of each ring. After determining the thickness that you want - you simply follow that set of holes in. After making the first cut, you move the indexing pin to the next hole (thickness hole) and make the next cut - this will release your first ring. Your bowl is underway - just keep cutting until you are out of rings to cut. The part that remains on your machine will become the base of your bowl.
Now you are ready for glue up. You have a board, mine is a piece of 3/4" plywood about 18"x18" with about an 18" piece 1/2" threaded rod running through it. You take the first ring off the machine (your largest ring) and lay it upside down, then line up your next ring - apply glue and work your way up to the last ring. Once you have that last ring in place you put the bottom on (the piece that was left after your last ring was cut) and glue it in place. Tighten down the nut and washer and let it dry for about an hour. I use Titebond II or III glue.
Once it's dry, load it back on the machine (or lathe) and begin sanding.
There may be several sources for purchasing the Ringmaster - I have dealt with The Wooden Post Gary Neely is so helpful and friendly that I don't think that I would go anywhere else to buy one. He also sell pen supplies - for you pen makers. There is also a Yahoo Users Group Forum that may offfer more insight if anyone is interested.


