A map is an item used to view explored terrain and mark landmarks.
Obtaining[]
Crafting[]
| Ingredients | Crafting recipe | Description |
|---|---|---|
| Paper + Compass |
This variation is called an "empty locator map" in Bedrock Edition, or an "empty map" in Java Edition.
When the player first creates a map, it is blank. It needs to be activated by holding it and pressing use item. after which it records terrain and location markers as the player travels within (or close to) the area it maps. | |
| Paper | [Bedrock Edition only]
This variation is called an "empty map". It does not show location markers. It is intended for cloning and zooming locator maps without having to consume an additional compass (thereby saving iron ingots and redstone dust), but it can also be activated and later converted to a locator map by combining it with a compass on an anvil, crafting table, or cartography table. |
Natural generation[]
Chest loot[]
| Item | Structure | Container | Quantity | Chance |
|---|---|---|---|---|
| Java Edition | ||||
| Empty Map | Shipwreck | Map chest | 1 | 7.7% |
| Stronghold | Library chest | 1 | 10.9% | |
| Village | Cartographer's chest | 1–3 | 46.2% | |
| Bedrock Edition | ||||
| Map[A] | Shipwreck | Map chest | 1 | 7.7% |
| Stronghold | Library chest | 1 | 10.5% | |
| Village | Cartographer's chest | 1–3 | 46.2% | |
- ↑ Named unknown map, but changed to map 0, the scale level is 1:4, Maps from the same stack are stackable, but maps that are not stacked are unstackable despite looking identical.
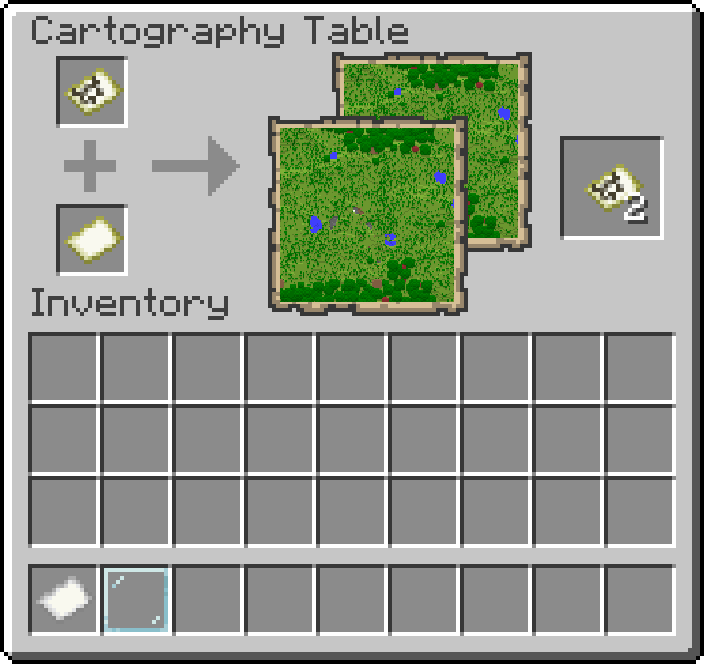
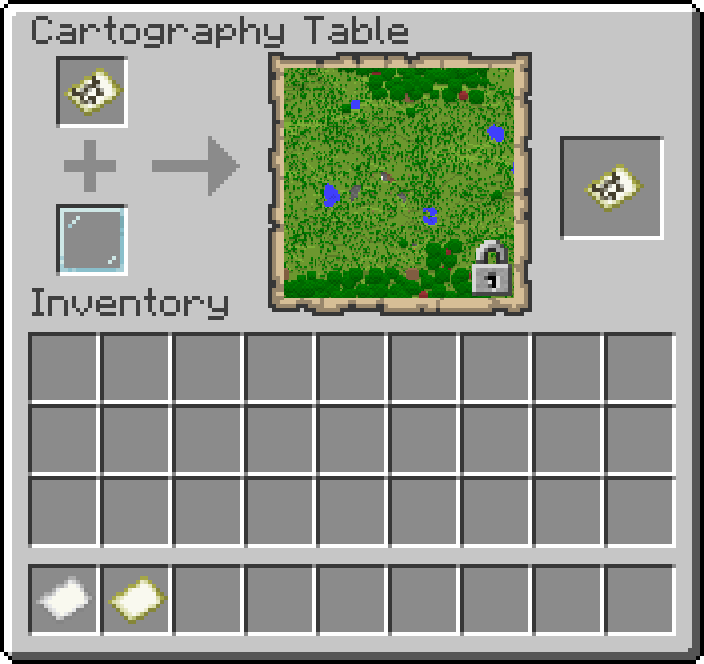
Cartography table[]
A map can also be created using a single paper on a cartography table to create an empty map, or a paper with a compass for an empty locator map.[Bedrock Edition only]
Starting map[]
When creating a new world in Bedrock Edition, the player can enable the "Starting Map" option to spawn with an empty locator map in the hotbar. The map's zoom scale is 1:8. The map is updated only while the player holds it.
Trading[]
Novice-level cartographer villagers sell a single empty map for 7 emeralds as their trades.
In Java Edition, cartographer villagers may give players with the Hero of the Village effect an empty map.
Usage[]
Mapping[]
Crafting a map creates an empty map. The map is drawn for the first time when it is held and used (with use item). This map can then be adjusted to different zoom levels. After conversion to a drawn map item, it starts to draw a top-down view of the player's surroundings, with North pointing to the top of the map. A pointed oval pointer indicates the player's position on the map, and moves in real-time as the player moves across the terrain shown on the map. The map does not center on the player when created, rather, the world is broken up into large invisible grid squares, and the map displays the area of whichever grid square it is in when it is first used. For example, if a player uses a new map in a certain grid square, and then moves a distance away and uses another fresh map but is still within the same grid square, both maps appear identical. To make a map that is not identical to the first one, the player would have to move outside of the edges of the first map (because then they would be in a new grid square). This way, no two maps of the same size can ever partially overlap and every map can display only a fixed area.
To record the world on a map, that specific map must be held in the player's hands while the player moves around the world. The world is recorded as-is during exploration, meaning that if the world is modified, a player must revisit the area while holding the map to update the map's view. Maps can also be cloned. If a player holds a map whose one or more clones are on display in item frames, updates are made on all clone-connected maps.
Other players are displayed on the map only if they have a map in their inventory cloned from the one being looked at. When placing a map into an item frame, the map displays with a green pointer shown at the location of the item frame. This is to help the player see where they are in relation to the area that the map is showing. If the player leaves a map in an item frame and views a clone of it, the green pointer remains in the spot of the framed copy. This can be used to set up waypoints. Unexplored areas are transparent, making the item frame visible.
When the player leaves the area shown on a specific map, the player pointer transforms into a white dot that moves on that map. The marker shrinks to a smaller white dot if the player is far from the map's center: the area is 320 by 320 blocks per scale factor. The dot moves along the edge of the map to show the relative location of the player. However in Bedrock Edition, the pointer remains as an arrow but shrinks until the player is near the area shown on the map.
While maps in the Nether work, they show only the red-and-gray pattern, regardless of the blocks placed. The only useful function is finding where the player is in relation to placed framed maps, which show as green pointers. Additionally, the player pointer rapidly spins and is not a good indicator of direction. Placing a banner in the Nether still shows it on the map as usual. Having a smaller map image while riding a strider in the Nether can help one to see one's footing while traveling over lava.
In Java Edition, when using a map from another dimension, the map shows the player's position and direction when they were last in the dimension of the map. In Bedrock Edition, however, the player can use maps from one dimension while in another dimension. For locator maps, the place marker changes color depending on the dimension that the player is currently in (white for the Overworld, red for the Nether, and magenta for the End). An Overworld map in the Nether shows the player's corresponding location and direction in the Overworld.[1] Similarly, a Nether Map in the Overworld shows the player's corresponding location in the Overworld, but the place marker spins, just like a Nether map in the Nether. An Overworld map in the End shows the world spawn.[1] A Nether map cannot be used in the End — the map appears, but the place marker is not shown anywhere — and similarly, an End map cannot be used in the Overworld or the Nether.
A player can make a large piece of pixel art (128×128) facing upward, center a map on it, and place that map in an item frame to create a custom picture. Locking is recommended. See Map item format#Map Pixel Art for details on the techniques.
Maps display as a mini-map when held in the off-hand, or if the off-hand slot is occupied; the map is full-sized only when held in the dominant hand with both hands free.
A map always positions itself facing towards North when placed horizontally within an item frame regardless of how the map is placed.
Map content[]
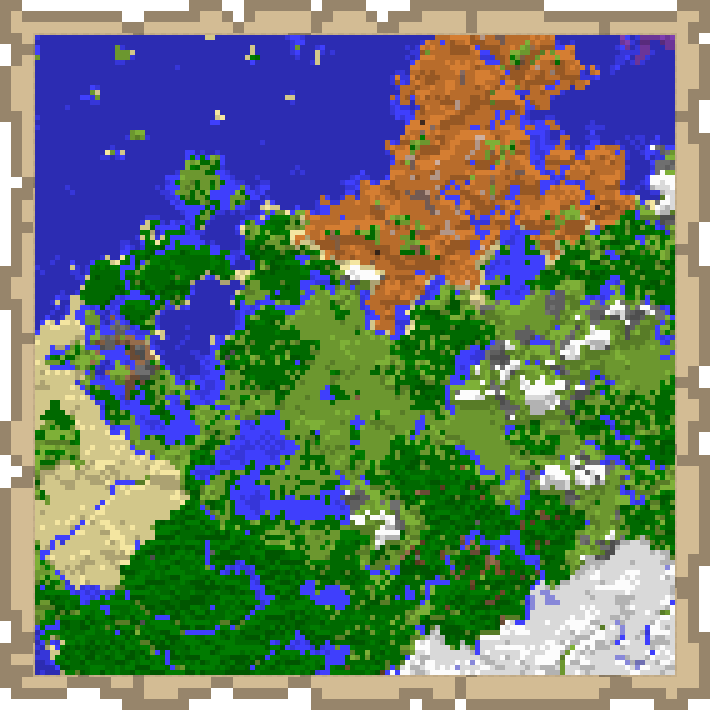
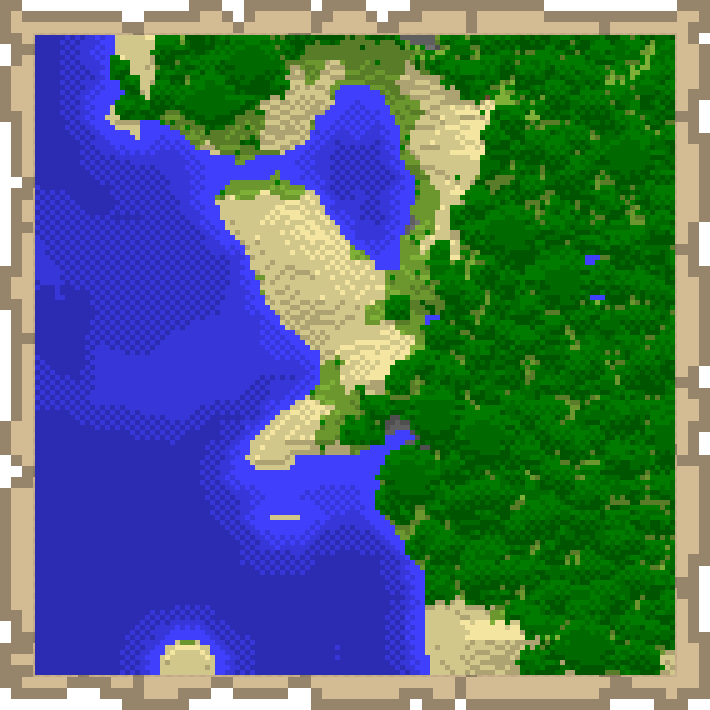
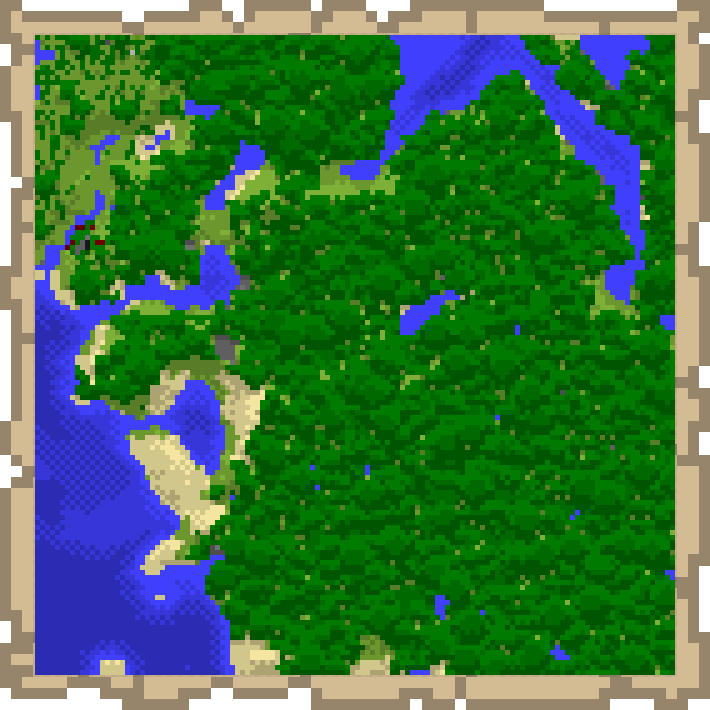
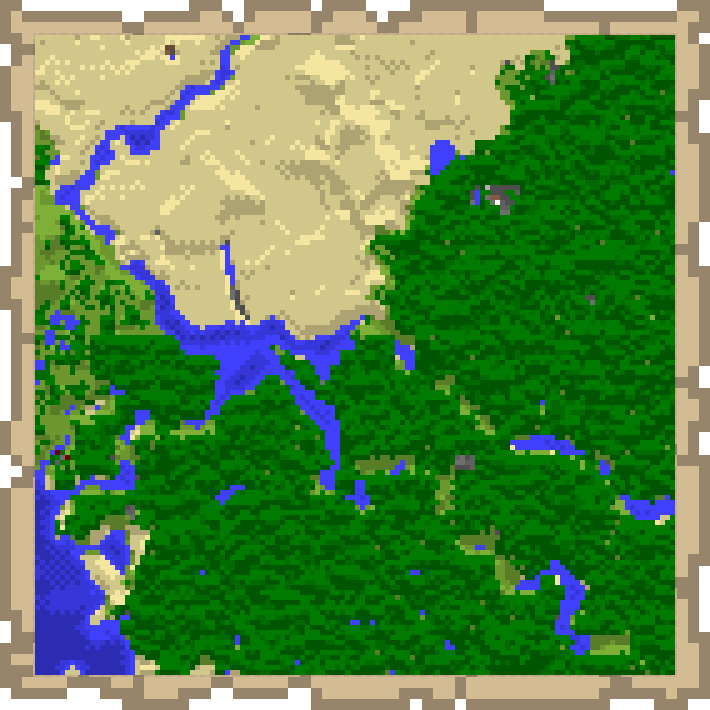
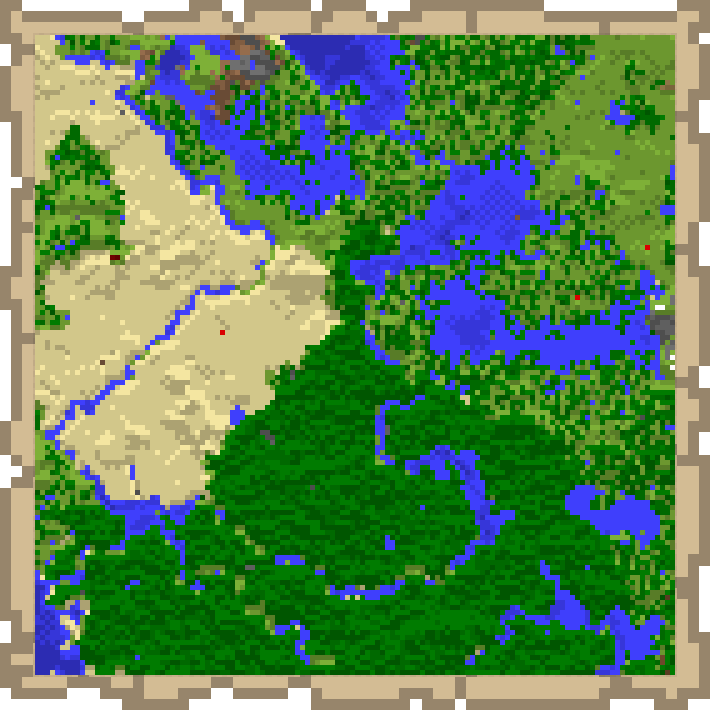
Maps consist of square pixels arranged like pixels in a 128×128 square pattern, with each pixel representing a square portion of land. In Java Edition, the color of a map pixel generally matches the color of the most common opaque block in the corresponding area, as seen from the sky. 'Minority blocks' in the target area have no effect on the color of the pixel, thus small features tend to be undetectable on zoomed-out maps.
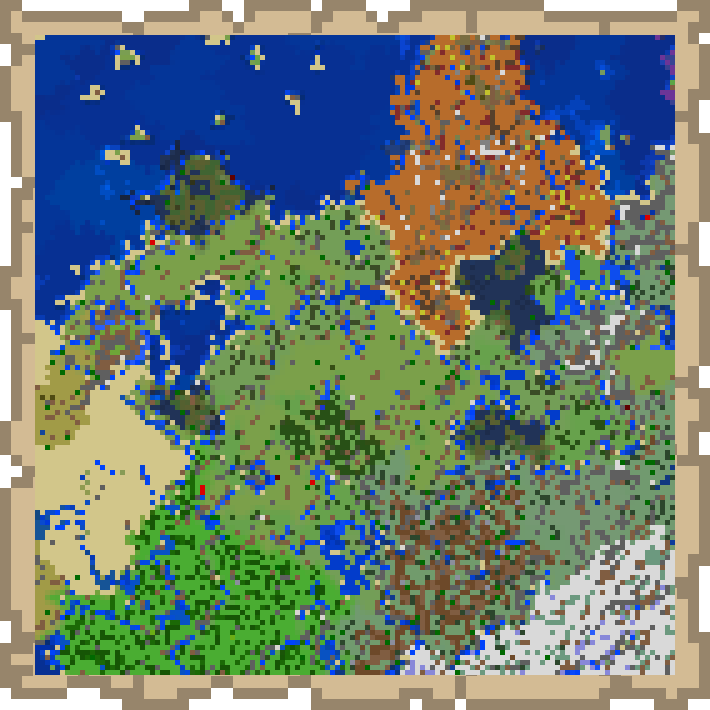
In Bedrock Edition, the color of a map pixel instead matches the single top-most opaque block in a grid sized by the map magnification pixel size (see the table in the "Player marker and pointer" section below). For example, a 3/4 magnification map has a pixel size of 8x8 blocks; this means the map will read only the top-most opaque blocks at the 0,0 coordinate, the 8,0 coordinate, the 0,8 coordinate, etcetera, ignoring all other blocks in the area. This means that in Bedrock Edition, map pixel art requires only one block per pixel regardless of map magnification.
In Bedrock Edition, grass, foliage and water colors that are biome-dependent are represented accurately on a map.
| Java Edition | Bedrock Edition |
|---|---|
|
|
| Biome colors on Java Edition. | Biome colors on Bedrock Edition. |
Maps also show ground up to about 15 blocks below the surface of the water in oceans as slightly lighter blue, to show where the ground rises. This is not true with land above water. Higher elevations in the world mean lighter colors on the map. The map records the surface even as the player moves below the surface.
A standard map represents 128x128 blocks (1 block per pixel, 8x8 chunks) but maps can be zoomed-out to represent up to 2048x2048 blocks (16 square blocks per pixel, 128x128 chunks).
Some relevant distances: 64 blocks (4 chunks) is the update radius from a player in the Overworld and the End. However, it is half this (32 blocks) in the Nether. Also, 1024 blocks is the minimum Overworld distance from a nether portal, at which players can build another portal and expect to reach a new location in the Nether. This is the distance across a 1:8 map, and also from a 1:16 map's center to its edge.
Player marker and pointer[]
In Java Edition, every map contains a marker that marks the position of the player, and points in the same direction as the player. When a player moves out of a map, a big white dot appears and moves relative to the player's position. The pointer either disappears when the player moves away a certain distance from the border of the map or, in case of explorer maps, the big white dot changes to a smaller white dot. The distance required for the small white dot to appear(explorer maps) or for the big dot to vanish (normal maps) changes with the scaling of the map.
- Level 0/4 : 128×128 blocks (each map pixel represents 1 block)
- Level 1/4 : 256×256 blocks (2×2 blocks per map pixel)
- Level 2/4 : 512×512 blocks (4×4 blocks per map pixel)
- Level 3/4 : 1024×1024 blocks (8×8 blocks per map pixel)
- Level 4/4 : 2048×2048 blocks (16×16 blocks per map pixel)
In Bedrock Edition, a map can be crafted with or without this marker, and a map without a position marker can add one later by adding a compass to the map. When a map is crafted without a compass, it's simply called an "empty map", but when crafted with a compass, it's called an "empty locator map". The marker also turns red if the player enters the Nether with an Overworld map and shows the player's Overworld location relative to the Nether location. A map created in the End has a purple marker showing the player's location. If an Overworld map is used in the End, a magenta dot appears on the player's spawn point.
| Name | Ingredients | Anvil usage | Description |
|---|---|---|---|
| Locator Map | Map + Compass |
Bedrock Edition only.
Maps crafted with only paper do not show the location marker; to add it, a compass must be added to the map. |
| Ingredients | Crafting recipe | Description |
|---|---|---|
| Map or Empty Map + Compass |
Bedrock Edition only.
Maps crafted from only paper do not show the location marker; to add it, a compass must be added to the map. |
In Bedrock Edition, a cartography table can also be used to add a pointer to create a locator map or empty locator map. This can be done by adding a compass to paper, or to an empty map or map.
Zooming out[]
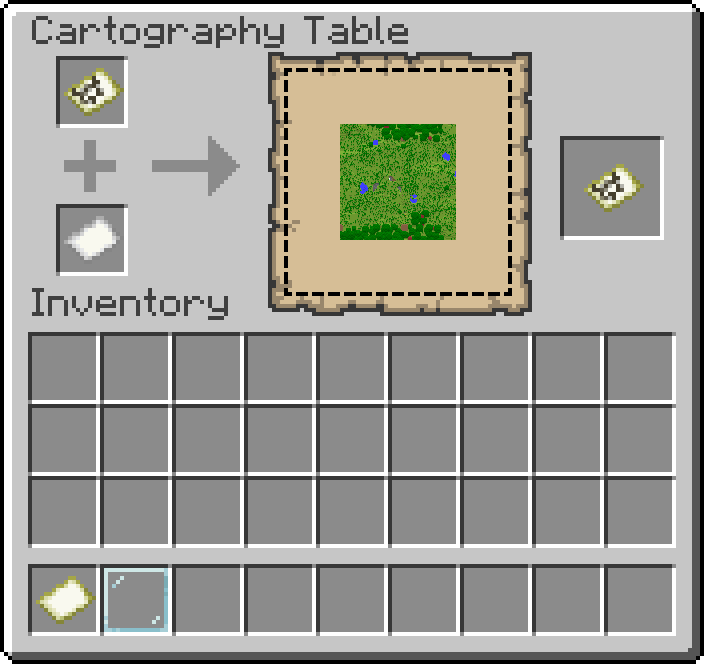
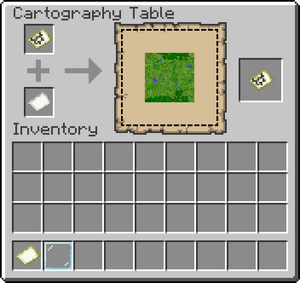
In Java Edition, cartography table's UI, showing the map is being zoomed out.
A cartography table can also be used to zoom out, taking only one piece of paper per zoom level.
A blank map can not be zoomed out. A map has to have something already marked on it for the zooming to be possible.
| Ingredients | Crafting recipe | Description |
|---|---|---|
| Paper + Map or Locator Map |
Locator Map Bedrock Edition only. |
| Name | Ingredients | Anvil usage | Description |
|---|---|---|---|
| Map or Locator Map (zoomed out) | Map or Locator Map + Paper |
Bedrock Edition only.
Supplying 8 sheets of paper results in a zoomed-out version of the input map. |
Zoom details[]
The zooming function starts from when the map is created (zoom level 0) up to its fourth zoom step (zoom level 4).
| Zoom step 0 | Zoom step 1 | Zoom step 2 | Zoom step 3 | Zoom step 4 | ||
|---|---|---|---|---|---|---|
|
|
|
|
| ||
| Zoom level | 0/4 | 1/4 | 2/4 | 3/4 | 4/4 | |
| 1 map pixel represents | 1 block | 2×2 blocks | 4×4 blocks | 8×8 blocks | 16×16 blocks (1×1 chunk) | |
| Scaling ratio | 1:1 | 1:2 | 1:4 | 1:8 | 1:16 | |
| Map covers an area of | 128×128 blocks | 256×256 blocks | 512×512 blocks | 1024×1024 blocks | 2048×2048 blocks | |
| 8×8 chunks | 16×16 chunks | 32×32 chunks | 64×64 chunks | 128×128 chunks | ||
| Smallest discernible features | Blocks | Trees, Paths | Lakes, Buildings | Mountains, Rivers | Biomes, Mountain Ranges | |
| Use cases | Pixel art, Base plans | Base surroundings | Structure mapping | Landscape mapping | Biome mapping | |
| Total paper needed to zoom out from Level 0 | in anvil[BE only] or crafting table | - | 8 | 16 | 24 | 32 |
| in cartography table | - | 1 | 2 | 3 | 4 | |
Maps are always aligned to a grid at all zoom levels. That means zooming out any different map in a specific area covered by that map always has the same center. As such, maps are aligned by map width (1024 blocks for a level 3 maps) minus 64. A level 3 map generated at spawn covers X and Z coordinates from -64 to 959. All maps generated in this area zoom out to the same coordinates, guaranteeing that they are always 'aligned' on a map wall. For a zoomed-out map to cover a new area, it must start with a base (level 0) map that is in that area.
At zoom level 0, a map created on the point (0,0) has (0,0) at the center of the map. At higher zoom levels of the same map, the coordinate (0,0) is in the top left square of the map.
In Java Edition, zoom level can be seen on a map by turning on Advanced Tooltips (a debug screen option that can be toggled by using the key combination F3 + H). The tooltip of the map then shows the zoom level, scaling factors, and map ID.
Cloning[]

In Java Edition, cartography table's UI, showing the map is being cloned.
A mix of empty maps and empty locator maps may be used. Whether the cloned maps show position markers is dependent only on the input map.
A cartography table can also be used to clone a map.
The parts of the world that have already been explored and mapped are copied, and newly explored areas appear on both instances. If one of the maps is later zoomed out, then the maps lose their connection to each other and function as completely separate maps that have to be individually filled by exploring.
In Creative mode, a map in an item frame may be cloned by using pick block on it, as long as that map is not also in the player's inventory.
It doesn't matter if the map to be cloned is at a higher zoom level (made of more paper) than the blank map. Upon copying the map, both resulting maps have the same magnification as the starting map.
| Name | Ingredients | Anvil usage | Description |
|---|---|---|---|
| Map or Locator Map (cloned) | Map or Locator Map + Empty Map |
Bedrock Edition only.
Only one copy can be made at a time. The input map must be a locator map for the output to be a locator map; an empty map has no effect. |
Crafting ingredient[]
| Name | Ingredients | Crafting recipe | Description |
|---|---|---|---|
| Explorer Map (cloned) |
Empty Map + Ocean Explorer Map or Woodland Explorer Map or Buried Treasure Map |
The output has the same map center as the input map, and the same monument, woodland mansion or buried treasure marker. Cloned maps are stackable. |
Marking points[]
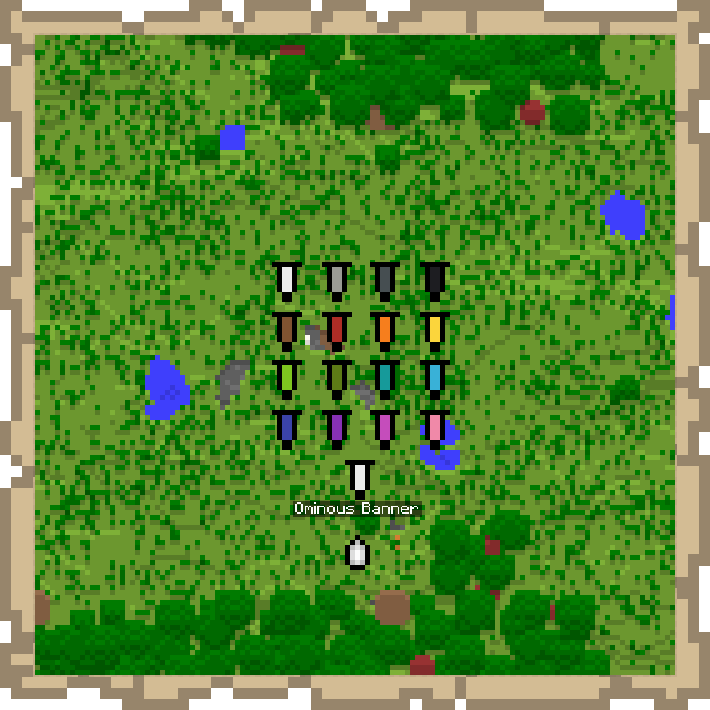
In Java Edition the player has the ability to mark spots on a map. To do this, use a map on a placed-down banner, and the spot of the banner gets marked on the map. The mark takes the color of whatever the base color is for the banner, and if the banner has a name, the mark shows that name. Banner marks on a map are always oriented with their top facing north, regardless of the banner's actual orientation. If the banner is destroyed, the mark of the banner remains at first, but if the player gets closer to where the banner previously was, it disappears as the area is updated on the map.
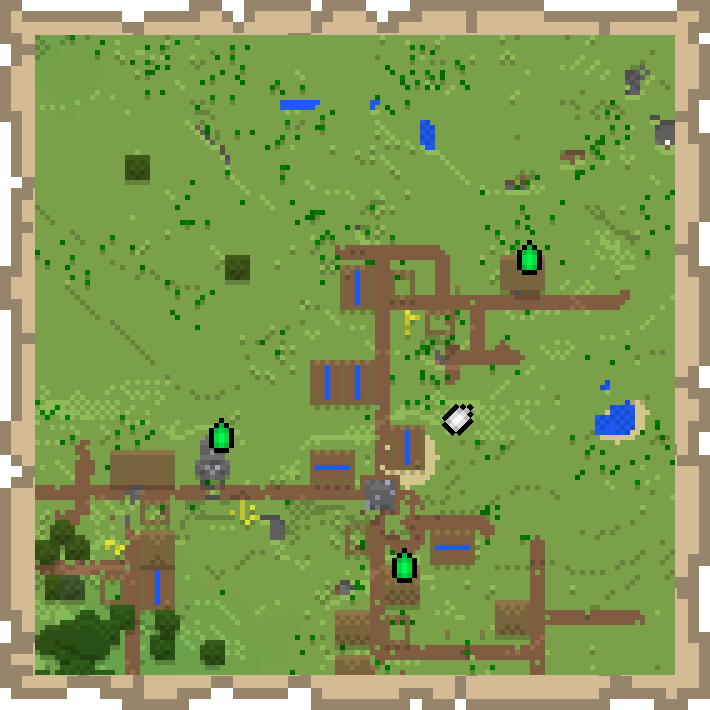
If a map is mounted on an item frame and is within the area it depicts, the mounted map displays its current location with a green indicator rotated to match its orientation.

In Bedrock Edition this is what a map lying on an item frame looks like, while showing markers.
In Bedrock Edition the player can place copies of locator maps in item frames in order to create a land mark. The marker is a green dot that resembles the shape of the player's marker, but in green color. The position the marker points at depends on the direction the item frame is facing. It is worth noting that the markers work only on copies of the same map. Other maps of the same area do not show the existing markers that the player(s) had placed.
If a player has a cloned map in their inventory, their pointer appears white when viewed on the same map held by another player. Hence, if all players have the same cloned map in their inventory, all markers would appear white when the clone map is viewed.
| Java Edition | Bedrock Edition |
|---|---|
|
|
| How every banner appears In Java Edition on a map, including named banners. | In Bedrock Edition this is how a locator map shows map markers while held by a player. |
Locking[]

In Java Edition, cartography table's UI, showing the map is being locked.
Maps can be locked when using a glass pane in a cartography table. This creates a new map containing the same data and locks it. All copies of this new map are also locked. A locked map never changes, even when the depicted terrain changes. In Bedrock Edition, locked maps have a unique texture.
| Condition | Newly created map | Map after terrain alteration |
|---|---|---|
| Unlocked map | |

|
| Locked map | |
|
Sounds[]
| Sound | Subtitles | Source | Description | Resource location | Translation key | Volume | Pitch | Attenuation distance |
|---|---|---|---|---|---|---|---|---|
| Map drawn | Players | When a map is drawn | ui | subtitles | 1.0 | 1.0 | 16 | |
| Map drawn | Blocks | When a map is edited using a cartography table | ui | subtitles | 1.0 | 1.0 | 16 |
| Sound | Source | Description | Resource location | Volume | Pitch |
|---|---|---|---|---|---|
| Blocks | When a map is drawn | ui[verify] | 0.8 | 1.0 | |
| Blocks | When a map is edited using a cartography table | ui | 0.8 | 1.0 |
Data values[]
ID[]
| Name | Identifier | Form | Translation key |
|---|---|---|---|
| Empty Map | map | Item | item.minecraft.map |
| Map | filled_map | Item | item.minecraft.filled_map filled_map.buried_treasure filled_map.explorer_jungle[upcoming: JE 1.20.2] filled_map.explorer_swamp[upcoming: JE 1.20.2] filled_map.mansion filled_map.monument filled_map.unknown filled_map.village_desert[upcoming: JE 1.20.2] filled_map.village_plains[upcoming: JE 1.20.2] filled_map.village_savanna[upcoming: JE 1.20.2] filled_map.village_snowy[upcoming: JE 1.20.2] filled_map.village_taiga[upcoming: JE 1.20.2] |
| Name | Identifier | Alias ID | Numeric ID | Form | Translation key |
|---|---|---|---|---|---|
| Empty Map | empty_map | emptymap | 515 | Item | item.emptyMap.name item.emptyLocatorMap.name |
| Map | filled_map | map | 420 | Item | item.map.name item.map.exploration.mansion.name item.map.exploration.monument.name item.map.exploration.treasure.name |
Metadata[]
In Bedrock Edition, maps use the following data values:
Empty map:
| DV | Description | |
|---|---|---|
| 0 | Empty Map | |
| 2 | Empty Locator Map |
Filled map:
| DV | Description | |
|---|---|---|
| 0 | Map | |
| 2 | Map (locator) | |
| 3 | Ocean Explorer Map | |
| 4 | Woodland Explorer Map | |
| 5 | Treasure Map | |
| 6 | Locked Map |
Item data[]
- tag: The item's tag tag.
- map: The map number.
- map_scale_direction: Only internally used when scaling a map, after that directly removed: The amount to increase the current map scale by when crafting. Always 1.
- map_to_lock: 1 or 0 (true/false) - true if the map should be locked after being taken out of the cartography table. Only internally used when locking a map, after that directly removed.
- Decorations: A list of optional icons to display on the map. Decorations that are removed or modified do not update until the world is reloaded.
- An individual decoration.
- id: An arbitrary unique string identifying the decoration.
- type: The ID of the map icon to display.
- x: The world X position of the decoration.
- z: The world Z position of the decoration.
- rot: The rotation of the symbol, ranging from 0.0 to 360.0, measured clockwise. A rotation of 0 displays the icon upside-down compared to its appearance in the icon texture.
- An individual decoration.
- display: The display tag.
- MapColor: The color of the markings on the item's texture.
Map icons[]
Map icons are 8×8 in Java Edition, but 16×16 in Bedrock Edition. As such, there are minor misalignment issues in Java Edition.[2]
Map icons texture in Java Edition
Map icons texture in Bedrock Edition
| Java ID | Bedrock ID | Text ID | Appearance | Purpose | Shown in item frames? |
|---|---|---|---|---|---|
| 0 | player |
Players (on map) | No | ||
| 1 | 1 | frame |
The current map in an item frame | Yes | |
| 2 | red_marker |
Position converted to Overworld when opening Overworld map in the Nether[Bedrock Edition only] | No | ||
| 3 | blue_marker |
Other players | No | ||
| 4 | target_x |
Unused | Yes | ||
| 5 | 5 | target_point |
Unused | Yes | |
| 6 | 6 | player_off_map |
Players off map, nearby[Java Edition only] | No | |
| 7 | 13 | player_off_limits |
Players off map, far away[Java Edition only] | No | |
| 8 | 14 | mansion |
Woodland mansion | Yes | |
| 9 | 15 | monument |
Ocean monument | Yes | |
| 10 - 25 | banner_* |
Banners in all 16 wool colors[Java Edition only] |
Banner markers | Yes | |
| 26 | 4 | red_x |
Buried treasure | Yes | |
| 8 | Position converted to Overworld when opening Overworld map in the End[Bedrock Edition only] | No | |||
| 9 | Other players | Yes | |||
| 10 | Other players | No | |||
| 11 | Other players | No | |||
| - | 12 | Other structure such as stronghold, fortress, end city, etc. when used as explorer map destination[Bedrock Edition only] | Yes |
It should be noted that even if the player used a NBT editor to add an additional icon on the map, Minecraft shows only the first one listed when the player loads up their world.
Achievements[]
| Icon | Achievement | In-game description | Actual requirements (if different) | Gamerscore earned | Trophy type (PS4) | |
|---|---|---|---|---|---|---|
| PS4 | Other | |||||
| Map Room | Place 9 fully explored, adjacent map items into 9 item frames in a 3 by 3 square. | The frames have to be on a wall, not the floor. | 40G | Silver | ||
History[]
The specific instructions are: MC-72962
| April 27, 2011 | Notch unveiled screenshots of the map. | |||||||||||||||||||||||||||||||||||||||||||||||||||||||||||||||||||||||||||||||||||||||||||||||||||||||||||||
|---|---|---|---|---|---|---|---|---|---|---|---|---|---|---|---|---|---|---|---|---|---|---|---|---|---|---|---|---|---|---|---|---|---|---|---|---|---|---|---|---|---|---|---|---|---|---|---|---|---|---|---|---|---|---|---|---|---|---|---|---|---|---|---|---|---|---|---|---|---|---|---|---|---|---|---|---|---|---|---|---|---|---|---|---|---|---|---|---|---|---|---|---|---|---|---|---|---|---|---|---|---|---|---|---|---|---|---|---|---|---|
| April 28, 2011 | Notch said that he would try to make maps place-able on walls. | |||||||||||||||||||||||||||||||||||||||||||||||||||||||||||||||||||||||||||||||||||||||||||||||||||||||||||||
| Java Edition Beta | ||||||||||||||||||||||||||||||||||||||||||||||||||||||||||||||||||||||||||||||||||||||||||||||||||||||||||||||
1.6Tropical fish also have assigned names that can be seen after capture. In Java Edition, the smaller text under the item name is displayed showing the fish name, similar to the text that displays enchantments under enchanted items. In Bedrock Edition, the item name is displayed showing "Bucket of <fish name>". Their colors are mostly named according to the colored block names, though with a few exceptions:
The base color comes first, and if the pattern color is different, it comes after that. Lastly, the fish bucket is given a name according to the shape and pattern of the fish:
Some tropical fish don't follow the normal naming system, and instead, reference real-life fish species. Apart from these names, these types of fish aren't different from regular tropical fish in terms of design or behavior. These varieties are:
| Test Build 3 | |||||||||||||||||||||||||||||||||||||||||||||||||||||||||||||||||||||||||||||||||||||||||||||||||||||||||||||
1.6.6{{Extension DPL}}<ul><li>[[Copper Horn|Copper Horn]]<br/>{{About|the removed item|the current item|Goat Horn}}
{{outdated feature|edition=bedrock}}
{{Item
| renewable = Yes
| stackable = No
}}
A '''copper horn''' was an [[item]] crafted from a [[goat horn]] and [[copper ingots]].
== Obtaining ==
=== Crafting ===
{{Crafting
|ignoreusage=1
|A2=Copper Ingot
|B2=Goat Horn
|B3=Copper Ingot
|C2=Copper Ingot
|Output=Copper Horn
}}
=== Natural generation ===
Copper horns were found in pillager outpost chests.
== Usage ==
Copper horns were used to play sounds. They took one second to use and had a four second cooldown. There were ten variations of copper horns, and each of them played three different sounds: when looking up, crouching, or neither of those. In total, there were thirty different sounds that could be played using copper horns. The sound a copper horn plays based on multiple conditions, which are in order as follows:
* If crouching, the bass tune was played.
* Else, if looking up (by 45 degrees), the harmony tune was played.
* Else, the melody tune was played.
== Sounds ==
Sound names in the item tooltip are created using the harmony, melody, and bass sounds in that order.
=== Harmony ===
{{Sound table
|type=bedrock
|sound=harmony0.ogg
|description="Great" ("Great Sky Falling")
|source=hostile
|id=horn.call.0
|volume=1.0
|pitch=1.0}}
{{Sound table
|sound=harmony1.ogg
|description="Old" ("Old Hymn Resting")
|source=hostile
|id=horn.call.1
|volume=1.0
|pitch=1.0}}
{{Sound table
|sound=harmony2.ogg
|description="Pure" ("Pure Water Desire")
|source=hostile
|id=horn.call.2
|volume=1.0
|pitch=1.0}}
{{Sound table
|sound=harmony3.ogg
|description="Humble" ("Humble Fire Memory")
|source=hostile
|id=horn.call.3
|volume=1.0
|pitch=1.0}}
{{Sound table
|sound=harmony4.ogg
|description="Dry" ("Dry Urge Anger")
|source=hostile
|id=horn.call.4
|volume=1.0
|pitch=1.0}}
{{Sound table
|sound=harmony5.ogg
|description="Clear" ("Clear Temper Journey")
|source=hostile
|id=horn.call.5
|volume=1.0
|pitch=1.0}}
{{Sound table
|sound=harmony6.ogg
|description="Fresh" ("Fresh Nest Thought")
|source=hostile
|id=horn.call.6
|volume=1.0
|pitch=1.0}}
{{Sound table
|sound=harmony7.ogg
|description="Secret" ("Secret Lake Tear")
|source=hostile
|id=horn.call.7
|volume=1.0
|pitch=1.0}}
{{Sound table
|sound=harmony8.ogg
|description="Fearless" ("Fearless River Gift")
|source=hostile
|id=horn.call.8
|volume=1.0
|pitch=1.0}}
{{Sound table
|sound=harmony9.ogg
|description="Sweet" ("Sweet Moon Love")
|source=hostile
|id=horn.call.9
|volume=1.0
|pitch=1.0
|foot=1}}
=== Melody ===
{{Sound table
|type=bedrock
|sound=melody0.ogg
|description="Sky" ("Great Sky Falling")
|source=hostile
|id=horn.melody.0
|volume=1.0
|pitch=1.0}}
{{Sound table
|sound=melody1.ogg
|description="Hymn" ("Old Hymn Resting")
|source=hostile
|id=horn.melody.1
|volume=1.0
|pitch=1.0}}
{{Sound table
|sound=melody2.ogg
|description="Water" ("Pure Water Desire")
|source=hostile
|id=horn.melody.2
|volume=1.0
|pitch=1.0}}
{{Sound table
|sound=melody3.ogg
|description="Fire" ("Humble Fire Memory")
|source=hostile
|id=horn.melody.3
|volume=1.0
|pitch=1.0}}
{{Sound table
|sound=melody4.ogg
|description="Urge" ("Dry Urge Anger")
|source=hostile
|id=horn.melody.4
|volume=1.0
|pitch=1.0}}
{{Sound table
|sound=melody5.ogg
|description="Temper" ("Clear Temper Journey")
|source=hostile
|id=horn.melody.5
|volume=1.0
|pitch=1.0}}
{{Sound table
|sound=melody6.ogg
|description="Nest" ("Fresh Nest Thought")
|source=hostile
|id=horn.melody.6
|volume=1.0
|pitch=1.0}}
{{Sound table
|sound=melody7.ogg
|description="Lake" ("Secret Lake Tear")
|source=hostile
|id=horn.melody.7
|volume=1.0
|pitch=1.0}}
{{Sound table
|sound=melody8.ogg
|description="River" ("Fearless River Gift")
|source=hostile
|id=horn.melody.8
|volume=1.0
|pitch=1.0}}
{{Sound table
|sound=melody9.ogg
|description="Moon" ("Sweet Moon Love")
|source=hostile
|id=horn.melody.9
|volume=1.0
|pitch=1.0
|foot=1}}
=== Bass ===
{{Sound table
|type=bedrock
|sound=bass0.ogg
|description="Falling" ("Great Sky Falling")
|source=hostile
|id=horn.bass.0
|volume=1.0
|pitch=1.0}}
{{Sound table
|sound=bass1.ogg
|description="Resting" ("Old Hymn Resting")
|source=hostile
|id=horn.bass.1
|volume=1.0
|pitch=1.0}}
{{Sound table
|sound=bass2.ogg
|description="Desire" ("Pure Water Desire")
|source=hostile
|id=horn.bass.2
|volume=1.0
|pitch=1.0}}
{{Sound table
|sound=bass3.ogg
|description="Memory" ("Humble Fire Memory")
|source=hostile
|id=horn.bass.3
|volume=1.0
|pitch=1.0}}
{{Sound table
|sound=bass4.ogg
|description="Anger" ("Dry Urge Anger")
|source=hostile
|id=horn.bass.4
|volume=1.0
|pitch=1.0}}
{{Sound table
|sound=bass5.ogg
|description="Journey" ("Clear Temper Journey")
|source=hostile
|id=horn.bass.5
|volume=1.0
|pitch=1.0}}
{{Sound table
|sound=bass6.ogg
|description="Thought" ("Fresh Nest Thought")
|source=hostile
|id=horn.bass.6
|volume=1.0
|pitch=1.0}}
{{Sound table
|sound=bass7.ogg
|description="Tear" ("Secret Lake Tear")
|source=hostile
|id=horn.bass.7
|volume=1.0
|pitch=1.0}}
{{Sound table
|sound=bass8.ogg
|description="Gift" ("Fearless River Gift")
|source=hostile
|id=horn.bass.8
|volume=1.0
|pitch=1.0}}
{{Sound table
|sound=bass9.ogg
|description="Love" ("Sweet Moon Love")
|source=hostile
|id=horn.bass.9
|volume=1.0
|pitch=1.0
|foot=1}}
==Data Values==
===ID===
{{ID table
|edition=bedrock
|shownumericids=y
|showforms=y
|notshowbeitemforms=y
|generatetranslationkeys=y
|displayname=Copper Horn
|spritetype=item
|nameid=copper_horn
|form=item
|foot=1}}
== History ==
{{h|bedrock}}
{{h||Vanilla Experiments<br>(experimental)|link=1.18.30|snap=beta 1.18.30.26|[[File:Copper Horn BE1.png|32px]]Added copper horns.}}
{{h|||snap=beta 1.18.30.28|[[File:Copper Horn BE2.png|32px]]Changed the texture of copper horns.}}
{{h||1.19.0|snap=beta 1.19.0.24|Removed copper horns.}}
{{h|foot}}
== Trivia ==
* Copper horns were removed from the game as they didn't live up to the developers' design goals, and as such are no longer supported.<ref>{{cite|url=https://feedback.minecraft.net/hc/en-us/articles/5540500564365| title = Minecraft Beta & Preview - 1.19.0.24/25|website=feedback.minecraft.net|date=April 14, 2022}}</ref>
* This is the first item in {{el|be}} to have been completely removed instead of just made unobtainable. This is likely due to the fact it never made it out of [[experimental gameplay]].
** If a world that contained this item is loaded into a newer version, the horn will disappear upon loading.
== References ==
{{reflist}}
{{Items}}
{{Removed features}}
[[Category:Renewable resources]]
[[de:Ziegenhorn]]
[[es:Cuerno de cobre]]
[[fr:Corne de chèvre]]
[[it:Corno di capra]]
[[lzh:銅號]]
[[pl:Kozi róg]]
[[pt:Chifre de cobre]]
[[ru:Козий рог]]
[[zh:铜制号角]]</li><li>[[Light Gray Dye|Light Gray Dye]]<br/>{{Item
| image = Light Gray Dye.png
| renewable = Yes
| stackable = Yes (64)
}}
'''Light gray dye'''{{fn|Known as '''Light Grey Dye''' in British, Canadian, Australian, and New Zealand English variants.}} is a [[Dyeing#Primary Colors|quasi-primary dye]].
== Obtaining ==
=== Crafting ===
{{Crafting
|head=1
|showname=0
|showdescription=1
|Azure Bluet;Oxeye Daisy;White Tulip
|Output=Light Gray Dye
|type=Material
}}
{{Crafting
|Black Dye
|White Dye
|White Dye
|Output=Light Gray Dye,3
|type=Material
|description={{IN|bedrock}}, the black and white dye can be replaced with [[ink sac]]s and [[bone meal]], respectively.
}}
{{Crafting
|Gray Dye
|White Dye
|Output=Light Gray Dye,2
|type=Material
|description={{IN|bedrock}}, the white dye can be replaced with [[bone meal]].
|foot=1
}}
=== Trading ===
[[Wandering trader]]s sell 3 light gray dye for an [[emerald]].
== Usage ==
{{dye usage}}
=== Crafting ingredient ===
{{crafting usage|ignore=Banner|continue=1}}
{{banner crafting usage}}
=== Loom ingredient ===
{{Banner loom usage|Light Gray Dye}}
=== Trading ===
Expert-level shepherd villagers have {{frac|1|6}} chance to buy 12 light gray dye for an emerald.
== Data values ==
=== ID ===
{{edition|java}}:
{{ID table
|edition=java
|showforms=y
|generatetranslationkeys=y
|displayname=Light Gray Dye
|spritetype=item
|nameid=light_gray_dye
|form=item
|foot=1}}
{{edition|bedrock}}:
{{ID table
|edition=bedrock
|showaliasids=y
|shownumericids=y
|showforms=y
|notshowbeitemforms=y
|generatetranslationkeys=y
|displayname=Light Gray Dye
|spritetype=item
|nameid=light_gray_dye
|aliasid=dye / 7
|id=402
|form=item
|translationkey=item.dye.silver.name
|foot=1}}
== Video ==
<div style="text-align:center">{{yt|1w3j1SKcoww}}</div>
== History ==
{{History|java beta}}
{{History||1.2|[[File:Light Gray Dye JE1 BE1.png|32px]] Added light gray dye.}}
{{History|java}}
{{History||1.4.2|snap=12w34a|Added the ability to [[Armor#Dyeing|dye]] leather [[armor]] and [[wolf]] collars.}}
{{History||1.4.6|snap=12w49a|Light gray dye can now be [[crafting|crafted]] with [[gunpowder]] to create a [[firework star]].}}
{{History||1.6.1|snap=13w19a|[[Stained clay]] can now be crafted.}}
{{history||1.7.2|snap=13w36a|With the addition of new [[flower]]s, many secondary and tertiary dyes are now primary [[dye]]s.}}
{{History|||snap=13w41a|[[Stained glass]] can now be crafted.}}
{{History||1.8|snap=14w30a|Added [[banner]]s, which can be dyed.}}
{{History||1.11|snap=16w39a|Added the ability to dye [[shulker box]]es.}}
{{History||1.12|snap=17w15a|Added the ability to dye [[bed]]s.}}
{{History||1.13|snap=17w47a|The different data values for the <code>dye</code> ID have now been split up into their own IDs.
|Prior to [[1.13/Flattening|''The Flattening'']], this [[item]]'s numeral ID was 351.}}
{{History||1.14|snap=18w43a|Light gray dye is now crafted using [[white dye|white]] and [[black dye]]s, instead of [[bone meal]] and [[ink sac]]s.
|[[File:Light Gray Dye JE2 BE2.png|32px]] The texture of light gray dye has now been changed.}}
{{History|||snap=18w44a|Light gray dye can now change the text color on [[sign]]s to light gray.}}
{{History|||snap=19w05a|Added the [[wandering trader]], which sells light gray dye.}}
{{History|||snap=19w11a|Light gray dye can now be [[trading|bought]] by shepherd villagers.}}
{{History||1.17|snap=20w45a|Light gray dye can now be used to craft [[light gray candle]]s.}}
{{History|||snap=21w19a|Light gray dye can no longer be used to craft light gray candles.}}
{{History|||snap=Pre-release 1|Light gray dye can now once again be used to craft light gray candles.}}
{{History||1.20<br>(Experimental)|link=1.19.3|snap=22w42a|Light gray dye can now change the text color on [[hanging sign]]s to light gray.}}
{{History|pocket alpha}}
{{History||v0.3.0|[[File:Light Gray Dye JE1 BE1.png|32px]] Added light gray dye. It is currently unobtainable and serves no purpose.}}
{{History||v0.8.0|snap=build 1|Light gray dye can be [[craft]]ed with [[bone meal]] and [[gray dye]], or with two bone meals and an [[ink sac]], despite there being no way of obtaining gray dye or ink sacs at the time.}}
{{History||v0.8.0|snap=build 3|Light gray dye is now available in [[creative]] mode.}}
{{History||v0.9.0|snap=build 3|Light gray dye can now be obtained in [[survival]] mode.}}
{{History|||snap=build 11|Light gray dye can now be used to craft colored [[terracotta]].}}
{{History||v0.11.0|snap=build 1|Light gray dye can now be used to dye tamed [[wolf]] collars.}}
{{History||v0.14.0|snap=build 1|Light gray dye can now be used to dye [[water]] in [[cauldron]]s.}}
{{History|pocket}}
{{History||1.0.0|snap=alpha 0.17.0.1|Light gray dye can now be used to dye [[shulker]]s.}}
{{History||1.1.0|snap=alpha 1.1.0.0|Light gray dye can now be used to craft [[concrete powder]], colored [[bed]]s and dyed [[shulker box]]es.}}
{{History|bedrock}}
{{History||1.2.0|snap=beta 1.2.0.2|Light gray dye can now be used to craft [[firework star]]s, [[stained glass]] and patterns on [[banner]]s.}}
{{History||1.4.0|snap=beta 1.2.20.1|Light gray dye can now be used to craft [[balloon]]s and [[glow stick]]s.}}
{{History||1.8.0|snap=beta 1.8.0.8|Light gray dye can now be used to dye tamed [[cat]] collars.}}
{{History||1.10.0|snap=beta 1.10.0.3|Light gray dye is now [[trading|sold]] by [[wandering trader]]s.
|Light gray dye can now be used to dye white [[carpet]]s and undyed [[glass pane]]s.
|[[File:Light Gray Dye JE2 BE2.png|32px]] The texture of light gray dye has now been changed.}}
{{History||1.11.0|snap=beta 1.11.0.1|Light gray dye can be [[trading|sold]] to shepherd [[villager]]s.}}
{{History||1.16.100|snap=beta 1.16.100.56|The ID of light gray dye has been changed from <code>dye/7</code> to <code>light_gray_dye</code>.}}
{{History|console}}
{{History||xbox=TU1|xbone=CU1|ps=1.00|switch=1.0.1|wiiu=Patch 1|[[File:Light Gray Dye JE1 BE1.png|32px]] Added light gray dye.}}
{{History|PS4}}
{{History||1.90|[[File:Light Gray Dye JE2 BE2.png|32px]] The texture of light gray dye has now been changed.}}
{{History|new 3ds}}
{{History||0.1.0|[[File:Light Gray Dye JE1 BE1.png|32px]] Added light gray dye.}}
{{History|foot}}
== Issues ==
{{issue list}}
== Trivia ==
* In [[Bedrock Edition]], Some items/blocks' Block states/Item NBT uses '''Silver''' instead of '''Light Gray'''
== Notes ==
{{fnlist}}
{{Items}}
[[Category:Dyes]]
[[cs:Světle šedé barvivo]]
[[de:Hellgrauer Farbstoff]]
[[es:Tinte gris claro]]
[[fr:Teinture gris clair]]
[[hu:Világosszürke festék]]
[[ja:薄灰色の染料]]
[[ko:회백색 염료]]
[[nl:Lichtgrijze kleurstof]]
[[pl:Jasnoszary barwnik]]
[[pt:Corante cinza-claro]]
[[ru:Светло-серый краситель]]
[[zh:淡灰色染料]]
[[Category:Renewable resources]]</li></ul> | The ability to auto-craft maps using shift-click has been disabled. | |||||||||||||||||||||||||||||||||||||||||||||||||||||||||||||||||||||||||||||||||||||||||||||||||||||||||||||
1.8{{Extension DPL}}<ul><li>[[Flint|Flint]]<br/>{{Item
| image = Flint.png
|type=
| renewable = Yes
| stackable = Yes (64)
}}
'''Flint''' is a mineral obtained from [[gravel]].
== Obtaining ==
=== Mining ===
When a block of [[gravel]] is mined, there is a 10% chance for a single piece of flint to drop instead of the [[gravel]] block. When mined with a [[Fortune]]-enchanted tool, this chance increases to 16% at Fortune I, 25% at Fortune II, and 100% at Fortune III. Gravel mined using a tool with [[Silk Touch]] or gravel that fell on a non-solid block never produces flint.
=== Trading ===
Novice-level [[Trading#Fletcher|fletcher]] [[villager]]s have a 50%{{only|bedrock}} or {{frac|2|3}}{{only|java}} chance to offer 10 pieces of flint for 10 blocks of gravel and an [[emerald]].
=== Chest loot ===
{{LootChestItem|flint}}
== Usage ==
=== Crafting ingredient ===
{{crafting usage}}
=== Trading ===
Apprentice-level fletcher villagers buy 26 flint for an emerald.
Apprentice-level leatherworker villagers have a {{frac|2|3}} chance to buy 26 flint for an emerald {{in|java}}, and always offer the trade {{in|bedrock}}.
Journeyman-level toolsmith villagers have a {{frac|2|5}} chance to buy 30 flint for one emerald in ''Java Edition'', and always offer the trade in Bedrock Edition.
Journeyman-level weaponsmith villagers buy 24 flint for an emerald.
== Data values ==
=== ID ===
{{edition|java}}:
{{ID table
|edition=java
|showforms=y
|generatetranslationkeys=y
|displayname=Flint
|spritetype=item
|nameid=flint
|form=item
|foot=1}}
{{edition|bedrock}}:
{{ID table
|edition=bedrock
|shownumericids=y
|showforms=y
|notshowbeitemforms=y
|generatetranslationkeys=y
|displayname=Flint
|spritetype=item
|nameid=flint
|id=356
|form=item
|foot=1}}
== History ==
{{History|java indev}}
{{History||20100219|[[File:Flint JE1 BE1.png|32px]] Added flint.
|Flint is now used to craft [[flint and steel]].}}
{{History|java alpha}}
{{History||v1.0.14|Crafting [[arrow]]s now requires flint, rather than [[iron ingot]]s.}}
{{History|java}}
{{History||1.3.1|snap=12w21a|Farmer [[villager]]s now [[trading|sell]] 4–5 flint for 1 [[emerald]] and 10 [[gravel]].}}
{{History|||snap=1.3|[[File:Flint JE2 BE2.png|32px]] The texture of flint has been slightly changed.}}
{{History||1.8|snap=14w02a|Fletcher [[villager]]s now sell 6–10 flint for 1 emerald and 10 gravel.}}
{{History||1.13|snap=17w47a|Prior to [[1.13/Flattening|''The Flattening'']], this [[item]]'s numeral ID was 318.}}
{{History||1.14|snap=18w43a|[[File:Flint JE3 BE3.png|32px]] The texture of flint has been changed.}}
{{History|||snap=18w50a|Flint can now be found in [[chest]]s in [[village]] fletcher houses.}}
{{History|||snap=19w11a|Fletcher, leatherworker, toolsmith and weaponsmith [[villager]]s now [[trading|buy]] flint.}}
{{History||1.16|snap=20w07a|Flint has a {{frac|10|109}} (~9.17%) chance of being given by the new [[piglin]]s when [[bartering]], in a stack size of 3–8, making it renewable.}}
{{History|||snap=20w09a|Flint can no longer be obtained by bartering with piglins. However, they are still renewable as piglins offer [[gravel]].}}
{{History|||snap=20w16a|Flint now generates in [[ruined portal]] chests.}}
{{History|pocket alpha}}
{{History||v0.3.3|[[File:Flint JE1 BE1.png|32px]] Added flint.
|Flint can be used to craft [[arrow]]s.}}
{{History||v0.4.0|Flint can now be used to make [[flint and steel]].}}
{{History||v0.8.0|snap=build 1|[[File:Flint JE2 BE2.png|32px]] The texture of flint has been changed.}}
{{History|pocket}}
{{History||1.0.4|snap=alpha 1.0.4.0|Fletcher [[villager]]s now [[trading|sell]] 6–10 flint for 1 [[emerald]] and 10 [[gravel]].}}
{{History|bedrock}}
{{History||1.10.0|snap=beta 1.10.0.3|[[File:Flint JE3 BE3.png|32px]] The texture of flint has been changed.}}
{{History||1.11.0|snap=beta 1.11.0.1|Flint can now be found in [[village]] fletcher [[chest]]s.}}
{{History|||snap=beta 1.11.0.4|[[Trading]] has been changed, fletcher [[villager]]s now have a 50% chance to [[trading|sell]] 10 flint for 10 [[gravel]] and one [[emerald]] as part of their first tier trade.
|Flint can now be [[trading|sold]] to toolsmith, weaponsmith, fletcher, and leatherworker villagers.}}
{{History|console}}
{{History||xbox=TU1|xbone=CU1|ps=1.0|wiiu=Patch 1|switch=1.0.1|[[File:Flint JE1 BE1.png|32px]] Added flint.}}
{{History||?|[[File:Flint JE2 BE2.png|32px]] The texture of flint has been changed.}}
{{History||xbox=none|xbone=none|ps=1.90|wiiu=none|switch=none|[[File:Flint JE3 BE3.png|32px]] The texture of flint has been changed.}}
{{History|foot}}
== Issues ==
{{issue list}}
== Gallery ==
<gallery>
File:GodPortal.png|A piece of flint found in a [[ruined portal]] chest, together with an [[enchanted golden apple]].
</gallery>
== References ==
{{reflist}}
== External Links ==
*[https://www.minecraft.net/en-us/article/taking-inventory--flint Taking Inventory: Flint] – Minecraft.net on October 31, 2019
{{Items}}
[[Category:Renewable resources]]
[[cs:Pazourek]]
[[de:Feuerstein]]
[[es:Pedernal]]
[[fr:Silex]]
[[hu:Kovakő]]
[[it:Selce]]
[[ja:火打石]]
[[ko:부싯돌]]
[[nl:Vuursteen]]
[[pl:Krzemień]]
[[pt:Sílex]]
[[ru:Кремень]]
[[th:หินเหล็กไฟ]]
[[uk:Кремінь]]
[[zh:燧石]]</li><li>[[Painting|Painting]]<br/>{{ItemEntity
|title=Painting
|image=Painting JE2 BE2.png
|extratext=View [[#Renders|all renders]]
|renewable=Yes
|stackable=Yes (64)
|drops=1 {{ItemLink|Painting}}
}}
'''Paintings''' are decorative [[entity|entities]] that hang on walls.
== Obtaining ==
=== Crafting ===
{{Crafting
|A1= Stick |B1= Stick |C1= Stick
|A2= Stick |B2= Any Wool |C2= Stick
|A3= Stick |B3= Stick |C3= Stick
|Output= Painting
|type= Decoration block
}}
Paintings can be crafted with any color of [[wool]]. The color of the wool used does not influence the picture chosen when the painting is placed.
Once placed, it displays a random painting.
=== Breaking ===
To remove a painting from a wall, the player can {{control|attack}} it, break one of its supporting blocks, cover one square of it with a block, hit it with an arrow, egg, ender pearl, snowball, or fire charge, or subject it to an explosion. The painting then drops as an item. Arrows that hit paintings disappear.
=== Trading ===
Master-level shepherd [[villager]]s sell 3 paintings for 2 [[emerald]]s.
== Usage ==
=== Placement ===
Paintings can be placed on the sides of [[solid block]]s, [[sign]]s, [[banner]]s, or [[sculk vein]]s. A small gap is visible between the painting and attachment surface. There are several different sizes of paintings (see below). When placed, a painting checks for the largest amount of space it has. It then chooses a random painting of that size. The player can add blocks around the painting to ensure it is the size wanted. When the supporting blocks are removed, the painting breaks after 20 game [[tick]]s (1 second) if no supporting blocks are replaced during that interval.
=== Properties ===
Being an entity, paintings can simultaneously exist in the same space as blocks such as water or torches. Specifically, they can share the space with any block whose collision box does not intersect its hitbox.
Players and mobs are able to walk through paintings, as long as the blocks supporting the painting allow it. Secret doorways can be created this way. [[Light]] propagates through paintings as well.
If a player is concealed behind a painting, the player's name is also concealed from other players.{{verify|Is this true in Bedrock?}}
Paintings are non-flammable.
== Canvases ==
{{Stub|Needing the new painting renders}}
There are 31 paintings in the game. These are mostly based on paintings by [[Kristoffer Zetterstrand]], who also created the ''Minecraft'' versions.
{| class="wikitable stikitable" style="text-align: center" data-description="Paintings"
! style="min-width:150px" |Canvas
! style="min-width:3em;max-width:4em" |Size
! style="min-width:3em" |Original
! style="min-width:3em" |Name
! style="min-width:3em;max-width:4.5em" |[[Resource location]]
! style="min-width:10em" |Description
! Java Edition version added
|-
! [[File:Alban (texture).png|64px]]
| rowspan="3" | 1×1 blocks<br>16×16 pixels || [https://zetterstrand.com/work/pictures/archive/alban.jpeg "Albanian"] || Albanian || <code>alban</code> || A man wearing a fez next to a house and a bush. As the name of the painting suggests, it may be a landscape in [[Wikipedia:Albania|Albania]]. || rowspan="11" | [[Indev 20100223]]
|-
! [[File:Aztec (texture).png|64px]]
|[https://zetterstrand.com/eventz/wp-content/uploads/2aztbig.jpg "de_aztec"]|| de_aztec || <code>aztec</code> || [[Wikipedia:Noclip mode|Free-look]] perspective of the map [[w:c:counterstrike:Aztec|de_aztec]] from the video game ''[[Wikipedia:Counter-Strike (video game)|Counter-Strike]]''.
|-
! [[File:Aztec2 (texture).png|64px]]
|[https://zetterstrand.com/eventz/wp-content/uploads/11aztec_for_print.jpg "de_aztec"]|| de_aztec || <code>aztec2</code> || [[Wikipedia:Noclip mode|Free-look]] perspective of the map [[w:c:counterstrike:Aztec|de_aztec]] from the video game ''[[Wikipedia:Counter-Strike (video game)|Counter-Strike]]''.
|-
! [[File:1-21-adds-20-new-paintings-with-new-sizes-heres-are-all-of-v0-26pp8s1r3nxc1.png]]
| rowspan="2" |3x4 blocks
48x64 pixels
|[https://www.google.com/url?sa=i&url=https%3A%2F%2Fwww.reddit.com%2Fr%2FMinecraft%2Fcomments%2F1cgwz70%2F121_adds_20_new_paintings_with_new_sizes_heres%2F&psig=AOvVaw1gGCrgmKvO2dQbL69e3OSB&ust=1714850346269000&source=images&cd=vfe&opi=89978449&ved=0CBEQjRxqFwoTCOjls7-Z8oUDFQAAAAAdAAAAABAE]|| Backyard ||
|-
!
|
|Pond
|
|-
! [[File:Bomb (texture).png|64px]]
| rowspan="5" |1×1 blocks<br>16×16 pixels
|[https://zetterstrand.com/eventz/wp-content/uploads/12bomb.jpg "Target successfully bombed"]|| Target Successfully Bombed || <code>bomb</code> || The map [[w:c:counterstrike:Dust II|de_dust2]] from the video game ''[[Wikipedia:Counter-Strike (video game)|Counter-Strike]]'', named “target successfully bombed" in reference to the game.
|-
! [[File:Kebab (texture).png|64px]]
|[https://zetterstrand.com/work/pictures/archive/kebab2.jpg "Kebab med tre pepperoni"] || Kebab med tre pepperoni || <code>kebab</code> || A kebab with three green chili peppers.
|-
! [[File:Plant (texture).png|64px]]
|[https://zetterstrand.com/work/pictures/archive/paradistrad.jpeg "Paradisträd"] || Paradisträd || <code>plant</code> || Still life of two plants in pots. "Paradisträd" is Swedish for "[[Wikipedia:Crassula ovata|money tree]]", which is a common name for the depicted species in Scandinavia.
|-
!
|
|Meditative
|
|
|-
! [[File:Wasteland (texture).png|64px]]
| Wasteland || <code>wasteland</code> || A view of some wastelands; a small animal (presumably a rabbit) is sitting on the window ledge.
|-
! [[File:Courbet (texture).png|128px]]
| rowspan="5" | 2×1 blocks<br>32×16 pixels ||[https://zetterstrand.com/eventz/wp-content/uploads/bonjourmonsieurcourbet_BIG.jpg "Bonjour monsieur Courbet"]|| Bonjour Monsieur Courbet || <code>courbet</code> || Two hikers with pointy beards seemingly greeting each other. Based on Gustave Courbet's painting ''[[Wikipedia:La rencontre|The Meeting or "Bonjour, Monsieur Courbet"]]''.
|-
! [[File:Pool (texture).png|128px]]
|[https://zetterstrand.com/eventz/wp-content/uploads/thepool_1920.jpg "The pool"]|| The Pool || <code>pool</code> || Some men and women skinny-dipping in a pool over a cube of sorts. Also there is an old man resting in the lower-right edge.
|-
! [[File:Sea (texture).png|128px]]
| rowspan=2 |[https://zetterstrand.com/eventz/wp-content/uploads/SeaSide_1920.jpg "Seaside"]
| Seaside
| <code>sea</code>
| Mountains and a lake, with a small photo of a mountain and a bright-colored plant on the window ledge. || [[Indev 20100223]] / [[Alpha v1.1.1]]
|-
! [[File:Creebet (texture).png|128px]]
| Creebet || <code>creebet</code> || Mountains and a lake, with a small photo of a mountain and a creeper looking at the viewer through a window. || [[Alpha v1.1.1]]
|-
! [[File:Sunset (texture).png|128px]]
|[https://zetterstrand.com/eventz/wp-content/uploads/sunset_dense.jpg "sunset_dense"]|| sunset_dense || <code>sunset</code> || A view of mountains at sunset. || [[Indev 20100223]]
|-
! [[File:Graham (texture).png|64px]]
| rowspan="3" | 1×2 blocks<br>16×32 pixels ||[https://zetterstrand.com/eventz/wp-content/uploads/graham.jpg "Graham"]|| Graham || <code>graham</code> || King Graham, the player character in the video game series ''[[Wikipedia:King's Quest|King's Quest]]''. The original is based on ''[[Wikipedia:File:Sánchez_Cotán_(Bodegón_con_membrillo,_repollo,_melón_y_pepino).jpg|Still Life with Quince, Cabbage, Melon, and Cucumber]]'' by Juan Sánchez Cotán.|| [[Alpha v1.1.1]]
|-
! [[File:Wanderer (texture).png|64px]]
|[https://zetterstrand.com/eventz/wp-content/uploads/wanderer_1920.jpg "Wanderer"]|| Wanderer || <code>wanderer</code> || A version of Caspar David Friedrich's famous painting ''[[Wikipedia:Wanderer above the Sea of Fog|Wanderer above the Sea of Fog]]''. || rowspan="5" | [[Indev 20100223]]
|-
!
|
|Prairie Ride
|
|
|-
! [[File:Bust (texture).png|128px]]
| rowspan="8" | 2×2 blocks<br>32×32 pixels ||[https://zetterstrand.com/eventz/wp-content/uploads/bust_1915.jpg "Bust"]|| Bust || <code>bust</code> || A bust of [[Wikipedia:Marcus Aurelius|Marcus Aurelius]] surrounded by fire.
|-
! [[File:Match (texture).png|128px]]
|[https://zetterstrand.com/eventz/wp-content/uploads/Match_rgb_1918.jpg "Match"]|| Match || <code>match</code> || A hand holding a match, causing fire on a white cubic gas fireplace.
|-
! [[File:Skull and Roses (texture).png|128px]]
|[https://zetterstrand.com/eventz/wp-content/uploads/moonlight-installation_1920.jpg "Moonlight Installation"]|| Skull and Roses || <code>skull_and_roses</code> || A skeleton at night with red flowers in the foreground. The original painting was different, depicting a woman sitting in a couch, while the skull is in the middle of a body of glacial water of sorts.
|-
! [[File:Stage (texture).png|128px]]
|[https://zetterstrand.com/eventz/wp-content/uploads/The-stage-is-set-1.jpg "The stage is set"]
| The Stage Is Set
| <code>stage</code>
| Scenery from ''[[Wikipedia:Space Quest I|Space Quest I]]'', with the character Graham from the video game series ''[[Wikipedia:King's Quest|King's Quest]]'' appearing twice. || [[Indev 20100223]] / [[Alpha v1.1.1]]
|-
! [[File:Void (texture).png|128px]]
|[https://zetterstrand.com/eventz/wp-content/uploads/the-void_1920.jpg "The Void"]|| The void || <code>void</code> || An angel praying into a void with fire below. || [[Indev 20100223]]
|-
! [[File:Wither (painting texture).png|128px]]
| – || Wither || <code>wither</code> || The creation of a [[wither]].
This is the only painting not based on a real painting. Made by Jens Bergensten.<ref>{{Citation|url=https://www.youtube.com/watch?v=kK5Y4k-vVXc|title=Who Made Minecraft’s LAST Painting?!|author=AntVenom|website=YouTube|date=29 October 2022}}</ref><ref>https://www.reddit.com/r/Minecraft/comments/1tzav2/comment/cedagcy/</ref>
|| [[Java Edition 1.4.2]] ([[12w36a]])
|-
!
|
|Baroque
|
|
|
|-
!
|
|Humble
|
|
|
|-
! [[File:Fighters (texture).png|128px]]
| rowspan="5" | 4×2 blocks<br>64×32 pixels ||[https://zetterstrand.com/eventz/wp-content/uploads/fighters.jpg "Fighters"]|| Fighters || <code>fighters</code> || Two men poised to fight. Paper versions of fighters from the game ''[[Wikipedia:International Karate +|International Karate +]]''. || [[Indev 20100223]]
|-
!
|
|Changing
|
|
|
|-
!
|
|Finding
|
|
|
|-
!
|
|Lowmist
|
|
|
|-
!
|
|Passage
|
|
|
|-
!
| rowspan="8" |3x3 blocks
48×48 pixels
|
|Bouquet
|
|
|
|-
!
|
|Cavebird
|
|
|
|-
!
|
|Cotan
|
|
|
|-
!
|
|Endboss
|
|
|
|-
!
|
|Fern
|
|
|
|-
!
|
|Owlemons
|
|
|
|-
!
|
|Sunflowers
|
|
|
|-
!
|
|Tides
|
|
|
|-
! [[File:Donkey Kong (texture).png|128px]]
| rowspan="2" | 4×3 blocks<br>64×48 pixels ||[https://zetterstrand.com/eventz/wp-content/uploads/kong.jpg "Kong"]|| Kong || <code>donkey_kong</code> || A paper-looking screenshot of the level [https://www.mariowiki.com/100m 100m] from the arcade game ''[[Wikipedia:Donkey Kong (arcade game)|Donkey Kong]]''. || rowspan="2" | [[Alpha v1.1.1]]
|-
! [[File:Skeleton (painting texture).png|128px]]
|[https://zetterstrand.com/eventz/wp-content/uploads/mortal_coil.jpg "Mortal Coil"]|| Mortal Coil || <code>skeleton</code> || [[w:c:grim-fandango:Bruno Martinez|Bruno Martinez]] from the adventure game ''[[Wikipedia:Grim Fandango|Grim Fandango]]''.
|-
! [[File:Burning Skull (texture).png|128px]]
| rowspan="5" | 4×4 blocks<br>64×64 pixels ||[https://zetterstrand.com/eventz/wp-content/uploads/skull_on_fire_framed_c_1910.jpg "Skull on Fire"]|| Skull On Fire || <code>burning_skull</code> || A Skull on fire; in the background there is a moon in a clear night sky.<br>This painting is based on a Minecraft screenshot,<ref>{{Citation|url=https://web.archive.org/web/20220928041338/https://imgur.com/HVhrbnH|website=Imgur|date=22 August 2020|title=https://web.archive.org/web/20220928041338/https://imgur.com/HVhrbnH}}</ref> with the grass block and a 3D skull added on top.<ref>{{Citation|url=https://web.archive.org/web/20200906184721/https://imgur.com/AwqQFS6|title=https://web.archive.org/web/20200906184721/https://imgur.com/AwqQFS6|website=Imgur|date=23 August 2020}}</ref>
(See the [[:en:Painting#Trivia|trivia]] section for more info.)
| [[Java Edition Beta 1.2 01|Beta 1.2_01]] / [[Java Edition Beta 1.3|Beta 1.3]]
|-
! [[File:Pigscene (texture).png|128px]]
|[https://zetterstrand.com/eventz/wp-content/uploads/rgb_1914.jpg "RGB"]|| Pigscene || <code>pigscene</code> <!-- yes, without an underscore --> || A girl pointing to a pig on a canvas. In the original version, the canvas showed red, green and blue blocks, representing the three colors of the [[Wikipedia:RGB color model|RGB color model]] that is typically used by computer displays. It is based on the painting ''[[Wikipedia:File:Jacob van Oost (I) - The Artist's Studio - WGA16654.jpg|The Artist's Studio]]'' by Jacob van Oost.|| [[Alpha v1.1.1]]
|-
! [[File:Pointer (texture).png|128px]]
|[https://zetterstrand.com/eventz/wp-content/uploads/pointer_1920.jpg "Pointer"]|| Pointer || <code>pointer</code> || The main character of the game ''[[Wikipedia:International Karate +|International Karate +]]'' in a fighting stance touching a large hand. It could also be interpreted as a play on Michelangelo's famous painting ''[[Wikipedia:The Creation of Adam|The Creation of Adam]]''. || [[Indev 20100223]]
|-
!
|
|Unpacked
|
|
|
|-
!
|
|Orb
|
|
|
|-
! TBA ||
Pack || <code>pack</code> || Reference to the pack.png fi || [[Java Edition 1.21]]le
|}
=== Unused paintings ===
In [[Pocket Edition v0.5.0 alpha|v0.5.0 alpha]], with the addition of paintings to Pocket Edition, four unused 32×32 paintings were present in <samp>[[kz.png]]</samp> which remained unused. See {{slink|Bedrock Edition unused features|Paintings}} for more information. They were also added to Java Edition in snapshot [[Java Edition 22w16a|22w16a]]. They cannot be placed by default, but can be summoned by [[commands]] (such as {{cmd|/summon painting ~ ~ ~ {variant:"water"} }}) or through a [[datapack]].
According to [[Helen Zbihlyj]],<ref>https://old.reddit.com/r/Minecraft/comments/u8hpnx/thoughts_on_the_new_paintings/i5olue6/?context=3 ([https://web.archive.org/web/20220422115723/https://old.reddit.com/r/Minecraft/comments/u8hpnx/thoughts_on_the_new_paintings/i5olue6/?context=3 archived])</ref> these paintings were originally added "as part of a Pocket Edition promo map" (no footage found) which was planned to be a part of [[Pocket Edition]] promotion at [[MINECON 2012]] [[MINECON 2013|or 2013]] and have never been used in game. The artist of these paintings remains unknown.
{| class="wikitable stikitable" style="text-align: center" data-description="Paintings"
! style="min-width:100px" |Canvas
! style="min-width:3em;max-width:4em" |Size
! style="min-width:6em" |Name
! style="min-width:10em" |[[Resource location]]
! style="min-width:10em" |Description
! style="min-width:5em;max-width:10em" |Bedrock Edition version added
! style="min-width:5em;max-width:8em" |Java Edition version added
|-
! [[File:Earth (texture) BE2.png|128px]]
| rowspan="4" | 2×2 blocks<br>32×32 pixels || Earth || <code>earth</code> || One of the four {{Wikipedia|Classical element|classical elements}}: Earth. || rowspan="4" | [[Pocket Edition v0.5.0 alpha|v0.5.0 alpha]] || rowspan="4" | [[Java Edition 22w16a|22w16a]]
|-
! [[File:Fire (texture) BE2.png|128px]]
| Fire || <code>fire</code> || One of the four classical elements: Fire.
|-
! [[File:Water (texture) BE2.png|128px]]
| Water || <code>water</code> || One of the four classical elements: Water.
|-
! [[File:Wind (texture) BE2.png|128px]]
| Wind || <code>wind</code> || One of the four classical elements: Air.
|}
==Sounds==
{{Edition|Java}}:
{{Sound table
|sound=Painting break1.ogg
|sound2=Painting break2.ogg
|sound3=Painting break3.ogg
|subtitle=Painting breaks<ref>{{Cite bug|MC|194948|Painting, item frame and lead breaking subtitles inconsistent with block breaking subtitle|date=July 14, 2020}}</ref>
|source=neutral
|description=When a painting is broken or pops off
|id=entity.painting.break
|translationkey=subtitles.entity.painting.break
|volume=1.0
|pitch=1.0
|distance=16}}
{{Sound table
|sound=Painting place1.ogg
|sound2=Painting place2.ogg
|sound3=Painting place3.ogg
|sound4=Painting place4.ogg
|subtitle=Painting placed
|source=neutral
|description=When a painting is placed
|id=entity.painting.place
|translationkey=subtitles.entity.painting.place
|volume=1.0
|pitch=1.0
|distance=16
|foot=1}}
{{Edition|Bedrock}}:
{{Sound table
|type=bedrock
|sound=Item Frame break1.ogg
|sound2=Item Frame break2.ogg
|sound3=Item Frame break3.ogg
|source=block
|description=When a painting is broken or pops off
|id=block.itemframe.break
|volume=1.0
|pitch=1.0}}
{{Sound table
|sound=Item Frame add item1.ogg
|sound2=Item Frame add item2.ogg
|soumd3=Item Frame add item3.ogg
|sound4=Item Frame add item4.ogg
|source=block
|description=When a painting is placed
|id=block.itemframe.add_item
|volume=1.0
|pitch=1.0
|foot=1}}
== Data values ==
=== ID ===
{{edition|java}}:
{{ID table
|edition=java
|firstcolumnname=Item
|showforms=y
|generatetranslationkeys=y
|displayname=Painting
|spritetype=item
|nameid=painting
|form=item
|foot=1}}
{{ID table
|edition=java
|firstcolumnname=Entity
|generatetranslationkeys=y
|displayname=Painting
|spritetype=entity
|nameid=painting
|foot=1}}
{{edition|bedrock}}:
{{ID table
|edition=bedrock
|firstcolumnname=Item
|shownumericids=y
|showforms=y
|notshowbeitemforms=y
|generatetranslationkeys=y
|displayname=Painting
|spritetype=item
|nameid=painting
|id=357
|form=item
|foot=1}}
{{ID table
|edition=bedrock
|firstcolumnname=Entity
|shownumericids=y
|generatetranslationkeys=y
|displayname=Painting
|spritetype=entity
|nameid=painting
|id=83
|foot=1}}
=== Entity data ===
Paintings have entity data that defines various properties of the entity.
{{el|java}}:
{{main|Entity format}}
{{/ED}}
{{el|bedrock}}:
: See [[Bedrock Edition level format/Entity format]].
== Video ==
<div style="text-align:center">{{yt|M3vWDirTMek}}</div>
== History ==
{{History|java indev}}
{{History||20100223|[[File:Painting JE1 BE1.png|32px]] Added paintings.
|There are currently 19 canvases, which can be viewed at [[Java Edition history of textures/Paintings]].
|The [[crafting]] recipe of paintings uses eight [[planks]].
{{{!}} class{{=}}"collapsible collapsed"
! Recipe
{{!}}-
{{!}}
{{Crafting Table
|A1=Oak Planks
|B1=Oak Planks
|C1=Oak Planks
|A2=Oak Planks
|B2=Light Gray Wool
|C2=Oak Planks
|A3=Oak Planks
|B3=Oak Planks
|C3=Oak Planks
|Output=Painting
}}
{{!}}}
|Painting textures are currently stored on a [[texture atlas]] called <samp>[[kz.png]]</samp>.}}
{{History|java infdev}}
{{History||20100227-1|The [[crafting]] recipe has of paintings has been changed, so that it now uses [[stick]]s, rather than [[planks]].
{{{!}} class{{=}}"collapsible collapsed"
! Recipe
{{!}}-
{{!}}
{{Crafting Table
|A1=Stick
|B1=Stick
|C1=Stick
|A2=Stick
|B2=Light Gray Wool
|C2=Stick
|A3=Stick
|B3=Stick
|C3=Stick
|Output=Painting
}}
{{!}}}
}}
{{History|java alpha}}
{{History||v1.1.1|Added five more painting canvases, for a total of 24.
|The textures of two paintings have been changed.}}
{{History|java beta}}
{{History||1.2_01|Added a new painting, although it uses an untextured part of <samp>kz.png</samp> due to the painting texture not yet being implemented.}}
{{History||1.3|The texture of the new painting, has been added to the part of <samp>kz.png</samp> displayed by the new painting.}}
{{History||April 27, 2011|link=https://web.archive.org/web/20201111211000/https://notch.tumblr.com/post/4988431144/the-maps|Custom paintings are mentioned by [[Notch]].}}
{{History||1.7.3|Paintings pushed by [[piston]]s now pop off.}}
{{History|java}}
{{History||1.4.2|snap=12w36a|Added new painting canvas 'Wither'.
|Paintings can now be placed overlapping one another.}}
{{History||1.8|snap=14w10a|Paintings can no longer be placed directly inside of each other.}}
{{History||1.9|snap=15w49a|Paintings can no longer be destroyed by [[lightning]].}}
{{History|||snap=15w50a|Added [[sound]]s for placing and breaking paintings: <code>entity.painting.place</code> and <code>entity.painting.break</code>.}}
{{History||1.11|snap=16w32a|The [[entity]] ID for paintings has been changed from <code>Painting</code> to <code>painting</code>.}}
{{History||1.12|snap=17w06a|Paintings now have a more intuitive placement system. When placed, a painting always uses the maximum possible amount of available space.}}
{{History||1.13|snap=17w47a|Prior to [[1.13/Flattening|''The Flattening'']], this [[item]]'s numeral ID was 321.}}
{{History|||snap=18w02a|Paintings now use a [[resource location]] for their motive.}}
{{History||1.14|snap=18w43a|[[File:Painting JE2 BE2.png|32px]] The [[item]] texture of paintings has been changed.}}
{{History|||snap=19w07a|Paintings are now stored as individual image files instead of parts of a single large image file, and now support animations.}}
{{History|||snap=19w11a|Shepherd [[villager]]s now [[trading|sell]] paintings.}}
{{History||1.17|snap=21w11a|The painting back texture has been updated to be in line with the texture update.}}
{{History||1.19|snap=22w16a|Added the four unused paintings from Bedrock Edition: "Earth", "Wind", "Fire", and "Water".|These paintings can only be added through a [[data pack]], or with the {{cmd|summon}} command.}}
{{History||1.19.4|snap=23w06a|Added [[painting]] variants to "Functional Blocks" tab.|Paintings with pre-defined variant will now display author, title and size in description when hovered over.|The "Operator Utilities" tab now contains the four paintings that are not available in Survival mode.}}
{{History||1.21|snap=TBA|Added 20 new paintings, one 1x1, one 2x1, two 2x2s, eight 3x3s, two 3x4s, four 4x2s and two 4x4s}}
}
{{History|pocket alpha}}
{{History||v0.5.0|[[File:Painting JE1 BE1.png|32px]] Added paintings.
|There are currently 25 canvases, which can be viewed at [[Bedrock Edition history of textures/Paintings]].}}
{{History||v0.8.0|snap=build 3|A new painting rendering has been added.{{info needed|What exactly changed?}}}}
{{History||v0.12.1|snap=build 1|Paintings are no longer available from the [[nether reactor]].}}
{{History||v0.15.0|snap=build 1|Paintings now have [[sound]]s when placed and broken.}}
{{History|pocket}}
{{History||1.0.7|Added new painting canvas 'Wither'.}}
{{History|bedrock}}
{{History||1.10.0|snap=beta 1.10.0.3|[[File:Painting JE2 BE2.png|32px]] The [[item]] texture of paintings has been changed.}}
{{History||1.11.0|snap=beta 1.11.0.4|Paintings can now be [[trading|bought]] from shepherd [[villager]]s.}}
{{History||1.17.0|snap=beta 1.17.0.50|The painting back texture has been updated to be in line with the texture update.}}
{{History|console}}
{{History||xbox=TU1|xbone=CU1|ps=1.0|wiiu=Patch 1|switch=1.0.1|[[File:Painting JE1 BE1.png|32px]] Added paintings.
|There are currently 25 canvases, which can be viewed at [[Legacy Console Edition history of textures/Paintings]].}}
{{History||xbox=TU11|The limit for paintings in a world has been increased.
|A message is now displayed when the maximum paintings are reached.}}
{{History||xbox=TU14|ps=1.04|Added new painting canvas 'Wither'.}}
{{History||xbox=TU43|xbone=CU33|ps=1.36|wiiu=Patch 13|Added [[sound]]s for paintings.}}
{{History||xbox=none|xbone=none|ps=1.90|wiiu=none|switch=none|[[File:Painting JE2 BE2.png|32px]] The [[item]] texture of paintings has been changed.}}
{{History|3ds}}
{{History||0.1.0|[[File:Painting JE1 BE1.png|32px]] Added paintings.
|There are currently 25 canvases, which can be viewed at [[New Nintendo 3DS Edition history of textures/Paintings]].}}
{{History|foot}}
== Issues ==
{{issue list}}
== Trivia ==
* On April 26, 2011, Notch stated that the automapping code can be used to share custom paintings and books in the future.<ref>{{tweet|notch|62970142207913984|The auto mapping code can be used to share custom paintings and books in the future. There's a hard cap on 65536 of each/world, though|April 26, 2011}}</ref>
* The texture on the back of a painting is the same as the wooden planks texture, but with a yellowish color similar to that of [[chests]] (but slightly darker).
* The "Skull on Fire" painting contains a Minecraft world in the background, which is based on a screenshot taken by the artist in [[Java Edition Alpha v1.1.2 01|Alpha 1.1.2_01]] (or earlier) on October 12, 2010, at 13:22:49 (UTC+2).<ref>{{cite|url=https://web.archive.org/web/20220928041338/https://imgur.com/HVhrbnH|title=The original (never publicly shared before) screenshot that Kristoffer Zetterstrand took and based his painting on.|website=Imgur}}</ref>
**The seeds for this world are -1044887956651363087 and -6984854390176336655 (both are the same), standing at X=-249.65, Y=91, Z=-29.04.<ref>https://pastebin.com/fzAY9ES4</ref><ref>https://www.reddit.com/r/Minecraft/comments/iqg3ey/the_original_screenshot_seed_of_the_minecraft/</ref>
* The "Skull on Fire" painting's texture was added in [[Java Edition Beta 1.3|Beta 1.3]]. However, the code for paintings to randomly display the part of the [[Kz.png]] texture that was to be occupied by the Burning Skull painting was added earlier, in [[Java Edition Beta 1.2_01|Beta 1.2_01]]. As there was nothing on this part of the texture except for a purple background grid, this is what would be displayed if the painting was randomly chosen, until the Burning Skull painting texture was actually added.
* The original "Skull on Fire" painting was given to the winner of an official texture pack competition by Mojang.<ref>https://web.archive.org/web/20110110003612/http://www.webhallen.com:80/minecraft/</ref>
== Gallery ==
<gallery>
File:Notch Painting Screenshot.png|The first image of paintings released by [[Notch]].
File:Skull on Fire world.jpg|The original screenshot behind the "Skull on Fire" painting.
File:Burning Skull Render.jpg|A render of the "Skull on Fire" painting that [[Kristoffer Zetterstrand]] used as a reference image.
File:Skull on Fire IRL.jpg|The original "Skull on Fire" painting being painted.
File:Burning Skull JE1.png|The "Skull on Fire" painting as it appeared between versions [[Java Edition Beta 1.2_01|Beta 1.2_01]] and [[Java Edition Beta 1.2_02|Beta 1.2_02]], prior to its texture being added in [[Java Edition Beta 1.3|Beta 1.3]].
</gallery>
=== Renders ===
<gallery>
Alban.png | Albanian
Aztec.png | de_aztec
Aztec2.png | de_aztec
Bomb.png | Target Successfully Bombed
Kebab.png | Kebab med tre pepperoni
Plant.png | Paradisträd
Wasteland.png | Wasteland
Courbet.png | Bonjour Monsieur Courbet
Creebet.png | Creebet
Pool.png | The Pool
Sea.png | Seaside
Sunset.png | sunset_dense
Graham.png | Graham
Wanderer.png | Wanderer
Bust.png | Bust
Match.png | Match
Skull and Roses.png | Skull and Roses
Stage.png | The Stage Is Set
Void.png | The void
Wither (painting).png | Wither
Fighters.png | Fighters
Donkey Kong.png | Kong
Skeleton (painting).png | Mortal Coil
Burning Skull.png | Skull On Fire
Pigscene.png | Pigscene
Pointer.png | Pointer
Earth BE2.png | Earth
Fire BE2.png | Fire
Water BE2.png | Water
Wind BE2.png | Wind
</gallery>
== See also ==
* [[Item Frame]]
* [[Bedrock Edition unused features#Paintings|Unused paintings]]
* [[Kz.png]]
* [[Kristoffer Zetterstrand]]
== References ==
{{reflist}}
== External links ==
*[https://www.minecraft.net/en-us/article/taking-inventory-painting Taking Inventory: Painting] – Minecraft.net on January 18, 2019
{{items}}
{{entities}}
[[cs:Obraz]]
[[de:Gemälde]]
[[es:Cuadro]]
[[fr:Tableau]]
[[hu:Festmény]]
[[it:Quadro]]
[[ja:絵画]]
[[ko:그림]]
[[nl:Schilderij]]
[[pl:Obraz]]
[[pt:Quadro]]
[[ru:Картина]]
[[th:ภาพวาด]]
[[uk:Картина]]
[[zh:画]]</li></ul> | Pre-release | Maps can now be found in library chests in the brand-new strongholds. | ||||||||||||||||||||||||||||||||||||||||||||||||||||||||||||||||||||||||||||||||||||||||||||||||||||||||||||
| Auto crafting maps has been restored. Map cloning, therefore, is unavailable for a period of time. | ||||||||||||||||||||||||||||||||||||||||||||||||||||||||||||||||||||||||||||||||||||||||||||||||||||||||||||||
1.8.1{{Extension DPL}}<ul><li>[[Dye|Dye]]<br/>{{Item
| title = Dyes
| image = White Dye.png
| extratext = View [[#Gallery|all renders]]
| renewable = Yes
| stackable = Yes (64)
}}
'''Dyes''' are a set of sixteen items used to change the color of [[wool]], [[carpet]]s, [[terracotta]], [[concrete powder]], [[glass]], [[shulker box]]es, [[bed]]s, [[candle]]s, the patterns on [[banner]]s, [[firework star]]s, certain mobs, and text on [[sign]]s and [[hanging sign]]s. {{IN|bedrock}} they can also be used to dye water in a [[cauldron]] (which is thereafter used to dye leather [[armor]]); {{in|java}} leather armor can be dyed directly. {{IN|education}} dyes can also be used to dye [[balloon]]s and [[glow stick]]s.
{{IN|bedrock|education}}, [[bone meal]], [[ink sac]]s, [[lapis lazuli]], and [[cocoa bean]]s can generally substitute for [[white dye]], [[black dye]], [[blue dye]], and [[brown dye]], respectively, in crafting recipes and for use in dyeing items or mobs. However, they have other important uses that aren't related to color, and are therefore not considered true dyes. They are mentioned in this article only in regard to their use as dyeing agents; see their individual articles for complete information about them.
[[File:Dye Recipes.png|400px|thumb|A guide for creating all the dyes]]
== Obtaining ==
<!--[[File:Dye Chart.png|350px|thumb|A guide to crafting all the dyes.{{until|java 1.14}}]]-->
Dyes can be produced by crafting them from plants (mainly flowers), by crafting dyes of different colors together, by smelting plants, or by trading with a [[wandering trader]].
{{loadPage|Crafting/Dye|Crafting|h3}}
=== Smelting ===
{{smelting|head=1|Sea Pickle|Lime Dye|0,2}}
{{smelting|foot=1|Cactus|Green Dye|1||b=Lapis Lazuli|c=Any fuel|d=1}}
=== Trading ===
[[Wandering trader]]s can sell 3 dyes for an [[emerald]]. {{IN|bedrock}}, they can also sell 3 lapis lazuli, bone meal, cocoa beans, or ink sacs for one emerald.
Apprentice-level cleric [[villager]]s sell one lapis lazuli per emerald.
=== Chest loot ===
{{#invoke:LootChest|base3|blue-dye,green-dye,orange-dye,light-blue-dye,yellow-dye,white-dye}}
=== Other ===
Ink sacs can also be created using 1 iron, 1 sulfur, and 4 oxygen in the [[compound creator]]. {{only|bedrock|education}}
== Usage ==
Similar to their use in crafting, [[bone meal]], [[ink sac]]s, [[lapis lazuli]], and [[cocoa beans]] can be substituted for the corresponding dye in any of the following usages unless otherwise specified.{{only|bedrock}} <!--- sections are ordered by craftable dyeable blocks, dyeable items, version exclusive sections, and non-crafting miscellaneous uses--->
=== Dyeing wool and mobs ===
Players can dye wool by placing [[wool]] and any dye in a crafting grid.
{{Crafting
|nocat=1
|Any Wool
|Matching Dye
|Output=Any Wool
}}
Dyes can be {{control|use|text=used}} on sheep to change the color of the wool. Shearing a colored sheep drops the corresponding color of the wool, and the sheep retains the color when the wool regenerates. [[Breeding]] colored sheep produces a lamb colored as one of the parent sheep, or a color resulting from the combination of both parents' color. The color combining follows the same rules that dyes use – red and yellow sheep produce an orange lamb, but a blue and yellow sheep cannot create a green lamb. The unlimited reproduction of colored sheep makes dyeing and shearing sheep infinitely more efficient than just dyeing wool directly.
Dye can also be used on a tamed [[wolf]] or [[cat]] to change the color of its collar from the default red to the color of the dye.
=== Dyeing carpets ===
Carpets can be dyed.
{{Crafting
|Any Carpet
|Matching Dye
|Output= Matching Carpet
|type= Building block
}}
=== Dyeing terracotta ===
[[Terracotta]] can be dyed by placing 8 blocks around a dye on a crafting table.
{{Crafting
|nocat=1
|A1=Terracotta |B1=Terracotta |C1=Terracotta
|A2=Terracotta |B2=Matching Dye |C2=Terracotta
|A3=Terracotta |B3=Terracotta |C3=Terracotta
|Output=Matching Dyed Terracotta,8
}}
=== Creating concrete powder ===
Dyes can also be used to craft [[concrete powder]], which can then be set into their respective [[concrete]] blocks (they cannot be dyed directly).
{{Crafting
|nocat=1
|Sand |Gravel |Sand
|Gravel |Matching Dye |Gravel
|Sand |Gravel |Sand
|Output=Matching Concrete Powder,8
}}
=== Staining glass ===
[[Stained glass]] can be stained by placing 8 blocks of glass around a dye on a [[crafting table]]. Just like regular glass, stained glass can be crafted into stained glass panes. The recipe for this is the same as with regular glass.
{{Crafting
|nocat=1
|A1=Glass |B1=Glass |C1=Glass
|A2=Glass |B2=Matching Dye |C2=Glass
|A3=Glass |B3=Glass |C3=Glass
|Output=Matching Stained Glass,8
|head=1
}}
{{Crafting
|nocat=1
|A1= Glass Pane
|B1= Glass Pane
|C1= Glass Pane
|A2= Glass Pane
|B2= Matching Dye
|C2= Glass Pane
|A3= Glass Pane
|B3= Glass Pane
|C3= Glass Pane
|Output= Matching Stained Glass Pane,8
|type= Decoration block
|foot=1
}}
=== Dyeing shulker boxes ===
[[Shulker box]]es are generated in a light shade of purple (like the [[purpur block]]), but can be dyed any color. They can also be re-dyed as often as desired.
{{Crafting
|ignoreusage=1
|showname=1
|Any Shulker Box
|Matching Dye
|Output=Matching Shulker Box
}}
=== Dyeing beds ===
Players can dye beds by placing a [[bed]] and any color dye in a crafting grid.
{{Crafting
|nocat=1
|Any Bed
|Matching Dye
|Output=Matching Bed
}}
=== Dyeing candles ===
Players can dye [[candles]] by placing an undyed candle and any color dye in a crafting grid.
{{Crafting
|ignoreusage=1
|Candle
|Matching Dye
|Output=Matching Dyed Candle
}}
=== Banner patterns ===
{{main|Banner#Patterns}}
Dyes are used in most banner patterns to determine the pattern and color displayed.
=== Dyeing armor ===
[[File:DyeGraph2.png|200px|thumb|A graph showing all combinations of two dyes on a [[tunic]].]]
Leather [[armor]] can be dyed by:
* Crafting dyes with a piece of leather armor or leather [[horse armor]].{{Only|java}}
* Dousing the leather armor or leather [[horse armor]] in a [[cauldron]] to which dyes have been added.{{Only|bedrock}}
There are 5,713,438<ref>https://anrar4.github.io/DyeLeatherArmor/</ref> (34.1% of sRGB) colors leather armor can be, as it is possible to put more than one dye on the crafting bench alongside the leather armor. Armor can be dyed multiple times with previous colors affecting the final outcome. Colored armor can be reverted to their original color using a [[cauldron]] with undyed water.
The game has a specific formula for calculating the color of dyed armor: each color, in the RGB color model, has a red value, green value, and blue value. For each dye in the crafting grid, and the armor itself (if it is already dyed), the red, green, and blue values are added to running totals. In addition, a running total of the highest value (be it red, green, or blue) is also kept. After this, each total is divided by the number of colors used. This effectively produces the average red, green, blue, and maximum values. The maximum value of the average RGB values is also calculated. Finally, each average RGB value is multiplied by the average maximum value and divided by the maximum of the average RGB values. The modified average RGB values are then used as the final color. This procedure can be summed up with the following equations:
for each color (all "total" variables start at 0 before counting):
totalRed = totalRed + redValue
totalGreen = totalGreen + greenValue
totalBlue = totalBlue + blueValue
totalMaximum = totalMaximum + max(redValue, greenValue, blueValue)
numberOfColors = numberOfColors + 1
averageRed = totalRed / numberOfColors
averageGreen = totalGreen / numberOfColors
averageBlue = totalBlue / numberOfColors
averageMaximum = totalMaximum / numberOfColors
maximumOfAverage = max(averageRed, averageGreen, averageBlue)
gainFactor = averageMaximum / maximumOfAverage
resultRed = averageRed * gainFactor
resultGreen = averageGreen * gainFactor
resultBlue = averageBlue * gainFactor
Due to the way this formula works, the resulting color can never be darker than the average of the input colors and is often lighter and more saturated. Of course, the resulting color can never be lighter or more saturated than the lightest or most saturated input color. In addition, this formula never creates an RGB value higher than 255 (which would be invalid in the 8-bit RGB color model).
If leather armor is renamed on an [[anvil]], it retains its name when dyed or undyed.
;Mixing Samples
: {{ItemSprite|Yellow Dye}} + {{ItemSprite|Yellow Dye}} = {{Tint|leather-chestplate| #{{CalcDye| yellow=2 }} | code=1}}
: {{ItemSprite|Red Dye}} + {{ItemSprite|Blue Dye}} + {{ItemSprite|White Dye}} = {{Tint|leather-chestplate| #{{CalcDye| red=1 | blue=1 | white=1}} | code=1}}
: {{ItemSprite|Green Dye}} + {{ItemSprite|Red Dye}} + {{ItemSprite|Pink Dye}} = {{Tint|leather-chestplate| #{{CalcDye| green=1 | red=1 | pink=1}} | code=1}}
=== Dyeing firework stars ===
A [[firework star]] can have a single color or a combination of up to eight colors when crafted with dyes. Adding one or more dyes to a crafted firework star adds a "fade to color" effect to it, overwriting any existing fade colors.
{{Crafting
|head=1
|ignoreusage=1
|ingredients=[[Gunpowder]] +<br>Any Dye (1–8) +<br>Extra ingredient (optional)
|Gunpowder
|Matching Dye
|Diamond;Glowstone Dust;Head;Gold Nugget;Feather;Fire Charge;
|Output=Matching Firework Star
}}
{{Crafting
|ignoreusage=1
|Matching Firework Star
|Any Dye
|Output=Matching Firework Star
|foot=1
}}
=== Creating balloons ===
Dye can be used to craft balloons.{{only|education}}
{{Crafting
|nocat=1
|A1= Latex
|B1= Matching Dye
|C1= Latex
|A2= Latex
|B2= Helium
|C2= Latex
|A3= Latex
|B3= Lead
|C3= Latex
|Output= Matching Balloon
}}
=== Creating glow sticks ===
Dye can also be used to craft glow sticks.{{only|education}}
{{Crafting
|nocat=1
|A1= Polyethylene
|B1= Hydrogen Peroxide
|C1= Polyethylene
|A2= Polyethylene
|B2= Matching Dye
|C2= Polyethylene
|A3= Polyethylene
|B3= Luminol
|C3= Polyethylene
|Output= Matching Glow Stick
}}
=== Dyeing water inside cauldrons ===
Water can be dyed in a cauldron by holding any dye in the hand and pressing {{Ctrl|use}} on a cauldron filled with water.{{only|bedrock}}
=== Signs ===
Dye can be {{control|used}} on a [[sign]] or a [[hanging sign]] to change the text color. {{IN|bedrock}}, [[ink sac]]s cannot be used for this purpose; black dye must be used to change the text to black.
=== Trading ===
Apprentice, journeyman and expert-level shepherd [[villager]]s buy any of the 12 dyes for an [[emerald]].
== Color values ==
The "color codes" are used to determine the color imparted on sheep, wolf and cat collars, firework stars, [[beacon]] beams, and dyed leather armor. The hex value is shown in the extended tooltips of dyed leather armor; however, to set the color using an NBT data tag in a [[command]], the decimal value must be used instead. The color values for firework stars are slightly different from the ones listed below, and use [[Item colors#Firework stars|these values]] instead.
{| class="wikitable" style="margin:2px; border: 1px solid silver; text-align: left;" data-description="Data values"
! rowspan=2 | Description
! colspan=2 style="text-align:center" | Color Code
|-
! Dec
! <abbr title="Hexadecimal color code">Hex</abbr>
|-
| style="text-align:center" | White || 16383998 || {{color|#F9FFFE}}
|-
| style="text-align:center" | Light gray || 10329495 || {{color|#9D9D97}}
|-
| style="text-align:center" | Gray || 4673362 || {{color|#474F52}}
|-
| style="text-align:center" | Black || 1908001|| {{color|#1D1D21}}
|-
| style="text-align:center" | Brown || 8606770 || {{color|#835432}}
|-
| style="text-align:center" | Red || 11546150 || {{color|#B02E26}}
|-
| style="text-align:center" | Orange || 16351261 || {{color|#F9801D}}
|-
| style="text-align:center" | Yellow || 16701501 || {{color|#FED83D}}
|-
| style="text-align:center" | Lime || 8439583 || {{color|#80C71F}}
|-
| style="text-align:center" | Green || 6192150 || {{color|#5E7C16}}
|-
| style="text-align:center" | Cyan || 1481884|| {{color|#169C9C}}
|-
| style="text-align:center" | Light blue || 3847130 || {{color|#3AB3DA}}
|-
| style="text-align:center" | Blue || 3949738 || {{color|#3C44AA}}
|-
| style="text-align:center" | Purple || 8991416 || {{color|#8932B8}}
|-
| style="text-align:center" | Magenta || 13061821 || {{color|#C74EBD}}
|-
| style="text-align:center" | Pink || 15961002 || {{color|#F38BAA}}
|}
== Sounds ==
{{edition|java}}:
{{Sound table
|rowspan=2
|sound=Dye.ogg
|subtitle=Dye stains
|source=block
|description=When dye is used on a [[sign]]
|id=item.dye.use
|translationkey=subtitles.item.dye.use
|volume=1.0
|pitch=1.0/0.9/0.95/1.1
|distance=16}}
{{Sound table
|subtitle=Dye stains
|source=player
|description=When dye is used on a [[sheep]]
|id=item.dye.use
|translationkey=subtitles.item.dye.use
|volume=1.0
|pitch=1.0/0.9/0.95/1.1
|distance=16
|foot=1}}
{{edition|bedrock}}:
{{Sound table
|type=bedrock
|sound=Dye.ogg
|source=sound
|description=When dye is used on a sign
|id=sign.dye.use
|volume=1.0
|pitch=1.0}}
{{Sound table
|rowspan=3
|sound=Water Splash Old.ogg
|source=block
|description=When dye is added to a cauldron
|id=cauldron.adddye
|volume=0.1
|pitch=1.0}}
{{Sound table
|source=block
|description=When armor is dyed using a cauldron
|id=cauldron.dyearmor
|volume=0.1
|pitch=1.0}}
{{Sound table
|source=block
|description=When dye is removed from armor using a cauldron
|id=cauldron.cleanarmor
|volume=0.1
|pitch=1.0
|foot=1}}
== Achievements ==
{{load achievements|Rainbow Collection;Tie dye outfit}}
== Video ==
{{Video note|These videos are outdated, as it does not include details of the [[Java Edition 1.7.2|1.7.2]] update's changes to the dyeing system/production chain.}}
<div style="text-align:center">
<span style="display:inline-block">{{yt|8YD7oauNZHE}}</span>
<span style="display:inline-block">{{yt|7tETaRt7STM}}</span>
</div>
== History ==
{{History|java beta}}
{{History||January 3, 2011|link=https://web.archive.org/web/0/http://notch.tumblr.com/post/2582321901/2011-here-we-go|Notch mentions adding a "paint" feature if he can figure out how.}}
{{History||January 10, 2011<ref group="n">Supposed time when fragment was filmed. Based on modified date of client.jar/gui/trap.png in [[Beta 1.2]].</ref>|link=https://www.youtube.com/watch?v=cBF2ugTzXqQ&t=181s|[[File:Red Dye (pre-release).png|32px]] Shown rose red in development as part of [[Minecraft: The Story of Mojang]].}}
{{History||1.2|[[File:Ink Sac JE1 BE1.png|32px]] [[File:Red Dye JE1 BE1.png|32px]] [[File:Green Dye JE1 BE1.png|32px]] [[File:Cocoa Beans JE1 BE1.png|32px]] [[File:Lapis Lazuli JE1 BE1.png|32px]] [[File:Purple Dye JE1 BE1.png|32px]] [[File:Cyan Dye JE1 BE1.png|32px]] [[File:Light Gray Dye JE1 BE1.png|32px]] [[File:Gray Dye JE1 BE1.png|32px]] [[File:Pink Dye JE1 BE1.png|32px]] [[File:Lime Dye JE1 BE1.png|32px]] [[File:Yellow Dye JE1 BE1.png|32px]] [[File:Light Blue Dye JE1 BE1.png|32px]] [[File:Magenta Dye JE1 BE1.png|32px]] [[File:Orange Dye JE1 BE1.png|32px]] [[File:Bone Meal JE1 BE1.png|32px]] Added dyes.
|[[File:Black Dye (Recreated).png|32px]] [[File:Red Dye (pre-release).png|32px]] [[File:Green Dye (Recreated).png|32px]] [[File:Brown Dye (Recreated).png|32px]] [[File:Blue Dye (Recreated).png|32px]] [[File:Purple Dye (Recreated).png|32px]] [[File:Cyan Dye (Recreated).png|32px]] [[File:Light Gray Dye (Recreated).png|32px]] [[File:Gray Dye (Recreated).png|32px]] [[File:Pink Dye (Recreated).png|32px]] [[File:Lime Dye (Recreated).png|32px]] [[File:Yellow Dye (Recreated).png|32px]] [[File:Light Blue Dye (Recreated).png|32px]] [[File:Magenta Dye (Recreated).png|32px]] [[File:Orange Dye (Recreated).png|32px]] [[File:White Dye (Recreated).png|32px]] Leftovers of old textures can be seen in [[items.png]] with 100% opacity. The white dye texture was reused for [[Sugar]].
| The colors were as follows:{{verify|Did the color codes remain the same between Beta 1.2 and Java 1.11.2?}}
{{:Color/Java Edition dye colors before 17w06a}}
}}
{{History|java}}
{{History||1.1|snap=11w49a|[[Sheep]] can now regrow their [[wool]] by eating [[grass block|grass]]. Dyed sheep regrow wool in their new color.}}
{{History||1.3.1|snap=12w19a|[[File:Cocoa Beans JE2.png|32px]] The texture of [[cocoa beans]] has been changed.}}
{{History|||snap=1.3|[[File:bone meal changes.gif|32px]] The textures of [[bone meal]], [[cactus green]], cocoa beans and [[rose red]] have been changed. The textures have been lowered one pixel.}}
{{History||1.4.2|snap=12w34a|Added the ability to dye leather [[armor]] and [[wolf]] collars.}}
{{History||1.4.4|snap=1.4.3|Color codes have been changed. The colors of red, brown, blue, purple, cyan, pink, light blue, magenta and orange were adjusted a little vividly.}}
{{History||1.6.1|snap=13w19a|[[Stained clay]] can now be crafted using dyes.}}
{{history||1.7.2|snap=13w36a|With the addition of new [[flower]]s, many secondary and tertiary dyes are now primary dyes.}}
{{History|||snap=13w41a|[[Stained glass]] can now be crafted using dyes.}}
{{History||1.8|snap=14w02a|As cleric [[villager]]s now sell lapis lazuli, all dyes have become fully renewable.}}
{{History|||snap=14w30a|Added [[banner]]s, which can be dyed.}}
{{History||1.9|snap=15w34a|Added [[shield]]s, which can be dyed indirectly by applying a matching [[banner]].}}
{{History||1.11|snap=16w39b|Dyes are now used to change the color of [[shulker box]]es.}}
{{History||1.12|snap=17w06a|Dyes are now used to craft [[concrete powder]].
|Color codes have been changed. All colors are adjusted more vividly. The changes were as follows:
{{:Color/Java Edition dye color changes in 17w06a}}
|Light blue dye, stained glass, and stained glass panes, did not change colors in this update. This means that they still use old colors.<ref name="unchanged dyes">{{Bug|MC-214643}}<br>{{Bug|MC-214641}}</ref>
}}
{{History|||snap=17w15a|Dyes can now apply color to white [[bed]]s.}}
{{History||1.13|snap=17w47a|The different data values for the <code>dye</code> ID have been split up into their own IDs.}}
{{History||1.14|snap=18w43a|[[Bone meal]], [[ink sac]]s, [[cocoa beans]] and [[lapis lazuli]] are no longer considered dyes.
|[[File:White Dye JE1 BE1.png|32px]] [[File:Black Dye JE1 BE1.png|32px]] [[File:Brown Dye JE1 BE1.png|32px]] [[File:Blue Dye JE1 BE1.png|32px]] Added [[white dye|white]], [[black dye|black]], [[brown dye|brown]] and [[blue dye]]s.
|"Rose Red", "Dandelion Yellow" and "Cactus Green" have been renamed to "Red Dye", "Yellow Dye" and "Green Dye", respectively.
|[[Glass pane]]s and [[carpet]]s can now be dyed.
|[[File:Light Gray Dye JE2 BE2.png|32px]] [[File:Gray Dye JE2 BE2.png|32px]] [[File:Red Dye JE2 BE2.png|32px]] [[File:Orange Dye JE2 BE2.png|32px]] [[File:Yellow Dye JE2 BE2.png|32px]] [[File:Lime Dye JE2 BE2.png|32px]] [[File:Green Dye JE2 BE2.png|32px]] [[File:Cyan Dye.png|32px]] [[File:Light Blue Dye JE2 BE2.png|32px]] [[File:Purple Dye JE2 BE2.png|32px]] [[File:Magenta Dye JE2 BE2.png|32px]] [[File:Pink Dye JE2 BE2.png|32px]] The textures of light gray, gray, red, orange, yellow, lime, green, cyan, light blue, purple, magenta, and pink dyes, have been changed. The color texture for light blue dye was not changed to reflect the updated colors from 1.12.<ref name="unchanged dyes"></ref>}}
{{History|||snap=18w44a|The color of the text on [[sign]]s can now be changed with dye.}}
{{History|||snap=18w49a|Yellow dyes can now be found in [[chest]]s in [[village]] mason houses.}}
{{History|||snap=18w50a|Green dyes can now be found in [[chest]]s in [[desert]] [[village]] houses.}}
{{History|||snap=19w05a|Added the [[wandering trader]], which can sell any type of dye.}}
{{History|||snap=19w11a|All 16 types of dyes can now be [[trading|bought]] by shepherd villagers.}}
{{History||1.16.2|snap=Pre-release 2|Reversed the order of dyes to match other colored items in the [[Creative inventory]].<ref name="reverse dye">{{Bug|MC-136553}}</ref>
|Regrouped dyes in the Creative inventory such that white, blue, brown, and black dyes are within and not [[cocoa beans]], [[ink sacs]], [[lapis lazuli]], and [[bone meal]].<ref name="regroup dye">{{Bug|MC-177684}}</ref>}}
{{History||1.17|snap=20w45a|Added [[candle]]s, which can be dyed.}}
{{History|||snap=21w03a|Added a sound for applying dyes.}}
{{History|||snap=21w19a|Candles can no longer be dyed.}}
{{History|||snap=Pre-release 1|Candles can now once again be dyed.}}
{{History||1.20<br>(Experimental)|link=1.19.3|snap=22w42a|The color of the text on [[hanging sign]]s can now be changed with dye.}}
{{History||1.20<br>(Experimental)|link=1.19.4|snap=23w07a|[[Torchflower]]s can now be crafted into orange dye.|[[Pink petals]] can now be crafted into pink dye.}}
{{History||1.20|snap=23w12a|[[Pitcher plant]]s can now be crafted into cyan dye.|Blue, light blue, orange, white, and yellow dye can now be found in [[suspicious gravel]] and [[suspicious sand]] in [[trail ruins]].}}
{{History|||snap=23w14a|Pitcher plants can now craft two [[cyan dye]] instead of one.}}
{{History|||snap=23w16a|Blue, light blue, orange, white, and yellow dye no longer generates in [[suspicious sand]] in [[trail ruins]].|Due to the split of the archaeological loot tables for the suspicious gravel within the [[trail ruins]]; blue, light blue, orange, white, and yellow dye now are in the common loot.}}
{{History|pocket alpha}}
{{History||v0.3.0|[[File:Bone Meal JE1 BE1.png|32px]] [[File:Light Gray Dye JE1 BE1.png|32px]] [[File:Gray Dye JE1 BE1.png|32px]] [[File:Ink Sac JE1 BE1.png|32px]] [[File:Cocoa Beans JE1 BE1.png|32px]] [[File:Red Dye JE1 BE1.png|32px]] [[File:Orange Dye JE1 BE1.png|32px]] [[File:Yellow Dye JE1 BE1.png|32px]] [[File:Lime Dye JE1 BE1.png|32px]] [[File:Green Dye JE1 BE1.png|32px]] [[File:Cyan Dye JE1 BE1.png|32px]] [[File:Light Blue Dye JE1 BE1.png|32px]] [[File:Lapis Lazuli JE1 BE1.png|32px]] [[File:Purple Dye JE1 BE1.png|32px]] [[File:Magenta Dye JE1 BE1.png|32px]] [[File:Pink Dye JE1 BE1.png|32px]] Added dyes. Only [[dandelion yellow]] and [[lapis lazuli]] are currently obtainable and have functionality.}}
{{History||v0.3.2|[[Cactus green]] is now obtainable by smelting [[cacti]].}}
{{History||v0.3.3|[[Bone meal]] is now obtainable via [[crafting]].}}
{{History||v0.4.0|[[Cyan dye]], [[light blue dye]], [[lime dye]], [[magenta dye]], [[orange dye]], [[pink dye]], and [[purple dye]] are now obtainable via crafting.
|[[Rose red]] is now obtainable by smelting red [[mushroom]]s.
|All available dyes, excluding bone meal, can now be used to craft their respective [[wool]] color.}}
{{History||v0.8.0|snap=build 1|[[File:Cocoa Beans JE3 BE2.png|32px]] The texture of cocoa beans has been changed.}}
{{History|||snap=build 3|[[Ink sac]]s, [[cocoa bean]]s, [[gray dye]], and [[light gray dye]] are now available in the [[creative]] [[inventory]].
|Rose red can now be obtained from [[beetroot]]s.}}
{{History||v0.9.0|snap=build 1|Cocoa beans can now be obtained from [[cocoa pod]]s.
|The [[rose]] has been removed and replaced with a new poppy [[flower]] that can be crafted into rose red.}}
{{History|||snap=build 3|All new [[flower]]s can now be [[crafting|crafted]] into dyes. Because of this, many secondary and tertiary dyes are now primary dyes.
|[[Gray dye]] and [[light gray dye]] can now be obtained in [[survival]].}}
{{History|||snap=build 11|[[Terracotta|Stained clay]] can now be crafted using dyes.}}
{{History||v0.11.0|snap=build 1|[[Ink sac]]s can now be obtained from [[squid]].
|Added the ability to dye [[wolf]] collars.}}
{{History||v0.12.1|snap=build 1|Red [[mushroom]]s can no longer be smelted to obtain [[rose red]].}}
{{History||v0.14.0|snap=build 1|[[Cauldron]]s now used for leather dyeing, by applying a dye to a [[water]]-filled cauldron.}}
{{History||v0.16.0|snap=build 1|[[Cocoa bean]]s can no longer be crafted.}}
{{History|pocket}}
{{History||1.0.0|snap=alpha 0.17.0.1|Added a ''Dye'' button for [[sheep]].
|Added [[shulker]]s, which can be dyed.
|Added [[stained glass]]. Stain glass cannot be [[crafting|crafted]], but purple glass generates in [[end city|end cities]].}}
{{History||1.1.0|snap=alpha 1.1.0.0|Dyes can now apply color to a white [[bed]]s.
|Dyes are now used to craft [[concrete powder]].
|The color palette has been changed.}}
{{History|bedrock}}
{{History||1.2.0|snap=beta 1.2.0.2|Dyes can now be used for [[banner]] crafting.
|Dyes can now be used to craft [[firework star]]s.
|[[Stained glass]] is now [[crafting|craftable]], using dyes.}}
{{History||1.4.0|snap=beta 1.2.20.1|[[Lime dye]] can now be obtained from smelting [[sea pickle]]s.
|Dyes can now used to craft [[glow stick]]s and [[balloon]]s.}}
{{History||1.8.0|snap=beta 1.8.0.8|Dyes can now be used to dye [[cat]] collars.}}
{{History|||snap=beta 1.8.0.10|[[File:White Dye JE1 BE1.png|32px]] [[File:Black Dye JE1 BE1.png|32px]] [[File:Brown Dye JE1 BE1.png|32px]] [[File:Blue Dye JE1 BE1.png|32px]] Added [[white dye|white]], [[brown dye|brown]], [[black dye|black]] and [[blue dye]]s, which can be crafted from [[lapis lazuli]], [[bone meal]], [[cocoa beans]] and [[ink sac]]s. This, however, the later four still use as dyes.<ref>{{Bug|MCPE-42473}}</ref>
|"Rose Red", "Dandelion Yellow" and "Cactus Green" have been renamed to "Red Dye", "Yellow Dye" and "Green Dye", respectively.}}
{{History||1.9.0|snap=beta 1.9.0.0|Blue and white dye can now be obtained from [[cornflower]]s and [[lily of the valley]]s.}}
{{History||1.10.0|snap=beta 1.10.0.3|[[Glass pane]]s and [[carpet]]s can now be dyed.
|Only a single dye is now required to apply a banner pattern in a [[loom]].
|Various dyes except black dye, white dye, brown dye and blue dye are now [[trading|sold]] by [[wandering trader]]s.
|[[File:Bone Meal JE2 BE2.png|32px]] [[File:Light Gray Dye JE2 BE2.png|32px]] [[File:Gray Dye JE2 BE2.png|32px]] [[File:Ink Sac JE2 BE2.png|32px]] [[File:Cocoa Beans JE4 BE3.png|32px]] [[File:Red Dye JE3 BE3.png|32px]] [[File:Orange Dye JE2 BE2.png|32px]] [[File:Yellow Dye JE2 BE2.png|32px]] [[File:Lime Dye JE2 BE2.png|32px]] [[File:Green Dye JE2 BE2.png|32px]] [[File:Cyan Dye.png|32px]] [[File:Light Blue Dye JE2 BE2.png|32px]] [[File:Lapis Lazuli JE2 BE2.png|32px]] [[File:Purple Dye JE2 BE2.png|32px]] [[File:Magenta Dye JE2 BE2.png|32px]] [[File:Pink Dye JE2 BE2.png|32px]] The textures of bone meal, light gray, gray, ink sac, cocoa beans, red, orange, yellow, lime, green, cyan, light blue, lapis lazuli, purple, magenta, and pink dyes have been changed.}}
{{History||1.11.0|snap=beta 1.11.0.4|Dye can now be [[trading|sold]] to shepherd [[villager]]s.}}
{{History||1.16.210|snap=beta 1.16.210.59|The color of the text on [[sign]]s can now be changed with dye.}}
{{History|||snap=beta 1.16.210.60|The ability to dye the color of the text on [[sign]]s was temporarily removed.}}
{{History||1.16.220|snap=beta 1.16.220.50|The color of the text on [[sign]]s can now be changed with dye again.}}
{{History||1.17.10|snap=beta 1.17.10.22|Added [[candles]], which can be dyed.}}
{{History|console}}
{{History||xbox=TU1|xbone=CU1|ps=1.0|wiiu=Patch 1|switch=1.0.1|[[File:Bone Meal JE1 BE1.png|32px]] [[File:Light Gray Dye JE1 BE1.png|32px]] [[File:Gray Dye JE1 BE1.png|32px]] [[File:Ink Sac JE1 BE1.png|32px]] [[File:Cocoa Beans JE1 BE1.png|32px]] [[File:Red Dye JE1 BE1.png|32px]] [[File:Orange Dye JE1 BE1.png|32px]] [[File:Yellow Dye JE1 BE1.png|32px]] [[File:Lime Dye JE1 BE1.png|32px]] [[File:Green Dye JE1 BE1.png|32px]] [[File:Cyan Dye JE1 BE1.png|32px]] [[File:Light Blue Dye JE1 BE1.png|32px]] [[File:Lapis Lazuli JE1 BE1.png|32px]] [[File:Purple Dye JE1 BE1.png|32px]] [[File:Magenta Dye JE1 BE1.png|32px]] [[File:Pink Dye JE1 BE1.png|32px]] Added dyes.}}
{{History||xbox=TU9|[[File:Cocoa Beans JE3 BE2.png|32px]] The texture of cocoa beans has been changed.}}
{{History||xbox=none|xbone=none|ps=1.83|wiiu=none|switch=none|[[File:White Dye JE1 BE1.png|32px]] [[File:Black Dye JE1 BE1.png|32px]] [[File:Brown Dye JE1 BE1.png|32px]] [[File:Blue Dye JE1 BE1.png|32px]] Added [[white dye|white]], [[black dye|black]], [[brown dye|brown]], and [[blue dye|blue]] dyes, which can crafted from [[bone meal]], [[ink sac]], [[cocoa beans]], and [[lapis lazuli]].
|"Rose Red", "Dandelion Yellow" and "Cactus Green" have been renamed to "Red Dye", "Yellow Dye" and "Green Dye", respectively.}}
{{History||ps=1.90|[[File:Bone Meal JE2 BE2.png|32px]] [[File:Light Gray Dye JE2 BE2.png|32px]] [[File:Gray Dye JE2 BE2.png|32px]] [[File:Ink Sac JE2 BE2.png|32px]] [[File:Cocoa Beans JE4 BE3.png|32px]] [[File:Red Dye JE2 BE2.png|32px]] [[File:Orange Dye JE2 BE2.png|32px]] [[File:Yellow Dye JE2 BE2.png|32px]] [[File:Lime Dye JE2 BE2.png|32px]] [[File:Green Dye JE2 BE2.png|32px]] [[File:Cyan Dye.png|32px]] [[File:Light Blue Dye JE2 BE2.png|32px]] [[File:Lapis Lazuli JE2 BE2.png|32px]] [[File:Purple Dye JE2 BE2.png|32px]] [[File:Magenta Dye JE2 BE2.png|32px]] [[File:Pink Dye JE2 BE2.png|32px]] The textures of bone meal, light gray, gray, ink sac, cocoa beans, red, orange, yellow, lime, green, cyan, light blue, lapis lazuli, purple, magenta, and pink dyes have been changed.}}
{{History|3ds}}
{{History||0.1.0|[[File:Bone Meal JE1 BE1.png|32px]] [[File:Light Gray Dye JE1 BE1.png|32px]] [[File:Gray Dye JE1 BE1.png|32px]] [[File:Ink Sac JE1 BE1.png|32px]] [[File:Cocoa Beans JE3 BE2.png|32px]] [[File:Red Dye JE1 BE1.png|32px]] [[File:Orange Dye JE1 BE1.png|32px]] [[File:Yellow Dye JE1 BE1.png|32px]] [[File:Lime Dye JE1 BE1.png|32px]] [[File:Green Dye JE1 BE1.png|32px]] [[File:Cyan Dye JE1 BE1.png|32px]] [[File:Light Blue Dye JE1 BE1.png|32px]] [[File:Lapis Lazuli JE1 BE1.png|32px]] [[File:Purple Dye JE1 BE1.png|32px]] [[File:Magenta Dye JE1 BE1.png|32px]] [[File:Pink Dye JE1 BE1.png|32px]] Added dyes from [[Pocket Edition v0.15.4 alpha]].}}
{{History|foot}}
<gallery>
Pre-release dyes.png|Pre-release dye textures hidden within [[Items.png]].
</gallery>
;Notes
{{reflist|group=n}}
== Gallery ==
<gallery>
White Dye.png|White Dye
Light Gray Dye.png|Light Gray Dye
Gray Dye.png|Gray Dye
Black Dye.png|Black Dye
Brown Dye.png|Brown Dye
Red Dye.png|Red Dye
Orange Dye.png|Orange Dye
Yellow Dye.png|Yellow Dye
Lime Dye.png|Lime Dye
Green Dye.png|Green Dye
Cyan Dye.png|Cyan Dye
Light Blue Dye.png|Light Blue Dye
Blue Dye.png|Blue Dye
Purple Dye.png|Purple Dye
Magenta Dye.png|Magenta Dye
Pink Dye.png|Pink Dye
</gallery>
==Issues==
{{issue list}}
== Trivia ==
* Players can obtain each one of every color with 1 cocoa bean, 2 yellow dye, 2 ink sac, 3 green dye, 4 lapis lazuli, 4 red dye, and 6 bone meal (2 bones).
* The dyed sheep breeding behavior mirrors [[wikipedia:Lamarckism|Lamarck's theory]], in which the organisms evolve inheriting the external changes and adaptations of the previous generation, transmitting them to their offspring.
* In ''Bedrock Edition'', tertiary colors, along with their regular crafting recipes, can be crafted with primary colors. E.g.: Magenta can be crafted with one rose red and two bone meals.
* The colors of the dyes match the chat colors in [[color codes]] except for brown (dye only), light aqua, and gold (color codes only).
* The texture for light blue dye still uses the color from prior to the 1.12 World of Color update.<ref name="unchanged dyes"></ref>
== References ==
{{reflist}}
== External Links ==
* Tools for calculating leather dye combination: [https://minecraft.tools/en/armor.php minecraft.tools] (webapp); [https://github.com/pudquick/pyMCdyes/ pyMCDyes] (open-source Python script, outdated); [https://anrar4.github.io/DyeLeatherArmor/ DyeLeatherArmor]: a tool for calculating an exact crafting recipe for any sRGB color
{{Items}}
[[Category:Dyes]]
[[Category:Renewable resources]]
[[cs:Barvivo]]
[[de:Farbstoff]]
[[es:Tinte]]
[[fr:Teinture]]
[[hu:Színezés]]
[[it:Colorante]]
[[ja:染料]]
[[ko:염료]]
[[nl:Kleurstof]]
[[pl:Barwniki]]
[[pt:Corante]]
[[ru:Красители]]
[[th:สีย้อม]]
[[uk:Барвники]]
[[zh:染料]]</li><li>[[Food|Food]]<br/>{{For|food in ''Minecraft Dungeons''|MCD:Food}}
[[File:Eating Steve.png|thumb|right|150px]]
[[File:Eating Alex.png|thumb|right|150px]]
'''Food''' refers to any consumable [[item]]s that, when eaten, restore [[hunger]] points and hunger saturation points, and sometimes cause [[status effect]]s. They are essential to survival, as going without them eventually causes the player to starve, causing damage until reaching {{hp|10}} in Easy [[difficulty]], and {{hp|1}} on Normal. [[Hunger#Effects of hunger|Starvation]] damage kills the player in Hard and [[Hardcore]] Mode.
Food is eaten by holding {{control|use}} while having the food item selected in the hot bar or in the off-hand.
[[Cake]] cannot be eaten this way, and must instead be placed on a surface before being eaten.
With the exception of [[chorus fruit]], [[golden apple]]s, [[honey bottle]]s, [[milk]], and [[suspicious stew]]{{only|Java}}, food cannot be eaten when the hunger bar is completely full. In [[Creative]] Mode, any food can be consumed at any time.
All food items and ingredients can be stacked in the inventory slots, except for [[milk]], [[rabbit stew]], [[mushroom stew]], [[beetroot soup]], [[suspicious stew]], and [[cake]].{{only|Java}}
This page covers food items for players; blocks and items that can be eaten by other [[mob]]s are not included here.
== Hunger and saturation ==
{{main|Hunger#Mechanics}}
{{seealso|Tutorials/Hunger_management}}
[[File:Raw_and_Cooked_Chicken_Comparison.png|thumb|Raw (left) and cooked (right) [[chicken]]. Eating raw chicken can give the [[player]] [[food poisoning]].]]
[[Player]]s have two different food statistics, one of which is visible: The hunger level is visible, and the saturation level is not.
[[Saturation]] is the first statistic to decrease when a player performs energy-intensive actions, and it must be completely depleted before the visible hunger meter begins decreasing. Although the current saturation level is generally hidden, the player can tell that their saturation level is completely depleted if the visible hunger meter begins displaying a jittering effect.
Eating a food item replenishes a fixed number of hunger points and saturation points, based on the item. Some foods have a better ratio of saturation to hunger points replenished than others. Overeating the hunger bar does not overflow to saturation.
A player's current saturation level can never exceed their current hunger level. A player at a hunger level of 5, for example, can be at a maximum of 5 saturation. Food always restores hunger (raising the saturation limit) ''before'' supplying saturation. The most efficient use of food is to eat low-saturation food to fill the hunger bar, followed by high-saturation food to fill saturation. While a few hunger points may be wasted when eating nourishing food when nearly full, eating nourishing foods on a low hunger bar wastes even more points of saturation. Maximizing saturation increases the length of time (and/or the amount of damage healed) before the player needs to eat again.
=== Usage ===
Most foods can be eaten by holding down the right-click button with a food item in hand. It takes 1.61 seconds to eat most foods; dried kelp takes 0.865 seconds to eat. Additionally, a player can hold food in their [[offhand]] {{in|Java}}.
While eating, food [[particles]] form from the player's mouth correlated with their respective food item, and produces a munching noise. Eating also slows the user significantly.
Unlike other foods, [[cake]] has to be eaten by placing it, then right-clicking on its block form. Eating cake is instant and it has 7 edible slices, each giving {{hunger|2}} hunger and 0.4 hunger [[saturation]].
=== Nourishment value ===
Nourishment is defined as the ratio of saturation to hunger points restored. Foods with higher nourishment values should be eaten when the hunger bar is more full.
The "nourishment" table below can help by categorizing foods by their saturation-to-hunger restoration ratios. See the more detailed [[#Foods|Foods]] table for the exact hunger and saturation statistics of each food.
<!-- do not change the locations of the food in this table without providing an explanation in the edit summary -->
{| class="wikitable" data-description="Nourishment value"
|-
!Nourishment
! Value
!Food
|- style="text-align: left;"
!Great
| 2.4
| {{Slot|Enchanted Golden Apple}}{{Slot|Golden Apple}}{{Slot|Golden Carrot}}
|- style="text-align: left;"
!Good
| 1.6
| {{Slot|Cooked Mutton}}{{Slot|Cooked Porkchop}}{{Slot|Cooked Salmon}}{{Slot|Steak}}
|- style="text-align: left;"
!Normal
| 1.2
| {{Slot|Baked Potato}}{{Slot|Beetroot}}{{Slot|Beetroot Soup}}{{Slot|Bread}}{{Slot|Carrot}}{{Slot|Cooked Chicken}}{{Slot|Cooked Cod}}{{Slot|Cooked Rabbit}}{{Slot|Mushroom Stew}}{{Slot|Rabbit Stew}}{{Slot|Suspicious Stew}}
|- style="text-align: left;"
! Low
| 0.6
| {{Slot|Apple}}{{Slot|Chorus Fruit}}{{Slot|Dried Kelp}}<ref group="note" name="Java">{{only|java}}</ref>{{Slot|Melon Slice}}{{Slot|Poisonous Potato}}{{Slot|Potato}}{{Slot|Pumpkin Pie}}{{Slot|Raw Beef}}{{Slot|Raw Chicken}}{{Slot|Raw Mutton}}{{Slot|Raw Porkchop}}{{Slot|Raw Rabbit}}{{Slot|Sweet Berries}}<ref group="note" name="Bedrock">{{only|bedrock}}</ref>
|- style="text-align: left;"
!Poor
| 0.2
| {{Slot|Cake}}{{Slot|Cookie}}{{Slot|Dried Kelp}}<ref group="note" name="Bedrock"/>{{Slot|Glow Berries}}{{Slot|Honey Bottle}}{{Slot|Pufferfish|link=Pufferfish (item)}}{{Slot|Raw Cod}}{{Slot|Raw Salmon}}{{Slot|Rotten Flesh}}{{Slot|Spider Eye}}{{Slot|Sweet Berries}}<ref group="note" name="Java"/>{{Slot|Tropical Fish|link=Tropical Fish (item)}}
|}
== Foods ==
{{/table}}
=== Ingredients ===
The following items cannot be eaten on their own. Instead, they are used to craft consumable food items.
<!--
Please leave spaces between each row in the table - this has no effect on the appearance of the table, but it makes it a lot easier on future wiki editors!
-->
{| class="sortable wikitable list-style-none" data-description="Ingredients"
|-
! Name
! Icon
! Used to make
! Source(s)
! Notes
|- id="Bowl"
! scope="row" | [[Bowl]]
| {{Slot|Bowl}}
| {{itemLink|Mushroom Stew}}
* {{itemLink|Beetroot Soup}}
* {{itemLink|Rabbit Stew}}
* {{itemLink|Suspicious Stew}}
|
* [[Crafting]] from [[planks]]
* [[Fishing Rod#Usage|Fishing]]
* [[Turtle]] killed by [[lightning]]
* Eating food made with them
|
|- id="Cocoa Bean"
! scope="row" | [[Cocoa Beans]]
| {{Slot|Cocoa Beans}}
| {{itemLink|Cookie}}s
|
* Breaking [[cocoa plant]]s
* Bought from [[wandering trader]]
|
|- id="Egg"
! scope="row" | [[Egg]]
| {{Slot|Egg}}
|
* {{itemLink|Cake}}
* {{itemLink|Pumpkin Pie}}
|
* Laid by [[chicken]]s
* Found in village fletcher chests
|
|- id="Milk"
! scope="row" | [[Milk Bucket]]
| {{Slot|Milk Bucket}}
| {{itemLink|Cake}}
|
* Milking a [[cow]], [[mooshroom]]s, or [[goat]]s
* Killing a [[Wandering trader]] drinking it
| Can also be consumed to clear [[status effect]]s
|- id="Mushroom"
! scope="row" | [[Brown Mushroom]] and [[Red Mushroom]]
| {{Slot|Brown Mushroom;Red Mushroom}}
| {{itemLink|Mushroom Stew}}
* {{itemLink|Rabbit Stew}}
* {{itemLink|Suspicious Stew}}
| {{anchor|Brown Mushroom|Red Mushroom}}
* Dark/shady areas
* Swamp [[biome]]s
* [[Mushroom fields]]
* Breaking [[Huge Mushroom|huge brown or red mushrooms]]
* [[The Nether]]
* Using [[shears]] on a [[mooshroom|brown mooshroom or red mushroom]]
* Bought from [[wandering trader]]
|
|- id="Flower"
! scope="row" | [[Flower]]
| {{Slot|Any Flower}}
|{{itemLink|Suspicious Stew}}
|
* Breaking [[Flower]]
* Using [[Bone Meal]] on a [[Grass Block]]
* Bought from [[wandering trader]]
* Killing [[Iron Golem]] (poppy)
|
|- id="Pumpkin"
! scope="row" | [[Pumpkin]]
| {{Slot|Pumpkin}}
| {{itemLink|Pumpkin Pie}}
|
* Harvesting mature [[pumpkin]]s grown from [[pumpkin seeds]]
* Naturally occurring [[pumpkin]]s
* Taiga and Snowy Taiga [[Village]]s
* Bought from [[wandering trader]]
|
|- id="Sugar"
! scope="row" | [[Sugar]]
| {{Slot|Sugar}}
|
* {{itemLink|Cake}}
* {{itemLink|Pumpkin Pie}}
|
* Crafting [[sugar cane]]
* Dropped by [[witch]]es
* Creating from its base [[element]]s {{only|bedrock|education}}
* Redeemed from [[honey bottle]] on a crafting table
|
|- id="Wheat"
! scope="row" | [[Wheat]]
| {{Slot|Wheat}}
|
* {{itemLink|Bread}}
* {{itemLink|Cake}}
* {{itemLink|Cookie}}s
|
* Harvesting mature [[wheat]]
* Found in [[Dungeon#Loot|dungeon]], [[Woodland Mansion#Loot|woodland mansion]], [[Shipwreck#Loot|shipwreck]], [[Igloo#Loot|igloo]], [[Village#Loot|village]], [[Ocean Ruins#Loot|ocean ruins]], and [[Pillager Outpost#Loot|pillager outpost]] chest
* Crafting [[hay bale]]s
|
|- id="Gold Nugget"
! scope="row" | [[Gold Nugget]]
| {{Slot|Gold Nugget}}
| {{itemLink|Golden Carrot}}
|
* Crafting [[gold ingot]]s
* Dropped by [[zombified piglin]]s
* Found in [[Shipwreck#Loot|shipwreck]], [[Igloo#Loot|igloo]], [[Village#Loot|village]], and [[Ocean Ruins#Loot|ocean ruins]] chest
* Smelting golden armor or tools
* Mining [[nether gold ore]] without [[Silk Touch]]
|
|- id="Gold Ingot"
! scope="row" | [[Gold Ingot]]
| {{Slot|Gold Ingot}}
| {{itemLink|Golden Apple}}
|
* Crafting [[gold block]]s or [[gold nugget]]s
* Rarely dropped by [[zombified piglin]]s and by [[Drowned]]
* Smelting [[gold ore]] or [[nether gold ore]]
* Found in [[Shipwreck#Loot|shipwreck]], [[Jungle Pyramid#Structure:Loot|jungle pyramid]], [[Dungeon#Loot|dungeon]], [[Woodland Mansion#Loot|woodland mansion]], [[Nether Fortress#Loot|nether fortress]], [[End city#Loot|end city]], [[Mineshaft#Loot|mineshaft]], [[Village#Structure:Loot|village]], [[Stronghold#Loot|stronghold]], [[Buried Treasure#Loot|buried treasure]] and [[Desert pyramid#Structure:Loot|desert pyramid]] chest
|
|- id="Honey Block"
! scope="row" | [[Honey Block]]
| {{Slot|Honey Block}}
| {{itemLink|Honey Bottle}}
|
* Crafting [[honey bottle]]s
|
|}
== Sounds ==
{{Sound table/Entity/Food}}
== Achievements ==
{{load achievements|Pork Chop;Iron Belly;Rabbit Season;Overpowered;Castaway;Delicious Fish;The Lie;Bake Bread;Time For Stew}}
== Advancements ==
{{load advancements|Husbandry;A Balanced Diet;A Furious Cocktail;How Did We Get Here;Fishy Business}}
== History ==
{{History|java classic}}
{{History||June 14, 2009|link=https://notch.tumblr.com/post/123343045/my-vision-for-survival|[[Notch]] discussed how food would work in [[survival]] mode: "Monsters will hurt you and take away from your health. The only way to regain health is to eat food. You get food from either hunting or from farming."}}
{{History||0.24_SURVIVAL_TEST|[[Mushroom]]s are now edible, making them the first food to be added in the game. At this point, food restores [[health]] instead of [[hunger]], and are eaten instantly without sound or animation. Pigs drop them upon death.}}
{{History|java indev}}
{{History||0.31|snap=20091231-2|Added [[apple]]s, which are currently non-functional.}}
{{History|||snap=20100110|Apples are now edible, and restore {{hp|4}} each.}}
{{History|||snap=?|Mushrooms are no longer edible.}}
{{History|||snap=20100130|Added [[mushroom stew]], which restores {{hp|8}} health.}}
{{History||20100206|Added [[wheat]] and [[bread]].
|Mushroom stew now restores {{hp|10}} health.}}
{{History||20100219|[[Pig]]s now drop [[raw porkchop]]s, which can be [[smelt]]ed to become [[cooked porkchop]]s.}}
{{History|java infdev}}
{{History||20100227-1|Added [[golden apple]]s. At this point, they were crafted with [[block of gold]], and restored {{hp|20}}.}}
{{History|java alpha}}
{{History||v1.0.8|Added [[milk]], which was at this point unobtainable and the player could not use it in any way.}}
{{History||v1.0.11|Milk can now be obtained in the game, by milking a [[cow]] with an empty [[bucket]].}}
{{History||v1.0.14|With the addition of [[chicken]]s, [[egg]]s are now in the game, but have no use. Chickens do not drop raw chicken at this point in time.}}
{{History||v1.2.0|snap=<nowiki>?|slink=:Category:Information needed requiring unarchived version|Added [[pumpkin]]s, but not pumpkin seeds.
|Added [[raw fish]] and [[cooked fish]], obtainable through [[fishing]].}}
{{History||v1.2.3|Eating food now functions correctly in multiplayer.}}
{{History|java beta}}
{{History||1.2|Added [[sugar]] and [[cake]].}}
{{History||1.4|[[Cocoa beans]] now appear naturally in the game; since Beta 1.2, they were available only through inventory editors.
|Added [[cookie]]s.}}
{{History||1.5|Pigs now drop cooked porkchops if killed while on fire.}}
{{History||1.8|snap=Pre-release|Added [[melon]]s, [[melon seeds]], and [[pumpkin seeds]].
|Added [[raw chicken]] as a drop from chickens, which can be smelted into [[cooked chicken]].
|Added [[raw beef]] as a drop from cows, which can be smelted into [[steak]].
|Added [[rotten flesh]] as a new drop from [[zombie]]s.
|Added an eating animation, instead of food simply disappearing from the player's hand as if a block had been placed.
|Added [[hunger bar]]; now food restores hunger instead of health.
|Food now stacks in the inventory, with the exception of cake, mushroom stew, and milk.
|[[Huge mushroom]]s were added as a new source for [[mushroom]]s.
|With the addition of the hunger bar, golden apples now restore {{Hunger|10}} and give 30 seconds of [[regeneration]], but do not heal health directly anymore.}}
{{History|java}}
{{History||1.0.0|snap=Beta 1.9 Prerelease 2|Mushrooms can now be obtained from the mushroom island [[biome]], via the huge mushrooms, random scattered mushrooms, or the new [[mooshroom]]s.
|[[Milk]] can be used to nullify the effects of [[potion]]s.
|[[Spider]]s now drop [[Spider Eye|eyes]].}}
{{History||1.1|snap=release|Golden apples are now made with [[gold nugget]]s instead of blocks of gold, restore {{Hunger|4}} and give 4 seconds of regeneration.}}
{{History||1.3.1|snap=12w21a|Added enchanted golden apples, which functioned like golden apples prior to 1.1 and had the same crafting recipe, but also gave resistance and fire resistance for 5 minutes each.
|[[Cocoa Beans]] are now a crop, making all food items a renewable resource.}}
{{History||1.4.2|snap=12w34a|[[Potato]]es and [[carrot]]s can be obtainable from zombies (rare drop) or harvested.
|Potatoes can be cooked to make [[baked potato]]es
|Harvesting potatoes may give 0–2 [[poisonous potato]]es.
|Carrots can be crafted into [[golden carrot]]s.
|Added [[pumpkin pie]], making [[pumpkin]]s a food ingredient.}}
{{History||1.7.2|snap=13w36a|Added [[tropical fish (item)|clownfish]], [[Raw Salmon|raw]] and [[cooked salmon]], and [[pufferfish (item)|pufferfish]].}}
{{History||1.8|snap=14w02a|Baked potatoes now restore {{Hunger|5}} hunger points instead of 6, with a corresponding reduction in saturation restored.
|Carrots now restore {{Hunger|3}} hunger points instead of 4, with a corresponding reduction in saturation restored.}}
{{History|||snap=14w27a|Added [[Raw Mutton|raw]] and [[cooked mutton]], [[Raw Rabbit|raw]] and [[cooked rabbit]], and [[rabbit stew]].}}
{{History||1.9|snap=15w31a|Added [[chorus fruit]], [[beetroot]] and [[beetroot soup]].
|Enchanted golden apples are no longer craftable, making them no longer renewable.}}
{{History||1.13|snap=18w07a|Added [[dried kelp]], which is edible.}}
{{History||1.14|snap=18w43a|Added [[suspicious stew]].}}
{{History|||snap=18w49a|Added [[sweet berries]].}}
{{History||1.15|snap=19w34a|Added [[honey bottle]]s.}}
{{History|||snap=19w35a|[[Honey bottle]]s now remove [[poison]] effects when consumed.}}
{{History|||snap=19w46a|All foods can now be consumed in Creative mode, including cake.}}
{{History||1.17|snap=21w05a|Added [[glow berries]].}}
{{History|pocket alpha}}
{{History||v0.4.0|Added the first food items: [[apple]]s, [[bread]], [[mushroom stew]], [[raw beef]], [[steak]], [[raw chicken]], [[cooked chicken]], [[raw porkchop]]s, and [[cooked porkchop]].}}
{{History||v0.5.0|Added [[melon]]s, [[melon slice]]s, and [[melon seeds]].}}
{{History||v0.7.0|Added [[milk]] and [[cake]].}}
{{History||v0.8.0|snap=build 1|Added [[pumpkin pie]], [[carrot]]s, [[potato]]es, and [[baked potato]]es.}}
{{History|||snap=build 2|Added [[beetroot]]s and [[beetroot soup]].}}
{{History||v0.9.0|snap=build 1|[[Potato]]es and [[carrot]]s can be obtainable from zombies (rare drop) or harvested.
|Added [[cookie]]s.}}
{{History||v0.11.0|snap=build 1|Added [[rotten flesh]] as a new drop from [[zombie]]s, at this time, it inflicts poison.
|Added [[Raw Fish|raw]] and [[cooked fish]], [[clownfish]], [[Raw Salmon|raw]] and [[cooked salmon]], and [[pufferfish]].}}
{{History|||snap=build 4|[[Milk]] can be used to nullify the effects of [[potion]]s.}}
{{History||v0.12.1|snap=build 1|Eating food now restores hunger.
|[[Spider]]s now drop [[Spider Eye|eyes]].
|Added poisonous potatoes, golden apples, enchanted golden apples and golden carrots.}}
{{History||v0.13.0|snap=build 1|Hunger restored by food now matches Minecraft PC.
|Added raw rabbit, cooked rabbit, and [[rabbit stew]].}}
{{History||v0.15.0|snap=build 1|Added raw mutton and cooked mutton.}}
{{History|pocket}}
{{History||1.0.0|snap=alpha 0.17.0.1|Added chorus fruit.}}
{{History|bedrock}}
{{History||1.4.0|snap=beta 1.2.14.2|Added [[dried kelp]], which is edible.}}
{{History||1.7.0|snap=beta 1.7.0.2|Food can now be eaten in creative mode and on peaceful difficulty.}}
{{History||1.10.0|snap=beta 1.10.0.3|Added [[sweet berries]].}}
{{History||1.13.0|snap=beta 1.13.0.9|Added [[suspicious stew]].}}
{{History||1.14.0|snap=beta 1.14.0.1|Added [[honey bottle]].}}
{{History||1.17.0|snap=beta 1.16.220.52|Added [[glow berries]].}}
{{History|foot}}
{{items}}
[[Category:Food]]
[[cs:Potraviny]]
[[de:Hunger]]
[[es:Comida]]
[[fr:Nourriture]]
[[hu:Étel]]
[[it:Cibo]]
[[ja:食料]]
[[ko:식료품]]
[[nl:Voedsel]]
[[pl:Jedzenie]]
[[pt:Alimento]]
[[ru:Еда]]
[[th:อาหาร]]
[[uk:Їжа]]
[[zh:食物]]</li></ul></nowiki> | Maps now work both while walking and flying. | |||||||||||||||||||||||||||||||||||||||||||||||||||||||||||||||||||||||||||||||||||||||||||||||||||||||||||||
| Java Edition | ||||||||||||||||||||||||||||||||||||||||||||||||||||||||||||||||||||||||||||||||||||||||||||||||||||||||||||||
1.0.0{{Extension DPL}}<ul><li>[[Footprint|Footprint]]<br/>{{about|the joke item|the unused particle|Java Edition unused features#Footprint particle}}
{{Joke feature}}
{{Item
| image = Footprint (item).png
| renewable = No
| stackable = Yes (64)
}}
The '''Footprint''' was a joke item from [[Java Edition 20w14∞]], found only in the {{code|missing}} dimension.
== Appearance ==
This item is semi-transparent with a grey colour scheme.
== Obtaining ==
=== Dimension ===
Footprints were obtained only from a chest in the {{Code|missing}} dimension. Only existing in 2020 April fools snapshot 20w14∞, it cannot exist in any non-April Fool's joke versions and April Fool's joke versions before or after 20w14∞. There is a maximum of 2 footprints that can be obtained legitimately in any given world.
=== Cheats/Creative Mode ===
Despite these footprints not being available in the creative inventory, it is still possible to acquire them via the command {{Code|code=give <target> minecraft:footprint <amount>}} or duplicating them by holding down middle-click whilst in creative mode.
== Usage ==
As of snapshot 20w14∞, this item cannot be placed or used in any way other than a trophy. This item can be inserted and/or rotated inside of an item frame, and it has a stack limit of 64.
== Data values ==
=== ID ===
{{ID table
|showforms=y
|generatetranslationkeys=java
|displayname=Footprint
|spritetype=item
|nameid=footprint
|form=item
|foot=1}}
== History ==
{{History|java}}
{{History||20w14∞|[[File:Footprint (item).png|32px]] Added the footprint item.}}
{{History|foot}}
== Gallery ==
<gallery>
File:Missing biome.png|The Easter Egg dimension that the item spawns in.
</gallery>
== Trivia ==
* This is a reference to the removed "Footstep" particle, hence in the "missing" dimension.
** This item is intended as a joke directed towards the commands' community where the "Footstep" particle is commonly requested.<ref>https://gist.github.com/boq/8e65cb85badc75765eeb8956af78aaa5</ref>
== References ==
{{reflist}}
{{Items}}
{{Jokes}}
[[Category:Non-renewable resources]]
[[Category:Joke items]]
[[es:Footprint]]
[[pt:Pegada]]</li><li>[[Dye|Dye]]<br/>{{Item
| title = Dyes
| image = White Dye.png
| extratext = View [[#Gallery|all renders]]
| renewable = Yes
| stackable = Yes (64)
}}
'''Dyes''' are a set of sixteen items used to change the color of [[wool]], [[carpet]]s, [[terracotta]], [[concrete powder]], [[glass]], [[shulker box]]es, [[bed]]s, [[candle]]s, the patterns on [[banner]]s, [[firework star]]s, certain mobs, and text on [[sign]]s and [[hanging sign]]s. {{IN|bedrock}} they can also be used to dye water in a [[cauldron]] (which is thereafter used to dye leather [[armor]]); {{in|java}} leather armor can be dyed directly. {{IN|education}} dyes can also be used to dye [[balloon]]s and [[glow stick]]s.
{{IN|bedrock|education}}, [[bone meal]], [[ink sac]]s, [[lapis lazuli]], and [[cocoa bean]]s can generally substitute for [[white dye]], [[black dye]], [[blue dye]], and [[brown dye]], respectively, in crafting recipes and for use in dyeing items or mobs. However, they have other important uses that aren't related to color, and are therefore not considered true dyes. They are mentioned in this article only in regard to their use as dyeing agents; see their individual articles for complete information about them.
[[File:Dye Recipes.png|400px|thumb|A guide for creating all the dyes]]
== Obtaining ==
<!--[[File:Dye Chart.png|350px|thumb|A guide to crafting all the dyes.{{until|java 1.14}}]]-->
Dyes can be produced by crafting them from plants (mainly flowers), by crafting dyes of different colors together, by smelting plants, or by trading with a [[wandering trader]].
{{loadPage|Crafting/Dye|Crafting|h3}}
=== Smelting ===
{{smelting|head=1|Sea Pickle|Lime Dye|0,2}}
{{smelting|foot=1|Cactus|Green Dye|1||b=Lapis Lazuli|c=Any fuel|d=1}}
=== Trading ===
[[Wandering trader]]s can sell 3 dyes for an [[emerald]]. {{IN|bedrock}}, they can also sell 3 lapis lazuli, bone meal, cocoa beans, or ink sacs for one emerald.
Apprentice-level cleric [[villager]]s sell one lapis lazuli per emerald.
=== Chest loot ===
{{#invoke:LootChest|base3|blue-dye,green-dye,orange-dye,light-blue-dye,yellow-dye,white-dye}}
=== Other ===
Ink sacs can also be created using 1 iron, 1 sulfur, and 4 oxygen in the [[compound creator]]. {{only|bedrock|education}}
== Usage ==
Similar to their use in crafting, [[bone meal]], [[ink sac]]s, [[lapis lazuli]], and [[cocoa beans]] can be substituted for the corresponding dye in any of the following usages unless otherwise specified.{{only|bedrock}} <!--- sections are ordered by craftable dyeable blocks, dyeable items, version exclusive sections, and non-crafting miscellaneous uses--->
=== Dyeing wool and mobs ===
Players can dye wool by placing [[wool]] and any dye in a crafting grid.
{{Crafting
|nocat=1
|Any Wool
|Matching Dye
|Output=Any Wool
}}
Dyes can be {{control|use|text=used}} on sheep to change the color of the wool. Shearing a colored sheep drops the corresponding color of the wool, and the sheep retains the color when the wool regenerates. [[Breeding]] colored sheep produces a lamb colored as one of the parent sheep, or a color resulting from the combination of both parents' color. The color combining follows the same rules that dyes use – red and yellow sheep produce an orange lamb, but a blue and yellow sheep cannot create a green lamb. The unlimited reproduction of colored sheep makes dyeing and shearing sheep infinitely more efficient than just dyeing wool directly.
Dye can also be used on a tamed [[wolf]] or [[cat]] to change the color of its collar from the default red to the color of the dye.
=== Dyeing carpets ===
Carpets can be dyed.
{{Crafting
|Any Carpet
|Matching Dye
|Output= Matching Carpet
|type= Building block
}}
=== Dyeing terracotta ===
[[Terracotta]] can be dyed by placing 8 blocks around a dye on a crafting table.
{{Crafting
|nocat=1
|A1=Terracotta |B1=Terracotta |C1=Terracotta
|A2=Terracotta |B2=Matching Dye |C2=Terracotta
|A3=Terracotta |B3=Terracotta |C3=Terracotta
|Output=Matching Dyed Terracotta,8
}}
=== Creating concrete powder ===
Dyes can also be used to craft [[concrete powder]], which can then be set into their respective [[concrete]] blocks (they cannot be dyed directly).
{{Crafting
|nocat=1
|Sand |Gravel |Sand
|Gravel |Matching Dye |Gravel
|Sand |Gravel |Sand
|Output=Matching Concrete Powder,8
}}
=== Staining glass ===
[[Stained glass]] can be stained by placing 8 blocks of glass around a dye on a [[crafting table]]. Just like regular glass, stained glass can be crafted into stained glass panes. The recipe for this is the same as with regular glass.
{{Crafting
|nocat=1
|A1=Glass |B1=Glass |C1=Glass
|A2=Glass |B2=Matching Dye |C2=Glass
|A3=Glass |B3=Glass |C3=Glass
|Output=Matching Stained Glass,8
|head=1
}}
{{Crafting
|nocat=1
|A1= Glass Pane
|B1= Glass Pane
|C1= Glass Pane
|A2= Glass Pane
|B2= Matching Dye
|C2= Glass Pane
|A3= Glass Pane
|B3= Glass Pane
|C3= Glass Pane
|Output= Matching Stained Glass Pane,8
|type= Decoration block
|foot=1
}}
=== Dyeing shulker boxes ===
[[Shulker box]]es are generated in a light shade of purple (like the [[purpur block]]), but can be dyed any color. They can also be re-dyed as often as desired.
{{Crafting
|ignoreusage=1
|showname=1
|Any Shulker Box
|Matching Dye
|Output=Matching Shulker Box
}}
=== Dyeing beds ===
Players can dye beds by placing a [[bed]] and any color dye in a crafting grid.
{{Crafting
|nocat=1
|Any Bed
|Matching Dye
|Output=Matching Bed
}}
=== Dyeing candles ===
Players can dye [[candles]] by placing an undyed candle and any color dye in a crafting grid.
{{Crafting
|ignoreusage=1
|Candle
|Matching Dye
|Output=Matching Dyed Candle
}}
=== Banner patterns ===
{{main|Banner#Patterns}}
Dyes are used in most banner patterns to determine the pattern and color displayed.
=== Dyeing armor ===
[[File:DyeGraph2.png|200px|thumb|A graph showing all combinations of two dyes on a [[tunic]].]]
Leather [[armor]] can be dyed by:
* Crafting dyes with a piece of leather armor or leather [[horse armor]].{{Only|java}}
* Dousing the leather armor or leather [[horse armor]] in a [[cauldron]] to which dyes have been added.{{Only|bedrock}}
There are 5,713,438<ref>https://anrar4.github.io/DyeLeatherArmor/</ref> (34.1% of sRGB) colors leather armor can be, as it is possible to put more than one dye on the crafting bench alongside the leather armor. Armor can be dyed multiple times with previous colors affecting the final outcome. Colored armor can be reverted to their original color using a [[cauldron]] with undyed water.
The game has a specific formula for calculating the color of dyed armor: each color, in the RGB color model, has a red value, green value, and blue value. For each dye in the crafting grid, and the armor itself (if it is already dyed), the red, green, and blue values are added to running totals. In addition, a running total of the highest value (be it red, green, or blue) is also kept. After this, each total is divided by the number of colors used. This effectively produces the average red, green, blue, and maximum values. The maximum value of the average RGB values is also calculated. Finally, each average RGB value is multiplied by the average maximum value and divided by the maximum of the average RGB values. The modified average RGB values are then used as the final color. This procedure can be summed up with the following equations:
for each color (all "total" variables start at 0 before counting):
totalRed = totalRed + redValue
totalGreen = totalGreen + greenValue
totalBlue = totalBlue + blueValue
totalMaximum = totalMaximum + max(redValue, greenValue, blueValue)
numberOfColors = numberOfColors + 1
averageRed = totalRed / numberOfColors
averageGreen = totalGreen / numberOfColors
averageBlue = totalBlue / numberOfColors
averageMaximum = totalMaximum / numberOfColors
maximumOfAverage = max(averageRed, averageGreen, averageBlue)
gainFactor = averageMaximum / maximumOfAverage
resultRed = averageRed * gainFactor
resultGreen = averageGreen * gainFactor
resultBlue = averageBlue * gainFactor
Due to the way this formula works, the resulting color can never be darker than the average of the input colors and is often lighter and more saturated. Of course, the resulting color can never be lighter or more saturated than the lightest or most saturated input color. In addition, this formula never creates an RGB value higher than 255 (which would be invalid in the 8-bit RGB color model).
If leather armor is renamed on an [[anvil]], it retains its name when dyed or undyed.
;Mixing Samples
: {{ItemSprite|Yellow Dye}} + {{ItemSprite|Yellow Dye}} = {{Tint|leather-chestplate| #{{CalcDye| yellow=2 }} | code=1}}
: {{ItemSprite|Red Dye}} + {{ItemSprite|Blue Dye}} + {{ItemSprite|White Dye}} = {{Tint|leather-chestplate| #{{CalcDye| red=1 | blue=1 | white=1}} | code=1}}
: {{ItemSprite|Green Dye}} + {{ItemSprite|Red Dye}} + {{ItemSprite|Pink Dye}} = {{Tint|leather-chestplate| #{{CalcDye| green=1 | red=1 | pink=1}} | code=1}}
=== Dyeing firework stars ===
A [[firework star]] can have a single color or a combination of up to eight colors when crafted with dyes. Adding one or more dyes to a crafted firework star adds a "fade to color" effect to it, overwriting any existing fade colors.
{{Crafting
|head=1
|ignoreusage=1
|ingredients=[[Gunpowder]] +<br>Any Dye (1–8) +<br>Extra ingredient (optional)
|Gunpowder
|Matching Dye
|Diamond;Glowstone Dust;Head;Gold Nugget;Feather;Fire Charge;
|Output=Matching Firework Star
}}
{{Crafting
|ignoreusage=1
|Matching Firework Star
|Any Dye
|Output=Matching Firework Star
|foot=1
}}
=== Creating balloons ===
Dye can be used to craft balloons.{{only|education}}
{{Crafting
|nocat=1
|A1= Latex
|B1= Matching Dye
|C1= Latex
|A2= Latex
|B2= Helium
|C2= Latex
|A3= Latex
|B3= Lead
|C3= Latex
|Output= Matching Balloon
}}
=== Creating glow sticks ===
Dye can also be used to craft glow sticks.{{only|education}}
{{Crafting
|nocat=1
|A1= Polyethylene
|B1= Hydrogen Peroxide
|C1= Polyethylene
|A2= Polyethylene
|B2= Matching Dye
|C2= Polyethylene
|A3= Polyethylene
|B3= Luminol
|C3= Polyethylene
|Output= Matching Glow Stick
}}
=== Dyeing water inside cauldrons ===
Water can be dyed in a cauldron by holding any dye in the hand and pressing {{Ctrl|use}} on a cauldron filled with water.{{only|bedrock}}
=== Signs ===
Dye can be {{control|used}} on a [[sign]] or a [[hanging sign]] to change the text color. {{IN|bedrock}}, [[ink sac]]s cannot be used for this purpose; black dye must be used to change the text to black.
=== Trading ===
Apprentice, journeyman and expert-level shepherd [[villager]]s buy any of the 12 dyes for an [[emerald]].
== Color values ==
The "color codes" are used to determine the color imparted on sheep, wolf and cat collars, firework stars, [[beacon]] beams, and dyed leather armor. The hex value is shown in the extended tooltips of dyed leather armor; however, to set the color using an NBT data tag in a [[command]], the decimal value must be used instead. The color values for firework stars are slightly different from the ones listed below, and use [[Item colors#Firework stars|these values]] instead.
{| class="wikitable" style="margin:2px; border: 1px solid silver; text-align: left;" data-description="Data values"
! rowspan=2 | Description
! colspan=2 style="text-align:center" | Color Code
|-
! Dec
! <abbr title="Hexadecimal color code">Hex</abbr>
|-
| style="text-align:center" | White || 16383998 || {{color|#F9FFFE}}
|-
| style="text-align:center" | Light gray || 10329495 || {{color|#9D9D97}}
|-
| style="text-align:center" | Gray || 4673362 || {{color|#474F52}}
|-
| style="text-align:center" | Black || 1908001|| {{color|#1D1D21}}
|-
| style="text-align:center" | Brown || 8606770 || {{color|#835432}}
|-
| style="text-align:center" | Red || 11546150 || {{color|#B02E26}}
|-
| style="text-align:center" | Orange || 16351261 || {{color|#F9801D}}
|-
| style="text-align:center" | Yellow || 16701501 || {{color|#FED83D}}
|-
| style="text-align:center" | Lime || 8439583 || {{color|#80C71F}}
|-
| style="text-align:center" | Green || 6192150 || {{color|#5E7C16}}
|-
| style="text-align:center" | Cyan || 1481884|| {{color|#169C9C}}
|-
| style="text-align:center" | Light blue || 3847130 || {{color|#3AB3DA}}
|-
| style="text-align:center" | Blue || 3949738 || {{color|#3C44AA}}
|-
| style="text-align:center" | Purple || 8991416 || {{color|#8932B8}}
|-
| style="text-align:center" | Magenta || 13061821 || {{color|#C74EBD}}
|-
| style="text-align:center" | Pink || 15961002 || {{color|#F38BAA}}
|}
== Sounds ==
{{edition|java}}:
{{Sound table
|rowspan=2
|sound=Dye.ogg
|subtitle=Dye stains
|source=block
|description=When dye is used on a [[sign]]
|id=item.dye.use
|translationkey=subtitles.item.dye.use
|volume=1.0
|pitch=1.0/0.9/0.95/1.1
|distance=16}}
{{Sound table
|subtitle=Dye stains
|source=player
|description=When dye is used on a [[sheep]]
|id=item.dye.use
|translationkey=subtitles.item.dye.use
|volume=1.0
|pitch=1.0/0.9/0.95/1.1
|distance=16
|foot=1}}
{{edition|bedrock}}:
{{Sound table
|type=bedrock
|sound=Dye.ogg
|source=sound
|description=When dye is used on a sign
|id=sign.dye.use
|volume=1.0
|pitch=1.0}}
{{Sound table
|rowspan=3
|sound=Water Splash Old.ogg
|source=block
|description=When dye is added to a cauldron
|id=cauldron.adddye
|volume=0.1
|pitch=1.0}}
{{Sound table
|source=block
|description=When armor is dyed using a cauldron
|id=cauldron.dyearmor
|volume=0.1
|pitch=1.0}}
{{Sound table
|source=block
|description=When dye is removed from armor using a cauldron
|id=cauldron.cleanarmor
|volume=0.1
|pitch=1.0
|foot=1}}
== Achievements ==
{{load achievements|Rainbow Collection;Tie dye outfit}}
== Video ==
{{Video note|These videos are outdated, as it does not include details of the [[Java Edition 1.7.2|1.7.2]] update's changes to the dyeing system/production chain.}}
<div style="text-align:center">
<span style="display:inline-block">{{yt|8YD7oauNZHE}}</span>
<span style="display:inline-block">{{yt|7tETaRt7STM}}</span>
</div>
== History ==
{{History|java beta}}
{{History||January 3, 2011|link=https://web.archive.org/web/0/http://notch.tumblr.com/post/2582321901/2011-here-we-go|Notch mentions adding a "paint" feature if he can figure out how.}}
{{History||January 10, 2011<ref group="n">Supposed time when fragment was filmed. Based on modified date of client.jar/gui/trap.png in [[Beta 1.2]].</ref>|link=https://www.youtube.com/watch?v=cBF2ugTzXqQ&t=181s|[[File:Red Dye (pre-release).png|32px]] Shown rose red in development as part of [[Minecraft: The Story of Mojang]].}}
{{History||1.2|[[File:Ink Sac JE1 BE1.png|32px]] [[File:Red Dye JE1 BE1.png|32px]] [[File:Green Dye JE1 BE1.png|32px]] [[File:Cocoa Beans JE1 BE1.png|32px]] [[File:Lapis Lazuli JE1 BE1.png|32px]] [[File:Purple Dye JE1 BE1.png|32px]] [[File:Cyan Dye JE1 BE1.png|32px]] [[File:Light Gray Dye JE1 BE1.png|32px]] [[File:Gray Dye JE1 BE1.png|32px]] [[File:Pink Dye JE1 BE1.png|32px]] [[File:Lime Dye JE1 BE1.png|32px]] [[File:Yellow Dye JE1 BE1.png|32px]] [[File:Light Blue Dye JE1 BE1.png|32px]] [[File:Magenta Dye JE1 BE1.png|32px]] [[File:Orange Dye JE1 BE1.png|32px]] [[File:Bone Meal JE1 BE1.png|32px]] Added dyes.
|[[File:Black Dye (Recreated).png|32px]] [[File:Red Dye (pre-release).png|32px]] [[File:Green Dye (Recreated).png|32px]] [[File:Brown Dye (Recreated).png|32px]] [[File:Blue Dye (Recreated).png|32px]] [[File:Purple Dye (Recreated).png|32px]] [[File:Cyan Dye (Recreated).png|32px]] [[File:Light Gray Dye (Recreated).png|32px]] [[File:Gray Dye (Recreated).png|32px]] [[File:Pink Dye (Recreated).png|32px]] [[File:Lime Dye (Recreated).png|32px]] [[File:Yellow Dye (Recreated).png|32px]] [[File:Light Blue Dye (Recreated).png|32px]] [[File:Magenta Dye (Recreated).png|32px]] [[File:Orange Dye (Recreated).png|32px]] [[File:White Dye (Recreated).png|32px]] Leftovers of old textures can be seen in [[items.png]] with 100% opacity. The white dye texture was reused for [[Sugar]].
| The colors were as follows:{{verify|Did the color codes remain the same between Beta 1.2 and Java 1.11.2?}}
{{:Color/Java Edition dye colors before 17w06a}}
}}
{{History|java}}
{{History||1.1|snap=11w49a|[[Sheep]] can now regrow their [[wool]] by eating [[grass block|grass]]. Dyed sheep regrow wool in their new color.}}
{{History||1.3.1|snap=12w19a|[[File:Cocoa Beans JE2.png|32px]] The texture of [[cocoa beans]] has been changed.}}
{{History|||snap=1.3|[[File:bone meal changes.gif|32px]] The textures of [[bone meal]], [[cactus green]], cocoa beans and [[rose red]] have been changed. The textures have been lowered one pixel.}}
{{History||1.4.2|snap=12w34a|Added the ability to dye leather [[armor]] and [[wolf]] collars.}}
{{History||1.4.4|snap=1.4.3|Color codes have been changed. The colors of red, brown, blue, purple, cyan, pink, light blue, magenta and orange were adjusted a little vividly.}}
{{History||1.6.1|snap=13w19a|[[Stained clay]] can now be crafted using dyes.}}
{{history||1.7.2|snap=13w36a|With the addition of new [[flower]]s, many secondary and tertiary dyes are now primary dyes.}}
{{History|||snap=13w41a|[[Stained glass]] can now be crafted using dyes.}}
{{History||1.8|snap=14w02a|As cleric [[villager]]s now sell lapis lazuli, all dyes have become fully renewable.}}
{{History|||snap=14w30a|Added [[banner]]s, which can be dyed.}}
{{History||1.9|snap=15w34a|Added [[shield]]s, which can be dyed indirectly by applying a matching [[banner]].}}
{{History||1.11|snap=16w39b|Dyes are now used to change the color of [[shulker box]]es.}}
{{History||1.12|snap=17w06a|Dyes are now used to craft [[concrete powder]].
|Color codes have been changed. All colors are adjusted more vividly. The changes were as follows:
{{:Color/Java Edition dye color changes in 17w06a}}
|Light blue dye, stained glass, and stained glass panes, did not change colors in this update. This means that they still use old colors.<ref name="unchanged dyes">{{Bug|MC-214643}}<br>{{Bug|MC-214641}}</ref>
}}
{{History|||snap=17w15a|Dyes can now apply color to white [[bed]]s.}}
{{History||1.13|snap=17w47a|The different data values for the <code>dye</code> ID have been split up into their own IDs.}}
{{History||1.14|snap=18w43a|[[Bone meal]], [[ink sac]]s, [[cocoa beans]] and [[lapis lazuli]] are no longer considered dyes.
|[[File:White Dye JE1 BE1.png|32px]] [[File:Black Dye JE1 BE1.png|32px]] [[File:Brown Dye JE1 BE1.png|32px]] [[File:Blue Dye JE1 BE1.png|32px]] Added [[white dye|white]], [[black dye|black]], [[brown dye|brown]] and [[blue dye]]s.
|"Rose Red", "Dandelion Yellow" and "Cactus Green" have been renamed to "Red Dye", "Yellow Dye" and "Green Dye", respectively.
|[[Glass pane]]s and [[carpet]]s can now be dyed.
|[[File:Light Gray Dye JE2 BE2.png|32px]] [[File:Gray Dye JE2 BE2.png|32px]] [[File:Red Dye JE2 BE2.png|32px]] [[File:Orange Dye JE2 BE2.png|32px]] [[File:Yellow Dye JE2 BE2.png|32px]] [[File:Lime Dye JE2 BE2.png|32px]] [[File:Green Dye JE2 BE2.png|32px]] [[File:Cyan Dye.png|32px]] [[File:Light Blue Dye JE2 BE2.png|32px]] [[File:Purple Dye JE2 BE2.png|32px]] [[File:Magenta Dye JE2 BE2.png|32px]] [[File:Pink Dye JE2 BE2.png|32px]] The textures of light gray, gray, red, orange, yellow, lime, green, cyan, light blue, purple, magenta, and pink dyes, have been changed. The color texture for light blue dye was not changed to reflect the updated colors from 1.12.<ref name="unchanged dyes"></ref>}}
{{History|||snap=18w44a|The color of the text on [[sign]]s can now be changed with dye.}}
{{History|||snap=18w49a|Yellow dyes can now be found in [[chest]]s in [[village]] mason houses.}}
{{History|||snap=18w50a|Green dyes can now be found in [[chest]]s in [[desert]] [[village]] houses.}}
{{History|||snap=19w05a|Added the [[wandering trader]], which can sell any type of dye.}}
{{History|||snap=19w11a|All 16 types of dyes can now be [[trading|bought]] by shepherd villagers.}}
{{History||1.16.2|snap=Pre-release 2|Reversed the order of dyes to match other colored items in the [[Creative inventory]].<ref name="reverse dye">{{Bug|MC-136553}}</ref>
|Regrouped dyes in the Creative inventory such that white, blue, brown, and black dyes are within and not [[cocoa beans]], [[ink sacs]], [[lapis lazuli]], and [[bone meal]].<ref name="regroup dye">{{Bug|MC-177684}}</ref>}}
{{History||1.17|snap=20w45a|Added [[candle]]s, which can be dyed.}}
{{History|||snap=21w03a|Added a sound for applying dyes.}}
{{History|||snap=21w19a|Candles can no longer be dyed.}}
{{History|||snap=Pre-release 1|Candles can now once again be dyed.}}
{{History||1.20<br>(Experimental)|link=1.19.3|snap=22w42a|The color of the text on [[hanging sign]]s can now be changed with dye.}}
{{History||1.20<br>(Experimental)|link=1.19.4|snap=23w07a|[[Torchflower]]s can now be crafted into orange dye.|[[Pink petals]] can now be crafted into pink dye.}}
{{History||1.20|snap=23w12a|[[Pitcher plant]]s can now be crafted into cyan dye.|Blue, light blue, orange, white, and yellow dye can now be found in [[suspicious gravel]] and [[suspicious sand]] in [[trail ruins]].}}
{{History|||snap=23w14a|Pitcher plants can now craft two [[cyan dye]] instead of one.}}
{{History|||snap=23w16a|Blue, light blue, orange, white, and yellow dye no longer generates in [[suspicious sand]] in [[trail ruins]].|Due to the split of the archaeological loot tables for the suspicious gravel within the [[trail ruins]]; blue, light blue, orange, white, and yellow dye now are in the common loot.}}
{{History|pocket alpha}}
{{History||v0.3.0|[[File:Bone Meal JE1 BE1.png|32px]] [[File:Light Gray Dye JE1 BE1.png|32px]] [[File:Gray Dye JE1 BE1.png|32px]] [[File:Ink Sac JE1 BE1.png|32px]] [[File:Cocoa Beans JE1 BE1.png|32px]] [[File:Red Dye JE1 BE1.png|32px]] [[File:Orange Dye JE1 BE1.png|32px]] [[File:Yellow Dye JE1 BE1.png|32px]] [[File:Lime Dye JE1 BE1.png|32px]] [[File:Green Dye JE1 BE1.png|32px]] [[File:Cyan Dye JE1 BE1.png|32px]] [[File:Light Blue Dye JE1 BE1.png|32px]] [[File:Lapis Lazuli JE1 BE1.png|32px]] [[File:Purple Dye JE1 BE1.png|32px]] [[File:Magenta Dye JE1 BE1.png|32px]] [[File:Pink Dye JE1 BE1.png|32px]] Added dyes. Only [[dandelion yellow]] and [[lapis lazuli]] are currently obtainable and have functionality.}}
{{History||v0.3.2|[[Cactus green]] is now obtainable by smelting [[cacti]].}}
{{History||v0.3.3|[[Bone meal]] is now obtainable via [[crafting]].}}
{{History||v0.4.0|[[Cyan dye]], [[light blue dye]], [[lime dye]], [[magenta dye]], [[orange dye]], [[pink dye]], and [[purple dye]] are now obtainable via crafting.
|[[Rose red]] is now obtainable by smelting red [[mushroom]]s.
|All available dyes, excluding bone meal, can now be used to craft their respective [[wool]] color.}}
{{History||v0.8.0|snap=build 1|[[File:Cocoa Beans JE3 BE2.png|32px]] The texture of cocoa beans has been changed.}}
{{History|||snap=build 3|[[Ink sac]]s, [[cocoa bean]]s, [[gray dye]], and [[light gray dye]] are now available in the [[creative]] [[inventory]].
|Rose red can now be obtained from [[beetroot]]s.}}
{{History||v0.9.0|snap=build 1|Cocoa beans can now be obtained from [[cocoa pod]]s.
|The [[rose]] has been removed and replaced with a new poppy [[flower]] that can be crafted into rose red.}}
{{History|||snap=build 3|All new [[flower]]s can now be [[crafting|crafted]] into dyes. Because of this, many secondary and tertiary dyes are now primary dyes.
|[[Gray dye]] and [[light gray dye]] can now be obtained in [[survival]].}}
{{History|||snap=build 11|[[Terracotta|Stained clay]] can now be crafted using dyes.}}
{{History||v0.11.0|snap=build 1|[[Ink sac]]s can now be obtained from [[squid]].
|Added the ability to dye [[wolf]] collars.}}
{{History||v0.12.1|snap=build 1|Red [[mushroom]]s can no longer be smelted to obtain [[rose red]].}}
{{History||v0.14.0|snap=build 1|[[Cauldron]]s now used for leather dyeing, by applying a dye to a [[water]]-filled cauldron.}}
{{History||v0.16.0|snap=build 1|[[Cocoa bean]]s can no longer be crafted.}}
{{History|pocket}}
{{History||1.0.0|snap=alpha 0.17.0.1|Added a ''Dye'' button for [[sheep]].
|Added [[shulker]]s, which can be dyed.
|Added [[stained glass]]. Stain glass cannot be [[crafting|crafted]], but purple glass generates in [[end city|end cities]].}}
{{History||1.1.0|snap=alpha 1.1.0.0|Dyes can now apply color to a white [[bed]]s.
|Dyes are now used to craft [[concrete powder]].
|The color palette has been changed.}}
{{History|bedrock}}
{{History||1.2.0|snap=beta 1.2.0.2|Dyes can now be used for [[banner]] crafting.
|Dyes can now be used to craft [[firework star]]s.
|[[Stained glass]] is now [[crafting|craftable]], using dyes.}}
{{History||1.4.0|snap=beta 1.2.20.1|[[Lime dye]] can now be obtained from smelting [[sea pickle]]s.
|Dyes can now used to craft [[glow stick]]s and [[balloon]]s.}}
{{History||1.8.0|snap=beta 1.8.0.8|Dyes can now be used to dye [[cat]] collars.}}
{{History|||snap=beta 1.8.0.10|[[File:White Dye JE1 BE1.png|32px]] [[File:Black Dye JE1 BE1.png|32px]] [[File:Brown Dye JE1 BE1.png|32px]] [[File:Blue Dye JE1 BE1.png|32px]] Added [[white dye|white]], [[brown dye|brown]], [[black dye|black]] and [[blue dye]]s, which can be crafted from [[lapis lazuli]], [[bone meal]], [[cocoa beans]] and [[ink sac]]s. This, however, the later four still use as dyes.<ref>{{Bug|MCPE-42473}}</ref>
|"Rose Red", "Dandelion Yellow" and "Cactus Green" have been renamed to "Red Dye", "Yellow Dye" and "Green Dye", respectively.}}
{{History||1.9.0|snap=beta 1.9.0.0|Blue and white dye can now be obtained from [[cornflower]]s and [[lily of the valley]]s.}}
{{History||1.10.0|snap=beta 1.10.0.3|[[Glass pane]]s and [[carpet]]s can now be dyed.
|Only a single dye is now required to apply a banner pattern in a [[loom]].
|Various dyes except black dye, white dye, brown dye and blue dye are now [[trading|sold]] by [[wandering trader]]s.
|[[File:Bone Meal JE2 BE2.png|32px]] [[File:Light Gray Dye JE2 BE2.png|32px]] [[File:Gray Dye JE2 BE2.png|32px]] [[File:Ink Sac JE2 BE2.png|32px]] [[File:Cocoa Beans JE4 BE3.png|32px]] [[File:Red Dye JE3 BE3.png|32px]] [[File:Orange Dye JE2 BE2.png|32px]] [[File:Yellow Dye JE2 BE2.png|32px]] [[File:Lime Dye JE2 BE2.png|32px]] [[File:Green Dye JE2 BE2.png|32px]] [[File:Cyan Dye.png|32px]] [[File:Light Blue Dye JE2 BE2.png|32px]] [[File:Lapis Lazuli JE2 BE2.png|32px]] [[File:Purple Dye JE2 BE2.png|32px]] [[File:Magenta Dye JE2 BE2.png|32px]] [[File:Pink Dye JE2 BE2.png|32px]] The textures of bone meal, light gray, gray, ink sac, cocoa beans, red, orange, yellow, lime, green, cyan, light blue, lapis lazuli, purple, magenta, and pink dyes have been changed.}}
{{History||1.11.0|snap=beta 1.11.0.4|Dye can now be [[trading|sold]] to shepherd [[villager]]s.}}
{{History||1.16.210|snap=beta 1.16.210.59|The color of the text on [[sign]]s can now be changed with dye.}}
{{History|||snap=beta 1.16.210.60|The ability to dye the color of the text on [[sign]]s was temporarily removed.}}
{{History||1.16.220|snap=beta 1.16.220.50|The color of the text on [[sign]]s can now be changed with dye again.}}
{{History||1.17.10|snap=beta 1.17.10.22|Added [[candles]], which can be dyed.}}
{{History|console}}
{{History||xbox=TU1|xbone=CU1|ps=1.0|wiiu=Patch 1|switch=1.0.1|[[File:Bone Meal JE1 BE1.png|32px]] [[File:Light Gray Dye JE1 BE1.png|32px]] [[File:Gray Dye JE1 BE1.png|32px]] [[File:Ink Sac JE1 BE1.png|32px]] [[File:Cocoa Beans JE1 BE1.png|32px]] [[File:Red Dye JE1 BE1.png|32px]] [[File:Orange Dye JE1 BE1.png|32px]] [[File:Yellow Dye JE1 BE1.png|32px]] [[File:Lime Dye JE1 BE1.png|32px]] [[File:Green Dye JE1 BE1.png|32px]] [[File:Cyan Dye JE1 BE1.png|32px]] [[File:Light Blue Dye JE1 BE1.png|32px]] [[File:Lapis Lazuli JE1 BE1.png|32px]] [[File:Purple Dye JE1 BE1.png|32px]] [[File:Magenta Dye JE1 BE1.png|32px]] [[File:Pink Dye JE1 BE1.png|32px]] Added dyes.}}
{{History||xbox=TU9|[[File:Cocoa Beans JE3 BE2.png|32px]] The texture of cocoa beans has been changed.}}
{{History||xbox=none|xbone=none|ps=1.83|wiiu=none|switch=none|[[File:White Dye JE1 BE1.png|32px]] [[File:Black Dye JE1 BE1.png|32px]] [[File:Brown Dye JE1 BE1.png|32px]] [[File:Blue Dye JE1 BE1.png|32px]] Added [[white dye|white]], [[black dye|black]], [[brown dye|brown]], and [[blue dye|blue]] dyes, which can crafted from [[bone meal]], [[ink sac]], [[cocoa beans]], and [[lapis lazuli]].
|"Rose Red", "Dandelion Yellow" and "Cactus Green" have been renamed to "Red Dye", "Yellow Dye" and "Green Dye", respectively.}}
{{History||ps=1.90|[[File:Bone Meal JE2 BE2.png|32px]] [[File:Light Gray Dye JE2 BE2.png|32px]] [[File:Gray Dye JE2 BE2.png|32px]] [[File:Ink Sac JE2 BE2.png|32px]] [[File:Cocoa Beans JE4 BE3.png|32px]] [[File:Red Dye JE2 BE2.png|32px]] [[File:Orange Dye JE2 BE2.png|32px]] [[File:Yellow Dye JE2 BE2.png|32px]] [[File:Lime Dye JE2 BE2.png|32px]] [[File:Green Dye JE2 BE2.png|32px]] [[File:Cyan Dye.png|32px]] [[File:Light Blue Dye JE2 BE2.png|32px]] [[File:Lapis Lazuli JE2 BE2.png|32px]] [[File:Purple Dye JE2 BE2.png|32px]] [[File:Magenta Dye JE2 BE2.png|32px]] [[File:Pink Dye JE2 BE2.png|32px]] The textures of bone meal, light gray, gray, ink sac, cocoa beans, red, orange, yellow, lime, green, cyan, light blue, lapis lazuli, purple, magenta, and pink dyes have been changed.}}
{{History|3ds}}
{{History||0.1.0|[[File:Bone Meal JE1 BE1.png|32px]] [[File:Light Gray Dye JE1 BE1.png|32px]] [[File:Gray Dye JE1 BE1.png|32px]] [[File:Ink Sac JE1 BE1.png|32px]] [[File:Cocoa Beans JE3 BE2.png|32px]] [[File:Red Dye JE1 BE1.png|32px]] [[File:Orange Dye JE1 BE1.png|32px]] [[File:Yellow Dye JE1 BE1.png|32px]] [[File:Lime Dye JE1 BE1.png|32px]] [[File:Green Dye JE1 BE1.png|32px]] [[File:Cyan Dye JE1 BE1.png|32px]] [[File:Light Blue Dye JE1 BE1.png|32px]] [[File:Lapis Lazuli JE1 BE1.png|32px]] [[File:Purple Dye JE1 BE1.png|32px]] [[File:Magenta Dye JE1 BE1.png|32px]] [[File:Pink Dye JE1 BE1.png|32px]] Added dyes from [[Pocket Edition v0.15.4 alpha]].}}
{{History|foot}}
<gallery>
Pre-release dyes.png|Pre-release dye textures hidden within [[Items.png]].
</gallery>
;Notes
{{reflist|group=n}}
== Gallery ==
<gallery>
White Dye.png|White Dye
Light Gray Dye.png|Light Gray Dye
Gray Dye.png|Gray Dye
Black Dye.png|Black Dye
Brown Dye.png|Brown Dye
Red Dye.png|Red Dye
Orange Dye.png|Orange Dye
Yellow Dye.png|Yellow Dye
Lime Dye.png|Lime Dye
Green Dye.png|Green Dye
Cyan Dye.png|Cyan Dye
Light Blue Dye.png|Light Blue Dye
Blue Dye.png|Blue Dye
Purple Dye.png|Purple Dye
Magenta Dye.png|Magenta Dye
Pink Dye.png|Pink Dye
</gallery>
==Issues==
{{issue list}}
== Trivia ==
* Players can obtain each one of every color with 1 cocoa bean, 2 yellow dye, 2 ink sac, 3 green dye, 4 lapis lazuli, 4 red dye, and 6 bone meal (2 bones).
* The dyed sheep breeding behavior mirrors [[wikipedia:Lamarckism|Lamarck's theory]], in which the organisms evolve inheriting the external changes and adaptations of the previous generation, transmitting them to their offspring.
* In ''Bedrock Edition'', tertiary colors, along with their regular crafting recipes, can be crafted with primary colors. E.g.: Magenta can be crafted with one rose red and two bone meals.
* The colors of the dyes match the chat colors in [[color codes]] except for brown (dye only), light aqua, and gold (color codes only).
* The texture for light blue dye still uses the color from prior to the 1.12 World of Color update.<ref name="unchanged dyes"></ref>
== References ==
{{reflist}}
== External Links ==
* Tools for calculating leather dye combination: [https://minecraft.tools/en/armor.php minecraft.tools] (webapp); [https://github.com/pudquick/pyMCdyes/ pyMCDyes] (open-source Python script, outdated); [https://anrar4.github.io/DyeLeatherArmor/ DyeLeatherArmor]: a tool for calculating an exact crafting recipe for any sRGB color
{{Items}}
[[Category:Dyes]]
[[Category:Renewable resources]]
[[cs:Barvivo]]
[[de:Farbstoff]]
[[es:Tinte]]
[[fr:Teinture]]
[[hu:Színezés]]
[[it:Colorante]]
[[ja:染料]]
[[ko:염료]]
[[nl:Kleurstof]]
[[pl:Barwniki]]
[[pt:Corante]]
[[ru:Красители]]
[[th:สีย้อม]]
[[uk:Барвники]]
[[zh:染料]]</li></ul> | Beta 1.9 Prerelease 5 | Prior to this update, the sun in Minecraft rose in the North, which threw off many players and led to a common misconception that Minecraft maps/worlds were oriented with East at the top. The sun now rises in the east and sets in the west, making navigation much more intuitive. | ||||||||||||||||||||||||||||||||||||||||||||||||||||||||||||||||||||||||||||||||||||||||||||||||||||||||||||
| Before the change in sun position, it was commonly said that Minecraft maps/worlds are oriented with East at the top; sunrise, by definition, occurs at the East, which means it is certainly true that the maps were oriented "East" since the Sun rose from the top (North). However, Jeb asserted (and Notch agreed) that the sun rose in the north.[3][4] Most mods and map-making tools, however, used the terms East and North consistent with their actual definitions (e.g. a Cartograph-generated map with North at the top is rotated 90 degrees from the in-game map). | ||||||||||||||||||||||||||||||||||||||||||||||||||||||||||||||||||||||||||||||||||||||||||||||||||||||||||||||
1.4.2{{Extension DPL}}<ul><li>[[Cooked Chicken|Cooked Chicken]]<br/>{{about|a food item|other uses of the word "chicken"|Chicken (disambiguation)}}
{{Item
| title = Cooked Chicken
| image = Cooked Chicken.png
| renewable = Yes
| heals = {{hunger|6}}
| stackable = Yes (64)
}}
'''Cooked chicken''' is a [[food]] item that can be eaten by the [[player]].
== Obtaining ==
=== Mob loot ===
When a chicken dies while on fire, it drops one cooked chicken. The maximum is increased by 1 per level of [[Looting]], for a maximum of 1–4 cooked chicken with Looting III.
=== Cooking ===
[[Raw chicken]] can be cooked in a [[furnace]], [[smoker]], or [[campfire]]. Each piece of cooked chicken removed from a furnace output slot gives 0.35 [[experience]] (22.4 experience per stack).
{{Smelting
|Raw Chicken
|Cooked Chicken
|0,35
}}
=== Trading ===
{{IN|java}}, apprentice-level butcher [[villager]]s have a {{frac|2|3}} chance to sell 8 cooked chicken for an [[emerald]].
Butcher villagers may give cooked chicken to players with the [[Hero of the Village]] effect.{{only|java}}
{{IN|bedrock}}, apprentice-level butcher villagers have a 25% chance to sell 8 cooked chicken for an emerald as part of their trades.
== Usage ==
=== Food ===
To eat cooked chicken, press and hold {{control|use}} while it is selected in the hotbar. Eating one restores {{hunger|6}} [[hunger]] and 7.2 hunger [[Hunger#Mechanics|saturation]].
=== Wolves ===
Cooked chicken can be used to [[breed]] and heal tamed [[wolves]], lead them around, and make baby tamed wolves grow up faster by 10% of the remaining time.
== Sounds ==
{{Sound table/Entity/Food}}
== Data values ==
=== ID ===
{{edition|java}}:
{{ID table
|edition=java
|showforms=y
|generatetranslationkeys=y
|displayname=Cooked Chicken
|spritetype=item
|nameid=cooked_chicken
|form=item
|foot=1}}
{{edition|bedrock}}:
{{ID table
|edition=bedrock
|shownumericids=y
|showforms=y
|notshowbeitemforms=y
|generatetranslationkeys=y
|displayname=Cooked Chicken
|spritetype=item
|nameid=cooked_chicken
|id=276
|form=item
|foot=1}}
== Advancements ==
{{load advancements|Husbandry;A Balanced Diet}}
== Video ==
<div style="text-align:center">{{yt|ux362Ae8Llc}}</div>
== History ==
{{History|java beta}}
{{History||July 19, 2011|link=https://twitter.com/jeb_/status/93330811608240128|[[File:Cooked Chicken (pre-release).png|32px]] A teaser image for cooked chicken is revealed by [[Jeb]].}}
{{History||July 19, 2011|link=https://twitter.com/jeb_/status/93946593748852736|[[File:Cooked Chicken (pre-release 2).png|32px]] Jens changes the texture based on feedback, saying "the chicken may be too smooth compared to other MC [[item]]s."<ref>https://twitter.com/jeb_/status/93335976298033152</ref>}}
{{History||1.8|snap=Pre-release|[[File:Cooked Chicken JE1 BE1.png|32px]] Added cooked chicken.}}
{{History|java}}
{{History||1.2.1|snap=12w03a|Cooked chicken can now be used to breed wolves.}}
{{History||1.3.1|snap=12w21a|Farmer [[villager]]s now [[trading|sell]] 7–8 cooked chicken for 1 [[emerald]].}}
{{History||1.4.2|snap=12w37a|[[File:Cooked Chicken JE2 BE2.png|32px]] The texture of cooked chicken has been changed so that it no longer has a dark outline.}}{{History||1.8|snap=14w02a|Butcher villagers now [[trading|sell]] 6–8 cooked chicken for 1 [[emerald]]. Farmer [[villager]]s no longer sell cooked chicken.}}
{{History||1.9|snap=15w43a|[[Chicken]]s can now [[drops|drop]] several cooked chickens if killed with a [[Looting]]-enchanted [[weapons|weapon]].}}
{{History||1.13|snap=17w47a|Prior to [[1.13/Flattening|''The Flattening'']], this [[item]]'s numeral ID was 366.}}
{{History||1.14|snap=18w43a|[[File:Cooked Chicken JE3 BE3.png|32px]] The texture of cooked chicken has been changed.}}
{{History|||snap=19w13a|Butcher villagers now give cooked chicken to players under the [[Hero of the Village]] effect.}}
{{History|pocket alpha}}
{{History||v0.4.0|[[File:Cooked Chicken JE1 BE1.png|32px]] Added cooked chicken.}}
{{History||v0.5.0|Cooked chicken now restores {{hp|6}} instead of {{hp|3}}.}}
{{History||v0.8.0|snap=build 1|[[File:Cooked Chicken JE2 BE2.png|32px]] The texture of cooked chicken has been changed so that it no longer has a dark outline.}}
{{History||v0.12.1|snap=build 1|Cooked chicken now restores [[hunger]] instead of [[health]].}}
{{History|pocket}}
{{History||1.0.4|snap=alpha 1.0.4.0|Butcher villagers now [[trading|sell]] 6–8 cooked chicken for 1 [[emerald]].}}
{{History||?|[[Chicken]]s can now [[drops|drop]] several cooked chickens if killed with a [[Looting]]-enchanted [[weapons|weapon]].}}
{{History|bedrock}}
{{History||1.10.0|snap=beta 1.10.0.3|[[File:Cooked Chicken JE3 BE3.png|32px]] The texture of cooked chicken has been changed.}}
{{History||1.11.0|snap=beta 1.11.0.4|[[Trading]] has been changed, butcher [[villager]]s now have a 25% chance to [[trading|sell]] 4 cooked chicken as part of their second-tier [[trading|trade]].}}
{{History||1.16.0|snap=beta 1.16.0.57|[[Trading]] has been changed, apprentice butcher [[villager]]s now have a 25% chance to [[trading|sell]] 8 cooked chicken instead of 4.}}
{{History|console}}
{{History||xbox=TU5|xbone=CU1|ps=1.0|wiiu=Patch 1|[[File:Cooked Chicken JE1 BE1.png|32px]] Added cooked chicken.}}
{{History||xbox=TU12|[[File:Cooked Chicken JE2 BE2.png|32px]] The texture of cooked chicken has been changed so that it no longer has a dark outline.}}
{{History|PS4}}
{{History||1.90|[[File:Cooked Chicken JE3 BE3.png|32px]] The texture of cooked chicken has been changed.}}
{{History|new3DS}}
{{History||0.1.0|[[File:Cooked Chicken JE2 BE2.png|32px]] Added cooked chicken.}}
{{History|foot}}
== Issues ==
{{issue list}}
== Gallery ==
<gallery>
Beta 1.8 Dev Chicken.png|First image of cooked chicken.
Beta 1.8 Dev Chicken 2.png|Second image of cooked chicken.
</gallery>
== References ==
{{reflist}}
{{Items}}
[[Category:Food]]
[[Category:Renewable resources]]
[[cs:Pečené kuře]]
[[de:Gebratenes Hühnchen]]
[[es:Pollo asado]]
[[fr:Poulet rôti]]
[[hu:Sültcsirke]]
[[it:Pollo cotto]]
[[ja:焼き鳥]]
[[ko:익힌 닭고기]]
[[nl:Gebraden kip]]
[[pl:Pieczony kurczak]]
[[pt:Frango assado]]
[[ru:Жареная курятина]]
[[zh:熟鸡肉]]</li><li>[[Ender Pearl|Ender Pearl]]<br/>
{{ItemEntity
|image=Ender Pearl.png
|renewable=Yes
|stackable=Yes (16)
|size=Height: 0.25 Blocks<br>Width: 0.25 Blocks
}}
An '''ender pearl''' is an [[item]] that can be thrown and [[teleport|teleports]] the thrower to where it lands, and used to craft [[eye of ender|eyes of ender]] which are required to access [[the End]].
== Obtaining ==
=== Mob loot ===
An [[enderman]] has a 50% chance to drop 1 ender pearl when killed. The drop is increased by 1 per level of [[Looting]], with a maximum of 4 with Looting III.
=== Chest loot ===
{{LootChestItem|ender-pearl}}
A [[trapped chest]] always containing 2 ender pearls can be found in the "fake end portal" room of [[woodland mansion]]s.
=== Trading ===
{{IN|java}}, expert-level [[Trading#Cleric|cleric villagers]] have a {{frac|2|3}} chance to sell an ender pearl for 5 [[emerald]]s.
{{IN|bedrock}}, expert-level cleric villagers sell one ender pearl for 5 emeralds.
=== Bartering ===
[[Piglin]]s have a {{frac|10|459}} (4.27) chance to [[barter]] 3-4 ender pearls when given a [[gold ingot]].
== Usage ==
Ender pearls can be thrown by pressing {{control|use}}. After it is thrown, the ender pearl is consumed, and the player teleports to where it lands, taking {{hp|5}} [[fall damage]]. Wearing armor enchanted with [[Protection]] and/or [[Feather Falling]] reduces the damage taken from the ender pearl.
Ender pearls have a small cone of travel; they do not all follow the same path when thrown in the same direction. The direction and velocity of ender pearl throws is slightly randomized. They can travel about 30 blocks when thrown straight up, and up to 54 blocks forward when thrown at an optimum launch angle of ~35° (on even ground).
The thrower's vertical velocity influences the throw. Hence timing a throw with a jump can increase the throwing range to 42 blocks when thrown straight up and 64 blocks forward at a 35° angle. Throwing while falling significantly decreases the range. Ender pearls collide with all [[minecart]] types, [[boat]]s, [[end crystal]]s and [[nether portal]]s, and travel through [[end portal]]s. Ender pearls that fall into the [[void]] disappear, and do not trigger the player to teleport. However, ender pearl entities (instead of dropped items) are ''not'' destroyed by lava and will teleport the player to the bottom of lava pools/lava oceans.
Ender pearls have a cooldown of one second before they can be used again. The cooldown is shown in the hotbar by a white overlay on the ender pearl that shrinks and must disappear before the player can use it again. If there are other inventory or hotbar slots containing ender pearls, they are covered with the white overlay as well.<ref>{{bug|MC-88236|||WAI}}</ref>
Ender pearls can be thrown into [[end gateway]]s to reach the outer islands of the End. They can also be thrown into the [[exit portal]] to reach the player's spawn point.
Ender pearl teleportation makes no sound ''itself''{{only|java}}, but does emit a "small fall" sound at the destination when applying teleportation damage to the player.
=== Stasis chamber ===
Ender pearls are affected by [[bubble column]]s. An ender pearl can remain afloat on top of an upward bubble column, allowing it to be stored indefinitely. A mechanism can then be triggered to make the ender pearl hit a solid surface (e.g. by closing a [[trapdoor]]), teleporting the thrower back to the setup wherever they are.
=== Spawning endermites ===
An ender pearl has a 10% chance to spawn an [[endermite]] when it lands. This is the only way through which endermites can spawn, without using cheats. The endermite spawns at ''the player's position'' when the pearl lands{{only|je}}, or at the pearl's landing site{{only|be}}.
=== Crafting ingredient ===
{{crafting usage}}
== Sounds ==
{{edition|java}}:<br>
Thrown ender pearls use the Friendly Creatures sound category for entity-dependent sound events.
{{Sound table
|sound=Bow shoot.ogg
|subtitle=Ender Pearl flies
|source=neutral
|description=When an ender pearl is thrown
|id=entity.ender_pearl.throw
|translationkey=subtitles.entity.ender_pearl.throw
|volume=0.5
|pitch={{frac|1|3}}-0.5
|distance=16
|foot=1}}
{{Edition|Bedrock}}:
{{Sound table
|type=bedrock
|sound=Bow shoot.ogg
|source=player
|description=When an ender pearl is thrown
|id=random.bow
|volume=0.5
|pitch=0.33-0.5
|foot=1}}
== Data values ==
=== ID ===
{{edition|java}}:
{{ID table
|edition=java
|firstcolumnname=Item
|showforms=y
|generatetranslationkeys=y
|displayname=Ender Pearl
|spritetype=item
|nameid=ender_pearl
|form=item
|foot=1}}
{{ID table
|edition=java
|firstcolumnname=Entity
|generatetranslationkeys=y
|displayname=Thrown Ender Pearl
|spritetype=entity
|spritename=Ender Pearl
|nameid=ender_pearl
|foot=1}}
{{edition|bedrock}}:
{{ID table
|edition=bedrock
|firstcolumnname=Item
|shownumericids=y
|showforms=y
|notshowbeitemforms=y
|generatetranslationkeys=y
|displayname=Ender Pearl
|spritetype=item
|nameid=ender_pearl
|id=422
|foot=1}}
{{ID table
|edition=bedrock
|firstcolumnname=Entity
|shownumericids=y
|generatetranslationkeys=y
|displayname=Ender Pearl
|spritetype=entity
|nameid=ender_pearl
|id=87
|foot=1}}
===Entity Data===
Thrown ender pearls have entity data that define various properties of the entity.
{{el|java}}:
{{main|Entity format}}
{{/ED}}
{{el|bedrock}}:
: See [[Bedrock Edition level format/Entity format]].
== Achievements ==
{{Load achievements|Beam Me Up}}
== Advancements ==
{{load advancements|Remote Getaway;Bullseye}}
== History ==
{{History|java beta}}
{{History||1.8|snap=Pre-release|[[File:Ender Pearl JE1.png|32px]] Added ender pearls along with [[endermen]].
|Ender pearls have no use, but can stack up to 64.}}
{{History|java}}
{{History||1.0.0|snap=Beta 1.9 Prerelease|Ender pearls are now less commonly found near bodies of [[water]] since [[endermen]] now teleport away when in contact with water. Before this version, endermen didn't attempt to teleport and were [[damage]]d/killed from water much more frequently, causing numerous ender pearls to occur around bodies of water.
|Later, on a suggestion from [[wikipedia:Reddit|Reddit]] user isJesus, [[Notch]] implemented the teleporting feature for ender pearls.<ref>http://www.reddit.com/r/Minecraft/comments/kpsay/eggsnowballender_pearl_suggestiongif/c2mabfj</ref><ref>{{Tweet|notch|118614580539826176}}</ref><ref>http://www.reddit.com/r/Minecraft/comments/kss7n/twitter_ender_pearls_have_a_unique_ability_now/c2mwldd</ref>}}
{{History|||snap=Beta 1.9 Prerelease 2|Added teleporting feature to ender pearls.
|Using an ender pearl to teleport resulted in being kicked from servers for "hacking". This is due to a check triggering that was supposed to prevent modified clients from moving too quickly.
|Ender pearls now only stack up to 16.}}
{{History|||snap=Beta 1.9 Prerelease 3|Ender pearls are now used to craft [[eyes of ender]].
|Ender pearls can now be found in the new [[stronghold]] altar [[chest]]s.}}
{{History||1.3.1|snap=12w24a|[[File:Ender Pearl JE2 BE1.png|32px]] The texture of ender pearls has been changed.}}
{{History||1.8|snap=14w02a|As part of the revamp of the trading system, cleric [[villager]]s now [[trading|buy]] ender pearls.}}
{{History|||snap=14w03a|Villager clerics no longer buy ender pearls.}}
{{History|||snap=14w11b|Ender pearls have a 5% chance to spawn [[endermite]]s when used.}}
{{History||1.9|snap=15w31a|Ender pearls can now be thrown in [[Creative]] mode.}}
{{History|||snap=15w34c|Ender pearls now have a cooldown after using them.}}
{{History|||snap=15w41a|[[Villager]] clerics now [[trading|sell]] ender pearls for 4–7 [[emerald]]s, as one of their tier III trades.}}
{{History|||snap=15w49a|Thrown ender pearls now take the user's motion into account. For example, an ender pearl thrown forward will land closer if the player is falling, and land farther if the player is ascending.}}
{{History||1.10|snap=16w21a|Ender pearls can now teleport riders off their mounts.}}
{{History||1.11|snap=16w32a|The entity ID of ender pearls has been changed from <code>ThrownEnderpearl</code> to <code>ender_pearl</code>.}}
{{History|||snap=16w39a|Ender pearls can now be found in [[woodland mansion]]s' fake portal room [[chest]]s.}}
{{History||1.13|snap=17w47a|Prior to [[1.13/Flattening|''The Flattening'']], this [[item]]'s numeral ID was 368.}}
{{History||1.14|snap=18w43a|[[File:Ender Pearl JE3 BE2.png|32px]] The texture of ender pearls has been changed.}}
{{History||1.16|snap=20w07a|Ender pearls have a {{frac|2|109}} (~1.83%) chance of being offered by [[piglin]]s when [[bartering]], in a stack size of 2–4.}}
{{History|||snap=20w09a|Ender pearls now have a {{frac|10|226}} (~4.42%) chance of being offered by piglins when bartering, in a stack size of 1–5.}}
{{History|||snap=20w10a|Ender pearls now have a {{frac|20|411}} (~4.87%) chance of being offered by piglins when bartering, in a stack size of 4–8.}}
{{History|||snap=20w20a|Ender pearls now have a {{frac|20|423}} (~4.73%) chance of being offered by piglins when bartering, in a stack size of 4–8.}}
{{History||1.16.2|snap=20w28a|Ender pearls now have a {{frac|10|459}} (~2.18%) chance of being offered by piglins when bartering, in a stack size of 2–4.}}
{{History|||snap=Pre-Release 1|Ender pearls are now affected by [[bubble column]]s.<ref>{{bug|MC-125758|||Fixed}}</ref>
|Ender pearls no longer get destroyed at contact with non-solid blocks.<ref>{{bug|MC-73884|||Fixed}}</ref>}}
{{History|pocket alpha}}
{{History||v0.14.0|snap=build 1|[[File:Ender Pearl JE2 BE1.png|32px]] Added ender pearls.
|While fully implemented, ender pearls currently have no assigned ID and are currently unobtainable in-game.}}
{{History|pocket}}
{{History||1.0.0|snap=alpha 0.17.0.1|Ender pearls are now obtainable in-game.
|Ender pearls can now be used to craft [[eyes of ender]].}}
{{History|||snap=alpha 1.0.0.0|Ender pearls now require a 1-second cooldown.}}
{{History|||snap=alpha 1.0.0.1|Ender pearl cooldown now has an animation.}}
{{History||1.0.4|snap=alpha 1.0.4.0|Ender pearls can now be [[trading|bought]] from cleric [[villager]]s for 4-7 [[emerald]]s.}}
{{History||1.1.0|snap=alpha 1.1.0.0|Ender pearls can now be found in [[woodland mansion]]s' [[chest]]s.}}
{{History|bedrock}}
{{History||1.10.0|snap=beta 1.10.0.3|[[File:Ender Pearl JE3 BE2.png|32px]] The texture of ender pearls has been changed.}}
{{History||1.11.0|snap=beta 1.11.0.4|[[Trading]] has been changed, expert-level cleric [[villager]]s now [[trading|sell]] an ender pearl for 5 [[emerald]]s as part of their trade.}}
{{History||1.16.0|snap=beta 1.16.0.57|Ender pearls can now be obtained from [[bartering]] with [[piglin]]s.}}
{{History||1.16.100|snap=beta 1.16.100.54|Ender pearls now have a {{frac|10|459}} (~2.18%) chance of being offered by piglins when bartering, in a stack size of 2–4.}}
{{History|console}}
{{History||xbox=TU5|xbone=CU1|ps=1.0|wiiu=Patch 1|switch=1.0.1|[[File:Ender Pearl JE2 BE1.png|32px]] Added ender pearls.}}
{{History||xbox=TU7|A teleporting feature has been added to ender pearls.}}
{{History||xbox=none|xbone=none|ps=1.90|wiiu=none|switch=none|[[File:Ender Pearl JE3 BE2.png|32px]] The texture of ender pearls has been changed.}}
{{History|new 3ds}}
{{History||1.7.10|[[File:Ender Pearl JE2 BE1.png|32px]] Added ender pearls.}}
{{History|foot}}
== Issues ==
{{issue list}}
== Trivia ==
*Ender pearls can be used to teleport/move through non-[[solid block]]s without suffocation and solid blocks by pressing against the blocks and using the ender pearl at the player's feet until the player goes through.<ref>{{bug|MC-2164}}</ref><ref>{{ytl|KA1UmxraeUg}}</ref>
*In ''Java Edition'', it is possible to spawn a thrown ender pearl using commands, but it does not teleport, unless it is assigned an owner.
*If the player throws an ender pearl and then dies before impact while the pearl is in a loaded chunk, the pearl disappears and the player is not teleported. Pearls in unloaded chunks do not disappear if their owner dies.
*If the player throws an ender pearl in Survival mode and changes to Creative mode before the pearl lands, the player is still teleported.
*The player is still teleported by throwing an ender pearl and entering [[the Nether]] before it lands. The pearl is not lost if an ender pearl is thrown into a [[nether portal]] and the player travels through the portal; the pearl lands and teleports the player as usual.
*If multiple ender pearls are thrown in succession, the player can be hurt only once from fall damage within about a one-second span.
*If a [[player]] dies from ender pearl teleportation, the [[death message]] says: "<player> hit the ground too hard".
*A thrown ender pearl faces toward the player in first-person view, while it appears rotated horizontal in [[third-person view]]. This is the case for all throwable items (ender pearl, [[egg]], [[snowball]], and all throwable [[potion]]s).
*Ender pearls and [[snowball]]s have the exact same range when fired. Therefore, snowballs can be used to predict the trajectory of ender pearls, or simply for practicing ender pearl throwing. This can be very helpful when the player has to throw ender pearls in dangerous environments, such as the Nether or the End.
*Despite the fact that ender pearls deal no damage to anything they're thrown at, provokable mobs (such as iron golems and piglins) will be provoked by the player if one is thrown at them.
== Gallery ==
<gallery>
Ender Pearl Suggestion.gif|The original suggestion image for teleporting with ender pearls.
Enderlake.png|Ender pearls were formerly found in [[water]], however endermen now teleport out to prevent damage.
</gallery>
== References ==
{{reflist}}
== See also ==
*[[End Dimension]]
*[[Ender Dragon]]
*[[Ender Portal]]
*[[Enderman]]
{{Items}}
{{entities}}
[[cs:Endová perla]]
[[de:Enderperle]]
[[es:Perla de ender]]
[[fr:Perle de l'Ender]]
[[hu:Véggyöngy]]
[[ja:エンダーパール]]
[[ko:엔더 진주]]
[[nl:Enderparel]]
[[pl:Enderperła]]
[[pt:Pérola de ender]]
[[ru:Жемчуг Края]]
[[th:ไข่มุกเอนเดอร์]]
[[tr:Ender İncisi]]
[[uk:Перлина Краю]]
[[zh:末影珍珠]]</li></ul> | 12w34a | |||||||||||||||||||||||||||||||||||||||||||||||||||||||||||||||||||||||||||||||||||||||||||||||||||||||||||||
| Previously, in order to map a new area, the map had to be crafted in that area (rather than carrying a previously-crafted map to the new area). The point where a map is crafted becomes its permanent center, and could never be changed. | ||||||||||||||||||||||||||||||||||||||||||||||||||||||||||||||||||||||||||||||||||||||||||||||||||||||||||||||
| The pointer no longer disappears when leaving the map, but transforms into a white dot, indicating on what side of the map the player is located. | ||||||||||||||||||||||||||||||||||||||||||||||||||||||||||||||||||||||||||||||||||||||||||||||||||||||||||||||
| Maps now align to a grid, making it easier to create adjacent maps. | ||||||||||||||||||||||||||||||||||||||||||||||||||||||||||||||||||||||||||||||||||||||||||||||||||||||||||||||
| Maps can now be zoomed out (but not zoomed in). | ||||||||||||||||||||||||||||||||||||||||||||||||||||||||||||||||||||||||||||||||||||||||||||||||||||||||||||||
| Maps can now be cloned and scaled. | ||||||||||||||||||||||||||||||||||||||||||||||||||||||||||||||||||||||||||||||||||||||||||||||||||||||||||||||
| 12w34b | Maps now have a zoom level, which was fixed at 1:8 prior to snapshot 12w34a,[5] but now starts at 1:1 and can be increased up to 1:16 by re-crafting an existing map. | |||||||||||||||||||||||||||||||||||||||||||||||||||||||||||||||||||||||||||||||||||||||||||||||||||||||||||||
| Maps are no longer numbered on the top-left corner and is labeled through the tooltip. | ||||||||||||||||||||||||||||||||||||||||||||||||||||||||||||||||||||||||||||||||||||||||||||||||||||||||||||||
| 12w36a | New maps are now crafted at a scale factor of 1:1. A zoomed in map can be zoomed out by re-crafting it with another 8 sheets of paper on a crafting table. Each time this is done, the scale increases - 1:1, 1:2, 1:4, 1:8, 1:16 with a map scale of 1:16 being the current maximum. | |||||||||||||||||||||||||||||||||||||||||||||||||||||||||||||||||||||||||||||||||||||||||||||||||||||||||||||
1.7.2{{Extension DPL}}<ul><li>[[Heart of the Sea|Heart of the Sea]]<br/>{{Item
| image = Heart of the Sea.png
| stackable = Yes (64)
| rarity = Uncommon
| renewable = No
}}
A '''heart of the sea''' is a rare [[item]] that can be crafted into a [[conduit]].
== Obtaining ==
The heart of the sea must be found. It cannot be crafted or obtained by trading, making it a [[non-renewable resource]].
A heart of the sea is obtained from a [[buried treasure]]. The location is marked with a noticeable red X on a [[Explorer Map|buried treasure map]], which is found in [[Ocean_Ruins|ocean ruins]] and [[Shipwreck|shipwrecks]]. Feeding [[raw cod]] or [[raw salmon]] to a [[dolphin]] causes the dolphin to swim toward the nearest [[buried treasure]], [[shipwreck]], or [[ocean ruins]].
=== Chest loot ===
{{LootChestItem|heart-of-the-sea}}
== Usage ==
=== Crafting===
{{crafting usage}}
== Data values ==
=== ID ===
{{edition|java}}:
{{ID table
|edition=java
|showforms=y
|generatetranslationkeys=y
|displayname=Heart of the Sea
|spritetype=item
|nameid=heart_of_the_sea
|form=item
|foot=1}}
{{edition|bedrock}}:
{{ID table
|edition=bedrock
|shownumericids=y
|showforms=y
|notshowbeitemforms=y
|generatetranslationkeys=y
|displayname=Heart of the Sea
|spritetype=item
|nameid=heart_of_the_sea
|id=571
|form=item
|foot=1}}
== History ==
{{History|java}}
{{History||1.13|snap=18w15a|[[File:Heart of the Sea JE1 BE2.png|32px]] Added heart of the sea.}}
{{History|||snap=18w19a|Heart of the sea now generates in all [[buried treasure]] [[chest]]s in a stack of 1.}}
{{History|bedrock}}
{{History||1.4.0|snap=beta 1.2.14.2|An entry in the [[buried treasure]] loot table has been added named <code>nautilus_core</code>. It is unobtainable though since the <code>nautilus_core</code> has not been added into the game yet.}}
{{History|||snap=beta 1.2.20.1|[[File:Heart of the Sea BE1.png|32px]] Added heart of the sea as an [[item]] obtainable in buried treasure [[chest]]s. It cannot be used to craft [[conduit]]s yet.}}
{{History|||snap=beta 1.2.20.2|[[File:Heart of the Sea JE1 BE2.png|32px]] The texture of heart of the sea has been changed.}}
{{History||1.5.0|snap=beta 1.5.0.1|Heart of the sea can now be used to craft [[conduit]]s.}}
{{History|console}}
{{History||xbox=TU69|ps=1.76|wiiu=Patch 38|[[File:Heart of the Sea JE1 BE2.png|32px]] Added heart of the sea.}}
{{History|education}}
{{History||1.4.0|[[File:Heart of the Sea JE1 BE2.png|32px]] Added heart of the sea. It generates in all [[buried treasure]] [[chest]]s in a stack of 1.}}
{{History|foot}}
== Issues ==
{{issue list}}
== Trivia ==
* Before the heart of the sea was added to {{el|be}}, there was an entry found in the buried treasure chest loot table named <code>nautilus_core</code>, which was later revealed to be the heart of the sea. Despite the name change, the heart of the sea continues to be referred to as the <code>nautilus_core</code> in most game files.
== External Links ==
*[https://www.minecraft.net/en-us/article/heart-sea Taking Inventory: Heart of the Sea] – Minecraft.net on August 31, 2023
{{items}}
[[Category:Non-renewable resources]]
[[de:Herz des Meeres]]
[[fr:Cœur de la mer]]
[[es:Corazón del mar]]
[[it:Cuore del mare]]
[[ja:海洋の心]]
[[ko:바다의 심장]]
[[nl:Hart van de zee]]
[[pl:Serce oceanu]]
[[pt:Coração do mar]]
[[ru:Сердце моря]]
[[uk:Серце моря]]
[[zh:海洋之心]]</li><li>[[Mushroom Stew|Mushroom Stew]]<br/>{{Item
| title = Mushroom Stew
| image = Mushroom Stew.png
| renewable = Yes
| heals = {{hunger|6}}
| stackable = No
}}
'''Mushroom stew''' is a [[food]] item.
== Obtaining ==
=== Harvesting ===
Mushroom stew can be obtained by “milking” a [[mooshroom]] with an empty [[bowl]]. This is accomplished by {{Control|using}} a bowl on a mooshroom. The bowl gets replaced by the mushroom stew item. There is no cooldown for doing so.
If a stack of more than one bowl is used on a mooshroom, only one bowl is consumed, and the mushroom stew goes into an empty inventory slot, or is dropped if the player's inventory is full.
=== Crafting ===
{{Crafting
|Red Mushroom
|Brown Mushroom
|Bowl
|Output= Mushroom Stew
|type= Foodstuff
}}
== Usage ==
=== Food ===
{{see also|Tutorials/Hunger management|title1=Hunger management}}
To eat mushroom stew, press and hold {{control|use}} while it is selected in the hotbar. Eating one restores {{hunger|6}} [[hunger]] and 7.2 hunger
[[Hunger#Mechanics|saturation]].
The bowl is returned to the player empty after the mushroom stew has been eaten, and can be reused to craft more, similarly to [[Rabbit Stew|rabbit stew]] and [[Beetroot Soup|beetroot soup]].
== Sounds ==
=== Generic ===
{{Sound table/Entity/Food}}
=== Unique ===
{{Edition|Java}}:
{{Sound table
|sound=Mooshroom milk1.ogg
|sound2=Mooshroom milk2.ogg
|sound3=Mooshroom milk3.ogg
|subtitle=Mooshroom gets milked
|source=neutral
|description=When a mooshroom is milked with a bowl
|id=entity.mooshroom.milk
|translationkey=subtitles.entity.mooshroom.milk
|volume=1.0
|pitch=''varies'' <ref group=sound name=milkpitch>Can be 1.0, 0.9, or 1.1 for each sound</ref>
|distance=16
|foot=1}}
{{Edition|Bedrock}}:
{{Sound table
|type=bedrock
|sound=Mooshroom milk1.ogg
|sound2=Mooshroom milk2.ogg
|sound3=Mooshroom milk3.ogg
|subtitle=Mooshroom gets milked
|source=Friendly Creatures
|description=When a mooshroom is milked with a bowl
|id=mob.mooshroom.suspicious_milk
|volume=1.0/0.9/1.1
|pitch=1.0
|foot=1}}
== Data values ==
=== ID ===
{{edition|java}}:
{{ID table
|edition=java
|showforms=y
|generatetranslationkeys=y
|displayname=Mushroom Stew
|spritetype=item
|nameid=mushroom_stew
|form=item
|foot=1}}
{{edition|bedrock}}:
{{ID table
|edition=bedrock
|shownumericids=y
|showforms=y
|notshowbeitemforms=y
|generatetranslationkeys=y
|displayname=Mushroom Stew
|spritetype=item
|nameid=mushroom_stew
|id=260
|form=item
|foot=1}}
== Advancements ==
{{load advancements|Husbandry;A Balanced Diet}}
== History ==
{{History|java indev}}
{{History||0.31|snap=20100130|[[File:Mushroom Stew JE1 BE1.png|32px]] Added mushroom stew.
|Restores {{hp|8}} [[health]].}}
{{History||20100206|Mushroom stew now restores {{hp|10}} health.}}
{{History|java beta}}
{{History||1.6|snap=Test Build 3|[[Mushroom]] spreading mechanic added, making mushroom stew [[renewable]].}}
{{History||1.8|snap=Pre-release|Now restores {{hunger|8}} [[hunger]].}}
{{History|java}}
{{History||1.0.0|snap=Beta 1.9 Prerelease|More fungi sources have now been introduced with the addition of the [[Mushroom Fields|mushroom biome]].
|A [[mooshroom]] can now be "milked" with a [[bowl]] to obtain mushroom stew.}}
{{History|||snap=Beta 1.9 Prerelease 3|Mushroom stew can now be crafted in the [[2×2 crafting grid]] in the [[inventory]]. Previously, the crafting recipe was shaped, now it's shapeless.}}
{{History||1.2.5|snap=release|The [[player]] milking a [[mooshroom]] with a stack of [[bowl]]s no longer results in receiving back a single bowl of mushroom stew.}}
{{History||1.4.2|snap=?|Mushroom stew now restores {{Hunger|6}} instead of {{Hunger|8}}.}}
{{History||1.13|snap=17w47a|Prior to [[1.13/Flattening|''The Flattening'']], this [[item]]'s numeral ID was 282.}}
{{History||1.14|snap=18w43a|[[File:Mushroom Stew JE2 BE2.png|32px]] The texture of mushroom stew has now been changed.}}
{{History||1.16|snap=Pre-release 1|Mooshrooms can now be milked for mushroom stew in Creative mode.<ref>{{Cite bug|MC|90969|Cannot get mushroom stew from mooshrooms / milk from cows in creative mode|date=October 19, 2015}}</ref>}}
{{History|pocket alpha}}
{{History||v0.4.0|[[File:Mushroom Stew JE1 BE1.png|32px]] Added mushroom stew.}}
{{History||v0.5.0|Mushroom stew now restores {{hp|8}} instead of {{hp|4}}.}}
{{History||v0.9.0|snap=build 1|A mooshroom can now be "milked" with a [[bowl]] to obtain mushroom stew.}}
{{History||v0.12.1|snap=build 1|Mushroom stew now restores [[hunger]] instead of [[health]].}}
{{History|bedrock}}
{{History||1.10.0|snap=beta 1.10.0.3|[[File:Mushroom Stew JE2 BE2.png|32px]] The texture of mushroom stew has now been changed.}}
{{History|console}}
{{History||xbox=TU1|xbone=CU1|ps=1.0|switch=1.0.1|wiiu=Patch 1|[[File:Mushroom Stew JE1 BE1.png|32px]] Added mushroom stew.}}
{{History||xbox=none|xbone=none|ps=1.90|wiiu=none|switch=none|[[File:Mushroom Stew JE2 BE2.png|32px]] The texture of mushroom stew has now been changed.}}
{{History|new3ds}}
{{History||0.1.0|[[File:Mushroom Stew JE1 BE1.png|32px]] Added mushroom stew.}}
{{History|foot}}
== Issues ==
{{Issue list}}
== References ==
{{reflist}}
== External Links ==
*[https://www.minecraft.net/en-us/article/taking-inventory--mushroom-stew Taking Inventory: Mushroom Stew] – Minecraft.net on September 1, 2022
{{items}}
[[de:Pilzsuppe]]
[[es:Estofado de champiñones]]
[[fr:Soupe de champignons]]
[[hu:Gombaragu]]
[[ja:キノコシチュー]]
[[ko:버섯 스튜]]
[[nl:Paddenstoelenstoofpot]]
[[pl:Zupa grzybowa]]
[[pt:Ensopado de cogumelos]]
[[ru:Тушёные грибы]]
[[zh:蘑菇煲]]
[[Category:Food]]
[[Category:Renewable resources]]
<references /></li></ul> | 13w38a | The map size has been increased when placed on a wall using the item frame. | ||||||||||||||||||||||||||||||||||||||||||||||||||||||||||||||||||||||||||||||||||||||||||||||||||||||||||||
| More colors have been added to maps for different blocks.[6] | ||||||||||||||||||||||||||||||||||||||||||||||||||||||||||||||||||||||||||||||||||||||||||||||||||||||||||||||
1.8{{Extension DPL}}<ul><li>[[Debug Stick|Debug Stick]]<br/>{{about|the item|other uses|Debug}}
{{exclusive|java}}
{{Item
| image = Debug Stick.gif
| rarity = Epic
| renewable = No
| stackable = No
}}
The '''debug stick''' is an [[item]] used to edit the [[block states]] of [[block]]s. It is visually identical to a regular [[stick]], but with a glint (as if [[Enchanting|enchanted]]).
== Obtaining ==
The debug stick is obtainable via [[commands]] such as {{cmd|/give}} or {{Cmd|/item}}, or the Creative inventory if the player has the appropriate permissions. It can be obtained only in worlds with cheats on.
== Usage ==
The debug stick can be used to change block states. {{control|Hitting}} the block allows players to select the block state key they wish to change, for an example, switching between the ''conditional'' and the ''facing'' block state keys for a [[command block]]. {{control|Using}} the block allows them to cycle through the valid values for the block state key, again as an example, the player can make the command block face, ''down'', ''east'', ''north'', ''south'', ''up'', or ''west'' if they chose the ''facing'' block state key. {{control|Sneaking}} while {{control|hitting}} or {{control|using}} cycles through the block state keys or values in reverse order.
It is notable that {{Control|using}} debug stick directly on an interactive block without {{Control|sneaking}} uses the block itself instead of the stick.<ref>{{bug|MC-200199}} </ref>
The debug stick cannot be used while in Survival or Adventure mode. It works only in creative mode with cheats enabled. In modes other than Creative, it acts like a regular item — although when {{control|using}} it on a block, the player swings the stick as if interacting with it (but nothing happens).
== Data values ==
=== ID ===
{{ID table
|edition=java
|showforms=y
|generatetranslationkeys=y
|displayname=Debug Stick
|spritetype=item
|nameid=debug_stick
|form=item
|foot=1}}
=== Item data ===
<div class="treeview">
* {{nbt|compound|tag}}: The item's '''tag''' tag.
{{:Player.dat_format/Debug Sticks}}
</div>
== History ==
{{History|java}}
{{History||1.13|snap=17w47a|[[File:Debug Stick.gif|32px]] Added debug sticks.}}
{{History||1.16|snap=20w10a|Debug sticks are now capable of editing [[fire]] due to its added hitbox.}}
{{History||1.19.3|snap=22w44a|The debug stick is now available in the creative inventory, but only if cheats are enabled.}}
{{History|||snap=22w45a|Moved the debug stick behind the Operator Utilities tab in the creative inventory. The tab is only available if cheats are enabled and the "Operator Items Tab" option in the controls menu is turned on.}}
{{History|foot}}
== Issues ==
The debug stick is not supported, and any issues resulting of its usage are closed as "Won't Fix" in the issue tracker.<br/> Issues with the stick itself are considered valid.<ref>https://bugs.mojang.com/browse/MC-122323?focusedCommentId=419481&page=com.atlassian.jira.plugin.system.issuetabpanels:comment-tabpanel#comment-419481</ref><ref>{{reddit|7es23r||Just be aware that any weird state you create with it you cannot naturally create and any bugs that come from it will be shot down as 'Wont fix' :D|_Grum|November 22, 2017}}</ref>
{{issue list}}
== Trivia ==
*An [[add-on]] made by Mineplex was showcased in [[MINECON Live 2019]], which had an editor stick for {{el|be}}, similar to the Debug Stick.<ref>{{ytl|OZqNaEX8208|MINECON Live 2019 @ 1:05:02|Minecraft|September 28, 2019|t=3902}}</ref>
== Gallery ==
<gallery>
Technically Updated.jpg|Artwork of Steve and Alex wielding debug sticks.
</gallery>
== See also ==
*[[Block states]]
== References ==
{{Reflist}}
{{Items}}
[[Category:Non-renewable resources]]
[[de:Debug-Stab]]
[[es:Palo de depuración]]
[[fr:Bâton de débogage]]
[[ja:デバッグ棒]]
[[ko:디버그 막대기]]
[[pl:Patyk debugujący]]
[[pt:Graveto de depuração]]
[[ru:Палка отладки]]
[[zh:调试棒]]</li><li>[[Copper Horn|Copper Horn]]<br/>{{About|the removed item|the current item|Goat Horn}}
{{outdated feature|edition=bedrock}}
{{Item
| renewable = Yes
| stackable = No
}}
A '''copper horn''' was an [[item]] crafted from a [[goat horn]] and [[copper ingots]].
== Obtaining ==
=== Crafting ===
{{Crafting
|ignoreusage=1
|A2=Copper Ingot
|B2=Goat Horn
|B3=Copper Ingot
|C2=Copper Ingot
|Output=Copper Horn
}}
=== Natural generation ===
Copper horns were found in pillager outpost chests.
== Usage ==
Copper horns were used to play sounds. They took one second to use and had a four second cooldown. There were ten variations of copper horns, and each of them played three different sounds: when looking up, crouching, or neither of those. In total, there were thirty different sounds that could be played using copper horns. The sound a copper horn plays based on multiple conditions, which are in order as follows:
* If crouching, the bass tune was played.
* Else, if looking up (by 45 degrees), the harmony tune was played.
* Else, the melody tune was played.
== Sounds ==
Sound names in the item tooltip are created using the harmony, melody, and bass sounds in that order.
=== Harmony ===
{{Sound table
|type=bedrock
|sound=harmony0.ogg
|description="Great" ("Great Sky Falling")
|source=hostile
|id=horn.call.0
|volume=1.0
|pitch=1.0}}
{{Sound table
|sound=harmony1.ogg
|description="Old" ("Old Hymn Resting")
|source=hostile
|id=horn.call.1
|volume=1.0
|pitch=1.0}}
{{Sound table
|sound=harmony2.ogg
|description="Pure" ("Pure Water Desire")
|source=hostile
|id=horn.call.2
|volume=1.0
|pitch=1.0}}
{{Sound table
|sound=harmony3.ogg
|description="Humble" ("Humble Fire Memory")
|source=hostile
|id=horn.call.3
|volume=1.0
|pitch=1.0}}
{{Sound table
|sound=harmony4.ogg
|description="Dry" ("Dry Urge Anger")
|source=hostile
|id=horn.call.4
|volume=1.0
|pitch=1.0}}
{{Sound table
|sound=harmony5.ogg
|description="Clear" ("Clear Temper Journey")
|source=hostile
|id=horn.call.5
|volume=1.0
|pitch=1.0}}
{{Sound table
|sound=harmony6.ogg
|description="Fresh" ("Fresh Nest Thought")
|source=hostile
|id=horn.call.6
|volume=1.0
|pitch=1.0}}
{{Sound table
|sound=harmony7.ogg
|description="Secret" ("Secret Lake Tear")
|source=hostile
|id=horn.call.7
|volume=1.0
|pitch=1.0}}
{{Sound table
|sound=harmony8.ogg
|description="Fearless" ("Fearless River Gift")
|source=hostile
|id=horn.call.8
|volume=1.0
|pitch=1.0}}
{{Sound table
|sound=harmony9.ogg
|description="Sweet" ("Sweet Moon Love")
|source=hostile
|id=horn.call.9
|volume=1.0
|pitch=1.0
|foot=1}}
=== Melody ===
{{Sound table
|type=bedrock
|sound=melody0.ogg
|description="Sky" ("Great Sky Falling")
|source=hostile
|id=horn.melody.0
|volume=1.0
|pitch=1.0}}
{{Sound table
|sound=melody1.ogg
|description="Hymn" ("Old Hymn Resting")
|source=hostile
|id=horn.melody.1
|volume=1.0
|pitch=1.0}}
{{Sound table
|sound=melody2.ogg
|description="Water" ("Pure Water Desire")
|source=hostile
|id=horn.melody.2
|volume=1.0
|pitch=1.0}}
{{Sound table
|sound=melody3.ogg
|description="Fire" ("Humble Fire Memory")
|source=hostile
|id=horn.melody.3
|volume=1.0
|pitch=1.0}}
{{Sound table
|sound=melody4.ogg
|description="Urge" ("Dry Urge Anger")
|source=hostile
|id=horn.melody.4
|volume=1.0
|pitch=1.0}}
{{Sound table
|sound=melody5.ogg
|description="Temper" ("Clear Temper Journey")
|source=hostile
|id=horn.melody.5
|volume=1.0
|pitch=1.0}}
{{Sound table
|sound=melody6.ogg
|description="Nest" ("Fresh Nest Thought")
|source=hostile
|id=horn.melody.6
|volume=1.0
|pitch=1.0}}
{{Sound table
|sound=melody7.ogg
|description="Lake" ("Secret Lake Tear")
|source=hostile
|id=horn.melody.7
|volume=1.0
|pitch=1.0}}
{{Sound table
|sound=melody8.ogg
|description="River" ("Fearless River Gift")
|source=hostile
|id=horn.melody.8
|volume=1.0
|pitch=1.0}}
{{Sound table
|sound=melody9.ogg
|description="Moon" ("Sweet Moon Love")
|source=hostile
|id=horn.melody.9
|volume=1.0
|pitch=1.0
|foot=1}}
=== Bass ===
{{Sound table
|type=bedrock
|sound=bass0.ogg
|description="Falling" ("Great Sky Falling")
|source=hostile
|id=horn.bass.0
|volume=1.0
|pitch=1.0}}
{{Sound table
|sound=bass1.ogg
|description="Resting" ("Old Hymn Resting")
|source=hostile
|id=horn.bass.1
|volume=1.0
|pitch=1.0}}
{{Sound table
|sound=bass2.ogg
|description="Desire" ("Pure Water Desire")
|source=hostile
|id=horn.bass.2
|volume=1.0
|pitch=1.0}}
{{Sound table
|sound=bass3.ogg
|description="Memory" ("Humble Fire Memory")
|source=hostile
|id=horn.bass.3
|volume=1.0
|pitch=1.0}}
{{Sound table
|sound=bass4.ogg
|description="Anger" ("Dry Urge Anger")
|source=hostile
|id=horn.bass.4
|volume=1.0
|pitch=1.0}}
{{Sound table
|sound=bass5.ogg
|description="Journey" ("Clear Temper Journey")
|source=hostile
|id=horn.bass.5
|volume=1.0
|pitch=1.0}}
{{Sound table
|sound=bass6.ogg
|description="Thought" ("Fresh Nest Thought")
|source=hostile
|id=horn.bass.6
|volume=1.0
|pitch=1.0}}
{{Sound table
|sound=bass7.ogg
|description="Tear" ("Secret Lake Tear")
|source=hostile
|id=horn.bass.7
|volume=1.0
|pitch=1.0}}
{{Sound table
|sound=bass8.ogg
|description="Gift" ("Fearless River Gift")
|source=hostile
|id=horn.bass.8
|volume=1.0
|pitch=1.0}}
{{Sound table
|sound=bass9.ogg
|description="Love" ("Sweet Moon Love")
|source=hostile
|id=horn.bass.9
|volume=1.0
|pitch=1.0
|foot=1}}
==Data Values==
===ID===
{{ID table
|edition=bedrock
|shownumericids=y
|showforms=y
|notshowbeitemforms=y
|generatetranslationkeys=y
|displayname=Copper Horn
|spritetype=item
|nameid=copper_horn
|form=item
|foot=1}}
== History ==
{{h|bedrock}}
{{h||Vanilla Experiments<br>(experimental)|link=1.18.30|snap=beta 1.18.30.26|[[File:Copper Horn BE1.png|32px]]Added copper horns.}}
{{h|||snap=beta 1.18.30.28|[[File:Copper Horn BE2.png|32px]]Changed the texture of copper horns.}}
{{h||1.19.0|snap=beta 1.19.0.24|Removed copper horns.}}
{{h|foot}}
== Trivia ==
* Copper horns were removed from the game as they didn't live up to the developers' design goals, and as such are no longer supported.<ref>{{cite|url=https://feedback.minecraft.net/hc/en-us/articles/5540500564365| title = Minecraft Beta & Preview - 1.19.0.24/25|website=feedback.minecraft.net|date=April 14, 2022}}</ref>
* This is the first item in {{el|be}} to have been completely removed instead of just made unobtainable. This is likely due to the fact it never made it out of [[experimental gameplay]].
** If a world that contained this item is loaded into a newer version, the horn will disappear upon loading.
== References ==
{{reflist}}
{{Items}}
{{Removed features}}
[[Category:Renewable resources]]
[[de:Ziegenhorn]]
[[es:Cuerno de cobre]]
[[fr:Corne de chèvre]]
[[it:Corno di capra]]
[[lzh:銅號]]
[[pl:Kozi róg]]
[[pt:Chifre de cobre]]
[[ru:Козий рог]]
[[zh:铜制号角]]</li></ul> | 14w31a | Zoomed maps now conform to an expanded grid based on their zoom level. Previously, careful considerations would need to be taken to creating a wall of adjoining maps. | ||||||||||||||||||||||||||||||||||||||||||||||||||||||||||||||||||||||||||||||||||||||||||||||||||||||||||||
1.8.1{{Extension DPL}}<ul><li>[[Obsidian Boat|Obsidian Boat]]<br/>{{for|other uses|Obsidian (disambiguation)}} {{for|other kinds of boats|Boat (disambiguation)}}
{{Joke feature}}
{{ItemEntity
|title=Obsidian Boat
|image=Obsidian Boat.png
|image2=Obsidian Boat (item).png
|stackable=No
|renewable=Yes
}}
The '''obsidian boat''' was a joke [[boat]] variant released in an April Fools' joke version.
== Obtaining ==
=== Crafting ===
{{crafting
|A2 = Obsidian |C2 = Obsidian
|A3 = Obsidian |B3 = Obsidian |C3 = Obsidian
|Output= Obsidian Boat
|ignoreusage=1
}}
== Usage ==
Obsidian boats sank in [[water]] instead of floating. They also sank in lava like other boats but did not get destroyed in it.
== Sounds ==
Obsidian boats used the Friendly Creatures sound category for entity-dependent sound events, although did not have any sounds of their own.
== Data values ==
=== ID ===
{{ID table
|shownumericids=y
|showforms=y
|generatetranslationkeys=java
|displayname=Obsidian Boat
|spritetype=item
|nameid=obsidian_boat
|id=432
|form=item
|translationkey=item.obsidian_boat.name
|foot=1}}
{{ID table
|shownumericids=y
|generatetranslationkeys=java
|displayname=Obsidian Boat
|spritetype=entity
|nameid=boat
|id=41
|translationkey=entity.Boat.name
|foot=1}}
=== Entity data ===
{{/ED}}
== History ==
{{History|java}}
{{History||1.10|snap=15w14a|link=Java Edition 15w14a|[[File:Obsidian_Boat_(item).png|32px]] [[File:Obsidian Boat.png|32px]] Added the obsidian boat.}}
{{History|foot}}
== Issues ==
Obsidian boat is a joke feature and as such issues relating to them cannot be fixed.
{{Items}}
{{Entities}}
{{Jokes}}
[[Category:Joke items]]
[[Category:Joke entities]]
[[it:Barca di ossidiana]]
[[ja:黒曜石のボート]]
[[pt:Bote de obsidiana]]
[[uk:Обсидіановий човен]]
[[zh:15w14a]]</li><li>[[Lingering Potion|Lingering Potion]]<br/>{{about|throwable potions that leave a lingering area of effect|the throwable potions without a lingering effect|Splash Potion|the drinkable potions|Potion}}
{{Item
| image = <gallery>
Lingering Water Bottle.png | Water Bottle
Uncraftable Lingering Potion.png | Uncraftable
</gallery>
| extratext = View [[#Gallery|all renders]]
| renewable = Uncraftable, Luck{{only|java|short=1}}, Decay{{only|bedrock|short=1}}: No<br>
All others: Yes
| stackable = No
}}
'''Lingering potions''' are variants of [[splash potion]]s that can be thrown to leave clouds with [[status effect]]s that linger on the ground in an area.
== Obtaining ==
=== Brewing ===
{{main|Brewing}}
{{brewing
|Dragon's Breath
|Any Lingering Potion
|ingredients=[[Dragon's Breath]] + <br>Any [[Splash Potion]]
}}
== Usage ==
=== Creating area effect clouds ===
Lingering potions are thrown, like [[splash potion]]s, by {{control|using}} them. On impact they explode, creating a cloud. The cloud is made of the potion particles corresponding to the potion that was thrown.
The cloud starts with a radius of 3 blocks, decreasing to 0 over the course of 30 seconds. During the cloud's existence, any player or mob that walks into it after the first second gets the corresponding status effect; this decreases the radius by a {{frac|1|2}} block immediately, reducing the cloud's lifespan by 5 seconds.
For effects with duration, the duration applied by the cloud is {{frac|1|4}} that of the corresponding [[potion]]. For effects without duration such as healing or harming, the potency of the effect is {{frac|1|2}} that of the corresponding potion.
The effect may be applied consecutively if the player or mob remains in the cloud. For example, a player throwing the Lingering Potion of Healing II straight down consumes the cloud within a few seconds while being healed 5 times for a total of {{hp|20}} health. As far as healing is concerned, this makes the lingering potion much more powerful than the regular or splash potion, provided that the player is away from other mobs or players.
Lingering potions can also be thrown out of [[dispenser]]s like splash potions.
=== Lingering water bottle ===
Like the [[Splash potion#Splash water bottles|splash water bottle]], a lingering water bottle puts out fire and damages endermen and blazes by {{hp|1}}. It creates no effect cloud.
==== Mud ====
Lingering water bottles can be {{control|used}} on [[dirt]], [[coarse dirt]], or [[rooted dirt]] to turn it into [[mud]].
=== Crafting ingredient ===
{{crafting usage|Lingering Potion, Lingering Water Bottle|match=any}}
=== Filling cauldrons ===
{{IN|bedrock}}, using a lingering potion on a cauldron adds one level of that potion to the cauldron. Attempting to add a lingering potion to a cauldron with water, dyed water or a non-matching potion empties the cauldron and creates an explosion sound (but no actual explosion).
=== Uncraftable lingering potion ===
{{IN|java}}, the uncraftable potion is a splash potion with no effect that is unobtainable in regular gameplay. It is also available in potion and splash potion forms, as well as for tipped arrows.
It can be obtained using the following command: {{cmd|give @s minecraft:lingering_potion{Potion:"minecraft:empty"} }}. It is also obtained any time a potion has invalid or missing potion effect tags, and thus serves as a placeholder.
{| class="wikitable" style="text-align: center;" data-description="Unused potions"
! Icon
! Name
|-
| {{Slot|Uncraftable Lingering Potion|link=none}}
! Uncraftable Lingering Potion
|}
== Custom effects ==
{{IN|java}}, lingering potions can be obtained with any status effect using {{cmd|give}} and the tag {{code|CustomPotionEffects}}, which is an array of effects for the potion. See [[Item format#Potion Effects]] for more information, and [[status effect]] for a list of effects and IDs.
== Sounds ==
{{edition|java}}:<br>
Lingering potions use the Friendly Creatures sound category for entity-dependent sound events.
{{Sound table
|sound=Glass dig1.ogg
|sound2=Glass dig2.ogg
|sound3=Glass dig3.ogg
|subtitle=Bottle smashes
|source=neutral
|description=When a lingering potion impacts something
|id=entity.splash_potion.break
|translationkey=subtitles.entity.potion.splash
|volume=1.0
|pitch=0.9-1.0
|distance=16}}
{{Sound table
|rowspan=2
|sound=Bow shoot.ogg
|subtitle=Bottle thrown
|source=neutral
|description=When a lingering potion is thrown by a player
|id=entity.lingering_potion.throw
|translationkey=subtitles.entity.potion.throw
|volume=0.5
|pitch={{frac|1|3}}-0.5
|distance=16}}
{{Sound table
|subtitle=Dispensed item
|source=block
|description=When a lingering potion is dispensed by a [[dispenser]]
|id=block.dispenser.launch
|translationkey=subtitles.block.dispenser.dispense
|volume=1.0
|pitch=1.2
|distance=16
|foot=1}}
{{edition|bedrock}}:
{{Sound table
|type=bedrock
|sound=Glass dig1.ogg
|sound2=Glass dig2.ogg
|sound3=Glass dig3.ogg
|source=block
|description=When a splash potion impacts something
|id=random.glass
|volume=1.0
|pitch=1.0}}
{{Sound table
|rowspan=2
|sound=Bow shoot.ogg
|source=player
|description=When a splash potion is thrown by a player
|id=random.bow
|volume=0.5
|pitch=0.33-0.5}}
{{Sound table
|source=player
|description=When a splash potion is dispensed from a dispenser
|id=random.bow
|volume=1.0
|pitch=0.83-1.25
|foot=1}}
== Data values ==
=== ID ===
{{edition|java}}:
{{ID table
|edition=java
|showforms=y
|generatetranslationkeys=y
|displayname=Lingering Potion
|spritetype=item
|nameid=lingering_potion
|form=item
|translationkey=item.minecraft.lingering_potion,item.minecraft.lingering_potion.effect.empty,item.minecraft.lingering_potion.effect.water,item.minecraft.lingering_potion.effect.mundane,item.minecraft.lingering_potion.effect.thick,item.minecraft.lingering_potion.effect.awkward,item.minecraft.lingering_potion.effect.night_vision,item.minecraft.lingering_potion.effect.invisibility,item.minecraft.lingering_potion.effect.leaping,item.minecraft.lingering_potion.effect.fire_resistance,item.minecraft.lingering_potion.effect.swiftness,item.minecraft.lingering_potion.effect.slowness,item.minecraft.lingering_potion.effect.water_breathing,item.minecraft.lingering_potion.effect.healing,item.minecraft.lingering_potion.effect.harming,item.minecraft.lingering_potion.effect.poison,item.minecraft.lingering_potion.effect.regeneration,item.minecraft.lingering_potion.effect.strength,item.minecraft.lingering_potion.effect.weakness,item.minecraft.lingering_potion.effect.levitation,item.minecraft.lingering_potion.effect.luck,item.minecraft.lingering_potion.effect.turtle_master,item.minecraft.lingering_potion.effect.slow_falling
|foot=1}}
{{edition|bedrock}}:
{{ID table
|edition=bedrock
|shownumericids=y
|showforms=y
|notshowbeitemforms=y
|generatetranslationkeys=y
|displayname=Lingering Potion
|spritetype=item
|nameid=lingering_potion
|id=562
|form=item
|translationkey=potion.emptyPotion.linger.name,potion.mundane.linger.name,potion.mundane.extended.linger.name,potion.thick.linger.name,potion.awkward.linger.name,potion.nightVision.linger.name,potion.invisibility.linger.name,potion.jump.linger.name,potion.fireResistance.linger.name,potion.moveSpeed.linger.name,potion.moveSlowdown.linger.name,potion.heal.linger.name,potion.harm.linger.name,potion.poison.linger.name,potion.regeneration.linger.name,potion.damageBoost.linger.name,potion.weakness.linger.name,potion.wither.linger.name,potion.turtleMaster.linger.name,potion.slowFalling.linger.name
|foot=1}}
=== Item data ===
<div class="treeview">
* {{nbt|compound|tag}}: The item's '''tag''' tag.
{{:Player.dat_format/Potion}}
</div>
=== Thrown potion ===
{{Entity
| title = Thrown lingering potion
| networkid = '''[[JE]]''': 73
}}
==== ID ====
{{edition|java}}:
{{ID table
|generatetranslationkeys=java
|displayname=Lingering Potion
|spritetype=entity
|nameid=potion
|foot=1}}
{{edition|bedrock}}:
{{ID table
|shownumericids=y
|generatetranslationkeys=bedrock
|displayname=Lingering Potion
|spritetype=entity
|nameid=lingering_potion
|id=101
|foot=1}}
==== Entity Data ====
{{see also|Chunk format|Potions#Data values|title2=Potion data values}}
Lingering potions when thrown have entity data that define various properties of the entity.
{{:Splash Potion/ED}}
=== Area Effect Cloud ===
{{Entity
| title = Area Effect Cloud
| image = Area Effect Cloud.png
|imagesize=290px
}}
==== ID ====
{{edition|java}}:
{{ID table
|generatetranslationkeys=java
|displayname=Area Effect Cloud
|spritetype=entity
|nameid=area_effect_cloud
|foot=1}}
{{edition|bedrock}}:
{{ID table
|shownumericids=y
|generatetranslationkeys=bedrock
|displayname=Area Effect Cloud
|spritetype=entity
|nameid=area_effect_cloud
|id=95
|foot=1}}
==== Entity data ====
{{see also|Chunk format}}
The cloud that is created when: lingering potions are thrown; [[creeper]]s with potion effects explode; [[Ender Dragon#Dragon_Fireball|dragon fireballs]] hit the ground, is an entity, which has entity data that defines the properties of the entity.
{{/ED}}
==Advancements==
{{Load advancements|Zombie Doctor;A Furious Cocktail;How Did We Get Here?;Bullseye}}
== History ==
{{Info needed section|Lingering Potion of Decay; Lingering Potion of Weakness; Uncraftable Lingering Potion}}
{{History|java}}
{{History||1.9|snap=15w33a|[[File:Lingering Potion of Night Vision JE1 BE1.png|32px]] [[File:Lingering Potion of Invisibility JE1 BE1.png|32px]] [[File:Lingering Potion of Leaping JE1 BE1.png|32px]] [[File:Lingering Potion of Fire Resistance JE1 BE1.png|32px]] [[File:Lingering Potion of Swiftness JE1 BE1.png|32px]] [[File:Lingering Potion of Slowness JE1 BE1.png|32px]] [[File:Lingering Potion of Water Breathing JE1 BE1.png|32px]] [[File:Lingering Potion of Healing JE1 BE1.png|32px]] [[File:Lingering Potion of Harming JE1 BE1.png|32px]] [[File:Lingering Potion of Poison JE1 BE1.png|32px]] [[File:Lingering Potion of Regeneration JE1 BE1.png|32px]] [[File:Lingering Potion of Strength JE1 BE1.png|32px]] [[File:Lingering Potion of Weakness JE1 BE1.png|32px]] [[File:Lingering Potion of Luck JE1.png|32px]] Added lingering potions.
|[[File:Lingering Water Bottle JE1 BE1.png|32px]] [[File:Lingering Water Bottle JE1 BE1.png|32px]] [[File:Lingering Water Bottle JE1 BE1.png|32px]] [[File:Lingering Water Bottle JE1 BE1.png|32px]] Added lingering water bottle, and Mundane, Thick, and Awkward lingering potions.}}
{{History|||snap=15w33c|The bug where the [[player]] could not place [[splash potion]]s in the [[brewing stand]] has been fixed. This now allows for easier creation of lingering potions.}}
{{History|||snap=16w06a|Lingering potions can now be used to craft [[tipped arrow]]s.}}
{{History||1.11|snap=16w32a|The [[entity]] ID has been changed from {{code|AreaEffectCloud}} to {{code|area_effect_cloud}}.}}
{{History||1.13|snap=17w47a|Prior to [[1.13/Flattening|''The Flattening'']], this [[item]]'s numeral ID was 441.}}
{{History|||snap=18w07a|[[File:Lingering Potion of the Turtle Master JE1 BE1.png|32px]] Added the lingering potions of the Turtle Master.}}
{{History|||snap=18w14a|[[File:Lingering Potion of Slow Falling JE1 BE1.png|32px]] Added lingering potions of [[Slow Falling]].}}
{{History||1.14|snap=18w43a|[[File:Lingering Water Bottle JE2 BE2.png|32px]] [[File:Lingering Potion of Night Vision JE2 BE2.png|32px]] [[File:Lingering Potion of Invisibility JE2 BE2.png|32px]] [[File:Lingering Potion of Leaping JE2 BE2.png|32px]] [[File:Lingering Potion of Fire Resistance JE2 BE2.png|32px]] [[File:Lingering Potion of Swiftness JE2 BE2.png|32px]] [[File:Lingering Potion of Slowness JE2 BE2.png|32px]] [[File:Lingering Potion of the Turtle Master JE2 BE2.png|32px]] [[File:Lingering Potion of Water Breathing JE2 BE2.png|32px]] [[File:Lingering Potion of Healing JE2 BE2.png|32px]] [[File:Lingering Potion of Harming JE2 BE2.png|32px]] [[File:Lingering Potion of Poison JE2 BE2.png|32px]] [[File:Lingering Potion of Regeneration JE2 BE2.png|32px]] [[File:Lingering Potion of Strength JE2 BE2.png|32px]] [[File:Lingering Potion of Weakness JE2 BE2.png|32px]] [[File:Lingering Potion of Luck JE2.png|32px]] [[File:Lingering Potion of Slow Falling JE2 BE2.png|32px]] The textures of lingering potions have been changed.}}
{{History||1.19|snap=22w11a|Lingering water bottles can be {{control|used}} on [[dirt]], [[coarse dirt]], or [[rooted dirt]] to turn it into [[mud]].}}
{{History||1.19.3|snap=22w43a|Lingering water bottles can now extinguish burning entities.<ref>{{bug|MC-189911|||Fixed}}</ref>}}
{{History||1.19.4|snap=Pre-release 1|Lingering potions no longer have an enchantment glint.}}
{{History|||snap=Pre-release 3|[[File:Lingering Potion of Night Vision JE3.png|32px]] [[File:Lingering Potion of Invisibility JE3.png|32px]] [[File:Lingering Potion of Leaping JE3.png|32px]] [[File:Lingering Potion of Fire Resistance JE3.png|32px]] [[File:Lingering Potion of Swiftness JE3.png|32px]] [[File:Lingering Potion of Slowness JE3.png|32px]] [[File:Lingering Potion of the Turtle Master JE3.png|32px]] [[File:Lingering Potion of Water Breathing JE3.png|32px]] [[File:Lingering Potion of Harming JE3.png|32px]] [[File:Lingering Potion of Poison JE3.png|32px]] [[File:Lingering Potion of Strength JE3.png|32px]] Changed colors of the following lingering potions: Night Vision, Invisibility, Leaping, Fire Resistance, Swiftness, Slowness, Turtle Master, Water Breathing, Harming, Poison, Strength, Resistance.}}
{{History||1.20|snap=23w12a|Wither [[effect]] particle colors have been adjusted to make them more distinguishable.
|The lingering potion of [[Slow Falling]] has had its color tweaked to make it more distinguishable from the lingering potion of [[Invisibility]].}}
{{History|pocket}}
{{History||1.0.0|snap=alpha 0.17.0.1|[[File:Lingering Water Bottle JE1 BE1.png|32px]] [[File:Lingering Potion of Night Vision JE1 BE1.png|32px]] [[File:Lingering Potion of Invisibility JE1 BE1.png|32px]] [[File:Lingering Potion of Leaping JE1 BE1.png|32px]] [[File:Lingering Potion of Fire Resistance JE1 BE1.png|32px]] [[File:Lingering Potion of Swiftness JE1 BE1.png|32px]] [[File:Lingering Potion of Slowness JE1 BE1.png|32px]] [[File:Lingering Potion of Water Breathing JE1 BE1.png|32px]] [[File:Lingering Potion of Healing JE1 BE1.png|32px]] [[File:Lingering Potion of Harming JE1 BE1.png|32px]] [[File:Lingering Potion of Poison JE1 BE1.png|32px]] [[File:Lingering Potion of Regeneration JE1 BE1.png|32px]] [[File:Lingering Potion of Strength JE1 BE1.png|32px]] [[File:Lingering Potion of Weakness JE1 BE1.png|32px]] [[File:Lingering Potion of Decay BE1.png|32px]] Added lingering potions.
|Lingering water bottles, mundane, long mundane, thick, and awkward lingering potions are all available in the Creative inventory.}}
{{History|bedrock}}
{{History||1.5.0|snap=beta 1.5.0.4|[[File:Lingering Potion of the Turtle Master JE1 BE1.png|32px]] Added lingering potions of the Turtle Master.}}
{{History||1.6.0|snap=beta 1.6.0.5|[[File:Lingering Potion of Slow Falling JE1 BE1.png|32px]] Added lingering potions of [[Slow Falling]].}}
{{History||1.10.0|snap=beta 1.10.0.3|[[File:Lingering Water Bottle JE2 BE2.png|32px]] [[File:Lingering Potion of Night Vision JE2 BE2.png|32px]] [[File:Lingering Potion of Invisibility JE2 BE2.png|32px]] [[File:Lingering Potion of Leaping JE2 BE2.png|32px]] [[File:Lingering Potion of Fire Resistance JE2 BE2.png|32px]] [[File:Lingering Potion of Swiftness JE2 BE2.png|32px]] [[File:Lingering Potion of Slowness JE2 BE2.png|32px]] [[File:Lingering Potion of Water Breathing JE2 BE2.png|32px]] [[File:Lingering Potion of Healing JE2 BE2.png|32px]] [[File:Lingering Potion of Harming JE2 BE2.png|32px]] [[File:Lingering Potion of Poison JE2 BE2.png|32px]] [[File:Lingering Potion of Regeneration JE2 BE2.png|32px]] [[File:Lingering Potion of Strength JE2 BE2.png|32px]] [[File:Lingering Potion of Weakness JE2 BE2.png|32px]] [[File:Lingering Potion of Decay BE2.png|32px]] [[File:Lingering Potion of the Turtle Master JE2 BE2.png|32px]] [[File:Lingering Potion of Slow Falling JE2 BE2.png|32px]] The textures of lingering potions have been changed.}}
{{History||1.19.80|snap=beta 1.19.80.21|Changed potion colors for the following lingering potions: Fire Resistance, Harming, Invisibility, Leaping, Night Vision, Poison, Slowness, Strength, Swiftness, Turtle Master, and Water Breathing.
|Removed enchantment glint from lingering potions.}}
{{History|console}}
{{History||xbox=TU46|xbone=CU36|ps=1.38|wiiu=Patch 15|switch=1.0.1|[[File:Lingering Water Bottle JE1 BE1.png|32px]] [[File:Lingering Potion of Night Vision JE1 BE1.png|32px]] [[File:Lingering Potion of Invisibility JE1 BE1.png|32px]] [[File:Lingering Potion of Leaping JE1 BE1.png|32px]] [[File:Lingering Potion of Fire Resistance JE1 BE1.png|32px]] [[File:Lingering Potion of Swiftness JE1 BE1.png|32px]] [[File:Lingering Potion of Slowness JE1 BE1.png|32px]] [[File:Lingering Potion of Water Breathing JE1 BE1.png|32px]] [[File:Lingering Potion of Healing JE1 BE1.png|32px]] [[File:Lingering Potion of Harming JE1 BE1.png|32px]] [[File:Lingering Potion of Poison JE1 BE1.png|32px]] [[File:Lingering Potion of Regeneration JE1 BE1.png|32px]] [[File:Lingering Potion of Strength JE1 BE1.png|32px]] [[File:Lingering Potion of Weakness JE1 BE1.png|32px]] [[File:Lingering Potion of Luck JE1.png|32px]] Added lingering potions.}}
{{History||xbox=TU69|xbone=none|ps=1.76|wiiu=Patch 38|switch=none|[[File:Lingering Potion of Decay BE1.png|32px]] [[File:Lingering Potion of the Turtle Master JE1 BE1.png|32px]] [[File:Lingering Potion of Slow Falling JE1 BE1.png|32px]] Added lingering potions of the [[Wither (effect)|Decay]], [[Slow Falling]], and Turtle Master.}}
{{History||xbox=none|xbone=none|ps=1.90|wiiu=none|switch=none|[[File:Lingering Water Bottle JE2 BE2.png|32px]] [[File:Lingering Potion of Night Vision JE2 BE2.png|32px]] [[File:Lingering Potion of Invisibility JE2 BE2.png|32px]] [[File:Lingering Potion of Leaping JE2 BE2.png|32px]] [[File:Lingering Potion of Fire Resistance JE2 BE2.png|32px]] [[File:Lingering Potion of Swiftness JE2 BE2.png|32px]] [[File:Lingering Potion of Slowness JE2 BE2.png|32px]] [[File:Lingering Potion of Water Breathing JE2 BE2.png|32px]] [[File:Lingering Potion of Healing JE2 BE2.png|32px]] [[File:Lingering Potion of Harming JE2 BE2.png|32px]] [[File:Lingering Potion of Poison JE2 BE2.png|32px]] [[File:Lingering Potion of Regeneration JE2 BE2.png|32px]] [[File:Lingering Potion of Strength JE2 BE2.png|32px]] [[File:Lingering Potion of Weakness JE2 BE2.png|32px]] [[File:Lingering Potion of Luck JE2.png|32px]] [[File:Lingering Potion of Decay BE2.png|32px]] [[File:Lingering Potion of the Turtle Master JE2 BE2.png|32px]] [[File:Lingering Potion of Slow Falling JE2 BE2.png|32px]] The textures of lingering potions have been changed.}}
{{History|new 3ds}}
{{History||1.7.10|[[File:Lingering Water Bottle JE1 BE1.png|32px]] [[File:Lingering Potion of Night Vision JE1 BE1.png|32px]] [[File:Lingering Potion of Invisibility JE1 BE1.png|32px]] [[File:Lingering Potion of Leaping JE1 BE1.png|32px]] [[File:Lingering Potion of Fire Resistance JE1 BE1.png|32px]] [[File:Lingering Potion of Swiftness JE1 BE1.png|32px]] [[File:Lingering Potion of Slowness JE1 BE1.png|32px]] [[File:Lingering Potion of Water Breathing JE1 BE1.png|32px]] [[File:Lingering Potion of Healing JE1 BE1.png|32px]] [[File:Lingering Potion of Harming JE1 BE1.png|32px]] [[File:Lingering Potion of Poison JE1 BE1.png|32px]] [[File:Lingering Potion of Regeneration JE1 BE1.png|32px]] [[File:Lingering Potion of Strength JE1 BE1.png|32px]] [[File:Lingering Potion of Weakness JE1 BE1.png|32px]] [[File:Lingering Potion of Decay BE1.png|32px]] Added lingering potions.
|Lingering water bottles, mundane, long mundane, thick, and awkward lingering potions are all available in the Creative inventory.}}
{{History|foot}}
== Issues ==
{{issue list}}
== Trivia ==
* A thrown lingering potion faces toward the [[player]] in first-person view while it appears rotated horizontally in third-person view. This is the case for all throwable [[item]]s ([[ender pearl]]s, [[eggs]], [[snowball]]s, and all throwable potions).
== Gallery ==
<gallery>
Lingering Water Bottle.png|Water Bottle
Lingering Potion of Night Vision.png|Night Vision
Lingering Potion of Invisibility.png|Invisibility
Lingering Potion of Leaping.png|Leaping
Lingering Potion of Fire Resistance.png|Fire Resistance
Lingering Potion of Swiftness.png|Swiftness
Lingering Potion of Slowness.png|Slowness
Lingering Potion of the Turtle Master.png|Turtle Master
Lingering Potion of Water Breathing.png|Water Breathing
Lingering Potion of Healing.png|Healing
Lingering Potion of Harming.png|Harming
Lingering Potion of Poison.png|Poison
Lingering Potion of Regeneration.png|Regeneration
Lingering Potion of Strength.png|Strength
Lingering Potion of Weakness.png|Weakness
Lingering Potion of Slow Falling.png|Slow Falling
Lingering Potion of Luck.png|Luck
Lingering Potion of Decay.png|Decay
Uncraftable Lingering Potion.png|Uncraftable
</gallery>
=== Screenshots ===
<gallery>
Transparent Area Effect Cloud Image.png|Just area affect cloud particles
</gallery>
== See also ==
* {{ItemLink|Glass Bottle}}
* {{ItemLink|Potion}}
* {{ItemLink|Splash Potion}}
{{Items}}
{{Entities}}
[[Category:Combat]]
[[de:Verweiltrank]]
[[fr:Potion persistante]]
[[ko:잔류형 물약]]
[[ja:残留ポーション]]
[[pl:Trwałe miotane mikstury]]
[[pt:Poção prolongada]]
[[ru:Оседающие зелья]]
[[uk:Осідаючі зілля]]
[[zh:滞留药水]]</li></ul> | pre1 | Some colors have been changed on maps to more accurately represent their respective block. | ||||||||||||||||||||||||||||||||||||||||||||||||||||||||||||||||||||||||||||||||||||||||||||||||||||||||||||
1.9{{Extension DPL}}<ul><li>[[Glass Bottle|Glass Bottle]]<br/>{{about|the empty bottle||Bottle}}
{{Item
| image = Glass Bottle.png
| renewable = Yes
| stackable = Yes (64)
}}
A '''glass bottle''' is an [[item]] that can hold [[water]], [[potion]]s, [[Honey Bottle|honey]], or [[dragon's breath]].
== Obtaining ==
Glass bottles can be obtained by crafting, drinking from bottles, [[fishing]], or from [[witch]] drops.
=== Crafting ===
{{Crafting
|A2= Glass
|C2= Glass
|B3= Glass
|Output= Glass Bottle,3
|type= Brewing
}}
=== Drinking ===
Drinking a [[potion]] or [[Honey Bottle|honey bottle]] returns the empty glass bottle. Throwing a splash potion or a lingering potion does not return a glass bottle, but brewing a lingering potion gives back a glass bottle.
=== Mob loot ===
[[Witch]]es have a chance of dropping 0–6 glass bottles upon death. This is increased by 3 per level of [[Looting]], for a maximum of 0–15 glass bottles.
=== Mud ===
{{control|Using}} a [[water bottle]], [[splash water bottle]] or [[lingering water bottle]] on [[dirt]], [[coarse dirt]] or [[rooted dirt]] will transforming it into a [[mud]] block, at the same time leaving the player with an empty glass bottle.
=== Cauldrons ===
{{control|Using}} a water bottle (or, {{in|bedrock}}, a potion, splash potion, or lingering potion) on a [[cauldron]] that is not yet full adds that liquid to the cauldron, leaving the player with an empty glass bottle.
== Usage ==
Glass bottles can be filled to make [[water bottle]]s, which can then be used to [[brew]] items with a [[brewing stand]]. Glass bottles are also used to hold the resulting [[potion]].
=== Collecting liquids ===
==== Water ====
A bottle may be filled with water by holding it in the hand and {{control|using}} it on a [[water]] source block or a [[cauldron]] that has water in it. It can also be filled using a waterlogged block.{{only|java}}<ref>{{bug|MCPE-83420}}</ref>
Also, a bottle may be filled by powering a [[dispenser]] containing a bottle and pointed at a water source block. This does not work with cauldrons.<ref>{{bug|MC-165196|||Invalid}}</ref>
If filled via a water source, the water is unaffected. If filled via a cauldron, {{frac|1|3}} of the water in the cauldron is removed. Therefore, using a cauldron to fill water bottles is inefficient, except in [[the Nether]] where it is normally the only way to fill bottles.
==== Potion ====
{{IN|bedrock}}, a bottle may be filled with potion by {{control|using}} it on a [[cauldron]] containing potion. When the bottle is filled, {{frac|1|3}} of the cauldron's potion is removed.
==== Honey ====
If a [[beehive|bee nest]] or [[beehive]] is full, the player can {{control|use}} a glass bottle on the block, or may power a [[dispenser]] that contains a bottle and is pointed at the block, which empties the block and creates a [[honey bottle]]. Honey bottles can also be emptied by using them in crafting recipes (such as [[sugar]] or [[honey block]]). However, a lingering potion use on tipped arrow recipe does not give the bottle back.
==== Dragon's breath ====
{{control|Using}} a glass bottle in clouds emitted when the [[ender dragon]] breathes or shoots a [[dragon fireball]] fills the bottle with [[dragon's breath]].
When put 2 or more dragon's breath in the brewing stand, after the brewing process, a glass bottle will drop as an [[Item (entity)|entity]]. However, if put only 1 dragon's breath in the brewing stand, after the brewing process, the glass bottle is consumed and cannot be retrieved.<ref>{{bug|MC-259583}}</ref>
=== Trading ===
Expert-level cleric [[villager]]s have a 50% chance to buy 9 glass bottles for one [[emerald]] as part of their trade.{{only|bedrock}}
Expert-level cleric villagers have a {{frac|2|3}} chance to buy 9 glass bottles for one emerald.{{only|java}}
=== Crafting ingredients ===
{{Crafting usage|Glass Bottle}}
== Sounds ==
{{edition|java}}:
{{Sound table
|rowspan=2
|sound=Bottle fill water1.ogg
|sound2=Bottle fill water2.ogg
|sound3=Bottle fill water3.ogg
|sound4=Bottle fill water4.ogg
|subtitle=Bottle fills
|source=block
|description=When a bottle is filled with a liquid from a cauldron, or honey from a bee nest or beehive
|id=item.bottle.fill
|translationkey=subtitles.item.bottle.fill
|volume=1.0
|pitch=1.0
|distance=16}}
{{Sound table
|subtitle=Bottle fills
|source=neutral
|description=When a bottle is filled with water from a water source
|id=item.bottle.fill
|translationkey=subtitles.item.bottle.fill
|volume=1.0
|pitch=1.0
|distance=16}}
{{Sound table
|sound=Bottle empty1.ogg
|sound2=Bottle empty2.ogg
|subtitle=Bottle empties
|source=block
|description=When a water bottle is emptied
|id=item.bottle.empty
|translationkey=subtitles.item.bottle.empty
|volume=1.0
|pitch=1.0
|distance=16}}
{{Sound table
|sound=Bottle fill dragon breath1.ogg
|sound2=Bottle fill dragon breath2.ogg
|subtitle=Bottle fills
|source=neutral
|description=When a bottle is filled with dragon's breath
|id=item.bottle.fill_dragonbreath
|translationkey=subtitles.item.bottle.fill
|volume=1.0
|pitch=1.0
|distance=16
|foot=1}}
{{edition|java}}:
{{Sound table
|type=bedrock
|rowspan=4
|sound=Water Splash Old.ogg
|source=block
|description=When water from a bottle is placed in a cauldron<wbr><ref group=sound name=potionsplash>{{Bug|MCPE-174867}}</ref>
|id=cauldron.fillwater
|volume=0.1
|pitch=1.0}}
{{Sound table
|source=block
|description=When water from a bottle is taken from a cauldron<wbr><ref group=sound name=potionsplash/>
|id=cauldron.takewater
|volume=0.1
|pitch=1.0}}
{{Sound table
|source=block
|description=When a bottle is filled with a potion from a cauldron<wbr><ref group=sound name=potionsplash/>
|id=cauldron.fillpotion
|volume=0.1
|pitch=1.0}}
{{Sound table
|source=block
|description=When a potion bottle is emptied into a cauldron<wbr><ref group=sound name=potionsplash/>
|id=cauldron.takepotion
|volume=0.1
|pitch=1.0}}
{{Sound table
|sound=Bottle empty1.ogg
|sound2=Bottle empty2.ogg
|source=sound<!--bottle-->
|description=When a bottle is emptied<wbr>{{Upcoming|BE 1.20.40}}
|id=bottle.empty
|volume=1.0
|pitch=1.0}}
{{Sound table
|sound=Bottle fill water1.ogg
|sound2=Bottle fill water2.ogg
|sound3=Bottle fill water3.ogg
|sound4=Bottle fill water4.ogg
|source=sound<!--bottle-->
|description=When a bottle is filled<wbr>{{Upcoming|BE 1.20.40}}
|id=bottle.fill
|volume=1.0
|pitch=1.0}}
{{Sound table
|sound=Fill water bucket1.ogg
|sound2=Fill water bucket2.ogg
|sound3=Fill water bucket3.ogg
|source=block
|description=When a bottle is filled with honey from a bee nest or beehive<wbr><ref group=sound>{{Bug|MCPE-53881}}</ref>
|id=bucket.fill_water
|volume=1.0
|pitch=1.0}}
{{Sound table
|sound=Bottle fill dragon breath1.ogg
|sound2=Bottle fill dragon breath2.ogg
|source=sound
|description=When a bottle is filled with dragon's breath
|id=bottle.dragonbreath
|volume=0.7<wbr>{{Until|BE 1.20.40}}<br>1.0<wbr>{{Upcoming|BE 1.20.40}}
|pitch=1.0
|foot=1}}
== Data values ==
=== ID ===
{{edition|java}}:
{{ID table
|edition=java
|showforms=y
|generatetranslationkeys=y
|displayname=Glass Bottle
|spritetype=item
|nameid=glass_bottle
|form=item
|foot=1}}
{{edition|bedrock}}:
{{ID table
|edition=bedrock
|shownumericids=y
|showforms=y
|notshowbeitemforms=y
|generatetranslationkeys=y
|displayname=Glass Bottle
|spritetype=item
|id=427
|nameid=glass_bottle
|form=item
|foot=1}}
== Achievements ==
{{Load achievements|You Need a Mint;Local Brewery;Bee Our guest}}
== Advancements ==
{{load advancements|Local Brewery;You Need a Mint;Bee Our Guest}}
== History ==
{{History|java}}
{{History||1.0.0|snap=Beta 1.9 Prerelease 2|[[File:Glass Bottle JE1 BE1.png|32px]] Added glass bottles.}}
{{History|||snap=Beta 1.9 Prerelease 3|[[File:Water Bottle JE1 BE1.png|32px]] Glass bottles have been given their sole function of picking up [[water]] for the [[brewing]] of [[potion]]s.}}
{{History||1.4.2|snap=12w38b|[[Witch]]es now have a chance of [[drops|dropping]] glass bottles upon [[death]].}}
{{history||1.9|snap=15w33a|[[File:Dragon's Breath JE1 BE1.png|32px]] Glass bottles can now be used to obtain [[dragon's breath]].}}
{{history|||snap=15w43a|A glass bottle can be found in the [[brewing stand]] in an [[igloo]] basement.}}
{{history|||snap=15w43c|The glass bottle has been removed from igloo basements.}}
{{History|||snap=15w50a|Added [[sound]]s: <code>item.bottle.fill</code> and <code>item.bottle.fill_dragonbreath</code>.}}
{{History||1.13|snap=17w47a|Prior to [[1.13/Flattening|''The Flattening'']], this [[item]]'s numeral ID was 374.}}
{{History||1.14|snap=18w43a|[[File:Glass Bottle JE2 BE2.png|32px]] [[File:Water Bottle JE2 BE2.png|32px]] [[File:Dragon's Breath JE2 BE2.png|32px]] The textures of glass bottles, [[water bottle]]s and [[dragon's breath]] have been changed.}}
{{History|||snap=19w11a|Cleric [[villager]]s now [[trading|buy]] glass bottles.}}
{{History||1.15|snap=19w34a|[[File:Honey Bottle JE1.png|32px]] Glass bottles can now be used to collect [[Honey Bottle|honey]].
|[[Dispenser]]s may now use glass bottles to collect [[water]] and honey.}}
{{History|||snap=19w46a|Using glass bottles to collect honey now unlocks the [[Bee Our Guest]] advancement.}}
{{History||1.19|snap=22w11a|Converting [[dirt]], [[coarse dirt]] or [[rooted dirt]] into [[mud]] using a [[water bottle]], [[splash water bottle]] or [[lingering water bottle]] now leaves the player with an empty glass bottle.}}
{{History|pocket alpha}}
{{History||v0.12.1|snap=build 1|[[File:Glass Bottle JE1 BE1.png|32px]] Added glass bottles.}}
{{History||v0.14.0|snap=build 1|Glass bottles can now be used to empty [[cauldron]]s filled with [[water]] or [[potion]]s.
|Glass bottles can now be dropped by [[witch]]es.
|Potions and [[splash potion]]s can now be used to fill cauldrons, which turns them into glass bottles.}}
{{History|pocket}}
{{History||1.0.0|snap=alpha 0.17.0.1|[[File:Dragon's Breath JE1 BE1.png|32px]] Glass bottles can now be used to obtain [[dragon's breath]].
|[[Lingering potion]]s can now be used to fill [[cauldron]]s, which turns them into glass bottles.}}
{{History|bedrock}}
{{History||1.10.0|snap=beta 1.10.0.3|[[File:Glass Bottle JE2 BE2.png|32px]] The texture of glass bottles has been changed.}}
{{History||1.11.0|snap=beta 1.11.0.4|Glass bottles can now be [[trading|sold]] to cleric [[villager]]s.}}
{{History||1.14.0|snap=beta 1.14.0.1|[[File:Honey Bottle BE1.png|32px]] Glass bottles can now be used to collect [[Honey Bottle|honey]].
|[[Dispenser]]s may now use glass bottles to collect [[water]] and honey.}}
{{History|console}}
{{History||xbox=TU7|xbone=CU1|ps=1.0|wiiu=Patch 1|[[File:Glass Bottle JE1 BE1.png|32px]] Added glass bottles.}}
{{History|PS4}}
{{History||1.90|[[File:Glass Bottle JE2 BE2.png|32px]] The texture of glass bottles has been changed.}}
{{History|new 3ds}}
{{History||0.1.0|[[File:Glass Bottle JE1 BE1.png|32px]] Added glass bottles.}}
{{History||1.7.10|[[File:Dragon's Breath JE1 BE1.png|32px]] Glass bottles can now be used to obtain [[dragon's breath]].}}
{{history|foot}}
== Issues ==
{{issue list}}
==References==
{{Reflist}}
{{Items}}
[[cs:Lahvička]]
[[de:Glasflasche]]
[[es:Frasco de cristal]]
[[fr:Fiole]]
[[hu:Üvegpalack]]
[[it:Ampolla]]
[[ja:ガラス瓶]]
[[ko:유리병]]
[[nl:Glazen fles]]
[[pl:Szklana butelka]]
[[pt:Frasco]]
[[ru:Колба]]
[[zh:玻璃瓶]]
[[Category:Renewable resources]]</li><li>[[Crossbow|Crossbow]]<br/>{{For}}
{{Item
| title = Crossbow
| image = <gallery>
Crossbow.png | Crossbow
Crossbow Pull 0.png | Pull (state 0)
Crossbow Pull 1.png | Pull (state 1)
Crossbow Pull 2.png | Pull (state 2)
Arrow Loaded Crossbow.png | Arrow loaded
Firework Loaded Crossbow.png | Firework loaded
</gallery>
| rarity = Common
| renewable = Yes
| durability = 465{{only|JE|short=yes}}<br>464{{only|BE|short=1}}
| stackable = No
}}
A '''crossbow''' is a ranged [[weapon]] similar to a [[bow]] that uses [[arrow]]s or [[firework rocket|fireworks]] as ammunition.
== Obtaining ==
=== Crafting ===
{{Crafting
|A1=Stick|B1=Iron Ingot |C1=Stick
|A2=String|B2= Tripwire Hook|C2=String
|B3= Stick
|Output= Crossbow
|type= Combat
}}
=== Repairing ===
{{Grinding
|showdescription=1
|ingredients=2× Damaged [[Crossbow]] or<br>2× Damaged [[Arrow Loaded Crossbow]] or<br>2× Damaged [[Firework Loaded Crossbow]]
|Damaged Crossbow; Damaged Arrow Loaded Crossbow; Damaged Firework Loaded Crossbow
|Damaged Crossbow; Damaged Arrow Loaded Crossbow; Damaged Firework Loaded Crossbow
|Crossbow; Arrow Loaded Crossbow; Firework Loaded Crossbow
|description=The [[item durability|durability]] of the two crossbows is added together, plus an extra 5% durability.
}}
{{Crafting
|Damaged Crossbow;Damaged Arrow Loaded Crossbow;Damaged Firework Loaded Crossbow
|Damaged Crossbow;Damaged Arrow Loaded Crossbow;Damaged Firework Loaded Crossbow
|Output=Crossbow
|type=Combat
|ignoreusage=1
|showdescription=1
|description=The durability of the two crossbows is added together, plus an extra 5% durability. Any loaded ammunition is lost.
}}
=== Mob loot ===
==== Pillagers ====
When killed, a [[pillager]] has a small chance (8.5%) of dropping a loaded or unloaded crossbow with random [[durability]]; the [[drop]] rate increases by 1% per [[level]] of [[Looting]]: 9.5% with Looting I, 10.5% with Looting II and 11.5% with Looting III. The [[drop]]ped crossbow can rarely (10% chance) be [[enchanted]] at level 5–19 regardless of being [[enchanted]] when it [[spawn]]ed.
Crossbows dropped by pillagers may have multiple enchantments, including duplicate enchantments on the same weapon.
==== Piglins ====
[[Piglin]]s have a chance of wielding a crossbow upon spawning, and they also have a small chance (8.5%) of dropping a loaded or unloaded crossbow of random durability when killed; this rate increases by 1% per level of [[Looting]]: 9.5% with Looting I, 10.5% with Looting II and 11.5% with Looting III. It can rarely (10% chance) be enchanted at level 5–19 regardless of being enchanted when spawned.
=== Chest loot ===
{{LootChestItem|crossbow,damaged-level-enchanted-crossbow,damaged-random-enchanted-crossbow,damaged-random-enchanted-crossbow-2}}
=== Trading ===
Journeyman-level Fletcher [[villager]]s offer to [[trading|sell]] an unenchanted crossbow for 3 [[emerald]]s.
Master-level Fletcher villagers have a {{frac|1|16}} (6.25%) chance of selling an [[enchanting|enchanted]] crossbow for 8 emeralds.{{only|bedrock}}
Master-level Fletcher villagers have {{frac|2|3}} chance of selling an enchanted crossbow for 7-22 emeralds.{{only|java}}
== Usage ==
<gallery>
Steve aiming with Crossbow.png|
Alex aiming with Crossbow.png|
Pillager Aiming with Crossbow BE.png|
Piglin with Crossbow targeting JE.png|
</gallery>
Despite using [[iron ingot]]s in their crafting recipe, crossbows cannot be smelted into [[iron nugget]]s.<ref>{{bug|MC-111738}}</ref>
=== Weapon ===
[[File:Crossbowcooldown.gif|thumb|right|Charging and shooting the crossbow {{in|bedrock}}.]]
Crossbows are similar to [[bow]]s, but take longer to load and are slightly more powerful, shooting farther with slightly higher accuracy. Alternatively, they can be loaded with a firework rocket, which flies in a straight line.
Load them by {{control|using}} them, which makes the player move at sneak speed. Unlike bows, the [[arrow]] or [[firework rocket]] can be fired only if the player releases the use button after the crossbow is loaded{{Only|je}} or if the crossbow finishes its loading animation {{Only|be}}. At this point, it ''must be used a second time'' to fire its bolt.
Once it has reached full charge, the [[player]]'s speed returns to normal. After that, shooting a charged crossbow does not delay any of the [[player]]'s current action like [[sprinting]] or [[swimming]].
The crossbow can even be placed in another [[inventory]] slot or into an [[item frame]] without the [[arrow]] or [[firework rocket]] being unloaded or fired. A charged crossbow also remains charged after enchanting it with an enchantment table or with an anvil.
In order to use the crossbow, at least one arrow or firework rocket must be present in the inventory. The player can choose the type of arrow to fire based on its location in their [[inventory]]:
* [[File:Java Crossbow 1stP Loading.mp4|thumb|177x177px|Java Edition first-person loading animation for crossbows.]]Arrows in the off-hand, or the selected [[hotbar]] slot if the crossbow is in the off-hand, are prioritized first.
* If there are no arrows in the off-hand or selected hotbar slot, the arrow closest to slot 0 is selected.
Crossbows take 1.25 seconds (25 ticks) to load.
The player can load either an arrow, spectral arrow, tipped arrow (of any effect) or a firework (of any color/type).
[[File:Bedrock Crossbow 1stP Loading.mp4|thumb|177x177px|Bedrock Edition first-person loading animation for crossbows.]]
[[Endermen]] teleport away from projectile paths, so they cannot be hit with crossbow [[arrow]]s. However, they can still get harmed by [[firework rocket]] explosions, if they can't detect the firework rocket.
;Attack strength
''Java Edition'':
{| class="wikitable" style="text-align:center" data-description="Crossbow Damage Statistic"
|-
! Damage || Arrow || Max firework
|-
| {{ItemSprite|Crossbow|text= '''Minimum'''}}
| {{hp|7}}
| {{hp|11}}
|-
| {{ItemSprite|Crossbow|text= '''Average'''}}
| {{hp|9}}
| {{hp|14.5}}
|-
| {{ItemSprite|Crossbow|text= '''Maximum'''}}
| {{hp|11}}
| {{hp|18}}
|}
''Bedrock Edition''
* Always {{hp|9}}
=== Fireworks ===
[[Firework rocket]]s can be fired by loading the crossbow only while holding the rockets in the off-hand. They fly at 32 m/s. Firework rockets with higher flight duration have a longer time before they explode and therefore travel farther. Firing a firework rocket uses 3 [[durability]] points per shot.
{| class="wikitable" style="text-align:center"
! colspan="4" |Firework rocket range
|-
|Minimum
|Average
|Maximum
|Gunpowder
|-
|32m (20 ticks)
|40.8m (25.5 ticks)
|49.6m (31 ticks)
|1 ([[File:Gunpowder JE2 BE2.png|12x12px]])
|-
|48m (30 ticks)
|56.8m (35.5 ticks)
|65.6m (41 ticks)
| 2 ([[File:Gunpowder JE2 BE2.png|12x12px]][[File:Gunpowder JE2 BE2.png|12x12px]])
|-
|64m (40 ticks)
|72.8m (45.5 ticks)
|81.6m (51 ticks)
|3 ([[File:Gunpowder JE2 BE2.png|12x12px]][[File:Gunpowder JE2 BE2.png|12x12px]][[File:Gunpowder JE2 BE2.png|12x12px]])
|}
Firework rockets also work with the [[Multishot]] enchantment, enabling the [[player]] to shoot 3 firework rockets at a time. The increased durability usage stacks, resulting in 9 durability being consumed with each shot.
A shot firework rocket explodes instantly when it hits a [[mob]] or [[block]].{{only|java}} If the firework rocket has no explosion effect, it deals no [[damage]]. The explosion of a firework rocket deals {{hp|5}} to {{hp|6}} points of damage, with one [[firework star]]. The explosion has a radius of roughly 4 blocks, which is unaffected by the firework star's [[Firework Star#Effects|effect]]. Each additional firework star on the rocket deals an additional {{hp|1}} to {{hp|2}} points of damage, for a maximum of {{hp|11}} to {{hp|18}} with 7 firework stars. The flight duration of the firework increases the maximum range the firework can travel before exploding, but does not affect the damage output. Likewise, the damage remains the same regardless of any dyes used. The [[Piercing]] enchantment causes the firework rocket to pierce a number of entities based on its respective level before exploding.{{only|java}} Unlike an arrow shot from a bow, the firework does not slow down under water.
=== Repair ===
Crossbows can be repaired in an [[anvil]] or [[grindstone]] by combining two crossbows. Any loaded ammunition is retained from the crossbow in the first slot but sacrificed from the crossbow in the second slot.
===Enchantments===
{| class="wikitable"
|+
!Name
!Description
!Max Level
|-
|[[Quick Charge]]
|Decreases the reloading time of the crossbow by {{code|level * 0.25}} seconds. Crossbows with [[Quick Charge]] III fire slightly faster than [[bow]]s. If [[commands]] are used to enchant a crossbow with Quick Charge V, the crossbow charges instantaneously. A crossbow enchanted with Quick Charge VI is effectively impossible to charge, which renders it useless. This can be done only {{in|je}}.
|III
|-
|[[Multishot]]
| Makes the crossbow fire a spread of 3 projectiles at once instead of a single projectile, which is useful for targeting mobs spread out in a small area. This works for both [[arrow]]s and [[firework rocket]]s. Firing with this enchantment still uses only one projectile, and because of that, it is possible to recover only one of the three arrows shot from a Multishot crossbow. Multishot crossbows use 3 [[item durability|durability]] points per shot, unless using fireworks for ammunition, in which case 9 durability is consumed. Mutually exclusive with Piercing.
|I
|-
|[[Piercing]]
|Makes [[arrow]]s shot from the crossbow pierce [[entity|entities]] they hit and continue their flight, which allows each arrow to hit up to {{code|level + 1}} entities. This is useful for targeting [[mob]]s closely packed together, and for conserving arrows, as they can be picked up after piercing entities. Arrows fired in this manner also ignore [[Shield|shields]]. Mutually exclusive with Multishot.
|IV
|-
|[[Unbreaking]]
|Causes a <code>(Level /(Level+1)) * 100%</code> chance a shot fired does not reduce the [[item durability|durability]] of the crossbow.
|III
|-
|[[Mending]]
|Allows a certain proportion of [[experience]] orbs collected to contribute toward repairing the crossbow, rather than raising the [[player]]'s experience.
|I
|-
|[[Curse of Vanishing]]
| Causes the crossbow to disappear instead of dropping on the ground when the player dies. The {{cmd|gamerule keepInventory}} overrides this.
|I
|}
[[Multishot]] and [[Piercing]] are mutually exclusive. Normal methods of [[enchanting]] allow only one of them to be applied to a crossbow.
Crossbows can receive 3 unique [[enchanting|enchantment]]s, and have a base enchantability of 1. Enchantments specific to crossbows include [[Quick Charge]], Multishot and Piercing.
===Fuel===
Crossbows can be used as [[fuel]] in [[furnace]]s, [[smelting]] 1.5 [[item]]s per crossbow.
== Sounds ==
{{el|je}}:
{{Sound table
|sound=Crossbow loading start.ogg
|subtitle=Crossbow charges up
|source=player
|description=When a crossbow starts to load
|id=item.crossbow.loading_start
|translationkey=subtitles.item.crossbow.charge
|volume=0.15
|pitch=1.0
|distance=16}}
{{Sound table
|sound=Crossbow quick charge one1.ogg
|sound2=Crossbow quick charge one2.ogg
|sound3=Crossbow quick charge one3.ogg
|subtitle=Crossbow charges up
|source=player
|description=When a Quick Charge I crossbow starts to load <ref group=sound><code>quick1_3</code> occurs at half the frequency as the other sounds</ref>
|id=item.crossbow.quick_charge_1
|translationkey=subtitles.item.crossbow.charge
|volume=''varies'' <ref group=sound>0.325 for all except <code>quick1_1</code> (pitch=0.9), which is 0.25</ref>
|pitch=''varies'' <ref group=sound><code>quick1_1</code> can be 1.0 or 0.9; <code>quick1_2</code> can be 1.0 or 0.95; <code>quick1_3</code> can be 1.0</ref>
|distance=16}}
{{Sound table
|sound=Crossbow quick charge two1.ogg
|sound2=Crossbow quick charge two2.ogg
|sound3=Crossbow quick charge two3.ogg
|subtitle=Crossbow charges up
|source=player
|description=When a Quick Charge II crossbow starts to load <ref group=sound name=quickchargefrequency><code>_1</code> occurs at {{frac|2|3}} the frequency as the other sounds</ref>
|id=item.crossbow.quick_charge_2
|translationkey=subtitles.item.crossbow.charge
|pitch=''varies'' <ref group=sound name=quickchargevolume />
|volume=''varies'' <ref group=sound name=quickchargepitch />
|distance=16}}
{{Sound table
|sound=Crossbow quick charge three1.ogg
|sound2=Crossbow quick charge three2.ogg
|sound3=Crossbow quick charge three3.ogg
|subtitle=Crossbow charges up
|source=player
|description=When a Quick Charge III crossbow starts to load <ref group=sound name=quickchargefrequency />
|id=item.crossbow.quick_charge_3
|translationkey=subtitles.item.crossbow.charge
|volume=''varies'' <ref group=sound name=quickchargevolume>0.325 for all except <code>_1</code> (pitch=0.95), which is 0.25</ref>
|pitch=''varies'' <ref group=sound name=quickchargepitch><code>_1</code> can be 1.0 or 0.95; <code>_2</code> can be 1.0, 0.95, or 1.05; <code>_3</code> can be 1.0, 0.9, or 1.05</ref>
|distance=16}}
{{Sound table
|sound=Crossbow loading middle1.ogg
|sound2=Crossbow loading middle2.ogg
|sound3=Crossbow loading middle3.ogg
|sound4=Crossbow loading middle4.ogg
|subtitle=MC-203146
|source=player
|description=While a crossbow is loading <ref group=sound><code>loading_middle4</code> occurs at {{frac|1|4}} the frequency as the other sounds</ref>
|id=item.crossbow.loading_middle
|translationkey=-
|volume=0.325
|pitch=''varies'' <ref group=sound><code>loading_middle1</code> can be 1.0, 0.95, or 1.2; <code>loading_middle2</code> and <code>loading_middle3</code> can be 1.0, 0.9, or 1.05; <code>loading_middle4</code> can be 1.0</ref>
|distance=16}}
{{Sound table
|sound=Crossbow loading end.ogg
|subtitle=Crossbow loads
|source=dependent
|description=When a crossbow stops loading
|id=item.crossbow.loading_end
|translationkey=subtitles.item.crossbow.load
|volume=1.0
|pitch={{frac|13|15}}-1.2
|distance=16}}
{{Sound table
|sound=Crossbow shoot1.ogg
|sound2=Crossbow shoot2.ogg
|sound3=Crossbow shoot3.ogg
|subtitle=Crossbow fires
|source=dependent
|description=When a crossbow fires
|id=item.crossbow.shoot
|translationkey=subtitles.item.crossbow.shoot
|volume=0.8/0.9/0.9
|pitch=1.0/1.0/0.9 <ref group=sound>Multiplied by the loading percentage of the crossbow</ref>
|distance=16}}
{{Sound table
|sound=Arrow hit1.ogg
|sound2=Arrow hit2.ogg
|sound3=Arrow hit3.ogg
|sound4=Arrow hit4.ogg
|subtitle=Arrow hits
|source=neutral
|description=When an arrow hits a block or entity
|id=item.crossbow.hit
|translationkey=subtitles.item.crossbow.hit
|volume=1.0
|pitch={{frac|12|11}}-{{frac|4|3}}
|distance=16}}
{{Sound table
|sound=Succesfull Hit.ogg
|subtitle=Player hit
|source=player
|description=When an arrow shot by a player hits another player
|id=entity.arrow.hit_player
|translationkey=subtitles.entity.arrow.hit_player
|volume=0.18
|pitch=0.45
|distance=16}}
{{Sound table
|sound=Firework launch.ogg
|subtitle=Firework launches
|source=ambient
|description=When a crossbow fires a firework rocket
|id=entity.firework_rocket.launch
|translationkey=subtitles.entity.firework_rocket.launch
|volume=3.0
|pitch=1.0
|distance=16}}
{{Sound table
|sound=Random break.ogg
|subtitle=Item breaks
|source=dependent
|description=When a crossbow's durability is exhausted
|id=entity.item.break
|translationkey=subtitles.entity.item.break
|volume=0.8
|pitch=0.8-1.2
|distance=16
|foot=1}}
{{el|be}}:
{{Sound table
|type=bedrock
|sound=Crossbow loading start.ogg
|source=player
|description=When a crossbow starts to load
|id=crossbow.loading.start
|volume=1.0
|pitch=1.0}}
{{Sound table
|sound=Crossbow loading middle1.ogg
|sound2=Crossbow loading middle2.ogg
|sound3=Crossbow loading middle3.ogg
|sound4=Crossbow loading middle4.ogg
|source=player
|description=While a crossbow is loading and when a crossbow stops loading
|id=crossbow.loading.middle
|volume=1.0
|pitch=1.0}}
{{Sound table
|sound=Crossbow loading end.ogg
|source=player
|description=''Unused sound event''
|id=crossbow.loading.end
|volume=1.0
|pitch=1.0}}
{{Sound table
|sound=Crossbow quick charge one1.ogg
|sound2=Crossbow quick charge two1.ogg
|sound3=Crossbow quick charge three1.ogg
|source=player
|description=When a crossbow with Quick Charge starts to load
|id=crossbow.quick_charge.start
|volume=1.0
|pitch=1.0}}
{{Sound table
|sound=Crossbow quick charge one2.ogg
|sound2=Crossbow quick charge two2.ogg
|sound3=Crossbow quick charge three2.ogg
|source=player
|description=While a crossbow with Quick Charge is loading
|id=crossbow.quick_charge.middle
|volume=1.0
|pitch=1.0}}
{{Sound table
|sound=Crossbow quick charge one3.ogg
|sound2=Crossbow quick charge two3.ogg
|sound3=Crossbow quick charge three3.ogg
|source=player
|description=When a crossbow with Quick Charge stops loading
|id=crossbow.quick_charge.end
|volume=1.0
|pitch=1.0}}
{{Sound table
|sound=Crossbow shoot1.ogg
|sound2=Crossbow shoot2.ogg
|sound3=Crossbow shoot3.ogg
|source=player
|description=When a crossbow fires
|id=crossbow.shoot
|volume=1.0
|pitch=1.0}}
{{Sound table
|sound=Arrow hit1.ogg
|sound2=Arrow hit2.ogg
|sound3=Arrow hit3.ogg
|sound4=Arrow hit4.ogg
|source=player
|description=When an arrow hits a block or entity
|id=random.bowhit
|volume=1.0
|pitch=1.09-1.3}}
{{Sound table
|sound=Firework launch.ogg
|source=ambient
|description=When a crossbow fires a firework rocket
|id=firework.launch
|volume=1.0
|pitch=1.0}}
{{Sound table
|sound=Random break.ogg
|source=player
|description=When a crossbow's durability is exhausted
|id=random.break
|volume=1.0
|pitch=0.9
|foot=1}}
==Data values==
=== ID===
{{edition|java}}:
{{ID table
|edition=java
|showforms=y
|generatetranslationkeys=y
|displayname=Crossbow
|spritetype=item
|nameid=crossbow
|form=item
|foot=1}}
{{edition|bedrock}}:
{{ID table
|edition=bedrock
|shownumericids=y
|showforms=y
|notshowbeitemforms=y
|generatetranslationkeys=y
|displayname=Crossbow
|spritetype=item
|nameid=crossbow
|id=575
|form=item
|foot=1}}
===Item data===
{{el|java}}:
{{main|Player.dat format}}
<div class="treeview" style="margin-top: 0;">
*{{nbt|compound|tag}}: The '''tag''' tag.
{{:Player.dat_format/Crossbow}}
</div>
{{el|bedrock}}:
: See [[Bedrock Edition level format/Item format]].
==Achievements==
{{load achievements|Sniper Duel;Archer;Bullseye}}
==Advancements==
{{load advancements|Take Aim;Bullseye;Sniper Duel;Ol' Betsy;Who's the Pillager Now;Two Birds;Arbalistic}}
==History==
{{History||September 29, 2018|link={{tweet|Minecraft|1046094916902965249}}|Crossbows are announced at [[MINECON Earth 2018]].}}
{{History|java}}
{{History||1.14|snap=18w43a|[[File:Crossbow.png|32px]] [[File:Crossbow Pull 0.png|32px]] [[File:Crossbow Pull 1.png|32px]] [[File:Crossbow Pull 2.png|32px]] [[File:Arrow Loaded Crossbow.png|32px]] [[File:Crossbow.png|32px]] [[File:Crossbow Pull 0.png|32px]] [[File:Crossbow Pull 1.png|32px]] [[File:Crossbow Pull 2.png|32px]] [[File:Firework Loaded Crossbow.png|32px]] [[File:Crossbow.png|32px]] Added crossbows.
|Crossbows can be enchanted with either the [[Quick Charge]] (Highest Level III), [[Piercing]] (Highest Level IV) or [[Multishot]] (Highest Level I).}}
{{History|||snap=18w47a|Crossbows can now be found inside loot [[chest]]s at the top of [[pillager outpost]]s.}}
{{History|||snap=19w11a|Fletcher [[villager]]s now [[trading|sell]] crossbows and enchanted crossbows.}}
{{History||1.16|snap=20w07a|[[File:Piglin with Crossbow.png|32px]] [[File:Piglin left handed with Crossbow.png|35px]] [[File:Piglin using one hand to hold a loaded crossbow JE1.png|35px]] Added [[piglin]]s, which can spawn with and [[drops|drop]] crossbows.}}
{{History|||snap=20w16a|Crossbows now generate randomly enchanted in [[bastion remnants]] chests.}}
{{History||1.18|snap=21w37a|Crossbow durability is increased to 465 to match {{edition|BE}}.}}
{{History||1.19.4|snap=23w07a|The crossbow recipes are no longer unlocked by [[stick]]s.}}
{{History|upcoming java}}
{{History||Villager Trade Rebalance<br>(Experimental)|link=Java Edition 1.20.2|snap=23w31a|Enchantments exclusive to crossbows are no longer obtainable from villager [[trading]].}}
{{History|bedrock}}
{{History||1.8.0|snap=beta 1.8.0.10|[[File:Crossbow.png|32px]] [[File: Crossbow Pull 0.png|32px]] [[File: Crossbow Pull 1.png|32px]] [[File: Crossbow Pull 2.png|32px]] [[File:Arrow Loaded Crossbow.png|32px]] [[File:Crossbow.png|32px]] [[File:Crossbow Pull 0.png|32px]] [[File:Crossbow Pull 1.png|32px]] [[File:Crossbow Pull 2.png|32px]] [[File:Firework Loaded Crossbow.png|32px]] [[File:Crossbow.png|32px]] Added crossbows.
|Crossbows are currently apart of [[Experimental Gameplay]].}}
{{History||1.9.0|snap=beta 1.9.0.0|Added [[pillager]]s, which use and [[drops|drop]] crossbows.}}
{{History|||snap=beta 1.9.0.3|Crossbows now appear bigger in a pillager's hand.}}
{{History||1.10.0|snap=beta 1.10.0.3|Crossbows are now fully implemented and separate from [[Experimental Gameplay]].
|Crossbows can now be found in [[pillager outpost]] [[chest]]s.}}
{{History||1.11.0|snap=beta 1.11.0.4|Unenchanted and [[enchanting|enchanted]] crossbows can now be [[trading|bought]] from fletcher [[villager]]s.}}
{{History||1.12.0|snap=beta 1.12.0.3|Journeyman-level fletcher villagers now have 100% chance to [[trading|sell]] unenchanted crossbow, rather than 50% chance.}}
{{History||1.16.0|snap=beta 1.16.0.51|[[File:Piglin with Crossbow BE.png|32px]] Added [[piglin]]s, which can spawn with and [[drops|drop]] crossbows.}}
{{History|||snap=beta 1.16.0.57|Crossbows now generate randomly enchanted in [[bastion remnants]] chests.}}
{{History|PS4}}
{{History||1.90|[[File:Crossbow.png|32px]] [[File: Crossbow Pull 0.png|32px]] [[File: Crossbow Pull 1.png|32px]] [[File: Crossbow Pull 2.png|32px]] [[File:Arrow Loaded Crossbow.png|32px]] [[File:Crossbow.png|32px]] [[File:Crossbow Pull 0.png|32px]] [[File:Crossbow Pull 1.png|32px]] [[File:Crossbow Pull 2.png|32px]] [[File:Firework Loaded Crossbow.png|32px]] [[File:Crossbow.png|32px]] Added crossbows.}}
{{History|foot}}
==Issues==
{{issue list}}
==Trivia==
*Alongside [[pillager]]s, crossbows were inspired by ''[[Minecraft Dungeons]]'', even though they were added in the base game first.<ref>{{cite|url=https://discord.com/channels/579770991056519194/818903542139453480/819631528593588244| title = March 2021 developper Q&A|website=discord.com|date=March 11, 2021}}</ref>
*Crossbows [[enchanting|enchanted]] with [[Quick Charge]] VI and above get stuck on the first frame on the recharging animation because the resulting charge time is negative, and the game never reaches the time markers that tell it to advance the animation or the reloading procedure itself. It is technically possible to charge such crossbows, but this would require overflowing the value that determines how long the crossbow has been charged. This takes such an amount of time that this is practically impossible: for example, charging a crossbow with Quick Charge VI would take 69.4 years to complete.
*Although Piercing allows arrows to bypass [[shield]]s, they can't get through the wither armor.
*The crossbow's first-person loading animation in [[Bedrock Edition]] is different from [[Java Edition]].
*Even if a crossbow is already wound with a projectile, when it drops on the ground, it always looks uncharged.<ref>{{bug|MC-137552}}</ref>
*In real life, crossbows don't shoot the same arrows as bows, rather they shoot shorter, thicker, and oftentimes fletchless arrows (usually called "bolts") made to withstand the crossbow's increased power, which can shatter conventional arrows.
==Gallery==
<gallery>
File:CrossbowMinecon.png|A crossbow shown at [[MINECON Earth 2018]].
File:PillagerMinecon.png|A [[pillager]] armed with a crossbow, shown at MINECON Earth 2018.
File:EquippingCrossbow.png|How the crossbow is equipped.
File:Enchanted_Crossbow.gif|An enchanted crossbow.
File:Steve_Charging_Crossbow.gif|Steve charging crossbow {{in|java}}.
File:Alex_Charging_Crossbow.gif|Alex charging crossbow {{in|java}}.
File:Pillager_Charging_Crossbow.gif|Pillager charging crossbow.
File:Piglin_Charging_Crossbow.gif|Piglin charging crossbow.
File:Crossbow_(MCD).png|The ''Minecraft Dungeons'' variant of the crossbow
</gallery>
== References ==
{{reflist}}
== External Links ==
*[https://www.minecraft.net/en-us/article/taking-inventory--crossbow Taking Inventory: Crossbow] – Minecraft.net on October 20, 2022
{{Items}}
[[Category:Combat]]
[[Category:Renewable resources]]
[[de:Armbrust]]
[[es:Ballesta]]
[[fr:Arbalète]]
[[it:Balestra]]
[[ja:クロスボウ]]
[[ko:쇠뇌]]
[[pl:Kusza]]
[[pt:Besta]]
[[ru:Арбалет]]
[[th:หน้าไม้]]
[[zh:弩]]</li></ul> | 15w31a | Maps now display as a mini-map when held in the off-hand, or if the off-hand slot is occupied; the (old) large version is visible only when held in the dominant hand with the secondary hand free. | ||||||||||||||||||||||||||||||||||||||||||||||||||||||||||||||||||||||||||||||||||||||||||||||||||||||||||||
| 15w34a | New maps can now be crafted at a scale factor of 1:4. | |||||||||||||||||||||||||||||||||||||||||||||||||||||||||||||||||||||||||||||||||||||||||||||||||||||||||||||
| A crafting recipe has been added for zooming in maps. | ||||||||||||||||||||||||||||||||||||||||||||||||||||||||||||||||||||||||||||||||||||||||||||||||||||||||||||||
| 15w43a | The average yield of empty maps from stronghold library chests has been doubled. | |||||||||||||||||||||||||||||||||||||||||||||||||||||||||||||||||||||||||||||||||||||||||||||||||||||||||||||
| 15w45a | New maps are once again crafted at a scale factor of 1:1, as they had been before snapshot 15w34a. | |||||||||||||||||||||||||||||||||||||||||||||||||||||||||||||||||||||||||||||||||||||||||||||||||||||||||||||
| The crafting recipe, that was introduced in 15w34a, for zooming in maps has been removed. | ||||||||||||||||||||||||||||||||||||||||||||||||||||||||||||||||||||||||||||||||||||||||||||||||||||||||||||||
| 15w49a | Map making now uses armor equipping sounds. | |||||||||||||||||||||||||||||||||||||||||||||||||||||||||||||||||||||||||||||||||||||||||||||||||||||||||||||
1.11{{Extension DPL}}<ul><li>[[Minecart with Hopper|Minecart with Hopper]]<br/>{{ItemEntity
|image=Minecart with Hopper.png
|renewable=Yes
|stackable=No
|size=Height: 0.7 Blocks<br>Width: 0.98 Blocks
|networkid='''[[JE]]''': 10
|drops=1 {{ItemLink|Minecart with Hopper}}<br>plus contents
|health={{hp|6}}
}}
A '''minecart with hopper''' is a [[minecart]] with a [[hopper]] inside. Unlike a normal hopper, it pulls items from containers much more quickly, cannot push items into containers, can collect [[Item (entity)|item entities]] through a single layer of [[solid block]]s and is locked and unlocked via [[Activator Rail|activator rails]].
== Obtaining ==
=== Crafting ===
{{Crafting
|Output= Minecart with Hopper
|type= Transportation
|Hopper|Minecart}}
Minecarts with hoppers can be retrieved by attacking them. By doing so it drop as an [[item (entity)|item]] and any other contents of the hopper are dropped as well.
== Usage ==
[[File:Minecart with Hopper GUI.png|thumb|176px|The GUI of a minecart with hopper.]]
Minecarts with hoppers are placed similarly to other [[minecart]]s.
A minecart with hopper pulls in items lying nearby (within a range slightly larger than the cart itself), or inside a container directly above the minecart, at a rate of 1 item every [[game tick]] (20 items per second), eight times as fast as a normal hopper. It also picks up items that are lying on a block directly above the track. It does not push items into containers, but a hopper underneath the track can remove items from a minecart with hopper on the track. Ordinary hoppers can also drop items into a minecart with hopper like other containers, at the normal speed of 2.5 items per second. In Bedrock Edition, a minecart with hopper on curved rail pulls in items in a hopper lying in front of its moving direction and 1 block above if hopper's output funnel is pointed downward and no block is below that hopper.<ref>{{bug|MCPE-94293}}</ref>
The hopper can be disabled by passing over a powered [[activator rail]], and can be reenabled by an inactive activator rail.
An empty minecart with hopper can travel more than 85 blocks without stopping (as opposed to a normal cart going less than 12 blocks) from a dead stop using a 2 powered track starter even with another cart in front of them. However, the distance traveled by a minecart with hopper depends on the hopper's load. Using a 1 powered rail starter track, a minecart with an empty hopper travels 64 blocks until it stops (as opposed to an empty normal minecart going 8 blocks). The distance traveled diminishes non-linearly with increased hopper load; a minecart with a full hopper can travel only 16 blocks in this setup.
{{See also|Tutorials/Storage minecarts}}
== Sounds ==
{{Edition|Java}}:<br>
Minecarts with hoppers use the Friendly Creatures sound category for entity-dependent sound events.<ref group=sound name=rollsource>{{bug|MC-42132}}</ref>
{{Sound table
|sound=Minecart rolling.ogg
|subtitle=Minecart rolls
|source=Friendly Creatures <ref group=sound name=rollsource/>
|overridesource=1
|description=While a minecart with hopper is moving
|id=entity.minecart.riding
|translationkey=subtitles.entity.minecart.riding
|volume=0.0-0.35 <ref group=sound>Relates linearly with horizontal velocity (max 0.5)</ref>
|pitch=0.0-1.0 <ref group=sound>Will increase by 0.0025 per tick if the minecart's horizontal velocity is more than 0.01</ref>
|distance=16
|foot=1}}
{{Edition|Bedrock}}:
{{Sound table
|type=bedrock
|sound=Minecart rolling.ogg
|source=neutral
|description=While a minecart with hopper is moving
|id=minecart.base
|foot=1}}
== Data values ==
=== ID ===
{{edition|java}}:
{{ID table
|edition=java
|firstcolumnname=Item
|showforms=y
|generatetranslationkeys=y
|displayname=Minecart with Hopper
|spritetype=item
|nameid=hopper_minecart
|form=item
|foot=1}}
{{ID table
|edition=java
|firstcolumnname=Entity
|generatetranslationkeys=y
|displayname=Minecart with Hopper
|spritetype=entity
|nameid=hopper_minecart
|foot=1}}
{{edition|bedrock}}:
{{ID table
|edition=bedrock
|firstcolumnname=Item
|shownumericids=y
|showforms=y
|notshowbeitemforms=y
|generatetranslationkeys=y
|displayname=Minecart with Hopper
|spritetype=item
|nameid=hopper_minecart
|id=526
|form=item
|foot=1}}
{{ID table
|edition=bedrock
|firstcolumnname=Entity
|shownumericids=y
|generatetranslationkeys=y
|displayname=Minecart with Hopper
|spritetype=entity
|nameid=hopper_minecart
|id=96
|foot=1}}
=== Entity data ===
Minecarts with hoppers have entity data associated with them that contain various properties of the entity.
{{el|java}}:
{{main|Entity format}}
{{/ED}}
{{el|bedrock}}:
: See [[Bedrock Edition level format/Entity format]].
== Video ==
<div style="text-align:center">{{yt|I5etC7LeCac}}</div>
== History ==
{{History|java}}
{{History||1.5|snap=13w03a|[[File:Minecart with Hopper JE1 BE1.png|32px]] [[File:Minecart with Hopper (item) JE1 BE1.png|32px]] Added minecart with hopper.}}
{{History||1.9|snap=15w43a|Loot tables are added; minecarts with hopper now can use loot tables.}}
{{History||1.9.1|snap=pre2|The title of the [[inventory]] is changed from 'Hopper minecart' to 'Minecart with Hopper'.}}
{{History||1.11|snap=16w32a|The entity ID of the minecart with hopper has now been changed from <code>MinecartHopper</code> to <code>hopper_minecart</code>.}}
{{History||1.13|snap=17w47a|Prior to [[1.13/Flattening|''The Flattening'']], this [[item]]'s numeral ID was 408.}}
{{History||1.14|snap=18w43a|[[File:Minecart with Hopper JE2 BE2.png|32px]] [[File:Minecart with Hopper (item) JE2 BE2.png|32px]] The textures of the minecart with hopper have now been changed.}}
{{History||1.15|snap=19w38a|[[File:Minecart with Hopper 19w38a.png|32px]] The hopper now appears dark, same as suffocating mobs.}}
{{History|||snap=19w39a|The hopper now renders correctly.}}
{{History||1.16.2|snap=Pre-release 1|Opening or destroying a minecart with hopper now angers nearby [[piglin]]s.}}
{{History||1.19|snap=22w13a|The crafting recipe for a minecart with hopper is now shapeless.|Breaking a minecart with hopper will now drop the item instead of the minecart and hopper separately, though the contents of the hopper are still dropped.<ref>{{bug|MC-249493|||Fixed}}</ref>}}
{{History||1.19.4|snap=23w06a|Minecart with hopper now no longer aggravates [[piglin]]s when opened.}}
{{History|pocket alpha}}
{{History||v0.14.0|snap=build 1|[[File:Minecart with Hopper JE1 BE1.png|32px]] [[File:Minecart with Hopper (item) JE1 BE1.png|32px]] Added minecart with hopper.}}
{{History|pocket}}
{{History||1.1.0|snap=alpha 1.1.0.0|The entity ID of the minecart with hopper has now been changed from <code>minecarthopper</code> to <code>hopper_minecart</code>.}}
{{History|bedrock}}
{{History||1.10.0|snap=beta 1.10.0.3|[[File:Minecart with Hopper JE2 BE2.png|32px]] [[File:Minecart with Hopper (item) JE2 BE2.png|32px]] The textures of the minecart with hopper have now been changed.}}
{{History||1.19.0|snap=beta 1.19.0.30|Breaking a minecart with hopper will now drop the item instead of the minecart and hopper separately, though the contents of the hopper are still dropped.}}
{{History|console}}
{{History||xbox=TU19|xbone=CU7|ps=1.12|wiiu=Patch 1|switch=1.0.1|[[File:Minecart with Hopper JE1 BE1.png|32px]] [[File:Minecart with Hopper (item) JE1 BE1.png|32px]] Added minecart with hopper.}}
{{History||xbox=none|xbone=none|ps=1.90|wiiu=none|switch=none|[[File:Minecart with Hopper JE2 BE2.png|32px]] [[File:Minecart with Hopper (item) JE2 BE2.png|32px]] The textures of the minecart with hopper have now been changed.}}
{{History|new 3ds}}
{{History||0.1.0|[[File:Minecart with Hopper JE1 BE1.png|32px]] [[File:Minecart with Hopper (item) JE1 BE1.png|32px]] Added minecart with hopper.
|Minecarts with hopper emit smoke [[particles]] when destroyed.}}
{{History|foot}}
== Issues ==
{{issue list}}
== Gallery ==
<gallery>
File:First hopper Minecart Image.png|The first image of hopper carts released by Dinnerbone.<ref>{{Tweet|Dinnerbone|291215700213772289|Well you guys got that quick. The letters in the hotbar were for <nowiki>[imgur link]|January 15, 2013}}</ref>
File:13w03a Banner.png|The 13w03a banner showing a minecart with hopper and a [[dropper]].
</gallery>
== References ==
{{reflist}}
{{items}}
{{entities}}
[[Category:Mechanics]]
[[Category:Storage]]
[[cs:Vozík s násypkou]]
[[de:Trichterlore]]
[[es:Vagoneta con tolva]]
[[fr:Wagonnet à entonnoir]]
[[hu:Tölcsér csille]]
[[it:Carrello da miniera]]
[[ja:ホッパー付きのトロッコ]]
[[ko:호퍼가 실린 광산 수레]]
[[nl:Mijnkar met trechter]]
[[pl:Wagonik z lejem]]
[[pt:Carrinho de mina com funil]]
[[ru:Вагонетка с воронкой]]
[[uk:Вагонетка з лійкою]]
[[zh:漏斗矿车]]</li><li>[[Raw Porkchop|Raw Porkchop]]<br/>{{Item
| title = Raw Porkchop
| image = Raw Porkchop.png
| renewable = Yes
| heals = {{hunger|3}}
| stackable = Yes (64)
}}
A '''raw porkchop''' is a [[food]] item that can be eaten by the [[player]] or cooked to make a [[cooked porkchop]].
== Obtaining ==
=== Mob loot ===
==== Pigs ====
Adult [[pig]]s drop 1–3 raw porkchop when killed. The maximum amount is increased by 1 per level of [[Looting]], for a maximum of 1-6 with Looting III. If killed while on fire, they drop [[cooked porkchop]] instead.
==== Hoglins ====
Adult [[hoglin]]s drop 2–4 raw porkchop when killed. The maximum amount is increased by 1 per level of [[Looting]], for a maximum of 7 with Looting III. If killed while on fire, they drop [[cooked porkchop]] instead.
=== Chest loot ===
{{LootChestItem|raw-porkchop}}
== Usage ==
=== Food ===
To eat raw porkchop, press and hold {{control|use}} while it is selected in the hotbar. Eating one restores {{hunger|3}} [[hunger]] and 0.6 [[Hunger#Mechanics|saturation]].
=== Smelting ingredient ===
{{Smelting
|showname=1
|Raw Porkchop
|Cooked Porkchop
|0.35
}}
=== Trading ===
{{IN|bedrock}}, novice-level butcher [[villager]]s have a {{frac|1|3}} chance to [[trading|buy]] 7 raw porkchop for an [[emerald]] as part of their [[trading|trades]].
{{IN|java}}, novice-level butcher villagers have a 40% chance to buy 7 raw porkchop for an emerald.
=== Wolves ===
Raw porkchops can be used to [[breed]] and heal tamed [[wolves]], lead them around, and make baby tamed wolves grow up faster by 10% of the remaining time.
=== Piglins ===
[[Piglin|Piglins]] instantly pick up raw or [[Cooked Porkchop|cooked porkchops]] that are within 1 block of them, unless they have already picked up one within the last 10 seconds. Porkchops picked up are not dropped upon the piglin's death.
==Sounds==
{{Sound table/Entity/Food}}
== Data values ==
=== ID ===
{{edition|java}}:
{{ID table
|edition=java
|showitemtags=y
|showforms=y
|generatetranslationkeys=y
|displayname=Raw Porkchop
|spritetype=item
|nameid=porkchop
|itemtags=piglin_food
|form=item
|foot=1}}
{{edition|bedrock}}:
{{ID table
|edition=bedrock
|shownumericids=y
|showforms=y
|notshowbeitemforms=y
|generatetranslationkeys=y
|displayname=Raw Porkchop
|spritetype=item
|nameid=porkchop
|id=262
|form=item
|foot=1}}
== Achievements ==
{{load achievements|Pork Chop}}
== Advancements ==
{{load advancements|Husbandry;A Balanced Diet}}
== History ==
{{History|java indev}}
{{History||20100219|[[File:Raw Porkchop JE1 BE1.png|32px]] Added raw porkchops.
|Raw porkchops restore {{hp|3}} and do not stack in the [[inventory]].
|Raw porkchops are [[drops|dropped]] by [[pig]]s.}}
{{History|java beta}}
{{History||1.4|Raw porkchops can now be given to [[wolf|wolves]].}}
{{History||1.8|snap=Pre-release|Raw porkchops can now be stacked to 64.<ref>{{Tweet|jeb|103408168356421632|Some Minecraft food changes...}}</ref>
|Raw porkchops now restore {{hunger|3}} to the [[Hunger|food bar]].}}
{{History|java}}
{{History||1.2.1|snap=12w03a|Raw porkchops can now be used to breed wolves.}}
{{History||1.3.1|snap=12w21a|Raw porkchops can now be [[trading|sold]] to butcher [[villager]]s, at 14–17 pork chops for 1 [[emerald]].}}
{{History|||snap=12w25a|[[Pig]]s now [[drops|drop]] 1–3 porkchops instead of 0–2.}}
{{History||1.4.2|snap=12w37a|[[File:Raw Porkchop JE2 BE2.png|32px]] The texture of raw porkchops has been changed, so that it no longer has a dark outline.}}
{{History||1.8|snap=14w02a|[[Trading]] has been changed; butcher villagers now [[trading|buy]] 14–18 porkchops for 1 emerald.}}
{{History||1.13|snap=17w47a|Prior to [[1.13/Flattening|''The Flattening'']], this [[item]]'s numeral ID was 319.}}
{{History||1.14|snap=18w43a|[[File:Raw Porkchop.png|32px]] The texture of raw porkchops has been changed.}}
{{History|||snap=18w49a|Raw porkchops can now be found in [[chest]]s in [[village]] butcher shops.}}
{{History||1.16|snap=20w07a|Raw porkchops are dropped by the new [[hoglin]]s.
|Raw porkchops have a {{frac|5|109}} (~4.59%) chance of being given by the new [[piglin]]s when [[bartering]], in a stack size of 2–5.}}
{{History|||snap=20w09a|Raw porkchops can no longer be obtained by bartering with piglins.}}
{{History|||snap=20w16a|Raw porkchops now generate in [[bastion remnants]] chests.}}
{{History|pocket alpha}}
{{History||v0.4.0|[[File:Raw Porkchop JE1 BE1.png|32px]] Added raw porkchops.}}
{{History||v0.5.0|Raw porkchops now restore {{hp|3}} instead of {{hp|1}}.}}
{{History||v0.8.0|snap=build 1|[[File:Raw Porkchop JE2 BE2.png|32px]] The texture of raw porkchops has been changed, so that it no longer has that dark outline.}}
{{History||v0.12.1|snap=build 1|Raw porkchops now restore [[hunger]] instead of [[health]].}}
{{History||v0.16.2|[[Pig]]s now [[drops|drop]] 1–3 raw porkchops rather than 0–2.}}
{{History|pocket}}
{{History||1.0.4|snap=alpha 1.0.4.0|14–18 raw porkchops can now be [[trading|sold]] to butcher [[villager]]s for an [[emerald]].}}
{{History|bedrock}}
{{History||1.10.0|snap=beta 1.10.0.3|[[File:Raw Porkchop.png|32px]] The texture of raw porkchops has been changed.}}
{{History||1.11.0|snap=beta 1.11.0.3|Raw porkchops can now be found in [[village]] butcher [[chest]]s.}}
{{History|||snap=beta 1.11.0.4|Butcher [[villager]]s now have {{frac|1|3}} chance to [[trading|buy]] 7 raw porkchops.}}
{{History|console}}
{{History||xbox=TU1|xbone=CU1|ps=1.0|wiiu=Patch 1|switch=1.0.1|[[File:Raw Porkchop JE1 BE1.png|32px]] Added raw porkchops.}}
{{History||xbox=TU5|Raw porkchops are now stackable to 64 and fills [[hunger]] instead of [[health]].}}
{{History||xbox=TU12|[[File:Raw Porkchop JE2 BE2.png|32px]] The texture of raw porkchops has been changed, so that it no longer has a dark outline.}}
{{History||xbox=none|xbone=none|ps=1.90|wiiu=none|switch=none|[[File:Raw Porkchop.png|32px]] The texture of raw porkchops has been changed.}}
{{History|new3DS}}
{{History||0.1.0|[[File:Raw Porkchop JE2 BE2.png|32px]] Added raw porkchops.}}
{{History|foot}}
== Issues ==
{{issue list}}
== Gallery ==
<gallery>
I Porkchop Minecraft JINX.jpg|Official T-shirt artwork "I Porkchop Minecraft" sold by [https://www.jinx.com JINX].
I Brake for Porkchop Bumper Sticker JINX.jpg|An official bumper sticker featuring a raw porkchop sold by JINX.
</gallery>
== References ==
{{reflist}}
== External Links ==
*[https://www.minecraft.net/en-us/article/taking-inventory--porkchop Taking Inventory: Porkchop] – Minecraft.net on February 13, 2020
{{Items}}
[[Category:Food]]
[[cs:Syrová kotleta]]
[[de:Rohes Schweinefleisch]]
[[es:Chuleta de cerdo cruda]]
[[fr:Côtelette de porc crue]]
[[hu:Nyers disznóhús]]
[[ja:生の豚肉]]
[[nl:Rauw varkensvlees]]
[[pl:Surowy schab]]
[[pt:Costeleta de porco crua]]
[[ru:Сырая свинина]]
[[uk:Сира свинина]]
[[zh:生猪排]]
[[Category:Renewable resources]]</li></ul></nowiki> | 16w39a | Maps now work in the End. | ||||||||||||||||||||||||||||||||||||||||||||||||||||||||||||||||||||||||||||||||||||||||||||||||||||||||||||
| Empty maps are now sold by cartographer villagers as their tier 3 trade. | ||||||||||||||||||||||||||||||||||||||||||||||||||||||||||||||||||||||||||||||||||||||||||||||||||||||||||||||
| Added explorer maps, sold by cartographers as their tier 4 trades. | ||||||||||||||||||||||||||||||||||||||||||||||||||||||||||||||||||||||||||||||||||||||||||||||||||||||||||||||
1.12{{Extension DPL}}<ul><li>[[Redstone Repeater|Redstone Repeater]]<br/>{{Block
| image = <gallery>
Redstone Repeater.png|Redstone Repeater
Redstone Repeater BE.png|Redstone Repeater (BE)
</gallery>
| extratext = View [[#Renders|all renders]]
| transparent = Yes
| light = No
| tool = any
| stackable = Yes (64)
| flammable = No
| lavasusceptible = No
| renewable = Yes
}}
{{about|the block|repeater circuits|Transmission circuit#Repeater|other topics related to redstone|Redstone (disambiguation)}}
A '''redstone repeater''' is a [[block]] that produces a full-strength [[Redstone Dust|output signal]] from its front when its back is powered, with four configurable delay settings. It can also be locked into a power state by its side being directly powered by a repeater or a [[Redstone Comparator|comparator]].
== Obtaining ==
=== Breaking ===
A redstone repeater can be broken instantly using any [[tool]], or without a tool, and drops itself as an item. To remove a redstone repeater, {{control|mine}} it.
A redstone repeater is removed and drops as an item if:
* its attachment block is moved, removed, or destroyed;
* [[water]] or [[lava]] flows into its space;{{only|java}}
* a [[piston]] tries to push it or moves a block into its space.
=== Natural generation ===
[[File:Redstone Repeater naturally generated.png|thumb|A redstone repeater generated in the jungle temple's hidden room.]]
A single redstone repeater is generated naturally in each [[jungle temple]].
They also generate in [[Ancient City|ancient cities]].
=== Crafting ===
{{Crafting
|A2= Redstone Torch
|B2= Redstone Dust
|C2= Redstone Torch
|B3= Stone
|C3= Stone
|A3= Stone
|Output= Redstone Repeater
|type= Redstone
}}
== Usage ==
{{see also|Redstone circuit}}
A redstone repeater can be used in four different ways: to "repeat" redstone signals back to full strength, delay signals, prevent signals moving backwards, or to "lock" signals in one state.
A repeater can be placed only on top of [[opaque]] blocks (dirt, stone, etc.), on top of upside-down [[slab]]s, upside-down [[stairs]], furnaces, and glass. {{IN|be}}, a repeater can also be placed on fences and stone walls. They can also be placed on some transparent blocks. See [[Opacity/Placement]] for more information. To place a repeater, use the {{control|Place Block}} [[control]].
A redstone repeater has a front and back – the arrow on the top points to the repeater's front. A repeater also has two small redstone torches on its top – the color of the torches indicates whether its output is on (dark red when off, bright red when on) and the distance between them indicates the delay the repeater adds to the signal transmission.
A repeater is 0.125 ({{frac|1|8}}) blocks high.
=== Signal transmission ===
A repeater transmits signals only from its back to its front, but its behavior can be modified from the side (see [[#Signal locking|signal locking]], below).
[[File:Redstone Torch Power.png|Different ways to power a repeater|thumb]]
A redstone repeater can be powered by any of the following components at its back:
* an active [[power component]] (redstone torch, lever, block of redstone, etc.)
* powered [[redstone dust]]
* a powered [[redstone comparator]] or another powered redstone repeater facing the repeater
* a powered opaque block (including any opaque [[mechanism component]]s, such as [[dispenser]]s, [[redstone lamp]]s, etc.)
A redstone repeater can power any of the following components at its front:
* redstone dust
* a redstone comparator or another redstone repeater facing away from the repeater
* any opaque block (including any opaque [[mechanism component]]s)
A redstone repeater can activate any [[mechanism component]] it is facing.
An opaque block powered by a redstone repeater is called "strongly-powered" (as opposed to an opaque block "weakly-powered" by redstone dust). A strongly-powered opaque block can power adjacent redstone dust, as well as other redstone components.
=== Signal repeating ===
{{see also|Transmission circuit#Repeater}}
A redstone repeater can "repeat" a [[Redstone Dust|redstone]] signal, boosting it back up to power level 15.
Redstone signals have a maximum power level of 15 and that level drops by 1 for every block of [[redstone dust]] the signal travels through. If a signal must travel through more than 15 [[block]]s of redstone dust, a redstone repeater can be used to boost the signal back up to full strength. An extra two blocks of distance can be achieved by placing solid opaque blocks before and after the repeater.
While redstone repeaters can allow signals to travel great distances, each always adds some delay to the transmission since the minimum amount of delay is 1 redstone tick (0.1 seconds, barring lag).
=== Signal delay ===
When initially placed, a redstone repeater has a delay of one [[redstone tick]] (equivalent to two game ticks, or 0.1 seconds barring lag).
A repeater's delay can be modified by using the {{control|Use Item}} control. Each use increases the repeater's delay by one redstone tick, to a maximum of four redstone ticks, then back to one redstone tick. Longer delays can be made with multiple repeaters – for example, a repeater set to 'four' and another to 'one' provides a half-second delay (0.4s + 0.1s = 0.5s).
A repeater set to a delay of two to four redstone ticks increases the length of any shorter [[Pulse circuit#Pulses|on-pulse]] to match the length of the repeater's delay, and suppress any shorter off-pulse. For example, a repeater set to a 4-tick delay changes a 1-tick, 2-tick, or 3-tick on-pulse into a 4-tick on-pulse, and does not allow through any off-pulse shorter than 4 ticks.
Although a repeater cannot be set to have a delay of zero, [[Transmission circuit#Instant repeater|instant repeater circuits]] are possible (circuits that repeat a signal with no delay).
In Bedrock Edition, the first repeater have a delay of zero but the repeater is still showing 1-tick{{info needed}}
=== {{anchor|diode}} Signal direction ===
{{see also| Mechanics/Redstone/Transmission circuit#Diode}}
A redstone repeater acts as a diode – it allows redstone signals through in one direction (unlike [[redstone dust]] or opaque blocks that can transmit redstone signals in any direction).
A diode can be used to protect a [[redstone circuit]] from redstone signals feeding back into the circuit from its output, or can be used to isolate one part of a circuit from another.
=== {{anchor|lock}} Signal locking ===
{{see also| Mechanics/Redstone/Memory circuit}}
[[File:Latch.png|thumb|The left repeater has been locked in an unpowered output state by the right repeater.]]
A redstone repeater can be "locked" by another powered redstone repeater facing its side. When locked, the repeater does not change its output (whether powered or unpowered), no matter what the input does. When the side repeater turns back off, the repeater returns to its normal behavior.
A repeater can also be locked by a powered [[redstone comparator]] facing its side. This offers additional possibilities for locking signals because a comparator's output can be affected from 3 sides as well as by containers.
If a repeater is locked again too quickly after unlocking (e.g. the lock is controlled by a fast clock circuit), or the lock and the input are changed only on the same tick (e.g. because they're fed by the same clock and both repeaters have the same delay), the repeater does not switch states.
== Sounds ==
{{Edition|java}}:
{{Sound table/Block/Stone/JE}}
{{Edition|bedrock}}:
{{Sound table/Block/Wood/BE}}
== Data values ==
=== ID ===
{{edition|java}}:
{{ID table
|edition=java
|showforms=y
|generatetranslationkeys=y
|displayname=Redstone Repeater
|spritetype=block
|nameid=repeater
|foot=1}}
{{edition|bedrock}}:
{{ID table
|edition=bedrock
|firstcolumnname=Redstone Repeater
|shownumericids=y
|showforms=y
|generatetranslationkeys=y
|displayname=Unpowered block
|spritename=unpowered-repeater
|spritetype=block
|nameid=unpowered_repeater
|id=93
|form=block
|translationkey=-}}
{{ID table
|displayname=Powered block
|spritename=powered-repeater
|spritetype=block
|nameid=powered_repeater
|id=94
|form=block
|translationkey=-}}
{{ID table
|displayname=Item
|spritename=redstone-repeater
|spritetype=item
|nameid=repeater
|id=419
|form=item
|foot=1}}
=== Block states ===
{{see also|Block states}}
{{/BS}}
== Video ==
<div style="text-align:center">{{yt|0Ij_qMLiRzE}}</div>
== History ==
''For a more in-depth breakdown of changes to repeater textures and models, including a set of renders for each state combination, see [[/Asset history]]''
{{History|java beta}}
{{History||1.3|[[File:Redstone Repeater (S) JE1.png|32px]] [[File:Redstone Repeater (item) JE1.png|32px]] Added redstone repeaters.
|Originally, the four possible settings were "1, 2, 5 and 7",<ref>http://twitter.com/jeb_/status/33888465502339073</ref> but [[Jeb]] decided to change the settings to "1, 2, 3, and 4".<ref>http://www.reddit.com/r/Minecraft/comments/fmdtp/teammojang_redstone_repeater_video/c1gzrn6</ref>
|The particles when [[breaking]] redstone repeaters erroneously use the [[pumpkin]] top texture.}}
{{History||unknown|The breaking particles of redstone repeaters now use the smooth stone [[slab]] top texture, even though none of the elements on the [[model]] use it.}}
{{History||1.7|[[File:Redstone Repeater (S) JE2.png|32px]] The side texture of redstone repeaters has been changed to the previous bottom part of the texture.
|[[Redstone dust]] now automatically connects to the input of a redstone repeater. Previously, it needed to be specifically pointed towards the repeater like with other blocks.}}
{{History||unknown|Redstone dust now visually connects to the output of redstone repeaters, though this does not change its behavior.}}
{{History|java}}
{{History||unknown|The breaking particles of redstone repeaters have been changed to an unlit [[redstone torch]] when unpowered and a lit redstone torch when powered.}}
{{History||1.3.1|snap=12w22a|Redstone repeaters now naturally generate inside [[jungle temple]]s.}}
{{History|||snap=1.3|[[File:Redstone Repeater (item) JE2 BE1.png|32px]] The texture of redstone repeater [[item]]s have been changed.}}
{{History||1.4.2|snap=12w42a|[[File:Redstone Repeater (S) JE3.png|32px]] The top texture of redstone repeaters has now been changed.
|[[File:Locked Redstone Repeater (S) JE1.png|32px]] Added repeater locking to redstone repeaters. Interestingly, the smallest face of the bedrock cuboid's texture changes depending on the delay, but the other two faces remain the same. When/if this changed is unknown.}}
{{History||1.5|snap=13w02a|[[File:Redstone Repeater (S) JE4.png|32px]] The side textures of redstone repeaters have been changed to use the top texture of stone [[slab]]s.}}
{{History||unknown|The breaking [[particles|particle]] of redstone repeaters has been changed once again and now matches the top texture of redstone repeaters.}}
{{History||1.8|snap=14w06a|Repeaters no longer produce block [[light]] when powered.}}
{{History|||snap=14w10a|[[File:Powered Redstone Repeater (S) JE5.png|32px]] Torches on repeaters now no longer have protruding features.
|The torches underneath redstone repeaters have now been shortened, which has changed the underside textures from [[File:Redstone Repeater JE2 BE1 (facing NWU).png|32px]] [[File: Redstone Repeater Delay 2 JE2 BE1 (facing NWU).png|32px]] [[File: Redstone Repeater Delay 3 JE2 BE1 (facing NWU).png|32px]] [[File: Redstone Repeater Delay 4 JE2 BE1 (facing NWU).png|32px]] [[File: Active Redstone Repeater JE2 BE1 (facing NWU).png|32px]] [[File: Active Redstone Repeater Delay 2 JE2 BE1 (facing NWU).png|32px]] [[File: Active Redstone Repeater Delay 3 JE2 BE1 (facing NWU).png|32px]] [[File: Active Redstone Repeater Delay 4 JE2 BE1 (facing NWU).png|32px]] [[File: Locked Redstone Repeater JE2 BE1 (facing NWU).png|32px]] [[File: Locked Redstone Repeater Delay 2 JE2 BE1 (facing NWU).png|32px]] [[File: Locked Redstone Repeater Delay 3 JE2 BE1 (facing NWU).png|32px]] [[File: Locked Redstone Repeater Delay 4 JE2 BE1 (facing NWU).png|32px]] [[File: Active Locked Redstone Repeater JE2 BE1 (facing NWU).png|32px]] [[File: Active Locked Redstone Repeater Delay 2 JE2 BE1 (facing NWU).png|32px]] [[File: Active Locked Redstone Repeater Delay 3 JE2 BE1 (facing NWU).png|32px]] [[File: Active Locked Redstone Repeater Delay 4 JE2 BE1 (facing NWU).png|32px]] to [[File:Redstone Repeater JE3 (facing NWU).png|32px]] [[File: Redstone Repeater Delay 2 JE3 (facing NWU).png|32px]] [[File: Redstone Repeater Delay 3 JE3 (facing NWU).png|32px]] [[File: Redstone Repeater Delay 4 JE3 (facing NWU).png|32px]] [[File: Active Redstone Repeater JE3 (facing NWU).png|32px]] [[File: Active Redstone Repeater Delay 2 JE3 (facing NWU).png|32px]] [[File: Active Redstone Repeater Delay 3 JE3 (facing NWU).png|32px]] [[File: Active Redstone Repeater Delay 4 JE3 (facing NWU).png|32px]] [[File: Locked Redstone Repeater JE3 (facing NWU).png|32px]] [[File: Locked Redstone Repeater Delay 2 JE3 (facing NWU).png|32px]] [[File: Locked Redstone Repeater Delay 3 JE3 (facing NWU).png|32px]] [[File: Locked Redstone Repeater Delay 4 JE3 (facing NWU).png|32px]] [[File: Locked Active Redstone Repeater JE3 (facing NWU).png|32px]] [[File: Locked Active Redstone Repeater Delay 2 JE3 (facing NWU).png|32px]] [[File: Locked Active Redstone Repeater Delay 3 JE3 (facing NWU).png|32px]] [[File: Locked Active Redstone Repeater Delay 4 JE3 (facing NWU).png|32px]].}}
{{History|||snap=14w10b|[[File:Powered Redstone Repeater (S) JE4.png|32px]] Repeater torches now have protruding features again.<ref>{{bug|MC-50242}}</ref>}}
{{History|||snap=?|[[File:Powered Redstone Repeater (S) JE7.png|32px]] The torches on redstone repeaters are now affected by directional shading.}}
{{History||1.13|snap=17w47a|All 3 IDs for the redstone repeater have now been merged into 1 ID: <code>repeater</code>.
|Added powered block state to redstone repeaters.
|Redstone repeaters now render their underside, which has changed their undersides from [[File:Redstone Repeater JE3 (facing NWU).png|32px]] [[File: Redstone Repeater Delay 2 JE3 (facing NWU).png|32px]] [[File: Redstone Repeater Delay 3 JE3 (facing NWU).png|32px]] [[File: Redstone Repeater Delay 4 JE3 (facing NWU).png|32px]] [[File: Active Redstone Repeater JE3 (facing NWU).png|32px]] [[File: Active Redstone Repeater Delay 2 JE3 (facing NWU).png|32px]] [[File: Active Redstone Repeater Delay 3 JE3 (facing NWU).png|32px]] [[File: Active Redstone Repeater Delay 4 JE3 (facing NWU).png|32px]] [[File: Locked Redstone Repeater JE3 (facing NWU).png|32px]] [[File: Locked Redstone Repeater Delay 2 JE3 (facing NWU).png|32px]] [[File: Locked Redstone Repeater Delay 3 JE3 (facing NWU).png|32px]] [[File: Locked Redstone Repeater Delay 4 JE3 (facing NWU).png|32px]] [[File: Locked Active Redstone Repeater JE3 (facing NWU).png|32px]] [[File: Locked Active Redstone Repeater Delay 2 JE3 (facing NWU).png|32px]] [[File: Locked Active Redstone Repeater Delay 3 JE3 (facing NWU).png|32px]] [[File: Locked Active Redstone Repeater Delay 4 JE3 (facing NWU).png|32px]] to [[File:Redstone Repeater JE4 BE2 (facing NWU).png|32px]] [[File: Redstone Repeater Delay 2 JE4 BE2 (facing NWU).png|32px]] [[File: Redstone Repeater Delay 3 JE4 BE2 (facing NWU).png|32px]] [[File: Redstone Repeater Delay 4 JE4 BE2 (facing NWU).png|32px]] [[File: Active Redstone Repeater JE4 BE2 (facing NWU).png|32px]] [[File: Active Redstone Repeater Delay 2 JE4 BE2 (facing NWU).png|32px]] [[File: Active Redstone Repeater Delay 3 JE4 BE2 (facing NWU).png|32px]] [[File: Active Redstone Repeater Delay 4 JE4 BE2 (facing NWU).png|32px]] [[File: Locked Redstone Repeater JE4 BE2 (facing NWU).png|32px]] [[File: Locked Redstone Repeater Delay 2 JE4 BE2 (facing NWU).png|32px]] [[File: Locked Redstone Repeater Delay 3 JE4 BE2 (facing NWU).png|32px]] [[File: Locked Redstone Repeater Delay 4 JE4 BE2 (facing NWU).png|32px]] [[File: Locked Active Redstone Repeater JE4 BE2 (facing NWU).png|32px]] [[File: Locked Active Redstone Repeater Delay 2 JE4 BE2 (facing NWU).png|32px]] [[File: Locked Active Redstone Repeater Delay 3 JE4 BE2 (facing NWU).png|32px]] [[File: Locked Active Redstone Repeater Delay 4 JE4 BE2 (facing NWU).png|32px]].
|Prior to [[1.13/Flattening|''The Flattening'']], these [[block]]s' numeral IDs were 93 and 94, and the [[item]]'s 356.}}
{{History||1.14|snap=18w43a|[[File:Redstone Repeater (S) JE5.png|32px]] [[File:Powered Redstone Repeater (S) JE9.png|32px]] [[File:Locked Redstone Repeater (S) JE5.png|32px]] [[File:Powered Locked Redstone Repeater (S) JE6.png|32px]] [[File:Redstone Repeater (item) JE3 BE2.png|32px]] The textures of redstone repeaters have now been changed.}}
{{History|||snap=18w50a|[[File:Locked Redstone Repeater (S) JE6.png|32px]] [[File:Powered Locked Redstone Repeater (S) JE7.png|32px]] As the texture of [[bedrock]] has been changed, the textures of locked redstone repeaters have also now been changed.}}
{{History|||snap=19w12b|Redstone repeaters can now be placed on [[glass]], [[ice]], [[glowstone]] and [[sea lantern]]s.}}
{{History||1.19|snap=22w13a|Redstone repeaters now generate in [[Ancient City|ancient cities]].}}
{{History||1.20.2|snap=23w33a|Redstone repeaters now use stone sounds instead of wood sounds.<ref>{{bug|MC-182820|||Fixed}}</ref>}}
{{History|pocket alpha}}
{{History||v0.14.0|snap=build 1|[[File:Redstone Repeater (S) JE3.png|32px]] [[File:Redstone Repeater (item) JE2 BE1.png|32px]] Added redstone repeaters.}}
{{History|bedrock}}
{{History||1.2.0|snap=beta 1.2.0.2|Redstone repeaters now render their underside, which has changed their undersides from [[File:Redstone Repeater JE2 BE1 (facing NWU).png|32px]] [[File: Redstone Repeater Delay 2 JE2 BE1 (facing NWU).png|32px]] [[File: Redstone Repeater Delay 3 JE2 BE1 (facing NWU).png|32px]] [[File: Redstone Repeater Delay 4 JE2 BE1 (facing NWU).png|32px]] [[File: Active Redstone Repeater JE2 BE1 (facing NWU).png|32px]] [[File: Active Redstone Repeater Delay 2 JE2 BE1 (facing NWU).png|32px]] [[File: Active Redstone Repeater Delay 3 JE2 BE1 (facing NWU).png|32px]] [[File: Active Redstone Repeater Delay 4 JE2 BE1 (facing NWU).png|32px]] [[File: Locked Redstone Repeater JE2 BE1 (facing NWU).png|32px]] [[File: Locked Redstone Repeater Delay 2 JE2 BE1 (facing NWU).png|32px]] [[File: Locked Redstone Repeater Delay 3 JE2 BE1 (facing NWU).png|32px]] [[File: Locked Redstone Repeater Delay 4 JE2 BE1 (facing NWU).png|32px]] [[File: Active Locked Redstone Repeater JE2 BE1 (facing NWU).png|32px]] [[File: Active Locked Redstone Repeater Delay 2 JE2 BE1 (facing NWU).png|32px]] [[File: Active Locked Redstone Repeater Delay 3 JE2 BE1 (facing NWU).png|32px]] [[File: Active Locked Redstone Repeater Delay 4 JE2 BE1 (facing NWU).png|32px]] to [[File:Redstone Repeater JE4 BE2 (facing NWU).png|32px]] [[File: Redstone Repeater Delay 2 JE4 BE2 (facing NWU).png|32px]] [[File: Redstone Repeater Delay 3 JE4 BE2 (facing NWU).png|32px]] [[File: Redstone Repeater Delay 4 JE4 BE2 (facing NWU).png|32px]] [[File: Active Redstone Repeater JE4 BE2 (facing NWU).png|32px]] [[File: Active Redstone Repeater Delay 2 JE4 BE2 (facing NWU).png|32px]] [[File: Active Redstone Repeater Delay 3 JE4 BE2 (facing NWU).png|32px]] [[File: Active Redstone Repeater Delay 4 JE4 BE2 (facing NWU).png|32px]] [[File: Locked Redstone Repeater JE4 BE2 (facing NWU).png|32px]] [[File: Locked Redstone Repeater Delay 2 JE4 BE2 (facing NWU).png|32px]] [[File: Locked Redstone Repeater Delay 3 JE4 BE2 (facing NWU).png|32px]] [[File: Locked Redstone Repeater Delay 4 JE4 BE2 (facing NWU).png|32px]] [[File: Locked Active Redstone Repeater JE4 BE2 (facing NWU).png|32px]] [[File: Locked Active Redstone Repeater Delay 2 JE4 BE2 (facing NWU).png|32px]] [[File: Locked Active Redstone Repeater Delay 3 JE4 BE2 (facing NWU).png|32px]] [[File: Locked Active Redstone Repeater Delay 4 JE4 BE2 (facing NWU).png|32px]].}}
{{History||1.10.0|snap=beta 1.10.0.3|[[File:Redstone Repeater (S) BE2.png|32px]] [[File:Powered Redstone Repeater (S) BE2.png|32px]] [[File:Redstone Repeater (item) JE3 BE2.png|32px]] The textures of redstone repeaters have now been changed.}}
{{History||1.20.30|snap=beta 1.20.30.20|Redstone Repeaters now use the <code>minecraft:cardinal_direction</code> [[block state]] instead of <code>direction</code>.}}
{{History|console}}
{{History||xbox=TU1|xbone=CU1|ps=1.0|wiiu=Patch 1|switch=1.0.1|[[File:Redstone Repeater (S) JE3.png|32px]]{{verify|Was this model actually used here?}} [[File:Redstone Repeater (item) JE2 BE1.png|32px]] Added redstone repeaters.}}
{{History||xbox=TU19|xbone=CU7|ps=1.12|wiiu=Patch 1|switch=1.0.1|[[File:Locked Redstone Repeater (S) JE1.png|32px]]{{verify|Was this model actually used here?}} Added repeater locking to redstone repeaters.}}
{{History||xbox=none|xbone=none|ps=1.90|wiiu=none|switch=none|[[File:Redstone Repeater (S) JE4.png|32px]]{{verify|Was this model actually used here?}} [[File:Redstone Repeater (item) JE3 BE2.png|32px]] The textures of redstone repeaters have now been changed.}}
{{History|new 3ds}}
{{History||0.1.0|[[File:Redstone Repeater (S) JE3.png|32px]]{{verify|Was this model actually used here?}} [[File:Redstone Repeater (item) JE2 BE1.png|32px]] Added redstone repeaters and repeater locking.}}
{{History|foot}}
=== Redstone repeater "items" ===
{{:Technical blocks/Redstone Repeater}}
== Issues ==
{{Issue list}}
== Trivia ==
* The recipe and appearance of redstone repeaters are a likely reference to the old method of repeating signals, which would also use two torches at a time, inverting each other
== Gallery ==
<gallery>
Repeater clock.gif|A redstone clock formed from a redstone torch and a repeater.
Repeater feedback.gif|A redstone clock formed from two repeaters.
Two way repeater.gif|MCRedstoneSim diagram of a two-way repeater.
Repeater bridge.png|Crossing redstone wires using repeaters.
Jeb Repeaters 1.png|
Jeb Repeaters 2.png|
Jeb Repeaters 3.png|
</gallery>
=== Renders ===
<gallery>
Redstone Repeater.png
Redstone Repeater Delay 2.png
Redstone Repeater Delay 3.png
Redstone Repeater Delay 4.png
Powered Redstone Repeater.png
Powered Redstone Repeater Delay 2.png
Powered Redstone Repeater Delay 3.png
Powered Redstone Repeater Delay 4.png
Locked Redstone Repeater.png
Locked Redstone Repeater Delay 2.png
Locked Redstone Repeater Delay 3.png
Locked Redstone Repeater Delay 4.png
Powered Locked Redstone Repeater.png
Powered Locked Redstone Repeater Delay 2.png
Powered Locked Redstone Repeater Delay 3.png
Powered Locked Redstone Repeater Delay 4.png
Redstone Repeater BE.png
Redstone Repeater Delay 2 BE.png
Redstone Repeater Delay 3 BE.png
Redstone Repeater Delay 4 BE.png
Powered Redstone Repeater BE.png
Powered Redstone Repeater Delay 2 BE.png
Powered Redstone Repeater Delay 3 BE.png
Powered Redstone Repeater Delay 4 BE.png
Locked Redstone Repeater BE.png
Locked Redstone Repeater Delay 2 BE.png
Locked Redstone Repeater Delay 3 BE.png
Locked Redstone Repeater Delay 4 BE.png
Powered Locked Redstone Repeater BE.png
Powered Locked Redstone Repeater Delay 2 BE.png
Powered Locked Redstone Repeater Delay 3 BE.png
Powered Locked Redstone Repeater Delay 4 BE.png
</gallery>
== References ==
{{Reflist}}
{{Redstone}}
{{Blocks|Utility}}
{{Items}}
[[Category:Mechanics]]
[[Category:Redstone mechanics]]
[[Category:Redstone]]
[[Category:Mechanisms]]
[[Category:Manufactured blocks]]
[[Category:Generated structure blocks]]
[[Category:Non-solid blocks]]
[[de:Redstone-Verstärker]]
[[es:Repetidor de redstone]]
[[fr:Répéteur de redstone]]
[[hu:Redstone-jelismétlő]]
[[it:Ripetitore di redstone]]
[[ja:レッドストーンリピーター]]
[[ko:레드스톤 중계기]]
[[nl:Redstoneversterker]]
[[pl:Przekaźnik]]
[[pt:Repetidor de redstone]]
[[ru:Красный повторитель]]
[[tr:Kızıltaş tekrarlayıcı]]
[[zh:红石中继器]]</li><li>[[Enchanted Book|Enchanted Book]]<br/>{{About|the book that can give items enchantments when used on an anvil|the artifact that can enchant allied mobs in Minecraft Dungeons|Enchanter's Tome}}
{{Item
| image = Enchanted Book.gif
|imagesize=160px
| stackable = No
| renewable = '''Swift Sneak''': No<br>'''All others''': Yes
| rarity = Uncommon
}}
An '''enchanted book''' is an [[item]] that lets players add [[enchantments]] to certain items using an [[anvil]].
== Obtaining ==
=== Chest loot ===
==== Level-30 books ====
{{LootChestItem|enchanted-book}}
==== Random enchantment books ====
{{LootChestItem|enchanted-book-rnd}}
==== Soul Speed books ====
{{LootChestItem|enchanted-book-rnd-soul-speed}}
==== Swift Sneak books ====
{{LootChestItem|enchanted-book-rnd-swift-sneak}}
===Fishing===
Enchanted books can be obtained as a "treasure" item from [[fishing]] with a [[fishing rod]] as part of the "treasure" category. The book has the equivalent of a level 30 enchantment from an enchantment table, but treasure enchantments are available and the chance of multiple enchantments is not reduced.
=== Trading ===
{{IN|bedrock}}, librarian [[villager]]s have a 50% chance to sell enchanted books as part of their trades at novice, apprentice, and journeyman-level, and have {{frac|1|3}} chance to sell enchanted books at expert-level as part of their trades, meaning each librarian villager can sell up to four books. The price ranges between 5-64 [[emerald]]s per book. Based on the level of the enchantment and whether it is classified as a "[[Enchanting mechanics|treasure enchantment]]" (meaning they are not obtainable by enchanting, e.g. [[Mending]]), which doubles the cost, or not a price is determined.
{{IN|java}}, librarian villagers have a {{frac|2|3}} chance to sell an enchanted book as part of their trades at the novice, apprentice, and journeyman level, and have a 50% chance to sell an enchanted book at the expert level, meaning each librarian can sell up to four books. The price ranges from 5-64 [[emerald]]s per book, depending on the enchantment's level as well as whether or not it is a [[Enchanting mechanics|treasure enchantment]].
{| class="fandom-table"
|+Cost of Enchanted Books based on their level
!Level
!Lowest Price
!Highest Price
|-
|I (1)
|5
|19
|-
|II (2)
|8
|32
|-
|III (3)
|11
|45
|-
|IV (4)
|14
|58
|-
|V (5)
|17
|71 (capped at 64)
|}
They may contain any available enchantment (except Soul Speed and Swift Sneak) at any available level. See [[Trading#cite_note-enchanted-book-10|trading notes]] for more information on enchantments and prices.
===Drops ===
Vindicators and pillagers that spawn from raids have a small chance to drop an enchanted book with a level 30 enchantment, which may be a treasure enchantment.{{only|bedrock}}
===Enchanting===
[[File:Enchanted Book 4x.png|thumb|An enchanted book with multiple high level enchantments.]]
[[File:Similar enchantments.png|thumb|An enchanted book with multiple enchantments that can be applied to the same item.]]
Players can create an enchanted book by enchanting a [[book]] on an [[enchantment table]]. Books have a decreased chance of getting multiple enchantments (specifically, if multiple enchantments would be added, then one is removed at random), and have a lower "enchantability level" than most other items. Treasure enchantments such as Mending cannot be obtained from an enchantment table.
=== Bartering ===
Players can barter with [[piglin]]s by using or throwing [[gold ingot]]s, and doing so has a {{frac|5|459}} chance for piglins to give the player an enchanted book with any level of [[Soul Speed]]. Soul Speed enchanted books are only obtainable through [[bartering]], [[chest]] loot inside a bastion remnant, and [[fishing]]. They cannot be obtained through [[enchanting]] or [[trading]].
== Usage ==
{{see also|Anvil mechanics}}
In Survival, enchanted books are the only method to obtain certain enchantments on certain tools, such as Unbreaking on [[shield]]s. Enchanted books have a shine effect on their sprite.
To use an enchanted book, the player must place an item in the first slot in an [[anvil]], and a book in the next. In order to complete the enchantment, the player must have the required amount of [[experience]]. Note that using an enchanted book gets significant discounts at the anvil. Enchanted books themselves can be combined to create a single book with increased or multiple enchantments, similar to combining tools or weapons.
When combining items, the compatible enchantments from the book in the second slot are transferred to the item from the first slot, keeping the highest level of any type. If two enchantments have the same level and a higher level is available, they combine into the next level. If a book is applied to an item that can't take all of its spells, the appropriate spells are transferred, while the unusable ones are lost. Enchanted books are single-use.
Enchanted books do not exhibit their enchantment. For example, a book with Sharpness IV as an enchantment does no more damage than an un-enchanted book, or any non-weapon item, would when used as a weapon. An exception is the Fire Aspect book which can ignite TNT and light campfires and the Mending book if the block mined can be broken by fist.{{only|bedrock}}
=== Available items ===
{{See also|Enchantments}}
Enchanted books can enchant the usual items that can be enchanted at an [[enchanting table]], but ''unlike an enchanting table'', they are able to boost enchantments such as Sharpness or Thorns to their maximum power, and may apply the following enchantments to items (the table displays only netherite tools and armor, but any type can be enchanted):
<!-- do not change the items listed in this table. It is supposed to show the items that can receive these enchantments from an enchanted book, but are NOT possible through an enchanting table. -->
{| class="wikitable" style="text-align: center;" data-description="Secondary enchantments"
|-
!Enchantment
!Items enchantable<br>at an enchanting table
!Note
|-
|[[Efficiency]]
|{{simpleGrid|Shears}}{{simpleGrid|Netherite Pickaxe}}{{simpleGrid|Netherite Shovel}}{{simpleGrid|Netherite Axe}}{{simpleGrid|Netherite Hoe}}
|Increases mining speed
|-
|[[Thorns]]||{{simpleGrid|Netherite Helmet}}{{simpleGrid|Netherite Chestplate}}{{simpleGrid|Netherite Leggings}}{{simpleGrid|Netherite Boots}}
|Inflicts damage on attacker
|-
|[[Unbreaking]]
|{{simpleGrid|Shears}}{{simpleGrid|Flint and Steel}}{{simpleGrid|Fishing Rod}}{{simpleGrid|Carrot on a Stick}}{{simpleGrid|Warped Fungus on a Stick}}{{simpleGrid|Trident}}{{simpleGrid|Shield}}{{simpleGrid|Elytra}}<br>
{{simpleGrid|Netherite Pickaxe}}{{simpleGrid|Netherite Shovel}}{{simpleGrid|Netherite Axe}}{{simpleGrid|Netherite Hoe}}{{simpleGrid|Netherite Sword}}{{simpleGrid|Bow}}{{simpleGrid|Crossbow}}<br>
{{simpleGrid|Netherite Helmet}}{{simpleGrid|Netherite Chestplate}}{{simpleGrid|Netherite Leggings}}{{simpleGrid|Netherite Boots}}
|Increasing durability on enchanted tools/armors
|-
|[[Frost Walker]]
|{{simpleGrid|Netherite Boots}}
|Creates walkable ice layer over water
|-
|[[Mending]]
|{{simpleGrid|Netherite Helmet}}{{simpleGrid|Netherite Chestplate}}{{simpleGrid|Netherite Leggings}}{{simpleGrid|Netherite Boots}}<br>
{{simpleGrid|Netherite Pickaxe}}{{simpleGrid|Netherite Shovel}}{{simpleGrid|Netherite Axe}}{{simpleGrid|Netherite Hoe}}{{simpleGrid|Netherite Sword}}{{simpleGrid|Bow}}{{simpleGrid|Crossbow}}<br>
{{simpleGrid|Shears}}{{simpleGrid|Flint and Steel}}{{simpleGrid|Fishing Rod}}{{simpleGrid|Carrot on a Stick}}{{simpleGrid|Warped Fungus on a Stick}}{{simpleGrid|Trident}}{{simpleGrid|Shield}}{{simpleGrid|Elytra}}
|Uses XP Orbs to repair damaged tools/weapons/armors
|-
|[[Curse of Binding]]
|{{simpleGrid|Netherite Helmet}}{{simpleGrid|Netherite Chestplate}}{{simpleGrid|Netherite Leggings}}{{simpleGrid|Netherite Boots}}<br>{{simpleGrid|Elytra}}{{simpleGrid|Carved Pumpkin}}{{simpleGrid|Head}}
|Prevents removal of cursed item
|-
|[[Curse of Vanishing]]
|{{simpleGrid|Netherite Helmet}}{{simpleGrid|Netherite Chestplate}}{{simpleGrid|Netherite Leggings}}{{simpleGrid|Netherite Boots}}<br>
{{simpleGrid|Netherite Pickaxe}}{{simpleGrid|Netherite Shovel}}{{simpleGrid|Netherite Axe}}{{simpleGrid|Netherite Hoe}}{{simpleGrid|Netherite Sword}}{{simpleGrid|Bow}}{{simpleGrid|Crossbow}}<br>
{{simpleGrid|Shears}}{{simpleGrid|Flint and Steel}}{{simpleGrid|Fishing Rod}}{{simpleGrid|Carrot on a Stick}}{{simpleGrid|Warped Fungus on a Stick}}{{simpleGrid|Trident}}{{simpleGrid|Shield}}<br>{{simpleGrid|Elytra}}{{simpleGrid|Carved Pumpkin}}{{simpleGrid|Head}}<br>{{simpleGrid|Compass}}{{simpleGrid|Recovery Compass}}
|Cursed item is destroyed upon death
|-
|[[Soul Speed]]
|{{simpleGrid|Netherite Boots}}
|The wearer's speed is increased when walking on [[soul sand]] or [[soul soil]].
|-
|[[Swift Sneak]]
|{{simpleGrid|Netherite Leggings}}
|The wearer's sneaking speed is increased.
|}
=== Creative mode ===
The player can enchant any item with any enchantment in [[Creative]] mode, allowing any applied effects to exhibit themselves.{{only|java}} For example, a [[stick]] can be enchanted with [[Silk Touch]] to allow the player to successfully dig [[grass block]]s. The enchanted item can still be used in Survival mode without any loss of enchantments.
Enchantments that are normally incompatible are still incompatible; for example, Piercing and Multishot cannot be both applied to the same item, even in Creative mode.
If a block is enchanted, it loses the enchantment upon being placed in the world.
=== Disenchanting ===
Disenchanting an enchanted book at a [[grindstone]] yields a normal [[book]] and some experience depending on the quality of the book.
=== Chiseled bookshelf ===
{{control|Use|text=Using}} the [[chiseled bookshelf]] while having an enchanted book in the main hand will put the book inside the chiseled bookshelf.
== Sounds ==
{{edition|java}}:
{{Sound table
|sound=Chiseled bookshelf insert enchanted1.ogg
|sound2=Chiseled bookshelf insert enchanted2.ogg
|sound3=Chiseled bookshelf insert enchanted3.ogg
|sound4=Chiseled bookshelf insert enchanted4.ogg
|subtitle=Enchanted Book placed
|source=block
|description=When an enchanted book is placed in a chiseled bookshelf
|id=block.chiseled_bookshelf.insert.enchanted
|translationkey=subtitles.chiseled_bookshelf.insert_enchanted
|volume=0.8
|pitch=''varies'' <ref group=sound name=insertvaries>Can be 1.0, 0.85, or 1.1 for each sound</ref>
|distance=16}}
{{Sound table
|sound=Chiseled bookshelf pickup enchanted1.ogg
|sound2=Chiseled bookshelf pickup enchanted2.ogg
|sound3=Chiseled bookshelf pickup enchanted3.ogg
|subtitle=Enchanted Book taken
|source=block
|description=When an enchanted book is removed from a chiseled bookshelf
|id=block.chiseled_bookshelf.pickup.enchanted
|translationkey=subtitles.chiseled_bookshelf.take_enchanted
|volume=0.8
|pitch=''varies'' <ref group=sound name=pickupvaries>Can be 1.0, 0.8, or 1.1 for each sound</ref>
|distance=16
|foot=1}}
{{edition|bedrock}}:
{{Sound table
|type=bedrock
|sound=Chiseled bookshelf insert enchanted1.ogg
|sound2=Chiseled bookshelf insert enchanted2.ogg
|sound3=Chiseled bookshelf insert enchanted3.ogg
|sound4=Chiseled bookshelf insert enchanted4.ogg
|source=block
|description=When an enchanted book is placed in a chiseled bookshelf
|id=insert_enchanted.chiseled_bookshelf
|volume=0.8
|pitch=''varies'' <ref group=sound name=insertvaries>Can be 1.0, 0.85, or 1.1 for each sound</ref>}}
{{Sound table
|sound=Chiseled bookshelf pickup enchanted1.ogg
|sound2=Chiseled bookshelf pickup enchanted2.ogg
|sound3=Chiseled bookshelf pickup enchanted3.ogg
|source=block
|description=When an enchanted book is removed from a chiseled bookshelf
|id=pickup_enchanted.chiseled_bookshelf
|volume=0.8
|pitch=''varies'' <ref group=sound name=pickupvaries>Can be 1.0, 0.8, or 1.1 for each sound</ref>
|foot=1}}
== Data values ==
=== ID ===
{{edition|java}}:
{{ID table
|edition=java
|showforms=y
|generatetranslationkeys=y
|displayname=Enchanted Book
|spritetype=item
|nameid=enchanted_book
|form=item
|foot=1}}
{{edition|bedrock}}:
{{ID table
|edition=bedrock
|showitemtags=y
|shownumericids=y
|showforms=y
|notshowbeitemforms=y
|generatetranslationkeys=y
|displayname=Enchanted Book
|spritetype=item
|nameid=enchanted_book
|id=521
|itemtags=minecraft:bookshelf_books</code>
|form=item
|foot=1}}
=== Item data ===
{{el|java}}:
{{main|Player.dat format}}
Enchanted books use an NBT tag <code>StoredEnchantments</code> to indicate the enchantment.
The allowed sub-tags are <code>id</code> and <code>lvl</code>, equivalent to the format of the <code>Enchantments</code> tag that is used for enchantments applied to items.
''The following NBT structure is provided to show how the <code>StoredEnchantments</code> tag is organized, and is not comprehensive above the <code>tag</code> tag. The full NBT for an item can be found [[Chunk format#Items_and_XP_Orbs|here]].''
<div class="treeview" style="margin-top: 0;">
*{{nbt|compound|tag}}: The tag tag.
**{{nbt|list|StoredEnchantments}}: The list of enchantments on this book.
***{{nbt|compound}} An enchantment
****{{nbt|string|id}}: The enchantment name ID
****{{nbt|short|lvl}}: The enchantment level
</div>
{{el|bedrock}}:
:See [[Bedrock Edition level format/Item format]].
==Advancements==
{{load advancements|Enchanter}}
==History==
{{History|java}}
{{History||November 24, 2012|link=none|[[Dinnerbone]] stated that he wanted to add a way to [[enchanting|enchant]] items in an [[anvil]] using [[paper]] at [[MINECON 2012]].}}
{{History||December 6, 2012|link={{tweet|Dinnerbone|276777823996366848}}|Dinnerbone released the first image of enchanting a diamond [[sword]] using an enchanted book that has [[Looting]] II for 6 levels. He also stated that "this is the reason I originally added the anvil."}}
{{History||1.4.6|snap=12w49a|[[File:Enchanted Book JE1 BE1.png|32px]] Added enchanted books.
|The enchantments of enchanted books can be applied to any [[item]].}}
{{History|||snap=12w50a|In [[Survival]] mode, enchanted books can now be used with limited kind of items. In [[Creative]] mode, they can still be used with any item. It was stated that the remaining functionality in Creative mode is intentional.<ref>{{Tweet|Dinnerbone|277084371146665984|Also enchanted books + items they're not intended for are a little broken and I kindly ask you to not exploit it too badly thanks.|December 7, 2012}}</ref><ref>{{bug|MC-4203}}</ref>
|Librarian [[villager]]s now [[trading|sell]] enchanted books at a cost of 1 [[book]] at 5–64 [[emerald]]s. The cost depends on the [[enchanting|enchantment]] level, and the cost can occasionally go above 64 emeralds; see [[Trading/Before 1.8]] for more details.
|Enchanted books now spawn in [[dungeon]], [[mineshaft]], [[desert temple|desert]] and [[jungle temple|jungle]] temple, [[stronghold]] and [[village]] blacksmith [[chest]]s.}}
{{History|||snap=pre|Enchanted books have been added to the [[Creative inventory]]. All levels for each enchanted book can be found in the search tab, and only the maximum level in the ''Tools'' and ''Combat'' tabs.}}
{{History||1.5.1|snap=13w11a|The [[player]] can now combine enchanted books of the same level to create a higher level variation.}}
{{History||1.7.2|snap=13w36a|Enchanted books can now be obtained by [[fishing]] as a "treasure" [[item]]. It is possible for the book to have multiple enchantments.}}
{{History|||snap=13w39a|When [[enchanting]] books, [[book]]s can now gain multiple enchantments.}}
{{History||1.8|snap=14w02a|[[Trading]] for enchanted books has been changed: the [[emerald]] cost has been doubled for [[treasure enchantment]]s, and cost has been capped at 64.}}
{{History|||snap=14w25a|Enchanted book [[Depth Strider]] added, which can go up to Level III and allows for faster underwater moving.}}
{{History||1.9|snap=15w42a|Enchanted book [[Frost Walker]] added, which can go up to Level II and turns water into [[frosted ice]].
|Enchanted book [[Mending]] added, which repairs [[tools]]/[[armor]] upon receiving [[experience]].}}
{{History|||snap=15w43a|The average yield of enchanted books found in [[stronghold]] library [[chest]]s has now more than tripled.}}
{{History|||snap=15w44a|The average yield from [[desert temple]], [[mineshaft]] and [[dungeon]] chests has been substantially increased. The enchantments on these books are now fully random, rather than enchanted only at level 30.}}
{{History||1.11|snap=16w39a|Enchanted books are now found in the new [[woodland mansion]] chests, with fully random enchantments.
|Enchanted book [[Curse of Binding]] added, which prevents removal of cursed [[armor]].
|Enchanted book [[Curse of Vanishing]] added, which destroys cursed items upon [[death]].}}
{{History||1.13|snap=17w47a|Prior to [[1.13/Flattening|''The Flattening'']], this [[item]]'s numeral ID was 403.}}
{{History|||snap=18w09a|Enchanted books now have a chance of generating in [[underwater ruins]] chests.}}
{{History||1.14|snap=18w43a|[[File:Enchanted Book JE2 BE2.png|32px]] The texture of enchanted books has been changed.}}
{{History|||snap=18w47a|Enchanted books now have a chance of generating in [[pillager outpost]] chests.}}
{{History||1.16|snap=20w11a|Added [[Soul Speed]] enchanted book, which increases player's speed on [[soul sand]] and [[soul soil]]. It can be obtained only via the [[bartering]].}}
{{History|||snap=20w16a|Soul Speed enchanted books now generate in [[bastion remnants]] chests.}}
{{History||1.19|snap=Deep Dark Experimental Snapshot 1|Added [[Swift Sneak]] enchanted book, which increases player's speed while sneaking. It can be obtained only in [[ancient city]] chests.
|Enchanted books now generate in [[ancient city]] chests.}}
{{History||1.20<br>(Experimental)|link=1.19.3|snap=22w42a|Enchanted books can now interact with [[chiseled bookshelves]].}}
{{History|pocket alpha}}
{{History||v0.12.1|snap=build 1|[[File:Enchanted Book JE1 BE1.png|32px]] Added enchanted books.
|All levels of each enchanted book can be obtained in the Creative inventory.}}
{{History||v0.13.0|snap=build 1|Enchanted books now generate in [[desert temple]]s.}}
{{History||v0.14.0|snap=build 1|Enchanted books now generate in [[mineshaft]]s.}}
{{History||v0.15.0|snap=build 1|Enchanted books now generate in [[jungle pyramid]]s.}}
{{History|pocket}}
{{History||1.0.0|snap=alpha 0.17.0.1|Enchanted books now generate in [[end city|end cities]].}}
{{History||1.0.4|snap=alpha 1.0.4.0|Enchanted books can now be [[trading|bought]] from librarian villagers for 5-64 emeralds as part of their tier 1, 4 and 5 trades.}}
{{History||1.1.0|snap=alpha 1.1.0.0|Enchanted books now generate in [[woodland mansion]]s.
|Enchanted books [[Mending]] and [[Frost Walker]] added.}}
{{History|bedrock}}
{{History||1.2.13|snap=beta 1.2.13.5|Added Curse of Binding and Curse of Vanishing [[enchanting|enchantments]], but they are obtainable only via [[trading]] with librarian [[villager]]s.}}
{{History||1.4.0|snap=beta 1.2.20.1|Enchanted books can now be found in [[underwater ruins]].}}
{{History||1.4.0|snap=beta 1.2.20.2|Curse enchantments are no longer obtainable via trading.}}
{{History||1.10.0|snap=beta 1.10.0.3|[[File:Enchanted Book JE2 BE2.png|32px]] The texture of enchanted books has been changed.
|Enchanted books can now be found in [[pillager outpost]]s.}}
{{History||1.11.0|snap=beta 1.11.0.4|[[Vindicator]]s and [[pillager]]s that spawn in [[raid]]s can now [[drops|drop]] enchanted books.
|[[Trading]] has been changed, enchanted books [[trading|bought]] from librarian [[villager]]s now cost 15-64 [[emerald]]s.
|Librarian villagers now have a 50% chance to [[trading|sell]] enchanted books as part of their first, second, and third tier trade, and {{frac|1|3}} chance to sell enchanted books as part of their fourth tier trades.}}
{{History||1.16.0|snap=beta 1.16.0.57|Added [[Soul Speed]] enchanted book, which can be obtained only via [[bartering]] and at [[bastion remnants]] chests.}}
{{History||1.20.0<br>(Experimental)|link=Bedrock Edition 1.19.50|snap=beta 1.19.50.21|Enchanted books can now interact with [[chiseled bookshelves]].}}
{{History|console}}
{{History||xbox=TU14|xbone=CU1|ps=1.04|wiiu=Patch 1|[[File:Enchanted Book JE1 BE1.png|32px]] Added enchanted books.
|Only the maximum level of each enchanted book can be obtained within the Creative inventory.}}
{{History|PS4}}
{{History||1.90|[[File:Enchanted Book JE2 BE2.png|32px]] The texture of enchanted books has been changed.}}
{{History|new 3ds}}
{{History||0.1.0|[[File:Enchanted Book JE1 BE1.png|32px]] Added enchanted books.
|All levels of each enchanted book can be obtained in the Creative inventory.}}
{{History|foot}}
== Issues ==
{{Issue list}}
==Trivia==
*When obtained through the {{cmd|give}} command with no stored enchantments, the enchanted book has no attached enchantments, but still shines as if it is enchanted.
*A book enchanted with [[Unbreaking]] III appears in both the tools tab and combat tab of the [[Creative]] [[inventory]].
==Gallery==
<gallery>
File:Dinnerbones_enchanted_Books.png|First image of an enchanted book, released by Dinnerbone.
File:DungeonBook.png|An enchanted book found in a dungeon chest.
File:Enchanted_Book.gif|An animation of an enchanted book.
</gallery>
==References ==
{{reflist}}
{{Items}}
[[Category:Renewable resources]]
[[de:Verzaubertes Buch]]
[[es:Libro encantado]]
[[fr:Livre enchanté]]
[[hu:Varázskönyv]]
[[ja:エンチャントの本]]
[[ko:마법이 부여된 책]]
[[nl:Betoverd boek]]
[[pl:Zaklęta książka]]
[[pt:Livro encantado]]
[[ru:Зачарованная книга]]
[[th:หนังสือร่ายมนตร์]]
[[uk:Зачарована книга]]
[[zh:附魔书]]</li></ul> | 17w17a | Maps now have separate colors for colored terracotta blocks from other colored blocks. | ||||||||||||||||||||||||||||||||||||||||||||||||||||||||||||||||||||||||||||||||||||||||||||||||||||||||||||
1.13{{Extension DPL}}<ul><li>[[Redstone Dust|Redstone Dust]]<br/>{{Redirect|Redstone|the ore|Redstone Ore|the powered mineral block|Block of Redstone|other uses|Redstone (disambiguation)}}
{{Block
| group = Inactive (connected)
| 1-1= Inactive Redstone Wire (NESW).png
| 1-2 = Inactive Redstone Wire (NESW) BE.png
| group2 = Inactive (unconnected)
| 2-1 = Inactive Redstone Wire (unconnected).png
| 2-2 = Inactive Redstone Wire (unconnected).png
| group3 = Active (connected)
| 3-1 = Active Redstone Wire (NESW).png
| 3-2 = Active Redstone Wire (NESW) BE.png
| group4 = Active (unconnected)
| 4-1 = Active Redstone Wire (unconnected).png
| 4-2 = Active Redstone Wire (unconnected).png
| image = Redstone Dust JE2 BE2.png
| extratext = [[#Gallery|View all renders]]
| transparent = Yes
| light = No
| tool = all
| renewable = Yes
| stackable = Yes (64)
| flammable = No
| lavasusceptible = No
}}
'''Redstone dust''' is a mineral that can transmit [[Redstone circuit#Power|redstone power]] as a wire when placed as a [[block]]. It is also used in [[crafting]] and [[brewing]].
== Obtaining ==
=== Mining ===
{{see also|Redstone Ore#Natural generation}}
[[Redstone ore]] mined using an iron [[pickaxe]] or higher drops 4 or 5 redstone dust (or more with [[Fortune]], averaging at 6 redstone dust with Fortune III). If mined with [[Silk Touch]], the block drops itself instead of redstone dust.
=== Natural generation ===
15 lengths of redstone dust are naturally generated as part of the trap in each [[jungle pyramid]]. 5 lengths of redstone dust can be found in one type of jail cell room in a [[woodland mansion]]. In [[Ancient City|ancient cities]], multiple pieces of redstone dust can be found integrated into circuitry.
=== Breaking ===
Redstone dust can be broken instantly using any tool, or without a tool, and drops itself as an item.
Redstone dust is removed and drops as an item if:
* its attachment block is moved, removed, or destroyed
* [[water]] or [[lava]] flows into its space
* a [[piston]] tries to push it or moves a block into its space
=== Mob loot ===
[[Witch]]es have a chance of dropping 0–2 redstone dust upon death. This is increased by 1 per level of [[Looting]], for a maximum of 0–5 redstone dust.
=== Chest loot ===
{{LootChestItem|redstone}}
=== Crafting ===
Redstone dust can be crafted from [[blocks of redstone]].
{{Crafting
|Block of Redstone
|Output=Redstone Dust,9
|type=Redstone
}}
=== Smelting ===
{{Smelting
|showname=1
|Redstone Ore; Deepslate Redstone Ore
|Redstone Dust
|0.7
}}
=== Trading ===
{{IN|java}}, novice-level cleric [[villager]]s sell two redstone dust for one [[emerald]].
{{IN|bedrock}}, novice-level cleric villagers sell four redstone dust for one emerald.
=== Villager gifts ===
{{see also|Tutorials/Raid farming}}
{{IN|Java}}, when the player has the [[Hero of the Village]] status effect, clerics might throw that player a redstone dust as a gift.
== Usage ==
Redstone dust is used for [[#Brewing ingredient|brewing]], [[#Crafting ingredient|crafting]], and in redstone circuits by placing it on the ground to create [[#Redstone component|redstone wire]]. It can also be used to power redstone components.
=== Brewing ingredient ===
{{Brewing
|head=1
|Redstone Dust
|Mundane Potion
|base=Water Bottle
}}
{{Brewing
|foot=1
|name=Increased Duration
|Redstone Dust
|showbase=1
|base=Potion of Fire Resistance; Potion of Invisibility; Potion of Night Vision; Potion of Poison; Potion of Regeneration; Potion of Slowness; Potion of Strength; Potion of Swiftness; Potion of Water Breathing; Potion of Weakness; Potion of Leaping; Potion of Slow Falling
}}
=== Crafting ingredient ===
{{crafting usage|Redstone Dust}}
=== {{anchor|Redstone dust}} Redstone component ===
When placed in the world, redstone dust becomes a block of "redstone wire"{{Info needed|other blco? BE?}}, which can transmit [[Redstone circuit#Power|redstone power]].
=== Smithing ingredient ===
{{Smithing
|head=1
|ingredients=Any Armor Trim +<br/>Any Armor Piece + <br/>Redstone Dust
|Any Armor Trim Smithing Template
|Netherite Chestplate
|Redstone
|Redstone Trim Netherite Chestplate
|showdescription=1
|description = All armor types can be used in this recipe,<br/>a netherite chestplate is shown as an example.<br/>
|tail=1
}}
;Trim color palette
The following color palette is shown on the designs on trimmed armor:
*{{TrimPalette|redstone dust}}
=== Placement ===
[[File:Redstone wire as circuit component.png|Examples of redstone wire configuration. ''Top Left:'' Redstone wire connects diagonally vertically through non-opaque blocks. ''Top Right:'' Redstone wire does ''not'' connect diagonally vertically through opaque blocks. ''Center:'' Redstone wire gets darker as its power level drops, to a maximum of 15 blocks from a power source.|thumb]]
[[File:Redstone on Glowstone, Stairs, Slabs.png|Examples of redstone wire placements.|thumb]]
Redstone dust can be placed on [[opaque]] blocks as well as [[glowstone]], upside-down [[slab]]s, [[glass]], upside-down [[stairs]], and [[hopper]]s. It can also be placed on some transparent blocks; see [[Opacity/Placement]] for more information. It cannot be placed suspended in midair, even with commands, which is not unintentional.<ref>{{bug|MC-182709}}</ref>
Redstone wire configures itself to point toward adjacent redstone [[Redstone components#Power components|power components]] and [[Redstone components#Transmission components|transmission component]] connection points. Redstone wire also configures itself to point toward adjacent redstone wire one block higher or lower – unless there is a solid opaque block above the lower redstone wire.
If there is only one such adjacent redstone component, redstone wire configures itself into a {{BlockSprite|redstone-dust}} line pointing both at the neighbor and away from it. If there are two or more such adjacent components, redstone wire connects them in the form of {{BlockSprite|redstone-dust}}, {{BlockSprite|redstone-dust-upleft}}, {{BlockSprite|redstone-dust-t-up}}, or {{BlockSprite|redstone-dust-cross}} as needed.
When there are no adjacent components, a single redstone wire configures itself into a {{BlockSprite|redstone-dust-cross}} plus sign, which can provide power in all four directions. By right-clicking it can be changed into a {{BlockSprite|redstone-dust-dot}} dot, which does not provide power to any of the four directions.
{{IN|bedrock}}, redstone wire automatically configures itself to point toward adjacent blocks or [[Redstone components#Mechanism components|mechanism components]]. {{IN|java}}, it does not. If such a configuration is desired, the other neighbors of the redstone wire must be arranged to create it, i.e the redstone dust must be placed in a way that it would be pointed at the block’s location even if it were not there.
When redstone wire is reconfigured after placement, it does not update other redstone components around it of the change unless that reconfiguration also includes a change in power level or another component provides an update. This can create situations where a mechanism component remains activated when it shouldn't, or vice versa, until it receives an update from something else – a "feature" of redstone wire that can be used to make a [[BUD|block update detector]].
{{-}}
=== Behavior ===
{{Schematic|caption=
{{IN|be}}, the signal can go down from glass blocks.
|||rd-$ew!|RL-!||||rd-$ew!|RL-!|-
|rt-$!|rd-$ew!|SB|||rt-$!|rd-$ew!|glass||-
|ts-$|SB|rd-$ew|RL||ts-$|SB|rd-$ew!|RL-!
}}{{Schematic|caption =
However, the signal can never go down from slabs.
|||rd-$ew!|RL-!||||rd-$ew!|RL-!|-
|rt-$!|rd-$ew!|SB|||rt-$!|rd-$ew!|glass||-
|ts-$|ts-$|rd-$ew|RL||ts-$|ts-$|rd-$ew|RL
}}
Redstone wire can transmit power, which can be used to operate [[Redstone components#Mechanism components|mechanism components]] ([[door]]s, [[piston]]s, [[redstone lamp]]s, etc.).
Redstone wire can be "powered" by a number of methods:
* from an adjacent [[Redstone components#Power components|power component]] or a strongly-powered block
* from the output of a redstone repeater or redstone comparator
* from adjacent redstone wire. The powering dust can be a level higher or lower, but with restrictions:
** Redstone dust can be powered by redstone dust that is one level lower, or on an [[opaque]] block one level higher. A transparent block cannot{{only|java}} pass power downward.
** The block "between" the two dust blocks must be air or transparent. A solid block there "cuts" the connection between the higher and lower dust.
The "power level" of redstone dust can vary from 0 to 15. Most power components power-up adjacent redstone dust to power level 15, but a few ([[daylight sensor]]s, [[trapped chest]]s, and [[weighted pressure plate]]s) may create a lower power level. Redstone repeaters output power level 15 (when turned on), but [[redstone comparator]]s may output a lower power level.
{{Schematic | caption =
Redstone wire can transmit power up to 15 blocks.
|rt-$!|rd-$ew!+15|rd-$ew!+14|rd-$ew!+13|rd-$ew!+12|rd-$ew!+11|rd-$ew!+10|rd-$ew!+9
|rd-$ew!+8|rd-$ew!+7|rd-$ew!+6|rd-$ew!+5|rd-$ew!+4|rd-$ew!+3|rd-$ew!+2|rd-$ew!+1|rd-$ew+0
}}
Power level drops by 1 for every block of redstone wire it crosses. Thus, redstone wire can transmit power for no more than 15 blocks. To go further, the power level must be re-strengthened – typically with a redstone repeater.
Powered redstone wire on top of, or pointing at, an opaque block provides ''weak'' power to the block. A weakly-powered block cannot power other adjacent redstone wire, but can still power redstone repeaters and comparators, and activate adjacent mechanism components. Transparent blocks cannot be powered.
When redstone wire is unpowered, it appears dark red. When powered, it becomes bright red at power level 15, fading to darker shades with decreasing power. Powered redstone wire also produces "dust" [[particles]] of the same color.
While redstone wire always provides power to the directions it points into, it can still point into directions in which it cannot give power. If redstone wire comes in the form of a cross, the player can right-click to toggle it between a cross and dot. A redstone dot does not power anything adjacent to it, but powers the block under it.
== Sounds ==
{{Sound table/Block/Normal}}
== Data values ==
=== ID ===
{{edition|java}}:
{{ID table
|edition=java
|firstcolumnname=Redstone Dust
|showforms=y
|generatetranslationkeys=y
|displayname=Block
|spritename=redstone-dust
|spritetype=block
|nameid=redstone_wire
|form=block}}
{{ID table
|displayname=Item
|spritename=redstone-dust
|spritetype=item
|nameid=redstone
|form=item
|foot=1}}
{{edition|bedrock}}:
{{ID table
|edition=bedrock
|firstcolumnname=Redstone Dust
|shownumericids=y
|showforms=y
|generatetranslationkeys=y
|displayname=Block
|spritename=redstone-dust
|spritetype=block
|nameid=redstone_wire
|id=55
|form=block}}
{{ID table
|displayname=Item
|spritename=redstone-dust
|spritetype=item
|nameid=redstone
|id=373
|form=item
|foot=1}}
=== Block states ===
{{see also|Block states}}
{{/BS}}
{{LoadPage|Redstone Dust/Asset history|List of block state combinations|h4}}
== Achievements ==
{{load achievements|Dispense With This}}
== Video ==
{{Video note|These videos do not show all uses for redstone in crafting and all methods of obtaining. This video is also outdated, as of 1.13 Java Edition, redstone is now called Redstone Dust.}}
<div style="text-align:center">
<span style="display:inline-block">{{yt|zldqknGFWb4}}</span>
<span style="display:inline-block">{{yt|_IApwvCLJW8}}</span>
</div>
== History ==
{{History||May 21, 2009|link=https://web.archive.org/web/0/http://notch.tumblr.com/post/110762705/my-list-on-tile-types-so-far|[[Notch]] shows interest in adding wire-type [[block]]s.}}
{{History|java alpha}}
{{History||v1.0.1|[[File:Redstone Dust JE1 BE1.png|32px]] Added redstone dust as an [[item]].
|[[File:Inactive Redstone Wire (NS) JE1.png|32px]] [[File:Inactive Redstone Wire (EW) JE1.png|32px]] [[File:Inactive Redstone Wire (NE) JE1.png|32px]] [[File:Inactive Redstone Wire (ES) JE1.png|32px]] [[File:Inactive Redstone Wire (SW) JE1.png|32px]] [[File:Inactive Redstone Wire (NW) JE1.png|32px]] [[File:Inactive Redstone Wire (NEW) JE1.png|32px]] [[File:Inactive Redstone Wire (NES) JE1.png|32px]] [[File:Inactive Redstone Wire (ESW) JE1.png|32px]] [[File:Inactive Redstone Wire (NSW) JE1.png|32px]] [[File:Inactive Redstone Wire (NESW) JE1.png|32px]]<br>[[File:Active Redstone Wire (NS) JE1.png|32px]] [[File:Active Redstone Wire (EW) JE1.png|32px]] [[File:Active Redstone Wire (NE) JE1.png|32px]] [[File:Active Redstone Wire (ES) JE1.png|32px]] [[File:Active Redstone Wire (SW) JE1.png|32px]] [[File:Active Redstone Wire (NW) JE1.png|32px]] [[File:Active Redstone Wire (NEW) JE1.png|32px]] [[File:Active Redstone Wire (NES) JE1.png|32px]] [[File:Active Redstone Wire (ESW) JE1.png|32px]] [[File:Active Redstone Wire (NSW) JE1.png|32px]] [[File:Active Redstone Wire (NESW) JE1.png|32px]] Added redstone dust as a placed [[block]].
|Redstone dust as a placed block has two power appearances; either completely on, or completely off.
|Redstone dust is used to craft [[redstone torch]]es.
|At this time, redstone has not been given an official name.}}
{{History||v1.0.2_01|Redstone dust now doesn't connect through solid [[block]]s diagonally down.{{needs testing|may have been changed in v1.0.2|type=untestable}}
|Walking on redstone dust no longer [[breaking|breaks]] it.{{needs testing|may have been changed in v1.0.2|type=untestable}}
|Active redstone dust now gives off [[particles]].{{needs testing|may have been changed in v1.0.2|type=untestable}}}}
{{History||v1.1.0|Redstone is now used to craft [[compass]]es.}}
{{History||v1.2.0|snap=<nowiki>?|slink=:Category:Information needed requiring unarchived version|Redstone is now used to craft [[clock]]s.}}
{{History|java beta}}
{{History||1.0|With the addition of inventory tooltips, the [[item]] form of redstone dust has been named "Redstone", and the usually unobtainable block form has been named "Redstone Dust".}}
{{History||1.2|Redstone is now used to craft [[dispenser]]s and [[note block]]s.}}
{{History||1.3|[[File:Inactive Redstone Wire (NS) JE2.png|32px]] [[File:Inactive Redstone Wire (EW) JE2.png|32px]] [[File:Inactive Redstone Wire (NE) JE2.png|32px]] [[File:Inactive Redstone Wire (ES) JE2.png|32px]] [[File:Inactive Redstone Wire (SW) JE2.png|32px]] [[File:Inactive Redstone Wire (NW) JE2.png|32px]] [[File:Inactive Redstone Wire (NEW) JE2.png|32px]] [[File:Inactive Redstone Wire (NES) JE2.png|32px]] [[File:Inactive Redstone Wire (ESW) JE2.png|32px]] [[File:Inactive Redstone Wire (NSW) JE2.png|32px]] [[File:Inactive Redstone Wire (NESW) JE2.png|32px]]<br>[[File:Active Redstone Wire (NS) JE2.png|32px]] [[File:Active Redstone Wire (EW) JE2.png|32px]] [[File:Active Redstone Wire (NE) JE2.png|32px]] [[File:Active Redstone Wire (ES) JE2.png|32px]] [[File:Active Redstone Wire (SW) JE2.png|32px]] [[File:Active Redstone Wire (NW) JE2.png|32px]] [[File:Active Redstone Wire (NEW) JE2.png|32px]] [[File:Active Redstone Wire (NES) JE2.png|32px]] [[File:Active Redstone Wire (ESW) JE2.png|32px]] [[File:Active Redstone Wire (NSW) JE2.png|32px]] [[File:Active Redstone Wire (NESW) JE2.png|32px]] Redstone wire gets darker the farther away it is from a source of power, using a dedicated [[tint]] system. Previously, it was fully on until it reached its limit.
|Its particles now appear gray due to not being tinted.
|Redstone is now used to craft [[redstone repeater]]s.}}
{{History||1.5|[[File:Inactive Redstone Wire (NS) JE3.png|32px]] [[File:Inactive Redstone Wire (EW) JE3.png|32px]] [[File:Inactive Redstone Wire (NE) JE3.png|32px]] [[File:Inactive Redstone Wire (ES) JE3.png|32px]] [[File:Inactive Redstone Wire (SW) JE3.png|32px]] [[File:Inactive Redstone Wire (NW) JE3.png|32px]] [[File:Inactive Redstone Wire (NEW) JE3.png|32px]] [[File:Inactive Redstone Wire (NES) JE3.png|32px]] [[File:Inactive Redstone Wire (ESW) JE3.png|32px]] [[File:Inactive Redstone Wire (NSW) JE3.png|32px]] [[File:Inactive Redstone Wire (NESW) JE3.png|32px]]<br>[[File:Active Redstone Wire (NS) JE3.png|32px]] [[File:Active Redstone Wire (EW) JE3.png|32px]] [[File:Active Redstone Wire (NE) JE3.png|32px]] [[File:Active Redstone Wire (ES) JE3.png|32px]] [[File:Active Redstone Wire (SW) JE3.png|32px]] [[File:Active Redstone Wire (NW) JE3.png|32px]] [[File:Active Redstone Wire (NEW) JE3.png|32px]] [[File:Active Redstone Wire (NES) JE3.png|32px]] [[File:Active Redstone Wire (ESW) JE3.png|32px]] [[File:Active Redstone Wire (NSW) JE3.png|32px]] [[File:Active Redstone Wire (NESW) JE3.png|32px]] Fully off redstone wire is no longer black.
|Redstone dust can now be placed on [[snow]].
|Redstone is now used to craft [[powered rail]]s and [[detector rail]]s.}}
{{History||1.6.6|Redstone dust now checks if the block below has a solid top face or [[glowstone]], allowing it to be placed on it.}}
{{History||1.7|Redstone dust now connects to a [[redstone repeater|repeater]] without the dust being explicitly pointed at it.
|Redstone can now be used to craft [[piston]]s.}}
{{History||1.8|snap=Pre-release|Redstone can now be found in the new [[stronghold]] storeroom [[chest]]s, and in the new [[mineshaft]] chests.}}
{{History|java}}
{{History||1.0.0|snap=Beta 1.9 Prerelease 3|Redstone can now be [[brewing|brewed]] in a [[water bottle]] to create a [[mundane potion]].
|Redstone can now be found in the new [[stronghold]] altar [[chest]]s.
|Redstone now extends the [[potion]]s of [[Fire Resistance]], [[Slowness]], [[Swiftness]], [[Poison]], [[Weakness]] and [[Strength]].}}
{{History|||snap=Beta 1.9 Prerelease 4|Redstone now extends the new potion of [[Regeneration]].}}
{{History|||snap=RC1|[[File:Inactive Redstone Wire (unconnected) JE1.png|32px]] <br>[[File:Active Redstone Wire (unconnected) JE1.png|32px]] Redstone dust placement on one [[block]] has been changed from a "+" to a "•" shape.}}
{{History||?|Redstone wire block particles are now correctly colored.}}
{{History||1.1|snap=11w49a|Fixed redstone update bug.{{more info}}}}
{{History||1.2.1|snap=12w06a|Redstone can now be placed on [[glowstone]].}}
{{History|||snap=12w07a|Redstone is now used to craft [[redstone lamp]]s.}}
{{History||1.3.1|snap=12w21a|Redstone can now be [[trading|bought]] from priest [[villager]]s, at 2–4 redstone for 1 [[emerald]], making them [[renewable]].}}
{{History|||snap=12w22a|Redstone dust now generates in [[jungle temple]]s.}}
{{History|||snap=12w25a|Redstone dust can now be placed on top of upside-down [[slabs]] and [[stairs]].}}
{{History||1.4.2|snap=12w34a|Redstone now extends the new [[potion]]s of [[Night Vision]] and [[Invisibility]].}}
{{History|||snap=12w38a|[[Witch]]es have been added, which sometimes [[drops|drop]] redstone when killed.}}
{{History||1.5|snap=13w01a|Redstone can now be used to craft [[blocks of redstone]] and [[dropper]]s.}}
{{History||1.7.2|snap=13w36a|Redstone now extends the new [[potion]] of [[Water Breathing]].}}
{{History||1.8|snap=14w02a|[[Trading]] has been changed: cleric [[villager]]s now [[trading|sell]] 1–4 redstone for 1 [[emerald]].}}
{{History|||snap=14w25a|Redstone dust no longer changes to [[obsidian]] next to water when [[lava]] flows into it.}}
{{History|||snap=14w27a|Redstone now extends the new [[potion]] of [[Leaping]].}}
{{History||1.9|snap=15w31a|[[File:Inactive Redstone Wire (unconnected) JE2.png|32px]] [[File:Inactive Redstone Wire (NS) JE4.png|32px]] [[File:Inactive Redstone Wire (EW) JE4.png|32px]] [[File:Inactive Redstone Wire (NE) JE4.png|32px]] [[File:Inactive Redstone Wire (ES) JE4.png|32px]] [[File:Inactive Redstone Wire (SW) JE4.png|32px]] [[File:Inactive Redstone Wire (NW) JE4.png|32px]] [[File:Inactive Redstone Wire (NEW) JE4.png|32px]] [[File:Inactive Redstone Wire (NES) JE4.png|32px]] [[File:Inactive Redstone Wire (ESW) JE4.png|32px]] [[File:Inactive Redstone Wire (NSW) JE4.png|32px]] [[File:Inactive Redstone Wire (NESW) JE4.png|32px]]<br>[[File:Active Redstone Wire (unconnected) JE2.png|32px]] [[File:Active Redstone Wire (NS) JE4.png|32px]] [[File:Active Redstone Wire (EW) JE4.png|32px]] [[File:Active Redstone Wire (NE) JE4.png|32px]] [[File:Active Redstone Wire (ES) JE4.png|32px]] [[File:Active Redstone Wire (SW) JE4.png|32px]] [[File:Active Redstone Wire (NW) JE4.png|32px]] [[File:Active Redstone Wire (NEW) JE4.png|32px]] [[File:Active Redstone Wire (NES) JE4.png|32px]] [[File:Active Redstone Wire (ESW) JE4.png|32px]] [[File:Active Redstone Wire (NSW) JE4.png|32px]] [[File:Active Redstone Wire (NESW) JE4.png|32px]] Some slight changes have been made to redstone wire's appearance - the dot now extends outward with two more pixels, and the south-facing section of bends, T shapes and crosses now has one fewer pixel. It also appears straighter and more continuous in straight wire form.
|Redstone can no longer be added to extended [[potion]]s or tier-II potions.}}
{{History|||snap=15w44a|The average yield of redstone from [[dungeon]] [[chest]]s has been cut by more than half.
|The average yield of redstone in [[mineshaft]] chests has been increased.}}
{{History|||snap=15w46a|The hitbox of redstone now covers only part of the surface of the [[block]] below, based on the orientation of the redstone.}}
{{History||1.11|snap=16w39a|Redstone dust can now be found in chests in [[woodland mansion]]s.
|Redstone can now used to craft [[observer]]s.}}
{{History||1.13|snap=17w47a|The [[item]] form of "Redstone" has been renamed to "Redstone Wire".
|Prior to [[1.13/Flattening|''The Flattening'']], this [[block]]'s numeral ID was 55, and the [[item]]'s 331.}}
{{History|||snap=17w48a|"Redstone" has been renamed to "Redstone Dust".}}
{{History|||snap=18w07a|Redstone now extends the new [[potion of the Turtle Master]].}}
{{History||1.14|snap=18w43a|[[File:Redstone Dust JE2 BE2.png|32px]] The texture of redstone dust has been changed.}}
{{History|||snap=18w50a|Redstone dust can now be found in chests in [[village]] temples.}}
{{History|||snap=19w12b|Redstone dust can now be placed on [[glass]], [[ice]] and [[sea lantern]]s.}}
{{History|||snap=19w13a|Cleric villagers now give redstone dust to players under the [[Hero of the Village]] effect.}}
{{History||1.16|snap=20w06a|Redstone dust now has a bottom texture.}}
{{History|||snap=20w09a|Redstone can now be used to craft [[target]]s.}}
{{History|||snap=20w18a|Redstone dust placement on one [[block]] has been changed from a "•" back to a "+" shape.
|Redstone dust's hitbox is now no longer strictly a cuboid, and more closely matches the shape of the wiring.<ref>{{bug|MC-137336}}</ref>
|Upward going redstone dust now has a hitbox on the side of the [[block]] too, rather than only on the floor.<ref>{{bug|MC-153508}}</ref>
|Unconnected redstone dust now has all direction block states set to "side".
|The direction block states of redstone dust are now properly set to "side" at the end of a redstone wire on both ends, rather than only the one with other redstone besides it.
|[[File:Inactive Redstone Wire (N).png|32px]] [[File:Inactive Redstone Wire (E).png|32px]] [[File:Inactive Redstone Wire (S).png|32px]] [[File:Inactive Redstone Wire (W).png|32px]]<br>[[File:Active Redstone Wire (N).png|32px]] [[File:Active Redstone Wire (E).png|32px]] [[File:Active Redstone Wire (S).png|32px]] [[File:Active Redstone Wire (W).png|32px]] While not accessible in normal gameplay, redstone dust that points into one side, but not the opposite, now visually reaches halfway across the [[block]].}}
{{History|||snap=20w19a|Redstone dust now visually connects when going up [[soul sand]], 8-layer [[snow]] stacks and the back side of upside-down [[stairs]].
|[[Particles]] are now generated across the length of the redstone wire rather than the center of the [[block]].}}
{{History|||snap=20w21a|Redstone dust placement on one [[block]] is now toggleable between a "+" and a "•" shape, by {{control|interacting}} with it.}}
{{History||1.17|snap=21w08a|Redstone dust can now drop and be smelted from [[deepslate redstone ore]].}}
{{History||1.19|snap=22w13a|Redstone wire now generates in [[Ancient City|ancient cities]].}}
{{History||1.20<br>(Experimental)|link=1.19.4|snap=23w04a|Redstone dust can now be used as an armor trim material.}}
{{History|pocket alpha}}
{{History||v0.8.0|snap=build 1|[[File:Redstone Dust JE1 BE1.png|32px]] Added redstone as an [[item]].
|Redstone is now [[drops|dropped]] when [[breaking|mined]] from [[redstone ore]].
|Redstone can be used to craft [[compass]]es and [[clock]]s.}}
{{History|||snap=build 2|Redstone can now be used to craft [[powered rail]]s.}}
{{History||v0.11.0|snap=build 1|Redstone is now used to craft [[redstone block]]s.}}
{{History||v0.12.1|snap=build 1|Redstone has been added to the [[Creative]] [[inventory]], but it still cannot be placed. }}
{{History||v0.13.0|snap=build 1|Redstone can now be placed.
|Redstone is now used to craft [[redstone lamp]]s, [[note block]]s, [[detector rail]]s and [[redstone torch]]es.}}
{{History||v0.14.0|snap=build 1|Redstone is now used to craft [[dispenser]]s and [[dropper]]s.}}
{{History||v0.15.0|snap=build 1|Redstone is now used to craft [[piston]]s and [[observer]]s.}}
{{History|pocket}}
{{History||1.0.4|snap=alpha 1.0.4.0|Cleric [[villager]]s now [[trading|sell]] 1–4 redstone for an [[emerald]].}}
{{History||1.1.0|snap=alpha 1.1.0.0|Redstone can now be found in [[woodland mansion]]s.}}
{{History|bedrock}}
{{History||?|[[File:Inactive Redstone Wire (NE) BE.png|32px]] [[File:Inactive Redstone Wire (ES) BE.png|32px]] [[File:Inactive Redstone Wire (SW) BE.png|32px]] [[File:Inactive Redstone Wire (NW) BE.png|32px]] [[File:Inactive Redstone Wire (NEW) BE.png|32px]] [[File:Inactive Redstone Wire (NES) BE.png|32px]] [[File:Inactive Redstone Wire (ESW) BE.png|32px]] [[File:Inactive Redstone Wire (NSW) BE.png|32px]] [[File:Inactive Redstone Wire (NESW) BE.png|32px]]<br>[[File:Active Redstone Wire (NE) BE.png|32px]] [[File:Active Redstone Wire (ES) BE.png|32px]] [[File:Active Redstone Wire (SW) BE.png|32px]] [[File:Active Redstone Wire (NW) BE.png|32px]] [[File:Active Redstone Wire (NEW) BE.png|32px]] [[File:Active Redstone Wire (NES) BE.png|32px]] [[File:Active Redstone Wire (ESW) BE.png|32px]] [[File:Active Redstone Wire (NSW) BE.png|32px]] [[File:Active Redstone Wire (NESW) BE.png|32px]]<br>Placed redstone now assumes its current appearance with a more solid center. Its linear state appearences are unknown.}}
{{History||1.10.0|snap=beta 1.10.0.3|[[File:Redstone Dust JE2 BE2.png|32px]] The texture of redstone has been changed.}}
{{History||1.11.0|snap=beta 1.11.0.1|Redstone can now be found in [[desert]] [[village]] temple [[chest]]s.}}
{{History|||snap=beta 1.11.0.4|Cleric [[villager]]s now [[trading|sell]] 4 redstone as part of their first tier [[trading|trade]].}}
{{History||1.16.210|snap=beta 1.16.210.57|"Redstone" has been renamed to "Redstone Dust".}}
{{History||1.17.0|snap=beta 1.16.230.52|Redstone dust can now drop and be smelted from [[deepslate redstone ore]].}}
{{History||1.19.0|snap=beta 1.19.0.26|Redstone wire now generates in [[Ancient City|ancient cities]].}}
{{History||1.19.80|snap=beta 1.19.80.21|Redstone dust can now be used as an armor trim material.}}
{{History|console}}
{{History||xbox=TU1|xbone=CU1|ps=1.0|wiiu=Patch 1|switch=1.0.1|[[File:Redstone Dust JE1 BE1.png|32px]] Added redstone.}}
{{History||xbox=TU3|Redstone now connects to a [[redstone repeater|repeater]] without the dust being explicitly pointed at it.}}
{{History||xbox=none|xbone=none|ps=1.90|wiiu=none|switch=none|[[File:Redstone Dust JE2 BE2.png|32px]] The texture of redstone has been changed.}}
{{History||ps=1.95|Redstone can now be placed on [[glass]].}}
{{History|new 3ds}}
{{History||0.1.0|[[File:Redstone Dust JE1 BE1.png|32px]] Added redstone dust.}}
{{History|foot}}
=== Redstone wire "item" ===
{{:Technical blocks/Redstone Wire}}
== Gallery ==
=== Renders ===
; Java Edition
<gallery>
Inactive Redstone Wire (NESW).png |
Inactive Redstone Wire (unconnected).png |
Inactive Redstone Wire (NS).png |
Inactive Redstone Wire (EW).png |
Inactive Redstone Wire (NE).png |
Inactive Redstone Wire (ES).png |
Inactive Redstone Wire (SW).png |
Inactive Redstone Wire (NW).png |
Inactive Redstone Wire (NEW).png |
Inactive Redstone Wire (NES).png |
Inactive Redstone Wire (ESW).png |
Inactive Redstone Wire (NSW).png
</gallery>
<gallery>
Active Redstone Wire (NESW).png |
Active Redstone Wire (unconnected).png |
Active Redstone Wire (NS).png |
Active Redstone Wire (EW).png |
Active Redstone Wire (NE).png |
Active Redstone Wire (ES).png |
Active Redstone Wire (SW).png |
Active Redstone Wire (NW).png |
Active Redstone Wire (NEW).png |
Active Redstone Wire (NES).png |
Active Redstone Wire (ESW).png |
Active Redstone Wire (NSW).png
</gallery>
; Bedrock Edition
<gallery>
Inactive Redstone Wire (NESW) BE.png |
Inactive Redstone Wire (NESW) BE.png |
Inactive Redstone Wire (NS).png |
Inactive Redstone Wire (EW).png |
Inactive Redstone Wire (NE) BE.png |
Inactive Redstone Wire (ES) BE.png |
Inactive Redstone Wire (SW) BE.png |
Inactive Redstone Wire (NW) BE.png |
Inactive Redstone Wire (NEW) BE.png |
Inactive Redstone Wire (NES) BE.png |
Inactive Redstone Wire (ESW) BE.png |
Inactive Redstone Wire (NSW) BE.png
</gallery>
<gallery>
Active Redstone Wire (NESW) BE.png |
Active Redstone Wire (NESW) BE.png |
Active Redstone Wire (NS).png |
Active Redstone Wire (EW).png |
Active Redstone Wire (NE) BE.png |
Active Redstone Wire (ES) BE.png |
Active Redstone Wire (SW) BE.png |
Active Redstone Wire (NW) BE.png |
Active Redstone Wire (NEW) BE.png |
Active Redstone Wire (NES) BE.png |
Active Redstone Wire (ESW) BE.png |
Active Redstone Wire (NSW) BE.png
</gallery>
=== Screenshots ===
<gallery>
Slab Stair Redstone.png|First image of redstone dust on top of slabs and stairs.
File:Olivia Tinkering.jpeg|[[Olivia]] using a scarce amount of redstone dust.
File:23w32a.jpg|[[Sunny]] using a very long strip of redstone dust.
</gallery>
=== In other media ===
<gallery>
Powered By Redstone JINX.jpg|Official T-shirt artwork "Powered By Redstone" made by [https://www.jinx.com JINX].
File:Redstone Behind Chiseled Bookshelf Pixel Art.png|Pixel art of redstone dust.
</gallery>
== Issues ==
{{issue list|redstone|redstone dust|redstone wire}}
== Trivia ==
* Five updates for [[wikipedia:Windows 10 version history|Windows 10]] released from 2016 to 2018 were codenamed "Redstone", referencing ''Minecraft''.<ref>{{link|url=https://www.theverge.com/2015/4/7/8364355/microsoft-redstone-windows-updates|title=Microsoft plans ‘Redstone’ updates for Windows 10 in 2016|author=Tom Warren|website=The Verge|date=April 7, 2015}}</ref>
* The block has 1,296 possible block state combinations, the highest of all blocks as of 1.15.2, beating [[fire]]'s 512 and [[note block]]'s 800.
* According to {{el|ee}}, redstone dust contains radioactive [[element]]s.
== References ==
{{Reflist}}
{{Redstone}}
{{Blocks|Utility}}
{{Items}}
[[Category:Redstone mechanics]]
[[Category:Mechanisms]]
[[Category:Mechanics]]
[[Category:Generated structure blocks]]
[[Category:Non-solid blocks]]
[[Category:Brewing recipe]]
[[cs:Rudit]]
[[de:Redstone]]
[[el:Σκόνη Κοκκινόπετρας]]
[[es:Polvo de redstone]]
[[fr:Poudre de redstone]]
[[hu:Redstone]]
[[it:Polvere di redstone]]
[[ja:レッドストーンダスト]]
[[ko:레드스톤 가루]]
[[nl:Redstonestof]]
[[pl:Redstone]]
[[pt:Pó de redstone]]
[[ru:Красная пыль]]
[[th:ผงเรดสโตน]]
[[tr:Kızıltaş]]
[[uk:Редстоун]]
[[zh:红石粉]]</li><li>[[Nether Wart|Nether Wart]]<br/><!--Please do not change "nether wart" to "Nether wart". According to style guide, block names should not be capitalized.-->
{{about|the fungus used for potions|the block found in crimson forests|Nether Wart Block}}{{Block
| group = Age 0
| 1-1 = Nether Wart Age 0.png
| 1-2 = Nether Wart Age 0 BE.png
| group2 = Age 1-2
| 2-1 = Nether Wart Age 1-2.png
| 2-2 = Nether Wart Age 1-2 BE.png
| group3 = Age 3
| 3-1 = Nether Wart Age 3.png
| 3-2 = Nether Wart Age 3 BE.png
|image= Nether Wart (item).png
|transparent=Yes
|light=No
|tool=any
|renewable=Yes
|stackable=Yes (64)
|flammable=No
|lavasusceptible=No
}}
'''Nether wart''' is a fungus harvested from nether wart crops and is used to plant them, as well as being vital in the creation of [[potions]].
'''Nether wart crops''' are found in [[Nether Fortress/Structure|nether fortresses]] and [[Bastion Remnant|bastions]] and is used to grow nether wart in [[Soul Sand|soul sand]].
== Obtaining ==
=== Breaking ===
Nether wart can be mined instantly with any tool. A fully mature nether wart crop yields 2–4 nether wart. This is increased by one for each level of [[Fortune]], this allows for a maximum of 7 nether warts dropping from one crop. Less mature stages drop one nether wart, even with the Fortune enchantment.
=== Natural generation ===
Nether wart can generate in [[nether fortress]]es in [[soul sand]] gardens around stairwells. Nether wart can also generate in the courtyards of housing unit [[bastion remnant]]s. Due to only spawning in these specific structures, it's entirely possible for a nether fortress or bastion remnant to generate without nether wart (though they may still appear in the chests that generate in the fortress).
{| class="wikitable"
|+
!Location
!Description
!Image
|-
|{{anchor|Nether Fortress}}'''Nether Fortress'''
|Nether wart can be found growing near stairwells in small soul sand gardens.
|[[File:Nether wart garden.png|thumb|Nether wart growing in a nether fortress.]]
|-
|{{anchor|Bastion Remnant}}'''Bastion Remnant'''
|Nether wart can be found growing in the central courtyard of each of the sections of piglin housing unit bastions.
|[[File:Bastion Courtyard.png|thumb|Nether wart growing in a bastion remnant.]]
|}
<br>
=== Chest loot ===
{{LootChestItem|nether-wart}}
== Usage ==
=== Brewing ingredient ===
Nether wart's primary purpose is to [[brew]] the [[Potion|awkward potion]], the base for all potions, but optional for Weakness.
{{brewing
|showname=1
|Nether Wart
|Awkward Potion
|base=Water Bottle
}}
=== Crafting ingredient ===
{{crafting usage}}
=== Trading ===
Master-level cleric [[villager]]s buy 22 nether warts for an [[emerald]] as part of their trades.
=== Farming ===
{{main|Tutorials/Nether Wart farming}}
When planted on [[soul sand]], nether wart grows through four stages, though the middle two stages use the same texture (the hitbox of stage 3 is three pixels taller). {{IN|java}}, the exact age can be seen using the [[debug screen]], and the ages range from 0 to 3. Each random tick, nether wart has a 10% chance of growing one stage. At default random tick speed, each nether wart grows one age step approximately every {{convert|13653|ticks|minutes}} on average, and fully grows from planting to harvest every {{convert|40960|ticks|minutes}} on average. The growth rate is not affected by light or any other environmental factors. [[Bone meal]] cannot be used on the nether wart.
Nether wart can only be planted on [[soul sand]]. It cannot be planted on [[soul soil]]. It can grow in any [[dimension]].
Nether wart is ready to harvest when it reaches its fourth stage (age:3). Breaking a fully grown nether wart drops 2 to 4 nether wart, while an immature one drops a single nether wart. Using a tool enchanted with fortune increases the maximum number of nether wart dropped by 1 per level, for a maximum of 7 for a tool enchanted with [[Fortune|Fortune III]].
=== Composting ===
Placing a nether wart into a [[composter]] has a 30% chance of raising the compost level by 1.
== Sounds ==
{{Sound table/Block/Nether wart}}
== Data values ==
=== ID ===
{{edition|java}}:
{{ID table
|edition=java
|showforms=y
|generatetranslationkeys=y
|displayname=Nether Wart
|spritetype=block
|nameid=nether_wart
|translationkey=block.minecraft.nether_wart,item.minecraft.nether_wart
|foot=1}}
{{edition|bedrock}}:
{{ID table
|edition=bedrock
|firstcolumnname=Nether Wart
|shownumericids=y
|showforms=y
|generatetranslationkeys=y
|displayname=Block
|spritename=nether-wart
|spritetype=block
|nameid=nether_wart
|id=115
|form=block
|itemform=item.nether_wart}}
{{ID table
|displayname=Item
|spritename=nether-wart
|spritetype=item
|nameid=nether_wart
|id=294
|form=item
|foot=1}}
=== Block states ===
{{see also|Block states}}
{{/BS}}
== Advancements ==
{{load advancements|A Seedy Place}}
== History ==
{{History|java}}
{{History||1.0.0|snap=Beta 1.9 Prerelease|[[File:Nether Wart Age 0 JE1.png|32px]] [[File:Nether Wart Age 1-2 JE1.png|32px]] [[File:Nether Wart Age 3 JE1.png|32px]] [[File:Nether Wart (item) JE1.png|32px]] Added nether wart.}}
{{History|||snap=Beta 1.9 Prerelease 3|Nether wart can now be brewed in a [[water bottle]] to create an [[awkward potion]].}}
{{History||1.3.1|snap=12w27a|Nether wart can now grow outside of [[the Nether]].}}
{{History|||snap=1.3|[[File:Nether Wart (item) JE2 BE1.png|32px]] The item texture has been changed.}}
{{History||1.4.2|snap=12w36a|Nether wart can now be used to breed [[chicken]]s.}}
{{History||1.6.1|snap=13w18a|Nether wart is now found in the new [[chest]]s in [[nether fortress]]es.}}
{{History||1.8|snap=14w06a|[[File:Nether Wart Age 0 JE2.png|32px]] [[File:Nether Wart Age 1-2 JE2.png|32px]] [[File:Nether Wart Age 3 JE2.png|32px]] Nether wart crops are now a pixel higher, likely as an accidental result of model conversion. Previously they were offset one pixel downwards like the other crops (wheat, carrots potatoes) to match farmland, although in nether wart's case such a downwards offset hides some pixels of the texture inside of the soul sand.<ref>{{bug|MC-250679}}</ref>}}
{{History|||snap=14w10a|[[File:Missing Model JE2.png|32px]] [[File:Missing Model JE2.png|32px]] [[File:Missing Model JE2.png|32px]]<br>[[File:Missing Model (anisotropic filtering) JE2.png|32px]] [[File:Missing Model (anisotropic filtering) JE2.png|32px]] [[File:Missing Model (anisotropic filtering) JE2.png|32px]] Nether wart crops of all ages [[Missing model|no longer have a model]].}}
{{History|||snap=14w10b|[[File:Nether Wart Age 0 JE4.png|32px]] [[File:Nether Wart Age 1-2 JE4.png|32px]] [[File:Nether Wart Age 3 JE4.png|32px]] Nether wart crops now have models again.<ref>{{bug|MC-50276}}</ref> In addition, they are now offset downwards by one pixel once more, hiding the bottom row of pixels again.}}
{{History|||snap=14w25a|[[File:Nether Wart Age 0 JE5.png|32px]] [[File:Nether Wart Age 1-2 JE5.png|32px]] [[File:Nether Wart Age 3 JE5.png|32px]] Nether wart crops are now darker and subject to directional shading.}}
{{History|||snap=14w27a|[[File:Nether Wart Age 0 JE6.png|32px]] [[File:Nether Wart Age 1-2 JE6.png|32px]] [[File:Nether Wart Age 3 JE6.png|32px]] Nether wart crops are no longer subject to directional shading.}}
{{History|||snap=14w34d|Nether wart can no longer be used to breed [[chicken]]s.}}
{{History||1.9|snap=15w43a|The average yield of nether wart from [[nether fortress]] chests has now been slightly decreased.}}
{{History||1.10|snap=16w20a|Nether wart can now be used to [[crafting|craft]] the new [[red nether brick]] blocks and [[nether wart block]]s.}}
{{History||1.12|snap=17w18b|Placing a nether wart in soul sand now gives the player the "A Seedy Place" [[advancement]].{{verify}}}}
{{History||1.13|snap=17w47a|Prior to [[1.13/Flattening|''The Flattening'']], this block's numeral ID was 115, and the item's 372.}}
{{History||1.14|snap=18w43a|[[File:Nether Wart Age 0 JE7.png|32px]] [[File:Nether Wart Age 1-2 JE7.png|32px]] [[File:Nether Wart Age 3 JE7.png|32px]] The textures of nether wart crops have changed.}}
{{History|||snap=19w03a|Placement and breaking [[sound]]s have now been added to nether wart. Before this version, nether wart made stone sounds.}}
{{History|||snap=19w11a|Cleric [[villager]]s now [[trading|buy]] nether wart.
|Nether wart can now be planted by aiming against the sides and underside of blocks, rather than just the top surface of the soul sand.}}
{{History||1.16|snap=20w15a|Nether wart can now be [[composter|composted]].}}
{{History|||snap=20w16a|Nether wart now generates as part of [[bastion remnant]]s.}}
{{History||1.17|snap=21w13a|[[File:Nether Wart Age 0 JE8.png|32px]] [[File:Nether Wart Age 1-2 JE8.png|32px]] [[File:Nether Wart Age 3 JE8.png|32px]] The "crop" template model has changed such that pixels appear in the same physical positions on opposite sides of texture planes, changing the nether wart crop's appearance in the process.<ref>{{bug|MC-199242}}</ref>}}
{{History|pocket alpha}}
{{History||v0.12.1|snap=build 1|[[File:Nether Wart Age 0 BE1.png|32px]] [[File:Nether Wart Age 1-2 BE1.png|32px]] [[File:Nether Wart Age 3 BE1.png|32px]] [[File:Nether Wart (item) JE2 BE1.png|32px]] Added nether wart.
|Nether wart uses a cross model instead of the "hash" shape associated with crops.}}
{{History||?|[[File:Nether Wart Age 0 JE6 BE2.png|32px]] [[File:Nether Wart Age 1-2 JE6 BE2.png|32px]] [[File:Nether Wart Age 3 JE6 BE2.png|32px]]{{verify|Correct models? check UV, etc.}} Nether wart now uses a more conventional crop model.}}
{{History|pocket}}
{{History||1.1.3|snap=alpha 1.1.3.0|Nether wart can now be used to [[crafting|craft]] [[red nether bricks]] and [[nether wart block]]s.}}
{{History|bedrock}}
{{History||1.10.0|snap=beta 1.10.0.3|[[File:Nether Wart Age 0 BE.png|32px]] [[File:Nether Wart Age 1-2 BE.png|32px]] [[File:Nether Wart Age 3 BE.png|32px]] The textures of nether wart crops have changed.
|Placement and breaking [[sound]]s have now been added to nether wart.}}
{{History||1.11.0|snap=beta 1.11.0.4|Nether wart can now be [[trading|sold]] to cleric [[villager]]s.}}
{{History||1.16.0|snap=beta 1.16.0.57|Nether wart now generates as part of [[bastion remnant]]s.
|The placement and breaking [[sound]]s for nether wart have been changed to match {{el|je}}.
|Nether wart can now be [[composter|composted]].}}
{{History|console}}
{{History||xbox=TU7|xbone=CU1|ps=1.0|wiiu=Patch 1|switch=1.0.1|[[File:Nether Wart Age 0 JE6 BE2.png|32px]] [[File:Nether Wart Age 1-2 JE6 BE2.png|32px]] [[File:Nether Wart Age 3 JE6 BE2.png|32px]]{{verify|Correct models? check UV, etc.}} [[File:Nether Wart (item) JE2 BE1.png|32px]] Added nether wart.}}
{{History||xbox=TU9|Nether wart now spawns randomly wherever [[soul sand]] is generated in [[the Nether]].
|[[Nether fortress]]es have now been changed to make nether wart rooms more likely.
|Nether wart can now grow outside of [[the Nether]].}}
{{History||xbox=none|xbone=none|ps=1.90|wiiu=none|switch=none|[[File:Nether Wart Age 0 JE7.png|32px]] [[File:Nether Wart Age 1-2 JE7.png|32px]] [[File:Nether Wart Age 3 JE7.png|32px]]{{verify|Correct models?}} The textures of nether wart crops have now been changed.}}
{{History|New 3DS}}
{{History||0.1.0|[[File:Nether Wart Age 0 JE6 BE2.png|32px]] [[File:Nether Wart Age 1-2 JE6 BE2.png|32px]] [[File:Nether Wart Age 3 JE6 BE2.png|32px]]{{verify|Correct models? check UV, etc.}} [[File:Nether Wart (item) JE2 BE1.png|32px]] Added nether wart.}}
{{History|foot}}
=== Nether wart "item" ===
{{:Technical blocks/Nether Wart}}
==Issues==
{{issue list}}
== Trivia ==
* Nether wart's stage changes cannot be detected by a [[block update detector]], but can by an [[observer]] block.
* Unlike other crimson "plants", nether wart doesn't have a warped equivalent. This is also the case with [[nether sprouts]], which lack a crimson equivalent.
== Gallery ==
<gallery>
Nether Brick And Wart.png|Nether wart found in a nether fortress.
Nether Wart Closeup.png| Another example of nether wart found in a nether fortress.
Nether wart three sizes.png|The three different sizes of the nether wart as viewed from the side.
Nether Fortress Large Stairs Room.png
</gallery>
== References ==
{{reflist}}
{{Blocks|vegetation}}
{{Items}}
[[Category:Nether blocks]]
[[Category:Fungi]]
[[Category:Non-solid blocks]]
[[Category:Generated structure blocks]]
[[de:Netherwarze]]
[[es:Verruga del Nether]]
[[fr:Verrues du Nether]]
[[hu:Bibircsók]]
[[it:Verruca del Nether]]
[[ja:ネザーウォート]]
[[ko:네더 사마귀]]
[[nl:Netherkruid]]
[[pl:Netherowa brodawka]]
[[pt:Fungo do Nether]]
[[ru:Адский нарост]]
[[th:หูดเนเธอร์]]
[[uk:Пекельний наріст]]
[[zh:下界疣]]
[[Category:Brewing recipe]]</li></ul></nowiki> | 17w47a | Prior to The Flattening, these items' numeral IDs were 358 and 395. | ||||||||||||||||||||||||||||||||||||||||||||||||||||||||||||||||||||||||||||||||||||||||||||||||||||||||||||
| Maps now use additional NBT to specify which map they contain. Prior to this version, they used the damage value instead. | ||||||||||||||||||||||||||||||||||||||||||||||||||||||||||||||||||||||||||||||||||||||||||||||||||||||||||||||
| Map IDs are no longer limited to 32,768. | ||||||||||||||||||||||||||||||||||||||||||||||||||||||||||||||||||||||||||||||||||||||||||||||||||||||||||||||
| 17w50a | Maps can now be placed on floor and ceiling item frames. | |||||||||||||||||||||||||||||||||||||||||||||||||||||||||||||||||||||||||||||||||||||||||||||||||||||||||||||
| 18w10a | Spots on maps can now be marked using banners. | |||||||||||||||||||||||||||||||||||||||||||||||||||||||||||||||||||||||||||||||||||||||||||||||||||||||||||||
| 18w11a | Empty maps can now generate in shipwreck chests. | |||||||||||||||||||||||||||||||||||||||||||||||||||||||||||||||||||||||||||||||||||||||||||||||||||||||||||||
| pre7 | Maps have been changed slightly, in regard to which blocks are shown and which blocks are not. | |||||||||||||||||||||||||||||||||||||||||||||||||||||||||||||||||||||||||||||||||||||||||||||||||||||||||||||
1.14{{Extension DPL}}<ul><li>[[Bottle of Entity|Bottle of Entity]]<br/>{{joke feature}}
{{exclusive|java}}
{{WIP}}
{{see also|Potion|Splash Potion}}
{{Item
|image=Bottle of Entity.png
|image2=Splash Bottle of Entity.png
|image3=Bottle of Void.png
|stackable= No
}}
'''Bottles of entity''' are items that transform players into the respective mobs when drunk.
'''Splash bottle of entity''' are a variation of bottles of mob that can be thrown.
'''Bottle of void''' is a special bottle to transform back to the original player. Right clicking with it on a transformed player will remove the transformation and convert the bottle into a bottle of entity of that transformation.
A transformation into an entity will sometimes lead to special effects. For example, transforming into a chicken will allow the player to glide slowly to the ground. The chicken will however take fall damage upon landing, killing it and transforming the player back to themselves.
Transforming into an enderman will cause the player to be teleported randomly when a projectile it aimed at it or when they're being looked at by other players. Transforming into any mob capable of flight (for example, a bat) will allow the player to fly in survival mode as if they were in creative mode.
== Sounds ==<!--No sounds when thrown from a player or dispenser-->
Splash bottles of entities use the Friendly Creatures sound category for entity-dependent sound events.
{{Sound table
|sound=Bottle fill water1.ogg
|sound2=Bottle fill water2.ogg
|sound3=Bottle fill water3.ogg
|sound4=Bottle fill water4.ogg
|subtitle=Bottle fills
|source=neutral
|description=When an entity is collected using a bottle of void
|id=item.bottle.fill
|translationkey=subtitles.item.bottle.fill
|volume=1.0
|pitch=1.0
|distance=16}}
{{Sound table
|sound=Drink.ogg
|subtitle=Sipping
|source=player
|description=While a player is drinking a bottle of entity
|id=entity.generic.drink
|translationkey=subtitles.entity.generic.drink
|volume=0.5
|pitch=0.9-1.0
|distance=16}}
{{Sound table
|sound=Glass dig1.ogg
|sound2=Glass dig2.ogg
|sound3=Glass dig3.ogg
|subtitle=Bottle smashes
|source=neutral
|description=When a splash bottle of entity impacts something <ref group=sound>This sound is played six times simultaneously</ref>
|id=entity.splash_potion.break
|translationkey=subtitles.entity.potion.splash
|volume=1.0
|pitch=0.9-1.0
|distance=16
|foot=1}}
== Data values ==
=== ID ===
{{ID table
|edition=java
|showforms=y
|generatetranslationkeys=y
|displayname=Bottle of Entity
|spritetype=item
|nameid=bottle_of_entity
|form=item
|translationkey=item.minecraft.bottle_of_entity,item.minecraft.bottle_of_entity.specific}}
{{ID table
|showforms=y
|generatetranslationkeys=y
|displayname=Splash Bottle of Entity
|spritetype=item
|nameid=splash_bottle_of_entity
|form=item
|translationkey=item.minecraft.splash_bottle_of_entity,item.minecraft.splash_bottle_of_entity.specific}}
{{ID table
|showforms=y
|generatetranslationkeys=y
|displayname=Bottle of Void
|spritetype=item
|nameid=bottle_of_void
|form=item
|translationkey=item.minecraft.bottle_of_void
|foot=1}}
== History ==
{{History|java}}
{{History||23w13a_or_b|[[File:Bottle of Entity.png|32px]] [[File:Splash Bottle of Entity.png|32px]] [[File:Bottle of Void.png|32px]] Added bottle of entity, splash bottle of entity, and bottle of void.}}
{{History|foot}}
{{items}}
{{Jokes}}
[[ja:Bottle of Entity]]
[[pt:Frasco de entidade]]
[[Category:Joke items]]</li><li>[[Dye|Dye]]<br/>{{Item
| title = Dyes
| image = White Dye.png
| extratext = View [[#Gallery|all renders]]
| renewable = Yes
| stackable = Yes (64)
}}
'''Dyes''' are a set of sixteen items used to change the color of [[wool]], [[carpet]]s, [[terracotta]], [[concrete powder]], [[glass]], [[shulker box]]es, [[bed]]s, [[candle]]s, the patterns on [[banner]]s, [[firework star]]s, certain mobs, and text on [[sign]]s and [[hanging sign]]s. {{IN|bedrock}} they can also be used to dye water in a [[cauldron]] (which is thereafter used to dye leather [[armor]]); {{in|java}} leather armor can be dyed directly. {{IN|education}} dyes can also be used to dye [[balloon]]s and [[glow stick]]s.
{{IN|bedrock|education}}, [[bone meal]], [[ink sac]]s, [[lapis lazuli]], and [[cocoa bean]]s can generally substitute for [[white dye]], [[black dye]], [[blue dye]], and [[brown dye]], respectively, in crafting recipes and for use in dyeing items or mobs. However, they have other important uses that aren't related to color, and are therefore not considered true dyes. They are mentioned in this article only in regard to their use as dyeing agents; see their individual articles for complete information about them.
[[File:Dye Recipes.png|400px|thumb|A guide for creating all the dyes]]
== Obtaining ==
<!--[[File:Dye Chart.png|350px|thumb|A guide to crafting all the dyes.{{until|java 1.14}}]]-->
Dyes can be produced by crafting them from plants (mainly flowers), by crafting dyes of different colors together, by smelting plants, or by trading with a [[wandering trader]].
{{loadPage|Crafting/Dye|Crafting|h3}}
=== Smelting ===
{{smelting|head=1|Sea Pickle|Lime Dye|0,2}}
{{smelting|foot=1|Cactus|Green Dye|1||b=Lapis Lazuli|c=Any fuel|d=1}}
=== Trading ===
[[Wandering trader]]s can sell 3 dyes for an [[emerald]]. {{IN|bedrock}}, they can also sell 3 lapis lazuli, bone meal, cocoa beans, or ink sacs for one emerald.
Apprentice-level cleric [[villager]]s sell one lapis lazuli per emerald.
=== Chest loot ===
{{#invoke:LootChest|base3|blue-dye,green-dye,orange-dye,light-blue-dye,yellow-dye,white-dye}}
=== Other ===
Ink sacs can also be created using 1 iron, 1 sulfur, and 4 oxygen in the [[compound creator]]. {{only|bedrock|education}}
== Usage ==
Similar to their use in crafting, [[bone meal]], [[ink sac]]s, [[lapis lazuli]], and [[cocoa beans]] can be substituted for the corresponding dye in any of the following usages unless otherwise specified.{{only|bedrock}} <!--- sections are ordered by craftable dyeable blocks, dyeable items, version exclusive sections, and non-crafting miscellaneous uses--->
=== Dyeing wool and mobs ===
Players can dye wool by placing [[wool]] and any dye in a crafting grid.
{{Crafting
|nocat=1
|Any Wool
|Matching Dye
|Output=Any Wool
}}
Dyes can be {{control|use|text=used}} on sheep to change the color of the wool. Shearing a colored sheep drops the corresponding color of the wool, and the sheep retains the color when the wool regenerates. [[Breeding]] colored sheep produces a lamb colored as one of the parent sheep, or a color resulting from the combination of both parents' color. The color combining follows the same rules that dyes use – red and yellow sheep produce an orange lamb, but a blue and yellow sheep cannot create a green lamb. The unlimited reproduction of colored sheep makes dyeing and shearing sheep infinitely more efficient than just dyeing wool directly.
Dye can also be used on a tamed [[wolf]] or [[cat]] to change the color of its collar from the default red to the color of the dye.
=== Dyeing carpets ===
Carpets can be dyed.
{{Crafting
|Any Carpet
|Matching Dye
|Output= Matching Carpet
|type= Building block
}}
=== Dyeing terracotta ===
[[Terracotta]] can be dyed by placing 8 blocks around a dye on a crafting table.
{{Crafting
|nocat=1
|A1=Terracotta |B1=Terracotta |C1=Terracotta
|A2=Terracotta |B2=Matching Dye |C2=Terracotta
|A3=Terracotta |B3=Terracotta |C3=Terracotta
|Output=Matching Dyed Terracotta,8
}}
=== Creating concrete powder ===
Dyes can also be used to craft [[concrete powder]], which can then be set into their respective [[concrete]] blocks (they cannot be dyed directly).
{{Crafting
|nocat=1
|Sand |Gravel |Sand
|Gravel |Matching Dye |Gravel
|Sand |Gravel |Sand
|Output=Matching Concrete Powder,8
}}
=== Staining glass ===
[[Stained glass]] can be stained by placing 8 blocks of glass around a dye on a [[crafting table]]. Just like regular glass, stained glass can be crafted into stained glass panes. The recipe for this is the same as with regular glass.
{{Crafting
|nocat=1
|A1=Glass |B1=Glass |C1=Glass
|A2=Glass |B2=Matching Dye |C2=Glass
|A3=Glass |B3=Glass |C3=Glass
|Output=Matching Stained Glass,8
|head=1
}}
{{Crafting
|nocat=1
|A1= Glass Pane
|B1= Glass Pane
|C1= Glass Pane
|A2= Glass Pane
|B2= Matching Dye
|C2= Glass Pane
|A3= Glass Pane
|B3= Glass Pane
|C3= Glass Pane
|Output= Matching Stained Glass Pane,8
|type= Decoration block
|foot=1
}}
=== Dyeing shulker boxes ===
[[Shulker box]]es are generated in a light shade of purple (like the [[purpur block]]), but can be dyed any color. They can also be re-dyed as often as desired.
{{Crafting
|ignoreusage=1
|showname=1
|Any Shulker Box
|Matching Dye
|Output=Matching Shulker Box
}}
=== Dyeing beds ===
Players can dye beds by placing a [[bed]] and any color dye in a crafting grid.
{{Crafting
|nocat=1
|Any Bed
|Matching Dye
|Output=Matching Bed
}}
=== Dyeing candles ===
Players can dye [[candles]] by placing an undyed candle and any color dye in a crafting grid.
{{Crafting
|ignoreusage=1
|Candle
|Matching Dye
|Output=Matching Dyed Candle
}}
=== Banner patterns ===
{{main|Banner#Patterns}}
Dyes are used in most banner patterns to determine the pattern and color displayed.
=== Dyeing armor ===
[[File:DyeGraph2.png|200px|thumb|A graph showing all combinations of two dyes on a [[tunic]].]]
Leather [[armor]] can be dyed by:
* Crafting dyes with a piece of leather armor or leather [[horse armor]].{{Only|java}}
* Dousing the leather armor or leather [[horse armor]] in a [[cauldron]] to which dyes have been added.{{Only|bedrock}}
There are 5,713,438<ref>https://anrar4.github.io/DyeLeatherArmor/</ref> (34.1% of sRGB) colors leather armor can be, as it is possible to put more than one dye on the crafting bench alongside the leather armor. Armor can be dyed multiple times with previous colors affecting the final outcome. Colored armor can be reverted to their original color using a [[cauldron]] with undyed water.
The game has a specific formula for calculating the color of dyed armor: each color, in the RGB color model, has a red value, green value, and blue value. For each dye in the crafting grid, and the armor itself (if it is already dyed), the red, green, and blue values are added to running totals. In addition, a running total of the highest value (be it red, green, or blue) is also kept. After this, each total is divided by the number of colors used. This effectively produces the average red, green, blue, and maximum values. The maximum value of the average RGB values is also calculated. Finally, each average RGB value is multiplied by the average maximum value and divided by the maximum of the average RGB values. The modified average RGB values are then used as the final color. This procedure can be summed up with the following equations:
for each color (all "total" variables start at 0 before counting):
totalRed = totalRed + redValue
totalGreen = totalGreen + greenValue
totalBlue = totalBlue + blueValue
totalMaximum = totalMaximum + max(redValue, greenValue, blueValue)
numberOfColors = numberOfColors + 1
averageRed = totalRed / numberOfColors
averageGreen = totalGreen / numberOfColors
averageBlue = totalBlue / numberOfColors
averageMaximum = totalMaximum / numberOfColors
maximumOfAverage = max(averageRed, averageGreen, averageBlue)
gainFactor = averageMaximum / maximumOfAverage
resultRed = averageRed * gainFactor
resultGreen = averageGreen * gainFactor
resultBlue = averageBlue * gainFactor
Due to the way this formula works, the resulting color can never be darker than the average of the input colors and is often lighter and more saturated. Of course, the resulting color can never be lighter or more saturated than the lightest or most saturated input color. In addition, this formula never creates an RGB value higher than 255 (which would be invalid in the 8-bit RGB color model).
If leather armor is renamed on an [[anvil]], it retains its name when dyed or undyed.
;Mixing Samples
: {{ItemSprite|Yellow Dye}} + {{ItemSprite|Yellow Dye}} = {{Tint|leather-chestplate| #{{CalcDye| yellow=2 }} | code=1}}
: {{ItemSprite|Red Dye}} + {{ItemSprite|Blue Dye}} + {{ItemSprite|White Dye}} = {{Tint|leather-chestplate| #{{CalcDye| red=1 | blue=1 | white=1}} | code=1}}
: {{ItemSprite|Green Dye}} + {{ItemSprite|Red Dye}} + {{ItemSprite|Pink Dye}} = {{Tint|leather-chestplate| #{{CalcDye| green=1 | red=1 | pink=1}} | code=1}}
=== Dyeing firework stars ===
A [[firework star]] can have a single color or a combination of up to eight colors when crafted with dyes. Adding one or more dyes to a crafted firework star adds a "fade to color" effect to it, overwriting any existing fade colors.
{{Crafting
|head=1
|ignoreusage=1
|ingredients=[[Gunpowder]] +<br>Any Dye (1–8) +<br>Extra ingredient (optional)
|Gunpowder
|Matching Dye
|Diamond;Glowstone Dust;Head;Gold Nugget;Feather;Fire Charge;
|Output=Matching Firework Star
}}
{{Crafting
|ignoreusage=1
|Matching Firework Star
|Any Dye
|Output=Matching Firework Star
|foot=1
}}
=== Creating balloons ===
Dye can be used to craft balloons.{{only|education}}
{{Crafting
|nocat=1
|A1= Latex
|B1= Matching Dye
|C1= Latex
|A2= Latex
|B2= Helium
|C2= Latex
|A3= Latex
|B3= Lead
|C3= Latex
|Output= Matching Balloon
}}
=== Creating glow sticks ===
Dye can also be used to craft glow sticks.{{only|education}}
{{Crafting
|nocat=1
|A1= Polyethylene
|B1= Hydrogen Peroxide
|C1= Polyethylene
|A2= Polyethylene
|B2= Matching Dye
|C2= Polyethylene
|A3= Polyethylene
|B3= Luminol
|C3= Polyethylene
|Output= Matching Glow Stick
}}
=== Dyeing water inside cauldrons ===
Water can be dyed in a cauldron by holding any dye in the hand and pressing {{Ctrl|use}} on a cauldron filled with water.{{only|bedrock}}
=== Signs ===
Dye can be {{control|used}} on a [[sign]] or a [[hanging sign]] to change the text color. {{IN|bedrock}}, [[ink sac]]s cannot be used for this purpose; black dye must be used to change the text to black.
=== Trading ===
Apprentice, journeyman and expert-level shepherd [[villager]]s buy any of the 12 dyes for an [[emerald]].
== Color values ==
The "color codes" are used to determine the color imparted on sheep, wolf and cat collars, firework stars, [[beacon]] beams, and dyed leather armor. The hex value is shown in the extended tooltips of dyed leather armor; however, to set the color using an NBT data tag in a [[command]], the decimal value must be used instead. The color values for firework stars are slightly different from the ones listed below, and use [[Item colors#Firework stars|these values]] instead.
{| class="wikitable" style="margin:2px; border: 1px solid silver; text-align: left;" data-description="Data values"
! rowspan=2 | Description
! colspan=2 style="text-align:center" | Color Code
|-
! Dec
! <abbr title="Hexadecimal color code">Hex</abbr>
|-
| style="text-align:center" | White || 16383998 || {{color|#F9FFFE}}
|-
| style="text-align:center" | Light gray || 10329495 || {{color|#9D9D97}}
|-
| style="text-align:center" | Gray || 4673362 || {{color|#474F52}}
|-
| style="text-align:center" | Black || 1908001|| {{color|#1D1D21}}
|-
| style="text-align:center" | Brown || 8606770 || {{color|#835432}}
|-
| style="text-align:center" | Red || 11546150 || {{color|#B02E26}}
|-
| style="text-align:center" | Orange || 16351261 || {{color|#F9801D}}
|-
| style="text-align:center" | Yellow || 16701501 || {{color|#FED83D}}
|-
| style="text-align:center" | Lime || 8439583 || {{color|#80C71F}}
|-
| style="text-align:center" | Green || 6192150 || {{color|#5E7C16}}
|-
| style="text-align:center" | Cyan || 1481884|| {{color|#169C9C}}
|-
| style="text-align:center" | Light blue || 3847130 || {{color|#3AB3DA}}
|-
| style="text-align:center" | Blue || 3949738 || {{color|#3C44AA}}
|-
| style="text-align:center" | Purple || 8991416 || {{color|#8932B8}}
|-
| style="text-align:center" | Magenta || 13061821 || {{color|#C74EBD}}
|-
| style="text-align:center" | Pink || 15961002 || {{color|#F38BAA}}
|}
== Sounds ==
{{edition|java}}:
{{Sound table
|rowspan=2
|sound=Dye.ogg
|subtitle=Dye stains
|source=block
|description=When dye is used on a [[sign]]
|id=item.dye.use
|translationkey=subtitles.item.dye.use
|volume=1.0
|pitch=1.0/0.9/0.95/1.1
|distance=16}}
{{Sound table
|subtitle=Dye stains
|source=player
|description=When dye is used on a [[sheep]]
|id=item.dye.use
|translationkey=subtitles.item.dye.use
|volume=1.0
|pitch=1.0/0.9/0.95/1.1
|distance=16
|foot=1}}
{{edition|bedrock}}:
{{Sound table
|type=bedrock
|sound=Dye.ogg
|source=sound
|description=When dye is used on a sign
|id=sign.dye.use
|volume=1.0
|pitch=1.0}}
{{Sound table
|rowspan=3
|sound=Water Splash Old.ogg
|source=block
|description=When dye is added to a cauldron
|id=cauldron.adddye
|volume=0.1
|pitch=1.0}}
{{Sound table
|source=block
|description=When armor is dyed using a cauldron
|id=cauldron.dyearmor
|volume=0.1
|pitch=1.0}}
{{Sound table
|source=block
|description=When dye is removed from armor using a cauldron
|id=cauldron.cleanarmor
|volume=0.1
|pitch=1.0
|foot=1}}
== Achievements ==
{{load achievements|Rainbow Collection;Tie dye outfit}}
== Video ==
{{Video note|These videos are outdated, as it does not include details of the [[Java Edition 1.7.2|1.7.2]] update's changes to the dyeing system/production chain.}}
<div style="text-align:center">
<span style="display:inline-block">{{yt|8YD7oauNZHE}}</span>
<span style="display:inline-block">{{yt|7tETaRt7STM}}</span>
</div>
== History ==
{{History|java beta}}
{{History||January 3, 2011|link=https://web.archive.org/web/0/http://notch.tumblr.com/post/2582321901/2011-here-we-go|Notch mentions adding a "paint" feature if he can figure out how.}}
{{History||January 10, 2011<ref group="n">Supposed time when fragment was filmed. Based on modified date of client.jar/gui/trap.png in [[Beta 1.2]].</ref>|link=https://www.youtube.com/watch?v=cBF2ugTzXqQ&t=181s|[[File:Red Dye (pre-release).png|32px]] Shown rose red in development as part of [[Minecraft: The Story of Mojang]].}}
{{History||1.2|[[File:Ink Sac JE1 BE1.png|32px]] [[File:Red Dye JE1 BE1.png|32px]] [[File:Green Dye JE1 BE1.png|32px]] [[File:Cocoa Beans JE1 BE1.png|32px]] [[File:Lapis Lazuli JE1 BE1.png|32px]] [[File:Purple Dye JE1 BE1.png|32px]] [[File:Cyan Dye JE1 BE1.png|32px]] [[File:Light Gray Dye JE1 BE1.png|32px]] [[File:Gray Dye JE1 BE1.png|32px]] [[File:Pink Dye JE1 BE1.png|32px]] [[File:Lime Dye JE1 BE1.png|32px]] [[File:Yellow Dye JE1 BE1.png|32px]] [[File:Light Blue Dye JE1 BE1.png|32px]] [[File:Magenta Dye JE1 BE1.png|32px]] [[File:Orange Dye JE1 BE1.png|32px]] [[File:Bone Meal JE1 BE1.png|32px]] Added dyes.
|[[File:Black Dye (Recreated).png|32px]] [[File:Red Dye (pre-release).png|32px]] [[File:Green Dye (Recreated).png|32px]] [[File:Brown Dye (Recreated).png|32px]] [[File:Blue Dye (Recreated).png|32px]] [[File:Purple Dye (Recreated).png|32px]] [[File:Cyan Dye (Recreated).png|32px]] [[File:Light Gray Dye (Recreated).png|32px]] [[File:Gray Dye (Recreated).png|32px]] [[File:Pink Dye (Recreated).png|32px]] [[File:Lime Dye (Recreated).png|32px]] [[File:Yellow Dye (Recreated).png|32px]] [[File:Light Blue Dye (Recreated).png|32px]] [[File:Magenta Dye (Recreated).png|32px]] [[File:Orange Dye (Recreated).png|32px]] [[File:White Dye (Recreated).png|32px]] Leftovers of old textures can be seen in [[items.png]] with 100% opacity. The white dye texture was reused for [[Sugar]].
| The colors were as follows:{{verify|Did the color codes remain the same between Beta 1.2 and Java 1.11.2?}}
{{:Color/Java Edition dye colors before 17w06a}}
}}
{{History|java}}
{{History||1.1|snap=11w49a|[[Sheep]] can now regrow their [[wool]] by eating [[grass block|grass]]. Dyed sheep regrow wool in their new color.}}
{{History||1.3.1|snap=12w19a|[[File:Cocoa Beans JE2.png|32px]] The texture of [[cocoa beans]] has been changed.}}
{{History|||snap=1.3|[[File:bone meal changes.gif|32px]] The textures of [[bone meal]], [[cactus green]], cocoa beans and [[rose red]] have been changed. The textures have been lowered one pixel.}}
{{History||1.4.2|snap=12w34a|Added the ability to dye leather [[armor]] and [[wolf]] collars.}}
{{History||1.4.4|snap=1.4.3|Color codes have been changed. The colors of red, brown, blue, purple, cyan, pink, light blue, magenta and orange were adjusted a little vividly.}}
{{History||1.6.1|snap=13w19a|[[Stained clay]] can now be crafted using dyes.}}
{{history||1.7.2|snap=13w36a|With the addition of new [[flower]]s, many secondary and tertiary dyes are now primary dyes.}}
{{History|||snap=13w41a|[[Stained glass]] can now be crafted using dyes.}}
{{History||1.8|snap=14w02a|As cleric [[villager]]s now sell lapis lazuli, all dyes have become fully renewable.}}
{{History|||snap=14w30a|Added [[banner]]s, which can be dyed.}}
{{History||1.9|snap=15w34a|Added [[shield]]s, which can be dyed indirectly by applying a matching [[banner]].}}
{{History||1.11|snap=16w39b|Dyes are now used to change the color of [[shulker box]]es.}}
{{History||1.12|snap=17w06a|Dyes are now used to craft [[concrete powder]].
|Color codes have been changed. All colors are adjusted more vividly. The changes were as follows:
{{:Color/Java Edition dye color changes in 17w06a}}
|Light blue dye, stained glass, and stained glass panes, did not change colors in this update. This means that they still use old colors.<ref name="unchanged dyes">{{Bug|MC-214643}}<br>{{Bug|MC-214641}}</ref>
}}
{{History|||snap=17w15a|Dyes can now apply color to white [[bed]]s.}}
{{History||1.13|snap=17w47a|The different data values for the <code>dye</code> ID have been split up into their own IDs.}}
{{History||1.14|snap=18w43a|[[Bone meal]], [[ink sac]]s, [[cocoa beans]] and [[lapis lazuli]] are no longer considered dyes.
|[[File:White Dye JE1 BE1.png|32px]] [[File:Black Dye JE1 BE1.png|32px]] [[File:Brown Dye JE1 BE1.png|32px]] [[File:Blue Dye JE1 BE1.png|32px]] Added [[white dye|white]], [[black dye|black]], [[brown dye|brown]] and [[blue dye]]s.
|"Rose Red", "Dandelion Yellow" and "Cactus Green" have been renamed to "Red Dye", "Yellow Dye" and "Green Dye", respectively.
|[[Glass pane]]s and [[carpet]]s can now be dyed.
|[[File:Light Gray Dye JE2 BE2.png|32px]] [[File:Gray Dye JE2 BE2.png|32px]] [[File:Red Dye JE2 BE2.png|32px]] [[File:Orange Dye JE2 BE2.png|32px]] [[File:Yellow Dye JE2 BE2.png|32px]] [[File:Lime Dye JE2 BE2.png|32px]] [[File:Green Dye JE2 BE2.png|32px]] [[File:Cyan Dye.png|32px]] [[File:Light Blue Dye JE2 BE2.png|32px]] [[File:Purple Dye JE2 BE2.png|32px]] [[File:Magenta Dye JE2 BE2.png|32px]] [[File:Pink Dye JE2 BE2.png|32px]] The textures of light gray, gray, red, orange, yellow, lime, green, cyan, light blue, purple, magenta, and pink dyes, have been changed. The color texture for light blue dye was not changed to reflect the updated colors from 1.12.<ref name="unchanged dyes"></ref>}}
{{History|||snap=18w44a|The color of the text on [[sign]]s can now be changed with dye.}}
{{History|||snap=18w49a|Yellow dyes can now be found in [[chest]]s in [[village]] mason houses.}}
{{History|||snap=18w50a|Green dyes can now be found in [[chest]]s in [[desert]] [[village]] houses.}}
{{History|||snap=19w05a|Added the [[wandering trader]], which can sell any type of dye.}}
{{History|||snap=19w11a|All 16 types of dyes can now be [[trading|bought]] by shepherd villagers.}}
{{History||1.16.2|snap=Pre-release 2|Reversed the order of dyes to match other colored items in the [[Creative inventory]].<ref name="reverse dye">{{Bug|MC-136553}}</ref>
|Regrouped dyes in the Creative inventory such that white, blue, brown, and black dyes are within and not [[cocoa beans]], [[ink sacs]], [[lapis lazuli]], and [[bone meal]].<ref name="regroup dye">{{Bug|MC-177684}}</ref>}}
{{History||1.17|snap=20w45a|Added [[candle]]s, which can be dyed.}}
{{History|||snap=21w03a|Added a sound for applying dyes.}}
{{History|||snap=21w19a|Candles can no longer be dyed.}}
{{History|||snap=Pre-release 1|Candles can now once again be dyed.}}
{{History||1.20<br>(Experimental)|link=1.19.3|snap=22w42a|The color of the text on [[hanging sign]]s can now be changed with dye.}}
{{History||1.20<br>(Experimental)|link=1.19.4|snap=23w07a|[[Torchflower]]s can now be crafted into orange dye.|[[Pink petals]] can now be crafted into pink dye.}}
{{History||1.20|snap=23w12a|[[Pitcher plant]]s can now be crafted into cyan dye.|Blue, light blue, orange, white, and yellow dye can now be found in [[suspicious gravel]] and [[suspicious sand]] in [[trail ruins]].}}
{{History|||snap=23w14a|Pitcher plants can now craft two [[cyan dye]] instead of one.}}
{{History|||snap=23w16a|Blue, light blue, orange, white, and yellow dye no longer generates in [[suspicious sand]] in [[trail ruins]].|Due to the split of the archaeological loot tables for the suspicious gravel within the [[trail ruins]]; blue, light blue, orange, white, and yellow dye now are in the common loot.}}
{{History|pocket alpha}}
{{History||v0.3.0|[[File:Bone Meal JE1 BE1.png|32px]] [[File:Light Gray Dye JE1 BE1.png|32px]] [[File:Gray Dye JE1 BE1.png|32px]] [[File:Ink Sac JE1 BE1.png|32px]] [[File:Cocoa Beans JE1 BE1.png|32px]] [[File:Red Dye JE1 BE1.png|32px]] [[File:Orange Dye JE1 BE1.png|32px]] [[File:Yellow Dye JE1 BE1.png|32px]] [[File:Lime Dye JE1 BE1.png|32px]] [[File:Green Dye JE1 BE1.png|32px]] [[File:Cyan Dye JE1 BE1.png|32px]] [[File:Light Blue Dye JE1 BE1.png|32px]] [[File:Lapis Lazuli JE1 BE1.png|32px]] [[File:Purple Dye JE1 BE1.png|32px]] [[File:Magenta Dye JE1 BE1.png|32px]] [[File:Pink Dye JE1 BE1.png|32px]] Added dyes. Only [[dandelion yellow]] and [[lapis lazuli]] are currently obtainable and have functionality.}}
{{History||v0.3.2|[[Cactus green]] is now obtainable by smelting [[cacti]].}}
{{History||v0.3.3|[[Bone meal]] is now obtainable via [[crafting]].}}
{{History||v0.4.0|[[Cyan dye]], [[light blue dye]], [[lime dye]], [[magenta dye]], [[orange dye]], [[pink dye]], and [[purple dye]] are now obtainable via crafting.
|[[Rose red]] is now obtainable by smelting red [[mushroom]]s.
|All available dyes, excluding bone meal, can now be used to craft their respective [[wool]] color.}}
{{History||v0.8.0|snap=build 1|[[File:Cocoa Beans JE3 BE2.png|32px]] The texture of cocoa beans has been changed.}}
{{History|||snap=build 3|[[Ink sac]]s, [[cocoa bean]]s, [[gray dye]], and [[light gray dye]] are now available in the [[creative]] [[inventory]].
|Rose red can now be obtained from [[beetroot]]s.}}
{{History||v0.9.0|snap=build 1|Cocoa beans can now be obtained from [[cocoa pod]]s.
|The [[rose]] has been removed and replaced with a new poppy [[flower]] that can be crafted into rose red.}}
{{History|||snap=build 3|All new [[flower]]s can now be [[crafting|crafted]] into dyes. Because of this, many secondary and tertiary dyes are now primary dyes.
|[[Gray dye]] and [[light gray dye]] can now be obtained in [[survival]].}}
{{History|||snap=build 11|[[Terracotta|Stained clay]] can now be crafted using dyes.}}
{{History||v0.11.0|snap=build 1|[[Ink sac]]s can now be obtained from [[squid]].
|Added the ability to dye [[wolf]] collars.}}
{{History||v0.12.1|snap=build 1|Red [[mushroom]]s can no longer be smelted to obtain [[rose red]].}}
{{History||v0.14.0|snap=build 1|[[Cauldron]]s now used for leather dyeing, by applying a dye to a [[water]]-filled cauldron.}}
{{History||v0.16.0|snap=build 1|[[Cocoa bean]]s can no longer be crafted.}}
{{History|pocket}}
{{History||1.0.0|snap=alpha 0.17.0.1|Added a ''Dye'' button for [[sheep]].
|Added [[shulker]]s, which can be dyed.
|Added [[stained glass]]. Stain glass cannot be [[crafting|crafted]], but purple glass generates in [[end city|end cities]].}}
{{History||1.1.0|snap=alpha 1.1.0.0|Dyes can now apply color to a white [[bed]]s.
|Dyes are now used to craft [[concrete powder]].
|The color palette has been changed.}}
{{History|bedrock}}
{{History||1.2.0|snap=beta 1.2.0.2|Dyes can now be used for [[banner]] crafting.
|Dyes can now be used to craft [[firework star]]s.
|[[Stained glass]] is now [[crafting|craftable]], using dyes.}}
{{History||1.4.0|snap=beta 1.2.20.1|[[Lime dye]] can now be obtained from smelting [[sea pickle]]s.
|Dyes can now used to craft [[glow stick]]s and [[balloon]]s.}}
{{History||1.8.0|snap=beta 1.8.0.8|Dyes can now be used to dye [[cat]] collars.}}
{{History|||snap=beta 1.8.0.10|[[File:White Dye JE1 BE1.png|32px]] [[File:Black Dye JE1 BE1.png|32px]] [[File:Brown Dye JE1 BE1.png|32px]] [[File:Blue Dye JE1 BE1.png|32px]] Added [[white dye|white]], [[brown dye|brown]], [[black dye|black]] and [[blue dye]]s, which can be crafted from [[lapis lazuli]], [[bone meal]], [[cocoa beans]] and [[ink sac]]s. This, however, the later four still use as dyes.<ref>{{Bug|MCPE-42473}}</ref>
|"Rose Red", "Dandelion Yellow" and "Cactus Green" have been renamed to "Red Dye", "Yellow Dye" and "Green Dye", respectively.}}
{{History||1.9.0|snap=beta 1.9.0.0|Blue and white dye can now be obtained from [[cornflower]]s and [[lily of the valley]]s.}}
{{History||1.10.0|snap=beta 1.10.0.3|[[Glass pane]]s and [[carpet]]s can now be dyed.
|Only a single dye is now required to apply a banner pattern in a [[loom]].
|Various dyes except black dye, white dye, brown dye and blue dye are now [[trading|sold]] by [[wandering trader]]s.
|[[File:Bone Meal JE2 BE2.png|32px]] [[File:Light Gray Dye JE2 BE2.png|32px]] [[File:Gray Dye JE2 BE2.png|32px]] [[File:Ink Sac JE2 BE2.png|32px]] [[File:Cocoa Beans JE4 BE3.png|32px]] [[File:Red Dye JE3 BE3.png|32px]] [[File:Orange Dye JE2 BE2.png|32px]] [[File:Yellow Dye JE2 BE2.png|32px]] [[File:Lime Dye JE2 BE2.png|32px]] [[File:Green Dye JE2 BE2.png|32px]] [[File:Cyan Dye.png|32px]] [[File:Light Blue Dye JE2 BE2.png|32px]] [[File:Lapis Lazuli JE2 BE2.png|32px]] [[File:Purple Dye JE2 BE2.png|32px]] [[File:Magenta Dye JE2 BE2.png|32px]] [[File:Pink Dye JE2 BE2.png|32px]] The textures of bone meal, light gray, gray, ink sac, cocoa beans, red, orange, yellow, lime, green, cyan, light blue, lapis lazuli, purple, magenta, and pink dyes have been changed.}}
{{History||1.11.0|snap=beta 1.11.0.4|Dye can now be [[trading|sold]] to shepherd [[villager]]s.}}
{{History||1.16.210|snap=beta 1.16.210.59|The color of the text on [[sign]]s can now be changed with dye.}}
{{History|||snap=beta 1.16.210.60|The ability to dye the color of the text on [[sign]]s was temporarily removed.}}
{{History||1.16.220|snap=beta 1.16.220.50|The color of the text on [[sign]]s can now be changed with dye again.}}
{{History||1.17.10|snap=beta 1.17.10.22|Added [[candles]], which can be dyed.}}
{{History|console}}
{{History||xbox=TU1|xbone=CU1|ps=1.0|wiiu=Patch 1|switch=1.0.1|[[File:Bone Meal JE1 BE1.png|32px]] [[File:Light Gray Dye JE1 BE1.png|32px]] [[File:Gray Dye JE1 BE1.png|32px]] [[File:Ink Sac JE1 BE1.png|32px]] [[File:Cocoa Beans JE1 BE1.png|32px]] [[File:Red Dye JE1 BE1.png|32px]] [[File:Orange Dye JE1 BE1.png|32px]] [[File:Yellow Dye JE1 BE1.png|32px]] [[File:Lime Dye JE1 BE1.png|32px]] [[File:Green Dye JE1 BE1.png|32px]] [[File:Cyan Dye JE1 BE1.png|32px]] [[File:Light Blue Dye JE1 BE1.png|32px]] [[File:Lapis Lazuli JE1 BE1.png|32px]] [[File:Purple Dye JE1 BE1.png|32px]] [[File:Magenta Dye JE1 BE1.png|32px]] [[File:Pink Dye JE1 BE1.png|32px]] Added dyes.}}
{{History||xbox=TU9|[[File:Cocoa Beans JE3 BE2.png|32px]] The texture of cocoa beans has been changed.}}
{{History||xbox=none|xbone=none|ps=1.83|wiiu=none|switch=none|[[File:White Dye JE1 BE1.png|32px]] [[File:Black Dye JE1 BE1.png|32px]] [[File:Brown Dye JE1 BE1.png|32px]] [[File:Blue Dye JE1 BE1.png|32px]] Added [[white dye|white]], [[black dye|black]], [[brown dye|brown]], and [[blue dye|blue]] dyes, which can crafted from [[bone meal]], [[ink sac]], [[cocoa beans]], and [[lapis lazuli]].
|"Rose Red", "Dandelion Yellow" and "Cactus Green" have been renamed to "Red Dye", "Yellow Dye" and "Green Dye", respectively.}}
{{History||ps=1.90|[[File:Bone Meal JE2 BE2.png|32px]] [[File:Light Gray Dye JE2 BE2.png|32px]] [[File:Gray Dye JE2 BE2.png|32px]] [[File:Ink Sac JE2 BE2.png|32px]] [[File:Cocoa Beans JE4 BE3.png|32px]] [[File:Red Dye JE2 BE2.png|32px]] [[File:Orange Dye JE2 BE2.png|32px]] [[File:Yellow Dye JE2 BE2.png|32px]] [[File:Lime Dye JE2 BE2.png|32px]] [[File:Green Dye JE2 BE2.png|32px]] [[File:Cyan Dye.png|32px]] [[File:Light Blue Dye JE2 BE2.png|32px]] [[File:Lapis Lazuli JE2 BE2.png|32px]] [[File:Purple Dye JE2 BE2.png|32px]] [[File:Magenta Dye JE2 BE2.png|32px]] [[File:Pink Dye JE2 BE2.png|32px]] The textures of bone meal, light gray, gray, ink sac, cocoa beans, red, orange, yellow, lime, green, cyan, light blue, lapis lazuli, purple, magenta, and pink dyes have been changed.}}
{{History|3ds}}
{{History||0.1.0|[[File:Bone Meal JE1 BE1.png|32px]] [[File:Light Gray Dye JE1 BE1.png|32px]] [[File:Gray Dye JE1 BE1.png|32px]] [[File:Ink Sac JE1 BE1.png|32px]] [[File:Cocoa Beans JE3 BE2.png|32px]] [[File:Red Dye JE1 BE1.png|32px]] [[File:Orange Dye JE1 BE1.png|32px]] [[File:Yellow Dye JE1 BE1.png|32px]] [[File:Lime Dye JE1 BE1.png|32px]] [[File:Green Dye JE1 BE1.png|32px]] [[File:Cyan Dye JE1 BE1.png|32px]] [[File:Light Blue Dye JE1 BE1.png|32px]] [[File:Lapis Lazuli JE1 BE1.png|32px]] [[File:Purple Dye JE1 BE1.png|32px]] [[File:Magenta Dye JE1 BE1.png|32px]] [[File:Pink Dye JE1 BE1.png|32px]] Added dyes from [[Pocket Edition v0.15.4 alpha]].}}
{{History|foot}}
<gallery>
Pre-release dyes.png|Pre-release dye textures hidden within [[Items.png]].
</gallery>
;Notes
{{reflist|group=n}}
== Gallery ==
<gallery>
White Dye.png|White Dye
Light Gray Dye.png|Light Gray Dye
Gray Dye.png|Gray Dye
Black Dye.png|Black Dye
Brown Dye.png|Brown Dye
Red Dye.png|Red Dye
Orange Dye.png|Orange Dye
Yellow Dye.png|Yellow Dye
Lime Dye.png|Lime Dye
Green Dye.png|Green Dye
Cyan Dye.png|Cyan Dye
Light Blue Dye.png|Light Blue Dye
Blue Dye.png|Blue Dye
Purple Dye.png|Purple Dye
Magenta Dye.png|Magenta Dye
Pink Dye.png|Pink Dye
</gallery>
==Issues==
{{issue list}}
== Trivia ==
* Players can obtain each one of every color with 1 cocoa bean, 2 yellow dye, 2 ink sac, 3 green dye, 4 lapis lazuli, 4 red dye, and 6 bone meal (2 bones).
* The dyed sheep breeding behavior mirrors [[wikipedia:Lamarckism|Lamarck's theory]], in which the organisms evolve inheriting the external changes and adaptations of the previous generation, transmitting them to their offspring.
* In ''Bedrock Edition'', tertiary colors, along with their regular crafting recipes, can be crafted with primary colors. E.g.: Magenta can be crafted with one rose red and two bone meals.
* The colors of the dyes match the chat colors in [[color codes]] except for brown (dye only), light aqua, and gold (color codes only).
* The texture for light blue dye still uses the color from prior to the 1.12 World of Color update.<ref name="unchanged dyes"></ref>
== References ==
{{reflist}}
== External Links ==
* Tools for calculating leather dye combination: [https://minecraft.tools/en/armor.php minecraft.tools] (webapp); [https://github.com/pudquick/pyMCdyes/ pyMCDyes] (open-source Python script, outdated); [https://anrar4.github.io/DyeLeatherArmor/ DyeLeatherArmor]: a tool for calculating an exact crafting recipe for any sRGB color
{{Items}}
[[Category:Dyes]]
[[Category:Renewable resources]]
[[cs:Barvivo]]
[[de:Farbstoff]]
[[es:Tinte]]
[[fr:Teinture]]
[[hu:Színezés]]
[[it:Colorante]]
[[ja:染料]]
[[ko:염료]]
[[nl:Kleurstof]]
[[pl:Barwniki]]
[[pt:Corante]]
[[ru:Красители]]
[[th:สีย้อม]]
[[uk:Барвники]]
[[zh:染料]]</li></ul> | 18w43a | |||||||||||||||||||||||||||||||||||||||||||||||||||||||||||||||||||||||||||||||||||||||||||||||||||||||||||||
| 18w48a | Empty maps can now be found in chests in village cartographer houses. | |||||||||||||||||||||||||||||||||||||||||||||||||||||||||||||||||||||||||||||||||||||||||||||||||||||||||||||
| 19w02a | Maps can now be cloned and zoomed out (extended) by using a cartography table. | |||||||||||||||||||||||||||||||||||||||||||||||||||||||||||||||||||||||||||||||||||||||||||||||||||||||||||||
| Maps can now be locked by using a glass pane with a cartography table. | ||||||||||||||||||||||||||||||||||||||||||||||||||||||||||||||||||||||||||||||||||||||||||||||||||||||||||||||
| The recipes for cloning and zooming out maps have been removed. | ||||||||||||||||||||||||||||||||||||||||||||||||||||||||||||||||||||||||||||||||||||||||||||||||||||||||||||||
| 19w06a | Map making is now silent again. | |||||||||||||||||||||||||||||||||||||||||||||||||||||||||||||||||||||||||||||||||||||||||||||||||||||||||||||
| 19w13a | Cartographer villagers now give empty maps to players under the Hero of the Village effect. | |||||||||||||||||||||||||||||||||||||||||||||||||||||||||||||||||||||||||||||||||||||||||||||||||||||||||||||
1.16{{Extension DPL}}<ul><li>[[Poisonous Potato|Poisonous Potato]]<br/>{{Item
| title = Poisonous Potato
| image = Poisonous Potato.png
| heals = {{hunger|2}}
|effects={{EffectLink|Poison}} (0:05) (60% chance)
| stackable = Yes (64)
| renewable = Yes
}}
A '''poisonous potato''' is a type of [[potato]] that can [[poison]] the [[player]].
== Obtaining ==
The poisonous potato is a rare [[drop]] when harvesting (destroying) [[potato|potato crops]]; a fully grown plant has a 2% chance of dropping one in addition to the 2-5 regular potatoes.
=== Chest loot ===
{{LootChestItem|poisonous-potato}}
== Usage ==
Poisonous potatoes cannot be planted on [[farmland]] or [[Baked Potato|baked]]. They also have no use with the [[composter]].<ref>{{bug|MC-142373|resolution=WAI}}</ref>
=== Food ===
{{see also|Tutorials/Hunger management|title1=Hunger management}}
To eat a poisonous potato, press and hold {{control|use}} while it is selected in the hotbar. Eating one restores {{hunger|2}} [[hunger]] and 1.2 hunger [[Hunger#Mechanics|saturation]] and has a 60% chance of applying 5 seconds of [[Poison]] II, draining {{hp|4|poisoned=1}} points of [[health]].
Interestingly, a poisonous potato actually restores double the hunger and saturation than a normal, unpoisoned potato. (A normal potato gives {{hunger|1}} hunger and 0.6 saturation points.)
==Sounds==
{{Sound table/Entity/Food}}
== Advancements ==
{{load advancements|Husbandry;A Balanced Diet}}
== Data values ==
=== ID ===
{{edition|java}}:
{{ID table
|edition=java
|showforms=y
|generatetranslationkeys=y
|displayname=Poisonous Potato
|spritetype=item
|nameid=poisonous_potato
|form=item
|foot=1}}
{{edition|bedrock}}:
{{ID table
|edition=bedrock
|shownumericids=y
|showforms=y
|notshowbeitemforms=y
|generatetranslationkeys=y
|displayname=Poisonous Potato
|spritetype=item
|nameid=poisonous_potato
|id=282
|form=item
|foot=1}}
== History ==
{{History|java}}
{{History||1.4.2|snap=12w34a|[[File:Poisonous Potato JE1 BE1.png|32px]] Added poisonous potatoes.}}
{{History||1.13|snap=17w47a|Prior to [[Java_Edition_1.13/Flattening|''The Flattening'']], this [[item]]'s numeral ID was 394.}}
{{History|||snap=18w11a|Poisonous potatoes now generate in the [[chest]]s of [[shipwreck]]s.}}
{{History||1.14|snap=18w43a|[[File:Poisonous Potato JE2.png|32px]] The texture of poisonous potatoes has been changed.}}
{{History|||snap=18w50a|[[File:Poisonous Potato JE3 BE2.png|32px]] The texture of poisonous potatoes has been changed, once again.}}
{{History|pocket alpha}}
{{History||v0.12.1|snap=build 1|[[File:Poisonous Potato JE1 BE1.png|32px]] Added poisonous potatoes.}}
{{History|bedrock}}
{{History||1.4.0|snap=beta 1.2.14.2|Poisonous potatoes can now be found inside of [[shipwreck]] [[chest]]s.}}
{{History||1.10.0|snap=beta 1.10.0.3|[[File:Poisonous Potato JE3 BE2.png|32px]] The texture of poisonous potatoes has been changed.}}
{{History|console}}
{{History||xbox=TU14|xbone=CU1|ps=1.04|wiiu=Patch 1|switch=1.0.1|[[File:Poisonous Potato JE1 BE1.png|32px]] Added poisonous potatoes.}}
{{History||xbox=none|xbone=none|ps=1.90|wiiu=none|switch=none|[[File:Poisonous Potato JE3 BE2.png|32px]] The texture of poisonous potatoes has been changed.}}
{{History|New 3DS}}
{{History||0.1.0|[[File:Poisonous Potato JE1 BE1.png|32px]] Added poisonous potatoes.}}
{{History|foot}}
== Issues ==
{{issue list}}
== References ==
{{reflist}}
{{Items}}
[[Category:Plants]]
[[cs:Jedovatá brambora]]
[[de:Giftige Kartoffel]]
[[es:Patata envenenada]]
[[fr:Pomme de terre empoisonnée]]
[[hu:Mérgező burgonya]]
[[it:Patata velenosa]]
[[ja:青くなったジャガイモ]]
[[ko:독이 있는 감자]]
[[nl:Giftige aardappel]]
[[pl:Trujący ziemniak]]
[[pt:Batata venenosa]]
[[ru:Ядовитый картофель]]
[[th:มันฝรั่งพิษ]]
[[uk:Отруйна картопля]]
[[zh:毒马铃薯]]
[[Category:Food]]
[[Category:Renewable resources]]</li><li>[[Gold Nugget|Gold Nugget]]<br/>{{About|the nugget|the block that can drop nuggets|Gilded Blackstone|the ore|Gold Ore|the ingot form|Gold Ingot|the mineral block|Block of Gold}}
{{Item
| image = Gold Nugget.png
| renewable = Yes
| stackable = Yes (64)
}}
'''Gold nuggets''' are items used to make [[gold ingot]]s and other various golden items. One gold nugget is effectively worth one-ninth of a gold ingot.
== Obtaining ==
=== Mob loot ===
[[Zombified Piglin|Zombified piglin]]s, when killed, may drop 0-1 gold nuggets. When killed using a weapon enchanted with [[Looting]], they may drop an additional gold nugget per level of Looting used, up to a maximum of 4.
=== Crafting ===
{{Crafting
|Gold Ingot
|Output= Gold Nugget, 9
|type= Material
}}
=== Smelting ===
{{Smelting
|Golden Sword; {Any golden tools}; {Any golden armor}; Golden Horse Armor
|Gold Nugget
|0,25
}}
=== Chest loot ===
{{LootChestItem|gold-nugget}}
=== Mining ===
[[Nether gold ore]] mined using a [[pickaxe]] drops 2-6 gold nuggets. If the pickaxe is enchanted with [[Fortune]], it has a 33.3% chance to multiply the drops by 2, Fortune II has a 25% chance to multiply the drops by 2 or 3 and Fortune III has a 20% chance each to multiply the drops by 2, 3, or 4 for a maximum possible drop of 24 golden nuggets. The average drop rate for a Fortune III pickaxe is 8.8, while the drop rate for a [[Silk Touch]] pickaxe is a single ingot, or a flat rate of 9. It is slightly more efficient to mine with a Silk Touch pickaxe.
[[Gilded Blackstone|Gilded blackstone]] mined using a pickaxe has a 10% chance to drop 2-5 gold nuggets. If the pickaxe is enchanted with Fortune I, the chance gold nuggets drop is increased 14.29%, Fortune II increases the drop chance to 25%, and Fortune III guarantees the drop.
== Usage ==
Gold nuggets can be used to craft a [[golden carrot]] or [[glistering melon]] for brewing. Also, gold nuggets can be combined with gunpowder and dye to create a [[firework star]] that bursts in a star-shaped explosion.
[[Piglin]]s instantly pick up any gold nuggets that are within 1 [[block]] of them. Unlike other gold-related items, they do not intentionally seek out gold nuggets to pick up and only pick them up if they walk near it. Unlike gold ingots, gold nuggets picked up are dropped upon the piglin's death.
=== Crafting ingredient ===
{{crafting usage}}
== Data values ==
=== ID ===
{{edition|java}}:
{{ID table
|edition=java
|showforms=y
|generatetranslationkeys=y
|displayname=Gold Nugget
|spritetype=item
|nameid=gold_nugget
|form=item
|foot=1}}
{{edition|bedrock}}:
{{ID table
|edition=bedrock
|shownumericids=y
|showforms=y
|notshowbeitemforms=y
|generatetranslationkeys=y
|displayname=Gold Nugget
|spritetype=item
|nameid=gold_nugget
|id=425
|form=item
|foot=1}}
== History ==
{{History|Java}}
{{History||1.0.0|snap=Beta 1.9 Prerelease|[[File:Gold Nugget JE1.png|32px]] Added gold nuggets.
|Gold nuggets are [[drops|dropped]] by [[zombie pigmen]].
|Gold nuggets can be used to craft [[gold ingot]]s.
|Gold nuggets currently do not have a mouseover name.}}
{{History|||snap=Beta 1.9 Prerelease 2|Gold nuggets now have a mouseover name.}}
{{History|||snap=Beta 1.9 Prerelease 4|Gold nuggets are now used to craft [[glistering melon]]s.
|Gold nuggets can now be [[crafting|crafted]] from a single [[gold ingot]].}}
{{History||1.1|snap=release|Normal [[golden apple]]s are now crafted with gold nuggets.}}
{{History||1.3.1|snap=1.3|[[File:Gold Nugget JE2 BE1.png|32px]] The texture of gold nuggets has been changed.}}
{{History||1.4.2|snap=12w34a|Gold nuggets are now used to craft [[golden carrot]]s.}}
{{History||1.4.6|snap=12w49a|Gold nuggets can now be used to craft a [[firework star]] for a star shaped effect on a [[firework rocket|firework]].}}
{{History||1.6.1|snap=13w23a|Gold nuggets can no longer be used to [[crafting|craft]] a [[golden apple]].}}
{{History||1.9|snap=15w43a|Gold nuggets may now be found among the loot in [[igloo]] basement [[chest]]s.}}
{{History||1.11.1|snap=16w50a|Gold nuggets can now be [[smelting|smelted]] from golden [[tool]]s and [[armor]].}}
{{History||1.13|snap=17w47a|Prior to [[1.13/Flattening|''The Flattening'']], this [[item]]'s numeral ID was 371.}}
{{History|||snap=18w09a|Gold nuggets can now be found in [[underwater ruins]] loot [[chest]]s.}}
{{History|||snap=18w11a|Gold nuggets now generate in the chests of [[shipwreck]]s.}}
{{History||1.14|snap=18w43a|[[File:Gold Nugget JE3 BE2.png|32px]] The texture of gold nuggets has been changed.}}
{{History|||snap=18w48a|Gold nuggets can now be found in chests in [[plains]] [[village]] houses.}}
{{History|||snap=18w49a|Gold nuggets can now be found in chests in [[savanna]] village houses.}}
{{History||1.16|snap=20w12a|[[Nether gold ore]] now [[drops]] 2-6 gold nuggets, affected by [[Fortune]].}}
{{History|||snap=20w15a|[[Gilded blackstone]] now has 10% chance to drop 2-5 gold nuggets. Only the drop chance is affected by [[Fortune]].}}
{{History|||snap=20w16a|Gold nuggets now generate in [[bastion remnant]]s and [[ruined portal]] chests.}}
{{History|||snap=Pre-release 1|Gold nuggets can now be used to distract [[piglin]]s.}}
{{History|||snap=Pre-release 3|Gold nuggets can no longer be used to distract [[piglin]]s.}}
{{History||1.20|snap=23w12a|Gold nuggets can now be found in [[suspicious gravel]] and [[suspicious sand]] in cold and warm [[ocean ruins]] and in [[trail ruins]].}}
{{History|||snap=23w16a|Gold nuggets no longer generate in [[suspicious sand]] in [[trail ruins]].|Due to the split of the archaeological loot tables for suspicious gravel within [[trail ruins]], gold nuggets are now common loot.}}
{{History|pocket alpha}}
{{History||v0.12.1|snap=build 1|[[File:Gold Nugget JE2 BE1.png|32px]] Added gold nuggets. |Gold nuggets can be used to craft [[glistering melon]]s, [[gold ingot]]s and [[golden carrot]]s.|[[Gold ingot]]s can now be [[crafting|crafted]] into 9 gold nuggets.|[[Zombie pigmen]] now [[drops|drop]] gold nuggets upon being killed.}}
{{History|pocket}}
{{History||1.0.0|snap=alpha 0.17.0.1|Gold nuggets can now be found inside [[igloo]] basement [[chest]]s.}}
{{History||1.1.0|snap=alpha 1.1.0.0|Gold nuggets can now be [[smelting|smelted]] from golden [[tool]]s and [[armor]].}}
{{History|bedrock}}
{{History||1.2.0|snap=beta 1.2.0.2|Gold nuggets can now be used to craft [[firework star]]s.}}
{{History||1.4.0|snap=beta 1.2.14.2|Gold nuggets can now be found in some [[shipwreck]] [[chest]]s.}}
{{History|||snap=beta 1.2.20.1|Gold nuggets can now be found in [[underwater ruins]] chests.}}
{{History||1.10.0|snap=beta 1.10.0.3|The gold nugget can now be found in [[plains]] [[village]] house chests.|[[File:Gold Nugget JE3 BE2.png|32px]] The texture of gold nuggets has been changed.}}
{{History||1.11.0|snap=beta 1.11.0.1|The gold nugget can now be found in [[savanna]] village house [[chest]]s.}}
{{History||1.16.0|snap=beta 1.16.0.57|[[Nether gold ore]] now [[drops]] 2-6 gold nuggets.|[[Gilded blackstone]] now has 10% chance to drop 2-5 gold nuggets.}}
{{History||1.16.100|snap=beta 1.16.100.50|Gold nuggets can now be used as fuel for a [[furnace]].<ref>{{bug|MCPE-114216}}</ref>}}
{{History||1.18.30|snap=beta 1.18.30.26|Gold nuggets can no longer be used as fuel for a furnace.}}
{{History|Legacy Console}}
{{History||xbox=TU7|xbone=CU1|ps=1.0|wiiu=Patch 1|switch=1.0.1|[[File:Gold Nugget JE2 BE1.png|32px]] Added gold nuggets.}}
{{History||xbox=TU53|xbone=CU43|ps=1.49|wiiu=Patch 23|switch=1.0.3|Gold nuggets can now be [[smelting|smelted]] from golden [[tool]]s and [[armor]].}}
{{History||xbox=none|xbone=none|ps=1.90|wiiu=none|switch=none|[[File:Gold Nugget JE3 BE2.png|32px]] The texture of gold nuggets has been changed.}}
{{History|3DS}}
{{History||0.1.0|[[File:Gold Nugget JE2 BE1.png|32px]] Added gold nuggets.}}
{{History||1.9.19|Gold nuggets can now be [[smelting|smelted]] from golden [[tool]]s and [[armor]].}}
{{History|foot}}
== Issues ==
{{issue list}}
== See also ==
* [[Iron Nugget]]
* [[Gold]]
{{Items}}
[[cs:Zlatý nuget]]
[[de:Goldklumpen]]
[[es:Pepita de oro]]
[[fr:Pépite d'or]]
[[hu:Aranyrög]]
[[it:Pepita d'oro]]
[[ja:金塊]]
[[ko:황금 조각]]
[[nl:Goudklompje]]
[[pl:Bryłka złota]]
[[pt:Pepita de ouro]]
[[ru:Кусочек золота]]
[[uk:Золотий самородок]]
[[zh:金粒]]
[[Category:Renewable resources]]</li></ul> | 20w21a | Map making sounds are now the same as when using a cartography table. | ||||||||||||||||||||||||||||||||||||||||||||||||||||||||||||||||||||||||||||||||||||||||||||||||||||||||||||
| Pocket Edition Alpha | ||||||||||||||||||||||||||||||||||||||||||||||||||||||||||||||||||||||||||||||||||||||||||||||||||||||||||||||
v0.14.0{{Extension DPL}}<ul><li>[[Nautilus Shell|Nautilus Shell]]<br/>{{Item
| type =
| stackable = Yes (64)
| renewable = Yes
}}
A '''nautilus shell''' is an item that is used for crafting [[conduit]]s.
==Obtaining==
===Fishing===
{{main|Fishing#Junk and treasure}}
Nautilus shells can be rarely obtained as a treasure item from fishing. The drop chances of nautilus shells slightly increase with each level of [[Luck of the Sea]] on the [[player]]'s [[fishing rod]].
===Mob loot===
[[Drowned]] have a 3%{{only|java|short=1}} or 8%{{only|bedrock|short=1}} chance to spawn with a nautilus shell in their off-hand, and this nautilus shell always drops upon [[death]].
===Trading===
[[Wandering trader]]s may [[trading|sell]] a nautilus shell for 5 [[emerald]]s each, but they only sell 5 of them at a time.
==Usage==
{{IN|bedrock}}, a nautilus shell is one of the few items that can be held in the off-hand.
===Crafting ingredient===
{{crafting usage}}
=== Trading ===
Nautilus shells can be given to trident-wielding drowned with a chance for the drowned to pick up the shell and drop the trident.<sup>[''[[Bedrock Edition]] only'']</sup>
==Data values==
===ID===
{{edition|java}}:
{{ID table
|edition=java
|showforms=y
|generatetranslationkeys=y
|displayname=Nautilus Shell
|spritetype=item
|nameid=nautilus_shell
|form=item
|foot=1}}
{{edition|bedrock}}:
{{ID table
|edition=bedrock
|shownumericids=y
|showforms=y
|notshowbeitemforms=y
|generatetranslationkeys=y
|displayname=Nautilus Shell
|spritetype=item
|nameid=nautilus_shell
|id=570
|form=item
|foot=1}}
==History==
{{History|java}}
{{History||1.13|snap=18w15a|[[File:Nautilus Shell JE1 BE2.png|32px]] Added nautilus shells.}}
{{History||1.14|snap=19w05a|Added [[Wandering Trader|wandering trader]]s, which sell nautilus shells.}}
{{History|bedrock}}
{{History||1.4.0|snap=beta 1.2.20.1|[[File:Nautilus Shell BE1.png|32px]] Added nautilus shells.}}
{{History|||snap=beta 1.2.20.2|[[File:Nautilus Shell JE1 BE2.png|32px]] The texture of nautilus shells has now been changed.}}
{{History||1.5.0|snap=beta 1.5.0.0|[[Drowned]] now sometimes spawn holding a nautilus shell.
|Nautilus shells are no longer behind [[Experimental Gameplay]].}}
{{History|||snap=beta 1.5.0.1|Nautilus shells can now be used to craft [[conduit]]s.}}
{{History||1.10.0|snap=beta 1.10.0.3|Nautilus shells can now be obtained from [[trading]] with [[wandering trader]]s.}}
{{History|console}}
{{History||xbox=TU69|ps=1.76|wiiu=Patch 38|[[File:Nautilus Shell JE1 BE2.png|32px]] Added nautilus shells.}}
{{History||xbox=none|ps=1.91|wiiu=none|Nautilus shells can now be obtained from [[trading]] with [[wandering trader]]s.}}
{{History|foot}}
==Issues==
{{issue list}}
==Trivia==
*[[wikipedia:Nautilus|Nautilus]]es are animals that occupy deep oceans in the real world. However, they are absent in Minecraft and there are currently no plans to add nautilus [[mob]]s into the game.
*Because {{el|bedrock}} allows for Nautilus shells to be held in the off-hand (since drowned hold them), they are the only item in that version that can be put in the off-hand slot without having a specific function.
{{items}}
[[de:Nautilusschale]]
[[es:Caparazón de nautilo]]
[[fr:Coquille de nautile]]
[[it:Conchiglia di nautilus]]
[[ja:オウムガイの殻]]
[[ko:앵무조개 껍데기]]
[[nl:Nautilusschelp]]
[[pl:Muszla łodzika]]
[[pt:Concha de náutilo]]
[[ru:Раковина наутилуса]]
[[th:เปลือกหอยงวงช้าง]]
[[uk:Мушля наутилуса]]
[[zh:鹦鹉螺壳]]
[[Category:Renewable resources]]</li><li>[[Gold Ingot|Gold Ingot]]<br/>{{About|the item|the ore|Gold Ore|the mineral block|Block of Gold|the nugget|Gold Nugget}}
{{Item
| image = Gold Ingot.png
| renewable = Yes
| stackable = Yes (64)
}}
A '''gold ingot''' is a [[metal]] ingot used to craft various [[item]]s, and also used as currency for [[bartering]] with [[piglin]]s.
== Obtaining ==
Gold ingots are mainly obtained by smelting [[raw gold]], [[gold ore]] and [[nether gold ore]], or just mining nether gold ore, dropping gold nuggets. Gold generates more frequently in [[badlands]] biomes.
=== Crafting ===
{{Crafting
|head=1
|showname=0
|Block of Gold
|Output=Gold Ingot,9
|type=Material
}}
{{Crafting
|A1= Gold Nugget
|B1= Gold Nugget
|C1= Gold Nugget
|A2= Gold Nugget
|B2= Gold Nugget
|C2= Gold Nugget
|A3= Gold Nugget
|B3= Gold Nugget
|C3= Gold Nugget
|Output= Gold Ingot
|type= Material
|foot=1
}}
=== Smelting ===
{{see also|Gold Ore#Natural generation}}
{{Smelting
|head=1
|Gold Ore;Nether Gold Ore;Deepslate Gold Ore
|Gold Ingot
|1
}}
{{Smelting
|foot=1
|Raw Gold
|Gold Ingot
|1
}}
=== Mob loot ===
[[Zombified piglin]]s have a 2.5% ({{frac|1|40}}) chance of dropping a gold ingot if killed by a player or tamed wolf. The chance is increased by 1% per level of [[Looting]], for a maximum of 5.5% with Looting III.
=== Chest loot ===
{{LootChestItem|gold-ingot}}
== Usage ==
=== Crafting ingredient===
As a material for weapons, tools, and armor, gold is not a straight upgrade from iron (except in the case of [[Horse Armor|horse armor]]). Gold has a higher mining speed and enchantability than any other material, but attack power and durability is less.
{{crafting usage}}
=== Trading ===
Apprentice-level cleric [[Villager|villagers]] buy 3 gold ingots for an [[emerald]] as part of their trade.
=== Repairing ===
Golden [[helmet]]s, [[chestplate]]s, [[leggings]], [[boots]], [[sword]]s, [[pickaxe]]s, [[axe]]s, [[hoe]]s and [[shovel]]s can be [[item repair|repaired]] with gold ingots in an [[anvil]].
=== Bartering ===
{{main|Bartering}}
[[Piglin]]s throw the player [[Bartering#Mechanics|item(s)]] if the player throws or {{ctrl|uses}} a gold ingot on them.
=== Beacons ===
Gold ingots can be used to select powers from a [[beacon]]. The player must select one of the available powers, and then insert an ingot in the item slot.
A gold ingot can be substituted for an [[iron ingot]] or [[netherite ingot]], an [[emerald]], or a [[diamond]].
=== Smithing ingredient ===
{{Smithing
|head=1
|ingredients=Any Armor Trim +<br/>Any Armor Piece + <br/>Gold Ingot
|Any Armor Trim Smithing Template
|Netherite Chestplate
|Gold Ingot
|Gold Trim Netherite Chestplate
|showdescription=1
|description = All armor types can be used in this recipe,<br/>a netherite chestplate is shown as an example.<br/>
|tail=1
}}
;Trim color palette
The following color palettes are shown on the designs on trimmed armor:
*{{TrimPalette|gold ingot}}
*{{TrimPalette|gold ingot|darker=1}} (a darker color palette is used when a golden armor piece is trimmed using a gold ingot).
== Achievements ==
{{load achievements|Oooh, shiny!}}
== Advancements ==
{{load advancements|Oh Shiny}}
== Data values ==
=== ID ===
{{edition|java}}:
{{ID table
|edition=java
|showitemtags=y
|showforms=y
|generatetranslationkeys=y
|displayname=Gold Ingot
|spritetype=item
|nameid=gold_ingot
|itemtags=beacon_payment_items, piglin_loved
|form=item
|foot=1}}
{{edition|bedrock}}:
{{ID table
|edition=bedrock
|shownumericids=y
|showforms=y
|notshowbeitemforms=y
|generatetranslationkeys=y
|displayname=Gold Ingot
|spritetype=item
|nameid=gold_ingot
|id=306
|form=item
|foot=1}}
== History ==
{{History|java indev}}
{{History||0.31|snap=20100128|[[File:Gold Ingot JE1.png|32px]] Added gold ingots.}}
{{History|||snap=20100129|[[File:Gold Ingot JE2 BE1.png|32px]] The texture of gold ingots has been changed.
|Gold ingots can be [[smelting|smelted]] from [[gold ore]] with [[flint and steel]] and [[drops|drop]] 3-5 gold ingots.
|Gold ingots can be used to craft [[gold block]]s.
|[[Gold block]]s now require 9 gold ingots (3×3) instead of 4 (2×2) to be [[crafting|crafted]], making them much more expensive.}}
{{History|||snap=20100130|Gold ingots can now be used to craft gold [[sword]]s, [[shovel]]s, [[pickaxe]]s and [[axe]]s.}}
{{History||20100206|Gold ingots are now used to [[crafting|craft]] gold [[hoe]]s.}}
{{History||?|Smelting gold ore now drops 1 gold ingot (down from 3-5).}}
{{History||20100218|Gold ingots are now used to craft gold [[helmet]]s, [[chestplate]]s, [[leggings]] and [[boots]].}}
{{history|java alpha}}
{{History||v1.2.0|snap=<nowiki>?|slink=:Category:Information needed requiring unarchived version|Gold ingots are now used to craft [[clock]]s.}}
{{History|java beta}}
{{History||1.5|Gold ingots are now used to craft [[powered rail]]s.}}
{{History||1.8|snap=Pre-release|Gold ingots can now be found in the new [[stronghold]] storerooms and [[mineshaft]] [[chest]]s.}}
{{History|java}}
{{History||1.0.0|snap=Beta 1.9 Prerelease|Gold ingots can be crafted from [[gold nuggets]], which are dropped by [[Zombified Piglin|zombie pigmen]], making gold a [[renewable resource]].}}
{{History|||snap=Beta 1.9 Prerelease 3|Gold ingots can now be found in the new [[stronghold]] altar [[chest]]s.}}
{{History|||snap=Beta 1.9 Prerelease 4|Gold ingots are now used to craft [[gold nugget]]s.}}
{{History||1.1|snap=12w01a|Gold ingots can now be found in [[village]] blacksmith chests.}}
{{History||1.2.1|snap=12w06a|Zombie pigmen now rarely drop gold ingots.}}
{{History||1.3.1|snap=12w21a|Added [[desert temple]]s, with a hidden [[chest]] room and loot containing gold ingots.
|All types of [[villager]]s now [[trading|buy]] 8–9 gold ingots for 1 [[emerald]], as a fallback trade in case no trades were generated for that villager.}}
{{History|||snap=12w22a|Added [[jungle temple]]s, which contain loot chests with gold ingots.}}
{{History||1.5|snap=13w01a|Gold ingots are now used to craft light [[weighted pressure plate]]s.}}
{{History||1.6.1|snap=13w16a|Gold ingot is now used to craft golden [[horse armor]].}}
{{History|||snap=13w18a|Gold ingot is no longer used to craft golden [[horse armor]].|Gold ingots are now found in [[nether fortress]] [[chest]]s.}}
{{History|||snap=13w23a|Gold ingots are now used to craft normal [[golden apple]]s.}}
{{History||1.8|snap=14w02a|[[Trading]] has been changed: only cleric [[villager]]s now [[trading|buy]] 8–10 gold ingots for 1 [[emerald]], as a legitimate trade.}}
{{History||1.9|snap=15w31a|Gold ingots can now be found in [[end city]] [[chest]]s.}}
{{History|||snap=15w43a|The average yield of gold ingots in [[nether fortress]] chest has been decreased.}}
{{History|||snap=15w44a|The average yield of gold ingots in [[mineshaft]] and [[desert temple]] chests has been decreased.
|Gold ingots have been added to [[dungeon]] [[chest]]s.}}
{{History||1.11|snap=16w39a|Gold ingots are now found in the new [[woodland mansion]] chests.}}
{{History||1.13|snap=17w47a|Prior to [[1.13/Flattening|''The Flattening'']], this [[item]]'s numeral ID was 266.}}
{{History|||snap=18w10a|Gold ingots now generate in [[buried treasure]] chests.}}
{{History|||snap=18w11a|Gold ingots can now be obtained as a [[drops|drop]] from [[drowned]].
|Gold ingots now generate in [[shipwreck]] chests.}}
{{History||1.14|snap=18w43a|[[File:Gold Ingot JE3.png|32px]] The texture of gold ingots has been changed.}}
{{History|||snap=18w44a|[[File:Gold Ingot JE4 BE2.png|32px]] The texture of gold ingots has been changed, once again.}}
{{History|||snap=18w50a|Gold ingots now generate in chests in [[village]] toolsmith houses and temples.}}
{{History||1.16|snap=20w06a|Gold ingots are now used to craft [[netherite ingot]]s.}}
{{History|||snap=20w07a|Gold ingots can now be used to [[bartering|barter]] with [[piglin]]s.}}
{{History|||snap=20w11a|Gold ingots can now be [[smelting|smelted]] from [[nether gold ore]].}}
{{History|||snap=20w16a|Gold ingots now generate in [[bastion remnants]] and [[ruined portal]] chests.}}
{{History||1.16.2|snap=20w30a|The average yield of gold ingots from bastion remnant chests has been slightly increased.}}
{{History||1.17|snap=21w05a|Drowneds no longer drop gold ingots, and instead drop [[copper ingot]]s.}}
{{History|||snap=21w08a|Gold ingots can now be smelted from [[deepslate gold ore]].}}
{{History|||snap=21w14a|Gold ingots can now be smelted from [[raw gold]].}}
{{History||1.20<br>(Experimental)|link=1.19.4|snap=23w04a|Gold ingots can now be used as an armor trim material.}}
{{History|||snap=23w05a|Gold ingots can now be trimmed with gold [[armor]].}}
{{History|pocket alpha}}
{{History||v0.2.0|[[File:Gold Ingot JE2 BE1.png|32px]] Added gold ingots. They are currently unobtainable and serve no purpose.}}
{{History||v0.3.2|Gold ingots are now obtainable by [[smelting]] gold ore in a [[furnace]].
|Gold ingots can be used to craft [[blocks of gold]], gold [[pickaxe]]s, [[axe]]s, [[sword]]s and [[shovel]]s.}}
{{History||v0.4.0|Gold ingots are now used to [[crafting|craft]] gold [[hoe]]s.}}
{{History||v0.6.0|Gold ingots are now used to craft gold [[armor]].}}
{{History||v0.8.0|snap=build 1|Gold ingots are now used to craft [[clock]]s.}}
{{History|||snap=build 2|Gold ingots are now used to craft [[powered rail]]s.}}
{{History||v0.9.0|snap=build 1|Gold ingots can now be found in blacksmith [[chest]]s in [[village]]s, [[stronghold]] altar chests and [[dungeon]] chests.}}
{{History||v0.12.1|snap=build 1|Gold ingots are now used to craft [[gold nugget]]s and [[golden apple]]s.
|Gold ingots are now found in [[nether fortress]] chests.}}
{{History||v0.13.0|snap=build 1|Gold ingots are now used to [[crafting|craft]] light [[weighted pressure plate]]s.
|Gold ingots now generate inside of hidden chest rooms in [[desert temple]]s.}}
{{History||v0.14.0|snap=build 1|Gold ingots are now found in [[minecart with chest]]s that generate in [[mineshaft]]s.}}
{{History||v0.15.0|snap=build 1|Gold ingots can now be found in [[jungle temple]] [[chest]]s.}}
{{History||v0.16.0|snap=build 4|Gold ingots can now be used to power [[beacon]]s.}}
{{History|pocket edition}}
{{History||1.0.0|snap=alpha 0.17.0.1|Gold ingots can now be found in [[end city]] ship chests and [[stronghold]] storerooms.}}
{{History||1.0.4|snap=alpha 1.0.4.0|Added [[trading]], cleric [[villager]]s now [[trading|buy]] 8–10 gold ingots for 1 [[emerald]].}}
{{History||1.1.0|snap=alpha 1.1.0.0|Gold ingots are now found in [[woodland mansion]] [[chest]]s.}}
{{history|bedrock}}
{{History||1.4.0|snap=beta 1.2.13.8|Added [[drowned]], which rarely [[drops|drop]] gold ingots.}}
{{History|||snap=beta 1.2.14.2|Gold ingots can now be found inside [[buried treasure]] [[chest]]s and [[shipwreck]]s.}}
{{History||1.10.0|snap=beta 1.10.0.3|Gold ingots can now be found in [[plains]] [[village]] weaponsmith chests.
|[[File:Gold Ingot JE4 BE2.png|32px]] The texture of gold ingots has been changed.}}
{{History||1.11.0|snap=beta 1.11.0.1|Gold ingots can now be found in [[desert]] village temple [[chest]]s and village toolsmith chests.
|Gold ingots can now be found in [[savanna]], [[taiga]], [[snowy taiga]], [[snowy tundra]] and desert village weaponsmith chests.}}
{{History|||snap=beta 1.11.0.4|Cleric [[villager]]s now [[trading|buy]] 3 gold ingots for one [[emerald]].}}
{{History||1.16.0|snap=beta 1.16.0.51|Gold ingots are now used to craft [[netherite ingot]]s.
|Gold ingots can now be used to [[bartering|barter]] with [[piglin]]s.}}
{{History|||snap=beta 1.16.0.57|Gold ingots can now be [[smelting|smelted]] from [[nether gold ore]].
|Gold ingots now be found in [[ruined portal]] and [[bastion remnants]] chests.}}
{{History||1.16.210|snap=beta 1.16.210.57|Gold ingots can no longer be obtained as a [[drops|drop]] from [[drowned]].}}
{{History||1.17.0|snap=beta 1.16.230.52|Gold ingots can now be smelted from [[deepslate gold ore]].}}
{{History|||snap=beta 1.17.0.50|Gold ingots can now be smelted from [[raw gold]].}}
{{History||1.19.80|snap=beta 1.19.80.21|Gold ingots can now be used as an armor trim material.}}
{{History|console}}
{{History||xbox=TU1|xbone=CU1|ps=1.0|wiiu=Patch 1|switch=1.0.1|[[File:Gold Ingot JE2 BE1.png|32px]] Added gold ingots.}}
{{History||xbox=none|xbone=none|ps=1.90|wiiu=none|switch=none|[[File:Gold Ingot JE4 BE2.png|32px]] The texture of gold ingots has been changed.}}
{{History|new3DS}}
{{History||0.1.0|[[File:Gold Ingot JE2 BE1.png|32px]] Added gold ingots.}}
{{History|foot}}
== Issues ==
{{issue list}}
== Trivia ==
*Gold ingots are the only ingots in the game used alongside another [[item]] to [[crafting|craft]] another type of ingot; in this case, it is used with [[netherite scrap]] to craft a [[netherite ingot]].
== See also ==
*{{BlockLink|Block of Gold}}
*{{ItemSprite|Golden Chestplate}} [[Golden Armor]]
*{{ItemLink|Gold Nugget}}
*{{BlockLink|Gold Ore}}
*[[Ore]]s
{{Items}}
[[cs:Zlatý ingot]]
[[de:Goldbarren]]
[[es:Lingote de oro]]
[[fr:Lingot d'or]]
[[hu:Aranyrúd]]
[[ja:金インゴット]]
[[ko:금괴]]
[[nl:Goudstaaf]]
[[pl:Sztabka złota]]
[[pt:Barra de ouro]]
[[ru:Золотой слиток]]
[[uk:Золотий зливок]]
[[zh:金锭]]
[[Category:Renewable resources]]</li></ul></nowiki> | build 1 | |||||||||||||||||||||||||||||||||||||||||||||||||||||||||||||||||||||||||||||||||||||||||||||||||||||||||||||
| Maps are crafted using nine paper, one for every slot of the crafting grid. | ||||||||||||||||||||||||||||||||||||||||||||||||||||||||||||||||||||||||||||||||||||||||||||||||||||||||||||||
| Maps must be combined with a compass using an anvil in order to show the player's position. | ||||||||||||||||||||||||||||||||||||||||||||||||||||||||||||||||||||||||||||||||||||||||||||||||||||||||||||||
| Maps can be zoomed using an anvil. | ||||||||||||||||||||||||||||||||||||||||||||||||||||||||||||||||||||||||||||||||||||||||||||||||||||||||||||||
| build 3 | New maps are now crafted at full zoom. | |||||||||||||||||||||||||||||||||||||||||||||||||||||||||||||||||||||||||||||||||||||||||||||||||||||||||||||
| Empty maps now have a "Create Map" button to initialize them. | ||||||||||||||||||||||||||||||||||||||||||||||||||||||||||||||||||||||||||||||||||||||||||||||||||||||||||||||
| build 7 | New maps are now crafted at a scale factor of 1:1. | |||||||||||||||||||||||||||||||||||||||||||||||||||||||||||||||||||||||||||||||||||||||||||||||||||||||||||||
v0.15.0{{Extension DPL}}<ul><li>[[Nether Quartz|Nether Quartz]]<br/>{{About|the item|the ore|Nether Quartz Ore|the mineral block|Block of Quartz|other uses|Quartz}}
{{Item
| image = Nether Quartz.png
|type=
| renewable = Yes
| stackable = Yes (64)
}}
'''Nether quartz''' is a white mineral found in [[the Nether]].
== Obtaining ==
{{see also|Nether Quartz Ore#Natural generation}}
=== Mining ===
[[Nether quartz ore]] mined using a [[pickaxe]] drops one unit of Nether quartz. If the pickaxe is enchanted with [[Fortune]], it may drop an extra unit per level of Fortune, up to a maximum of four with Fortune III. If the pickaxe is enchanted with [[Silk Touch]], the ore drops itself.
=== Chest loot ===
{{LootChestItem|nether-quartz}}
=== Smelting ===
{{Smelting
|Nether Quartz Ore
|Nether Quartz
|0,2
}}
=== Bartering ===
[[Piglin]]s may [[barter]] 5–12 nether quartz when given a [[gold ingot]].
== Usage ==
=== Crafting ingredient ===
{{crafting usage}}
=== Trading ===
Expert-level stone mason [[villagers]] have a {{frac|1|33}} chance to trade one [[emerald]] for 12 Nether quartz {{in|java}}. This trade is always offered {{in|bedrock}}.
=== Smithing ingredient ===
{{Smithing
|head=1
|ingredients=Any Armor Trim +<br/>Any Armor Piece + <br/>Nether Quartz
|Any Armor Trim Smithing Template
|Netherite Chestplate
|Nether Quartz
|Quartz Trim Netherite Chestplate
|showdescription=1
|description = All armor types can be used in this recipe,<br/>a netherite chestplate is shown as an example.<br/>
|tail=1
}}
;Trim color palette
The following color palette is shown on the designs on trimmed armor:
*{{TrimPalette|nether quartz}}
== Data values ==
=== ID ===
{{edition|java}}:
{{ID table
|edition=java
|showforms=y
|generatetranslationkeys=y
|displayname=Nether Quartz
|spritetype=item
|nameid=quartz
|form=item
|foot=1}}
{{edition|bedrock}}:
{{ID table
|edition=bedrock
|shownumericids=y
|showforms=y
|notshowbeitemforms=y
|generatetranslationkeys=y
|displayname=Nether Quartz
|spritetype=item
|nameid=quartz
|id=524
|form=item
|foot=1}}
== History ==
{{History|java}}
{{History||1.5|snap=13w01a|[[File:Nether Quartz JE1 BE1.png|32px]] Added Nether quartz.
|Nether quartz is used to craft [[daylight sensor]]s and [[redstone comparator]]s.}}
{{History|||snap=January 4, 2013|slink=http://twitter.com/jeb_/status/287481098760499201|[[Jeb]] tweeted that Nether quartz would be used for more decorative uses as well.}}
{{History|||snap=January 7, 2013|slink=http://twitter.com/jeb_/status/288311932304371712|Jeb tweeted a picture of some [[block of quartz]] tests potentially being replacements for the lack of limestone/marble in the game.}}
{{History|||snap=13w02a|Added [[block of quartz]], which is [[crafting|crafted]] with Nether quartz.}}
{{History||1.8|snap=14w02a|Nether quartz can now be used to craft [[granite]] and [[diorite]].}}
{{History||1.11|snap=16w39a|Nether quartz is now used to craft [[observer]]s.}}
{{History||1.13|snap=17w47a|Prior to [[1.13/Flattening|''The Flattening'']], this [[item]]'s numeric ID was 406.}}
{{History||1.14|snap=18w43a|[[File:Nether Quartz JE2 BE2.png|32px]] The texture of Nether quartz has now been changed.}}
{{History|||snap=19w11a|Nether quartz is now [[trading|bought]] by [[villager]]s of the new mason profession.}}
{{History||1.16|snap=20w07a|Nether quartz now has a {{frac|1|109}} (~0.92%) chance of being offered by [[piglin]]s when [[bartering]], in a stack size of 1–4, making it [[renewable resource|renewable]].}}
{{History|||snap=20w09a|Nether quartz now has a {{frac|10|226}} (~4.42%) chance of being offered by piglins when bartering, in a stack size of 1–5.}}
{{History|||snap=20w10a|Nether quartz now has a {{frac|20|411}} (~4.87%) chance of being offered by piglins when bartering, in a stack size of 8-16.}}
{{History|||snap=20w11a|Nether quartz now has a {{frac|20|417}} (~4.80%) chance of being offered by piglins when bartering.}}
{{History|||snap=20w13a|Nether quartz now has a {{frac|20|424}} (~4.72%) chance of being offered by piglins when bartering.}}
{{History|||snap=20w16a|Nether quartz can now be found in [[bastion remnant]] chests.}}
{{History|||snap=20w20a|Nether quartz now has a {{frac|20|423}} (~4.73%) chance of being offered by piglins when bartering.}}
{{History||1.16.2|snap=20w28a|Nether quartz now has a {{frac|20|459}} (~4.36%) chance of being offered by piglins when bartering, in a stack size of 5-12.}}
{{History||1.20<br>(Experimental)|link=1.19.4|snap=23w04a|Nether quartz can now be used as an armor trim material.}}
{{History|pocket alpha}}
{{History||v0.6.0|[[File:Nether Quartz JE1 BE1.png|32px]] Added Nether quartz.}}
{{History||v0.12.1|snap=build 1|Nether quartz is no longer available from the [[Nether reactor]] and is now available from [[the Nether]].}}
{{History||v0.13.0|snap=build 1|Nether quartz is now used to craft [[daylight sensor]]s.}}
{{History||v0.14.0|snap=build 1|Nether quartz can now be used to craft [[redstone comparator]]s.}}
{{History||v0.15.0|snap=build 1|Nether quartz is now used to craft [[observer]]s.}}
{{History|bedrock}}
{{History||1.10.0|snap=beta 1.10.0.3|[[File:Nether Quartz JE2 BE2.png|32px]] The texture of Nether quartz has now been changed.
|Between 20 and 26 nether quartz can now be [[trading|sold]] to stone mason [[villager]]s.}}
{{History||1.11.0|snap=beta 1.11.0.4|[[Trading]] has now been changed, 12 Nether quartz can now be sold to stone mason villagers.}}
{{History||1.16.0|snap=beta 1.16.0.57|Nether Quartz can now be obtained from bartering with piglin.}}
{{History||1.19.80|snap=beta 1.19.80.21|Nether quartz can now be used as an armor trim material.}}
{{History|console}}
{{History||xbox=TU14|xbone=CU1|ps=1.04|wiiu=Patch 1|switch=1.0.1|[[File:Nether Quartz JE1 BE1.png|32px]] Added Nether quartz.}}
{{History||xbox=none|xbone=none|ps=1.90|wiiu=none|switch=none|[[File:Nether Quartz JE2 BE2.png|32px]] The texture of Nether quartz has now been changed.}}
{{History|New 3DS}}
{{History||0.1.0|[[File:Nether Quartz JE1 BE1.png|32px]] Added Nether quartz.}}
{{History|foot}}
== Issues ==
{{issue list}}
== Trivia ==
* All of the sensor related items that are craftable (comparator, daylight sensor, observer) are crafted with some Nether quartz involved.
== References ==
{{reflist}}
{{items}}
[[Category:Renewable resources]]
[[cs:Netheritový křemen]]
[[de:Netherquarz]]
[[es:Cuarzo del Nether]]
[[fr:Quartz du Nether]]
[[hu:Alvilági kvarc]]
[[ja:ネザークォーツ]]
[[ko:네더 석영]]
[[nl:Netherkwarts]]
[[pl:Kwarc]]
[[pt:Quartzo do Nether]]
[[ru:Кварц Нижнего мира]]
[[uk:Пекельний кварц]]
[[zh:下界石英]]</li><li>[[Debug fourj item|Debug fourj item]]<br/>{{DISPLAYTITLE:<samp>debug_fourj_item</samp>}}
{{exclusive|Legacy Console}}{{Unobtainable||edition=console|section=}}{{Item
| image = Barrier (held) JE1 BE1.png
| renewable = No
| stackable = Yes (64)
| rarity = Common
| title = <samp>debug_fourj_item</samp>
}}
<samp>'''debug_fourj_item'''</samp> is an unobtainable item exclusive to the [[Legacy Console Edition]] and can only be obtained through modding the game. It has the texture of a [[barrier]], no "What's this?" hint and no display name.
==Obtaining==
The only way to obtain this item is via inventory editors and other external tools.
==Usage==
The purpose of this item is unknown, and it cannot be placed. Although the ID<ref name="r">[https://youtu.be/IscH0rUw_20 "マインクラフト WiiU 全面の木、偽バリアブロックのアイテムID公開"] - YouTube, March 26, 2019</ref> suggests that it was used for debugging and testing purposes.
==Data values==
===ID===
{{ID table|displayname=[No displayed name]
|showforms=y|form=item|nameid=debug_fourj_item|id=2255<ref group="note">Numerical IDs aren't supported on the Legacy Console Edition anymore.</ref><ref name="r"/>|shownumericids=y|translationkey=item.debug_fourj_item.name|generatetranslationkeys=y|foot=1}}
<references group="note" />
==History==
{{History|console}}
{{History||xbox=unknown|xbone=unknown|ps=unknown|wiiu=unknown|switch=unknown|[[File:Barrier (held) JE1 BE1.png|32px]] Added <samp>debug_fourj_item</samp>.}}
{{History|foot}}
== Gallery ==
<gallery>
Debug fourj item in inventory.png|<samp>debug_fourj_item</samp> as it appears in one's inventory
</gallery>
==See also==
*[[Debug Stick]]
==References==
<references />
{{Items}}
{{Unused features}}
[[Category:Articles missing historical information]]</li></ul> | ? | Maps can now be crafted either with 8 pieces of paper and a compass or 9 pieces of paper, to get a map with or without a position marker. | ||||||||||||||||||||||||||||||||||||||||||||||||||||||||||||||||||||||||||||||||||||||||||||||||||||||||||||
v0.16.0{{Extension DPL}}<ul><li>[[Cooked Chicken|Cooked Chicken]]<br/>{{about|a food item|other uses of the word "chicken"|Chicken (disambiguation)}}
{{Item
| title = Cooked Chicken
| image = Cooked Chicken.png
| renewable = Yes
| heals = {{hunger|6}}
| stackable = Yes (64)
}}
'''Cooked chicken''' is a [[food]] item that can be eaten by the [[player]].
== Obtaining ==
=== Mob loot ===
When a chicken dies while on fire, it drops one cooked chicken. The maximum is increased by 1 per level of [[Looting]], for a maximum of 1–4 cooked chicken with Looting III.
=== Cooking ===
[[Raw chicken]] can be cooked in a [[furnace]], [[smoker]], or [[campfire]]. Each piece of cooked chicken removed from a furnace output slot gives 0.35 [[experience]] (22.4 experience per stack).
{{Smelting
|Raw Chicken
|Cooked Chicken
|0,35
}}
=== Trading ===
{{IN|java}}, apprentice-level butcher [[villager]]s have a {{frac|2|3}} chance to sell 8 cooked chicken for an [[emerald]].
Butcher villagers may give cooked chicken to players with the [[Hero of the Village]] effect.{{only|java}}
{{IN|bedrock}}, apprentice-level butcher villagers have a 25% chance to sell 8 cooked chicken for an emerald as part of their trades.
== Usage ==
=== Food ===
To eat cooked chicken, press and hold {{control|use}} while it is selected in the hotbar. Eating one restores {{hunger|6}} [[hunger]] and 7.2 hunger [[Hunger#Mechanics|saturation]].
=== Wolves ===
Cooked chicken can be used to [[breed]] and heal tamed [[wolves]], lead them around, and make baby tamed wolves grow up faster by 10% of the remaining time.
== Sounds ==
{{Sound table/Entity/Food}}
== Data values ==
=== ID ===
{{edition|java}}:
{{ID table
|edition=java
|showforms=y
|generatetranslationkeys=y
|displayname=Cooked Chicken
|spritetype=item
|nameid=cooked_chicken
|form=item
|foot=1}}
{{edition|bedrock}}:
{{ID table
|edition=bedrock
|shownumericids=y
|showforms=y
|notshowbeitemforms=y
|generatetranslationkeys=y
|displayname=Cooked Chicken
|spritetype=item
|nameid=cooked_chicken
|id=276
|form=item
|foot=1}}
== Advancements ==
{{load advancements|Husbandry;A Balanced Diet}}
== Video ==
<div style="text-align:center">{{yt|ux362Ae8Llc}}</div>
== History ==
{{History|java beta}}
{{History||July 19, 2011|link=https://twitter.com/jeb_/status/93330811608240128|[[File:Cooked Chicken (pre-release).png|32px]] A teaser image for cooked chicken is revealed by [[Jeb]].}}
{{History||July 19, 2011|link=https://twitter.com/jeb_/status/93946593748852736|[[File:Cooked Chicken (pre-release 2).png|32px]] Jens changes the texture based on feedback, saying "the chicken may be too smooth compared to other MC [[item]]s."<ref>https://twitter.com/jeb_/status/93335976298033152</ref>}}
{{History||1.8|snap=Pre-release|[[File:Cooked Chicken JE1 BE1.png|32px]] Added cooked chicken.}}
{{History|java}}
{{History||1.2.1|snap=12w03a|Cooked chicken can now be used to breed wolves.}}
{{History||1.3.1|snap=12w21a|Farmer [[villager]]s now [[trading|sell]] 7–8 cooked chicken for 1 [[emerald]].}}
{{History||1.4.2|snap=12w37a|[[File:Cooked Chicken JE2 BE2.png|32px]] The texture of cooked chicken has been changed so that it no longer has a dark outline.}}{{History||1.8|snap=14w02a|Butcher villagers now [[trading|sell]] 6–8 cooked chicken for 1 [[emerald]]. Farmer [[villager]]s no longer sell cooked chicken.}}
{{History||1.9|snap=15w43a|[[Chicken]]s can now [[drops|drop]] several cooked chickens if killed with a [[Looting]]-enchanted [[weapons|weapon]].}}
{{History||1.13|snap=17w47a|Prior to [[1.13/Flattening|''The Flattening'']], this [[item]]'s numeral ID was 366.}}
{{History||1.14|snap=18w43a|[[File:Cooked Chicken JE3 BE3.png|32px]] The texture of cooked chicken has been changed.}}
{{History|||snap=19w13a|Butcher villagers now give cooked chicken to players under the [[Hero of the Village]] effect.}}
{{History|pocket alpha}}
{{History||v0.4.0|[[File:Cooked Chicken JE1 BE1.png|32px]] Added cooked chicken.}}
{{History||v0.5.0|Cooked chicken now restores {{hp|6}} instead of {{hp|3}}.}}
{{History||v0.8.0|snap=build 1|[[File:Cooked Chicken JE2 BE2.png|32px]] The texture of cooked chicken has been changed so that it no longer has a dark outline.}}
{{History||v0.12.1|snap=build 1|Cooked chicken now restores [[hunger]] instead of [[health]].}}
{{History|pocket}}
{{History||1.0.4|snap=alpha 1.0.4.0|Butcher villagers now [[trading|sell]] 6–8 cooked chicken for 1 [[emerald]].}}
{{History||?|[[Chicken]]s can now [[drops|drop]] several cooked chickens if killed with a [[Looting]]-enchanted [[weapons|weapon]].}}
{{History|bedrock}}
{{History||1.10.0|snap=beta 1.10.0.3|[[File:Cooked Chicken JE3 BE3.png|32px]] The texture of cooked chicken has been changed.}}
{{History||1.11.0|snap=beta 1.11.0.4|[[Trading]] has been changed, butcher [[villager]]s now have a 25% chance to [[trading|sell]] 4 cooked chicken as part of their second-tier [[trading|trade]].}}
{{History||1.16.0|snap=beta 1.16.0.57|[[Trading]] has been changed, apprentice butcher [[villager]]s now have a 25% chance to [[trading|sell]] 8 cooked chicken instead of 4.}}
{{History|console}}
{{History||xbox=TU5|xbone=CU1|ps=1.0|wiiu=Patch 1|[[File:Cooked Chicken JE1 BE1.png|32px]] Added cooked chicken.}}
{{History||xbox=TU12|[[File:Cooked Chicken JE2 BE2.png|32px]] The texture of cooked chicken has been changed so that it no longer has a dark outline.}}
{{History|PS4}}
{{History||1.90|[[File:Cooked Chicken JE3 BE3.png|32px]] The texture of cooked chicken has been changed.}}
{{History|new3DS}}
{{History||0.1.0|[[File:Cooked Chicken JE2 BE2.png|32px]] Added cooked chicken.}}
{{History|foot}}
== Issues ==
{{issue list}}
== Gallery ==
<gallery>
Beta 1.8 Dev Chicken.png|First image of cooked chicken.
Beta 1.8 Dev Chicken 2.png|Second image of cooked chicken.
</gallery>
== References ==
{{reflist}}
{{Items}}
[[Category:Food]]
[[Category:Renewable resources]]
[[cs:Pečené kuře]]
[[de:Gebratenes Hühnchen]]
[[es:Pollo asado]]
[[fr:Poulet rôti]]
[[hu:Sültcsirke]]
[[it:Pollo cotto]]
[[ja:焼き鳥]]
[[ko:익힌 닭고기]]
[[nl:Gebraden kip]]
[[pl:Pieczony kurczak]]
[[pt:Frango assado]]
[[ru:Жареная курятина]]
[[zh:熟鸡肉]]</li><li>[[Sugar Cane|Sugar Cane]]<br/>{{Block
|image=Sugar Cane.png
|image2=Sugar Cane (item) JE3.png
|extratext = View all [[#Gallery|renders]]
|transparent=Yes
|light=No
|tool=any
|renewable=Yes
|stackable=Yes (64)
|flammable=No
|lavasusceptible=No
}}
'''Sugar cane''' is a block found as 1–4-block-tall. It plants near water in the [[Overworld]]. As an item, it is an important crafting ingredient.
==Obtaining==
Sugar cane can be mined instantly with anything.
When the spot a sugar cane block is placed in becomes unsuitable, such as when the supporting block is removed, the sugar cane block uproots and drops as an item. {{IN|be}}, sugar cane uproots immediately after all adjacent water is removed. {{IN|je}}, sugar cane uproots on the next block update or [[Tick#Random tick|random tick]].
A sugar cane block drops itself as an item if a piston tries to push it (trying to pull it does nothing) or moves a block into its space.
===Natural generation===
[[File:Sugar Canez.png|thumb|250px|Naturally-occurring sugar cane near a river.]]
Sugar cane can generate naturally near [[water]] and [[ice]], as two ({{frac|11|18}} chance), three ({{frac|5|18}} chance), or four ({{frac|2|18}} chance) blocks tall. Rare taller sugar canes can be found if the world generator places two smaller canes on top of each other. It generates in approximately 0.8 sugar cane per chunk seeing as how they only generate near bodies of water.
Sugar canes attempt to generate 10 times in any Overworld biome, which requires water. An extra 10 attempts are made in [[swamp]] biomes, and 50 in [[desert]] biomes, which makes sugar cane twice as frequent in swamps and six times as frequent in desert biomes, making the banks of [[river]]s that cut through deserts lined with sugar canes. Sugar canes do not grow faster in swamps or deserts they only spawn a increased amount.
Sugar cane cannot generate in caves {{in|je}}.<ref>{{bug|MC-214959||Sugar cane generated in cave|Fixed}}</ref>
===Trading===
[[Wandering trader]]s can sell sugar cane for an [[emerald]].
==Usage==
Due to its water-displacing properties, sugar cane can interestingly be used to create underwater paths, allowing [[player]]s to move at normal speed and breathe if it is two blocks in height.{{only|java}}<ref>{{bug|MC-929||Sugar cane can be placed underwater|WAI}}</ref>
Sugar cane takes on a different shade of green depending on the biome in which it is placed.
===Crafting ingredient===
{{crafting usage}}
===Farming===
{{main|Tutorials/Sugar cane farming}}
[[File:Underground Sugar Farm.png|200px|thumb|An underground sugar cane farm.]]
Sugar cane can generate naturally up to any number of blocks tall, but ''grow'' only to a height of three blocks, adding a block of height when the top sugar cane block has received 16 random [[Tick#Block tick|block tick]]s (i.e. on average every 18 minutes on ''Java Edition''<!-- Average 68.27 seconds/tick * 16 ticks/growth = 18.2 minutes --> or 54 minutes on Bedrock Edition, but the actual rate can vary widely).
Sugar cane must be planted on a [[grass block]], [[dirt]], [[coarse dirt]], [[rooted dirt]], [[podzol]], [[mycelium]], [[sand]], [[red sand]], [[suspicious sand]], [[moss block]], or [[mud]] that is directly adjacent to [[water]], [[waterlogged]] block, or [[frosted ice]] (not merely above or diagonal to water), or on top of another sugar cane block. The adjacent water block can be covered with another block, whether [[opacity|opaque or transparent]], and sugar cane can still be placed and grow next to it. Sugar cane grows regardless of light level, even in complete darkness.
[[File:4blockcane.png|thumb|A natural 4-block-high sugar cane plant.]]
{{IN|bedrock}}, [[bone meal]] can be used to instantly grow sugar cane to three blocks. Only one bone meal is consumed. {{IN|java}}, bone meal cannot be used on sugar cane.<ref>{{bug|MC-73963||Can't use bonemeal on cacti or sugar cane|WAI}}</ref>
On average, it takes [[Tutorials/Sugar_cane_farming#Mechanics|18 minutes]] for a single block of sugar cane to grow 3 blocks tall.
=== Composting ===
Placing sugar cane into a [[composter]] has a 50% chance of raising the compost level by 1.
== List of colors ==
{{Missing information|Bedrock Edition colors (see [[Water#Color]]{{verify|it's there?}})}}
=== ''Java Edition'' ===
These values are generated by the biome dyeing algorithm. See [[Color#Biome colors|Biome colors]] for more information.
<div class="mw-collapsible mw-collapsed" style="float: left">
{| class="wikitable sortable" style="text-align:center" data-description="Java edition biome colors"
!Biome !! Category !! Rainfall !! Sugarcane Color !! Temperature Affects !! Render
|-
| {{BiomeLink|Badlands}} || Mesa || No || #90814d || No || [[File:Badlands Sugar Cane.png|32px]]
|-
| {{BiomeLink|Beach}} || Beach || Rain || #91bd59 || || [[File:Plains Sugar Cane.png|32px]]
|-
| {{BiomeLink|Birch Forest}} || Forest || Rain || #88bb67 || || [[File:Birch Forest Sugar Cane.png|32px]]
|-
| {{BiomeLink|Cold Ocean}} || Ocean || Rain || #8eb971 || || [[File:Ocean Sugar Cane.png|32px]]
|-
| {{BiomeLink|Dark Forest}} || Forest || Rain || #507a32 || || [[File:Dark Forest Sugar Cane.png|32px]]
|-
| {{BiomeLink|Deep Cold Ocean}} || Ocean || Rain || #8eb971 || || [[File:Ocean Sugar Cane.png|32px]]
|-
| {{BiomeLink|Deep Frozen Ocean}} || Ocean || Rain || #8eb971 || || [[File:Ocean Sugar Cane.png|32px]]
|-
| {{BiomeLink|Deep Lukewarm Ocean}} || Ocean || Rain || #8eb971 || || [[File:Ocean Sugar Cane.png|32px]]
|-
| {{BiomeLink|Deep Ocean}} || Ocean || Rain || #8eb971 || || [[File:Ocean Sugar Cane.png|32px]]
|-
| {{BiomeLink|Desert}} || Desert || No || #bfb755 || || [[File:Desert Sugar Cane.png|32px]]
|-
| {{BiomeLink|End Barrens}} || The End || No || #8eb971 || || [[File:Ocean Sugar Cane.png|32px]]
|-
| {{BiomeLink|End Highlands}} || The End || No || #8eb971 || || [[File:Ocean Sugar Cane.png|32px]]
|-
| {{BiomeLink|End Midlands}} || The End || No || #8eb971 || || [[File:Ocean Sugar Cane.png|32px]]
|-
| {{BiomeLink|Eroded Badlands}} || Mesa || No || #90814d || No || [[File:Badlands Sugar Cane.png|32px]]
|-
| {{BiomeLink|Flower Forest}} || Forest || Rain || #79c05a || || [[File:Forest Sugar Cane.png|32px]]
|-
| {{BiomeLink|Forest}} || Forest || Rain || #79c05a || || [[File:Forest Sugar Cane.png|32px]]
|-
| {{BiomeLink|Frozen Ocean}} || Ocean || Snow || #80b497 || || [[File:Snowy Plains Sugar Cane.png|32px]]
|-
| {{BiomeLink|Frozen River}} || River || Snow || #80b497 || || [[File:Snowy Plains Sugar Cane.png|32px]]
|-
| {{BiomeLink|Old Growth Spruce Taiga}} || Taiga || Rain || #86b783 || || [[File:Taiga Sugar Cane.png|32px]]
|-
| {{BiomeLink|Old Growth Pine Taiga}} || Taiga || Rain || #86b87f || || [[File:Old Growth Pine Taiga Sugar Cane.png|32px]]
|-
| {{BiomeLink|Ice Spikes}} || Icy || Snow || #80b497 || || [[File:Snowy Plains Sugar Cane.png|32px]]
|-
| {{BiomeLink|Jungle}} || Jungle || Rain || #59c93c || || [[File:Jungle Sugar Cane.png|32px]]
|-
| {{BiomeLink|Sparse Jungle}} || Jungle || Rain || #64c73f || || [[File:Sparse Jungle Sugar Cane.png|32px]]
|-
| {{BiomeLink|Lukewarm Ocean}} || Ocean || Rain || #8eb971 || || [[File:Ocean Sugar Cane.png|32px]]
|-
| {{BiomeLink|Windswept Hills}} || Extreme Hills || Rain || #8ab689 || || [[File:Windswept Hills Sugar Cane.png|32px]]
|-
| {{BiomeLink|Mushroom Fields}} || Mushroom || Rain || #55c93f || || [[File:Mushroom Fields Sugar Cane.png|32px]]
|-
| {{BiomeLink|Nether}} || Nether || No || #bfb755 || || [[File:Desert Sugar Cane.png|32px]]
|-
| {{BiomeLink|Ocean}} || Ocean || Rain || #8eb971 || || [[File:Ocean Sugar Cane.png|32px]]
|-
| {{BiomeLink|Plains}} || Plains || Rain || #91bd59 || || [[File:Plains Sugar Cane.png|32px]]
|-
| {{BiomeLink|River}} || River || Rain || #8eb971 || || [[File:Ocean Sugar Cane.png|32px]]
|-
| {{BiomeLink|Savanna}} || Savanna || No || #bfb755 || || [[File:Desert Sugar Cane.png|32px]]
|-
| {{BiomeLink|Savanna Plateau}} || Savanna || No || #bfb755 || || [[File:Desert Sugar Cane.png|32px]]
|-
| {{BiomeLink|Windswept Savanna}} || Savanna || No || #bfb755 || || [[File:Desert Sugar Cane.png|32px]]
|-
| {{BiomeLink|Small End Islands}} || The End || No || #8eb971 || || [[File:Ocean Sugar Cane.png|32px]]
|-
| {{BiomeLink|Snowy Beach}} || Beach || Snow || #83b593 || || [[File:Snowy Beach Sugar Cane.png|32px]]
|-
| {{BiomeLink|Snowy Taiga}} || Taiga || Snow || #80b497 || || [[File:Snowy Plains Sugar Cane.png|32px]]
|-
| {{BiomeLink|Snowy Plains}} || Icy || Snow || #80b497 || || [[File:Snowy Plains Sugar Cane.png|32px]]
|-
| {{BiomeLink|Stony Shore}} || None || Rain || #8ab689 || || [[File:Windswept Hills Sugar Cane.png|32px]]
|-
| {{BiomeLink|Sunflower Plains}} || Plains || Rain || #91bd59 || || [[File:Plains Sugar Cane.png|32px]]
|-
| {{BiomeLink|Swamp}} || Swamp || Rain || #6A7039 || If temperature below -0.1, used #4C763C. || [[File:Swamp Sugar Cane.png|32px]] / [[File:Swamp Sugar Cane (Cold).png|32px]]
|-
| {{BiomeLink|Taiga}} || Taiga || Rain || #86b783 || || [[File:Taiga Sugar Cane.png|32px]]
|-
| {{BiomeLink|Old Growth Birch Forest}} || Forest || Rain || #88bb67 || || [[File:Birch Forest Sugar Cane.png|32px]]
|-
| {{BiomeLink|The End}} || The End || No || #8eb971 || || [[File:Ocean Sugar Cane.png|32px]]
|-
| {{BiomeLink|The Void}} || None || No || #8eb971 || || [[File:Ocean Sugar Cane.png|32px]]
|-
| {{BiomeLink|Warm Ocean}} || Ocean || Rain || #8eb971 || || [[File:Ocean Sugar Cane.png|32px]]
|-
| {{BiomeLink|Wooded Badlands}} || Mesa || No || #90814d || No || [[File:Badlands Sugar Cane.png|32px]]
|-
| {{BiomeLink|Windswept Forest}} || Extreme Hills || Rain || #8ab689 || || [[File:Windswept Hills Sugar Cane.png|32px]]
|}
</div>
{{clear}}
=== Bedrock Edition ===
{{empty section}}
== Sounds ==
{{Sound table/Block/Grass}}
== Data values ==
=== ID ===
{{edition|java}}:
{{ID table
|edition=java
|showforms=y
|generatetranslationkeys=y
|displayname=Sugar Cane
|spritetype=block
|nameid=sugar_cane
|foot=1}}
{{edition|bedrock}}:
{{ID table
|edition=bedrock
|firstcolumnname=Sugar Cane
|shownumericids=y
|showforms=y
|showaliasids=y
|generatetranslationkeys=y
|displayname=Block
|spritename=sugar-cane
|spritetype=block
|nameid=reeds
|id=83
|form=block
|itemform=item.reeds}}
{{ID table
|displayname=Item
|spritename=sugar-cane
|spritetype=item
|nameid=sugar_cane
|id=385
|form=item
|aliasid=reeds
|translationkey=item.reeds.name
|foot=1}}
=== Block states ===
{{see also|Block states}}
{{/BS}}
== Video ==
{{Video note|This video was made before sugar cane had a different shade of green depending on the biome.|minor}}
<div style="text-align:center">{{yt|zlOnwn3PH5o}}</div>
== History ==
{{more images|Appearance when affected by {{bug|MC-48831}}}}
{{History|java alpha}}
{{History||v1.0.11|[[File:Sugar Cane JE1 BE1.png|32px]] [[File:Sugar Cane (item) JE1 BE1.png|32px]] Added reeds in the [[Seecret Updates|Seecret Friday Update 6]].
|Reeds are informally referred to as "bamboo" or "papyrus" by many [[player]]s.
|Since reeds can be washed away with [[water]] currents or instantly destroyed by removing the water adjacent to them, automated reed farms can be made.
|Reeds can be used to craft [[paper]].}}
{{History|java beta}}
{{History||1.2|[[Notch]] has [[wikipedia:Retroactive continuity|retconned]] reeds into sugar cane so that it can now be [[crafting|crafted]] into [[sugar]], included in the recipe for the [[cake]]s.}}
{{History||1.6|snap=Test Build 3|[[Arrow]]s no longer stick to sugar cane, and instead, they pass through. However, [[snowball]]s still come into contact with any sugar cane blocks, as if they are solid.}}
{{History||1.8|snap=Pre-release|Sugar cane can now grow and be placed onto [[sand]] as long as they are adjacent to [[water]]. This update allows sugar canes to appear next to [[water]] ponds in [[desert]] biomes.
|Sugar cane is now available in the [[creative]] [[inventory]] in both block and item forms.}}
{{History|java}}
{{History||1.0.0|snap=?|The sugar cane block has been removed from the creative inventory.}}
{{History||1.7.2|snap=13w36a|[[File:Sugar Cane JE2 BE2.png|32px]] Sugar cane is now [[tint]]ed depending on the [[biome]] it's in.
|The item texture remained unchanged, however, and still used the color palette from Alpha to 1.6.4.<ref name="Bug">{{bug|MC-216227}}</ref>}}
{{History||1.9|snap=15w43a|Sugar cane no longer breaks if its adjacent [[water]] is turned to [[frosted ice]].}}
{{History||1.13|snap=17w47a|The ID of sugar cane has now been changed from <code>reeds</code> to <code>sugar_cane</code>.
|"Sugar Canes" have now been renamed to "Sugar Cane".
|Prior to [[1.13/Flattening|''The Flattening'']], this [[block]]'s numeral ID was 83, and the [[item]]'s 338.}}
{{History||1.14|snap=18w43a|[[File:Sugar Cane (item) JE2 BE2.png|32px]] The texture of the sugar cane item has been changed.}}
{{History|||snap=19w03a|Placing sugar cane into a [[composter]] has a 20% chance of raising the compost level by 1.}}
{{History|||snap=19w05a|Sugar cane now has a 50% chance of increasing the compost level in a composter by 1.
|Added [[wandering trader]]s, which sell sugar cane.}}
{{History||1.16|snap=20w13a|Sugar cane has been moved from the Miscellaneous tab to the Decoration Blocks tab in the [[Creative inventory]].<ref name="misc decoration">https://bugs.mojang.com/browse/MC-174434</ref>}}
{{History||1.17|snap=21w11a|[[File:Sugar Cane (item) JE3.png|32px]] The texture of the sugar cane item has been changed, so that it actually matches the color it uses when placed again.<ref name="Bug"/>}}
{{History|||snap=Pre-release 1|Sugar cane now generates in mushroom fields.<ref>{{bug|MC-226683}}</ref>}}
{{History||1.19|snap=22w15a|Sugar cane can now be planted on mud.}}
{{History||1.20|snap=23w14a|Sugar cane can now be planted on [[suspicious sand]].}}
{{History|pocket alpha}}
{{History||Pre-release|[[File:Sugar Cane JE1 BE1.png|32px]] [[File:Sugar Cane (item) JE1 BE1.png|32px]] Added sugar cane.}}
{{History||v0.2.0|Despite being visible in the inventory, sugar cane does not drop anything when mined, making it unobtainable in Survival mode.}}
{{History||v0.2.1|Survival players now start with an infinite stack of sugar cane in the inventory.}}
{{History||v0.3.0|Sugar cane now drops its item form when mined.
|Survival players no longer start with an infinite stack of sugar cane in the inventory.}}
{{History||v0.5.0|Sugar cane can now be grown on [[sand]].
|Sugar cane can now be obtained after activating the [[nether reactor]].}}
{{History||v0.8.0|snap=build 5|[[Bone meal]] can now grow sugar cane to maximum height.}}
{{History||v0.9.0|snap=build 1|[[File:Sugar Cane JE2 BE2.png|32px]] The color of sugar cane now changes depending on the [[biome]] they are in.
|Using bone meal on sugar cane is no longer able to break blocks above it.}}
{{History||v0.12.1|snap=build 1|Sugar cane is no longer available from the [[nether reactor]].}}
{{History|pocket}}
{{History||1.0.0|snap=alpha 0.17.0.1|[[File:Sugar Cane JE1 BE1.png|32px]] Due to a bug, sugar canes no longer change color depending on the [[biome]].}}
{{History|bedrock}}
{{History||1.2.13|snap=beta 1.2.13.5|[[File:Sugar Cane JE2 BE2.png|32px]] The color of sugar canes now changes depending on the [[biome]], once again.}}
{{History||1.10.0|snap=beta 1.10.0.3|[[File:Sugar Cane (item) JE2 BE2.png|32px]] The texture of the sugar cane [[item]] has been changed.
|Sugar cane can now be [[trading|bought]] from [[wandering trader]]s.}}
{{History||1.11.0|snap=beta 1.11.0.1|Sugar canes can now be used to fill up [[composter]]s.}}
{{History||1.17.0|snap=beta 1.17.0.50|[[File:Sugar Cane (item) JE3.png|32px]] The texture of the sugar cane item has been changed, so that it actually matches the color it uses when placed again.}}
{{History|console}}
{{History||xbox=TU1|xbone=CU1|ps=1.0|wiiu=Patch 1|switch=1.0.1|[[File:Sugar Cane JE1 BE1.png|32px]] [[File:Sugar Cane (item) JE1 BE1.png|32px]] Added sugar canes.
|Sugar canes are solid, making it useful for growable walls. Unlike on Java Edition, they were never renamed to Sugar Cane.}}
{{History||xbox=TU2|Sugar canes are no longer solid, and arrows pass through them.}}
{{History||xbox=TU31|xbone=CU19|ps=1.22|wiiu=Patch 3|[[File:Sugar Cane JE2 BE2.png|32px]] The color of sugar cane now changes depending on the [[biome]] they're in.}}
{{History||xbox=TU60|xbone=CU51|ps=1.64|wiiu=Patch 30|switch=1.0.11|Sugar cane can now be grown with [[bonemeal]].}}
{{History||xbox=none|xbone=none|ps=1.90|wiiu=none|switch=none|[[File:Sugar Cane (item) JE2 BE2.png|32px]] The texture of the sugar cane [[item]] has been changed.}}
{{History||xbox=none|xbone=none|ps=1.91|wiiu=none|switch=none|Sugar cane can now be [[trading|bought]] from [[wandering trader]]s.
|Sugar canes can now be used to fill up [[composter]]s.}}
{{History|New Nintendo 3DS Edition}}
{{History||0.1.0|[[File:Sugar Cane JE1 BE1.png|32px]] [[File:Sugar Cane (item) JE1 BE1.png|32px]] Added sugar cane.}}
{{History|foot}}
=== Sugar cane "item" ===
{{:Technical blocks/Sugar Cane}}
== Issues ==
{{Issue list}}
== Trivia ==
*When a sugar cane is broken at the second level, the time resets (for example, if a two-block high sugar cane is broken, but is just about to grow to the third stage, it would reset that time).
*By placing more sugar canes on top of a sugar cane plant, it is possible to create tall sugar canes (up to y=319, the maximum height for building), although they do not naturally grow this high.
*Before sugar cane received an official name, they were sometimes referred to as [[bamboo]], a block added 9 years later. Other names were "reeds" and "papyrus".
== Gallery ==
=== Renders ===
<gallery>
Plains Sugar Cane.png|Plains
Taiga Sugar Cane.png|Taiga
Snowy Plains Sugar Cane.png|Snowy plains
Jungle Sugar Cane.png|Jungle
Desert Sugar Cane.png|Desert
Swamp Sugar Cane (Cold).png|Swamp (cold)
Swamp Sugar Cane.png|Swamp
Badlands Sugar Cane.png|Badlands
</gallery>
=== In-game ===
<gallery>
Huge Sugar Farm.png|A large sugar cane farm using 2×2 [[water]] holes.
Sugar Cane Waterfall.png|Water flowing over sugar cane.
UnderwaterSugarCane.png|Naturally generated sugar cane found underwater.
Sugar and Cactus.png|A [[cactus]] and sugar cane stalk generated next to each other.
SugarCaneRavine.png|Sugar cane found in the [[ravine]].
Reeds in Winter mode.png|Reeds generated in the [[winter mode]].
Sugar Cane Naturally Growing.png|Sugar cane growing between [[biome]]s.
Mesa Sugar Cane.jpg|Sugar cane growing on [[red sand]] in a [[badlands]] biome.
Sugarcanenowaterglitch.png|Sugar cane generated without a water source.
SwampCane.png|Sugar cane generated in a [[swamp]] biome.
Sugar cane savanna.png|Sugar cane growing in a [[savanna]] biome.
ForestSugarcane.png|Sugar cane growing in a [[forest]] biome.
Lava cane.png|Sugar cane growing with lava flowing around it.
Before breaking.png|Sugar canes few seconds before breaking because the water is frozen.
Undergroundreed.png|A sugar cane plant that generated in an underground [[water lake]].
Cave Sugar.png|Another example.
</gallery>
=== Heights ===
<gallery>
Tall Sugar Cane.png|Four-block tall sugar cane.
4RiverCane.png|Four-block tall sugar cane.
4-block tall sugar cane.png|Four-block tall sugar cane in a [[plains]] biome.
</gallery>
== References ==
{{Reflist}}
{{Blocks|vegetation}}
{{Items}}
[[Category:Plants]]
[[Category:Natural blocks]]
[[Category:Non-solid blocks]]
[[cs:Cukrová třtina]]
[[de:Zuckerrohr]]
[[es:Caña de azúcar]]
[[fr:Canne à sucre]]
[[hu:Cukornád]]
[[it:Canna da zucchero]]
[[ja:サトウキビ]]
[[ko:사탕수수]]
[[nl:Suikerriet]]
[[pl:Trzcina cukrowa]]
[[pt:Cana-de-açúcar]]
[[ru:Сахарный тростник]]
[[th:อ้อย]]
[[uk:Цукрова тростина]]
[[zh:甘蔗]]</li></ul> | build 1 | Different colors have been added to maps for different biomes. | ||||||||||||||||||||||||||||||||||||||||||||||||||||||||||||||||||||||||||||||||||||||||||||||||||||||||||||
| Pocket Edition | ||||||||||||||||||||||||||||||||||||||||||||||||||||||||||||||||||||||||||||||||||||||||||||||||||||||||||||||
1.0.0{{Extension DPL}}<ul><li>[[Popped Chorus Fruit|Popped Chorus Fruit]]<br/>{{Item
| image = Popped Chorus Fruit.png
| renewable = Yes
| stackable = Yes (64)
}}
'''Popped chorus fruit''' is an [[item]] obtained by [[smelting]] [[chorus fruit]], and used to craft [[End Rod|end rods]] and [[purpur blocks]]. Unlike raw chorus fruit, the popped fruit is inedible.
== Obtaining ==
=== Smelting ===
{{Smelting
|Chorus Fruit
|Popped Chorus Fruit
|0,1
}}
== Usage ==
=== Crafting ingredient ===
{{crafting usage}}
== Data values ==
=== ID ===
{{edition|java}}:
{{ID table
|edition=java
|showforms=y
|generatetranslationkeys=y
|displayname=Popped Chorus Fruit
|spritetype=item
|nameid=popped_chorus_fruit
|form=item
|foot=1}}
{{edition|bedrock}}:
{{ID table
|edition=bedrock
|showaliasids=y
|shownumericids=y
|showforms=y
|notshowbeitemforms=y
|generatetranslationkeys=y
|displayname=Popped Chorus Fruit
|spritetype=item
|nameid=popped_chorus_fruit
|aliasid=chorus_fruit_popped
|id=559
|form=item
|translationkey=item.chorus_fruit_popped.name
|foot=1}}
== History ==
{{History|java}}
{{History||1.9|snap=15w31a|[[File:Popped Chorus Fruit JE1 BE1.png|32px]] Added popped chorus fruit.
|Popped chorus fruit are used to craft [[purpur block]]s.}}
{{History|||snap=15w44b|Popped chorus fruit are now used to craft [[end rod]]s.}}
{{History||1.13|snap=17w47a|Prior to [[1.13/Flattening|''The Flattening'']], this [[item]]'s numeral ID was 433.}}
{{History|||snap=pre5|The ID of popped chorus fruit has now been changed to <code>popped_chorus_fruit</code>.}}
{{History||1.14|snap=18w43a|[[File:Popped Chorus Fruit JE2 BE2.png|32px]] The texture of popped chorus fruit has now been changed.}}
{{History|pocket}}
{{History||1.0.0|snap=alpha 0.17.0.1|[[File:Popped Chorus Fruit JE1 BE1.png|32px]] Added popped chorus fruit.}}
{{History|bedrock}}
{{History||1.10.0|snap=beta 1.10.0.3|[[File:Popped Chorus Fruit JE2 BE2.png|32px]] The texture of popped chorus fruit has now been changed.}}
{{History||1.16.100|snap=beta 1.16.100.56|The ID of popped chorus fruit has been changed from <code>chorus_fruit_popped</code> to <code>popped_chorus_fruit</code>.}}
{{History|console}}
{{History||xbox=TU46|xbone=CU36|ps=1.38|wiiu=Patch 15|[[File:Popped Chorus Fruit JE1 BE1.png|32px]] Added popped chorus fruit.}}
{{History||xbox=none|xbone=none|ps=1.90|wiiu=none|switch=none|[[File:Popped Chorus Fruit JE2 BE2.png|32px]] The texture of popped chorus fruit has now been changed.}}
{{History|new 3ds}}
{{History||1.7.10|[[File:Popped Chorus Fruit JE1 BE1.png|32px]] Added popped chorus fruit.}}
{{History|foot}}
== Issues ==
{{issue list}}
{{Items}}
[[cs:Vypukaný květ chorusu]]
[[de:Geplatzte Chorusfrucht]]
[[fr:Chorus éclaté]]
[[it:Frutto di chorus scoppiato]]
[[ja:焼いたコーラスフルーツ]]
[[ko:튀긴 후렴과]]
[[nl:Gepoft Chorusfruit]]
[[pl:Prażony owoc refrenusu]]
[[pt:Fruta do coro cozida]]
[[ru:Приготовленный плод коруса]]
[[zh:爆裂紫颂果]]
[[Category:Renewable resources]]</li><li>[[Eye of Ender|Eye of Ender]]<br/>{{redirect|Ender Eye|the boss|Ender Dragon|item that teleports the player to where it lands|Ender Pearl}}
{{ItemEntity
|image=Eye of Ender.png
|stackable=Yes (64)
|renewable=Yes
|size=Height: 0.25 Blocks<br>Width: 0.25 Blocks
|networkid='''[[JE]]''': 72
}}
An '''eye of ender''' is a craftable item used to locate [[stronghold]]s and activate the [[end portal]]s within them.
== Obtaining ==
=== Crafting ===
{{Crafting
|Blaze Powder
|Ender Pearl
|Output=Eye of Ender
|type=Miscellaneous
}}
== Usage ==
=== Locating strongholds ===
[[File:Eye of Ender (break).gif|thumb|right|An animation of an eye of ender shattering.]]
To locate [[stronghold]]s (and the [[end portal]]s they house):
* Pressing {{control|use}} while holding an eye of ender causes it to fly approximately 12 blocks in the direction of the nearest stronghold, traveling through any blocks necessary, and leave a trail of purple particles, the same particle effect used for [[endermen]] and [[ender chests]].
** The eye leads to the [[chunk]] where a spiral staircase, the first room generated in the stronghold, is located.
** The center of this entrance staircase is always exactly at the chunk coordinates 4, ~, 4, although the eye of ender leads to chunk coordinates 0, ~, 0 (the northwest corner of the chunk).
* While over 12 blocks away from the northwest corner of the staircase chunk, the eye will travel upward to offer an easily-visible indication of the horizontal direction the player must travel.
* When closer than 12 blocks to the northwest corner of the staircase chunk, the eye will travel downward, to indicate the player is above a stronghold and must mine downward.
* After two or three seconds of travel, the eye floats in the air briefly, then either falls (becoming collectable again) or shatters in mid-air. The eye has a 20% chance of shattering (80% chance of surviving) per throw, therefore throwing it three times has approximately 50% overall chance to shatter the eye (0.8<sup>3</sup>=51.2%).
* The eye of ender's flying function works only in the [[Overworld]]. It does nothing in [[the Nether]], [[the End]], [[custom dimension]]s{{verify|type=current}}, or in worlds with no strongholds.
Note that the eyes may point to an incorrect location if the target chunks were generated with a different biomes map in an older version or through different generation settings.<ref>See also {{bug|MC-135996}}</ref>
=== Activating end portals ===
[[File:Active End Portal.png|thumb|right|An end portal activated with eyes of ender.]]
Once an end portal is found, the eyes of ender are required to activate it. End portals require a total of 12 eyes of ender in order to activate, though each individual frame-block has a 10% chance of containing an eye of ender when generated. Eyes can be placed in empty [[End portal frame]]s by pressing {{control|use}} on them until the entire ring of 12 is filled, thereby activating the portal. Due to the fact that there is a 10% chance of each individual end portal frame having an eye in it, there is a one out of one trillion chance of every frame having an eye in it thereby activating the portal even if the player doesn't have any eyes of ender.
{| class="wikitable sortable mw-collapsible"
|+End Portal Pre-Filled Eyes
!Eyes
!0
!1
!2
!3
!4
!5-12
|-
|Exactly
|28%
|38%
|23%
|9%
|2%
|<1%
|-
|Or More
|100%
|72%
|34%
|11%
|3%
|<1%
|}
=== Crafting ingredient ===
{{crafting usage}}
== Sounds ==
{{Edition|Java}}:<br>
Eyes of ender use the Friendly Creatures sound category for entity-dependent sound events.
{{Sound table
|sound=Ender Eye death1.ogg
|sound2=Ender Eye death2.ogg
|subtitle=Eye of Ender falls <ref group=sound name=LousyEvents>{{Bug|MC-98316||Wrong subtitles caused by missing distinction}}</ref>
|source=neutral
|description=When an eye of ender drops or breaks
|id=entity.ender_eye.death|idnote=<ref group=sound name=LousyEvents/>
|translationkey=subtitles.entity.ender_eye.death|translationkeynote=<ref group=sound name=LousyEvents/>
|volume=1.3
|pitch=1.0
|distance=16}}
{{Sound table
|sound=Ender Eye launch1.ogg
|sound2=Ender Eye launch2.ogg
|subtitle=Eye of Ender shoots
|source=neutral
|description=When an eye of ender is thrown
|id=entity.ender_eye.launch
|translationkey=subtitles.entity.ender_eye.launch
|volume=0.5
|pitch={{frac|1|3}}-0.5
|distance=16}}
{{Sound table
|sound=End portal eye place1.ogg
|sound2=End portal eye place2.ogg
|sound3=End portal eye place3.ogg
|subtitle=Eye of Ender attaches
|source=block
|description=When an eye of ender is placed in an end portal frame
|id=block.end_portal_frame.fill
|translationkey=subtitles.block.end_portal_frame.fill
|volume=1.0
|pitch=1.0
|distance=16
|foot=1}}
{{Edition|Bedrock}}:
{{Sound table
|type=bedrock
|sound=Item Frame break1.ogg
|sound2=Item Frame break2.ogg
|sound3=Item Frame break3.ogg
|source=block
|description=When an eye of ender breaks <ref group=sound>{{Bug|MCPE-115646}}</ref>
|id=block.itemframe.break}}
{{Sound table
|sound=Bow shoot.ogg
|source=player
|description=When an eye of ender is thrown
|id=random.bow
|volume=0.5
|pitch=0.33-0.5}}
{{Sound table
|sound=End portal eye place1.ogg
|sound2=End portal eye place2.ogg
|sound3=End portal eye place3.ogg
|source=block
|description=When an eye of ender is placed in an end portal frame
|id=block.end_portal_frame.fill
|volume=0.3
|pitch=0.9/1.0/1.1
|foot=1}}
==Data values==
===ID===
{{edition|java}}:
{{ID table
|edition=java
|firstcolumnname=Item
|showforms=y
|generatetranslationkeys=y
|displayname=Eye of Ender
|spritetype=item
|nameid=ender_eye
|form=item
|foot=1}}
{{ID table
|edition=java
|firstcolumnname=Entity
|generatetranslationkeys=y
|displayname=Eye of Ender
|spritetype=entity
|nameid=eye_of_ender
|foot=1}}
{{edition|bedrock}}:
{{ID table
|edition=bedrock
|firstcolumnname=Item
|shownumericids=y
|showforms=y
|notshowbeitemforms=y
|generatetranslationkeys=y
|displayname=Eye of Ender
|spritetype=item
|nameid=ender_eye
|id=433
|form=item
|foot=1}}
{{ID table
|edition=bedrock
|firstcolumnname=Entity
|shownumericids=y
|generatetranslationkeys=y
|displayname=Eye of Ender
|spritetype=entity
|nameid=eye_of_ender_signal
|id=70
|foot=1}}
===Entity data===
The purple particles left by eyes of ender have entity data that define various properties of the entity.
{{el|java}}:
{{main|Entity format}}
{{/ED}}
{{el|bedrock}}:
:See [[Bedrock Edition level format/Entity format]].
==Advancements==
{{load advancements|Eye Spy}}
==Video ==
{{Video note|This video does not mention that eyes of ender can be used to craft [[ender chest]]s or [[end crystal]]s.}}
<div style="text-align:center">{{yt|E0AhoxYLomc}}</div>
==History==
{{History|java}}
{{History||1.0.0|snap=Beta 1.9 Prerelease 3|[[File:Eye of Ender JE1 BE1.png|32px]] Added eyes of ender.
|Eyes of ender can be used on a [[end portal frame|portal block]] to repair them, but repairing them does nothing.}}
{{History|||snap=Beta 1.9 Prerelease 4|Each eye can now be placed in a [[end portal frame|portal block]] or used to hone in on a [[stronghold]]. [[Jens Bergensten|Jeb]] demonstrated the new uses for an eye in his livestream.<ref>http://www.twitch.tv/jebox/b/297000418</ref> An [[end portal]] within a stronghold could be seen in the stream with two eyes inserted into blocks.
|In older worlds with chunks generated before [[Java Edition Beta 1.9 Prerelease 3|Beta 1.9 Prerelease 3]], the eyes may mislead the [[player]] to a place where there isn't a [[stronghold]] at all. This happens because the eyes lead to where a stronghold should be based on the world seed in the current version, but before Beta 1.9 Prerelease 3 strongholds generated differently based on the seed. Therefore, if the player saved the coordinates the eye traveled to in an old world and generated a new world with the same seed, the player could travel to those same coordinates and find a stronghold.}}
{{History|||snap=Beta 1.9 Prerelease 6|Eyes of ender no longer render like a tool in third person.}}
{{History|||snap=RC1|The throwing sound of eyes of ender has been changed.}}
{{History||1.3.1|snap=12w21a|Eyes of ender can now be used to craft [[ender chest]]s.
|Priest [[villager]]s would [[trading|buy]] 2–3 eyes of ender for one [[emerald]].}}
{{History|||snap=12w22a|Priest villagers no longer buy eyes of ender, instead selling them for 7–10 emeralds.}}
{{History||1.6.4|snap=1.6.3-pre|Eyes of ender now lead to [[stronghold]]s based on the structure data saved in the world file instead of calculating their approximate location via the [[seed (level generation)|world seed]]. Therefore, strongholds generated in old versions can still be found even if the distribution of strongholds is changed.}}
{{History||1.7.2|snap=13w41a|Eyes of Ender now lead to the entrance of a stronghold instead of the portal room.}}
{{History||1.8|snap=14w02a|With changes that have been made to villagers and the [[trading]] system, cleric villagers now sell eyes of ender for 7–11 [[emerald]]s, as one of their tier III trades.}}
{{History||1.9|snap=15w41a|Eyes of ender are no longer [[trading|sold]] by cleric [[villager]]s.}}
{{History|||snap=15w44b|An eye of ender is now used to craft an [[end crystal]].}}
{{History|||snap=pre3|Eyes of ender now point to the 125 new strongholds.<ref>{{bug|MC-91173}} resolved as "Fixed"</ref>}}
{{History||1.11|snap=16w32a|The [[entity]] ID has been changed from <code>EyeOfEnderSignal</code> to <code>eye_of_ender_signal</code>.}}
{{History||1.12|snap=17w17a|A new ''pop'' [[sound]] has been added when a thrown eye of ender bursts.}}
{{History||1.13|snap=17w47a|Prior to [[1.13/Flattening|''The Flattening'']], this [[item]]'s numeral ID was 381.}}
{{History|||snap=pre5|The [[entity]] ID has been changed to <code>eye_of_ender</code>.}}
{{History||1.14|snap=18w43a|[[File:Eye of Ender JE2 BE2.png|32px]] The texture of eyes of ender has been changed.}}
{{History||1.19|snap=22w11a|Eyes of Ender now lead to the corner of the chunk (0, ~, 0) instead of the center (8-9, ~, 8-9).<ref>{{bug|MC-253394}}</ref>}}
{{History|pocket}}
{{History||1.0.0|snap=alpha 0.17.0.1|[[File:Eye of Ender JE1 BE1.png|32px]] Added eyes of ender.}}
{{History|bedrock}}
{{History||1.10.0|snap=beta 1.10.0.3|[[File:Eye of Ender JE2 BE2.png|32px]] The texture of eyes of ender has been changed.}}
{{History||1.16.0|snap=beta 1.15.0.51|The [[particles]] of eyes of ender have been changed to match {{el|je}}.}}
{{History|console}}
{{History||xbox=TU7|xbone=CU1|ps=1.0|wiiu=Patch 1|[[File:Eye of Ender JE1 BE1.png|32px]] Added eyes of ender.}}
{{History||xbox=none|xbone=none|ps=1.90|wiiu=none|switch=none|[[File:Eye of Ender JE2 BE2.png|32px]] The texture of eyes of ender has been changed.}}
{{History|new 3ds}}
{{History||1.7.10|[[File:Eye of Ender JE1 BE1.png|32px]] Added eyes of ender.}}
{{History|foot}}
=== Historical images ===
<gallery>
File:Held_Eye_of_Ender.png|The eye of ender used to appear large in third-person view.
</gallery>
==Issues==
{{issue list}}
==Trivia ==
*When thrown in third-person view, the eyes of ender fly out from the player's feet instead of their hand.
*Before [[Java Edition 1.9]], eyes of ender can be purchased from cleric villagers, which means players can find a [[stronghold]] and go to [[the End]] without accessing [[the Nether]] at all.
*{{IN|bedrock}} if the player travels beyond a certain radius (roughly 740,000 blocks), eyes of ender always point to a stronghold near spawn, even though strongholds continue to generate past this limit. If one travels to this limit, they can see eyes of ender suddenly switching direction. A similar phenomenon occurs with the {{cmd|locate}} command.
==Gallery==
===Screenshots===
<gallery>
Stronghold Portal Room.png|An end portal frame containing a few eyes of ender.
EnderChestexample.png|An [[ender chest]] depicting an eye of ender on the front.
</gallery>
===In other media===
<gallery>
File:Eye of Ender JINX.jpg|Official T-shirt artwork "Eye of Ender" sold by JINX.
File:Happy Halloween Eye.jpg|A Halloween T-Shirt design featuring an eye of ender.
</gallery>
==External links==
*[http://www.strongholdfinder.com/ A super-easy stronghold triangulation tool]
*[http://jsfiddle.net/42EDX/40/ JSFiddle Eye of Ender triangulator - can guess the location of other 2 strongholds in the first ring]
*[https://ens-gijs.github.io/minecraft-stronghold-locator/ Minecraft Stronghold Locator Eye of Ender throw plotting visualizer - zoomable to show all possible stronghold rings]
*[https://github.com/winny-/stronghold Python Eye of Ender throw plotting tool]
*[http://www.purplefrog.com/~thoth/MinecraftStronghold/stronghold.html HTML Eye of Ender throw plotting visualizer (not updated after 1.9 stronghold placement changes)]
*[http://chunkbase.com/apps/stronghold-finder Chunk Base Stronghold Finder (seed-based)]
*[https://github.com/toolbox4minecraft/amidst/releases Amidst - File-based world visualizer]
*[http://minecraft.tournier.org/StrongholdLocator/ Find strongholds by analyzing stronghold.dat file]
== References==
{{reflist}}
{{Items}}
{{entities}}
[[cs:Endové oko]]
[[de:Enderauge]]
[[es:Ojo de ender]]
[[fr:Œil de l'Ender]]
[[hu:Végzet szeme]]
[[ja:エンダーアイ]]
[[ko:엔더의 눈]]
[[nl:Enderoog]]
[[pl:Oko Endera]]
[[pt:Olho de ender]]
[[ru:Око Края]]
[[th:ดวงตาแห่งเอนเดอร์]]
[[uk:Око Краю]]
[[zh:末影之眼]]</li></ul> | ? | Windows 10 Edition can now use the anvil as well as the crafting table to clone, zoom and apply markers, just as Pocket Edition in general could. | ||||||||||||||||||||||||||||||||||||||||||||||||||||||||||||||||||||||||||||||||||||||||||||||||||||||||||||
| Maps can now be found inside stronghold library chests. | ||||||||||||||||||||||||||||||||||||||||||||||||||||||||||||||||||||||||||||||||||||||||||||||||||||||||||||||
1.1.0{{Extension DPL}}<ul><li>[[Raw Mutton|Raw Mutton]]<br/>{{Distinguish|Cooked Mutton}}
{{Item
| title = Raw Mutton
| image = Raw Mutton.png
| heals = {{hunger|2}}
| renewable = Yes
| stackable = Yes (64)
}}
'''Raw mutton''' is a [[food]] item dropped by [[sheep]] when killed.
== Obtaining ==
=== Mob loot ===
An adult [[sheep]] drops 1–2 raw mutton when killed. The maximum amount is increased by 1 per level of [[Looting]], for a maximum of 1–5 with Looting III. If killed while on fire, a sheep drops [[cooked mutton]] instead.
=== Chest loot ===
{{LootChestItem|raw-mutton}}
== Usage ==
=== Food ===
To eat raw mutton, press and hold {{control|use}} while it is selected in the [[hotbar]]. Eating one restores {{hunger|2}} [[hunger]] and 1.2 [[Hunger#Mechanics|saturation]].
=== Smelting ingredient ===
{{Smelting
|showname=1
|Raw Mutton
|Cooked Mutton
|0.35
}}
=== Wolves ===
Raw mutton can be used to [[breed]] and heal tamed [[wolves]], lead them around, and make baby tamed wolves grow up faster by 10% of the remaining time.
=== Trading ===
Journeyman-level butcher [[villager]]s have a 50% chance to buy 7 raw mutton for an [[emerald]] as part of their trades.{{only|bedrock}}
Journeyman-level butcher villagers always offer to buy 7 raw mutton for an emerald.{{only|java}}
==Sounds==
{{Sound table/Entity/Food}}
== Data values ==
=== ID ===
{{edition|java}}:
{{ID table
|edition=java
|showforms=y
|generatetranslationkeys=y
|displayname=Raw Mutton
|spritetype=item
|nameid=mutton
|form=item
|foot=1}}
{{edition|bedrock}}:
{{ID table
|edition=bedrock
|showaliasids=y
|shownumericids=y
|showforms=y
|notshowbeitemforms=y
|generatetranslationkeys=y
|displayname=Raw Mutton
|spritetype=item
|nameid=mutton
|aliasid=muttonraw
|id=550
|form=item
|translationkey=item.muttonRaw.name
|foot=1}}
== Advancements ==
{{load advancements|Husbandry;A Balanced Diet}}
== Video ==
<div style="text-align:center">{{yt|PXlW-sZygTs}}</div>
== History ==
{{History||September 23, 2011|link={{tweet|jeb|117313469900009472}}|Mutton is mentioned by [[Jeb]].}}
{{History||September 11, 2012|link={{tweet|jeb|245503714167750656}}|Jeb again mentions the possibility of mutton as well as calamari being added into the game.}}
{{History|java}}
{{History||June 30, 2014|link=https://twitter.com/TheMogMiner/status/483636993780232192|[[Ryan Holtz]] tweets images of raw mutton and some other new items.}}
{{History||1.8|snap=14w27a|[[File:Raw Mutton JE1.png|32px]] Added raw mutton.}}
{{History||1.8|snap=14w33b|[[File:Raw Mutton JE2 BE1.png|32px]] The texture of raw mutton has been changed. The new texture was created by [[wikipedia:Reddit|Reddit]] user [http://www.reddit.com/u/zeldahuman zeldahuman].<ref>{{reddit|2bjzes/a_reminder_of_the_blocks_and_items_added_in_18_so|cj69zie|context=3}}</ref><ref>{{reddit|2c5f35/minecraft_snapshot_14w31a_has_been_released|cjct7gb}}</ref>}}
{{History||1.13|snap=17w47a|Prior to [[1.13/Flattening|''The Flattening'']], this [[item]]'s numeral ID was 423.}}
{{History||1.14|snap=18w43a|[[File:Raw Mutton JE3 BE2.png|32px]] The texture of raw mutton has been changed.}}
{{History|||snap=18w49a|Raw mutton can now be found in [[chest]]s in [[village]] butcher shops.}}
{{History|||snap=19w11a|Butcher villagers now [[trading|buy]] raw mutton.}}
{{History|pocket alpha}}
{{History||v0.15.0|snap=build 1|[[File:Raw Mutton JE2 BE1.png|32px]] Added raw mutton.}}
{{History|bedrock}}
{{History||1.10.0|snap=beta 1.10.0.3|[[File:Raw Mutton JE3 BE2.png|32px]] The texture of raw mutton has been changed.}}
{{History||1.11.0|snap=beta 1.11.0.1|Raw mutton can now be found in [[village]] butcher [[chest]]s.}}
{{History|||snap=beta 1.11.0.4|Raw mutton can now be [[trading|sold]] to butcher [[villager]]s.}}
{{History||1.16.0|snap=beta 1.16.0.57|Trading has been changed; journeyman butcher villagers now buy 7 raw mutton for an emerald instead of 8.}}
{{History||1.16.100|snap=beta 1.16.100.56|The ID of raw mutton has been changed from <code>muttonraw</code> to <code>mutton</code>.}}
{{History||1.16.210|snap=beta 1.16.210.51|Raw mutton is [[drops|dropped]] by [[goats]].}}
{{History||1.17.0|snap=beta 1.17.0.52|Goats no longer drop raw mutton.}}
{{History|console}}
{{History||xbox=TU31|xbone=CU19|ps=1.22|wiiu=Patch 3|[[File:Raw Mutton JE2 BE1.png|32px]] Added raw mutton.}}
{{History|PS4}}
{{History||1.90|[[File:Raw Mutton JE3 BE2.png|32px]] The texture of raw mutton has been changed.}}
{{History|3ds}}
{{History||0.1.0|[[File:Raw Mutton JE2 BE1.png|32px]] Added raw mutton.}}
{{History|foot}}
== Issues ==
{{issue list}}
== Gallery ==
<gallery>
Rabbit Items 3 Ryan Holtz.png|First image of the item by [[Ryan Holtz]].
Pocket Edition Mutton.jpg|First image of the item in ''Bedrock Edition'' by [[Jason Major]].
</gallery>
== References ==
{{reflist}}
{{items}}
[[de:Rohes Hammelfleisch]]
[[es:Cordero crudo]]
[[fr:Mouton cru]]
[[ja:生の羊肉]]
[[ko:익히지 않은 양고기]]
[[nl:Rauw schapenvlees]]
[[pl:Surowa baranina]]
[[pt:Carneiro cru]]
[[ru:Сырая баранина]]
[[zh:生羊肉]]
[[Category:Food]]
[[Category:Renewable resources]]</li><li>[[Sugar Cane|Sugar Cane]]<br/>{{Block
|image=Sugar Cane.png
|image2=Sugar Cane (item) JE3.png
|extratext = View all [[#Gallery|renders]]
|transparent=Yes
|light=No
|tool=any
|renewable=Yes
|stackable=Yes (64)
|flammable=No
|lavasusceptible=No
}}
'''Sugar cane''' is a block found as 1–4-block-tall. It plants near water in the [[Overworld]]. As an item, it is an important crafting ingredient.
==Obtaining==
Sugar cane can be mined instantly with anything.
When the spot a sugar cane block is placed in becomes unsuitable, such as when the supporting block is removed, the sugar cane block uproots and drops as an item. {{IN|be}}, sugar cane uproots immediately after all adjacent water is removed. {{IN|je}}, sugar cane uproots on the next block update or [[Tick#Random tick|random tick]].
A sugar cane block drops itself as an item if a piston tries to push it (trying to pull it does nothing) or moves a block into its space.
===Natural generation===
[[File:Sugar Canez.png|thumb|250px|Naturally-occurring sugar cane near a river.]]
Sugar cane can generate naturally near [[water]] and [[ice]], as two ({{frac|11|18}} chance), three ({{frac|5|18}} chance), or four ({{frac|2|18}} chance) blocks tall. Rare taller sugar canes can be found if the world generator places two smaller canes on top of each other. It generates in approximately 0.8 sugar cane per chunk seeing as how they only generate near bodies of water.
Sugar canes attempt to generate 10 times in any Overworld biome, which requires water. An extra 10 attempts are made in [[swamp]] biomes, and 50 in [[desert]] biomes, which makes sugar cane twice as frequent in swamps and six times as frequent in desert biomes, making the banks of [[river]]s that cut through deserts lined with sugar canes. Sugar canes do not grow faster in swamps or deserts they only spawn a increased amount.
Sugar cane cannot generate in caves {{in|je}}.<ref>{{bug|MC-214959||Sugar cane generated in cave|Fixed}}</ref>
===Trading===
[[Wandering trader]]s can sell sugar cane for an [[emerald]].
==Usage==
Due to its water-displacing properties, sugar cane can interestingly be used to create underwater paths, allowing [[player]]s to move at normal speed and breathe if it is two blocks in height.{{only|java}}<ref>{{bug|MC-929||Sugar cane can be placed underwater|WAI}}</ref>
Sugar cane takes on a different shade of green depending on the biome in which it is placed.
===Crafting ingredient===
{{crafting usage}}
===Farming===
{{main|Tutorials/Sugar cane farming}}
[[File:Underground Sugar Farm.png|200px|thumb|An underground sugar cane farm.]]
Sugar cane can generate naturally up to any number of blocks tall, but ''grow'' only to a height of three blocks, adding a block of height when the top sugar cane block has received 16 random [[Tick#Block tick|block tick]]s (i.e. on average every 18 minutes on ''Java Edition''<!-- Average 68.27 seconds/tick * 16 ticks/growth = 18.2 minutes --> or 54 minutes on Bedrock Edition, but the actual rate can vary widely).
Sugar cane must be planted on a [[grass block]], [[dirt]], [[coarse dirt]], [[rooted dirt]], [[podzol]], [[mycelium]], [[sand]], [[red sand]], [[suspicious sand]], [[moss block]], or [[mud]] that is directly adjacent to [[water]], [[waterlogged]] block, or [[frosted ice]] (not merely above or diagonal to water), or on top of another sugar cane block. The adjacent water block can be covered with another block, whether [[opacity|opaque or transparent]], and sugar cane can still be placed and grow next to it. Sugar cane grows regardless of light level, even in complete darkness.
[[File:4blockcane.png|thumb|A natural 4-block-high sugar cane plant.]]
{{IN|bedrock}}, [[bone meal]] can be used to instantly grow sugar cane to three blocks. Only one bone meal is consumed. {{IN|java}}, bone meal cannot be used on sugar cane.<ref>{{bug|MC-73963||Can't use bonemeal on cacti or sugar cane|WAI}}</ref>
On average, it takes [[Tutorials/Sugar_cane_farming#Mechanics|18 minutes]] for a single block of sugar cane to grow 3 blocks tall.
=== Composting ===
Placing sugar cane into a [[composter]] has a 50% chance of raising the compost level by 1.
== List of colors ==
{{Missing information|Bedrock Edition colors (see [[Water#Color]]{{verify|it's there?}})}}
=== ''Java Edition'' ===
These values are generated by the biome dyeing algorithm. See [[Color#Biome colors|Biome colors]] for more information.
<div class="mw-collapsible mw-collapsed" style="float: left">
{| class="wikitable sortable" style="text-align:center" data-description="Java edition biome colors"
!Biome !! Category !! Rainfall !! Sugarcane Color !! Temperature Affects !! Render
|-
| {{BiomeLink|Badlands}} || Mesa || No || #90814d || No || [[File:Badlands Sugar Cane.png|32px]]
|-
| {{BiomeLink|Beach}} || Beach || Rain || #91bd59 || || [[File:Plains Sugar Cane.png|32px]]
|-
| {{BiomeLink|Birch Forest}} || Forest || Rain || #88bb67 || || [[File:Birch Forest Sugar Cane.png|32px]]
|-
| {{BiomeLink|Cold Ocean}} || Ocean || Rain || #8eb971 || || [[File:Ocean Sugar Cane.png|32px]]
|-
| {{BiomeLink|Dark Forest}} || Forest || Rain || #507a32 || || [[File:Dark Forest Sugar Cane.png|32px]]
|-
| {{BiomeLink|Deep Cold Ocean}} || Ocean || Rain || #8eb971 || || [[File:Ocean Sugar Cane.png|32px]]
|-
| {{BiomeLink|Deep Frozen Ocean}} || Ocean || Rain || #8eb971 || || [[File:Ocean Sugar Cane.png|32px]]
|-
| {{BiomeLink|Deep Lukewarm Ocean}} || Ocean || Rain || #8eb971 || || [[File:Ocean Sugar Cane.png|32px]]
|-
| {{BiomeLink|Deep Ocean}} || Ocean || Rain || #8eb971 || || [[File:Ocean Sugar Cane.png|32px]]
|-
| {{BiomeLink|Desert}} || Desert || No || #bfb755 || || [[File:Desert Sugar Cane.png|32px]]
|-
| {{BiomeLink|End Barrens}} || The End || No || #8eb971 || || [[File:Ocean Sugar Cane.png|32px]]
|-
| {{BiomeLink|End Highlands}} || The End || No || #8eb971 || || [[File:Ocean Sugar Cane.png|32px]]
|-
| {{BiomeLink|End Midlands}} || The End || No || #8eb971 || || [[File:Ocean Sugar Cane.png|32px]]
|-
| {{BiomeLink|Eroded Badlands}} || Mesa || No || #90814d || No || [[File:Badlands Sugar Cane.png|32px]]
|-
| {{BiomeLink|Flower Forest}} || Forest || Rain || #79c05a || || [[File:Forest Sugar Cane.png|32px]]
|-
| {{BiomeLink|Forest}} || Forest || Rain || #79c05a || || [[File:Forest Sugar Cane.png|32px]]
|-
| {{BiomeLink|Frozen Ocean}} || Ocean || Snow || #80b497 || || [[File:Snowy Plains Sugar Cane.png|32px]]
|-
| {{BiomeLink|Frozen River}} || River || Snow || #80b497 || || [[File:Snowy Plains Sugar Cane.png|32px]]
|-
| {{BiomeLink|Old Growth Spruce Taiga}} || Taiga || Rain || #86b783 || || [[File:Taiga Sugar Cane.png|32px]]
|-
| {{BiomeLink|Old Growth Pine Taiga}} || Taiga || Rain || #86b87f || || [[File:Old Growth Pine Taiga Sugar Cane.png|32px]]
|-
| {{BiomeLink|Ice Spikes}} || Icy || Snow || #80b497 || || [[File:Snowy Plains Sugar Cane.png|32px]]
|-
| {{BiomeLink|Jungle}} || Jungle || Rain || #59c93c || || [[File:Jungle Sugar Cane.png|32px]]
|-
| {{BiomeLink|Sparse Jungle}} || Jungle || Rain || #64c73f || || [[File:Sparse Jungle Sugar Cane.png|32px]]
|-
| {{BiomeLink|Lukewarm Ocean}} || Ocean || Rain || #8eb971 || || [[File:Ocean Sugar Cane.png|32px]]
|-
| {{BiomeLink|Windswept Hills}} || Extreme Hills || Rain || #8ab689 || || [[File:Windswept Hills Sugar Cane.png|32px]]
|-
| {{BiomeLink|Mushroom Fields}} || Mushroom || Rain || #55c93f || || [[File:Mushroom Fields Sugar Cane.png|32px]]
|-
| {{BiomeLink|Nether}} || Nether || No || #bfb755 || || [[File:Desert Sugar Cane.png|32px]]
|-
| {{BiomeLink|Ocean}} || Ocean || Rain || #8eb971 || || [[File:Ocean Sugar Cane.png|32px]]
|-
| {{BiomeLink|Plains}} || Plains || Rain || #91bd59 || || [[File:Plains Sugar Cane.png|32px]]
|-
| {{BiomeLink|River}} || River || Rain || #8eb971 || || [[File:Ocean Sugar Cane.png|32px]]
|-
| {{BiomeLink|Savanna}} || Savanna || No || #bfb755 || || [[File:Desert Sugar Cane.png|32px]]
|-
| {{BiomeLink|Savanna Plateau}} || Savanna || No || #bfb755 || || [[File:Desert Sugar Cane.png|32px]]
|-
| {{BiomeLink|Windswept Savanna}} || Savanna || No || #bfb755 || || [[File:Desert Sugar Cane.png|32px]]
|-
| {{BiomeLink|Small End Islands}} || The End || No || #8eb971 || || [[File:Ocean Sugar Cane.png|32px]]
|-
| {{BiomeLink|Snowy Beach}} || Beach || Snow || #83b593 || || [[File:Snowy Beach Sugar Cane.png|32px]]
|-
| {{BiomeLink|Snowy Taiga}} || Taiga || Snow || #80b497 || || [[File:Snowy Plains Sugar Cane.png|32px]]
|-
| {{BiomeLink|Snowy Plains}} || Icy || Snow || #80b497 || || [[File:Snowy Plains Sugar Cane.png|32px]]
|-
| {{BiomeLink|Stony Shore}} || None || Rain || #8ab689 || || [[File:Windswept Hills Sugar Cane.png|32px]]
|-
| {{BiomeLink|Sunflower Plains}} || Plains || Rain || #91bd59 || || [[File:Plains Sugar Cane.png|32px]]
|-
| {{BiomeLink|Swamp}} || Swamp || Rain || #6A7039 || If temperature below -0.1, used #4C763C. || [[File:Swamp Sugar Cane.png|32px]] / [[File:Swamp Sugar Cane (Cold).png|32px]]
|-
| {{BiomeLink|Taiga}} || Taiga || Rain || #86b783 || || [[File:Taiga Sugar Cane.png|32px]]
|-
| {{BiomeLink|Old Growth Birch Forest}} || Forest || Rain || #88bb67 || || [[File:Birch Forest Sugar Cane.png|32px]]
|-
| {{BiomeLink|The End}} || The End || No || #8eb971 || || [[File:Ocean Sugar Cane.png|32px]]
|-
| {{BiomeLink|The Void}} || None || No || #8eb971 || || [[File:Ocean Sugar Cane.png|32px]]
|-
| {{BiomeLink|Warm Ocean}} || Ocean || Rain || #8eb971 || || [[File:Ocean Sugar Cane.png|32px]]
|-
| {{BiomeLink|Wooded Badlands}} || Mesa || No || #90814d || No || [[File:Badlands Sugar Cane.png|32px]]
|-
| {{BiomeLink|Windswept Forest}} || Extreme Hills || Rain || #8ab689 || || [[File:Windswept Hills Sugar Cane.png|32px]]
|}
</div>
{{clear}}
=== Bedrock Edition ===
{{empty section}}
== Sounds ==
{{Sound table/Block/Grass}}
== Data values ==
=== ID ===
{{edition|java}}:
{{ID table
|edition=java
|showforms=y
|generatetranslationkeys=y
|displayname=Sugar Cane
|spritetype=block
|nameid=sugar_cane
|foot=1}}
{{edition|bedrock}}:
{{ID table
|edition=bedrock
|firstcolumnname=Sugar Cane
|shownumericids=y
|showforms=y
|showaliasids=y
|generatetranslationkeys=y
|displayname=Block
|spritename=sugar-cane
|spritetype=block
|nameid=reeds
|id=83
|form=block
|itemform=item.reeds}}
{{ID table
|displayname=Item
|spritename=sugar-cane
|spritetype=item
|nameid=sugar_cane
|id=385
|form=item
|aliasid=reeds
|translationkey=item.reeds.name
|foot=1}}
=== Block states ===
{{see also|Block states}}
{{/BS}}
== Video ==
{{Video note|This video was made before sugar cane had a different shade of green depending on the biome.|minor}}
<div style="text-align:center">{{yt|zlOnwn3PH5o}}</div>
== History ==
{{more images|Appearance when affected by {{bug|MC-48831}}}}
{{History|java alpha}}
{{History||v1.0.11|[[File:Sugar Cane JE1 BE1.png|32px]] [[File:Sugar Cane (item) JE1 BE1.png|32px]] Added reeds in the [[Seecret Updates|Seecret Friday Update 6]].
|Reeds are informally referred to as "bamboo" or "papyrus" by many [[player]]s.
|Since reeds can be washed away with [[water]] currents or instantly destroyed by removing the water adjacent to them, automated reed farms can be made.
|Reeds can be used to craft [[paper]].}}
{{History|java beta}}
{{History||1.2|[[Notch]] has [[wikipedia:Retroactive continuity|retconned]] reeds into sugar cane so that it can now be [[crafting|crafted]] into [[sugar]], included in the recipe for the [[cake]]s.}}
{{History||1.6|snap=Test Build 3|[[Arrow]]s no longer stick to sugar cane, and instead, they pass through. However, [[snowball]]s still come into contact with any sugar cane blocks, as if they are solid.}}
{{History||1.8|snap=Pre-release|Sugar cane can now grow and be placed onto [[sand]] as long as they are adjacent to [[water]]. This update allows sugar canes to appear next to [[water]] ponds in [[desert]] biomes.
|Sugar cane is now available in the [[creative]] [[inventory]] in both block and item forms.}}
{{History|java}}
{{History||1.0.0|snap=?|The sugar cane block has been removed from the creative inventory.}}
{{History||1.7.2|snap=13w36a|[[File:Sugar Cane JE2 BE2.png|32px]] Sugar cane is now [[tint]]ed depending on the [[biome]] it's in.
|The item texture remained unchanged, however, and still used the color palette from Alpha to 1.6.4.<ref name="Bug">{{bug|MC-216227}}</ref>}}
{{History||1.9|snap=15w43a|Sugar cane no longer breaks if its adjacent [[water]] is turned to [[frosted ice]].}}
{{History||1.13|snap=17w47a|The ID of sugar cane has now been changed from <code>reeds</code> to <code>sugar_cane</code>.
|"Sugar Canes" have now been renamed to "Sugar Cane".
|Prior to [[1.13/Flattening|''The Flattening'']], this [[block]]'s numeral ID was 83, and the [[item]]'s 338.}}
{{History||1.14|snap=18w43a|[[File:Sugar Cane (item) JE2 BE2.png|32px]] The texture of the sugar cane item has been changed.}}
{{History|||snap=19w03a|Placing sugar cane into a [[composter]] has a 20% chance of raising the compost level by 1.}}
{{History|||snap=19w05a|Sugar cane now has a 50% chance of increasing the compost level in a composter by 1.
|Added [[wandering trader]]s, which sell sugar cane.}}
{{History||1.16|snap=20w13a|Sugar cane has been moved from the Miscellaneous tab to the Decoration Blocks tab in the [[Creative inventory]].<ref name="misc decoration">https://bugs.mojang.com/browse/MC-174434</ref>}}
{{History||1.17|snap=21w11a|[[File:Sugar Cane (item) JE3.png|32px]] The texture of the sugar cane item has been changed, so that it actually matches the color it uses when placed again.<ref name="Bug"/>}}
{{History|||snap=Pre-release 1|Sugar cane now generates in mushroom fields.<ref>{{bug|MC-226683}}</ref>}}
{{History||1.19|snap=22w15a|Sugar cane can now be planted on mud.}}
{{History||1.20|snap=23w14a|Sugar cane can now be planted on [[suspicious sand]].}}
{{History|pocket alpha}}
{{History||Pre-release|[[File:Sugar Cane JE1 BE1.png|32px]] [[File:Sugar Cane (item) JE1 BE1.png|32px]] Added sugar cane.}}
{{History||v0.2.0|Despite being visible in the inventory, sugar cane does not drop anything when mined, making it unobtainable in Survival mode.}}
{{History||v0.2.1|Survival players now start with an infinite stack of sugar cane in the inventory.}}
{{History||v0.3.0|Sugar cane now drops its item form when mined.
|Survival players no longer start with an infinite stack of sugar cane in the inventory.}}
{{History||v0.5.0|Sugar cane can now be grown on [[sand]].
|Sugar cane can now be obtained after activating the [[nether reactor]].}}
{{History||v0.8.0|snap=build 5|[[Bone meal]] can now grow sugar cane to maximum height.}}
{{History||v0.9.0|snap=build 1|[[File:Sugar Cane JE2 BE2.png|32px]] The color of sugar cane now changes depending on the [[biome]] they are in.
|Using bone meal on sugar cane is no longer able to break blocks above it.}}
{{History||v0.12.1|snap=build 1|Sugar cane is no longer available from the [[nether reactor]].}}
{{History|pocket}}
{{History||1.0.0|snap=alpha 0.17.0.1|[[File:Sugar Cane JE1 BE1.png|32px]] Due to a bug, sugar canes no longer change color depending on the [[biome]].}}
{{History|bedrock}}
{{History||1.2.13|snap=beta 1.2.13.5|[[File:Sugar Cane JE2 BE2.png|32px]] The color of sugar canes now changes depending on the [[biome]], once again.}}
{{History||1.10.0|snap=beta 1.10.0.3|[[File:Sugar Cane (item) JE2 BE2.png|32px]] The texture of the sugar cane [[item]] has been changed.
|Sugar cane can now be [[trading|bought]] from [[wandering trader]]s.}}
{{History||1.11.0|snap=beta 1.11.0.1|Sugar canes can now be used to fill up [[composter]]s.}}
{{History||1.17.0|snap=beta 1.17.0.50|[[File:Sugar Cane (item) JE3.png|32px]] The texture of the sugar cane item has been changed, so that it actually matches the color it uses when placed again.}}
{{History|console}}
{{History||xbox=TU1|xbone=CU1|ps=1.0|wiiu=Patch 1|switch=1.0.1|[[File:Sugar Cane JE1 BE1.png|32px]] [[File:Sugar Cane (item) JE1 BE1.png|32px]] Added sugar canes.
|Sugar canes are solid, making it useful for growable walls. Unlike on Java Edition, they were never renamed to Sugar Cane.}}
{{History||xbox=TU2|Sugar canes are no longer solid, and arrows pass through them.}}
{{History||xbox=TU31|xbone=CU19|ps=1.22|wiiu=Patch 3|[[File:Sugar Cane JE2 BE2.png|32px]] The color of sugar cane now changes depending on the [[biome]] they're in.}}
{{History||xbox=TU60|xbone=CU51|ps=1.64|wiiu=Patch 30|switch=1.0.11|Sugar cane can now be grown with [[bonemeal]].}}
{{History||xbox=none|xbone=none|ps=1.90|wiiu=none|switch=none|[[File:Sugar Cane (item) JE2 BE2.png|32px]] The texture of the sugar cane [[item]] has been changed.}}
{{History||xbox=none|xbone=none|ps=1.91|wiiu=none|switch=none|Sugar cane can now be [[trading|bought]] from [[wandering trader]]s.
|Sugar canes can now be used to fill up [[composter]]s.}}
{{History|New Nintendo 3DS Edition}}
{{History||0.1.0|[[File:Sugar Cane JE1 BE1.png|32px]] [[File:Sugar Cane (item) JE1 BE1.png|32px]] Added sugar cane.}}
{{History|foot}}
=== Sugar cane "item" ===
{{:Technical blocks/Sugar Cane}}
== Issues ==
{{Issue list}}
== Trivia ==
*When a sugar cane is broken at the second level, the time resets (for example, if a two-block high sugar cane is broken, but is just about to grow to the third stage, it would reset that time).
*By placing more sugar canes on top of a sugar cane plant, it is possible to create tall sugar canes (up to y=319, the maximum height for building), although they do not naturally grow this high.
*Before sugar cane received an official name, they were sometimes referred to as [[bamboo]], a block added 9 years later. Other names were "reeds" and "papyrus".
== Gallery ==
=== Renders ===
<gallery>
Plains Sugar Cane.png|Plains
Taiga Sugar Cane.png|Taiga
Snowy Plains Sugar Cane.png|Snowy plains
Jungle Sugar Cane.png|Jungle
Desert Sugar Cane.png|Desert
Swamp Sugar Cane (Cold).png|Swamp (cold)
Swamp Sugar Cane.png|Swamp
Badlands Sugar Cane.png|Badlands
</gallery>
=== In-game ===
<gallery>
Huge Sugar Farm.png|A large sugar cane farm using 2×2 [[water]] holes.
Sugar Cane Waterfall.png|Water flowing over sugar cane.
UnderwaterSugarCane.png|Naturally generated sugar cane found underwater.
Sugar and Cactus.png|A [[cactus]] and sugar cane stalk generated next to each other.
SugarCaneRavine.png|Sugar cane found in the [[ravine]].
Reeds in Winter mode.png|Reeds generated in the [[winter mode]].
Sugar Cane Naturally Growing.png|Sugar cane growing between [[biome]]s.
Mesa Sugar Cane.jpg|Sugar cane growing on [[red sand]] in a [[badlands]] biome.
Sugarcanenowaterglitch.png|Sugar cane generated without a water source.
SwampCane.png|Sugar cane generated in a [[swamp]] biome.
Sugar cane savanna.png|Sugar cane growing in a [[savanna]] biome.
ForestSugarcane.png|Sugar cane growing in a [[forest]] biome.
Lava cane.png|Sugar cane growing with lava flowing around it.
Before breaking.png|Sugar canes few seconds before breaking because the water is frozen.
Undergroundreed.png|A sugar cane plant that generated in an underground [[water lake]].
Cave Sugar.png|Another example.
</gallery>
=== Heights ===
<gallery>
Tall Sugar Cane.png|Four-block tall sugar cane.
4RiverCane.png|Four-block tall sugar cane.
4-block tall sugar cane.png|Four-block tall sugar cane in a [[plains]] biome.
</gallery>
== References ==
{{Reflist}}
{{Blocks|vegetation}}
{{Items}}
[[Category:Plants]]
[[Category:Natural blocks]]
[[Category:Non-solid blocks]]
[[cs:Cukrová třtina]]
[[de:Zuckerrohr]]
[[es:Caña de azúcar]]
[[fr:Canne à sucre]]
[[hu:Cukornád]]
[[it:Canna da zucchero]]
[[ja:サトウキビ]]
[[ko:사탕수수]]
[[nl:Suikerriet]]
[[pl:Trzcina cukrowa]]
[[pt:Cana-de-açúcar]]
[[ru:Сахарный тростник]]
[[th:อ้อย]]
[[uk:Цукрова тростина]]
[[zh:甘蔗]]</li></ul> | alpha 1.1.0.0 | Empty maps with direction markers built-in are now called "locator maps". | ||||||||||||||||||||||||||||||||||||||||||||||||||||||||||||||||||||||||||||||||||||||||||||||||||||||||||||
| alpha 1.1.0.3 | "Locator maps" are now called "empty locator maps". | |||||||||||||||||||||||||||||||||||||||||||||||||||||||||||||||||||||||||||||||||||||||||||||||||||||||||||||
| Empty maps are now sold by cartographer villagers for 7-11 emeralds as their tier 3 trade. | ||||||||||||||||||||||||||||||||||||||||||||||||||||||||||||||||||||||||||||||||||||||||||||||||||||||||||||||
| Bedrock Edition | ||||||||||||||||||||||||||||||||||||||||||||||||||||||||||||||||||||||||||||||||||||||||||||||||||||||||||||||
1.4.0Tropical fish also have assigned names that can be seen after capture. In Java Edition, the smaller text under the item name is displayed showing the fish name, similar to the text that displays enchantments under enchanted items. In Bedrock Edition, the item name is displayed showing "Bucket of <fish name>". Their colors are mostly named according to the colored block names, though with a few exceptions:
The base color comes first, and if the pattern color is different, it comes after that. Lastly, the fish bucket is given a name according to the shape and pattern of the fish:
Some tropical fish don't follow the normal naming system, and instead, reference real-life fish species. Apart from these names, these types of fish aren't different from regular tropical fish in terms of design or behavior. These varieties are:
| beta 1.2.14.2 | Maps can now be found inside map room chests in shipwrecks. | ||||||||||||||||||||||||||||||||||||||||||||||||||||||||||||||||||||||||||||||||||||||||||||||||||||||||||||
| ? | The texture of the filled map overlay has been changed. | |||||||||||||||||||||||||||||||||||||||||||||||||||||||||||||||||||||||||||||||||||||||||||||||||||||||||||||
| ? | Maps now function in dimensions other than the dimension in which they were created. | |||||||||||||||||||||||||||||||||||||||||||||||||||||||||||||||||||||||||||||||||||||||||||||||||||||||||||||
1.10.0{{Extension DPL}}<ul><li>[[Honey Bottle|Honey Bottle]]<br/>{{Item
| title = Honey Bottle
| image = Honey Bottle.png
| renewable = Yes
| heals = {{hunger|6}}
|effects=Clears {{EffectLink|Poison}}
| stackable = Yes (16)
}}
A '''honey bottle''' is a [[drinks|consumable drink]] [[item]] obtainable by using a [[glass bottle]] on a full [[beehive]]. Honey bottles remove [[poison]] when drunk and can be used to craft [[Honey Block|honey blocks]] and [[sugar]].
== Obtaining ==
{{See also|Tutorials/Honey farming}}
=== Harvesting ===
A honey bottle can be obtained by using a [[glass bottle]] on either a [[beehive]] or [[beehive|bee nest]] with a honey level of 5. Doing this angers any [[bee]]s inside, causing them to attack the player, unless there is a [[campfire]] or another [[block]] on [[fire]] beneath the bee nest or beehive.
A [[dispenser]] with glass bottles can be used to collect the honey without angering the bees. The honey bottle appears as an item in the dispenser's inventory. If the dispenser is full, the honey bottle is shot out.
=== Crafting ===
{{Crafting
|Glass Bottle
|Glass Bottle
|Honey Block
|Glass Bottle
|Glass Bottle
|Output=Honey Bottle, 4
|type= Foodstuff
}}
== Usage ==
To drink a honey bottle, press and hold {{control|use}} while it is selected in the [[hotbar]]. Drinking one restores {{hunger|6}} [[hunger]] and 1.2 hunger [[Hunger#Mechanics|saturation]]. Consuming the item also has the benefit of removing any [[poison]] effect applied to the player. Unlike drinking [[Milk Bucket|milk]], other applied effects are not removed upon drinking a honey bottle.
Honey bottles can be drunk even with a full hunger bar. Drinking a honey bottle takes 25% longer than eating other [[food]] - 2 seconds - and has a unique sound.
=== Crafting ingredient ===
{{Crafting usage}}
== Sounds ==
{{edition|java}}:
{{Sound table
|sound=Drink honey1.ogg
|sound2=Drink honey2.ogg
|sound3=Drink honey3.ogg
|sound4=Drink honey3.ogg
|subtitle=Gulping
|source=player
|description=While a player is drinking a honey bottle
|id=item.honey_bottle.drink
|translationkey=subtitles.item.honey_bottle.drink
|volume=0.5
|pitch=''varies'' <ref group=sound>0.9-1.0 for <code>drink_honey1</code> and <code>drink_honey2</code>, 0.315-0.35 for <code>drink_honey3</code>, and 0.675-0.75 for the second copy of <code>drink_honey3</code></ref>
|distance=16}}
{{Sound table
|sound=Bottle fill water1.ogg
|sound2=Bottle fill water2.ogg
|sound3=Bottle fill water3.ogg
|sound4=Bottle fill water4.ogg
|subtitle=Bottle fills
|source=block
|description=When a bottle is filled with honey
|id=item.bottle.fill
|translationkey = subtitles.item.bottle.fill
|volume=1.0
|pitch=1.0
|distance=16
|foot=1}}
{{edition|bedrock}}:
{{Sound table
|type=bedrock
|sound=Drink honey1.ogg
|sound2=Drink honey2.ogg
|sound3=Drink honey3.ogg
|sound4=Drink honey3.ogg<!--This is duplicated intentionally, see below-->
|source=player
|description=While a player is drinking a honey bottle
|id=random.drink_honey
|volume=''varies''<ref group="sound" name="bevarieshoney">0.5 for <code>drink_honey1</code> and <code>drink_honey2</code>, but <code>drink_honey3</code> is 0.175 or 0.375</ref>
|pitch=0.9-1.0}}
{{Sound table
|sound=Fill water bucket1.ogg
|sound2=Fill water bucket2.ogg
|sound3=Fill water bucket3.ogg
|source=block
|description=When a bottle is filled with honey<wbr><ref group=sound>{{Bug|MCPE-53881}}</ref>
|id=bucket.fill_water
|volume=1.0
|pitch=1.0
|foot=1}}
== Data values ==
=== ID ===
{{edition|java}}:
{{ID table
|edition=java
|showforms=y
|generatetranslationkeys=y
|displayname=Honey Bottle
|spritetype=item
|nameid=honey_bottle
|form=item
|foot=1}}
{{edition|bedrock}}:
{{ID table
|edition=bedrock
|shownumericids=y
|showforms=y
|notshowbeitemforms=y
|generatetranslationkeys=y
|displayname=Honey Bottle
|spritetype=item
|nameid=honey_bottle
|id=592
|form=item
|foot=1}}
== Achievements ==
{{Load achievements|Bee Our Guest}}
== Advancements ==
{{Load advancements|Husbandry;A Balanced Diet;Bee Our Guest}}
== History ==
{{History|java}}
{{History||1.15|snap=19w34a|[[File:Honey Bottle JE1.png|32px]] Added honey bottles.}}
{{History|||snap=19w35a|Honey bottles now remove the [[Poison]] effect when consumed.
|Honey bottles are now included in the "A Balanced Diet" [[advancement]].}}
{{History|||snap=19w36a|Honey bottles are now less filling, restoring 1.2 [[Hunger#Mechanics|saturation]] instead of 9.6.}}
{{History||1.15|snap=19w41a|Honey bottles can now be used to craft [[honey block]]s.}}
{{History||1.15|snap=19w44a|Honey bottles can now be [[crafting|crafted]] with four [[glass bottle]]s and one [[honey block]].
|Honey bottles are now stackable (up to 16).}}
{{History|||snap=19w46a|Using [[glass bottle]]s to collect honey now unlocks the [[Bee Our Guest]] advancement.}}
{{History|bedrock}}
{{History||1.14.0|snap=beta 1.14.0.1|[[File:Honey Bottle BE1.png|32px]] Added honey bottles.}}
{{History|||snap=beta 1.14.0.4|[[File:Honey Bottle BE2.png|32px]] The texture of honey bottles has been changed to match {{el|je}}'s.
|Honey bottles can now be crafted with four [[glass bottle]]s and one [[honey block]].
|Honey bottles are now stackable to 16.}}
{{History|||snap=release|slink=Bedrock Edition 1.14.0|Using [[glass bottle]]s to collect honey now unlocks the [[Bee our guest]] achievement.}}
{{History|foot}}
== Issues ==
{{issue list}}
== Trivia ==
* Honey bottles are the only drinkable [[item]]s that can stack. They have a maximum stack size of 16.
* Honey bottles are the only drinkable items that can restore hunger.
* Honey bottles are 4 pixels more full than [[water bottles]].
{{Items}}
[[cs:Lahvička medu]]
[[de:Honigflasche]]
[[es:Frasco con miel]]
[[fr:Fiole de miel]]
[[ja:ハチミツ入りの瓶]]
[[ko:꿀이 든 병]]
[[lzh:蜜瓶]]
[[pl:Butelka miodu]]
[[pt:Frasco de mel]]
[[ru:Бутылочка мёда]]
[[th:ขวดน้ำผึ้ง]]
[[uk:Пляшечка меду]]
[[zh:蜂蜜瓶]]
[[Category:Food]]
[[Category:Renewable resources]]</li><li>[[Bone Meal|Bone Meal]]<br/>{{Item
| image = Bone Meal.png
| renewable = Yes
| stackable = Yes (64)
}}
'''Bone meal''' is a material that can be used as a fertilizer for most plants and fungi, as well as a crafting ingredient for [[dye]]s.
== Obtaining ==
=== Crafting ===
{{Crafting
|Bone
|Output=Bone Meal,3
|type=Material
|showname=0
|head=1
}}
{{Crafting
|Bone Block
|Output= Bone Meal,9
|type=Material
|foot=1
}}
=== Mob loot ===
==== Fish ====
All fish mob variants ([[cod]], [[salmon]], [[tropical fish]], and [[pufferfish]]) have a 5% chance to drop 1 bone meal upon death.{{only|java}} In [[Bedrock Edition]], they drop [[bones]] instead.
=== Composters ===
When a [[composter]] is completely filled, a single bone meal drops the next time the composter is {{ctrl|used}}.
=== Trading ===
[[Wandering trader]]s sell 3 bone meal for an [[emerald]].{{only|bedrock}}
== Usage ==
=== Crafting ingredient ===
{{crafting usage}}
{{IN|bedrock}}, bone meal can be also used in [[banner pattern]]s:
{{banner crafting usage}}
=== Loom ingredient ===
{{Banner loom usage|Bone Meal}}
=== Dye ===
{{Dye usage}}
=== Fertilizer ===
Bone meal can also be used on the following [[plants]] to have a chance to increase their growth stage:
{| class="wikitable"
|+
!Plant
!Action
|-
|{{BlockLink|Wheat}}<br>{{BlockLink|Carrots}}<br>{{BlockLink|Potatoes}}
|The plant matures 2–5 growth stages.
|-
|{{BlockLink|Beetroots}}
|The plant has a 75% chance of growing to the next growth stage.
|-
|{{BlockLink|Bamboo}}
|Grows the [[bamboo]] by 1-2 stems.
|-
|{{BlockLink|Melon Stem|link=Melon seeds|text=Melon Seeds}}<br>{{BlockLink|Pumpkin Stem|link=Pumpkin seeds|text=Pumpkin Seeds}}
|The planted stem matures 2–5 growth stages. Bone meal affects only the stem's growth; it does not cause [[melon]]s or [[pumpkin]]s to sprout from a mature stem.
|-
|{{BlockLink|Saplings}}<br>{{BlockLink|Azalea}}<br>{{BlockLink|Flowering Azalea}}<br>{{BlockLink|Mangrove Propagule}} (not hanging)
|The [[sapling]] has a 45% chance of growing to the next growth stage, if possible. Saplings have two growth stages (with no visible difference between them) before growing into trees as the third stage. A tree cannot grow unless the sapling is planted in proper ground and sufficient space is available. Using bone meal on such an obstructed sapling with no chance of growing wastes the bone meal.
|-
|{{BlockLink|Sunflower}}s<br>{{BlockLink|Lilac}}s<br>{{BlockLink|Rose Bush}}es<br>{{BlockLink|Peony|Peonies}}
|The corresponding item form drops, without destroying the original plant.
|-
|{{BlockLink|Grass}}<br>{{BlockLink|Fern}}s<br>{{BlockLink|Seagrass}}
|A one-block-high tall [[grass]], [[fern]], or [[seagrass]] (that is on [[grass block]], [[dirt]], [[coarse dirt]], [[rooted dirt]], [[farmland]], [[podzol]], [[mycelium]], [[moss block]], [[mud]], or [[muddy mangrove roots]] (only exception is seagrass, will need to on a full surface)) grows into a two-block-high tall grass, fern or seagrass.
|-
|{{BlockLink|Mushrooms}}
|Has a 40% chance of growing into a {{EnvLink|huge mushroom}} if on [[grass block]], [[dirt]], [[coarse dirt]], [[rooted dirt]], [[farmland]], [[podzol]], [[mycelium]], [[moss block]], [[mud]], or [[muddy mangrove roots]].
|-
|{{BlockLink|Cocoa}}
|The cocoa plant matures 1 growth stage.
|-
|{{BlockLink|Sweet Berry Bush}}
|Grows every stage.
|-
|{{BlockLink|Sea Pickle}}
|If the [[sea pickle]] is on a [[coral block]] and in [[water]] at least 2 blocks deep, the sea pickle colony grows, and additional sea pickles generate nearby.
|-
|{{BlockLink|Sugar Cane}}{{only|bedrock|short=1}}
|The sugar cane grows to maximum height (three blocks tall).
|-
|{{BlockLink|Kelp}}
|The kelp plant grows by 1 block per bone meal used, up to its maximum height.
|-
|{{BlockLink|Flower|id=poppy}} (excluding wither roses){{only|bedrock|short=1}}
|One-block-high flowers make more flowers of the same type grow in the surrounding area.
|-
|{{BlockLink|Fungus|id=fungi}}
|Grows into [[huge fungi]], but only if on the respective [[nylium]].
|-
|{{BlockLink|Weeping Vines}}
|Grows the [[weeping vine]]s a few blocks downward.
|-
|{{BlockLink|Twisting Vines}}
|Grows the [[twisting vine]]s a few blocks upward.
|-
|{{BlockLink|Cave Vines}}
|Produces [[glow berries]] if the vine did not have any [[glow berries]] on it already.
|-
|{{BlockLink|Glow Lichen}}
|The [[glow lichen]] spreads to a random adjacent block.
|-
|{{BlockLink|Moss Block}}
|The [[moss block]] causes nearby [[stone]], [[cave vine]]s, and [[dirt]] to become moss blocks.
|-
|{{BlockLink|Big Dripleaf}}<br>{{BlockLink|Small Dripleaf}}
|A [[big dripleaf]] grows one block higher, and a [[small dripleaf]] becomes a big dripleaf.
|-
|{{BlockLink|Rooted Dirt}}
|Causes [[hanging roots]] to grow underneath the [[rooted dirt]] if there is space.
|-
|{{BlockLink|Mangrove Leaves}}
|Creates a hanging [[mangrove propagule]] under the [[mangrove leaves]].
|-
|{{BlockLink|Mangrove Propagule}} (hanging)
|The [[mangrove propagule]] matures 1 growth age.
|-
|{{BlockLink|Pink Petals}}
|Produces another pink petal in the block. If there are already four pink petals in the block, it will drop a pink petal as an item.
|-
|{{BlockLink|Torchflower Crop}}<br>{{BlockLink|Pitcher Crop}}
|Grows every stage.
|}
Bone meal does not affect:
* [[Cactus]]
* [[Vines]]
* [[Nether wart]]
* [[Sugar cane]]{{only|JE}}
* [[Chorus plant]]s, or other plants not listed above.
==== Wasting bone meal ====
Bone meal can be used on the following objects in the following situations, consuming it without any real effect:
* On [[grass]], [[fern]]s, and [[seagrass]] that do not have enough space to grow.<ref>{{bug|MC-125642}}</ref>
* On [[seagrass]] that doesn't have [[water]] above.
* On a [[dark oak sapling]] that is not in a group of four.<ref>{{bug|MC-168446}}</ref>
* On a [[mushroom]] that is not on a block that allows it to grow into a huge mushroom.<ref>{{bug|MC-173213}}</ref>
* On a [[sea pickle]] that is already in a group of four and has no valid locations to expand to.<ref>{{bug|MC-127995}}</ref>
* On a [[bamboo]] (not [[bamboo shoot]]) that is blocked in the way.
* On a [[sea pickle]] that is not on a [[coral block]].
* On a [[fungus]] that is not on its respective [[nylium]].
* Any plants that can't grow due to being block by the [[build limit]].
=== Creating new plants ===
If bone meal is {{ctrl|used}} on a [[grass block]]; [[tall grass]], [[grass]], [[flower]]s, and [[pink petals]] form on the targeted block and on random adjacent grass blocks in an 15×5×15{{only|java|short=1}}/7×5×7{{only|bedrock|short=1}} area centered on the targeted block. The flowers/pink petals that appear depend on the biome, meaning that in order to obtain specific flowers, the player must travel to biomes where the flowers are found naturally. See {{slink|Flower|Flower biomes}} for more information.
Using bone meal on a 2-block flower (rose bushes, sunflowers, lilacs or peonies) will cause one of the same type of flower to drop, without breaking the original. This is the only way to reproduce these flowers, since they cannot generate from using bone meal on grass blocks.
Using bone meal on a non-transparent block that is underwater generates [[seagrass]] on that block and surrounding blocks. Sometimes, if in a [[warm ocean]] biome, [[coral]] and [[coral fan]]s may have a chance to generate as well, and in Bedrock Edition, coral (not coral fan) can be generated in any biome. In order for this to work, there must be 2 water blocks above the block the bone meal is being used on, and the lower one must be non-flowing water.
Using bone meal on a [[sea pickle]] on a [[coral block]] creates sea pickles. This generates sea pickles up to 3 [[block]]s (of coral) away, so a 7+ × 7+ block (49+ blocks) of coral may be necessary, to return the most sea pickles per given bone meal attempt (more attempts grows them more numerously, exactly - including the range of it growing, like grass with heights on grass blocks - as coral and coral fans, though those others being non-solid blocks).
Using bone meal on [[netherrack]] adjacent to [[nylium]] converts the netherrack into nylium of the same type. If both crimson and warped nylium are adjacent to the netherrack that was applied with bone meal, there is a 50% chance that either type of nylium is created.
Using bone meal on [[nylium]] causes the corresponding [[roots]] and both types of [[fungi]] to appear on the nylium block and other nylium nearby, with the type of fungi matching the type of nylium being more common. In addition, using bone meal on the side of warped nylium creates [[nether sprouts]] and [[twisting vines]].
=== Farmer villagers ===
[[Villager]]s with the farmer profession can collect bone meal from a full [[composter]], with which they can make their crops grow faster.
== Sounds ==
{{edition|java}}:
{{Sound table
|sound=Bonemeal1.ogg
|sound2=Bonemeal2.ogg
|sound3=Bonemeal3.ogg
|sound4=Bonemeal4.ogg
|sound5=Bonemeal5.ogg
|subtitle=Bone Meal crinkles
|description=When bone meal is successfully used
|source=block
|id=item.bone_meal.use
|translationkey=subtitles.item.bone_meal.use
|volume=1.0
|pitch=1.0
|distance=16
|foot=1}}
{{edition|be}}:
{{Sound table
|type=bedrock
|sound=Bonemeal1.ogg
|sound2=Bonemeal2.ogg
|sound3=Bonemeal3.ogg
|sound4=Bonemeal4.ogg
|sound5=Bonemeal5.ogg
|description=When bone meal is successfully used
|source=block
|id=item.bone_meal.use
|volume=1.0
|pitch=0.9-1.1
|foot=1}}
== Data values ==
=== ID ===
{{edition|java}}:
{{ID table
|edition=java
|showforms=y
|generatetranslationkeys=y
|displayname=Bone Meal
|spritetype=item
|nameid=bone_meal
|form=item
|foot=1}}
{{edition|bedrock}}:
{{ID table
|edition=bedrock
|showaliasids=y
|shownumericids=y
|showforms=y
|notshowbeitemforms=y
|generatetranslationkeys=y
|displayname=Bone Meal
|spritetype=item
|nameid=bone_meal
|aliasid=dye / 15
|id=411
|form=item
|translationkey=item.dye.white.name
|foot=1}}
== History ==
{{History|java beta}}
{{History||1.2|[[File:Bone Meal JE1 BE1.png|32px]] Added bone meal.
|Bone meal can now only be applied to [[sapling]]s and [[wheat]].}}
{{History||1.6.6|Bone meal can now be applied on [[grass block]]s.}}
{{History||1.8|snap=Pre-release|Bone meal can now be used on [[mushroom]]s to make [[huge mushroom]]s, and the block the mushroom is on changes to [[dirt]].}}
{{History|||snap=Pre-release 2 ;)|Bone meal can now be applied on [[pumpkin seeds|pumpkin]] and [[melon seed]]s.}}
{{History|java}}
{{History||1.3.1|snap=12w19a|Bone meal can now be applied on [[cocoa bean]]s.}}
{{History|||snap=1.3|[[File:Bone Meal JE2 BE2.png|32px]] The texture of bone meal has been changed.}}
{{History||1.4.2|snap=12w34a|Bone meal can now be used to dye [[leather armor]] and [[tamed wolf]]'s collar.}}
{{History||1.4.6|snap=12w49a|Bone meal can now be [[crafted]] with [[gunpowder]] to create a [[firework star]].}}
{{History||1.5|snap=13w04a|Bone meal has been significantly nerfed.<br>
[[Wheat]], [[melon seeds|melon]] and [[pumpkin seed]]s, [[potato]]es and [[carrot]]s: one bone meal is now consumed for all seven stages of growth (melon and pumpkin seeds do not spawn right away).<br>
[[Sapling]]s: one bone meal is now consumed for each of the two growth stages, then it grows into a tree.<br>
[[Cocoa]]s: one bone meal is now consumed for each of the three stages of growth.
|Green [[particle]]s are now displayed when bone meal is used.
|Bone meal can now be used from [[dispenser]]s.}}
{{History|||snap=13w05a|The balancing of bone meal has been adjusted. Growing a plant to its last state now takes on average 2-5 uses of bone meal (results vary from plant to plant).<ref>https://web.archive.org/web/20220921040940/https://imgur.com/a/gOngk</ref>}}
{{History||1.6.1|snap=13w19a|Bone meal can now be used to craft white [[stained clay]].}}
{{History||1.7.2|snap=13w36a|The [[flower]]s generated when using bone meal on grass blocks is now biome dependent.}}
{{History|||snap=13w41a|Bone meal can now be used to craft white [[stained glass]].}}
{{History||1.8|snap=14w30a|Added [[banner]]s, which can be dyed with [[bone meal]].}}
{{History||1.10|snap=16w20a|Bone meal can now be used to craft [[bone block]]s.}}
{{History||1.11|snap=16w39b|Bone meal can now be used to dye [[shulker box]]es.}}
{{History||1.12|snap=17w06a|Bone meal can now be used to craft white [[concrete powder]].}}
{{History||1.13|snap=17w47a|The different data values for the <code>dye</code> ID have been split up into their own IDs.
|Prior to [[1.13/Flattening|''The Flattening'']], this [[item]]'s numeral ID was 351.}}
{{History|||snap=18w07a|Bone meal can now be used underwater to create [[seagrass]].}}
{{History|||snap=18w14b|Bone meal can now be used for spreading [[sea pickle]]s.}}
{{History||1.13.1|snap=18w31a|Bone meal used in [[water]] of warm ocean biomes now has a chance of growing [[coral]].
|[[Cod]], [[salmon]], [[tropical fish]], and [[pufferfish]] now have a chance of dropping bone meal upon death.}}
{{History|||snap=18w32a|Bone meal used in [[water]] of warm ocean biomes now has a chance of growing [[coral fan]]s.}}
{{History||1.14|snap=18w43a|Bone meal can now used to craft [[white dye]].
|Bone meal can no longer be used as a [[dye]].
|All of the dye-related functions and crafting recipes of bone meal (except bone blocks) have been transferred to white dye.
|[[File:Bone Meal JE3 BE3.png|32px]] The texture of bone meal has been changed.
|Bone meal can now be used on [[bamboo]] and [[bamboo shoot]].}}
{{History|||snap=19w03a|Bone meal can now be obtained from [[composter]]s.}}
{{History||1.16|snap=20w06a|Bone meal can now be used to grow [[fungi]] into [[huge fungi]].
|Bone meal can now be used to spread [[nylium]] onto netherrack.}}
{{History|||snap=20w09a|Using bone meal to grow fungi now works only on the respective [[nylium]].}}
{{History|||snap=20w11a|Bone meal can now grow [[kelp]], [[weeping vines]], and [[twisting vines]].}}
{{History|||snap=20w12a|Bone meal can now be used to grow [[roots]], [[fungi]], and [[nether sprouts]] on nylium.}}
{{History|||snap=20w13a|Farmers can now use bone meal to grow crops.}}
{{History||1.17|snap=21w03a|Bone meal can now be used to spread [[glow lichen]]s.}}
{{History|||snap=21w05a|Bone meal can now be used on [[moss block]]s, [[small dripleaf]], [[big dripleaf]], and [[cave vines]].}}
{{History|||snap=21w11a|Bone meal can now be used on [[rooted dirt]].}}
{{History|||snap=21w15a|Bone meal now makes a sound when used.}}
{{History|||snap=21w16a|Moss patches obtained from fertilizing moss blocks contain less vegetation and are now smaller and more irregular in shape.
|Bone meal can now be used on [[azalea]] and [[flowering azalea]].}}
{{History||1.19|snap=22w11a|Bone meal can now be used on [[mangrove propagule]]s and [[mangrove leaves]].}}
{{History||1.20<br>(Experimental)|link=1.19.4|snap=23w07a|Bone meal can now be used on [[pink petals]] and [[torchflower crop]]s.|Using bone meal on [[cherry grove]]s now have a chance to generate [[pink petal]]s.}}
{{History||1.20|snap=23w12a|Bone meal can now be used on [[pitcher crop]]s.}}
{{History|pocket alpha}}
{{History||v0.3.0|[[File:Bone Meal JE1 BE1.png|32px]] Added bone meal. It is currently unobtainable and serves no purpose.}}
{{History||v0.3.3|Bone meal can now be crafted from bones.
|Bone meal can now be applied to grass blocks and saplings.}}
{{History||v0.4.0|Added the first [[crop]]s, which bone meal can be applied to.}}
{{History||v0.8.0|snap=build 1|[[File:Bone Meal JE2 BE2.png|32px]] The texture of bone meal has been changed.
|Bone meal no longer instantly grows [[crop]]s to full size.
|Bone meal can now be used to craft white [[wool]].}}
{{History|||snap=build 5|[[Pumpkin]] and [[melon]] stems now grow by only one stage when bone meal is used.
|Some [[flower]]s now spawn certain other flowers when bone meal is used on them.
|Bone meal can now grow [[fern]]s and [[tall grass]] in [[survival]] and [[creative]].
|Bone meal can now grow [[sugar cane]]s to maximum height.}}
{{History||v0.9.0|snap=build 11|Bone meal can now be used to dye tamed [[wolf]] collars.}}
{{History||v0.14.0|snap=build 1|Bone meal can now be used from [[dispenser]]s.
|Bone meal can now be used to dye [[water]] in [[cauldron]]s.}}
{{History|pocket}}
{{History||1.0.0|snap=alpha 0.17.0.1|Bone meal can now be used to dye [[shulker]]s.}}
{{History||1.1.0|snap=alpha 1.1.0.0|Bone meal can now be used to craft white [[concrete powder]], white [[bed]]s and white [[shulker box]]es.}}
{{History||1.1.3|snap=alpha 1.1.3.0|Bone meal can now be used to craft [[bone block]]s.}}
{{History|bedrock}}
{{History||1.2.0|snap=beta 1.2.0.2|Bone meal can now be used to craft white [[stained glass]].
|Bone meal can now be used to craft [[firework star]]s.
|Bone meal can now be used to create [[banner]] patterns.}}
{{History||1.4.0|snap=beta 1.2.14.2|Bone meal can now be used underwater for growing [[seagrass]] and [[coral]].}}
{{History|||snap=beta 1.2.20.1|Bone meal can now be used for spreading [[sea pickle]]s.
|Bone meal can now be used to craft white [[balloon]]s and white [[glow stick]]s.}}
{{History||1.8.0|snap=beta 1.8.0.8|Bone meal can now be used to grow [[bamboo]].}}
{{History|||snap=beta 1.8.0.10|Bone meal can now be used to craft [[white dye]].}}
{{History||1.10.0|snap=beta 1.10.0.3|Bone meal are now sold by [[wandering trader]]s.
|[[File:Bone Meal JE3 BE3.png|32px]] The texture of bone meal has been changed.}}
{{History||1.11.0|snap=beta 1.11.0.1|Bone meal can now be obtained from [[composter]]s.}}
{{History||1.16.0|snap=beta 1.16.0.51|Bone meal can now grow [[fungus|fungi]] into [[huge fungi]].
|Bone meal can now be used to turn [[netherrack]] into [[nylium]].
|Bone meal can now be used to grow [[roots]], [[fungi]], and [[nether sprouts]] on nylium.}}
{{History||1.16.100|snap=beta 1.16.100.56|The ID of bone meal has been changed from <code>dye/15</code> to <code>bone_meal</code>.}}
{{History||1.16.210|snap=beta 1.16.210.51|Bone meal used in [[water]] now has a chance of growing [[coral fan]]s.}}
{{History||1.16.220|snap=beta 1.16.220.52|Bone meal can now be used on [[moss block]]s, [[small dripleaf]], [[big dripleaf]], [[cave vines]] and [[rooted dirt]].}}
{{History||1.17.0|snap=beta 1.16.230.50|Bone meal can now be used to spread [[glow lichen]]s.}}
{{History|||snap=beta 1.16.230.54|Bone meal can be used to grow [[azalea]]s into azalea trees.}}
{{History|||snap=beta 1.17.0.50|Bone meal now makes a sound when used.}}
{{History|console}}
{{History||xbox=TU1|xbone=CU1|ps=1.00|wiiu=Patch 1|switch=1.0.1|[[File:Bone Meal JE1 BE1.png|32px]] Added bone meal.}}
{{History||xbox=TU19|xbone=CU7|ps=1.12|Bone meal no longer instantly grows [[crop]]s to full size.}}
{{History||xbox=none|xbone=none|ps=1.90|wiiu=none|switch=none|[[File:Bone Meal JE3 BE3.png|32px]] The texture of bone meal has been changed.}}
{{History|new 3ds}}
{{History||0.1.0|[[File:Bone Meal JE2 BE2.png|32px]] Added bone meal.}}
{{History|foot}}
== Issues ==
{{issue list}}
== Trivia ==
* Bone meal can be used on the sides or bottom of a [[grass block]], as well as on a grass block with [[plant]]s already on top of it.
* Regardless of if it succeeds in fertilizing, bone meal makes green sparkles. However, like smoke from a [[torch]], the sparkles appear only if the [[player]] has [[particles]] set All or Decreased.
* In real life, [[Wikipedia:bone meal|bone meal]] is used as a fertilizer to provide nitrogen and phosphorus to plants.
==Gallery==
<gallery>
File:Bone Meal On Grass.png|Bone meal used on [[grass block]]s.
</gallery>
== See also ==
* [[Farming]]
== References ==
{{reflist}}
{{Items}}
[[Category:Dyes]]
[[Category:Plants]]
[[Category:Renewable resources]]
[[cs:Kostní moučka]]
[[de:Knochenmehl]]
[[es:Polvo de hueso]]
[[fr:Poudre d'os]]
[[hu:Csontliszt]]
[[ja:骨粉]]
[[ko:뼛가루]]
[[nl:Beendermeel]]
[[pl:Mączka kostna]]
[[pt:Farinha de osso]]
[[ru:Костная мука]]
[[th:ผงกระดูก]]
[[zh:骨粉]]</li></ul> | beta 1.10.0.3 | Maps can now be found in cartographer house chests in villages. | ||||||||||||||||||||||||||||||||||||||||||||||||||||||||||||||||||||||||||||||||||||||||||||||||||||||||||||
1.11.0{{Extension DPL}}<ul><li>[[Blaze Rod|Blaze Rod]]<br/>{{Item
| image = Blaze Rod.png
| renewable = Yes
| stackable = Yes (64)
}}
'''Blaze rods''' are [[item]]s exclusively obtained from [[blaze]]s. They act as a fuel for both brewing and [[smelting]], and are required to craft [[eye of ender|eyes of ender]] used to access to [[the End]].
== Obtaining ==
=== Mob loot ===
When killed by a player or tamed [[wolf]], a [[blaze]] has a 50% chance to drop a blaze rod. The [[Looting]] [[enchantment]] can increase the drops by one per level, for a maximum of 4 blaze rods. Blazes do not drop any blaze rods if killed by any other source.
== Usage ==
=== Crafting ingredient ===
{{crafting usage}}
=== Fuel ===
When used in a [[furnace]], a blaze rod lasts 120 seconds (12 items).
== Achievements ==
{{load achievements|Into Fire}}
== Advancements ==
{{load advancements|Into Fire}}
== Video ==
{{Video note|This video does not mention the crafting of [[End Rod]]s.|minor}}
<div style="text-align:center">{{yt|_mhRHuRlICY}}</div>
== Data values ==
=== ID ===
{{el|java}}:
{{ID table
|edition=java
|showforms=y
|generatetranslationkeys=y
|displayname=Blaze Rod
|spritetype=item
|nameid=blaze_rod
|form=item
|foot=1}}
{{el|bedrock}}:
{{ID table
|edition=bedrock
|shownumericids=y
|showforms=y
|notshowbeitemforms=y
|generatetranslationkeys=y
|displayname=Blaze Rod
|spritetype=item
|nameid=blaze_rod
|id=423
|form=item
|foot=1}}
== History ==
{{History|java}}
{{History||1.0.0|snap=Beta 1.9 Prerelease|[[File:Blaze Rod JE1 BE1.png|32px]] Added blaze rods.}}
{{History|||snap=Beta 1.9 Prerelease 2|Blaze rods are now used to craft [[blaze powder]].}}
{{History|||snap=Beta 1.9 Prerelease 3|Blaze rods are now used to craft [[brewing stand]]s.}}
{{History||1.8|snap=14w07a|Blaze rods are now held similarly to [[tools]].}}
{{History||1.9|snap=15w44b|Blaze rods are now used to craft [[end rod]]s.}}
{{History||1.13|snap=17w47a|Prior to [[1.13/Flattening|''The Flattening'']], this [[item]]'s numeral ID was 369.}}
{{History|pocket alpha}}
{{History||v0.12.1|snap=build 1|[[File:Blaze Rod JE1 BE1.png|32px]] Added blaze rods.
|Blaze rods can be used to craft [[blaze powder]] and [[brewing stand]]s.}}
{{History|pocket}}
{{History||1.0.0|snap=alpha 0.17.0.1|Blaze rods are now used to craft [[end rod]]s.}}
{{History|console}}
{{History||xbox=TU7|xbone=CU1|ps=1.00|wiiu=Patch 1|switch=1.0.1|[[File:Blaze Rod JE1 BE1.png|32px]] Added blaze rods.
|Blaze rods can be used to craft [[blaze powder]] and [[brewing stand]]s.}}
{{History||xbox=TU46|xbone=CU36|ps=1.38|wiiu=Patch 15|Blaze rods are now used to craft [[end rod]]s.}}
{{History|New 3DS}}
{{History||0.1.0|[[File:Blaze Rod JE1 BE1.png|32px]] Added blaze rods.
|Blaze rods can be used to craft [[blaze powder]] and [[brewing stand]]s.}}
{{History|foot}}
== Issues ==
{{issue list}}
== Trivia ==
* As part of an official collaboration, blaze rods are included in a free add-on for the roleplaying game [https://en.wikipedia.org/wiki/Dungeons_%26_Dragons ''Dungeons and Dragons''].<ref>https://www.google.com/url?sa=t&rct=j&q=&esrc=s&source=web&cd=&cad=rja&uact=8&ved=2ahUKEwj9uvqlwIT-AhV7LUQIHYlVDiwQFnoECBAQAQ&url=https%3A%2F%2Fwww.minecraft.net%2Fcontent%2Fdam%2Fgames%2Fminecraft%2Fsoftware%2FMinecraft-Monstrous-Compendium.pdf&usg=AOvVaw0aKOqpKAHSH11qgZhN_Bhx</ref> In the game, they are worth 100 gold pieces, create light, and can be broken to create an explosion.
* They are the spinning things surrounding the blaze's head
{{items}}
== References ==
{{Reflist}}
[[Category:Renewable resources]]
[[cs:Ohnivá hůl]]
[[de:Lohenrute]]
[[el:Οι ράβδοι των Blaze]]
[[es:Vara de blaze]]
[[fr:Bâton de Blaze]]
[[hu:Lángrúd]]
[[it:Verga di blaze]]
[[ja:ブレイズロッド]]
[[ko:블레이즈 막대]]
[[lzh:炎靈桿]]
[[nl:Blazestaf]]
[[pl:Płomienna różdżka]]
[[pt:Vara de blaze]]
[[ru:Огненный стержень]]
[[th:แท่งเบลซ]]
[[tr:Alaz Çubuğu]]
[[uk:Стрижень Блейза]]
[[zh:烈焰棒]]</li><li>[[Rabbit's Foot|Rabbit's Foot]]<br/>{{Item
| image = Rabbit's Foot.png
|type=
| renewable = Yes
| stackable = Yes (64)
}}
A '''rabbit's foot''' is a [[brewing]] item obtained from [[rabbit]]s.
== Obtaining ==
=== Mob loot ===
Each [[rabbit]] has a 10% chance to drop a rabbit's foot when killed by the [[player]]. This chance can be increased by 3% per level using a sword enchanted with [[Looting]].
A [[fox]] sometimes spawns with a rabbit's foot in its mouth, which always drops upon death. Alternatively, the player can drop a [[food]] item, which causes the fox to drop the rabbit's foot.
=== Cat gifts ===
{{main|Cat#Gifts}}
A tamed [[cat]] has a 70% chance of giving the player a gift when the player wakes up from a [[bed]], and the gift has a 16.13% chance to be a rabbit's foot.
== Usage ==
=== Brewing ingredient ===
{{Brewing
|head=1
|Rabbit's Foot
|Mundane Potion
|base=Water Bottle
}}
{{brewing
|foot=1
|showname=1
|Rabbit's Foot
|Potion of Leaping
}}
=== Trading ===
Journeyman-level cleric [[villager]]s buy rabbit's feet for an [[emerald]] as part of their trade: {{in|java}} they buy 2, and {{in|bedrock}} they buy 4.
== Video ==
<div style="text-align:center">{{yt|Ba3QN3uCniU}}</div>
== Data values ==
=== ID ===
{{edition|java}}:
{{ID table
|edition=java
|showforms=y
|generatetranslationkeys=y
|displayname=Rabbit's Foot
|spritetype=item
|nameid=rabbit_foot
|form=item
|foot=1}}
{{edition|bedrock}}:
{{ID table
|edition=bedrock
|shownumericids=y
|showforms=y
|notshowbeitemforms=y
|generatetranslationkeys=y
|displayname=Rabbit's Foot
|spritetype=item
|nameid=rabbit_foot
|id=528
|form=item
|foot=1}}
== History ==
{{History|java}}
{{History||1.8|snap=June 30, 2014|slink=https://twitter.com/TheMogMiner/status/483636993780232192|[[Ryan Holtz]] tweeted images of a rabbit's foot with some other new [[item]]s.}}
{{History|||snap=14w27a|[[File:Rabbit's Foot JE1.png|32px]] Added rabbit's foot.
|Added the [[potion of Leaping]]; it is [[brewing|brewed]] by adding a rabbit's foot to an [[awkward potion]]. The rabbit's foot also creates the [[mundane potion]] when brewed into a [[water bottle]].}}
{{History|||snap=14w33b|[[File:Rabbit's Foot JE2 BE1.png|32px]] The texture of the rabbit's foot has been changed. The new texture was created by [[wikipedia:Reddit|Reddit]] user [http://www.reddit.com/u/zeldahuman zeldahuman].<ref>{{reddit|2bjzes/a_reminder_of_the_blocks_and_items_added_in_18_so|cj69zie|context=3}}</ref><ref>{{reddit|2c5f35/minecraft_snapshot_14w31a_has_been_released|cjct7gb}}</ref>}}
{{History||1.8.1|snap=pre1|Potions of Leaping, which use rabbit's foot, can now be extended using [[redstone]].}}
{{History||1.9|snap=15w46a|The drop rate of rabbit's foot has been quadrupled.{{more info|Before/After rates}}}}
{{History||1.13|snap=17w47a|Prior to [[1.13/Flattening|''The Flattening'']], this [[item]]'s numeral ID was 414.}}
{{History||1.14|snap=18w43a|[[File:Rabbit's Foot JE3 BE2.png|32px]] The texture of rabbit's foot has been changed.}}
{{History|||snap=18w44a|[[Cat]]s now offer rabbit's feet as [[Cat#Gifts|gifts]].}}
{{History|||snap=19w07a|Added [[fox]]es, which sometimes spawn with rabbit's feet in their mouths.}}
{{History|||snap=19w11a|Cleric [[villager]]s now [[trading|buy]] rabbit's feet.}}
{{History|pocket alpha}}
{{History||v0.12.1|snap=build 1|[[File:Rabbit's Foot JE2 BE1.png|32px]] Added rabbit's foot to the [[Creative]] mode [[inventory]].}}
{{History||v0.13.0|snap=build 1|Rabbit's foot can now be obtained as a rare [[drops|drop]] upon killing [[rabbit]]s.
|Rabbit's foot can now be [[brewing|brewed]] to make [[potions of Leaping]].}}
{{History|bedrock}}
{{History||1.8.0|snap=beta 1.8.0.8|Tamed [[cat]]s can now give the [[player]] rabbit's foot as a gift.}}
{{History||1.10.0|snap=beta 1.10.0.3|[[File:Rabbit's Foot JE3 BE2.png|32px]] The texture of rabbit's foot has been changed.}}
{{History||1.11.0|snap=beta 1.11.0.4|Rabbit's foot can now be [[trading|sold]] to cleric [[villager]]s.}}
{{History||1.13.0|snap=beta 1.13.0.1|Added [[fox]]es, which can [[drops|drop]] rabbit's foot.}}
{{History|console}}
{{History||xbox=TU31|xbone=CU19|ps=1.22|wiiu=Patch 3|switch=1.0.1|[[File:Rabbit's Foot JE2 BE1.png|32px]] Added rabbit's foot.}}
{{History||xbox=none|xbone=none|ps=1.90|wiiu=none|switch=none|[[File:Rabbit's Foot JE3 BE2.png|32px]] The texture of rabbit's foot has been changed.}}
{{History|New 3DS}}
{{History||0.1.0|[[File:Rabbit's Foot JE2 BE1.png|32px]] Added rabbit's foot.}}
{{History|foot}}
== Issues ==
{{issue list}}
== Trivia ==
* The superstition that [[wikipedia:Rabbit's_foot|a rabbit's foot is a lucky charm]] applies equally to Minecraft as it does in the real world: it does not actually increase luck.
== Gallery ==
<gallery>
Rabbit Items 4 Ryan Holtz.png|First image of the item by [[Ryan Holtz]].
Rabbit Items 5 Ryan Holtz.png|Ryan Holtz brewing the item into a potion.
Rabbit Items 6 Ryan Holtz.png|Ryan Holtz enhancing the potion.
</gallery>
== References ==
{{reflist}}
== External Links ==
*[https://www.minecraft.net/en-us/article/taking-inventory--rabbit-s-foot Taking Inventory: Rabbit's Foot] – Minecraft.net on May 3, 2019
{{items}}
[[de:Hasenpfote]]
[[es:Pata de conejo]]
[[fr:Patte de lapin]]
[[it:Zampa di coniglio]]
[[ja:ウサギの足]]
[[ko:토끼발]]
[[nl:Konijnenpootje]]
[[pl:Królicza łapka]]
[[pt:Pé de coelho]]
[[ru:Кроличья лапка]]
[[uk:Кроляча лапка]]
[[zh:兔子脚]]
[[Category:Renewable resources]]
[[Category:Brewing recipe]]</li></ul> | beta 1.11.0.1 | Empty maps can now be created from 1 paper in cartography tables. | ||||||||||||||||||||||||||||||||||||||||||||||||||||||||||||||||||||||||||||||||||||||||||||||||||||||||||||
| Maps can now be zoomed, cloned, renamed, and have pointers added in cartography tables. | ||||||||||||||||||||||||||||||||||||||||||||||||||||||||||||||||||||||||||||||||||||||||||||||||||||||||||||||
| beta 1.11.0.4 | Cartographer villagers now sell empty map for an emerald as their first tier trades. | |||||||||||||||||||||||||||||||||||||||||||||||||||||||||||||||||||||||||||||||||||||||||||||||||||||||||||||
| Empty locator maps can now be bought from cartographer villagers. | ||||||||||||||||||||||||||||||||||||||||||||||||||||||||||||||||||||||||||||||||||||||||||||||||||||||||||||||
1.13.0{{Extension DPL}}<ul><li>[[:Category:Minecraft Dungeons items|Category:Minecraft Dungeons items]]<br/>All items that are in ''[[Minecraft Dungeons]]''.
{{Minecraft Dungeons items}}
[[Category:Minecraft Dungeons]]
[[Category:Items]]
[[ja:カテゴリ:アイテム (Minecraft Dungeons)]]
[[pl:Kategoria:Przedmioty w Minecraft Dungeons]]
[[pt:Categoria:Itens do Minecraft Dungeons]]</li><li>[[Painting|Painting]]<br/>{{ItemEntity
|title=Painting
|image=Painting JE2 BE2.png
|extratext=View [[#Renders|all renders]]
|renewable=Yes
|stackable=Yes (64)
|drops=1 {{ItemLink|Painting}}
}}
'''Paintings''' are decorative [[entity|entities]] that hang on walls.
== Obtaining ==
=== Crafting ===
{{Crafting
|A1= Stick |B1= Stick |C1= Stick
|A2= Stick |B2= Any Wool |C2= Stick
|A3= Stick |B3= Stick |C3= Stick
|Output= Painting
|type= Decoration block
}}
Paintings can be crafted with any color of [[wool]]. The color of the wool used does not influence the picture chosen when the painting is placed.
Once placed, it displays a random painting.
=== Breaking ===
To remove a painting from a wall, the player can {{control|attack}} it, break one of its supporting blocks, cover one square of it with a block, hit it with an arrow, egg, ender pearl, snowball, or fire charge, or subject it to an explosion. The painting then drops as an item. Arrows that hit paintings disappear.
=== Trading ===
Master-level shepherd [[villager]]s sell 3 paintings for 2 [[emerald]]s.
== Usage ==
=== Placement ===
Paintings can be placed on the sides of [[solid block]]s, [[sign]]s, [[banner]]s, or [[sculk vein]]s. A small gap is visible between the painting and attachment surface. There are several different sizes of paintings (see below). When placed, a painting checks for the largest amount of space it has. It then chooses a random painting of that size. The player can add blocks around the painting to ensure it is the size wanted. When the supporting blocks are removed, the painting breaks after 20 game [[tick]]s (1 second) if no supporting blocks are replaced during that interval.
=== Properties ===
Being an entity, paintings can simultaneously exist in the same space as blocks such as water or torches. Specifically, they can share the space with any block whose collision box does not intersect its hitbox.
Players and mobs are able to walk through paintings, as long as the blocks supporting the painting allow it. Secret doorways can be created this way. [[Light]] propagates through paintings as well.
If a player is concealed behind a painting, the player's name is also concealed from other players.{{verify|Is this true in Bedrock?}}
Paintings are non-flammable.
== Canvases ==
{{Stub|Needing the new painting renders}}
There are 31 paintings in the game. These are mostly based on paintings by [[Kristoffer Zetterstrand]], who also created the ''Minecraft'' versions.
{| class="wikitable stikitable" style="text-align: center" data-description="Paintings"
! style="min-width:150px" |Canvas
! style="min-width:3em;max-width:4em" |Size
! style="min-width:3em" |Original
! style="min-width:3em" |Name
! style="min-width:3em;max-width:4.5em" |[[Resource location]]
! style="min-width:10em" |Description
! Java Edition version added
|-
! [[File:Alban (texture).png|64px]]
| rowspan="3" | 1×1 blocks<br>16×16 pixels || [https://zetterstrand.com/work/pictures/archive/alban.jpeg "Albanian"] || Albanian || <code>alban</code> || A man wearing a fez next to a house and a bush. As the name of the painting suggests, it may be a landscape in [[Wikipedia:Albania|Albania]]. || rowspan="11" | [[Indev 20100223]]
|-
! [[File:Aztec (texture).png|64px]]
|[https://zetterstrand.com/eventz/wp-content/uploads/2aztbig.jpg "de_aztec"]|| de_aztec || <code>aztec</code> || [[Wikipedia:Noclip mode|Free-look]] perspective of the map [[w:c:counterstrike:Aztec|de_aztec]] from the video game ''[[Wikipedia:Counter-Strike (video game)|Counter-Strike]]''.
|-
! [[File:Aztec2 (texture).png|64px]]
|[https://zetterstrand.com/eventz/wp-content/uploads/11aztec_for_print.jpg "de_aztec"]|| de_aztec || <code>aztec2</code> || [[Wikipedia:Noclip mode|Free-look]] perspective of the map [[w:c:counterstrike:Aztec|de_aztec]] from the video game ''[[Wikipedia:Counter-Strike (video game)|Counter-Strike]]''.
|-
! [[File:1-21-adds-20-new-paintings-with-new-sizes-heres-are-all-of-v0-26pp8s1r3nxc1.png]]
| rowspan="2" |3x4 blocks
48x64 pixels
|[https://www.google.com/url?sa=i&url=https%3A%2F%2Fwww.reddit.com%2Fr%2FMinecraft%2Fcomments%2F1cgwz70%2F121_adds_20_new_paintings_with_new_sizes_heres%2F&psig=AOvVaw1gGCrgmKvO2dQbL69e3OSB&ust=1714850346269000&source=images&cd=vfe&opi=89978449&ved=0CBEQjRxqFwoTCOjls7-Z8oUDFQAAAAAdAAAAABAE]|| Backyard ||
|-
!
|
|Pond
|
|-
! [[File:Bomb (texture).png|64px]]
| rowspan="5" |1×1 blocks<br>16×16 pixels
|[https://zetterstrand.com/eventz/wp-content/uploads/12bomb.jpg "Target successfully bombed"]|| Target Successfully Bombed || <code>bomb</code> || The map [[w:c:counterstrike:Dust II|de_dust2]] from the video game ''[[Wikipedia:Counter-Strike (video game)|Counter-Strike]]'', named “target successfully bombed" in reference to the game.
|-
! [[File:Kebab (texture).png|64px]]
|[https://zetterstrand.com/work/pictures/archive/kebab2.jpg "Kebab med tre pepperoni"] || Kebab med tre pepperoni || <code>kebab</code> || A kebab with three green chili peppers.
|-
! [[File:Plant (texture).png|64px]]
|[https://zetterstrand.com/work/pictures/archive/paradistrad.jpeg "Paradisträd"] || Paradisträd || <code>plant</code> || Still life of two plants in pots. "Paradisträd" is Swedish for "[[Wikipedia:Crassula ovata|money tree]]", which is a common name for the depicted species in Scandinavia.
|-
!
|
|Meditative
|
|
|-
! [[File:Wasteland (texture).png|64px]]
| Wasteland || <code>wasteland</code> || A view of some wastelands; a small animal (presumably a rabbit) is sitting on the window ledge.
|-
! [[File:Courbet (texture).png|128px]]
| rowspan="5" | 2×1 blocks<br>32×16 pixels ||[https://zetterstrand.com/eventz/wp-content/uploads/bonjourmonsieurcourbet_BIG.jpg "Bonjour monsieur Courbet"]|| Bonjour Monsieur Courbet || <code>courbet</code> || Two hikers with pointy beards seemingly greeting each other. Based on Gustave Courbet's painting ''[[Wikipedia:La rencontre|The Meeting or "Bonjour, Monsieur Courbet"]]''.
|-
! [[File:Pool (texture).png|128px]]
|[https://zetterstrand.com/eventz/wp-content/uploads/thepool_1920.jpg "The pool"]|| The Pool || <code>pool</code> || Some men and women skinny-dipping in a pool over a cube of sorts. Also there is an old man resting in the lower-right edge.
|-
! [[File:Sea (texture).png|128px]]
| rowspan=2 |[https://zetterstrand.com/eventz/wp-content/uploads/SeaSide_1920.jpg "Seaside"]
| Seaside
| <code>sea</code>
| Mountains and a lake, with a small photo of a mountain and a bright-colored plant on the window ledge. || [[Indev 20100223]] / [[Alpha v1.1.1]]
|-
! [[File:Creebet (texture).png|128px]]
| Creebet || <code>creebet</code> || Mountains and a lake, with a small photo of a mountain and a creeper looking at the viewer through a window. || [[Alpha v1.1.1]]
|-
! [[File:Sunset (texture).png|128px]]
|[https://zetterstrand.com/eventz/wp-content/uploads/sunset_dense.jpg "sunset_dense"]|| sunset_dense || <code>sunset</code> || A view of mountains at sunset. || [[Indev 20100223]]
|-
! [[File:Graham (texture).png|64px]]
| rowspan="3" | 1×2 blocks<br>16×32 pixels ||[https://zetterstrand.com/eventz/wp-content/uploads/graham.jpg "Graham"]|| Graham || <code>graham</code> || King Graham, the player character in the video game series ''[[Wikipedia:King's Quest|King's Quest]]''. The original is based on ''[[Wikipedia:File:Sánchez_Cotán_(Bodegón_con_membrillo,_repollo,_melón_y_pepino).jpg|Still Life with Quince, Cabbage, Melon, and Cucumber]]'' by Juan Sánchez Cotán.|| [[Alpha v1.1.1]]
|-
! [[File:Wanderer (texture).png|64px]]
|[https://zetterstrand.com/eventz/wp-content/uploads/wanderer_1920.jpg "Wanderer"]|| Wanderer || <code>wanderer</code> || A version of Caspar David Friedrich's famous painting ''[[Wikipedia:Wanderer above the Sea of Fog|Wanderer above the Sea of Fog]]''. || rowspan="5" | [[Indev 20100223]]
|-
!
|
|Prairie Ride
|
|
|-
! [[File:Bust (texture).png|128px]]
| rowspan="8" | 2×2 blocks<br>32×32 pixels ||[https://zetterstrand.com/eventz/wp-content/uploads/bust_1915.jpg "Bust"]|| Bust || <code>bust</code> || A bust of [[Wikipedia:Marcus Aurelius|Marcus Aurelius]] surrounded by fire.
|-
! [[File:Match (texture).png|128px]]
|[https://zetterstrand.com/eventz/wp-content/uploads/Match_rgb_1918.jpg "Match"]|| Match || <code>match</code> || A hand holding a match, causing fire on a white cubic gas fireplace.
|-
! [[File:Skull and Roses (texture).png|128px]]
|[https://zetterstrand.com/eventz/wp-content/uploads/moonlight-installation_1920.jpg "Moonlight Installation"]|| Skull and Roses || <code>skull_and_roses</code> || A skeleton at night with red flowers in the foreground. The original painting was different, depicting a woman sitting in a couch, while the skull is in the middle of a body of glacial water of sorts.
|-
! [[File:Stage (texture).png|128px]]
|[https://zetterstrand.com/eventz/wp-content/uploads/The-stage-is-set-1.jpg "The stage is set"]
| The Stage Is Set
| <code>stage</code>
| Scenery from ''[[Wikipedia:Space Quest I|Space Quest I]]'', with the character Graham from the video game series ''[[Wikipedia:King's Quest|King's Quest]]'' appearing twice. || [[Indev 20100223]] / [[Alpha v1.1.1]]
|-
! [[File:Void (texture).png|128px]]
|[https://zetterstrand.com/eventz/wp-content/uploads/the-void_1920.jpg "The Void"]|| The void || <code>void</code> || An angel praying into a void with fire below. || [[Indev 20100223]]
|-
! [[File:Wither (painting texture).png|128px]]
| – || Wither || <code>wither</code> || The creation of a [[wither]].
This is the only painting not based on a real painting. Made by Jens Bergensten.<ref>{{Citation|url=https://www.youtube.com/watch?v=kK5Y4k-vVXc|title=Who Made Minecraft’s LAST Painting?!|author=AntVenom|website=YouTube|date=29 October 2022}}</ref><ref>https://www.reddit.com/r/Minecraft/comments/1tzav2/comment/cedagcy/</ref>
|| [[Java Edition 1.4.2]] ([[12w36a]])
|-
!
|
|Baroque
|
|
|
|-
!
|
|Humble
|
|
|
|-
! [[File:Fighters (texture).png|128px]]
| rowspan="5" | 4×2 blocks<br>64×32 pixels ||[https://zetterstrand.com/eventz/wp-content/uploads/fighters.jpg "Fighters"]|| Fighters || <code>fighters</code> || Two men poised to fight. Paper versions of fighters from the game ''[[Wikipedia:International Karate +|International Karate +]]''. || [[Indev 20100223]]
|-
!
|
|Changing
|
|
|
|-
!
|
|Finding
|
|
|
|-
!
|
|Lowmist
|
|
|
|-
!
|
|Passage
|
|
|
|-
!
| rowspan="8" |3x3 blocks
48×48 pixels
|
|Bouquet
|
|
|
|-
!
|
|Cavebird
|
|
|
|-
!
|
|Cotan
|
|
|
|-
!
|
|Endboss
|
|
|
|-
!
|
|Fern
|
|
|
|-
!
|
|Owlemons
|
|
|
|-
!
|
|Sunflowers
|
|
|
|-
!
|
|Tides
|
|
|
|-
! [[File:Donkey Kong (texture).png|128px]]
| rowspan="2" | 4×3 blocks<br>64×48 pixels ||[https://zetterstrand.com/eventz/wp-content/uploads/kong.jpg "Kong"]|| Kong || <code>donkey_kong</code> || A paper-looking screenshot of the level [https://www.mariowiki.com/100m 100m] from the arcade game ''[[Wikipedia:Donkey Kong (arcade game)|Donkey Kong]]''. || rowspan="2" | [[Alpha v1.1.1]]
|-
! [[File:Skeleton (painting texture).png|128px]]
|[https://zetterstrand.com/eventz/wp-content/uploads/mortal_coil.jpg "Mortal Coil"]|| Mortal Coil || <code>skeleton</code> || [[w:c:grim-fandango:Bruno Martinez|Bruno Martinez]] from the adventure game ''[[Wikipedia:Grim Fandango|Grim Fandango]]''.
|-
! [[File:Burning Skull (texture).png|128px]]
| rowspan="5" | 4×4 blocks<br>64×64 pixels ||[https://zetterstrand.com/eventz/wp-content/uploads/skull_on_fire_framed_c_1910.jpg "Skull on Fire"]|| Skull On Fire || <code>burning_skull</code> || A Skull on fire; in the background there is a moon in a clear night sky.<br>This painting is based on a Minecraft screenshot,<ref>{{Citation|url=https://web.archive.org/web/20220928041338/https://imgur.com/HVhrbnH|website=Imgur|date=22 August 2020|title=https://web.archive.org/web/20220928041338/https://imgur.com/HVhrbnH}}</ref> with the grass block and a 3D skull added on top.<ref>{{Citation|url=https://web.archive.org/web/20200906184721/https://imgur.com/AwqQFS6|title=https://web.archive.org/web/20200906184721/https://imgur.com/AwqQFS6|website=Imgur|date=23 August 2020}}</ref>
(See the [[:en:Painting#Trivia|trivia]] section for more info.)
| [[Java Edition Beta 1.2 01|Beta 1.2_01]] / [[Java Edition Beta 1.3|Beta 1.3]]
|-
! [[File:Pigscene (texture).png|128px]]
|[https://zetterstrand.com/eventz/wp-content/uploads/rgb_1914.jpg "RGB"]|| Pigscene || <code>pigscene</code> <!-- yes, without an underscore --> || A girl pointing to a pig on a canvas. In the original version, the canvas showed red, green and blue blocks, representing the three colors of the [[Wikipedia:RGB color model|RGB color model]] that is typically used by computer displays. It is based on the painting ''[[Wikipedia:File:Jacob van Oost (I) - The Artist's Studio - WGA16654.jpg|The Artist's Studio]]'' by Jacob van Oost.|| [[Alpha v1.1.1]]
|-
! [[File:Pointer (texture).png|128px]]
|[https://zetterstrand.com/eventz/wp-content/uploads/pointer_1920.jpg "Pointer"]|| Pointer || <code>pointer</code> || The main character of the game ''[[Wikipedia:International Karate +|International Karate +]]'' in a fighting stance touching a large hand. It could also be interpreted as a play on Michelangelo's famous painting ''[[Wikipedia:The Creation of Adam|The Creation of Adam]]''. || [[Indev 20100223]]
|-
!
|
|Unpacked
|
|
|
|-
!
|
|Orb
|
|
|
|-
! TBA ||
Pack || <code>pack</code> || Reference to the pack.png fi || [[Java Edition 1.21]]le
|}
=== Unused paintings ===
In [[Pocket Edition v0.5.0 alpha|v0.5.0 alpha]], with the addition of paintings to Pocket Edition, four unused 32×32 paintings were present in <samp>[[kz.png]]</samp> which remained unused. See {{slink|Bedrock Edition unused features|Paintings}} for more information. They were also added to Java Edition in snapshot [[Java Edition 22w16a|22w16a]]. They cannot be placed by default, but can be summoned by [[commands]] (such as {{cmd|/summon painting ~ ~ ~ {variant:"water"} }}) or through a [[datapack]].
According to [[Helen Zbihlyj]],<ref>https://old.reddit.com/r/Minecraft/comments/u8hpnx/thoughts_on_the_new_paintings/i5olue6/?context=3 ([https://web.archive.org/web/20220422115723/https://old.reddit.com/r/Minecraft/comments/u8hpnx/thoughts_on_the_new_paintings/i5olue6/?context=3 archived])</ref> these paintings were originally added "as part of a Pocket Edition promo map" (no footage found) which was planned to be a part of [[Pocket Edition]] promotion at [[MINECON 2012]] [[MINECON 2013|or 2013]] and have never been used in game. The artist of these paintings remains unknown.
{| class="wikitable stikitable" style="text-align: center" data-description="Paintings"
! style="min-width:100px" |Canvas
! style="min-width:3em;max-width:4em" |Size
! style="min-width:6em" |Name
! style="min-width:10em" |[[Resource location]]
! style="min-width:10em" |Description
! style="min-width:5em;max-width:10em" |Bedrock Edition version added
! style="min-width:5em;max-width:8em" |Java Edition version added
|-
! [[File:Earth (texture) BE2.png|128px]]
| rowspan="4" | 2×2 blocks<br>32×32 pixels || Earth || <code>earth</code> || One of the four {{Wikipedia|Classical element|classical elements}}: Earth. || rowspan="4" | [[Pocket Edition v0.5.0 alpha|v0.5.0 alpha]] || rowspan="4" | [[Java Edition 22w16a|22w16a]]
|-
! [[File:Fire (texture) BE2.png|128px]]
| Fire || <code>fire</code> || One of the four classical elements: Fire.
|-
! [[File:Water (texture) BE2.png|128px]]
| Water || <code>water</code> || One of the four classical elements: Water.
|-
! [[File:Wind (texture) BE2.png|128px]]
| Wind || <code>wind</code> || One of the four classical elements: Air.
|}
==Sounds==
{{Edition|Java}}:
{{Sound table
|sound=Painting break1.ogg
|sound2=Painting break2.ogg
|sound3=Painting break3.ogg
|subtitle=Painting breaks<ref>{{Cite bug|MC|194948|Painting, item frame and lead breaking subtitles inconsistent with block breaking subtitle|date=July 14, 2020}}</ref>
|source=neutral
|description=When a painting is broken or pops off
|id=entity.painting.break
|translationkey=subtitles.entity.painting.break
|volume=1.0
|pitch=1.0
|distance=16}}
{{Sound table
|sound=Painting place1.ogg
|sound2=Painting place2.ogg
|sound3=Painting place3.ogg
|sound4=Painting place4.ogg
|subtitle=Painting placed
|source=neutral
|description=When a painting is placed
|id=entity.painting.place
|translationkey=subtitles.entity.painting.place
|volume=1.0
|pitch=1.0
|distance=16
|foot=1}}
{{Edition|Bedrock}}:
{{Sound table
|type=bedrock
|sound=Item Frame break1.ogg
|sound2=Item Frame break2.ogg
|sound3=Item Frame break3.ogg
|source=block
|description=When a painting is broken or pops off
|id=block.itemframe.break
|volume=1.0
|pitch=1.0}}
{{Sound table
|sound=Item Frame add item1.ogg
|sound2=Item Frame add item2.ogg
|soumd3=Item Frame add item3.ogg
|sound4=Item Frame add item4.ogg
|source=block
|description=When a painting is placed
|id=block.itemframe.add_item
|volume=1.0
|pitch=1.0
|foot=1}}
== Data values ==
=== ID ===
{{edition|java}}:
{{ID table
|edition=java
|firstcolumnname=Item
|showforms=y
|generatetranslationkeys=y
|displayname=Painting
|spritetype=item
|nameid=painting
|form=item
|foot=1}}
{{ID table
|edition=java
|firstcolumnname=Entity
|generatetranslationkeys=y
|displayname=Painting
|spritetype=entity
|nameid=painting
|foot=1}}
{{edition|bedrock}}:
{{ID table
|edition=bedrock
|firstcolumnname=Item
|shownumericids=y
|showforms=y
|notshowbeitemforms=y
|generatetranslationkeys=y
|displayname=Painting
|spritetype=item
|nameid=painting
|id=357
|form=item
|foot=1}}
{{ID table
|edition=bedrock
|firstcolumnname=Entity
|shownumericids=y
|generatetranslationkeys=y
|displayname=Painting
|spritetype=entity
|nameid=painting
|id=83
|foot=1}}
=== Entity data ===
Paintings have entity data that defines various properties of the entity.
{{el|java}}:
{{main|Entity format}}
{{/ED}}
{{el|bedrock}}:
: See [[Bedrock Edition level format/Entity format]].
== Video ==
<div style="text-align:center">{{yt|M3vWDirTMek}}</div>
== History ==
{{History|java indev}}
{{History||20100223|[[File:Painting JE1 BE1.png|32px]] Added paintings.
|There are currently 19 canvases, which can be viewed at [[Java Edition history of textures/Paintings]].
|The [[crafting]] recipe of paintings uses eight [[planks]].
{{{!}} class{{=}}"collapsible collapsed"
! Recipe
{{!}}-
{{!}}
{{Crafting Table
|A1=Oak Planks
|B1=Oak Planks
|C1=Oak Planks
|A2=Oak Planks
|B2=Light Gray Wool
|C2=Oak Planks
|A3=Oak Planks
|B3=Oak Planks
|C3=Oak Planks
|Output=Painting
}}
{{!}}}
|Painting textures are currently stored on a [[texture atlas]] called <samp>[[kz.png]]</samp>.}}
{{History|java infdev}}
{{History||20100227-1|The [[crafting]] recipe has of paintings has been changed, so that it now uses [[stick]]s, rather than [[planks]].
{{{!}} class{{=}}"collapsible collapsed"
! Recipe
{{!}}-
{{!}}
{{Crafting Table
|A1=Stick
|B1=Stick
|C1=Stick
|A2=Stick
|B2=Light Gray Wool
|C2=Stick
|A3=Stick
|B3=Stick
|C3=Stick
|Output=Painting
}}
{{!}}}
}}
{{History|java alpha}}
{{History||v1.1.1|Added five more painting canvases, for a total of 24.
|The textures of two paintings have been changed.}}
{{History|java beta}}
{{History||1.2_01|Added a new painting, although it uses an untextured part of <samp>kz.png</samp> due to the painting texture not yet being implemented.}}
{{History||1.3|The texture of the new painting, has been added to the part of <samp>kz.png</samp> displayed by the new painting.}}
{{History||April 27, 2011|link=https://web.archive.org/web/20201111211000/https://notch.tumblr.com/post/4988431144/the-maps|Custom paintings are mentioned by [[Notch]].}}
{{History||1.7.3|Paintings pushed by [[piston]]s now pop off.}}
{{History|java}}
{{History||1.4.2|snap=12w36a|Added new painting canvas 'Wither'.
|Paintings can now be placed overlapping one another.}}
{{History||1.8|snap=14w10a|Paintings can no longer be placed directly inside of each other.}}
{{History||1.9|snap=15w49a|Paintings can no longer be destroyed by [[lightning]].}}
{{History|||snap=15w50a|Added [[sound]]s for placing and breaking paintings: <code>entity.painting.place</code> and <code>entity.painting.break</code>.}}
{{History||1.11|snap=16w32a|The [[entity]] ID for paintings has been changed from <code>Painting</code> to <code>painting</code>.}}
{{History||1.12|snap=17w06a|Paintings now have a more intuitive placement system. When placed, a painting always uses the maximum possible amount of available space.}}
{{History||1.13|snap=17w47a|Prior to [[1.13/Flattening|''The Flattening'']], this [[item]]'s numeral ID was 321.}}
{{History|||snap=18w02a|Paintings now use a [[resource location]] for their motive.}}
{{History||1.14|snap=18w43a|[[File:Painting JE2 BE2.png|32px]] The [[item]] texture of paintings has been changed.}}
{{History|||snap=19w07a|Paintings are now stored as individual image files instead of parts of a single large image file, and now support animations.}}
{{History|||snap=19w11a|Shepherd [[villager]]s now [[trading|sell]] paintings.}}
{{History||1.17|snap=21w11a|The painting back texture has been updated to be in line with the texture update.}}
{{History||1.19|snap=22w16a|Added the four unused paintings from Bedrock Edition: "Earth", "Wind", "Fire", and "Water".|These paintings can only be added through a [[data pack]], or with the {{cmd|summon}} command.}}
{{History||1.19.4|snap=23w06a|Added [[painting]] variants to "Functional Blocks" tab.|Paintings with pre-defined variant will now display author, title and size in description when hovered over.|The "Operator Utilities" tab now contains the four paintings that are not available in Survival mode.}}
{{History||1.21|snap=TBA|Added 20 new paintings, one 1x1, one 2x1, two 2x2s, eight 3x3s, two 3x4s, four 4x2s and two 4x4s}}
}
{{History|pocket alpha}}
{{History||v0.5.0|[[File:Painting JE1 BE1.png|32px]] Added paintings.
|There are currently 25 canvases, which can be viewed at [[Bedrock Edition history of textures/Paintings]].}}
{{History||v0.8.0|snap=build 3|A new painting rendering has been added.{{info needed|What exactly changed?}}}}
{{History||v0.12.1|snap=build 1|Paintings are no longer available from the [[nether reactor]].}}
{{History||v0.15.0|snap=build 1|Paintings now have [[sound]]s when placed and broken.}}
{{History|pocket}}
{{History||1.0.7|Added new painting canvas 'Wither'.}}
{{History|bedrock}}
{{History||1.10.0|snap=beta 1.10.0.3|[[File:Painting JE2 BE2.png|32px]] The [[item]] texture of paintings has been changed.}}
{{History||1.11.0|snap=beta 1.11.0.4|Paintings can now be [[trading|bought]] from shepherd [[villager]]s.}}
{{History||1.17.0|snap=beta 1.17.0.50|The painting back texture has been updated to be in line with the texture update.}}
{{History|console}}
{{History||xbox=TU1|xbone=CU1|ps=1.0|wiiu=Patch 1|switch=1.0.1|[[File:Painting JE1 BE1.png|32px]] Added paintings.
|There are currently 25 canvases, which can be viewed at [[Legacy Console Edition history of textures/Paintings]].}}
{{History||xbox=TU11|The limit for paintings in a world has been increased.
|A message is now displayed when the maximum paintings are reached.}}
{{History||xbox=TU14|ps=1.04|Added new painting canvas 'Wither'.}}
{{History||xbox=TU43|xbone=CU33|ps=1.36|wiiu=Patch 13|Added [[sound]]s for paintings.}}
{{History||xbox=none|xbone=none|ps=1.90|wiiu=none|switch=none|[[File:Painting JE2 BE2.png|32px]] The [[item]] texture of paintings has been changed.}}
{{History|3ds}}
{{History||0.1.0|[[File:Painting JE1 BE1.png|32px]] Added paintings.
|There are currently 25 canvases, which can be viewed at [[New Nintendo 3DS Edition history of textures/Paintings]].}}
{{History|foot}}
== Issues ==
{{issue list}}
== Trivia ==
* On April 26, 2011, Notch stated that the automapping code can be used to share custom paintings and books in the future.<ref>{{tweet|notch|62970142207913984|The auto mapping code can be used to share custom paintings and books in the future. There's a hard cap on 65536 of each/world, though|April 26, 2011}}</ref>
* The texture on the back of a painting is the same as the wooden planks texture, but with a yellowish color similar to that of [[chests]] (but slightly darker).
* The "Skull on Fire" painting contains a Minecraft world in the background, which is based on a screenshot taken by the artist in [[Java Edition Alpha v1.1.2 01|Alpha 1.1.2_01]] (or earlier) on October 12, 2010, at 13:22:49 (UTC+2).<ref>{{cite|url=https://web.archive.org/web/20220928041338/https://imgur.com/HVhrbnH|title=The original (never publicly shared before) screenshot that Kristoffer Zetterstrand took and based his painting on.|website=Imgur}}</ref>
**The seeds for this world are -1044887956651363087 and -6984854390176336655 (both are the same), standing at X=-249.65, Y=91, Z=-29.04.<ref>https://pastebin.com/fzAY9ES4</ref><ref>https://www.reddit.com/r/Minecraft/comments/iqg3ey/the_original_screenshot_seed_of_the_minecraft/</ref>
* The "Skull on Fire" painting's texture was added in [[Java Edition Beta 1.3|Beta 1.3]]. However, the code for paintings to randomly display the part of the [[Kz.png]] texture that was to be occupied by the Burning Skull painting was added earlier, in [[Java Edition Beta 1.2_01|Beta 1.2_01]]. As there was nothing on this part of the texture except for a purple background grid, this is what would be displayed if the painting was randomly chosen, until the Burning Skull painting texture was actually added.
* The original "Skull on Fire" painting was given to the winner of an official texture pack competition by Mojang.<ref>https://web.archive.org/web/20110110003612/http://www.webhallen.com:80/minecraft/</ref>
== Gallery ==
<gallery>
File:Notch Painting Screenshot.png|The first image of paintings released by [[Notch]].
File:Skull on Fire world.jpg|The original screenshot behind the "Skull on Fire" painting.
File:Burning Skull Render.jpg|A render of the "Skull on Fire" painting that [[Kristoffer Zetterstrand]] used as a reference image.
File:Skull on Fire IRL.jpg|The original "Skull on Fire" painting being painted.
File:Burning Skull JE1.png|The "Skull on Fire" painting as it appeared between versions [[Java Edition Beta 1.2_01|Beta 1.2_01]] and [[Java Edition Beta 1.2_02|Beta 1.2_02]], prior to its texture being added in [[Java Edition Beta 1.3|Beta 1.3]].
</gallery>
=== Renders ===
<gallery>
Alban.png | Albanian
Aztec.png | de_aztec
Aztec2.png | de_aztec
Bomb.png | Target Successfully Bombed
Kebab.png | Kebab med tre pepperoni
Plant.png | Paradisträd
Wasteland.png | Wasteland
Courbet.png | Bonjour Monsieur Courbet
Creebet.png | Creebet
Pool.png | The Pool
Sea.png | Seaside
Sunset.png | sunset_dense
Graham.png | Graham
Wanderer.png | Wanderer
Bust.png | Bust
Match.png | Match
Skull and Roses.png | Skull and Roses
Stage.png | The Stage Is Set
Void.png | The void
Wither (painting).png | Wither
Fighters.png | Fighters
Donkey Kong.png | Kong
Skeleton (painting).png | Mortal Coil
Burning Skull.png | Skull On Fire
Pigscene.png | Pigscene
Pointer.png | Pointer
Earth BE2.png | Earth
Fire BE2.png | Fire
Water BE2.png | Water
Wind BE2.png | Wind
</gallery>
== See also ==
* [[Item Frame]]
* [[Bedrock Edition unused features#Paintings|Unused paintings]]
* [[Kz.png]]
* [[Kristoffer Zetterstrand]]
== References ==
{{reflist}}
== External links ==
*[https://www.minecraft.net/en-us/article/taking-inventory-painting Taking Inventory: Painting] – Minecraft.net on January 18, 2019
{{items}}
{{entities}}
[[cs:Obraz]]
[[de:Gemälde]]
[[es:Cuadro]]
[[fr:Tableau]]
[[hu:Festmény]]
[[it:Quadro]]
[[ja:絵画]]
[[ko:그림]]
[[nl:Schilderij]]
[[pl:Obraz]]
[[pt:Quadro]]
[[ru:Картина]]
[[th:ภาพวาด]]
[[uk:Картина]]
[[zh:画]]</li></ul> | beta 1.13.0.1 | |||||||||||||||||||||||||||||||||||||||||||||||||||||||||||||||||||||||||||||||||||||||||||||||||||||||||||||
1.16.0{{Extension DPL}}<ul><li>[[Brick|Brick]]<br/>{{about|the item|the crafted block|Bricks|other uses}}
{{Item
| image = [[File:Brick JE2 BE2.png|32px]]
| stackable = Yes (64)
| renewable = Yes
}}
A '''brick''' is an item used to craft [[bricks|brick]] blocks, [[flower pot]]s, and [[decorated pot]]s.
== Obtaining ==
=== Smelting ===
A brick can be obtained by smelting a [[clay ball]].
{{Smelting
|Clay Ball
|Brick
|0,3
}}
=== Mining ===
When [[breaking]] a [[decorated pot]] with a tool without [[Silk Touch]] on the main hand, the decorated pot can drops 0-4 brick(s) depend on the material that the decorated pot make of.
=== Loot ===
{{LootChestItem|brick}}
=== Trading ===
Novice-level stone mason [[villager]]s sell 16{{only|bedrock}} or 10{{only|java}} bricks for one [[emerald]].
== Usage ==
Brick can be used to craft [[bricks]], [[flower pot]]s, and [[decorated pot]]s.
=== Crafting ingredient ===
{{crafting usage}}
== Data values ==
=== ID ===
{{edition|java}}:
{{ID table
|edition=java
|showforms=y
|generatetranslationkeys=y
|displayname=Brick
|spritetype=item
|nameid=brick
|form=item
|foot=1}}
{{edition|bedrock}}:
{{ID table
|edition=bedrock
|shownumericids=y
|showforms=y
|notshowbeitemforms=y
|generatetranslationkeys=y
|displayname=Brick
|spritetype=item
|nameid=brick
|id=383
|form=item
|foot=1}}
== History ==
{{History|java alpha}}
{{History||v1.0.11|[[File:Brick JE1 BE1.png|32px]] Added bricks as an item.}}
{{History|java}}
{{History||1.4.2|snap=12w34a|Bricks are now used for [[flower pot]]s.}}
{{History||1.13|snap=17w47a|Prior to [[1.13/Flattening|''The Flattening'']], this item's numeral ID was 336.}}
{{History||1.14|snap=18w43a|[[File:Brick JE2 BE2.png|32px]] The texture of bricks has been changed.}}
{{History|||snap=19w11a|Bricks are now [[trading|sold]] by [[villager]]s of the new mason profession, making them [[renewable resource|renewable]].}}
{{History||1.20<br>(Experimental)|link=1.19.4|snap=23w07a|Bricks can now be used for crafting [[decorated pot]]s.|Bricks now drop when brushing [[suspicious sand]] in [[desert well]]s.|Bricks now drop when mining [[decorated pot]] with a tool on the main hand.}}
{{History||1.20|snap=23w12a|The probability for the brick to generate in the [[suspicious sand]] in [[desert well]] has been changed from 1/7 to 1/8.|Brick can now be found in [[suspicious gravel]] and [[suspicious sand]] in [[trail ruins]].}}
{{History|||snap=23w16a|Brick no longer generates in [[suspicious sand]] in [[trail ruins]].|Due to the split of the archaeological loot tables for the suspicious gravel within the [[trail ruins]]; brick now is in the common loot.}}
{{History|pocket alpha}}
{{History||v0.2.0|[[File:Brick JE1 BE1.png|32px]] Added bricks as an item. They are currently unobtainable and serve no purpose.}}
{{History||v0.3.2|Bricks can now be obtained by smelting clay balls.
|Bricks are now used to craft [[brick block]]s.}}
{{History||v0.12.1|snap=build 1|Bricks are now used to craft [[flower pot]]s.}}
{{History||v0.16.0|snap=build 5|Added bricks to the [[Creative]] [[inventory]].<ref name="missing brick">{{Bug|MCPE-16556}}</ref>}}
{{History|bedrock}}
{{History||1.10.0|snap=beta 1.10.0.3|16 bricks can now be obtained via trading with stone mason [[villager]]s for 1-2 [[emerald]]s.
|[[File:Brick JE2 BE2.png|32px]] The texture of bricks has now been changed.}}
{{History||1.11.0|snap=beta 1.11.0.4|Trading has been changed; bricks sold by stone mason villagers now cost only one emerald.}}
{{History||1.20.0<br>(Experimental)|link=Bedrock Edition 1.19.70|snap=beta 1.19.70.23|Bricks now drop when brushing [[suspicious sand]] in [[desert well]]s and can be used to craft decorated pots.}}
{{History|console}}
{{History||xbox=TU1|xbone=CU1|ps=1.0|wiiu=Patch 1|[[File:Brick JE1 BE1.png|32px]] Added bricks.}}
{{History||xbox=none|xbone=none|ps=1.90|wiiu=none|switch=none|[[File:Brick JE2 BE2.png|32px]] The texture of bricks has been changed.}}
{{History|3ds}}
{{History||0.1.0|[[File:Brick JE1 BE1.png|32px]] Added bricks.}}
{{History|foot}}
== Issues ==
{{issue list}}
== References ==
{{reflist}}
{{Items}}
[[Category:Renewable resources]]
[[cs:Cihla]]
[[de:Ziegel]]
[[es:Ladrillo]]
[[fr:Brique]]
[[hu:Tégla]]
[[it:Mattone]]
[[ja:レンガ]]
[[ko:벽돌 (아이템)]]
[[nl:Baksteen]]
[[pl:Cegła]]
[[pt:Tijolo]]
[[ru:Кирпич]]
[[th:อิฐ]]
[[uk:Цеглина]]
[[zh:红砖]]</li><li>[[:Category:Minecraft Legends resources|Category:Minecraft Legends resources]]<br/>[[Category:Minecraft Legends]]
[[Category:Items]]
[[pt:Categoria:Recursos do Minecraft Legends]]</li></ul> | beta 1.16.0.57 | Trading has been changed, novice-level cartographer now sell an empty map for 7 emeralds. Cartographer villager no longer sell empty locator map. | ||||||||||||||||||||||||||||||||||||||||||||||||||||||||||||||||||||||||||||||||||||||||||||||||||||||||||||
1.16.100{{Extension DPL}}<ul><li>[[Purple Dye|Purple Dye]]<br/>{{Item
| image = Purple_Dye_JE2_BE2.png
| renewable = Yes
| stackable = Yes (64)
}}
'''Purple dye''' is a [[Dyeing#Secondary colors|secondary dye color]] created by combining [[red dye]] and [[blue dye]] in a crafting grid.
== Obtaining ==
=== Crafting ===
{{Crafting
|head=1
|showname=0
|Blue Dye
|Red Dye
|Output=Purple Dye,2
|type=Material
}}
{{Crafting
|foot=1
|Lapis Lazuli
|Red Dye
|Output=Purple Dye,2
|description={{only|bedrock|education}}
|type=Material
}}
=== Trading ===
[[Wandering trader]]s sometimes sell 3 purple dye for an [[emerald]].
== Usage ==
{{dye usage}}
=== Crafting ingredient ===
{{crafting usage|ignore=Banner|continue=1}}
{{banner crafting usage}}
=== Loom ingredient ===
{{Banner loom usage|Purple Dye}}
=== Trading ===
Apprentice-level Shepherd villagers have a 20% chance to buy 12 purple dye for an emerald as part of their trades.{{only|bedrock}}
Expert-level Shepherd villagers have a {{frac|2|7}} chance to buy 12 purple dye for an emerald.{{only|java}}
== Data values ==
=== ID ===
{{edition|java}}:
{{ID table
|edition=java
|showforms=y
|generatetranslationkeys=y
|displayname=Purple Dye
|spritetype=item
|nameid=purple_dye
|form=item
|foot=1}}
{{edition|bedrock}}:
{{ID table
|edition=bedrock
|showaliasids=y
|shownumericids=y
|showforms=y
|notshowbeitemforms=y
|generatetranslationkeys=y
|displayname=Purple Dye
|spritetype=item
|nameid=purple_dye
|aliasid=dye / 5
|id=400
|form=item
|translationkey=item.dye.purple.name
|foot=1}}
== Video ==
<div style="text-align:center">{{yt|Cx52CGo5QnI}}</div>
== History ==
{{History|java beta}}
{{History||1.2|[[File:Purple Dye JE1 BE1.png|32px]] Added purple dye.}}
{{History|java}}
{{History||1.4.2|snap=12w34a|Added the ability to [[Armor#Dyeing|dye]] leather [[armor]] and [[wolf]] collars.}}
{{History||1.4.6|snap=12w49a|Purple dye can now be [[crafting|crafted]] with [[gunpowder]] to create a [[firework star]].}}
{{History||1.6.1|snap=13w19a|[[Stained clay]] can now be crafted.}}
{{history||1.7.2|snap=13w36a|With the addition of new [[flower]]s, many secondary and tertiary dyes are now primary [[dye]]s.}}
{{History|||snap=13w41a|[[Stained glass]] can now be crafted.}}
{{History||1.8|snap=14w02a|Due to [[lapis lazuli]] being [[renewable resource|renewable]] now, purple dye is also now renewable.}}
{{History|||snap=14w30a|Added [[banner]]s which can be dyed.}}
{{History||1.13|snap=17w47a|The different data values for the <code>dye</code> ID have now been split up into their own IDs.
|Prior to [[1.13/Flattening|''The Flattening'']], this [[item]]'s numeral ID was 351.}}
{{History||1.14|snap=18w43a|Purple dye is now [[crafting|crafted]] using [[blue dye]], instead of [[lapis lazuli]].
|[[File:Purple_Dye_JE2_BE2.png|32px]] The texture of purple dye has now been changed.}}
{{History|||snap=18w44a|Purple dye can now change the text color on [[sign]]s to purple.}}
{{History|||snap=19w05a|Added the [[wandering trader]], which sells purple dye.}}
{{History|||snap=19w11a|Purple dye can now be [[trading|bought]] by shepherd villagers.}}
{{History||1.17|snap=20w45a|Purple dye can now be used to craft [[purple candle]]s.}}
{{History|||snap=21w19a|Purple dye can no longer be used to craft purple candles.}}
{{History|||snap=Pre-release 1|Purple dye can once again be used to craft purple candles.}}
{{History||1.20<br>(Experimental)|link=1.19.3|snap=22w42a|Purple dye can now change the text color on [[hanging sign]]s to purple.}}
{{History|pocket alpha}}
{{History||v0.3.0|[[File:Purple Dye JE1 BE1.png|32px]] Added purple dye. It is currently unobtainable and serves no purpose.}}
{{History||v0.4.0|Purple dye is now [[craft]]able with rose red and lapis lazuli.
|Purple dye can now be used to craft purple [[wool]].}}
{{History||v0.6.0|Purple dye can now be used to dye [[sheep]].}}
{{History||v0.8.0|snap=build 1|Purple dye can now be used to craft [[magenta dye]].}}
{{History||v0.9.0|snap=build 11|Purple dye can now be used to craft colored [[terracotta]].}}
{{History||v0.11.0|snap=build 1|Purple dye can now be used to dye tamed [[wolf]] collars.}}
{{History||v0.14.0|snap=build 1|Purple dye can now be used to dye [[water]] in [[cauldron]]s.}}
{{History|pocket}}
{{History||1.0.0|snap=alpha 0.17.0.1|Purple dye can now be used to dye [[shulker]]s.}}
{{History||1.1.0|snap=alpha 1.1.0.0|Purple dye can now be used to craft [[concrete powder]], colored [[bed]]s and dyed [[shulker box]]es.}}
{{History|bedrock}}
{{History||1.2.0|snap=beta 1.2.0.2|Purple dye can now be used to craft [[firework star]]s, [[stained glass]] and patterns on [[banner]]s.}}
{{History||1.4.0|snap=beta 1.2.20.1|Purple dye can now be used to craft [[balloon]]s and [[glow stick]]s.}}
{{History||1.8.0|snap=beta 1.8.0.8|Purple dye can now be used to dye tamed [[cat]] collars.}}
{{History||1.10.0|snap=beta 1.10.0.3|Purple dye is now [[trading|sold]] by [[wandering trader]]s.
|Purple dye can now be used to dye white [[carpet]]s and undyed [[glass pane]]s.
|[[File:Purple_Dye_JE2_BE2.png|32px]] The texture of purple dye has now been changed.}}
{{History||1.11.0|snap=beta 1.11.0.4|Purple dye can now be [[trading|sold]] to shepherd [[villager]]s.}}
{{History||1.16.100|snap=beta 1.16.100.56|The ID of purple dye has been changed from <code>dye/5</code> to <code>purple_dye</code>.}}
{{History|console}}
{{History||xbox=TU1|xbone=CU1|ps=1.00|switch=1.0.1|wiiu=Patch 1|[[File:Purple Dye JE1 BE1.png|32px]] Added purple dye.}}
{{History|PS4}}
{{History||1.90|[[File:Purple_Dye_JE2_BE2.png|32px]] The texture of purple dye has now been changed.}}
{{History|new 3ds}}
{{History||0.1.0|[[File:Purple Dye JE1 BE1.png|32px]] Added purple dye.}}
{{History|foot}}
== Issues ==
{{issue list}}
{{Items}}
[[Category:Items]]
[[Category:Dyes]]
[[Category:Renewable resources]]
[[cs:Fialové barvivo]]
[[de:Violetter Farbstoff]]
[[es:Tinte morado]]
[[fr:Teinture violette]]
[[hu:Lila festék]]
[[ja:紫色の染料]]
[[ko:보라색 염료]]
[[nl:Paarse kleurstof]]
[[pl:Fioletowy barwnik]]
[[pt:Corante roxo]]
[[ru:Фиолетовый краситель]]
[[zh:紫色染料]]</li><li>[[Water|Water]]<br/>{{About|the fluid|the bucket|Water Bucket|other forms of water}}
{{Fluid
| image = <gallery>
Water.png|Java Edition
Water BE.png|Bedrock Edition
</gallery>
| invimage = Water Bucket
| invimage2 = Water
| renewable = Yes
| transparent = Partial <small>(-1 to light)</small>
| light = No
| tool = bucket
| infinite = Yes
| flowrate = 5 [[tick]]s/block
| flowdistance = 8 blocks
}}
'''Water''' is a [[fluid]] that naturally generates abundantly in the [[Overworld]].
== Obtaining ==
Water blocks do not exist as items,{{only|java}} but water can be collected by using a [[bucket]] on a water source block or a full water [[cauldron]], creating a [[water bucket]].
{{IN|BE}}, it may be obtained as an item via inventory editing or add-ons.
=== Natural generation ===
Water naturally generates in the [[Overworld]] to form [[ocean]]s, [[river]]s and [[spring]]s. The water level is at [[altitude|layer 63]] near oceans and rivers, but changes depending on location due to the [[aquifer]] system, filling some carvers, noise caves and canyons with water at different levels. Water also generates as small puddles on the floor next to [[dripstone cluster]]s, and as clay pools on the floor of [[lush caves]].
Water also generates in [[village]]s, [[desert well]]s, [[stronghold]]s, [[woodland mansion]]s, [[ancient city|ancient cities]] and [[ocean monument]]s.
Water never generates in [[the Nether]] and instantly disappears if placed there with a water bucket. However, water can exist in the Nether in a [[cauldron]]. Water can also be placed in the Nether using [[commands]] such as {{cmd|setblock}} and {{cmd|fill}}. Although it does not naturally generate there, water can be placed and function normally in [[the End]].
{{IN|be}}, water also generates as part of [[ocean ruins]] with loot [[chest]]s, but only two water blocks generate:
* One water block generates inside the loot chest, making it a [[Waterlogging|waterlogged]] loot chest.
* The other water block generates on top of the loot chest.
These water blocks generate even if the ruin is located on the surface.<ref>{{bug|MCPE-36793}}</ref> This is not the case in {{el|je}}; if an underwater ruin generates on the surface, no water generates.<ref>{{bug|MC-136156}}</ref> This also happens with [[shipwreck]]s.
Water spends most of its time as stationary, rather than flowing – regardless of its level, or whether it contains a current downward or to the side. When specifically triggered by a block update, water changes to 'flowing', updates its level, then changes back to stationary. Water springs are generated as flowing, and oceans, and rivers are generated as stationary. This happens before most types of generated structure are created, and the main cause of water "glitches" is that generated structures do not trigger a block update to let water flow into them.
== Usage ==
=== Appearance ===
Water uses a translucent animated texture that is tinted differently in different biomes. {{IN|Java}}, water in cauldrons is completely opaque.<ref>{{bug|MC-13187}}</ref>
Unlike other translucent blocks such as [[ice]], [[stained glass]] and [[tinted glass]], water shows the opposite sides of its external planes when viewed from within and from outside.<ref>{{bug|MC-202578|||WAI}}</ref> However, it applies only to the top plane and four side planes; the bottom face is always unseen from above.<ref>{{bug|MC-190053}}</ref>
=== Swimming ===
{{main|Swimming}}
The button for {{control|swim|text=swimming}} is the same as the button for jumping; non-swimming players and mobs sink slowly in water. Holding the swim button raises the player through the water, and when the surface is reached, the player bobs up and down. The {{control|crouch}} button can be used to sink faster. The {{control|sprint}} button can be used to put the player in "swim mode" when the player is completely submerged in water. When in swim mode, the player is horizontal and one block high. The player has an arm-waving animation when viewed in third person or by other players.
Swimming in water is considerably slower against currents (see [[#Current|Current]] below), but faster when going with the current.
Most mobs that can stand can also swim any time they are in water, except for [[iron golem]]s, [[piglin]]s, [[hoglin]]s, [[strider]]s, [[piglin brute]]s and undead mobs. This can lead to drowning if the water is falling from above.
Water of any depth prevents any entity, including the player, from sustaining falling damage if they fall into it, regardless of the distance fallen.
Being inside of water also imparts a [[fog]] effect, tinted accordingly.
=== Spreading ===
{{Main|Fluid#Spread}}
[[File:Water spread v1-13.png|300px|right|An image showing water's spreading distance]]
Water spreads horizontally and downward into nearby [[air]] blocks. Water can spread downward infinitely until stopped by a block, and 7 blocks horizontally from a source block on a flat surface. Water spreads at a rate of 1 block every 5 game ticks, or 4 blocks per second.
When spreading horizontally, a weight is assigned to every direction water can flow. For each direction, this weight is initially set to 1000. Then, for every adjacent block it can flow into it tries to find a way down that is reachable in four or fewer blocks from the block it wants to flow to. When found, the flow weight for that direction is set to the shortest path distance to the way down. Finally, water spreads in the directions with the lowest flow weight.
Spreading water extinguishes [[fire]] and washes away certain types of items or placed blocks, causing them to drop as items and then carrying them along in the flow until the edge of the spread. Affected items include [[plant]]s (except trees), [[snow]], [[torch]]es, [[carpet]]s, [[redstone dust]] and some other redstone components, [[cobweb]], [[end rod]]s, [[head]]s, and [[flower pot]]s.
==== Flow arrangement tables ====
{| class="wikitable"
|+
|
|
|
|
|
|
|
!7
|
|
|
|
|
|
|
|-
|
|
|
|
|
|
! 7
!6
! 7
|
|
|
|
|
|
|-
|
|
|
|
|
! 7
!6
!5
!6
! 7
|
|
|
|
|
|-
|
|
|
|
! 7
!6
!5
!4
!5
!6
! 7
|
|
|
|
|-
|
|
|
! 7
!6
!5
!4
!3
!4
!5
!6
! 7
|
|
|
|-
|
|
! 7
!6
!5
!4
!3
!2
!3
!4
!5
!6
! 7
|
|
|-
|
! 7
!6
!5
!4
!3
!2
!1
!2
!3
!4
!5
!6
! 7
|
|-
!7
!6
!5
!4
!3
!2
!1
!0
!1
!2
!3
!4
!5
!6
!7
|-
|
! 7
!6
!5
!4
!3
!2
!1
!2
!3
!4
!5
!6
! 7
|
|-
|
|
! 7
!6
!5
!4
!3
!2
!3
!4
!5
!6
! 7
|
|
|-
|
|
|
! 7
!6
!5
!4
!3
!4
!5
!6
! 7
|
|
|
|-
|
|
|
|
! 7
!6
!5
!4
!5
!6
! 7
|
|
|
|
|-
|
|
|
|
|
! 7
!6
!5
!6
! 7
|
|
|
|
|
|-
|
|
|
|
|
|
! 7
!6
! 7
|
|
|
|
|
|
|-
|
|
|
|
|
|
|
!7
|
|
|
|
|
|
|
|}
{| class="wikitable"
! colspan="2" |Range
!Height in blocks
|-
!1
|block
|1
|-
!2
|blocks
|0.75-1
|-
!3
|blocks
|0.625-0.75
|-
!4
|blocks
|0.5-0.625
|-
!5
|blocks
|0.375-0.5
|-
!6
|blocks
|0.25-0.375
|-
!7
|blocks
|0.125-0.25
|}
=== Source blocks ===
{{anchor|Water Spawner}} <!-- Compatibility anchor -->
{{about|the behavior and creation of source units of water|the removed block that created water sources|Water Spawner|section=1}}
A water source block is created from a flowing block that is horizontally adjacent to two or more other source blocks, and sitting on top of a solid block or another water source block. This allows water spawners to exist, in which a new source block immediately forms in the space left by removing a source block with a [[bucket]]. Pools of still water can be created by placing water source blocks in a confined area.
Water spawners can be constructed by arranging for two source blocks to flow into a third block. Each of the examples below require two source blocks, each on opposite ends of the hole, to create a renewable water source block in between.
While water source blocks only generate adjacent to solid blocks, they do not require a solid block to support them. Removing all adjacent blocks to a water source block only causes it to remain floating in the air.
{{IN|java}}, the formation of new water sources blocks can be disabled when the [[game rule]] {{cd|waterSourceConversion}} is set to {{cd|false}}.
<gallery>
2x2 water source.png|2x2 water spawner (every corner is renewable)
3x1 water source.png|3x1 water spawner (middle water block is renewable)
L-shaped water source.png|L-shaped water spawner (corner water block is renewable)
</gallery>
A [[dispenser]] loaded with a filled [[bucket]] places a water source block in an empty block in front of it when activated. A dispenser loaded with an empty bucket and a water source right in front of it sucks the source into the bucket when activated.
In snowy [[biome]]s, water source blocks have a chance to turn into [[ice]] if directly under the sky. Ice blocks under brighter light levels melt back into water source blocks (except in [[the Nether]]). Ice reverts to water when broken, but only if there is a solid block under it.
=== Current ===
The current in a water block determines both the direction it appears to flow and the direction an [[entity]] such as a player or [[boat]] is pushed from that block.
Water with a current pushes players and [[mob]]s at a speed of about 1.39 meters per second, or 25 blocks every 18 seconds. Players that are in creative flying mode don’t get pushed.{{only|je}}<ref>{{bug|MCPE-84592}}</ref>
The horizontal current in a water block is based on a vector sum of the flows to and from that block from its four horizontal neighbors. For example, if a block receives water from the north and sends it both south and east, but borders a solid block on its west edge, then a south-southeast current exits from that block, because 2 southward flows (in and out) are combined with 1 eastward flow (out). Thus, 16 horizontal directions are possible. If a branch in a channel is 2 blocks wide at its entrance, then entities float into it rather than continuing in a straight line.
Water blocks can create a downward current. A downward current in a water block is caused by the block below it. Most blocks that do not have a solid upper face cause downward current on above water blocks. Also, ice and falling water blocks (blocks created by spreading downward) cause downward current on the water block above. Falling water blocks have a downward current by default.
=== Light ===
{{IN|bedrock}}, every block of water reduces [[light]] by 1 extra level (in addition to the normal fading-out of light). {{IN|java}}, water does not cause any additional decrease for block light, but diffuses sky light, causing the light to fade with depth. Underwater visibility changes depending on the biome the player is in. The [[Night Vision]] and [[Conduit Power]] effects increase underwater visibility.
=== Color ===
Water has several colors, depending on the biome.
==== Java Edition ====
{| class="wikitable sortable mw-collapsible mw-collapsed" data-description="Water Color in Java Edition"
|-
!Biome!!Water color!!Water fog color!!Block
|-
|{{BiomeSprite|Plains|text=Default (biomes not listed below)}}||{{color|#3F76E4}}||{{color|#050533}}||[[File:Plains Water JE.png|32px]]
|-
|{{BiomeLink|Swamp}}||{{color|#617B64}}||{{color|#232317}}||[[File:Swamp Water.png|32px]]
|-
|{{BiomeLink|Lukewarm Ocean}}<br>{{BiomeLink|Deep Lukewarm Ocean}}||{{color|#45ADF2}}||{{color|#041633}}||[[File:Lukewarm Ocean Water JE.png|32px]]
|-
|{{BiomeLink|Warm Ocean}}||{{color|#43D5EE}}||{{color|#041F33}}||[[File:Warm Ocean Water JE.png|32px]]
|-
|{{BiomeLink|Cold Ocean}}<br>{{BiomeLink|Deep Cold Ocean}}<br>{{BiomeLink|Snowy Taiga}}<br>{{BiomeLink|Snowy Beach}}||{{color|#3D57D6}}||{{color|#050533}}||[[File:Cold Ocean Water JE.png|32px]]
|-
|{{BiomeLink|Frozen River}}<br>{{BiomeLink|Frozen Ocean}}<br>{{BiomeLink|Deep Frozen Ocean}}||{{color|#3938C9}}||{{color|#050533}}||[[File:Frozen Ocean Water JE.png|32px]]
|-
|{{BiomeLink|Meadow}}||{{color|#0E4ECF}}||{{color|#050533}}||[[File:Meadow Water.png|32px]]
|-
|{{BiomeLink|Mangrove Swamp}}||{{color|#3A7A6A}}||{{color|#4D7A60}}|||[[File:Mangrove Swamp Water.png|32px]]
|-
|{{BiomeLink|Cherry Grove}}||{{color|#5DB7EF}}||{{color|#5DB7EF}}||[[File:Cherry Grove Water.png|32px]]
|}
==== Bedrock Edition====
Biome tints
<!--[[File:Water color.png|500px|thumb|center|From left to right - Badlands Plateau, Birch Forest and Snowy Taiga]]-->
{| class="wikitable sortable mw-collapsible mw-collapsed" data-description="Water Color in Bedrock Edition"
! Biome
!Water Surface Color
! Water Fog Color
!Water Fog Distance
!Water Surface Transparency
!Block
|-
|Default<br>(biomes not listed below)
|{{color|#44aff5}}||{{color|#44aff5}}||15||65%||[[File:Water BE.png|32px]]
|-
|{{BiomeLink|Sunflower Plains}}<br>{{BiomeLink|Plains}}
|{{color|#44aff5}}||{{color|#44aff5}}||60||-||[[File:Water BE.png|32px]]
|-
|{{BiomeLink|Desert}}
|{{color|#32a598}}||{{color|#32a598}}||60||-||[[File:Desert Water.png|32px]]
|-
|{{BiomeLink|Mountains}}
|{{color|#007BF7}}||{{color|#007BF7}}||-||-||[[File:Mountains Water.png|32px]]
|-
|{{BiomeLink|Forest}}
|{{color|#1e97f2}}||{{color|#1e97f2}}||60||-||[[File:Forest Water.png|32px]]
|-
|{{BiomeLink|Flower Forest}}
|{{color|#20a3CC}}||{{color|#20a3CC}}||60||-||[[File:Flower Forest Water.png|32px]]
|-
| {{BiomeLink|Taiga}}
| {{color|#287082}}||{{color|#287082}}||60||-||[[File:Taiga Water.png|32px]]
|-
|{{BiomeLink|Taiga Mountains}}
|{{color|#1e6B82}}||{{color|#1e6B82}}||-||-||[[File:Taiga Mountains Water.png|32px]]
|-
|{{BiomeLink|Swamp}}
|{{color|#4c6559}}||{{color|#4c6559||30||100%||[[File:Swamp Water BE.png|32px]]
|-
| {{BiomeLink|River}}
|{{color|#0084ff}}||{{color|#0084ff}}||60||-||[[File:River Water.png|32px]]
|-
|{{BiomeLink|Nether Wastes}}<br>{{BiomeLink|Warped Forest}}<br>{{BiomeLink|Crimson Forest}}<br>{{BiomeLink|Soul Sand Valley}}
|{{color|#905957}}||{{color|#905957}}||15||-||[[File:Nether Water.png|32px]]
|-
|{{BiomeLink|Basalt Deltas}}
|{{color|#3f76e4}}||{{color|#423e42}}||15||-||[[File:Basalt Deltas Water.png|32px]]
|-
|{{BiomeLink|The End}}
| {{color|#62529e}}||{{color|#62529e}}||-||-||[[File:The End Water.png|32px]]
|-
|{{BiomeLink|Frozen River}}
|{{color|#185390}}||{{color|#185390}}||60||-||[[File:Frozen River Water.png|32px]]
|-
|{{BiomeLink|Snowy Tundra}}<br>{{BiomeLink|Ice Spikes}}
|{{color|#14559b}}||{{color|#14559b}}||-||-||[[File:Ice Spikes Water.png|32px]]
|-
| {{BiomeLink|Mushroom Fields}}
|{{color|#8a8997}}||{{color|#8a8997}}||-||-||[[File:Mushroom Fields Water.png|32px]]
|-
|{{BiomeLink|Beach}}
| {{color|#157cab}}||{{color|#157cab}}||60||-||[[File:Beach Water.png|32px]]
|-
|{{BiomeLink|Mountain Edge}}
|{{color|#045cd5}}||{{color|#045cd5}}||-||-||[[File:Mountain Edge Water.png|32px]]
|-
|{{BiomeLink|Jungle}}<br>{{BiomeLink|Bamboo Jungle}}
|{{color|#14a2c5}}||{{color|#14a2c5||60<br>15||-||[[File:Jungle Water.png|32px]]
|-
|{{BiomeLink|Jungle Edge}}
| {{color|#0D8AE3}}||{{color|#0D8AE3}}||-||-||[[File:Jungle Edge Water.png|32px]]
|-
|{{BiomeLink|Stone Shore}}
|{{color|#0d67bb}}||{{color|#0d67bb}}||60||-||[[File:Stone Shore Water.png|32px]]
|-
|{{BiomeLink|Snowy Beach}}
|{{color|#1463a5}}||{{color|#1463a5}}||60||-||[[File:Snowy Beach Water.png|32px]]
|-
|{{BiomeLink|Birch Forest}}
|{{color|#0677ce}}||{{color|#0677ce}}||60||-||[[File:Birch Forest Water.png|32px]]
|-
|{{BiomeLink|Dark Forest}}
|{{color|#3B6CD1}}||{{color|#3B6CD1}}||60||-||[[File:Dark Forest Water.png|32px]]
|-
|{{BiomeLink|Snowy Taiga}}
|{{color|#205e83}}||{{color|#205e83}}||60||-||[[File:Snowy Taiga Water.png|32px]]
|-
|{{BiomeLink|Giant Tree Taiga}}<br>{{BiomeLink|Giant Spruce Taiga}}
|{{color|#2d6d77}}||{{color|#2d6d77}}||60||-||[[File:Giant Tree Taiga Water.png|32px]]
|-
|{{BiomeLink|Windswept Forest}}<br>{{BiomeLink|Windswept Gravelly Hills}}
|{{color|#0E63AB}}||{{color|#0E63AB}}||-||-||[[File:Wooded Mountains Water.png|32px]]
|-
|{{BiomeLink|Savanna}}
|{{color|#2C8B9C}}||{{color|#2C8B9C}}||60||-||[[File:Savanna Water.png|32px]]
|-
|{{BiomeLink|Savanna Plateau}}<br>{{BiomeLink|Shattered Savanna}}
|{{color|#2590a8}}||{{color|#2590a8}}||-||-||[[File:Savanna Plateau Water.png|32px]]
|-
|{{BiomeLink|Badlands}}
|{{color|#4E7f81}}||{{color|#4E7f81||60
|<nowiki>-||[[File:Badlands Water.png|32px]]
|-
|{{BiomeLink|Eroded Badlands}}<br>{{BiomeLink|Wooded Badlands}}
|{{color|#497f99}}||{{color|#497f99}}||-||-||[[File:Eroded Badlands Water.png|32px]]
|-
|{{BiomeLink|Ocean}}
|{{color|#1787D4}}||{{color|#1165b0}}||60||-||[[File:Ocean Water.png|32px]]
|-
|{{BiomeLink|Deep Ocean}}
|{{color|#1787D4}}||{{color|#1463a5}}||60||-||[[File:Ocean Water.png|32px]]
|-
|{{BiomeLink|Warm Ocean}}
|{{color|#02B0E5}}||{{color|#0289d5}}||60||55%||[[File:Warm Ocean Water.png|32px]]
|-
| {{BiomeLink|Lukewarm Ocean}}
|{{color|#0D96DB}}||{{color|#0a74c4}}||60||-||[[File:Lukewarm Ocean Water.png|32px]]
|-
|{{BiomeLink|Deep Lukewarm Ocean|Lukewarm Deep Ocean}}
|{{color|#0D96DB}}||{{color|#0e72b9}}||60||-||[[File:Lukewarm Ocean Water.png|32px]]
|-
|{{BiomeLink|Cold Ocean}}
|{{color|#2080C9}}||{{color|#14559b}}||60||-||[[File:Cold Ocean Water.png|32px]]
|-
|{{BiomeLink|Deep Cold Ocean|Cold Deep Ocean}}
|{{color|#2080C9}}||{{color|#185390}}||60||-||[[File:Cold Ocean Water.png|32px]]
|-
|{{BiomeLink|Frozen Ocean}}
|{{color|#2570B5}}||{{color|#174985}}||60||-||[[File:Frozen Ocean Water.png|32px]]
|-
|{{BiomeLink|Deep Frozen Ocean|Frozen Deep Ocean}}
|{{color|#2570B5}}||{{color|#1a4879}}||60||-||[[File:Frozen Ocean Water.png|32px]]
|-
|{{BiomeLink|Mangrove Swamp}}
|{{color|#3a7a6a}}||{{color|#4d7a60}}||30||-||[[File:Mangrove Swamp Water BE.png|32px]]
|}
Biome tints from [[Biome/Before 1.18|unused biomes]]
{| class="wikitable sortable mw-collapsible mw-collapsed" data-description="Water Color in Bedrock Edition"
! Biome
!Water Surface Color
!Water Fog Color
!Water Fog Distance
!Water Surface Transparency
!Block
|-
|{{BiomeLink|Legacy Frozen Ocean}}
|{{color|#44aff5}}||{{color|#44aff5}}||-||-||[[File:Water BE.png|32px]]
|-
|{{BiomeLink|Mountains}}
|{{color|#007BF7}}||{{color|#007bf7}}||-||-||[[File:Mountains Water.png|32px]]
|-
|{{BiomeLink|Taiga Mountains}}
|{{color|#1e6B82}}||{{color|#1e6b82}}||-||-||[[File:Taiga Mountains Water.png|32px]]
|-
|{{BiomeLink|Swamp Hills}}
| {{color|#4c6156}}||{{color|#4c6156||30||100%||[[File:Swamp Hills Water.png|32px]]
|-
| {{BiomeLink|Snowy Mountains}}
|{{color|#1156a7}}||{{color|#1156a7}}||-||-||[[File:Snowy Mountains Water.png|32px]]
|-
|{{BiomeLink|Mushroom Field Shore}}
|{{color|#818193}}||{{color|#818193}}||-||-||[[File:Mushroom Field Shore Water.png|32px]]
|-
|{{BiomeLink|Desert Hills}}
|{{color|#1a7aa1}}||{{color|#1a7aa1}}||-||-||[[File:Desert Hills Water.png|32px]]
|-
|{{BiomeLink|Wooded Hills}}
|{{color|#056bd1}}||{{color|#056bd1}}||-||-||[[File:Wooded Hills Water.png|32px]]
|-
|{{BiomeLink|Taiga Hills}}
|{{color|#236583}}||{{color|#236583}}||-||-||[[File:Taiga Hills Water.png|32px]]
|-
|{{BiomeLink|Mountain Edge}}
|{{color|#045cd5}}||{{color|#045cd5}}||-||-||[[File:Mountain Edge Water.png|32px]]
|-
|{{BiomeLink|Jungle Hills}}<br>{{BiomeLink|Modified Jungle}}<br>{{BiomeLink|Bamboo Jungle Hills}}
|{{color|#1B9ED8}}||{{color|#1B9ED8}}||-||-||[[File:Jungle Hills Water.png|32px]]
|-
|{{BiomeLink|Modified Jungle Edge}}
|{{color|#0D8AE3}}||{{color|#0D8AE3}}||-||-||[[File:Jungle Edge Water.png|32px]]
|-
|{{BiomeLink|Birch Forest Hills}}
|{{color|#0a74c4}}||{{color|#0a74c4}}||-||-||[[File:Birch Forest Hills Water.png|32px]]
|-
|{{BiomeLink|Snowy Taiga Mountains}}
|{{color|#205e83}}||{{color|#205e83}}||60||-||[[File:Snowy Taiga Water.png|32px]]
|-
|{{BiomeLink|Snowy Taiga Hills}}
|{{color|#245b78}}||{{color|#245b78}}||-||-||[[File:Snowy Taiga Hills Water.png|32px]]
|-
|{{BiomeLink|Giant Tree Taiga Hills}}
|{{color|#286378}}||{{color|#286378}}||-||-||[[File:Giant Tree Taiga Hills Water.png|32px]]
|-
|{{BiomeLink|id=modified-gravelly-mountains|Gravelly Mountains+}}
|{{color|#0E63AB}}||{{color|#0e63ab}}||-||-||[[File:Wooded Mountains Water.png|32px]]
|-
|{{BiomeLink|Shattered Savanna Plateau}}
|{{color|#2590a8}}||{{color|#2590a8}}||-||-||[[File:Savanna Plateau Water.png|32px]]
|-
|{{BiomeLink|Badlands Plateau}}<br>{{BiomeLink|Modified Badlands Plateau}}
|{{color|#55809E}}||{{color|#55809e}}||-||-||[[File:Badlands Plateau Water.png|32px]]
|-
|{{BiomeLink|Deep Warm Ocean|Warm Deep Ocean}}
|{{color|#02B0E5}}||{{color|#0686ca}}||60||-||[[File:Warm Ocean Water.png|32px]]
|}
===Water and lava===
{{Main|Fluid#Mixing}}
Water and lava can produce [[stone]], [[cobblestone]], or [[obsidian]] based on how they interact. If water touches a lava source, the lava source turns to obsidian. If both touch each other while flowing, cobblestone is made and no sources are removed, and if lava flows downward onto water, the water turns to stone.
===Interactions with mobs===
====Direct contact====
Water damages [[endermen]], [[snow golem]]s, [[Strider|striders]] and [[blaze]]s, at a rate of {{hp|1}} per half second. If water comes into contact with a [[shulker]] or an [[enderman]], the mob teleports away.
====Suffocation====
{{Main|Damage#Suffocation in water}}
Players and mobs (except [[aquatic mob]]s, [[undead mob]]s and [[iron golem]]s) have a breath meter that lasts 15 seconds. After they run out of breath, they take {{hp|2}} suffocation damage every second until they die, surface, or enter [[bubble column]]s.
[[Dolphin]]s are a special case in drowning: they take suffocation damage when underwater for about 4 minutes, but also take suffocation damage when in air for about 2 minutes.
Each level of the [[Respiration]] enchantment adds 15 seconds to the breath meter and grants an x/(x+1) chance (where x is the Respiration level) of not taking damage after that time: 30 seconds and an average {{hp|1}}/second with Respiration I, 45 seconds and an average of {{frac|2|3}} damage/second with Respiration II, and 60 seconds and an average of {{frac|1|2}} damage/second with Respiration III.
If a [[husk]] suffocates underwater, it starts to shake and eventually becomes a [[zombie]]. If a [[zombie]] suffocates underwater, it starts to shake and eventually transforms into a [[drowned]].
=== Slower mining speed===
Players with their head underwater require 5 times the normal amount of time to mine blocks while standing on the ground, or 25 times while not on the ground. If a player wears a helmet with the [[Aqua Affinity]] enchantment, then underwater mining speed while standing on the ground is the same as on land, and 5 times slower if not standing on the ground.
===Explosions===
Water does not prevent explosions from activating. Water has a high blast resistance, causing it to absorb any normal blasts, with the exception of explosions from [[underwater TNT]].
===Hardening concrete powder ===
When water comes into contact with [[concrete powder]], the powder hardens into solid [[concrete]].
===Sponges===
When a dry [[sponge]] comes into contact with a water source or flowing block, it becomes a wet [[sponge]], absorbing all water within 3 to 5 blocks in all directions. [[Kelp]] and [[lily pad]]s within the absorbed water blocks are destroyed and drop as items, and [[seagrass]] is destroyed without dropping anything. Mobs that take damage out of water are affected as a side-effect.
Sponges do not absorb water from [[Waterlogging|waterlogged]] blocks, nor water that comes into contact by flowing back in from outside the area of absorption. For instance, placing a sponge 4 or more blocks from a single water source removes the flowing water in the area of effect, but as the flow from the source resumes it is not affected by the wet sponge.
A sponge instantly absorbs nearby water when it is placed next to water or when water comes into contact with it (by being placed next to the sponge, or by flowing toward it). A sponge absorbs [[water]] around itself (water source blocks or flowing water) out to a [[taxicab distance]] of 7 in all directions (including up and down), but won't absorb more than 65 blocks of water (water closest to the sponge is absorbed first). The absorption propagates only from water to water and does not "jump over" non-water blocks (including air).
===Dripping===
[[File:WaterDropletsExample.png|thumb|Dripping water.]]
Water above a non-transparent block (except for stairs, fences, or slabs) produces dripping particles on the underside of that block. If a block of [[Pointed Dripstone|pointed dripstone]] hangs under any block directly beneath a water source, the drips can slowly fill up a [[cauldron]] placed underneath. Without the dripstone, a cauldron does not fill.
===Vertical transport===
[[Bubble column]]s are created by placing magma blocks or [[soul sand]] under water. These can be used to transport [[mobs]] or items quickly vertically.
==Sounds==
{{el|je}}:
{{Sound table
|sound=Entering water1.ogg
|sound2=Entering water2.ogg
|sound3=Entering water3.ogg
|subtitle=MC-177092
|source=ambient
|description=When the player's eye level goes underwater
|id=ambient.underwater.enter
|translationkey=-
|volume=0.8<wbr>{{Until|JE 1.20.2}}<br>0.5<wbr>{{Upcoming|JE 1.20.2}}
|pitch=1.0
|distance=16}}
{{Sound table
|sound=Exiting water1.ogg
|sound2=Exiting water2.ogg
|sound3=Exiting water3.ogg
|subtitle=MC-177092
|source=ambient
|description=When the player's eye level goes above water
|id=ambient.underwater.exit
|translationkey=-
|volume=0.5<wbr>{{Until|JE 1.20.2}}<br>0.3<wbr>{{Upcoming|JE 1.20.2}}
|pitch=1.0
|distance=16}}
{{Sound table
|sound=Underwater Ambience.ogg
|subtitle=MC-196825
|source=ambient
|description=Randomly when underwater
|id=ambient.underwater.loop
|translationkey=-
|volume=0.65
|pitch=1.0
|distance=16}}
{{Sound table
|sound=Bubbles1.ogg
|sound2=Bubbles2.ogg
|sound3=Bubbles3.ogg
|sound4=Bubbles4.ogg
|sound5=Bubbles5.ogg
|sound6=Bubbles6.ogg
|sound7=Water1.ogg
|sound8=Water2.ogg
|subtitle=MC-196825
|source=ambient
|description=Randomly when underwater
|id=ambient.underwater.loop.additions
|translationkey=-
|volume=1.0
|pitch=1.0
|distance=16}}
{{Sound table
|sound=Animal1.ogg
|sound2=Bass Whale1.ogg
|sound3=Bass Whale2.ogg
|sound4=Crackles1.ogg
|sound5=Crackles2.ogg
|sound6=Driplets1.ogg
|sound7=Driplets2.ogg
|sound8=Earth Crack.ogg
|subtitle=MC-196825
|source=ambient
|description=Randomly when underwater
|id=ambient.underwater.loop.additions.rare
|translationkey=-
|volume=''varies'' <ref group=sound>The first, fifth, and eighth sounds are 1.0; the second sound is 0.45; the third, sixth, and seventh sounds are 0.5; the fourth sound is 0.7</ref>
|pitch=1.0
|distance=16}}
{{Sound table
|sound=Animal2.ogg
|sound2=Dark1.ogg
|sound3=Dark2.ogg
|sound4=Dark3.ogg
|sound5=Dark4.ogg
|subtitle=MC-196825
|source=ambient
|description=Randomly when underwater
|id=ambient.underwater.loop.additions.ultra_rare
|translationkey=-
|volume=1.0 <ref group=sound>Except the third sound, which is 0.7</ref>
|pitch=1.0
|distance=16}}
{{Sound table
|sound=Water1.ogg
|sound2=Water2.ogg
|subtitle=Water flows
|source=block
|description=Randomly from flowing water
|id=block.water.ambient
|translationkey=subtitles.block.water.ambient
|volume=0.75-1.0
|pitch=0.5-1.5
|distance=16}}
{{Sound table
|sound=Water splash1.ogg
|sound2=Water splash2.ogg
|subtitle=Splashing
|source=dependent
|description=When something enters water
|id=entity.generic.splash
|translationkey=subtitles.entity.generic.splash
|volume=0.0-1.0 <ref group=sound name=speedvolume>The mob's momentum, with the horizontal axes' velocities multiplied by 0.2 (capped at 1.0)</ref>
|pitch=0.6-1.4
|distance=16}}
{{Sound table
|sound=Swim1.ogg
|sound2=Swim2.ogg
|sound3=Swim3.ogg
|sound4=Swim4.ogg
|subtitle=Swimming
|source=dependent
|description=While something is moving through water
|id=entity.generic.swim
|translationkey=subtitles.entity.generic.swim
|volume=0.0-1.0 <ref group=sound name=speedvolume/>
|pitch=0.6-1.4
|distance=16}}
{{Sound table
|sound=Empty water bucket1.ogg
|sound2=Empty water bucket1.ogg
|sound3=Empty water bucket2.ogg
|sound4=Empty water bucket3.ogg
|subtitle=Bucket empties
|source=block
|description=When water is placed with a bucket
|id=item.bucket.empty
|translationkey=subtitles.item.bucket.empty
|volume=1.0 <ref group=sound>Except for the second copy of {{cd|empty1}}, which is 0.9</ref>
|pitch=1.0
|distance=16}}
{{Sound table
|sound=Fill water bucket1.ogg
|sound2=Fill water bucket2.ogg
|sound3=Fill water bucket3.ogg
|subtitle=Bucket fills
|source=player
|description=When water is collected with a bucket
|id=item.bucket.fill
|translationkey=subtitles.item.bucket.fill
|volume=1.0
|pitch=1.0
|distance=16}}
{{Sound table
|sound=Axolotl.ogg
|sound2=Dragon fish.ogg
|sound3=Shuniji.ogg
|subtitle=-
|source=music
|description=Randomly when underwater
|id=music.under_water
|translationkey=-
|volume=0.4
|pitch=1.0
|distance=16
|foot=1}}
{{el|be}}:
{{Sound table
|type=bedrock
|sound=Water2.ogg
|source=block
|description=Randomly from flowing water
|id=liquid.water
|volume=0.75-1.0
|pitch=0.5-1.5}}
{{Sound table
|sound=Water Splash Old.ogg
|source=player
|description=When something enters water<wbr><ref group=sound>{{Bug|MCPE-44120}}</ref>
|id=random.splash
|pitch=0.6-1.4}}
{{Sound table
|sound=Water splash1.ogg
|sound2=Water splash2.ogg
|source=ambient
|description=?[[Category:Pages missing sound description]]<wbr>{{Upcoming|BE 1.20.40}}
|id=entity.generic.splash
|pitch=0.6-1.4}}
{{Sound table
|sound=Entering water1.ogg
|sound2=Entering water2.ogg
|sound3=Entering water3.ogg
|source=player
|description=When the player's eye level goes underwater<wbr>{{Upcoming|BE 1.20.40}}
|id=ambient.underwater.enter
|volume=<!--0.8 (other multipliers)-->
|pitch=1.0}}
{{Sound table
|sound=Exiting water1.ogg
|sound2=Exiting water2.ogg
|sound3=Exiting water3.ogg
|source=player
|description=When the player's eye level goes above water<wbr>{{Upcoming|BE 1.20.40}}
|id=ambient.underwater.exit
|volume=<!--1.0 (other multipliers)-->
|pitch=1.0}}
{{Sound table
|sound=Swim1.ogg
|sound2=Swim2.ogg
|sound3=Swim3.ogg
|sound4=Swim4.ogg
|source=player
|description=While something is moving through water
|id=random.swim
|pitch=0.6-1.4}}
{{Sound table
|sound=Empty water bucket1.ogg
|sound2=Empty water bucket2.ogg
|sound3=Empty water bucket3.ogg
|source=block
|description=When water is placed with a bucket
|id=bucket.empty_water
|volume=1.0
|pitch=1.0}}
{{Sound table
|sound=Fill water bucket1.ogg
|sound2=Fill water bucket2.ogg
|sound3=Fill water bucket3.ogg
|source=block
|description=When water is collected with a bucket
|id=bucket.fill_water
|volume=1.0
|pitch=1.0}}
{{Sound table
|sound=Axolotl.ogg
|sound2=Dragon fish.ogg
|sound3=Shuniji.ogg
|source=music
|description=Randomly when underwater
|id=music.game.water
|volume=0.2
|pitch=1.0
|foot=1}}
==Data values==
===ID===
{{edition|java}}:
{{ID table
|edition=java
|firstcolumnname=Water
|showforms=y
|generatetranslationkeys=y
|displayname=Block
|spritename=water
|spritetype=block
|nameid=water
|form=block
|foot=1}}
{{ID table
|edition=java
|firstcolumnname=Water
|showfluidtags=y
|displayname=Fluid
|spritename=water
|spritetype=block
|nameid=water
|fluidtags=water}}
{{ID table
|displayname=Flowing Fluid
|spritetype=block
|spritename=water
|nameid=flowing_water
|fluidtags=water
|foot=1}}
{{edition|bedrock}}:
{{ID table
|edition=bedrock
|firstcolumnname=Water
|shownumericids=y
|showforms=y
|generatetranslationkeys=y
|displayname=Flowing
|spritename=water
|spritetype=block
|nameid=flowing_water
|id=8
|form=block}}
{{ID table
|displayname=Stationary
|spritename=water
|spritetype=block
|nameid=water
|id=9
|form=block
|foot=1}}
===Block states===
{{see also|Block states}}
{{/BS}}
=== Fluid states===
{{see also|Block states}}
{{/FS}}
==Achievements==
{{load achievements|Free Diver;Sleep with the Fishes}}
==Advancements==
{{load advancements|Tactical fishing;The Cutest Predator}}
==History==
{{Main|/History}}
{{History|java classic}}
{{History||May 17, 2009|link=https://archive.org/download/Minecraft_IRC_Logs_2009/history/files/May-15-to-June-03-2009/2009-05-17.140618-0400EDT.txt.~1~|Notch mentions developing water.{{q|a very very first version of the water is somewhat working now, heh [/] the level starts out without any water and is surrounded a by a huge ocean [/] it quickly fills, leaving islands}}}}
{{History||0.0.12a|snap=May 18, 2009|slink=Java Edition Classic 0.0.12a/Development#Water test (May 18, 2009)|[[File:Water (pre-release).png|32px]] Water is shown.}}
{{History|||snap=release|slink=Java Edition Classic 0.0.12a|[[File:Water JE1.png|32px]] Added water.
|Water flows to any available space below or beside it and creates a new source [[block]], making it easy to flood a whole world just with one source.}}
{{History||May 22, 2009|link=wordofnotch:111386404|[[Notch]] pointed out that when a [[plant]] or non-cube block is placed in water, it produces a box of [[air]] around it. He asked how it could be fixed, and whether he even had to.}}
{{History||0.0.13a|[[File:Water JE2.png|32px]] The model of water has been changed.}}
{{History||May 24, 2009|link=wordofnotch:112481256|A new water system is mentioned.}}
{{History||May 24, 2009|link=wordofnotch:112481370|A new water system is shown.}}
{{History||May 24, 2009|link=wordofnotch:112487511| Another test of water is shown.}}
{{History||May 26, 2009|link=wordofnotch:113350683|While sharing feedback on experiments with random vertex and color offsets, and deciding to scrap it, Notch said he would investigate salvaging the technique to add animation to water tiles.}}
{{History||0.0.19a|[[File:Water JE3.png|32px]] Added [[Procedural animated texture generation|procedural animated texture]] to water. The old texture is retained for use as a [[animation placeholder texture|placeholder]].
|Upscaled model 2% to fix z-fighting with blocks below water. It's created water or lava models overlapping and z-fighting with each other.
|Added [[sponge]]s, which remove water.
|Water part of the [[world boundary]] still uses the old water texture.}}
{{History||0.0.20a_02|[[File:Water JE4.png|32px]] Changed model scale back to normal with 1% offset on all coordinates.}}
{{History||0.26 SURVIVAL TEST|[[File:Water JE5.png|32px]] UV mapping on side faces now has 11% v offset up.}}
{{History||0.28|[[File:Water JE4.png|32px]] Fixed UV mapping.}}
{{History|java indev}}
{{History||0.31|snap=20091223-1|[[File:Water JE6.png|32px]] Added the flowing water texture, which is now used on the sides of water.}}
{{History|||snap=20100106|Water part of the [[world boundary]] now uses the animated water texture.}}
{{History|||snap=20100113|Water is now finite.|[[Ocean]]s now have infinite water.
|Water now always drains from its highest remove location.
|Water no longer moves on the surface on its own.
|Water now has a {{frac|2|3}} probability to evaporate and a {{frac|1|3}} probability to copy.}}
{{History|||snap=20100122|Water now spawns in level generation as [[spring]]s and lakes.}}
{{History|||snap=20100131|The texture of water is now seen when underwater.}}
{{History|java infdev}}
{{History||20100227-1|Water no longer flows due to changes in chunk handling for infinite worlds.{{verify|type=change}}}}
{{History||20100607|[[File:Water JE7.png|32px]] UV mapping now has 1% uv offset on top and bottom faces and 1% u, 11% v offset on side faces.}}
{{History||20100608|[[File:Water JE6.png|32px]] Fixed UV mapping, once again.}}
{{History||20100615|[[File:Water JE8.png|32px]] The model has been changed.
|Added flowing water.
|Sources placed in isolation flow exclusively downward, rather than spreading out one block in each direction as well.
|Water and lava do not produce any solid blocks when combined.
|Water does not replace plants.
|Water is now infinite again.
|Added [[water bucket]]s, which can be filled with water.}}
{{History||20100616-1|[[File:Water JE9.png|32px]] Added vertex offset.
|Water and flowing water now has visual connection to blocks.
|Downward flowing water now pushes the [[player]] out.{{info needed|and other entities?}}}}
{{History||20100617-2|[[File:Water JE10.png|32px]] Removed vertex offset.
|Water sources placed in the air now flow outward.
|Lava and flowing lava touching water, flowing water now replaces with [[obsidian]].
|Downward flowing water no longer pushes the player out.
|Water now can replace [[plants]]. However no items are dropped.}}
{{History||20100618|Water can now replace [[rail]]s.}}
{{History||20100624|Water now destroys plants, dropping as items.}}
{{History|java alpha}}
{{History||v1.0.2_02|[[Fluids]], including water, have been slightly tweaked.}}
{{History||v1.0.5_01|Water can now freeze into [[ice]].}}
{{History||v1.2.6|[[Lake]]s, which contain water, have been added.}}
{{History|java beta}}
<!--{{History||1.5|Dropped [[item]]s in flowing water now move faster.{{check version|Taken from trivia, may not be beta}}}}-->
{{History||1.6|snap=Test Build 3|[[Rain]] and [[snow]] no longer fall through water.
|Water sources now form over [[glass]].}}
{{History||1.8|snap=Pre-release|[[File:Water JE11.png|32px]] Changed [[lighting]].
|Underwater [[particles]] have been added.
|Because of the change in how land is generated, if a [[player]] is in a world that was made pre-1.8 and travels into new [[chunk]]s, there's a chance that a large [[ocean]] may be formed as the ocean [[biome]]. There is also a one-[[block]]-high drop in sea level along the discontinuity between the old and new chunks with the old chunks being higher.
|Water can now be found in the farms and wells of [[village]]s, and the fountain rooms of [[stronghold]]s.
|Two [[biome]]s have been added that are almost all water: [[ocean]]s and [[river]]s.}}
{{History|java}}
{{History||1.0.0|snap=Beta 1.9 Prerelease|[[File:Swamp Water JE1.png|32px]] {{color|#E0FF70}} Added water color in swampland.
|Added dripping water.}}
{{History|||snap=Beta 1.9 Prerelease 4|Added [[Respiration]] and [[Aqua Affinity]] enchantments, which allow more breathing time in water and normal digging speed in water.}}
{{History|||snap=Beta 1.9 Prerelease 5|Now flowing downward creates source blocks}}
{{History|||snap=RC1|[[File:Water JE12.png|32px]] [[File:Swamp Water JE2.png|32px]] Faces on model now 0.1% moved to center to fix z-fighting on inner faces.}}
{{History||1.1|snap=12w01a|[[File:Swamp Water JE3.png|32px]] {{color|#E0FFAE}} The water color in swampland is now less intense.}}
{{History||1.2.1|snap=12w04a|Added [[desert well]]s, which contain water.}}
{{History||1.3.1|snap=12w17a|The ability to bring water using [[ice]] into [[the Nether]] has been removed.}}
{{History|||snap=12w21a|[[Dispenser]]s have been given the ability to shoot out [[fluids]], including water, inside [[water bucket]]s. They can also collect the fluids if activated again.}}
{{History||1.4.2|snap=12w38a|The [[sound]] when jumping and swimming in water has been changed.
|The sound of flowing water is now continuous.
|The water overlay is a more saturated blue.}}
{{History||1.4.4|snap=1.4.3|Water of any depth now negates all [[Damage#Fall damage|fall damage]]. [[Player]]s and [[mob]]s no longer die from great heights in shallow water.<ref>{{bug|MC-1644}} resolved as Works As Intended</ref>}}
{{History||1.5|snap=13w02a|[[File:Water JE13.png|32px]] [[File:Swamp Water JE4.png|32px]] The texture of water has been changed to use an animated texture file. Prior to this version, the texture was procedurally generated by the game (see dedicated section below).}}
{{History|||snap=13w03a|A water source [[block]] now forms if there is another water source block below it.}}
{{History|||snap=13w04a|Flowing water in [[Creative]] mode no longer slows the [[player]] down when flying.}}
{{History||1.6.1|snap=13w17a|Water [[lake]]s no longer generate in [[desert]]s.}}
{{History||1.7.2|snap=13w36a|[[File:Swamp Water JE4.png|32px]] {{color|#E0FFAE}} Added water color in swampland M, which is the same as in swampland.}}
{{History||1.7.2|snap=13w36a|Water pools now generate in the new desert M [[biome]].
|[[Ocean]]s are much smaller.}}
{{History|||snap=13w41a|[[File:Water JE14.png|32px]] [[File:Swamp Water JE5.png|32px]] Water's six internal faces are now visible from the outside.
|Water, [[ice]] and [[portal]]s are now visible through each other. This also now allows water's inside faces to be visible from outside.}}
{{History|||snap=13w42a|[[File:Water JE13.png|32px]] [[File:Swamp Water JE6.png|32px]] Water's internal faces have been removed. This visually reverts water to its pre-13w41a appearance when seen from the outside.}}
{{History||1.7.4|snap=13w47a|Water's internal top face has been readded.<ref>{{bug|MC-35658}}</ref>}}
{{History|||snap=13w48a|[[File:Water JE15.png|32px]] [[File:Swamp Water JE7.png|32px]] Water's internal side faces except the bottom face, have been readded.<ref>{{bug|MC-40621}}</ref><ref>{{bug|MC-190053}}</ref>}}
{{History||1.9|snap=15w43b|When viewed through [[glass]], water now appears as a solid blue color, as opposed to a downward flowing water texture.<ref name="badwatergraphicsJE">{{bug|MC-35790}}</ref>}}
{{History||1.11|snap=16w39a|Water now generates in [[woodland mansion]]s.}}
{{History||1.12|snap=17w06a|Water now hardens [[concrete powder]] into [[concrete]], on contact.}}
{{History||1.13|snap=18w07a|[[Item]]s now float in water.
|The [[player]]'s underwater visibility has been changed - the longer a player stays underwater, the better they can see.}}
{{History|||snap=18w10a|Underwater visibility now depends on the [[biome]] the player is in.}}
{{History|||snap=18w10c|Water can now be placed in the same block as [[chest]]s, [[trapped chest]]s, [[stairs]], [[slab]]s, [[fence]]s, [[wall]]s, [[iron bars]] and [[glass pane]]s.}}
{{History|||snap=18w10d|Water can now be placed in [[ender chest]]s, [[trapdoor]]s, [[ladder]]s, and [[sign]]s.}}
{{History|||snap=18w15a|[[File:Water JE16.png|32px]] {{color|#3F76E4}} Added default water color. The textures of water have been changed from blue to grayscale.<ref>{{bug|MC-200838}}</ref>
|[[File:Warm Ocean Water JE.png|32px]] [[File:Lukewarm Ocean Water JE.png|32px]] [[File:Frozen Ocean Water JE.png|32px]] [[File:Cold Ocean Water JE.png|32px]] Added water colors for [[warm ocean]], [[lukewarm ocean]], [[frozen ocean]] and [[cold ocean]].
|[[File:Swamp Water.png|32px]] {{color|#617B64}} Water color in swampland has been changed.
|[[File:Swamp Hills Water 18w15a.png|32px]] {{color|#E0FFAE}} Water color in swampland M is unchanged.<ref>{{bug|MC-128558}}</ref>
|Water now blocks 1 [[light]] level per [[block]] instead of 3.
|[[Player]]s no longer receive the [[Night Vision]] effect while underwater.{{verify|type=change|Did this ever happen, or is it just being used as an analogy?}}}}
{{History|||snap=18w16a|When water spreads and would later turn into a source [[block]], it now immediately places a source block.}}
{{History|||snap=18w19a|[[Experience orb]]s now float in water.}}
{{History|||snap=pre3|[[File:Swamp Water.png|32px]] {{color|#617B64}} water color in swamp hills now the same as in [[swamp]].}}
{{History|||snap=pre7|Pressing the {{control|jump}} button in flowing water at <code>level=1</code>, <code>level=2</code> and <code>level=3</code> now do normal jumps instead of {{control|swimming}} up.}}
{{History||1.15|snap=19w34a|Added [[bee]]s, which get damaged while in water.}}
{{History|||snap=19w35a|Bees now try to avoid water.}}
{{History||1.17|snap=20w45a|Flowing water no longer breaks rails.}}
{{History|||snap=21w06a|[[Aquifer]]s, large bodies of water in caves, have been added.}}
{{History|||snap=21w07a|Aquifers generate less often.}}
{{History|||snap=21w08a|Water [[spring]]s are now able to generate below Y{{=}}0.}}
{{History|||snap=21w10a|The FOV shrinking effect now respects the "FOV Effects" accessibility slider.<ref>{{bug|MC-214629}}</ref>}}
{{History|||snap=21w15a|All changes to water generation from 21w06a to 21w08a have been reverted.}}
{{History|||snap=Pre-release 2|[[Smooth lighting]] now works properly underwater.<ref>{{bug|MC-68129}} resolved as "Fixed"</ref>}}
{{History||1.18|snap=Experimental Snapshot 1|[[File:Meadow Water.png|32px]] Added water color in [[meadow]].
|All changes to water generation in the 1.17 snapshots have been reintroduced.}}
{{History||1.18|snap=21w40a|[[Water lake]]s no longer generate.}}
{{History||1.19|snap=Deep Dark Experimental Snapshot 1|Water can now generate as part of [[Ancient City|ancient cities]].}}
{{History||1.19|snap=22w14a|[[File:Mangrove Swamp Water.png|32px]] Added water color in [[mangrove swamp]].}}
{{History||1.19.3|snap=22w44a|Added the [[game rule]] {{cd|waterSourceConversion}}, which disables the formation of new water source blocks when set to {{cd|false}}.}}
{{History||1.20<br>(experimental)|link=1.19.4|snap=23w07a|[[File:Cherry Grove Water JE1.png|32px]] Added water color in [[cherry grove]].}}
{{History|pocket alpha}}
{{History||v0.1.0|[[File:Water JE11.png|32px]]{{verify|type=change|Is this accurate to how it appeared in this edition at this time?}} Added water.
|[[File:Water JE2.png|32px]] On older or much newer devices, the old [[Java Edition|Java]] water texture is used, whereas the newer animated texture is used on intermediately modern devices.}}
{{History||v0.7.0|[[File:Water JE11.png|32px]]{{verify|type=change|Is this accurate to how it appeared in this edition at this time?}} The texture of water has been changed to the new texture for all devices.}}
{{History||v0.9.0|snap=build 1|[[File:Swamp Water BE1.png|32px]] Water now uses a dark blue coloration in [[swamp]]s.
|Water dripping [[particles]] have been changed.
|[[Water lake]]s have been added.
|Water can now be found in the farms and wells of [[village]]s.
|Two [[biome]]s have been added that are almost all water: [[ocean]]s and [[river]]s.
|Oasis now generate in the new [[desert]] M [[biome]].}}
{{History||v0.10.0|snap=build 1|Smooth lighting for water has been added.
|A gradient effect has been added to water that increases its opacity with distance.
|[[File:Old bedrock swamp water.png|32px]] Water color in swampland has been changed.
|Flowing water can now push [[entities]].}}
{{History|||snap=build 7|Running water now has [[sound]]s.}}
{{History|||snap=?|Water now destroys [[block]]s.{{info needed|if this is referring to washing away plants and torches and stuff, it's been able to do that since 0.1.0}}}}
{{History||v0.14.0|snap=build 1|[[Dispenser]]s can now shoot out water from [[water bucket]]s. They can also suck up [[fluids]], including water, directly adjacent to the side they are facing.}}
{{History||v0.14.2|[[File:Old bedrock water.png|32px]] Water now uses animated texture files.}}
{{History|pocket}}
{{History||1.0.0|snap=alpha 1.0.0.0|When viewed through [[glass]], water now appears as a solid blue color, as opposed to a downward flowing water texture.<ref name="badwatergraphicsBE">{{bug|MCPE-11140}}</ref>}}
{{History||1.1.0|snap=alpha 1.1.0.0|Water now generates in [[woodland mansion]]s.
|Water now hardens [[concrete powder]] into [[concrete]], on contact.}}
{{History|bedrock}}
{{History||?|The rendering change for water in 1.0.0 has been reverted for an unknown reason.}}
{{History||1.2.13|snap=beta 1.2.13.5|Water can now be placed in the same [[block]]s as [[slab]]s and [[stairs]].}}
{{History||1.4.0|snap=beta 1.2.14.2|Water can now be placed in the same block as most transparent blocks, instead of slabs and stairs only.}}
{{History|||snap=beta 1.2.20.1|[[File:Plains Water.png|32px]] Water now has a completely new look for every [[biome]] and it is now much easier to see above and underwater (see [[Water#Bedrock Edition]] for all biome colors).
|[[Item]]s now float to the top of water.
|Underwater visibility now depends on the [[biome]] the [[player]] is in.
|[[Respiration]] enchantment and [[Water Breathing]] effect no longer grants enhanced underwater visibility.}}
{{History|||snap=?|When viewed through [[glass]], water now appears as its own top texture, as opposed to a downward flowing water texture.<ref name="badwatergraphicsBE"/>}}
{{History||1.14.0|snap=beta 1.14.0.1|Added [[bee]]s, which get damaged when touching water and try to avoid it.}}
{{History|console}}
{{History||xbox=TU1|xbone=CU1|ps=1.0|wiiu=Patch 1|switch=1.0.1|[[File:Water JE11.png|32px]]{{verify|type=change|Is this accurate to how it appeared in this edition at this time?}} [[File:Swamp Water JE2.png|32px]] Added water.}}
{{History||xbox=TU9|[[Dispenser]]s have been given the ability to shoot out [[fluids]], including water, inside [[water bucket]]s. They can also suck up the fluids if activated again, but a bug prevents the empty [[bucket]] from being filled.}}
{{History||xbox=TU12|[[File:Water JE15.png|32px]] Water now uses animated texture files.}}
{{History||xbox=TU25|xbone=CU14|ps=1.17|Water can be used in custom superflats. It appears as a 3D block in the block selection screen of the custom superflat interface.}}
{{History||xbox=TU31|xbone=CU19|ps=1.22|wiiu=Patch 3|Water splash [[sound]]s have been updated.
|Most [[mob]]s can now [[swimming|swim]] in water.}}
{{History||xbox=TU69|xbone=none|ps=1.76|wiiu=Patch 38|switch=none|[[File:Warm Ocean Water.png|32px]] [[File:Lukewarm Ocean Water.png|32px]] [[File:Frozen Ocean Water.png|32px]] [[File:Cold Ocean Water.png|32px]] Added [[warm ocean]], [[lukewarm ocean]], [[frozen ocean]] and [[cold ocean]] texture colors for water in those [[biome]]s.}}
{{History||ps=1.78|The animation of water is now less smooth.}}
{{History|New 3DS}}
{{History||0.1.0|[[File:Water JE15.png|32px]]{{verify|type=change|Is this accurate to how it appeared in this edition at this time?}} [[File:Old bedrock swamp water.png|32px]] Added water.}}
{{History|foot}}
<!-- Still need to add in the right version: Drowning added, Water can turn into ice -->
<!--- Still need to add "1.16 pre-release 5 - Water overlay texture turned slightly darker" -->
{{More sounds|Old and older water splash sounds.|type=historical}}
===Data history===
{{History|java}}
{{History||1.13|snap=17w47a|Prior to [[1.13/Flattening|''The Flattening'']], these blocks' numeral IDs were 8 and 9. Both blocks have been merged into a single one.}}
{{History|||snap=18w10c|Removed <code>flowing_water</code>.}}
{{History|foot}}
<gallery>
EarlyFlowingWater.png|The water and flowing water in [[Infdev 20100615]].
</gallery>
==Issues==
{{Issue list}}
==Trivia==
*The texture subtly overlaid on the screen when underwater is that of the original water texture from 0.0.12a.
**The outdatedness of this texture is not considered a bug or oversight, unlike many other outdated textures.<ref>{{bug|MC-241000|||Invalid}}</ref>
**This texture is particularly difficult to notice due to its extreme transparency,<ref>{{bug|MC-128337}}</ref> as well as the fact that other blocks likely make the scene visually noisy enough to further obscure it under most conditions.
* While underwater, the player's FOV (field of vision) is lowered by 10 to simulate light {{w|refraction}}. This can be disabled via the "FOV Effects" [[option]].
*If a player or mob with the [[Levitation]] effect touches water, the effect is completely negated.<ref>{{bug|MC-83369}}</ref>
==Gallery==
<gallery>
1.8underwater.png|Underwater particles, or "bubbles".
Underground water mix.png|Water that is underground, but is still part of 2 different biomes. The color is split.
InvisibleWater.png|A glitch where water is invisible below its surface level.
Water Cave Filling.png|Water flowing into a [[cave]].
Under water.png|A view underwater.
Mac os water texture V1.13-920.gif|Animated view of the Java edition water texture.
Bubbles.gif|These bubbles appear above the [[hunger]] bar when the player's head is in water, and when all the bubbles pop, a heart of damage is dealt every second until the player is no longer entirely under water.
Waterfall.png|A naturally occurring waterfall.
Water (texture) JE1 BE1.png|This texture is subtly overlaid on the screen when underwater.
Land ruin.png|An underwater ruin {{in|bedrock}} that generated on land with a water block on top of it.
Land ruin Java.png|An underwater ruin {{in|java}} that generated on land with a visible loot chest that is not waterlogged and doesn't have water on top of it.
Largelake.png|A large lake, during a [[thunderstorm]].
Coral reef at night.png|A [[coral reef]] at night, in a [[warm ocean]] biome.
WaterRavine.jpg|A bug that causes the water to not flow into the pit.
Obsidian Spring.png|A water flowing on lava lake, creating obsidian. The water was placed by a player.
Two flowing streams.png|Waterfalls made by a player.
Watercave.png|Water flowing into the cave from nearby lake.
RavineandStornghold.png|Ravine with multiple ores, water and lava falls, and stronghold bridge over it.
Water shade.png|Different water colors in swamp biome.
File:Nonflowingwater.png|A block of water, which is not flowing because of a glitch, besides a village farm.
</gallery>
==See also==
*[[Waterlogging]]
==References ==
{{Reflist}}
==External Links ==
*[https://www.minecraft.net/en-us/article/block-week-water Block of the Week: Water] – Minecraft.net on July 14, 2017
{{Blocks|natural}}
{{Items}}
[[Category:Fluids]]
[[Category:Natural blocks]]
[[Category:Non-solid blocks]]
[[Category:Generated structure blocks]]
[[cs:Voda]]
[[de:Wasser]]
[[es:Agua]]
[[fr:Eau]]
[[hu:Víz]]
[[it:Acqua]]
[[ja:水]]
[[ko:물]]
[[nl:Water]]
[[pl:Woda]]
[[pt:Água]]
[[ru:Вода]]
[[th:น้ำ]]
[[tr:Su]]
[[uk:Вода]]
[[zh:水]]</li></ul></nowiki> | beta 1.16.100.56 | The ID of maps have been changed from emptymap to empty_map and map to filled_map. | ||||||||||||||||||||||||||||||||||||||||||||||||||||||||||||||||||||||||||||||||||||||||||||||||||||||||||||
| Legacy Console Edition | ||||||||||||||||||||||||||||||||||||||||||||||||||||||||||||||||||||||||||||||||||||||||||||||||||||||||||||||
| TU1 | CU1 | 1.00 | Patch 1 | 1.0.1 | ||||||||||||||||||||||||||||||||||||||||||||||||||||||||||||||||||||||||||||||||||||||||||||||||||||||||||
| The player spawns with a free map. | ||||||||||||||||||||||||||||||||||||||||||||||||||||||||||||||||||||||||||||||||||||||||||||||||||||||||||||||
| Maps are available only as zoom step 3 maps centered at coordinates 0,0. Biome colors do not appear on maps. | ||||||||||||||||||||||||||||||||||||||||||||||||||||||||||||||||||||||||||||||||||||||||||||||||||||||||||||||
| Larger sized worlds on Xbox One, Playstation 4, and Nintendo Switch have zoom step 3 maps aligned to a grid with maps centered at 0, 1024, or 2048 on the X or Z coordinates. | ||||||||||||||||||||||||||||||||||||||||||||||||||||||||||||||||||||||||||||||||||||||||||||||||||||||||||||||
| TU21 | CU9 | 1.14 | Patch 1 | |||||||||||||||||||||||||||||||||||||||||||||||||||||||||||||||||||||||||||||||||||||||||||||||||||||||||||
| TU46 | CU36 | 1.38 | Patch 15 | The outer end islands appear on different maps; even on Xbox 360, Playstation 3, Vita, and Wii U editions. | ||||||||||||||||||||||||||||||||||||||||||||||||||||||||||||||||||||||||||||||||||||||||||||||||||||||||||
| 1.90 | ||||||||||||||||||||||||||||||||||||||||||||||||||||||||||||||||||||||||||||||||||||||||||||||||||||||||||||||
| 1.91 | Maps can now be created and used in cartography tables. | |||||||||||||||||||||||||||||||||||||||||||||||||||||||||||||||||||||||||||||||||||||||||||||||||||||||||||||
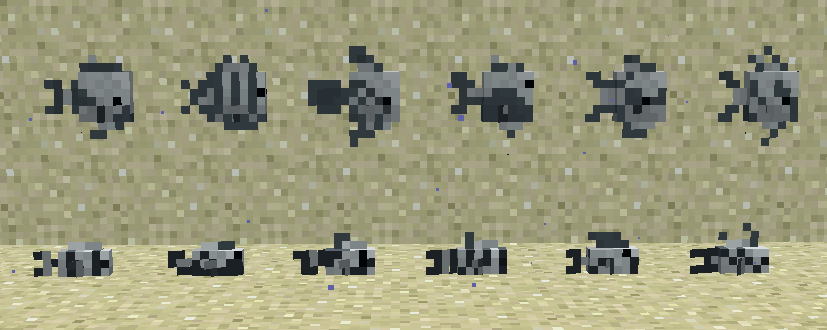
Issues[]
Issues relating to "Map" are maintained on the bug tracker. Report issues there.
Trivia[]
- Use of the F1 key can allow the player to hold a map without blocking their view at all.
- In Java Edition, a map created using
/givecan be any map by using the Map parameter to specify the map number desired. E.g./give [player] minecraft:filled_map{map:5}gives the specified player map_5. If no data value is supplied it defaults to map_0. If map_0 has not ever been crafted, it is centered on x=0, z=0. - The maps are stored separately as their own data (
.dat) file asmap_x.datwith (x) being the map number, see map item format for more info. By manipulating this number, players can organize their maps to suit them, or if they accidentally create a map in the same location, they can delete their extra map so as to save the number they make. - Certain programs can be used to make customized maps with images or text on them instead of actual maps, many people use these in adventure maps to show pictures or to tell a story.
- Since all copies of a map are links to the same file, copying an unfinished map keeps it synchronized with the copy as the player fills it in. Thus, a copy stored in a chest can act as a remote backup.
- A map that is in an item frame does not update itself until a player picks it up, lets it reload, and places it back again. However, if a player holds a clone of the map, both maps update.
- Filled maps are the only items that make 90 degree rotations in item frames, and also the only items that can expand the item frame into full block wide.
- On Legacy Console Edition, the player always spawns with a map in their inventory after creating a world. This was later added to Bedrock Edition as an optional feature in the world creation menu.
- Maps on Legacy Console Edition always show the player's current coordinates, as a substitute for the optional coordinate display in other editions.
- A map cannot be created on New Nintendo 3DS Edition. Instead, the map is always displayed on the bottom screen along with the coordinates. Biome colors do not appear on maps.
Gallery[]
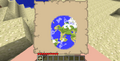
A fully zoomed map.

Having a map in hand does not stop the ability to see ahead.
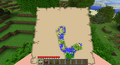
A world being recorded onto a map.

Nearly fully explored map.
A map edited to the scale of 1.
A map mapping the Sky Dimension.
A village and how it is represented on a map.
A map containing a custom image made by placing a large number of blocks.
A completely explored map.
A diagram showing how maps zoomed out before Java Edition 1.8. Notice how the larger maps have borders made of half and quarter small maps.
From 1.8, zoomed maps are aligned to this grid exactly.
A map of a Large Biomes world.
A map view of a mushroom biome, showing that mycelium appears purple on a map.
Maps held in the off-hand or in either hand while dual wielding appear as mini-maps.
Partly filled treasure map with an odd area at the bottom left. Normally a partly filled map would look striped (as in the top left), but this map seems to be bugged and is possibly showing caves, or something, in the bottom left.
Partly filled ocean explorer map. Updating the game from an older version (in this case the area was first generated before 1.18) and buying a map after updating (in this case in 1.19.4) can result in the map displaying rivers and terrain where there is really a frozen sea.
Stained glasses' appearances on maps before and after 1.13.
Stained glasses' appearances on maps before and after 1.13.
Various blocks' appearances on maps before and after 1.13.
Various blocks' appearances on maps before and after 1.13.
Holding a map in the offhand in Bedrock Edition.
Holding a map in both hands in Bedrock Edition.
A map that has not yet filled. A rare bug in Java.


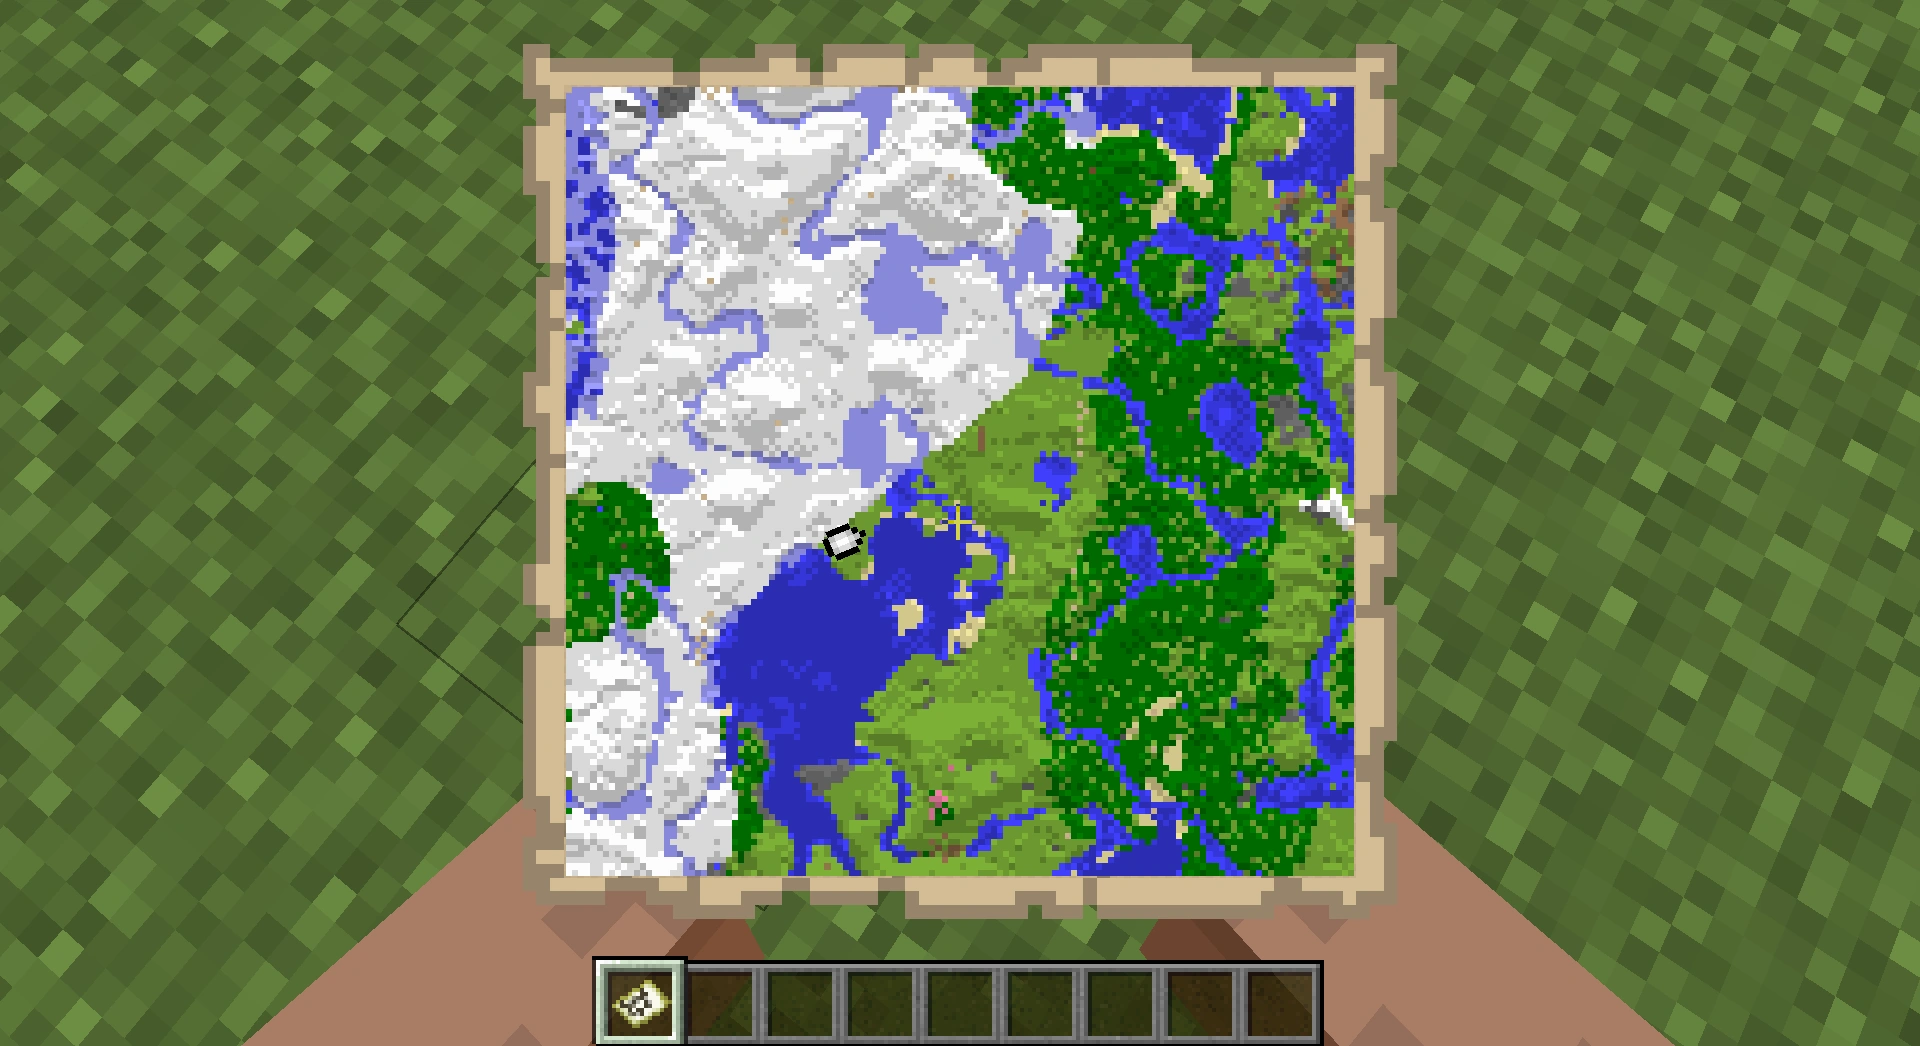
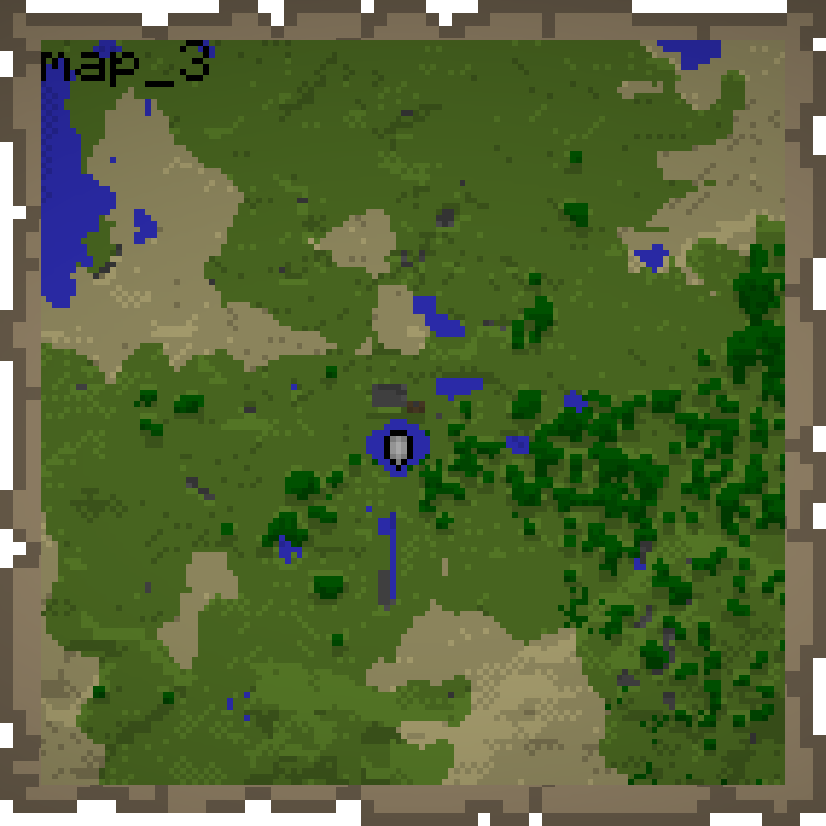
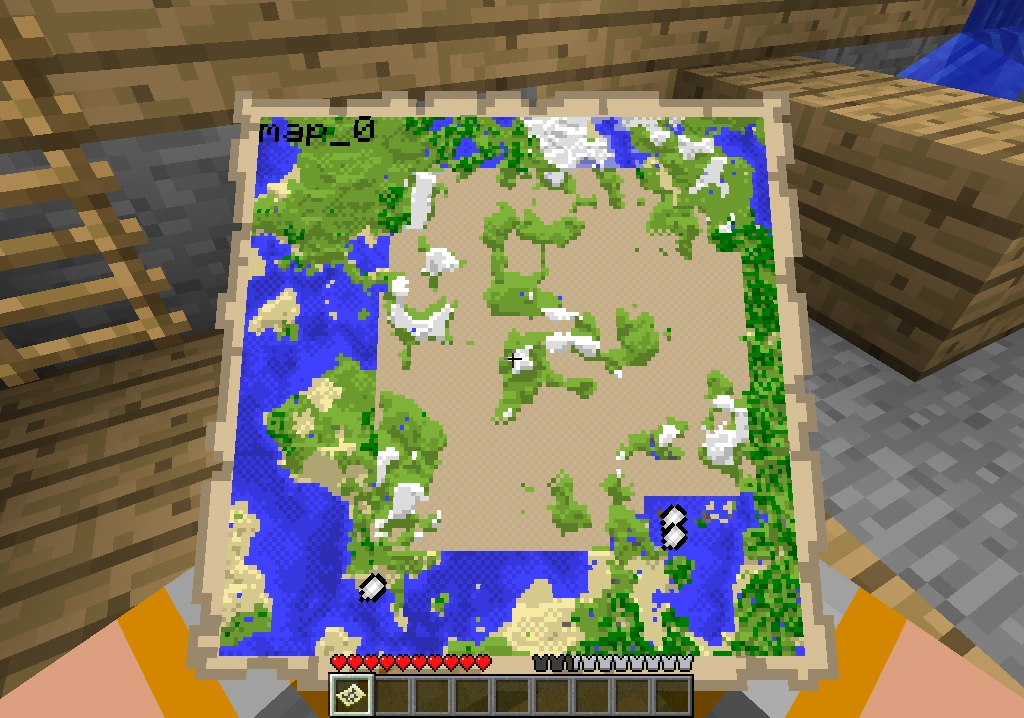
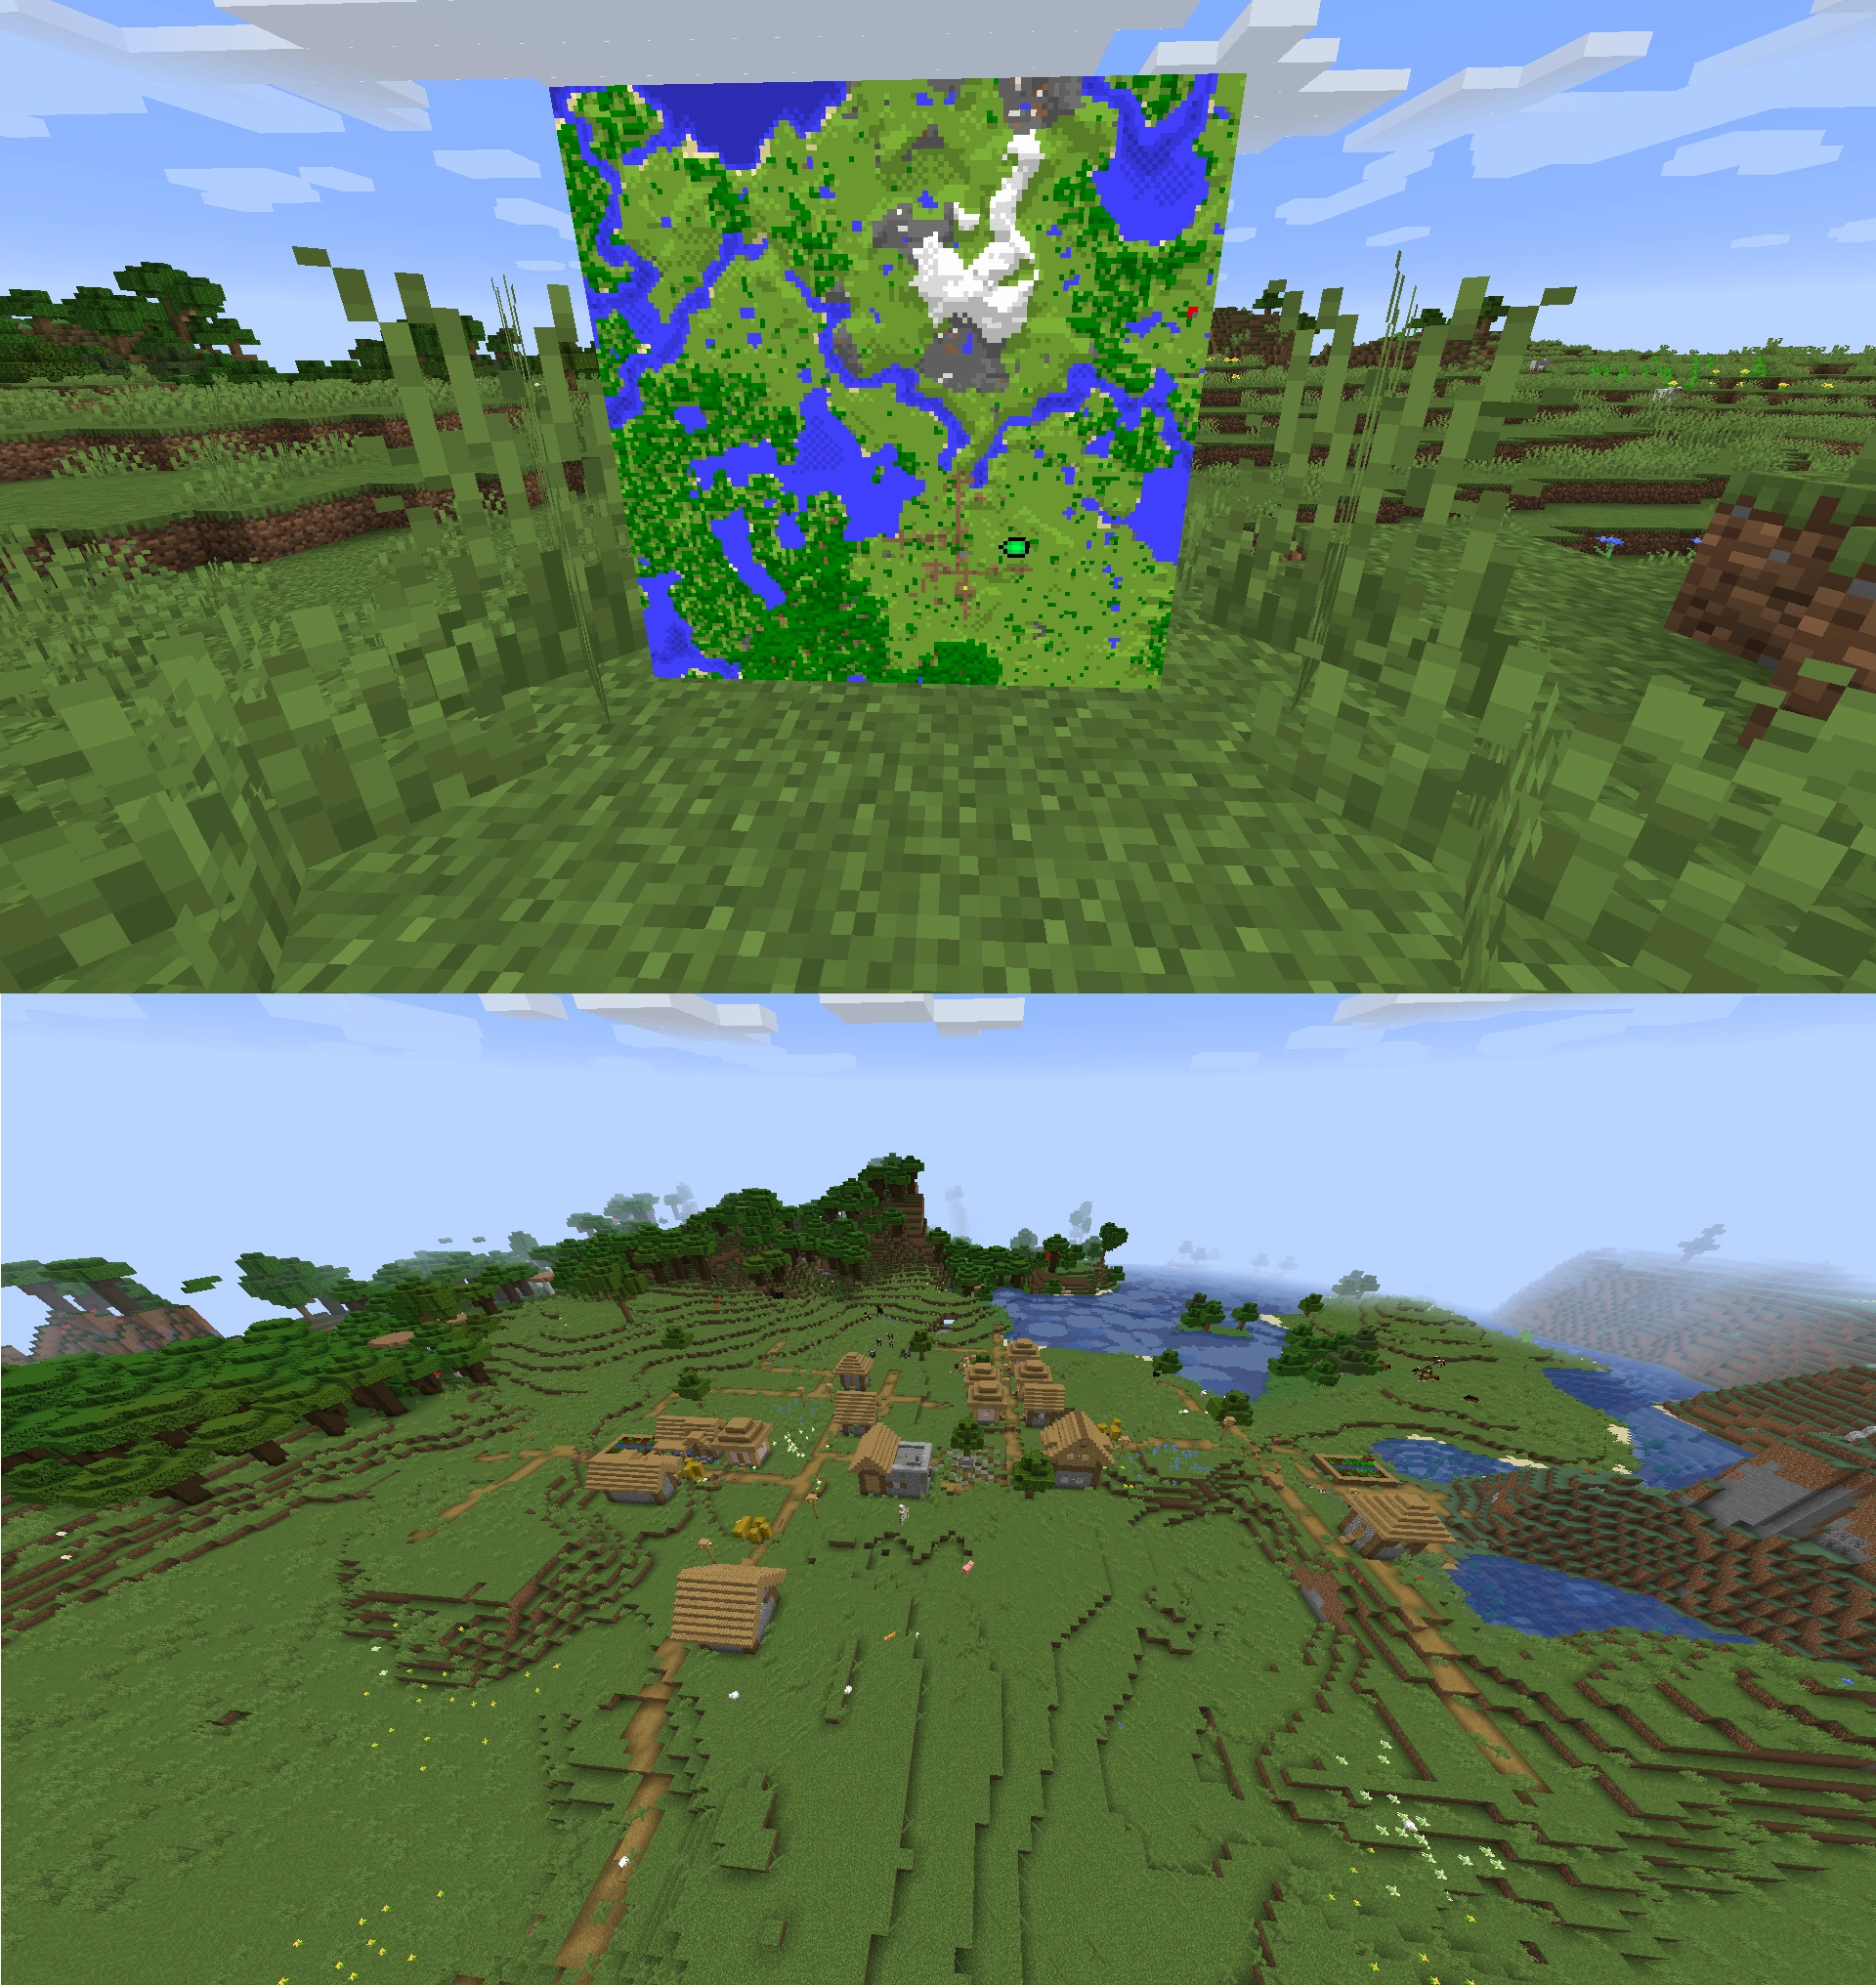
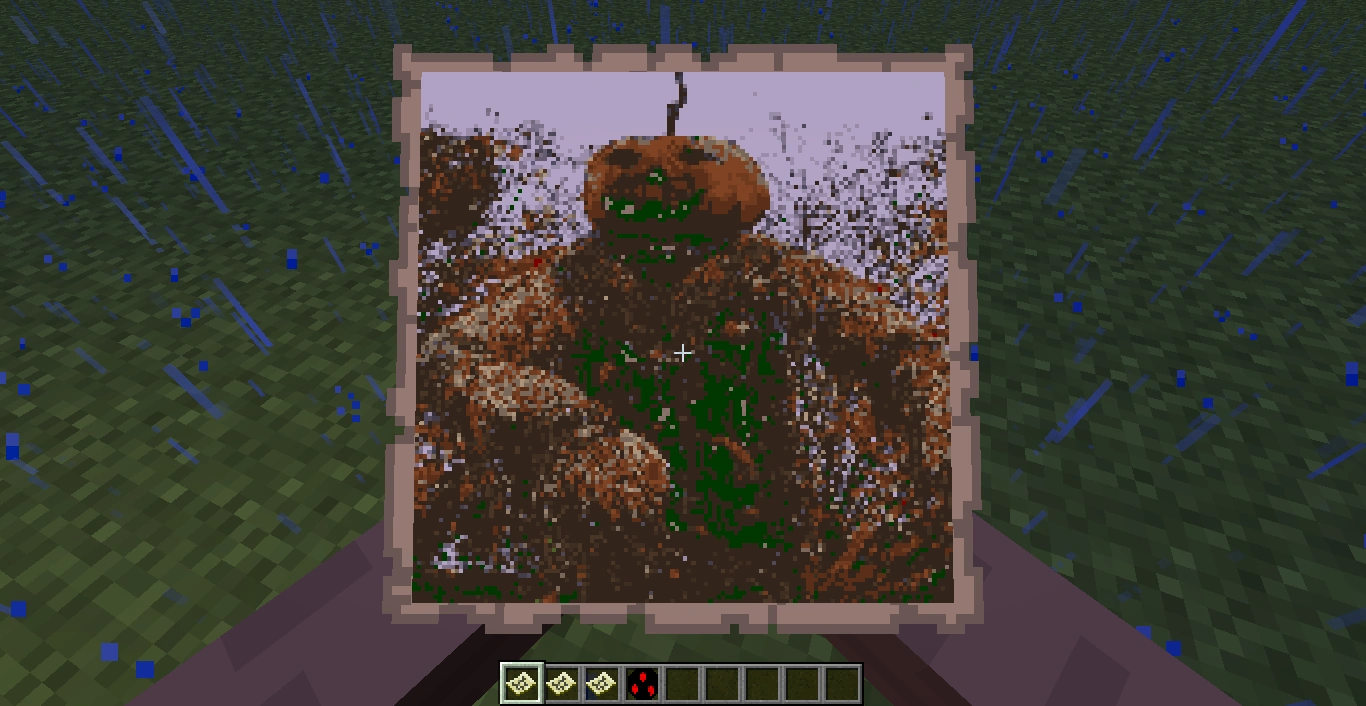
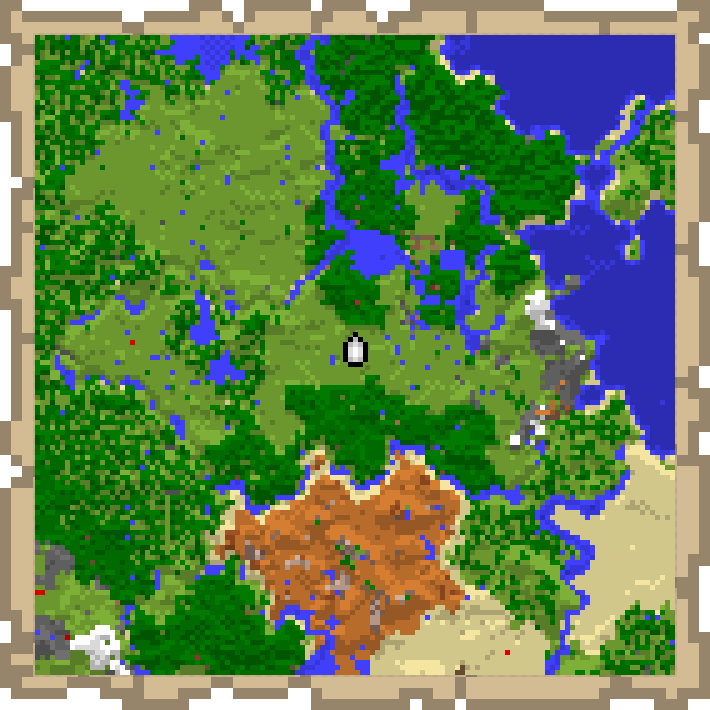
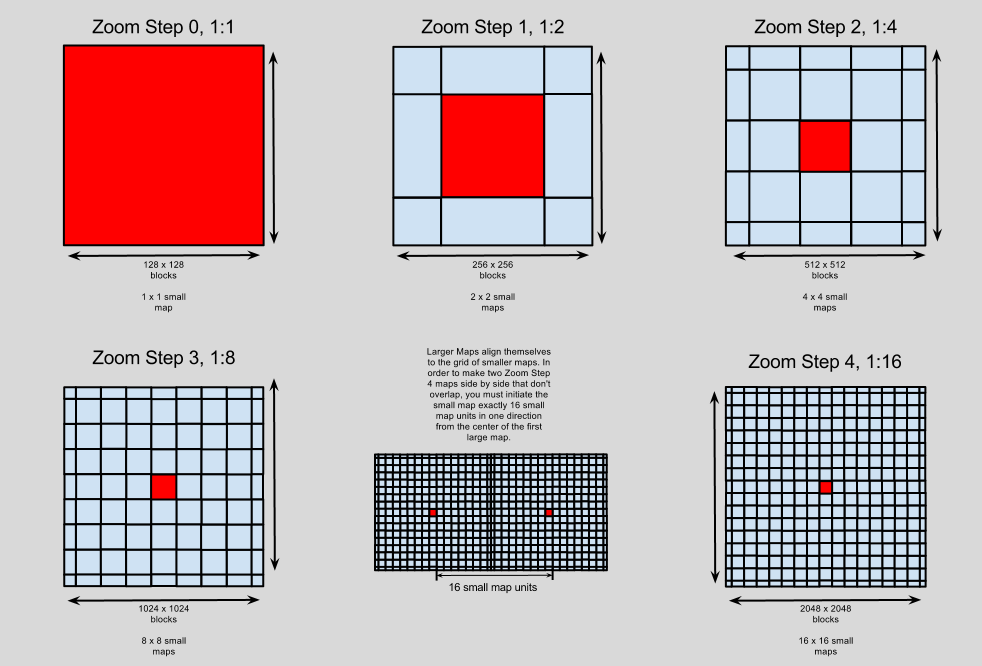
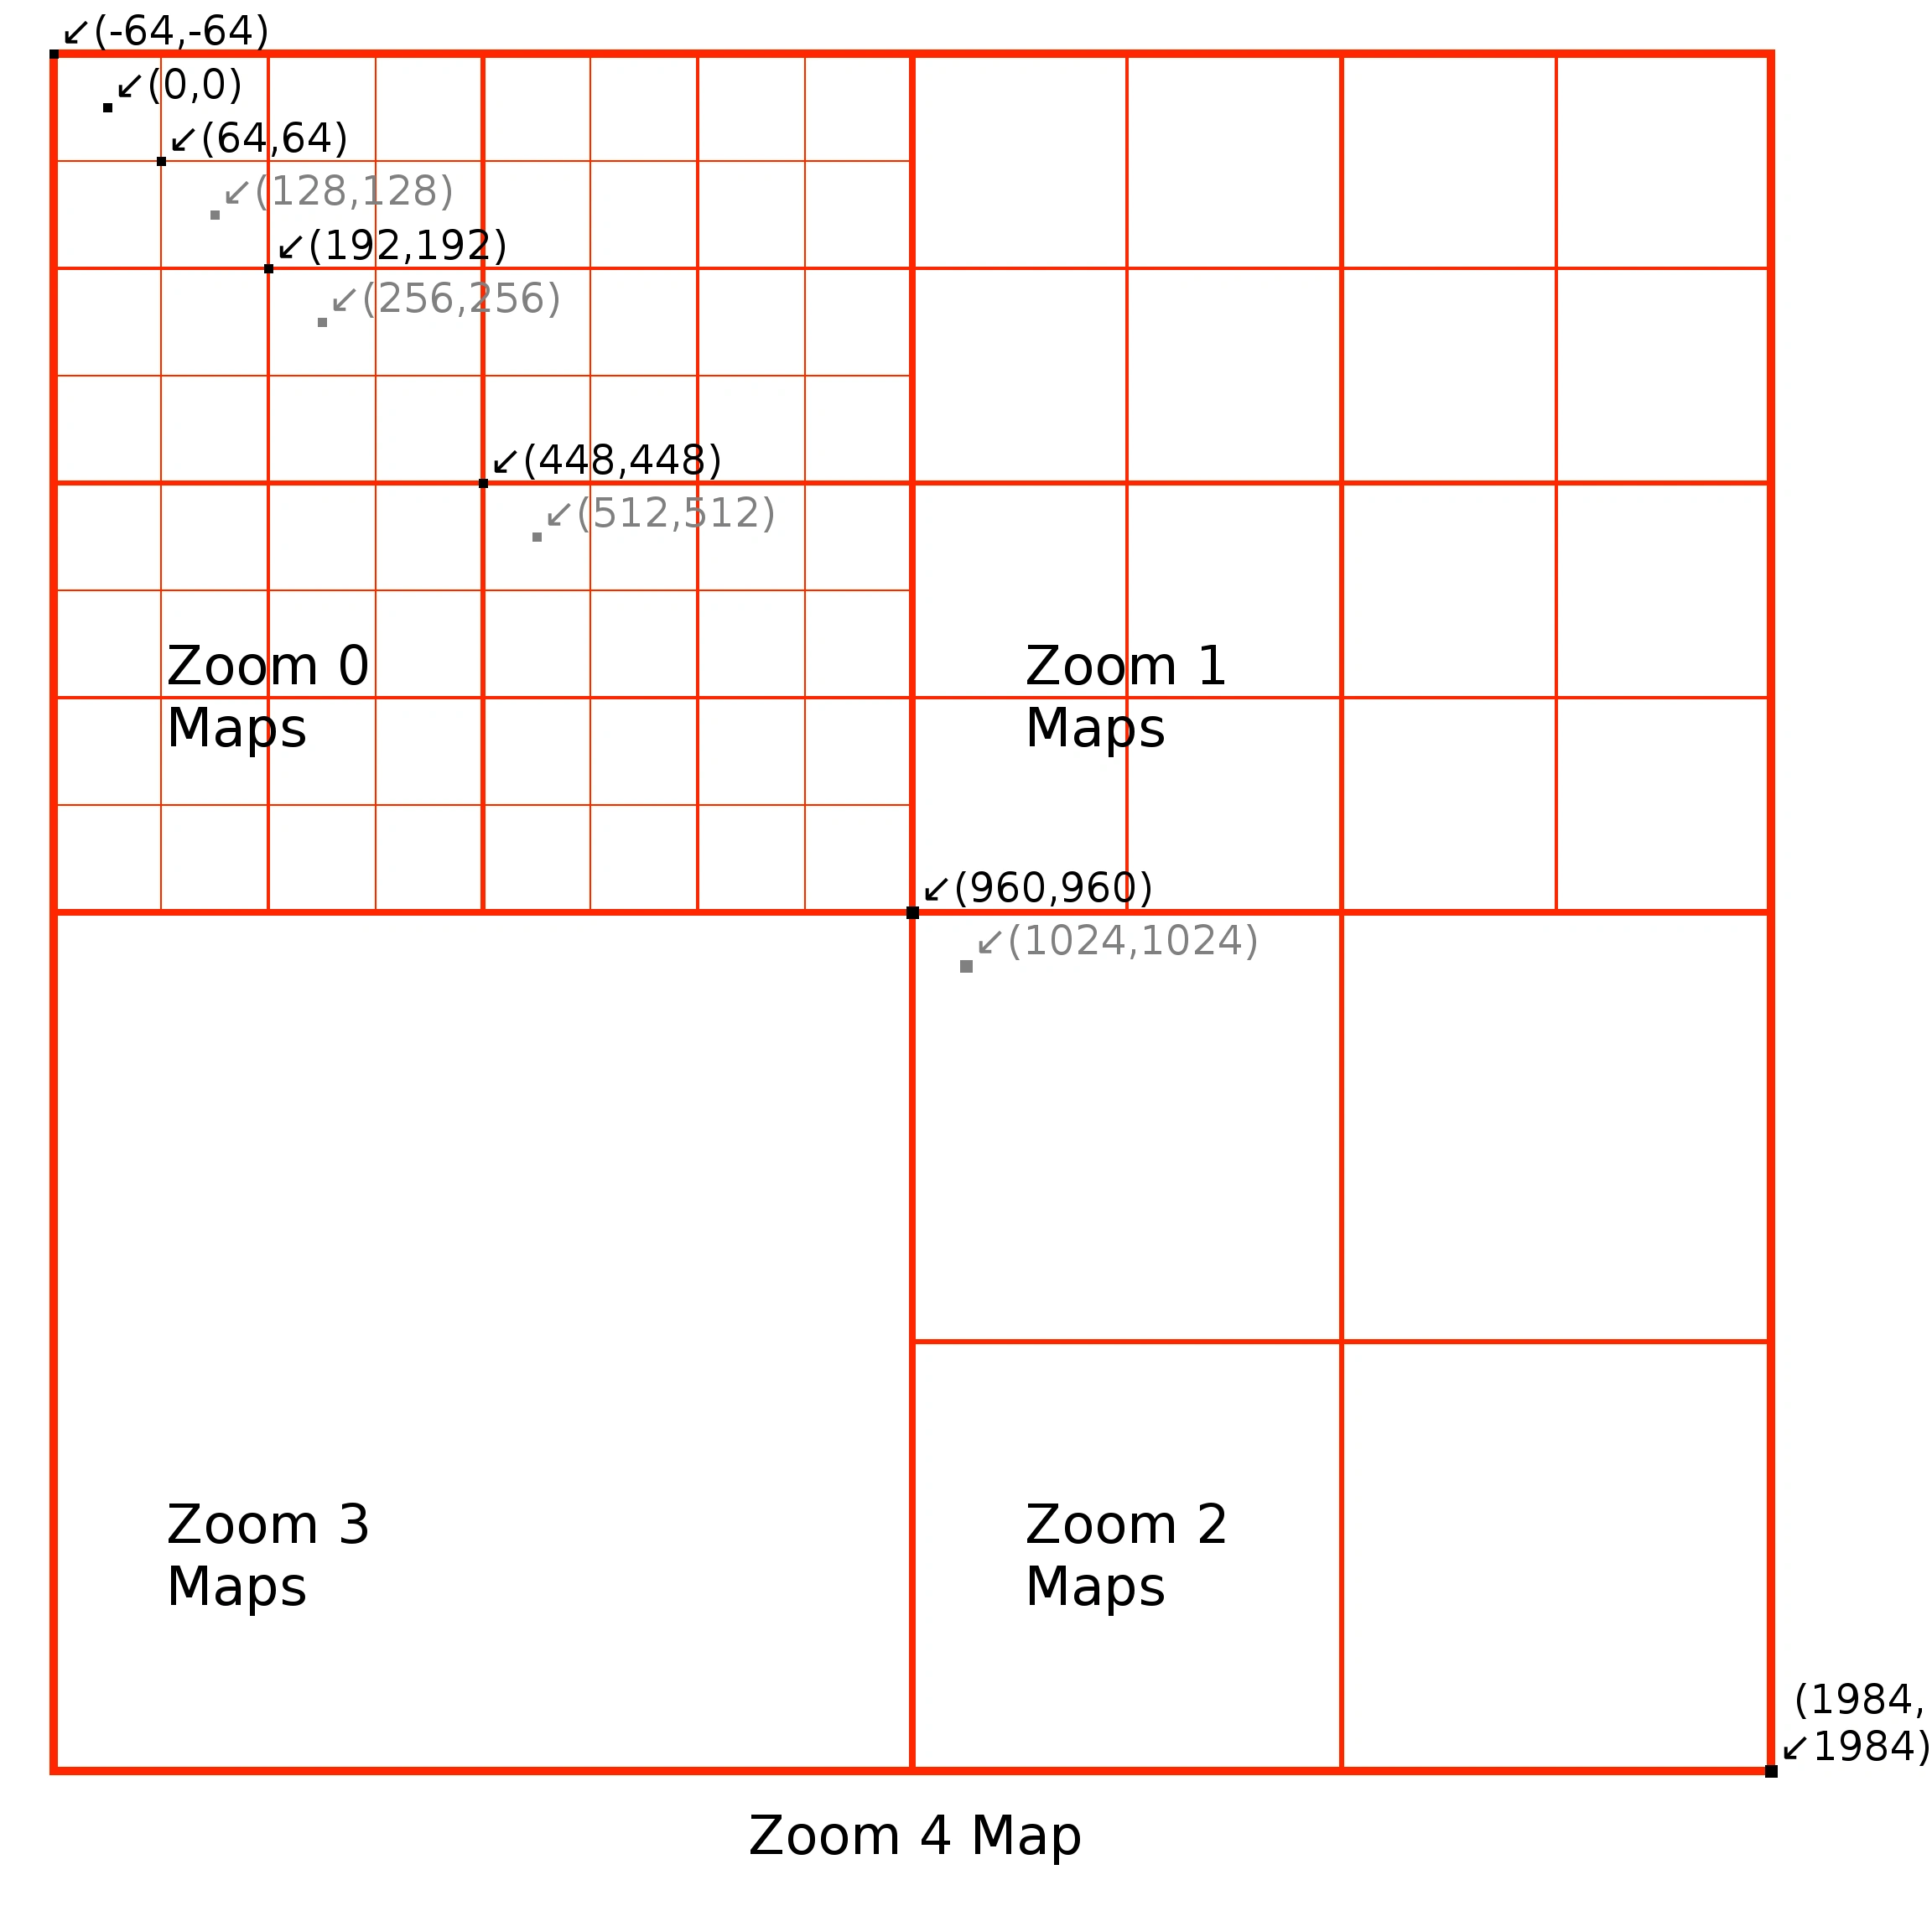
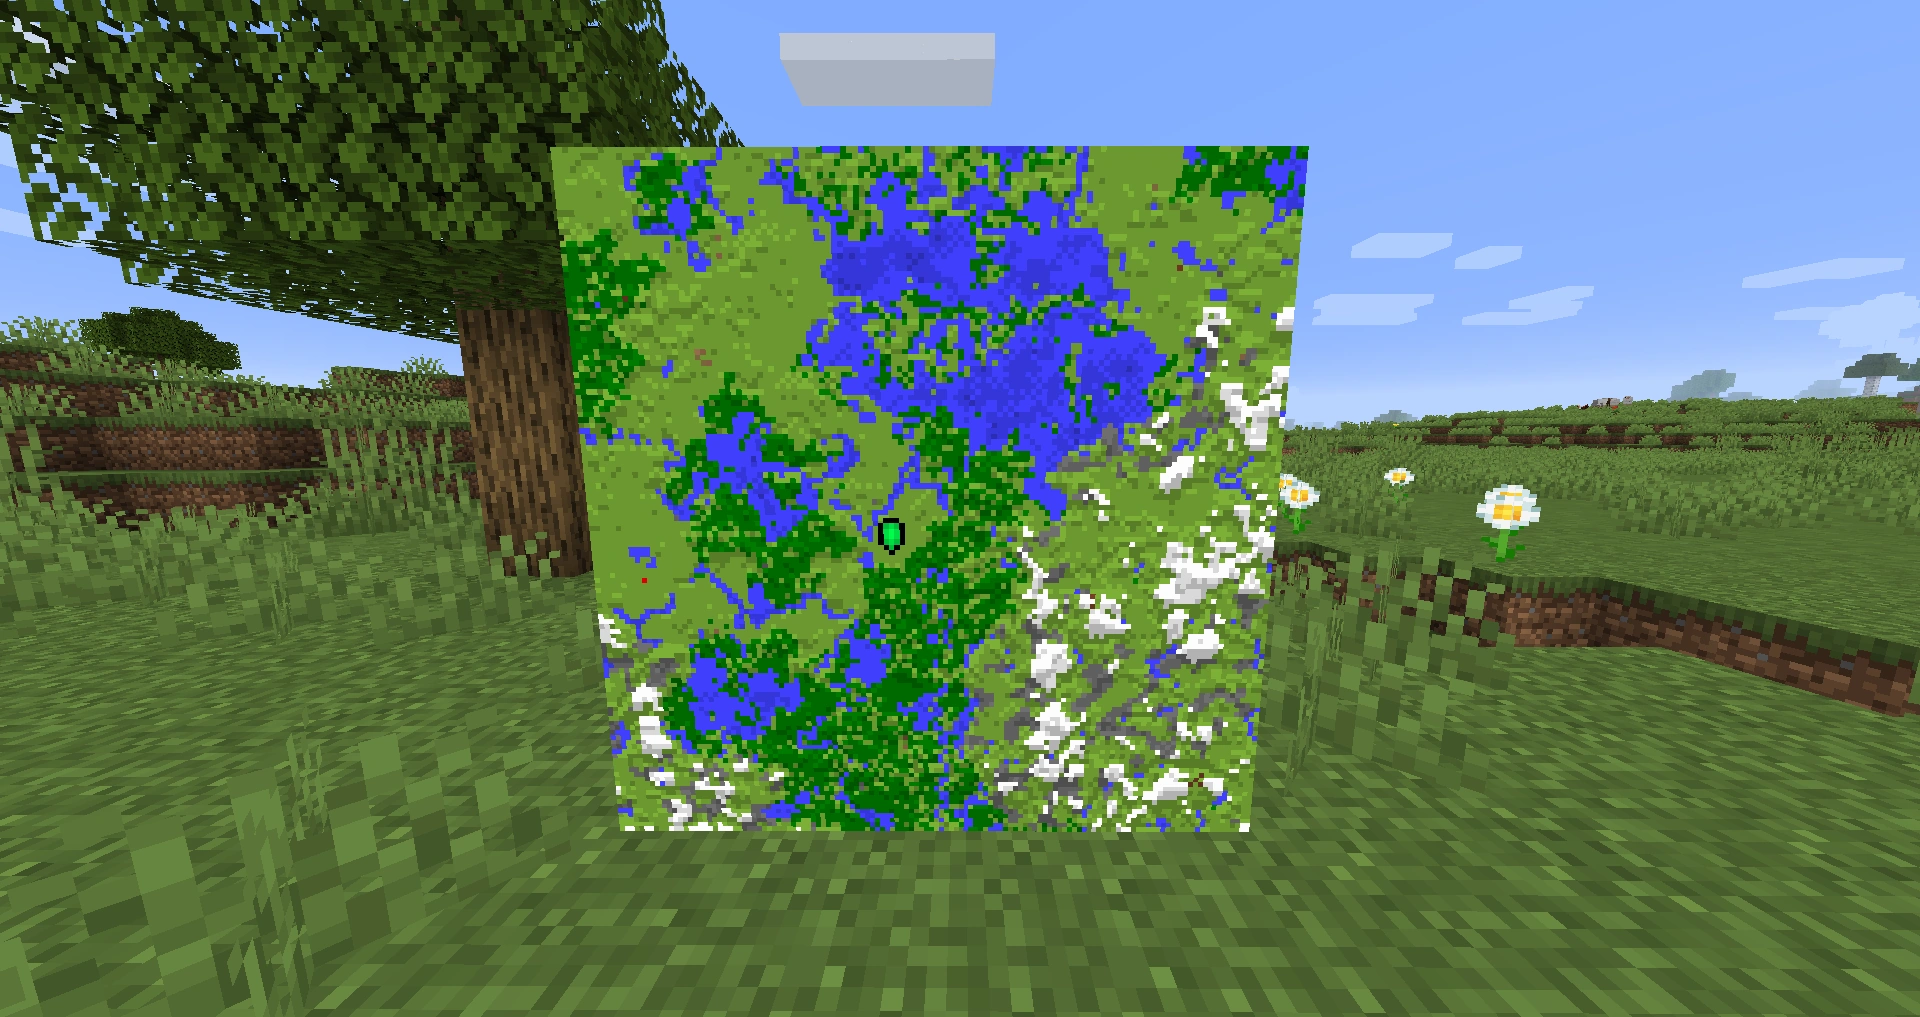
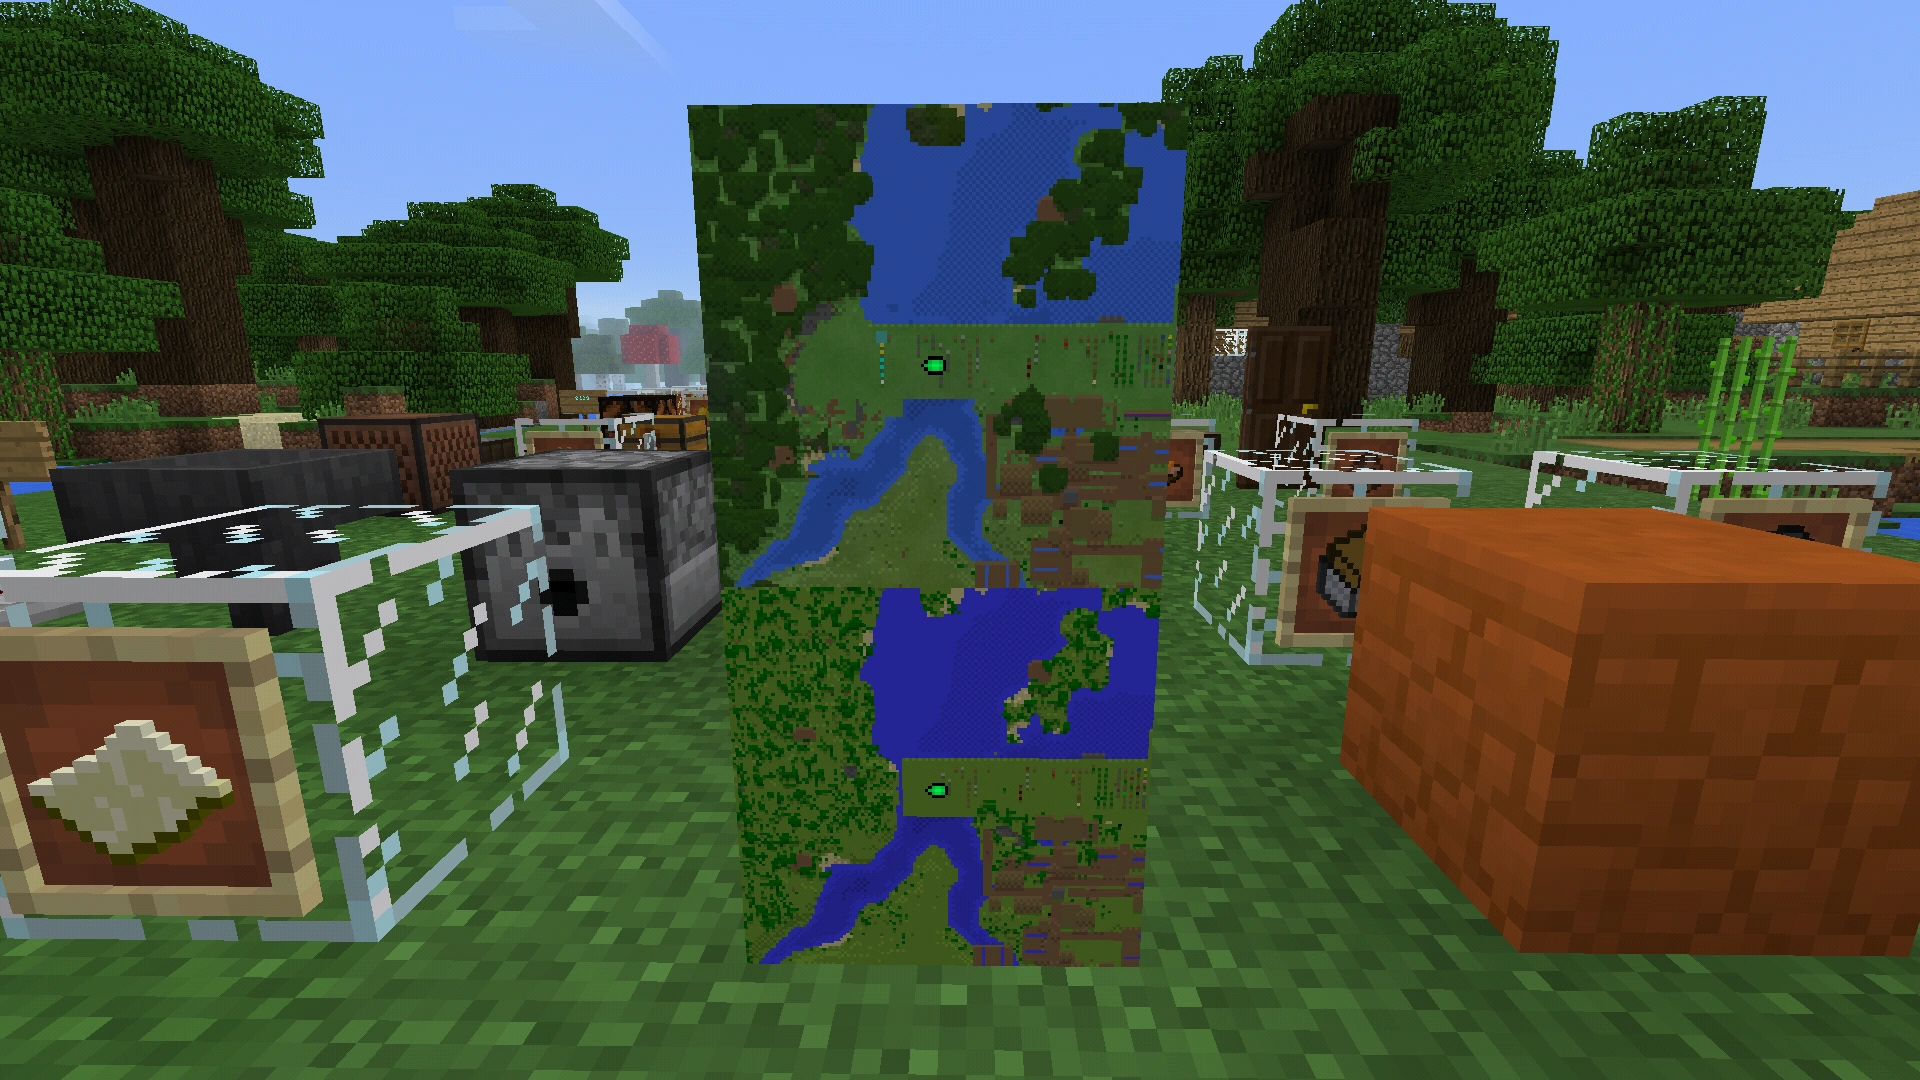
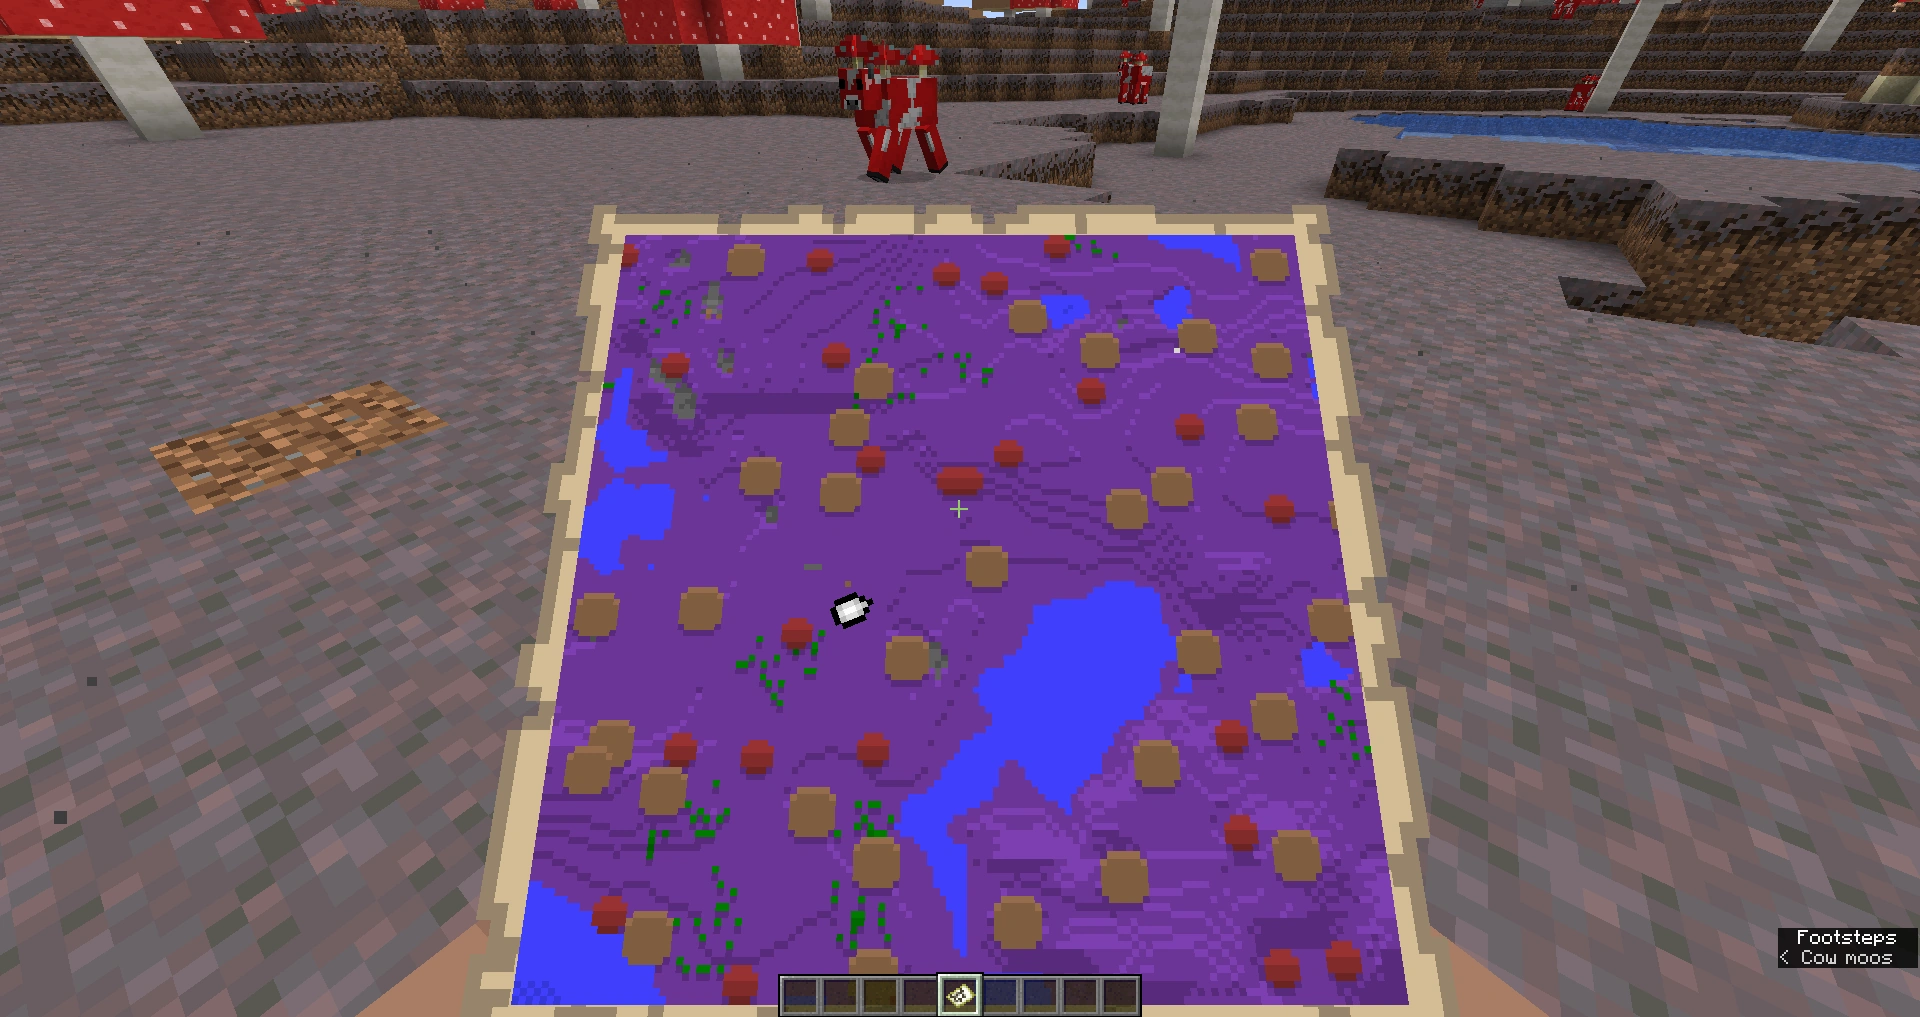
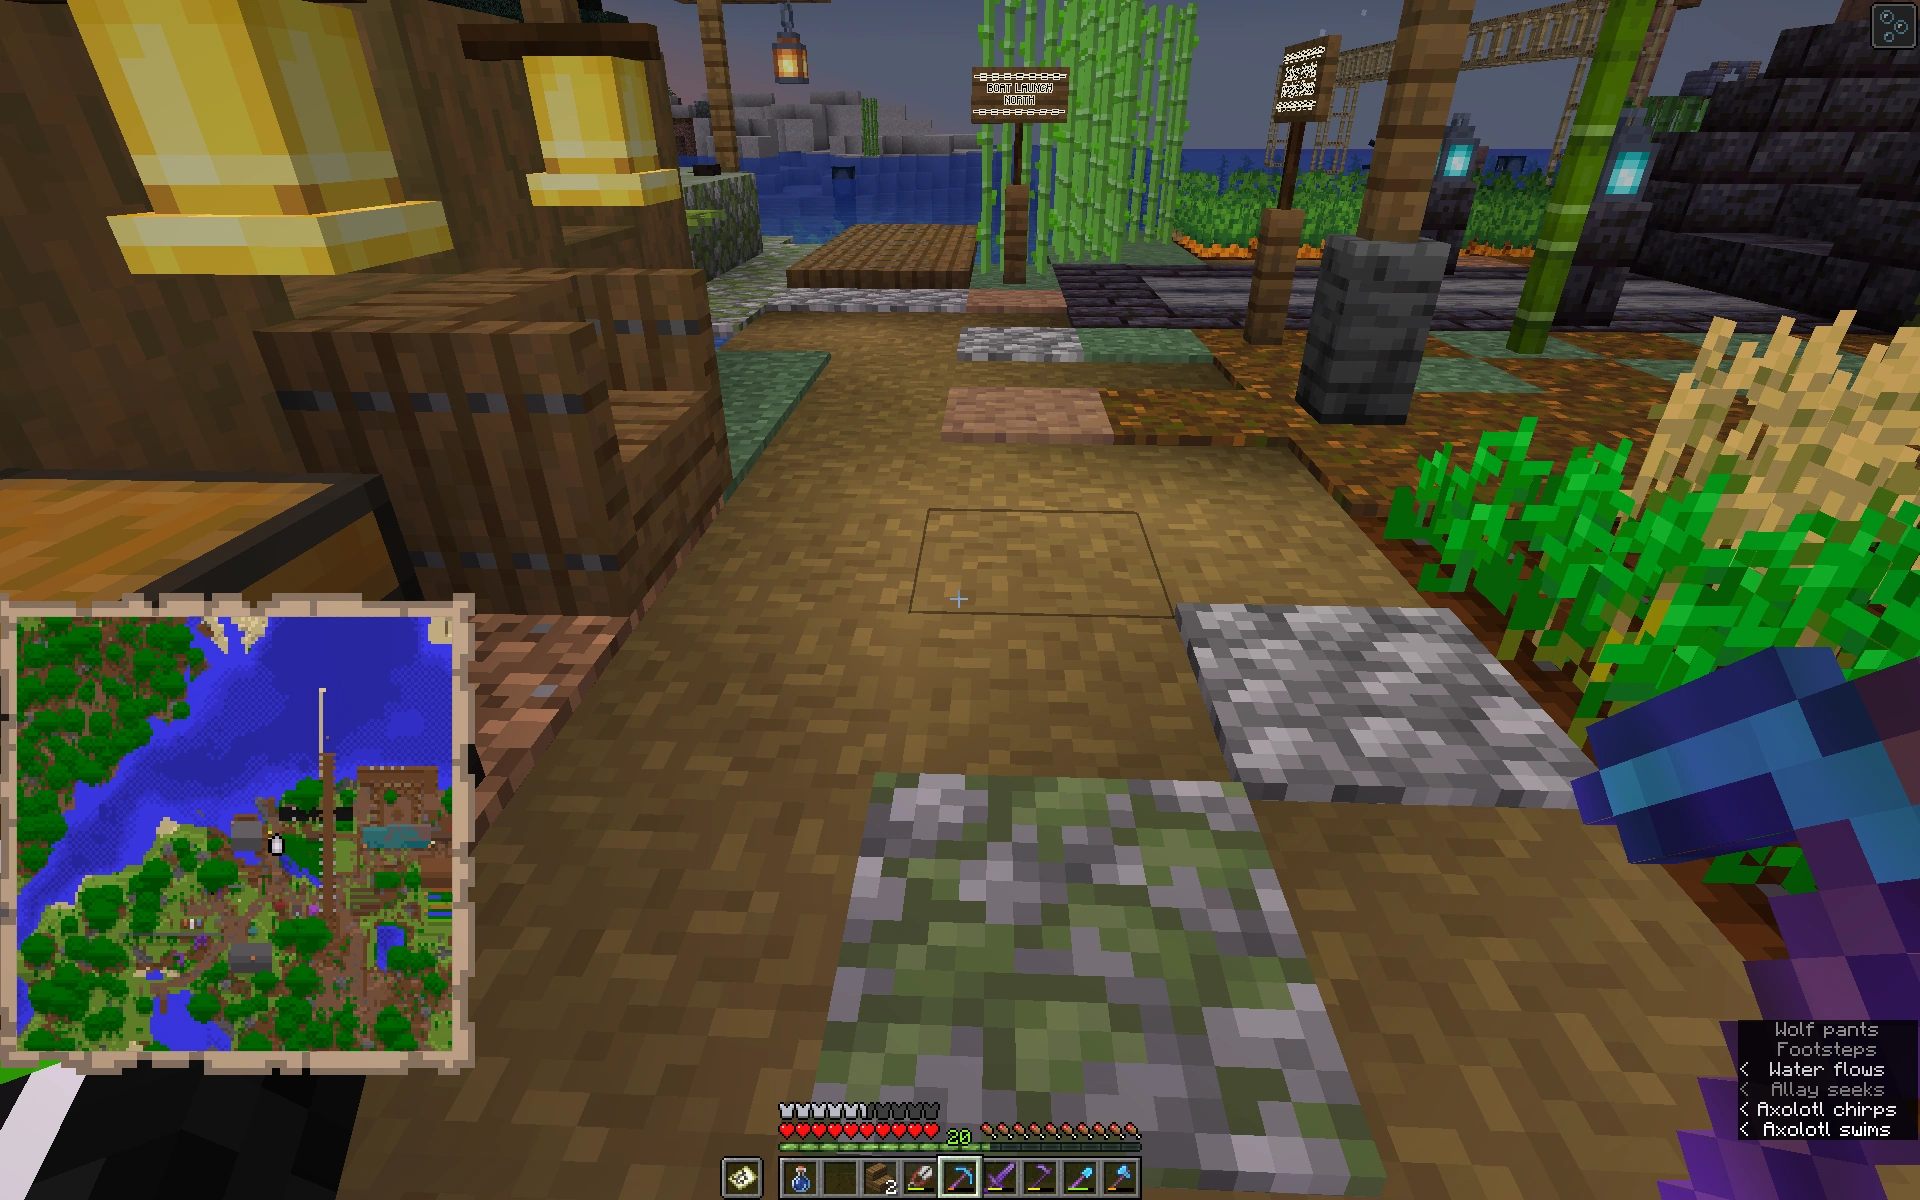
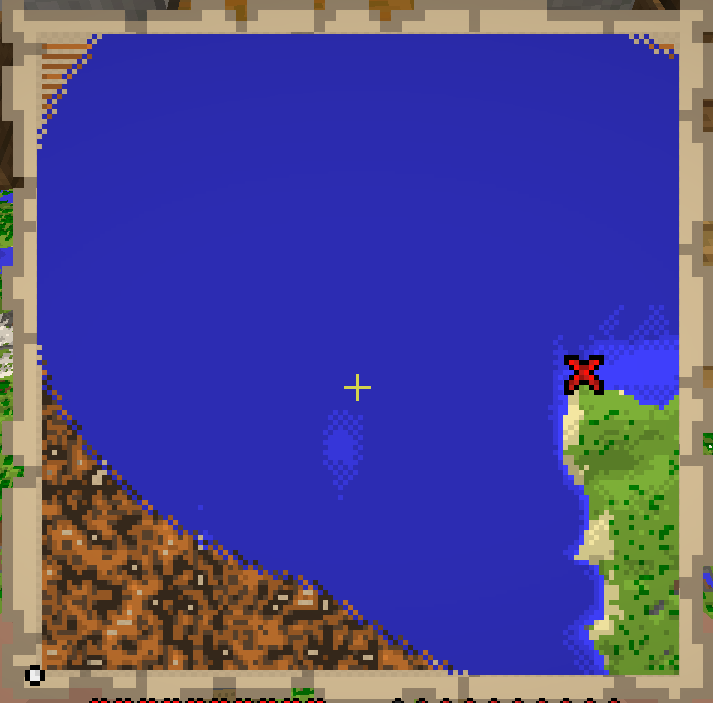
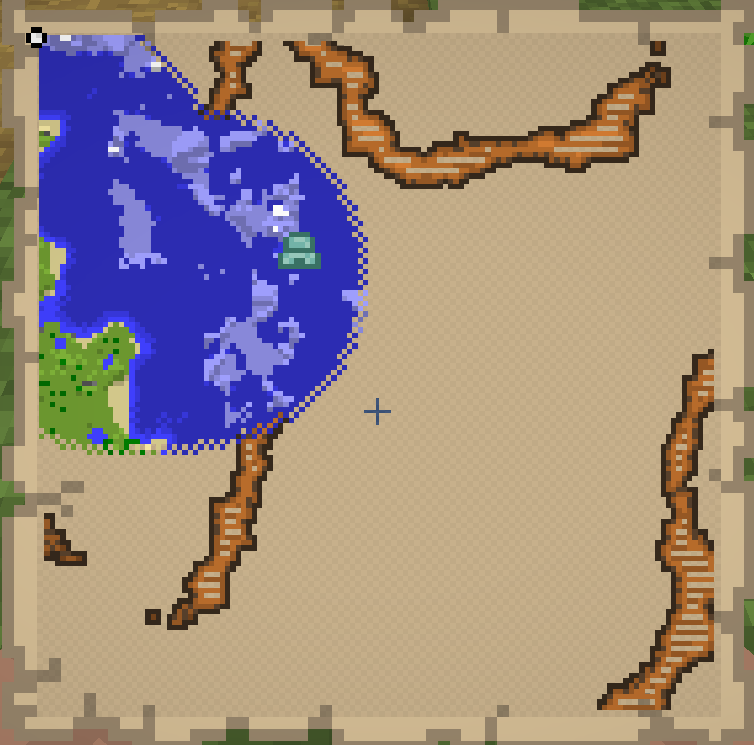
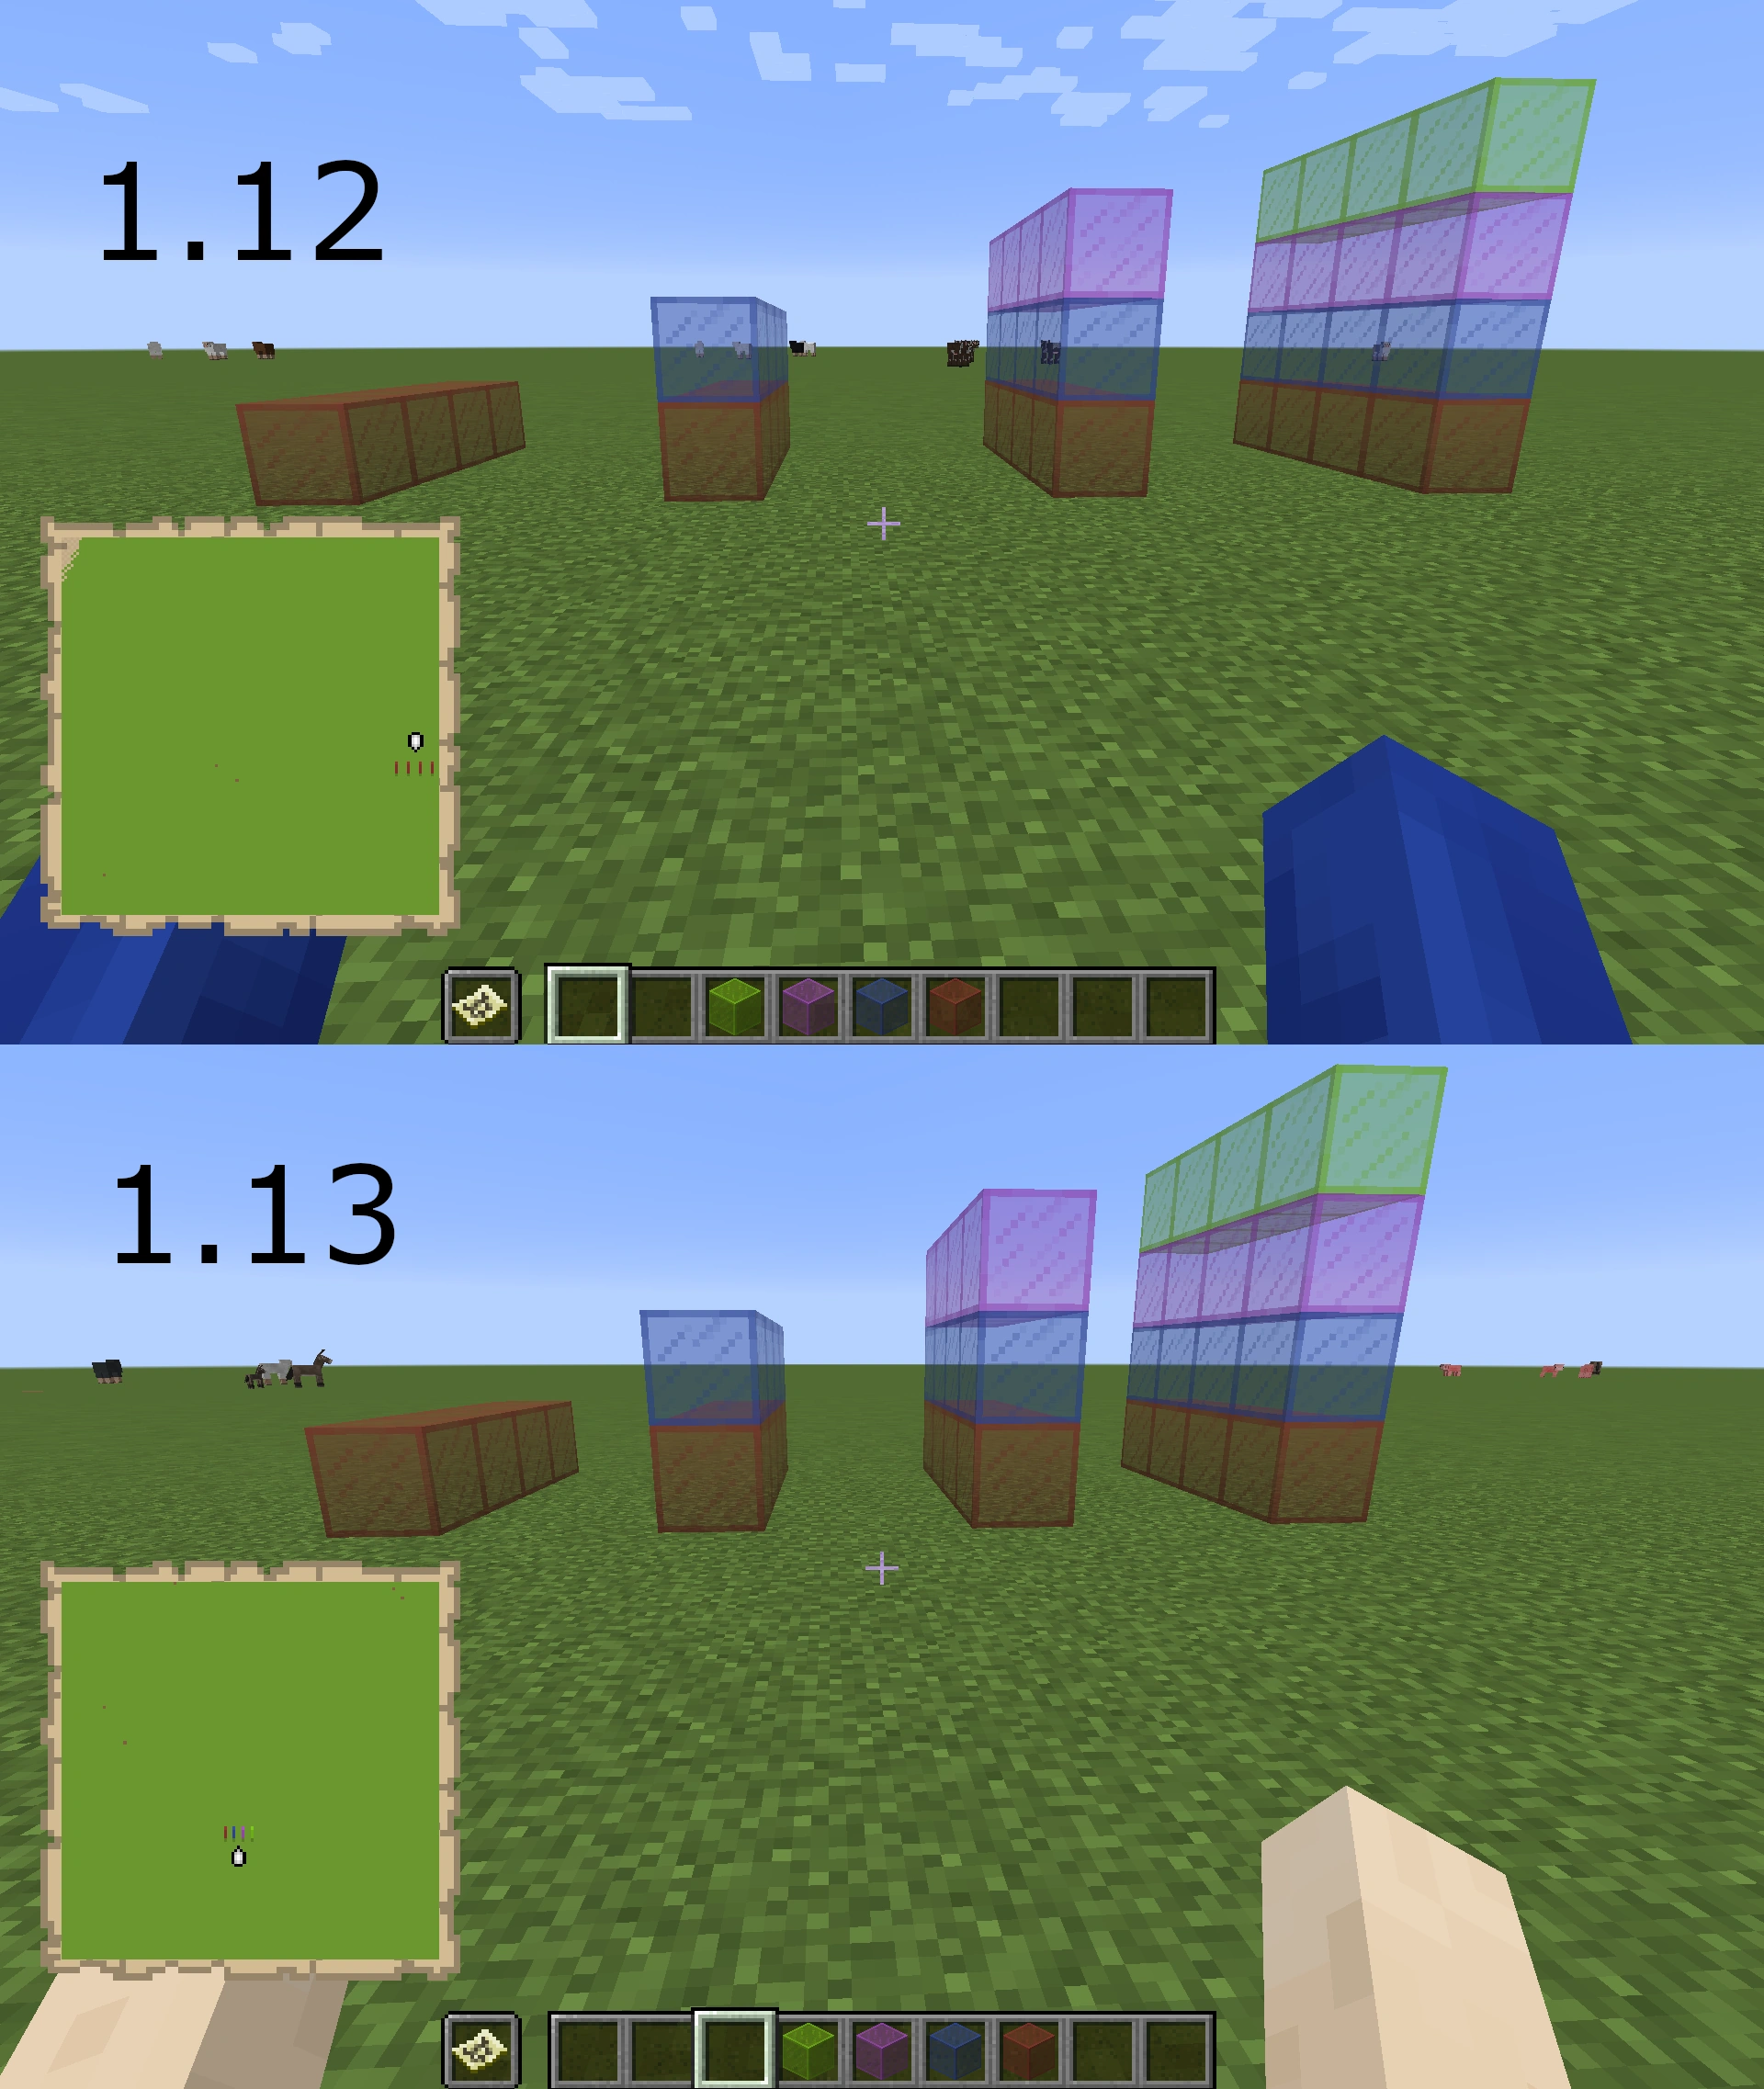

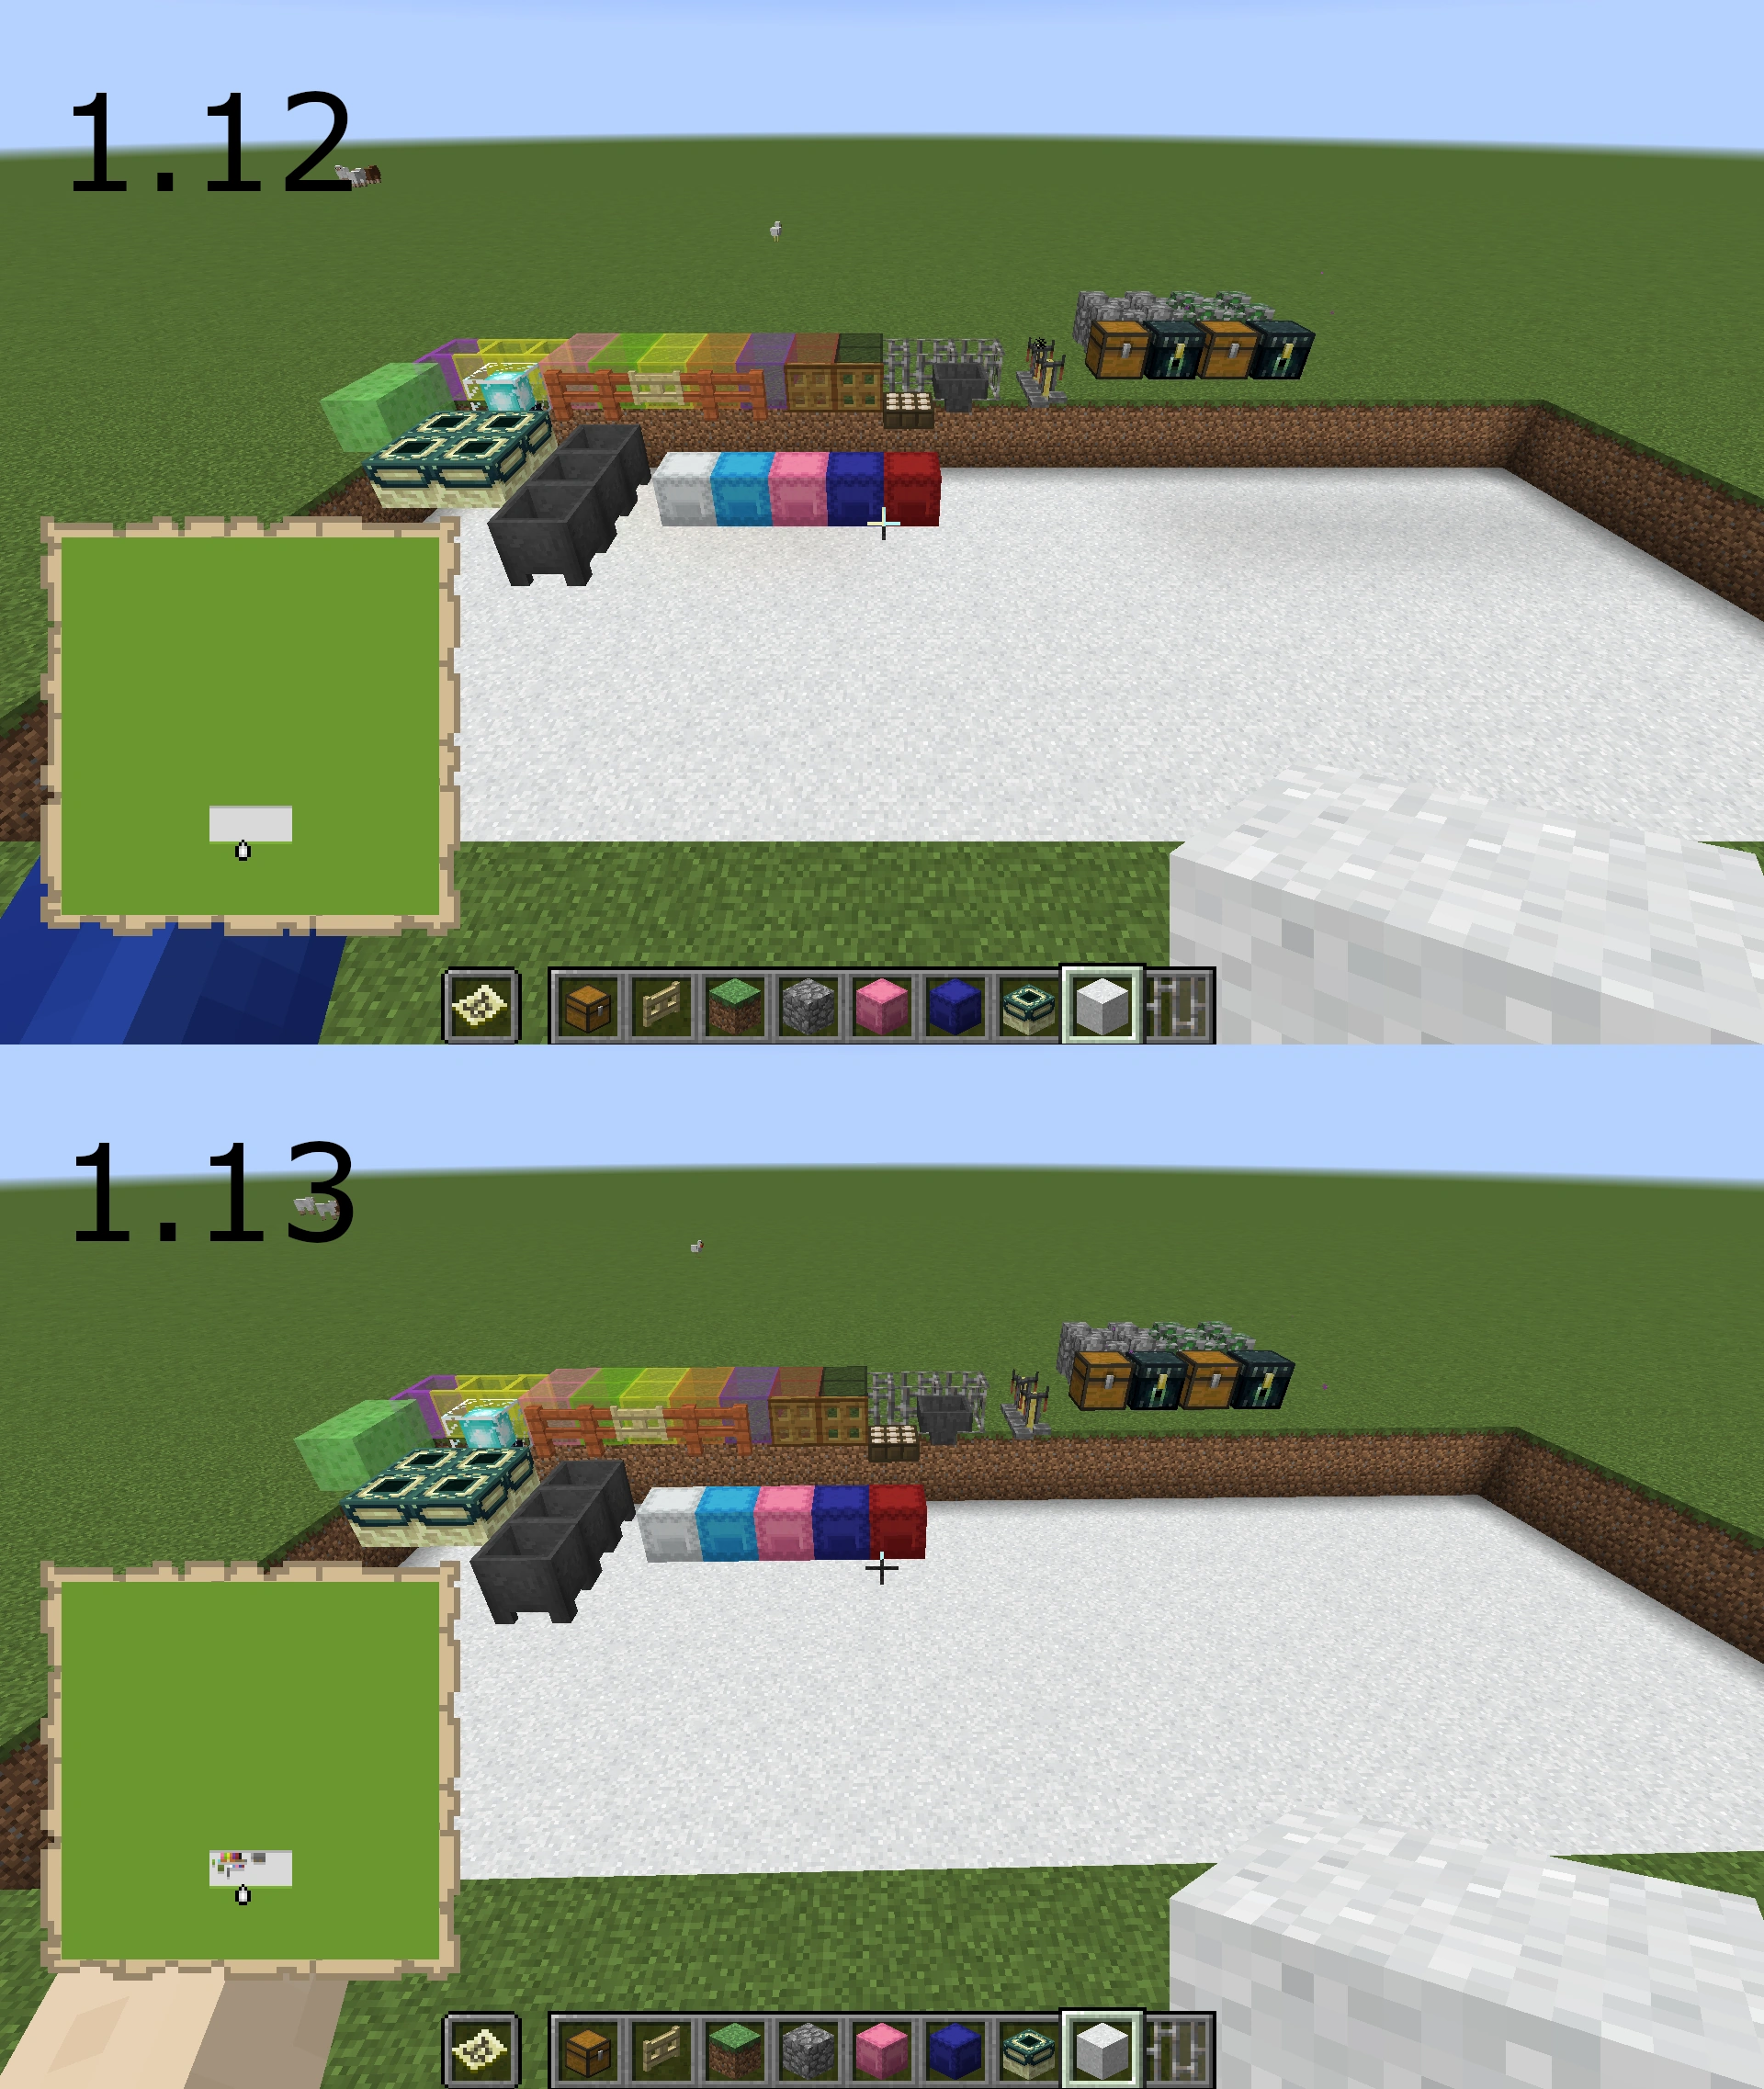
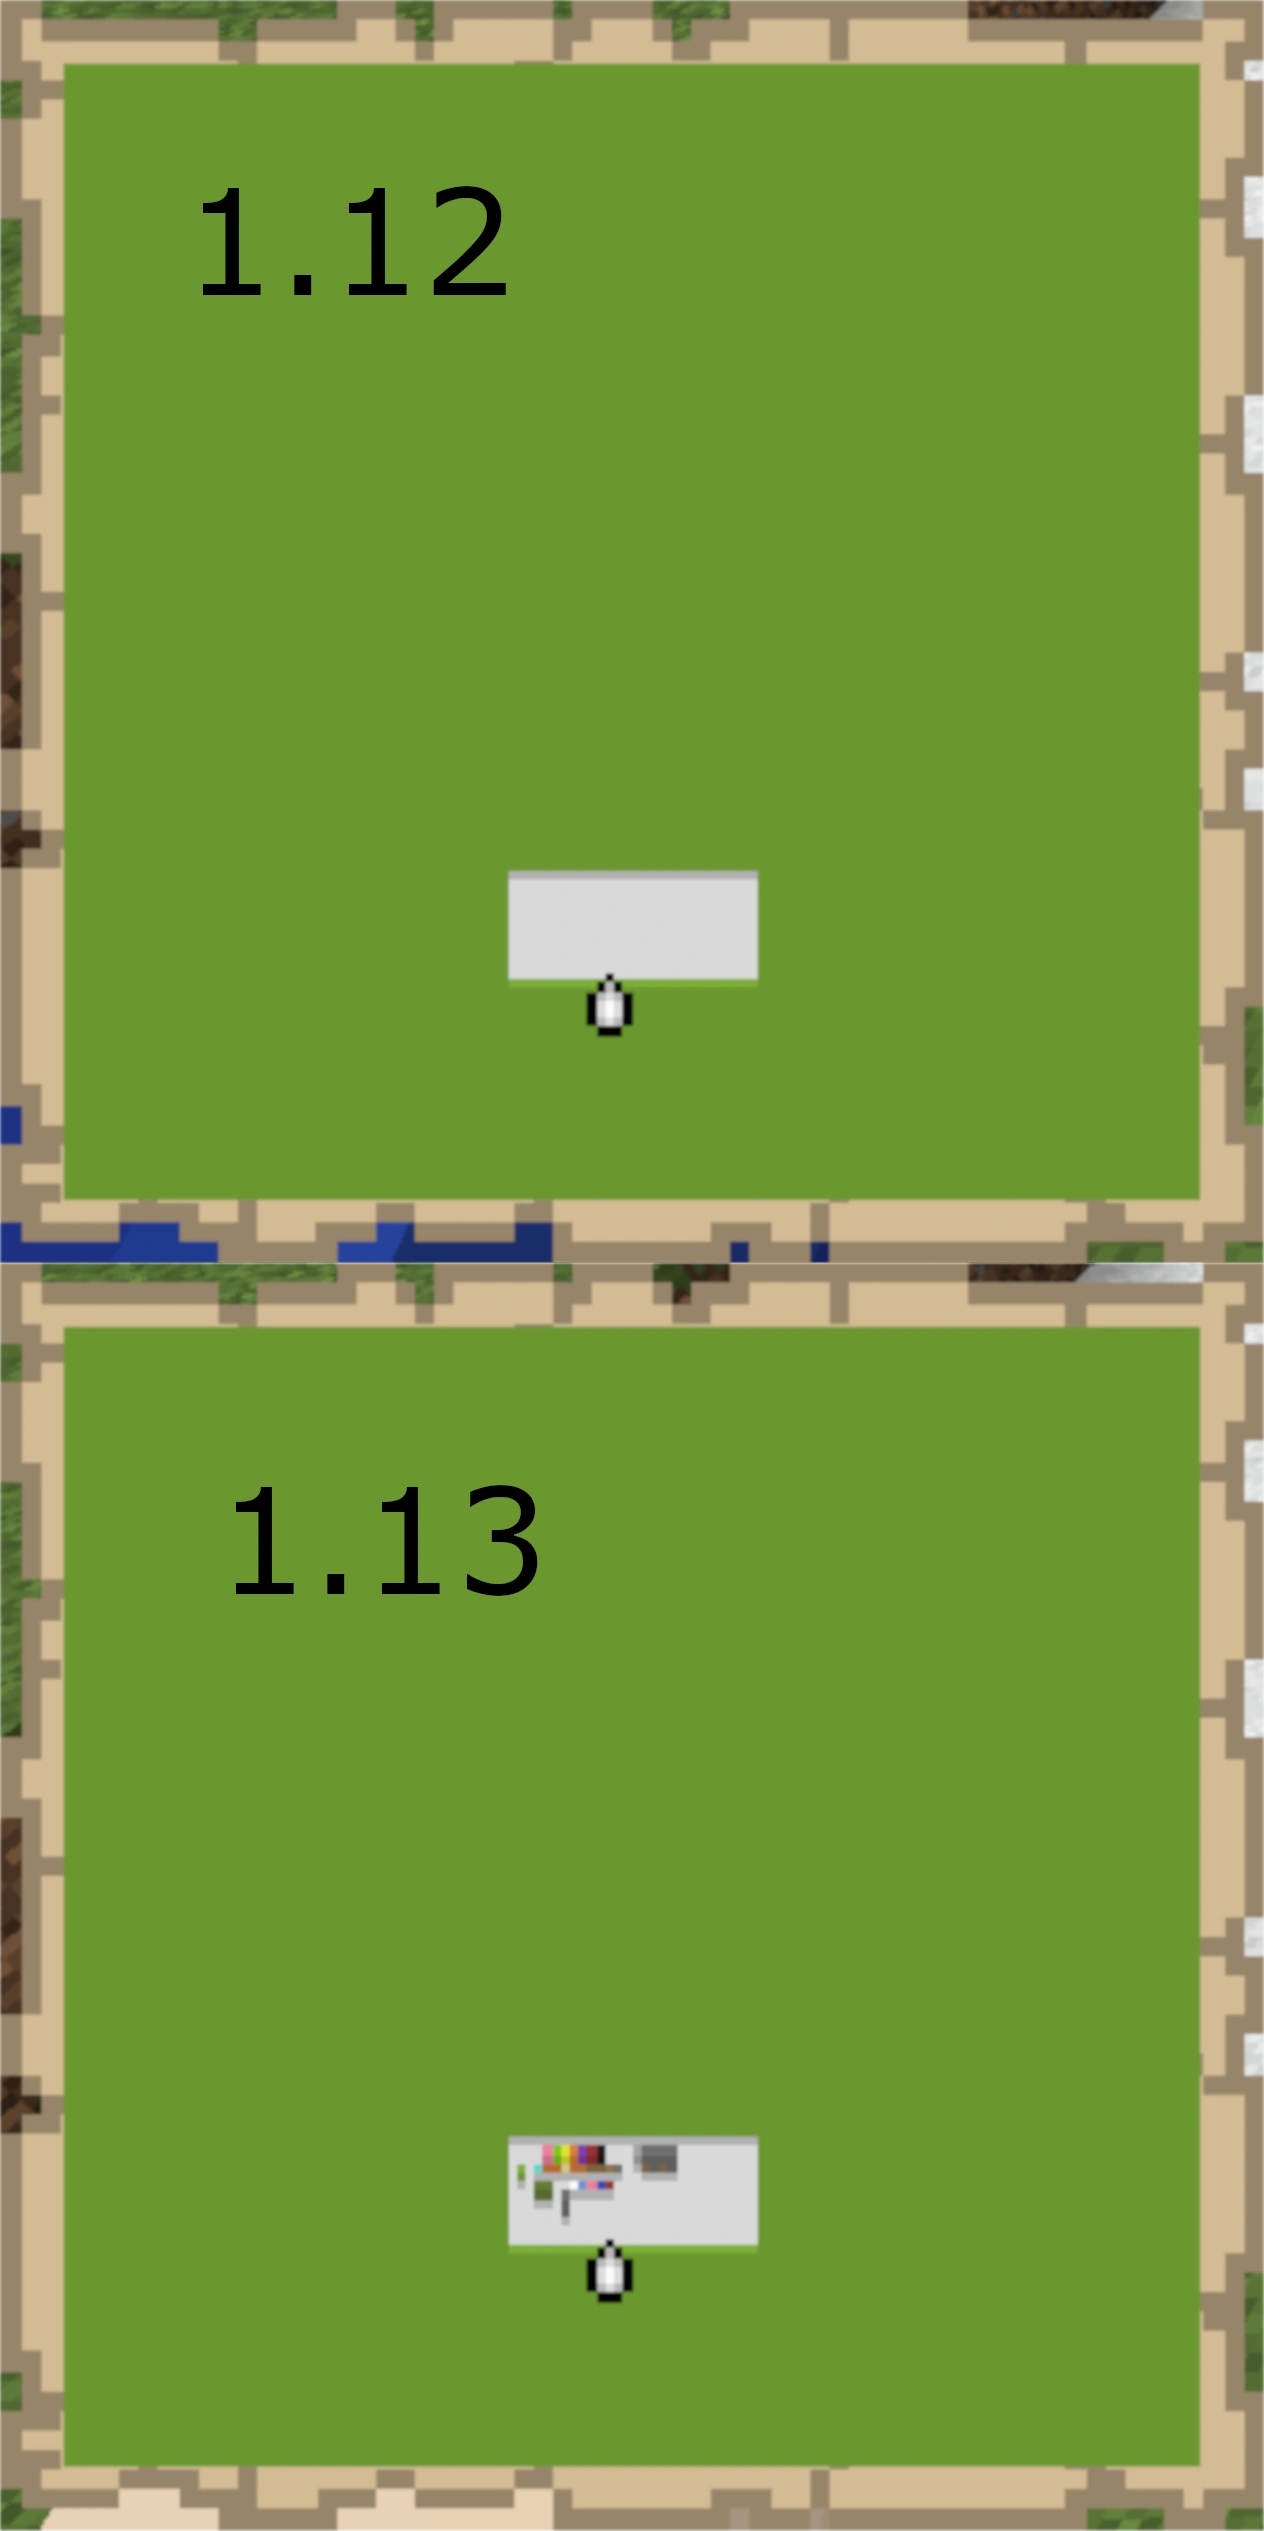
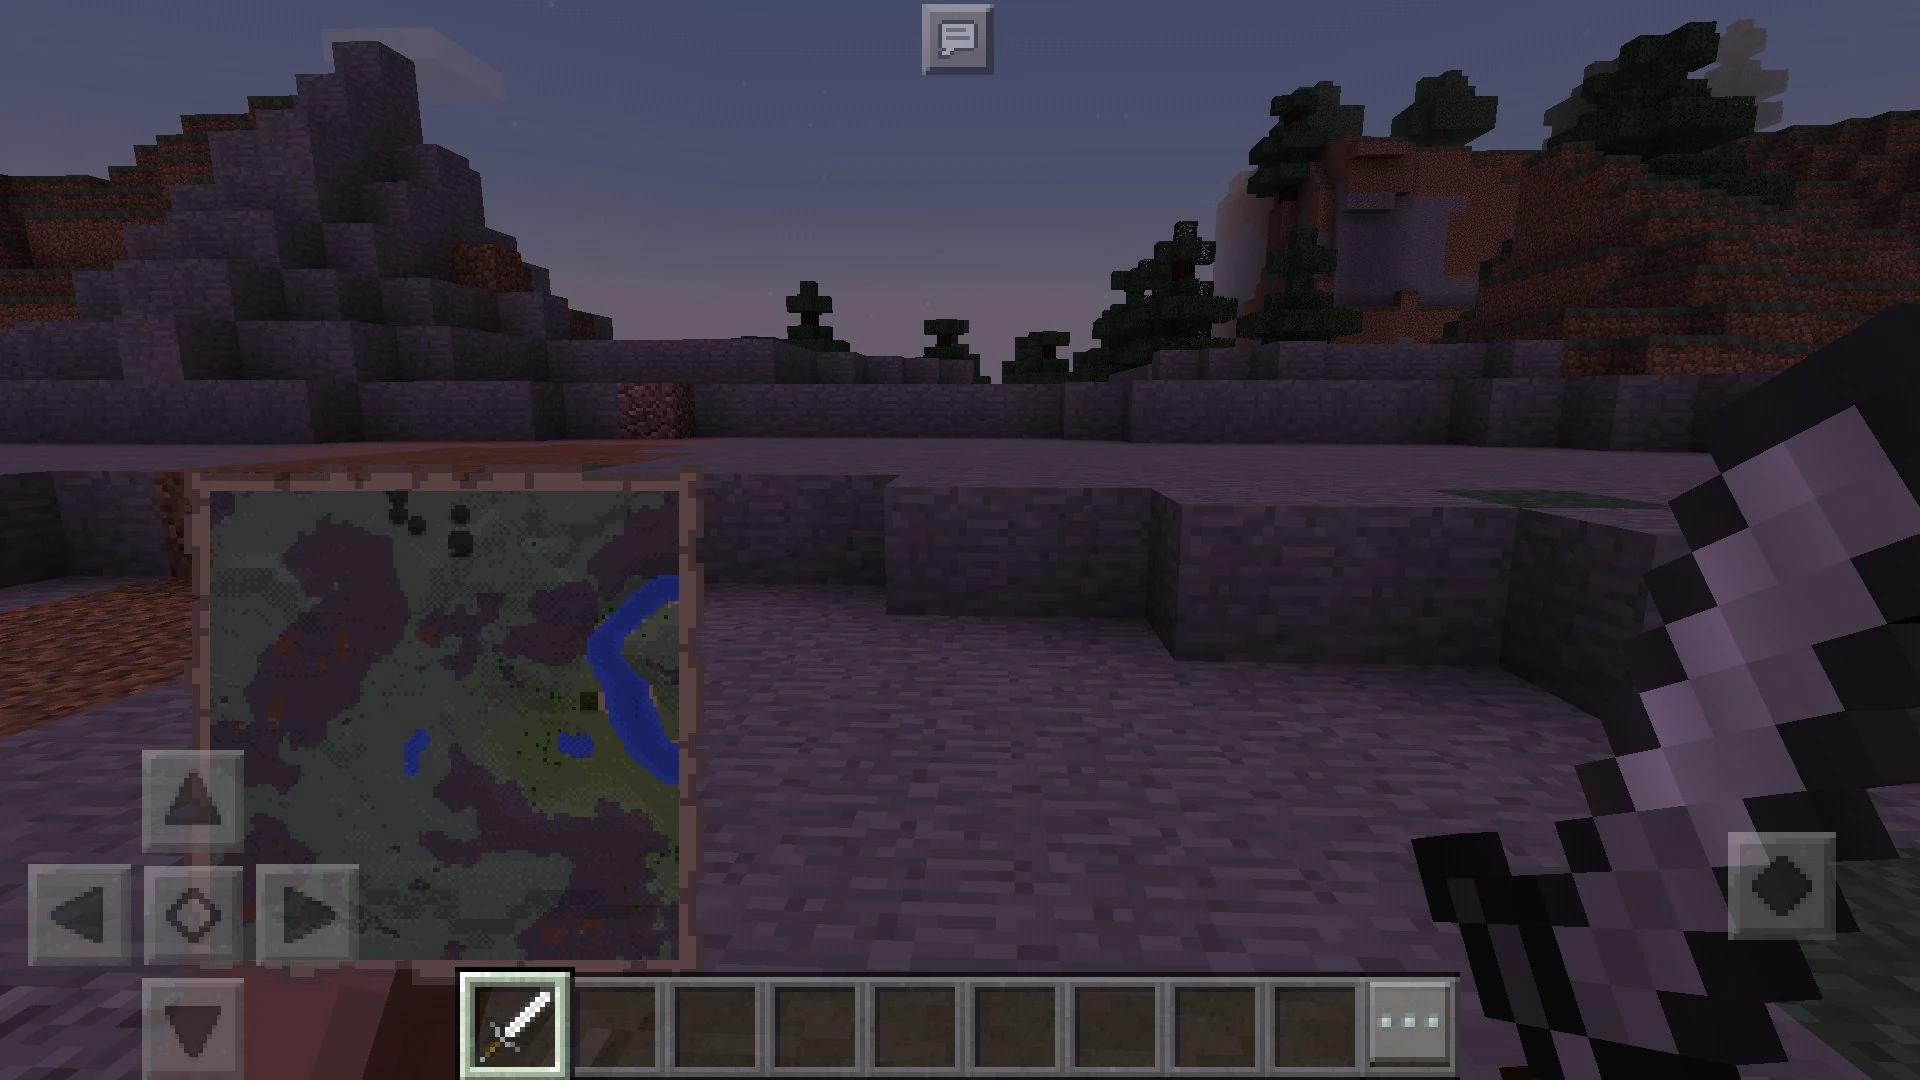
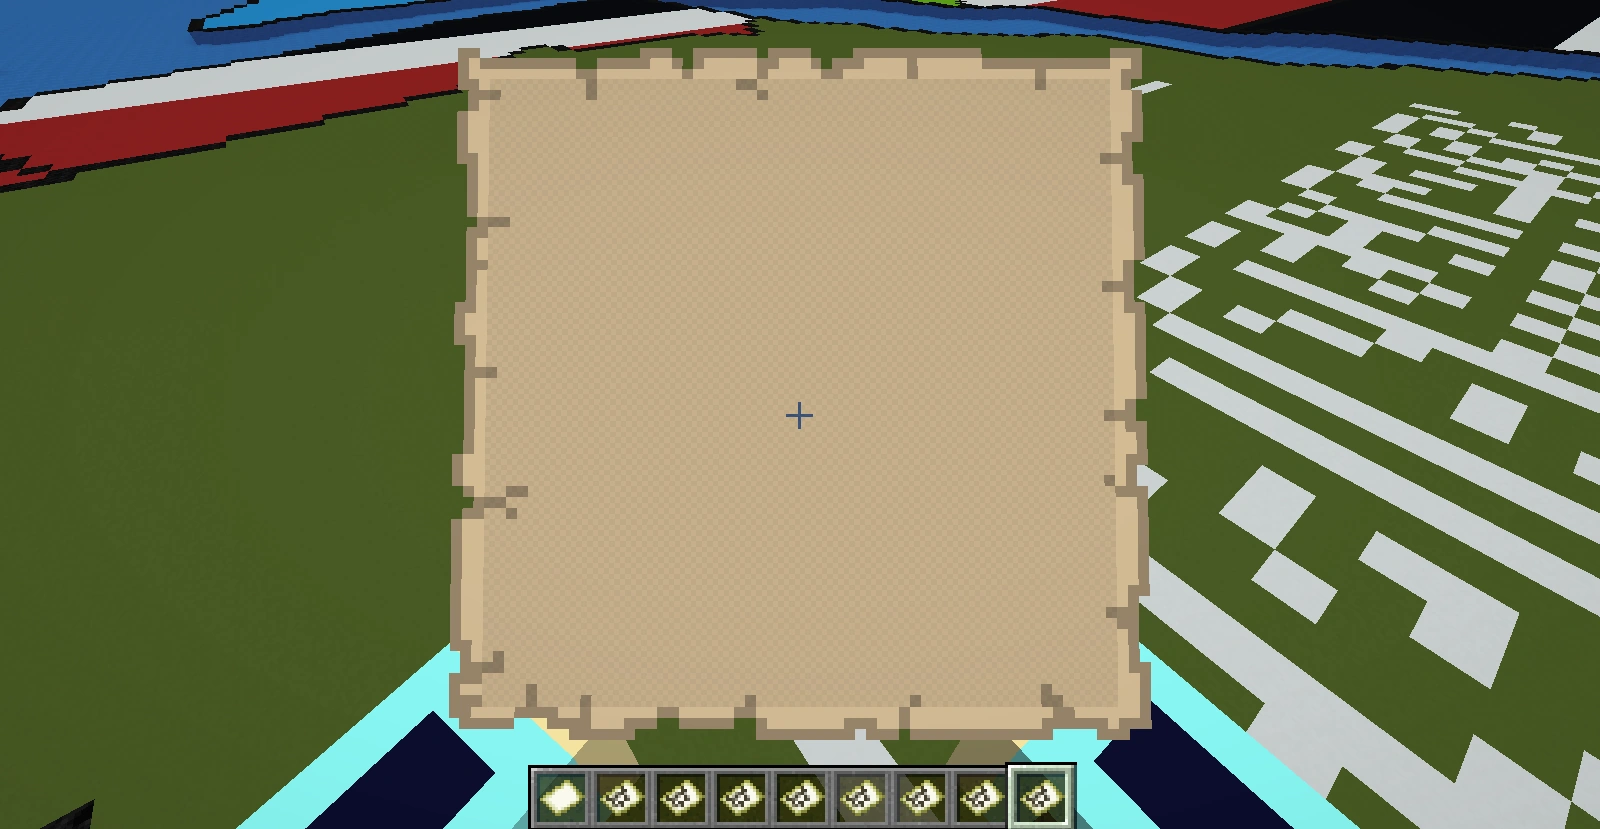
The Nether[]
A map in the Nether.
A map in the Nether; the arrow turns around itself, like in compass.
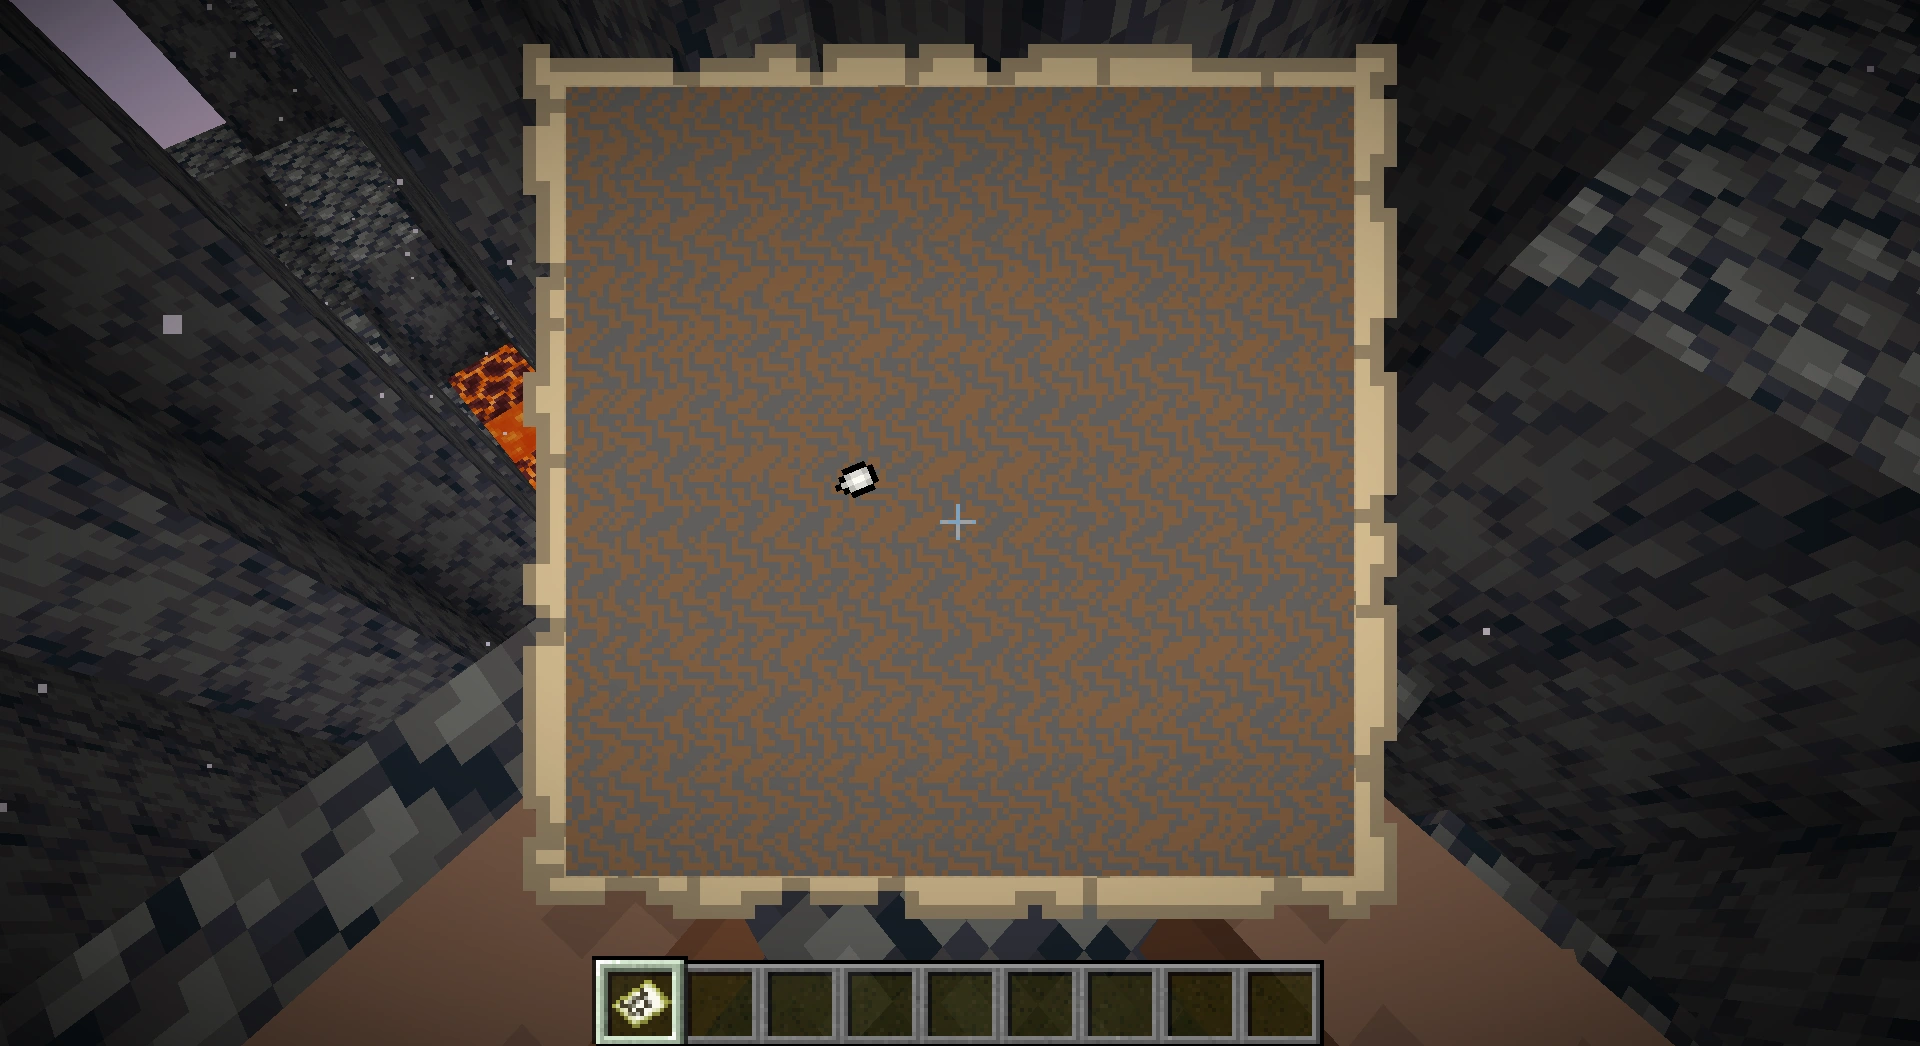
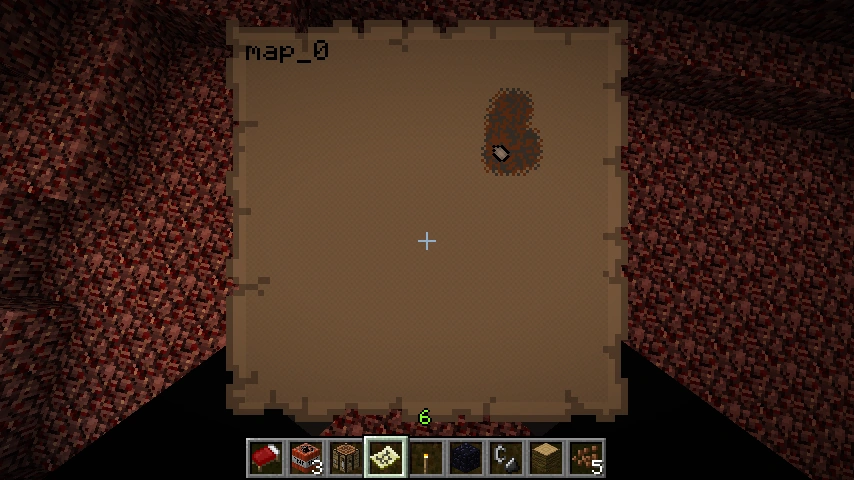
The End[]
The first image of a map in the End.
A map in the End.
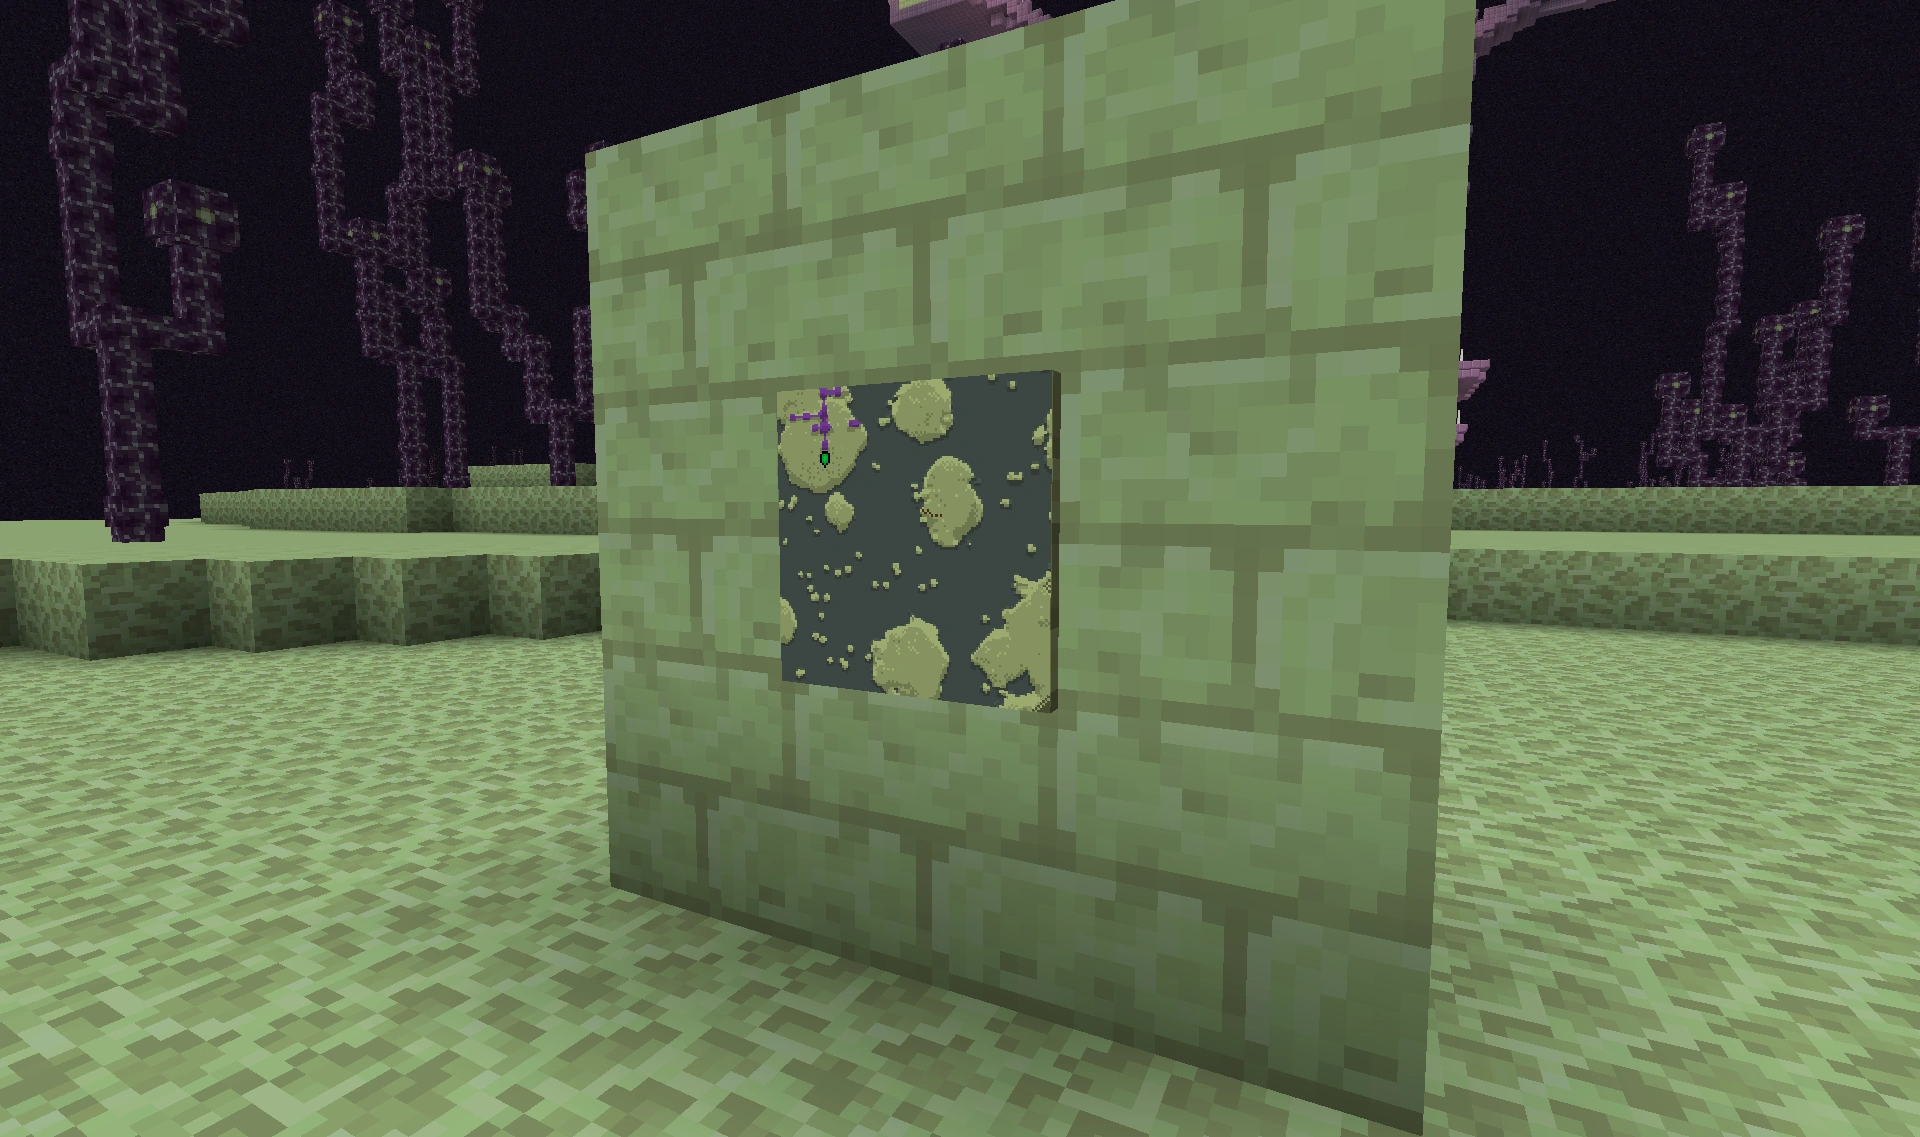
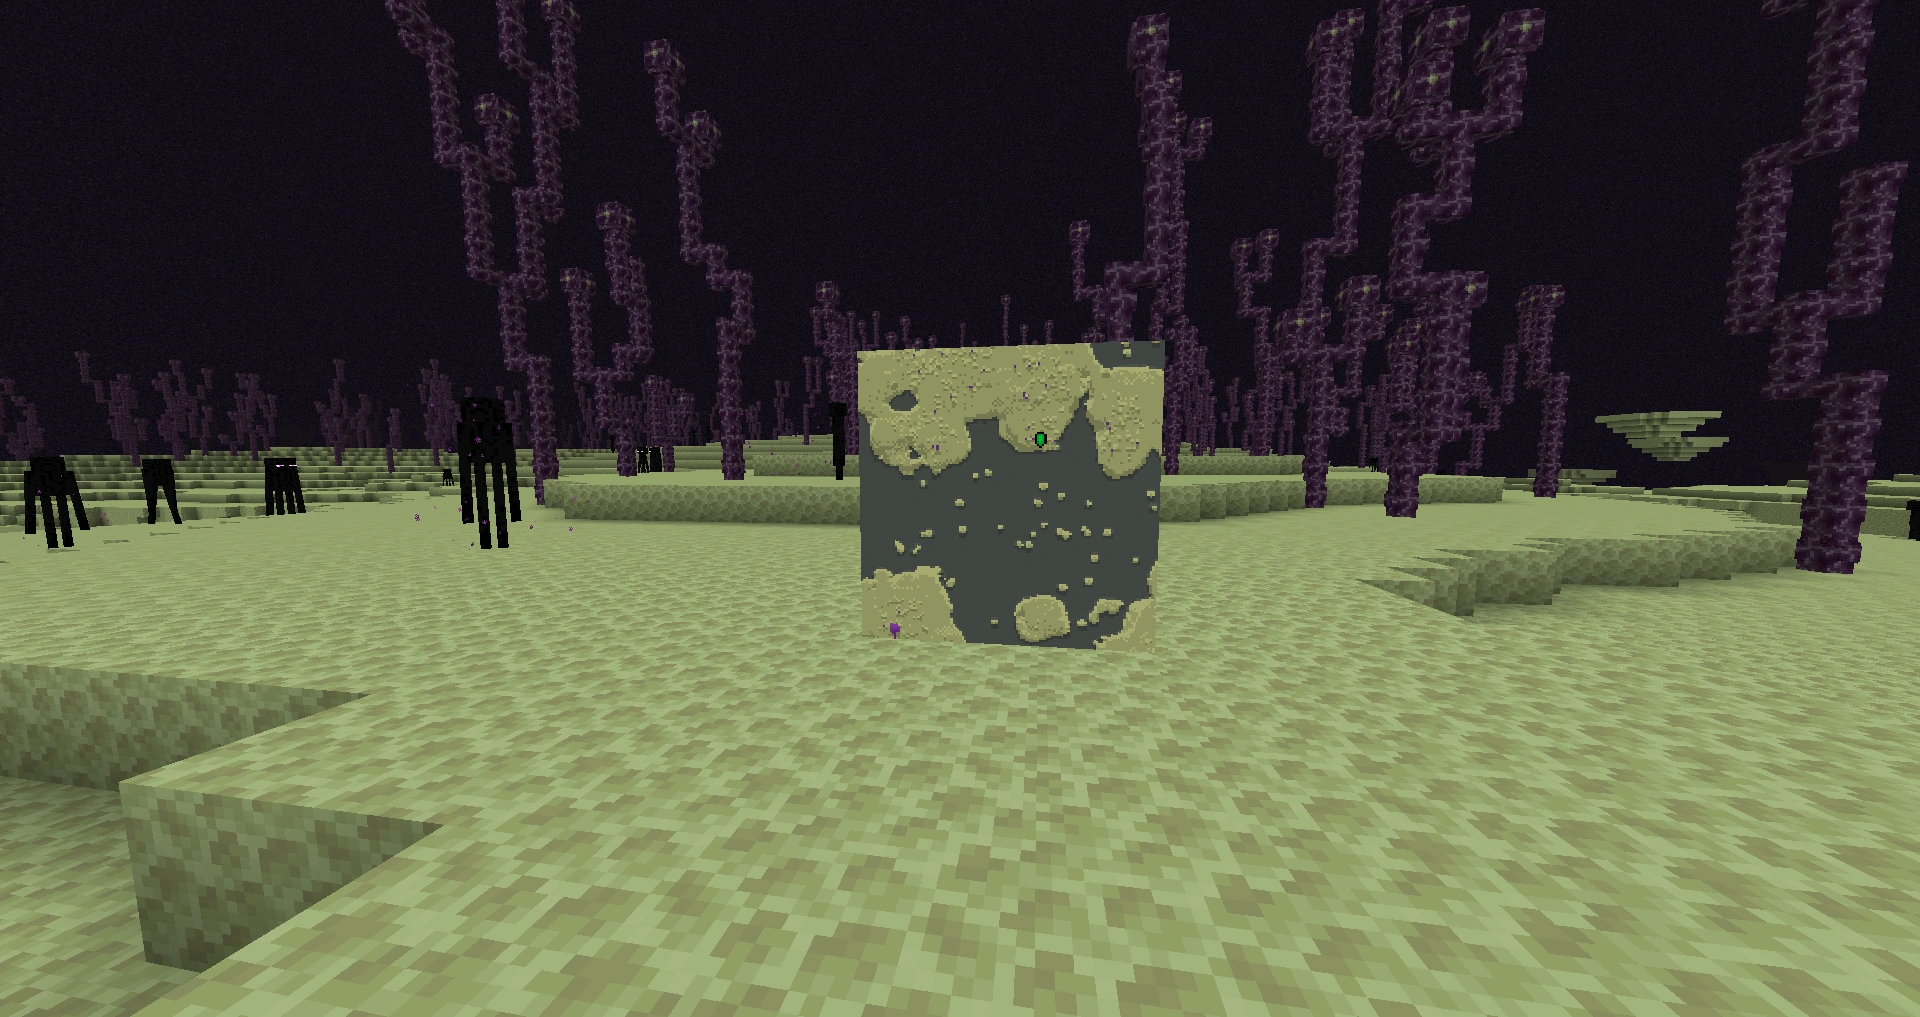
Maps in item frames[]
A map displayed on an item frame, as it looked before Java Edition 1.7.2.
Multiple maps in item frames. Notice a village, two desert temples and a lava lake.
A collection of 9 connected full maps.
A combination of 25 maps pasted together as one map.
A map wall on Bedrock Edition, showing large areas of biome colors for each biome.
Maps can be placed into item frames so they can be viewed together.
The comparison between 3 zooms of maps.
A 3x3 map wall with banner markers.
He-Man map art.
First image of player icons on maps.
Second image of player icons on maps.
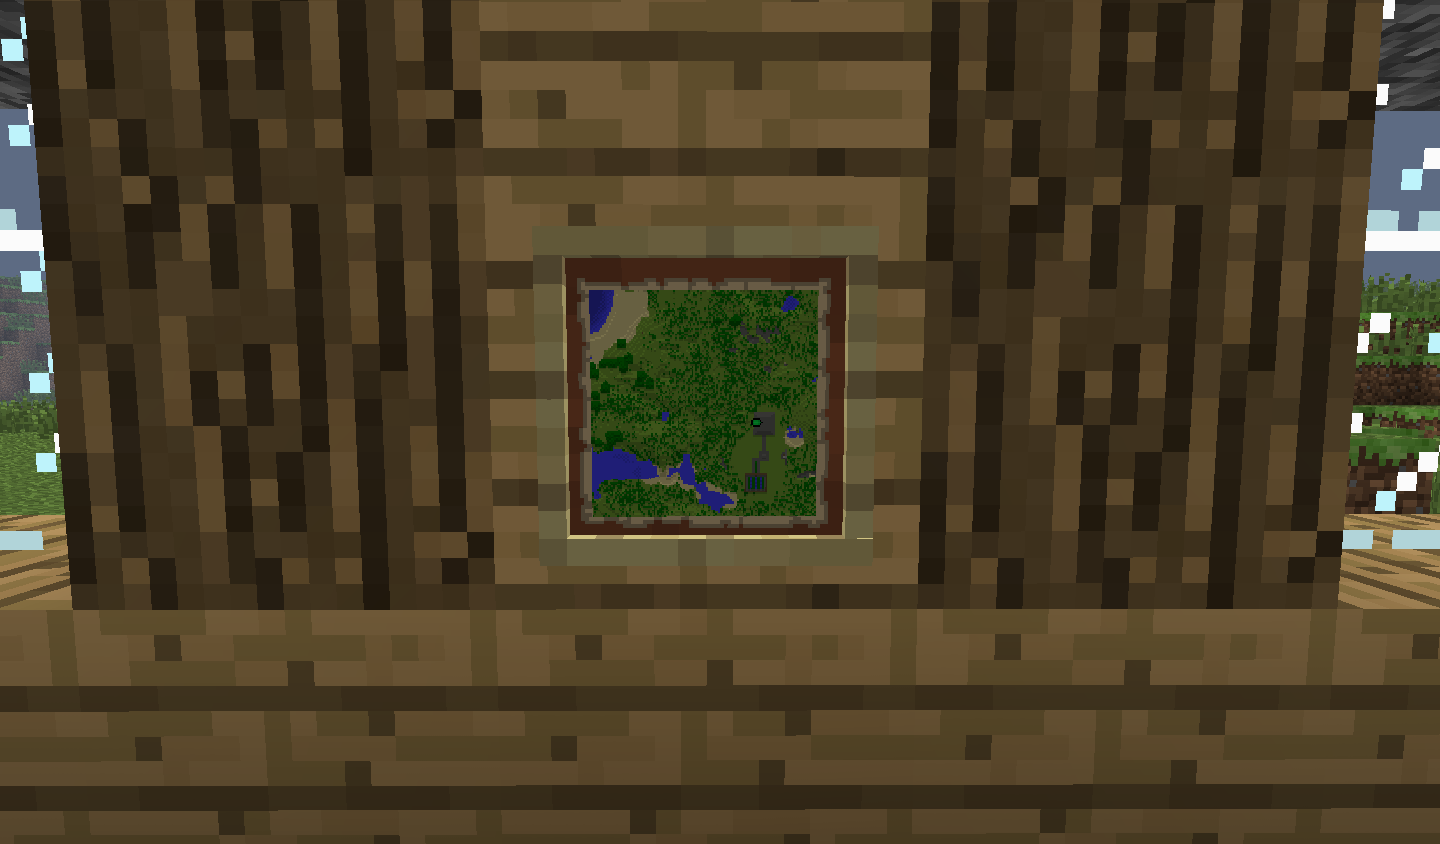
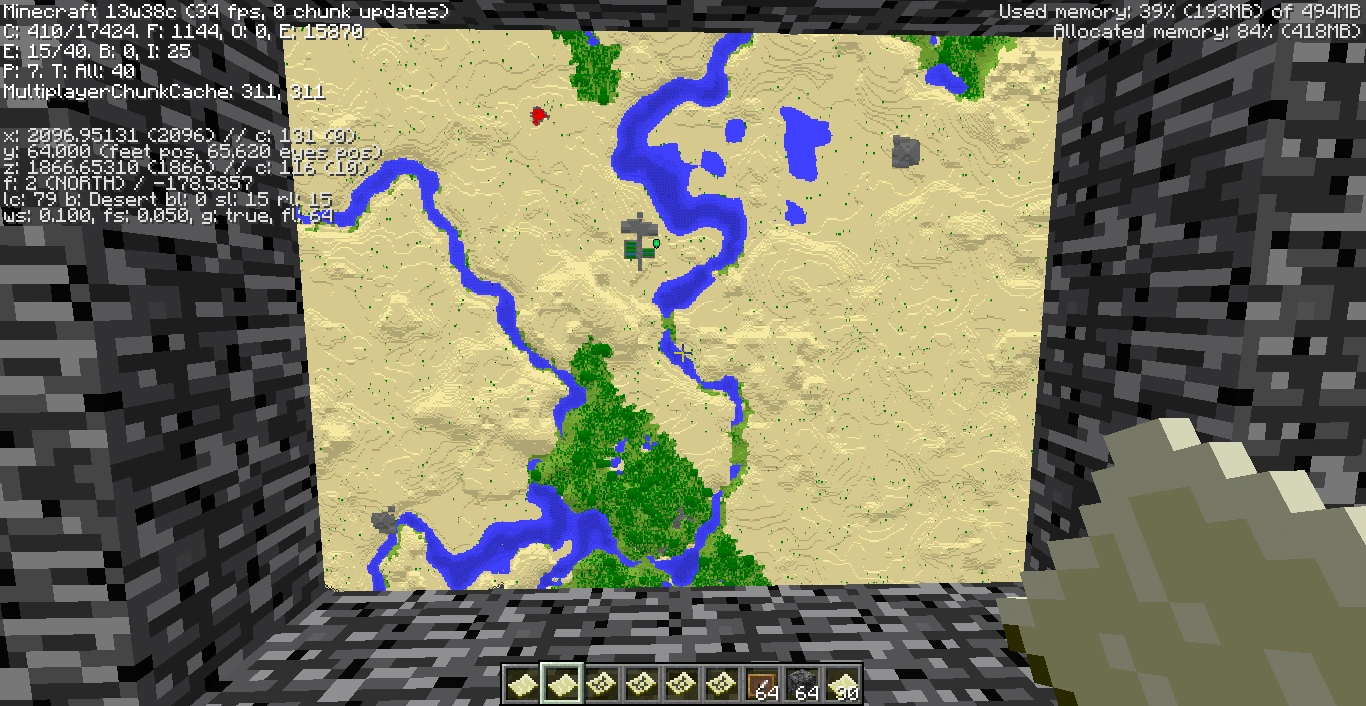
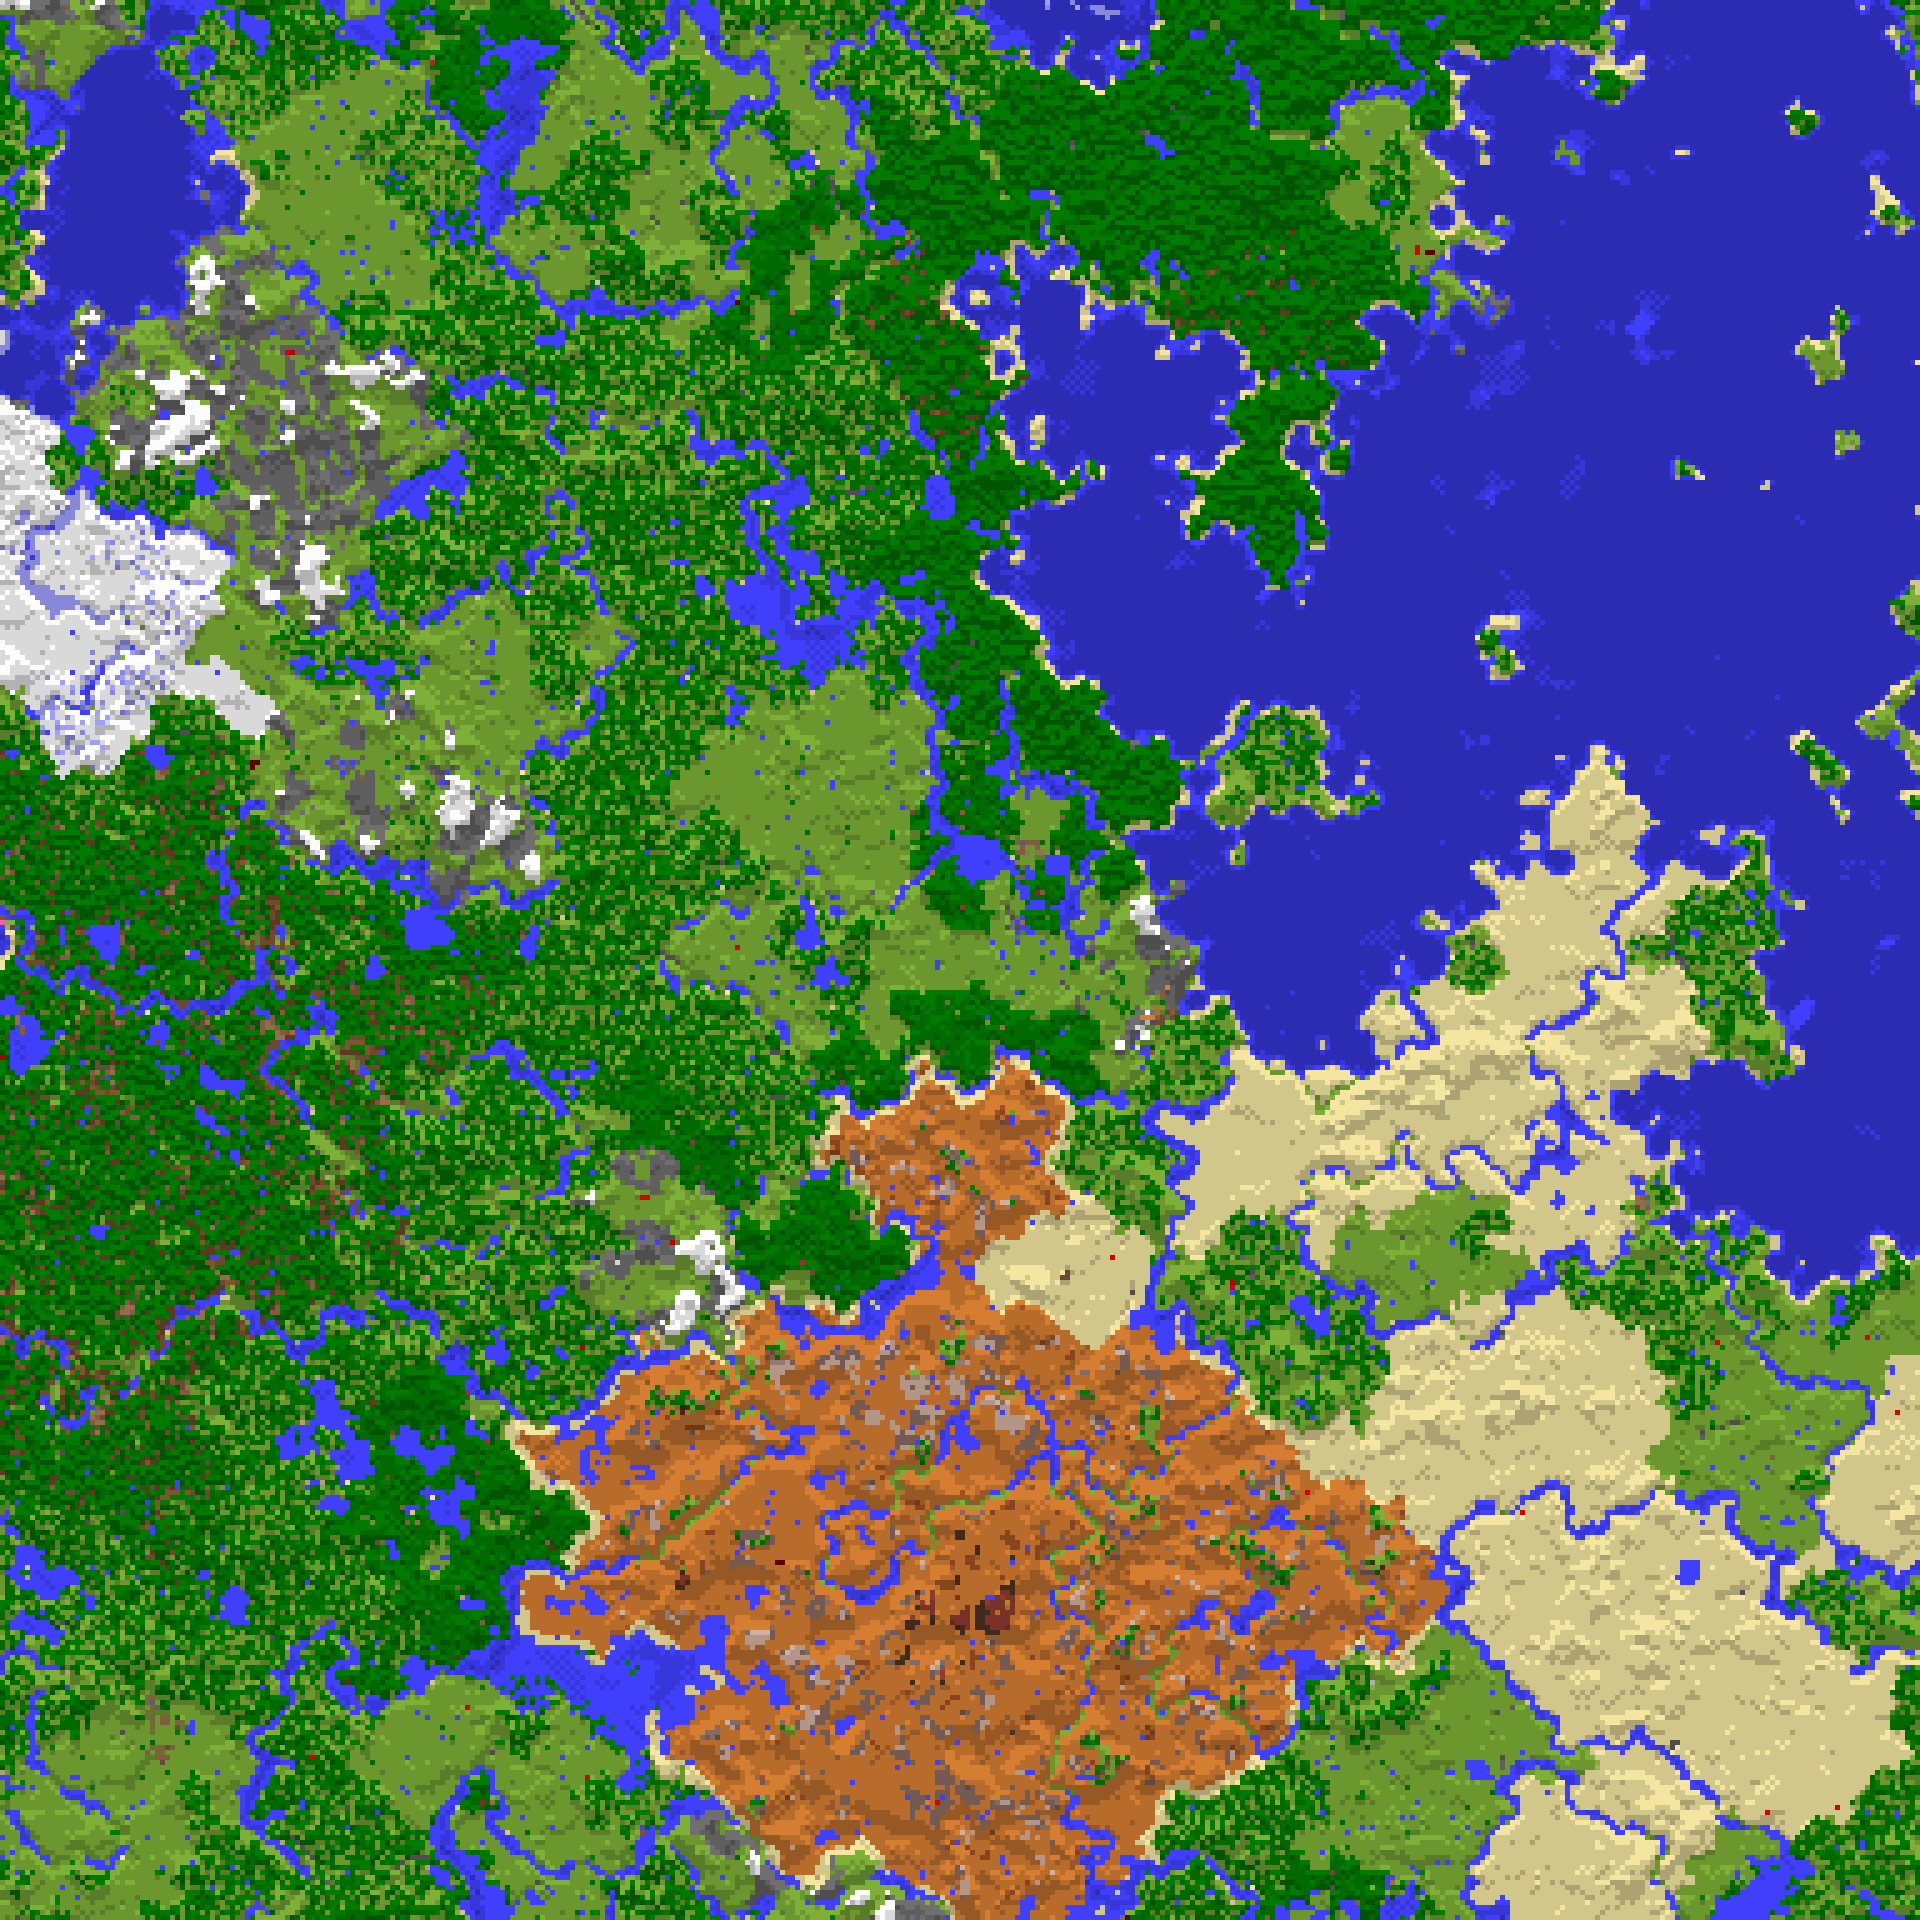
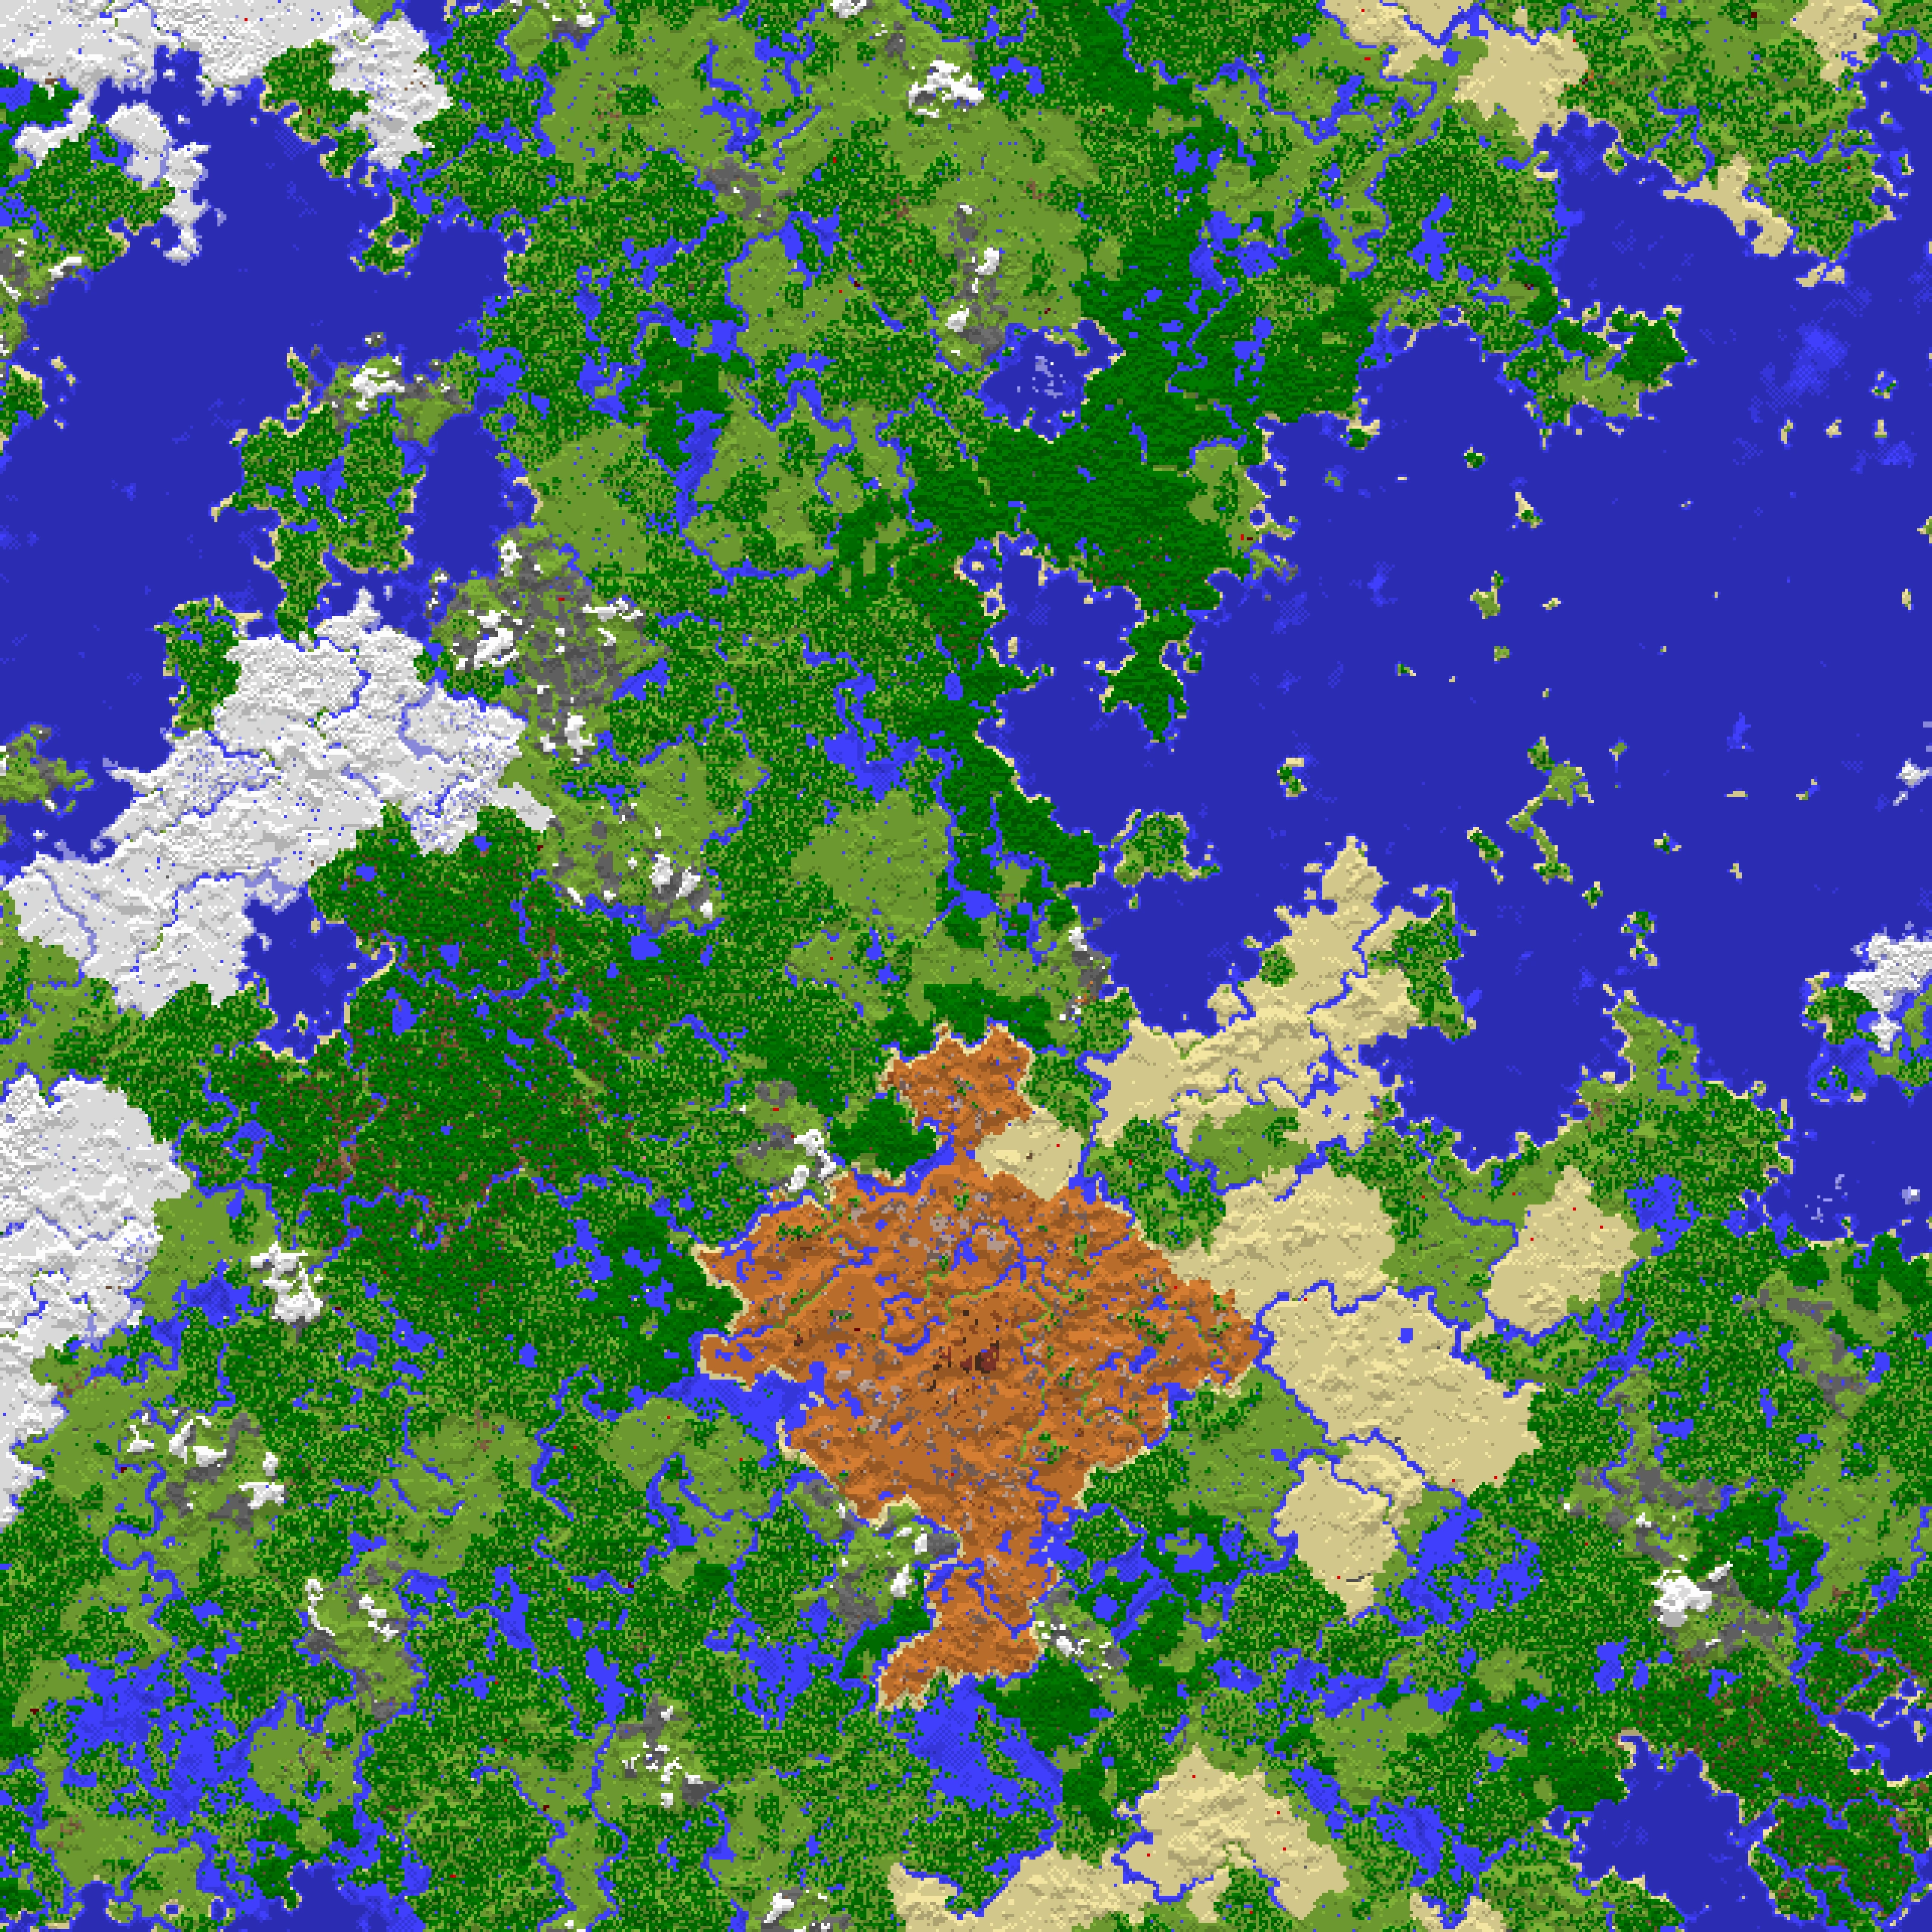
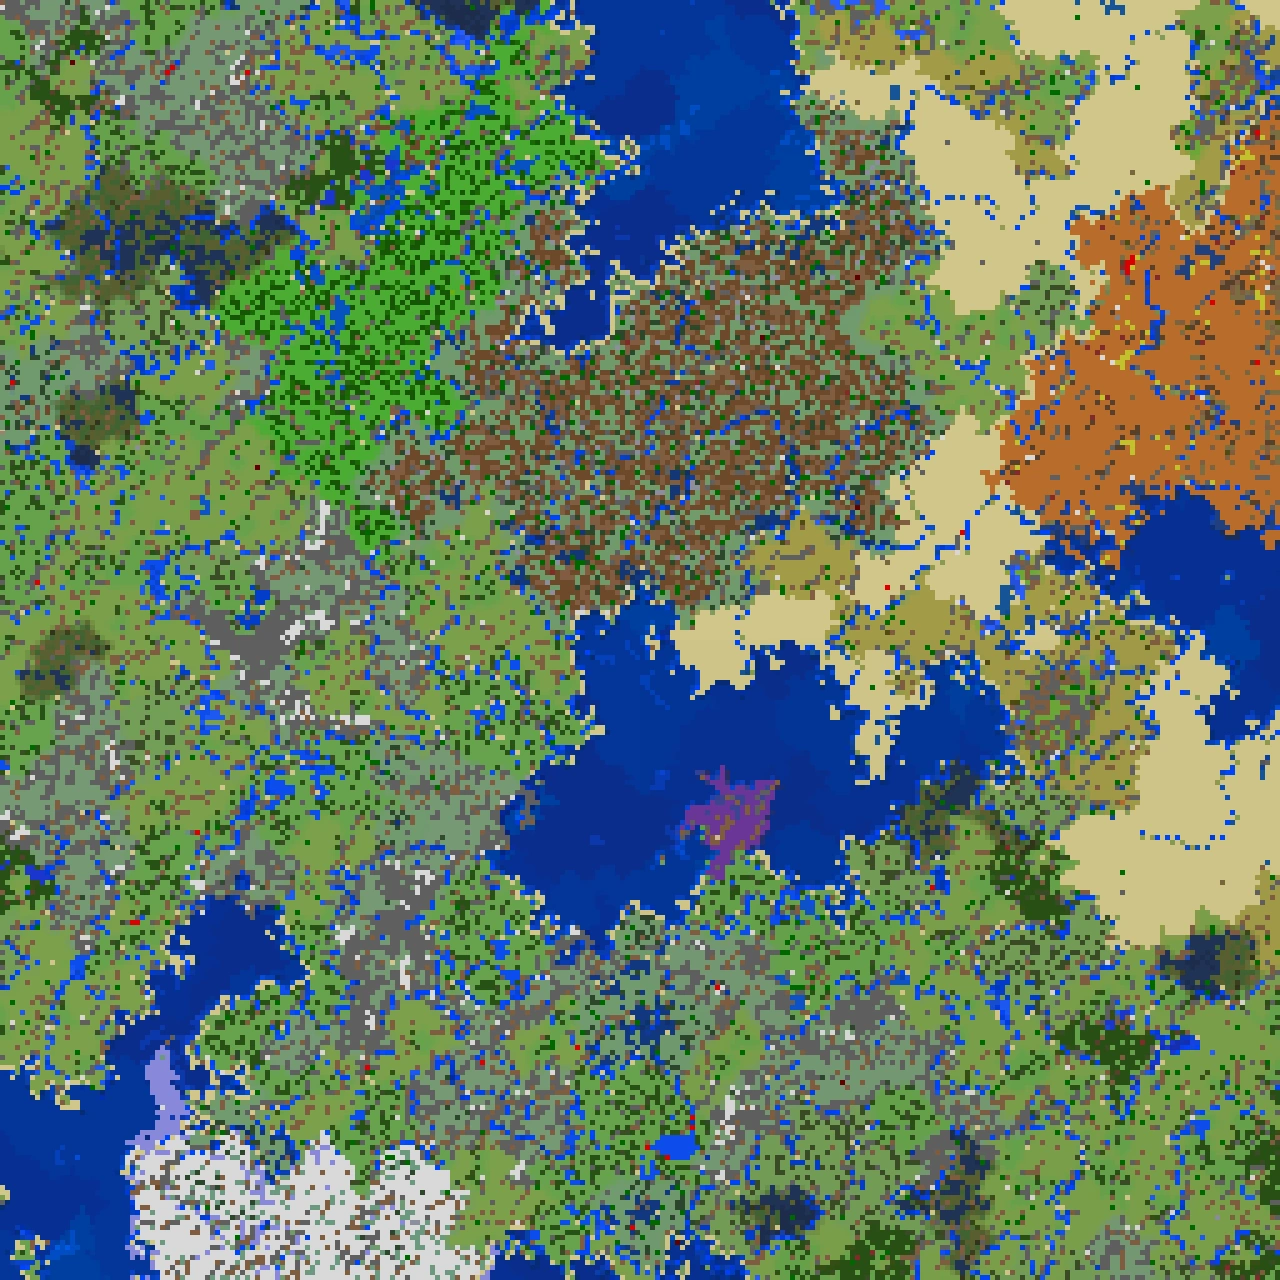
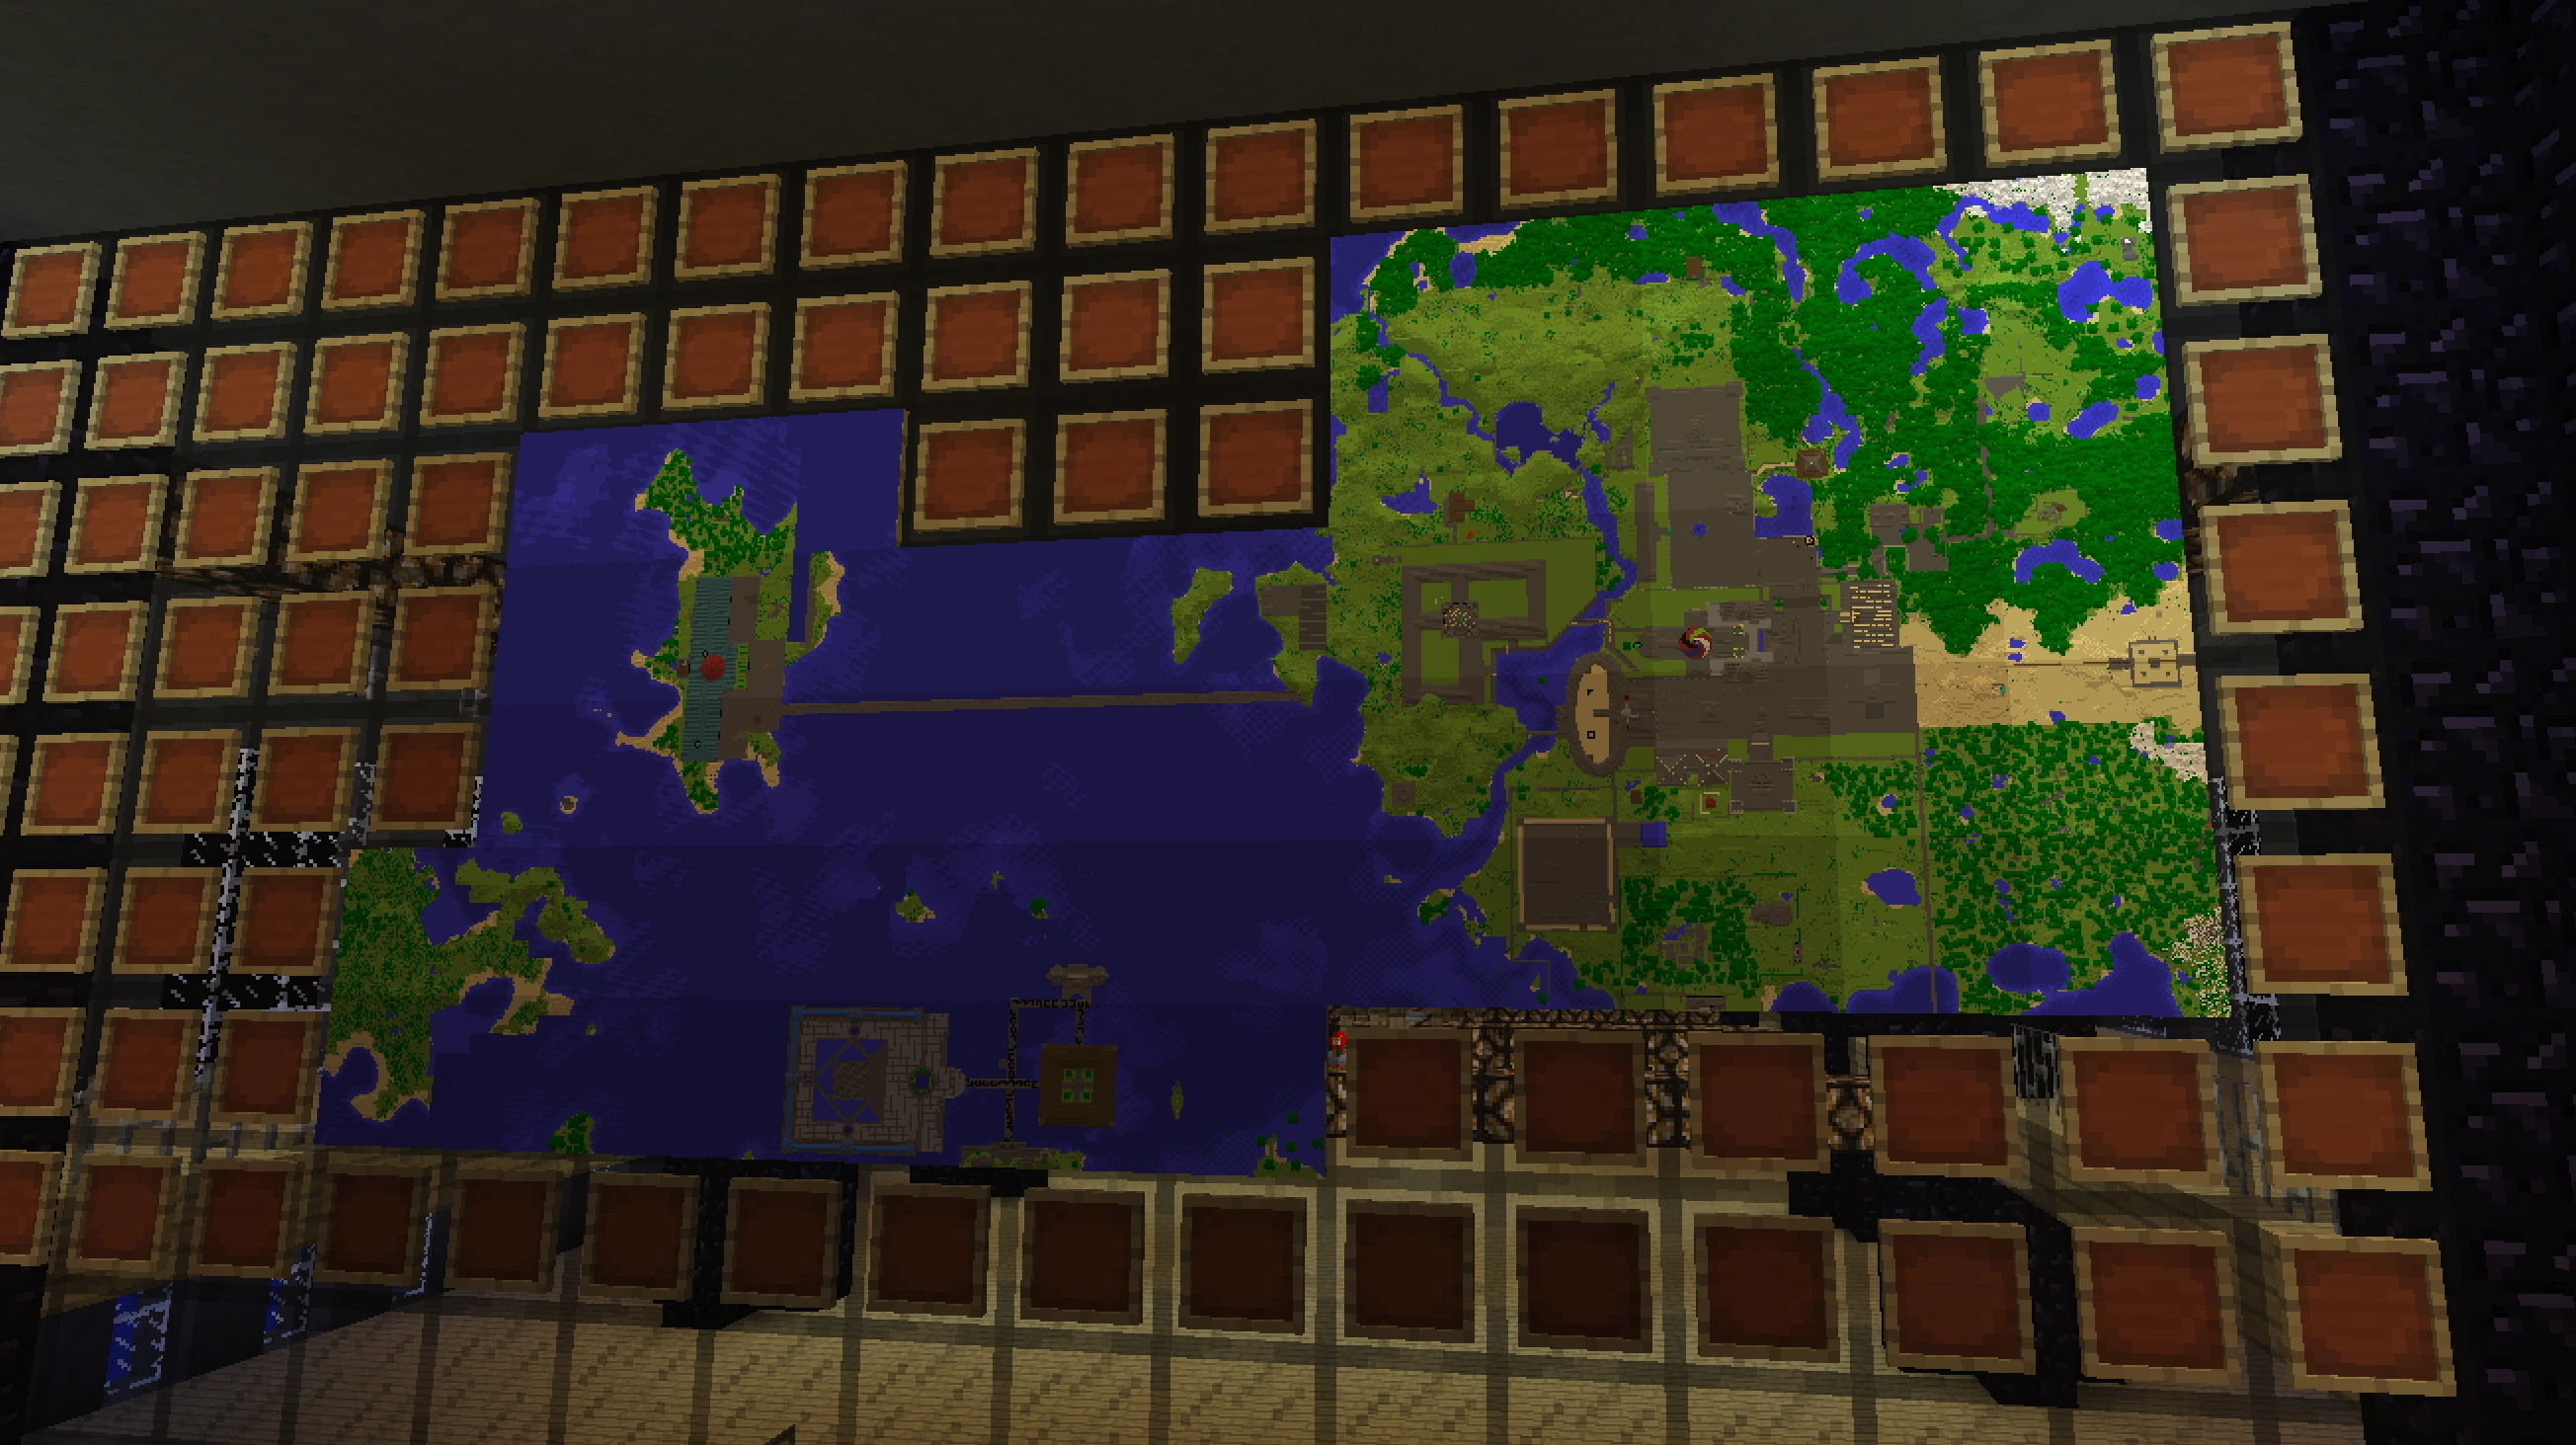
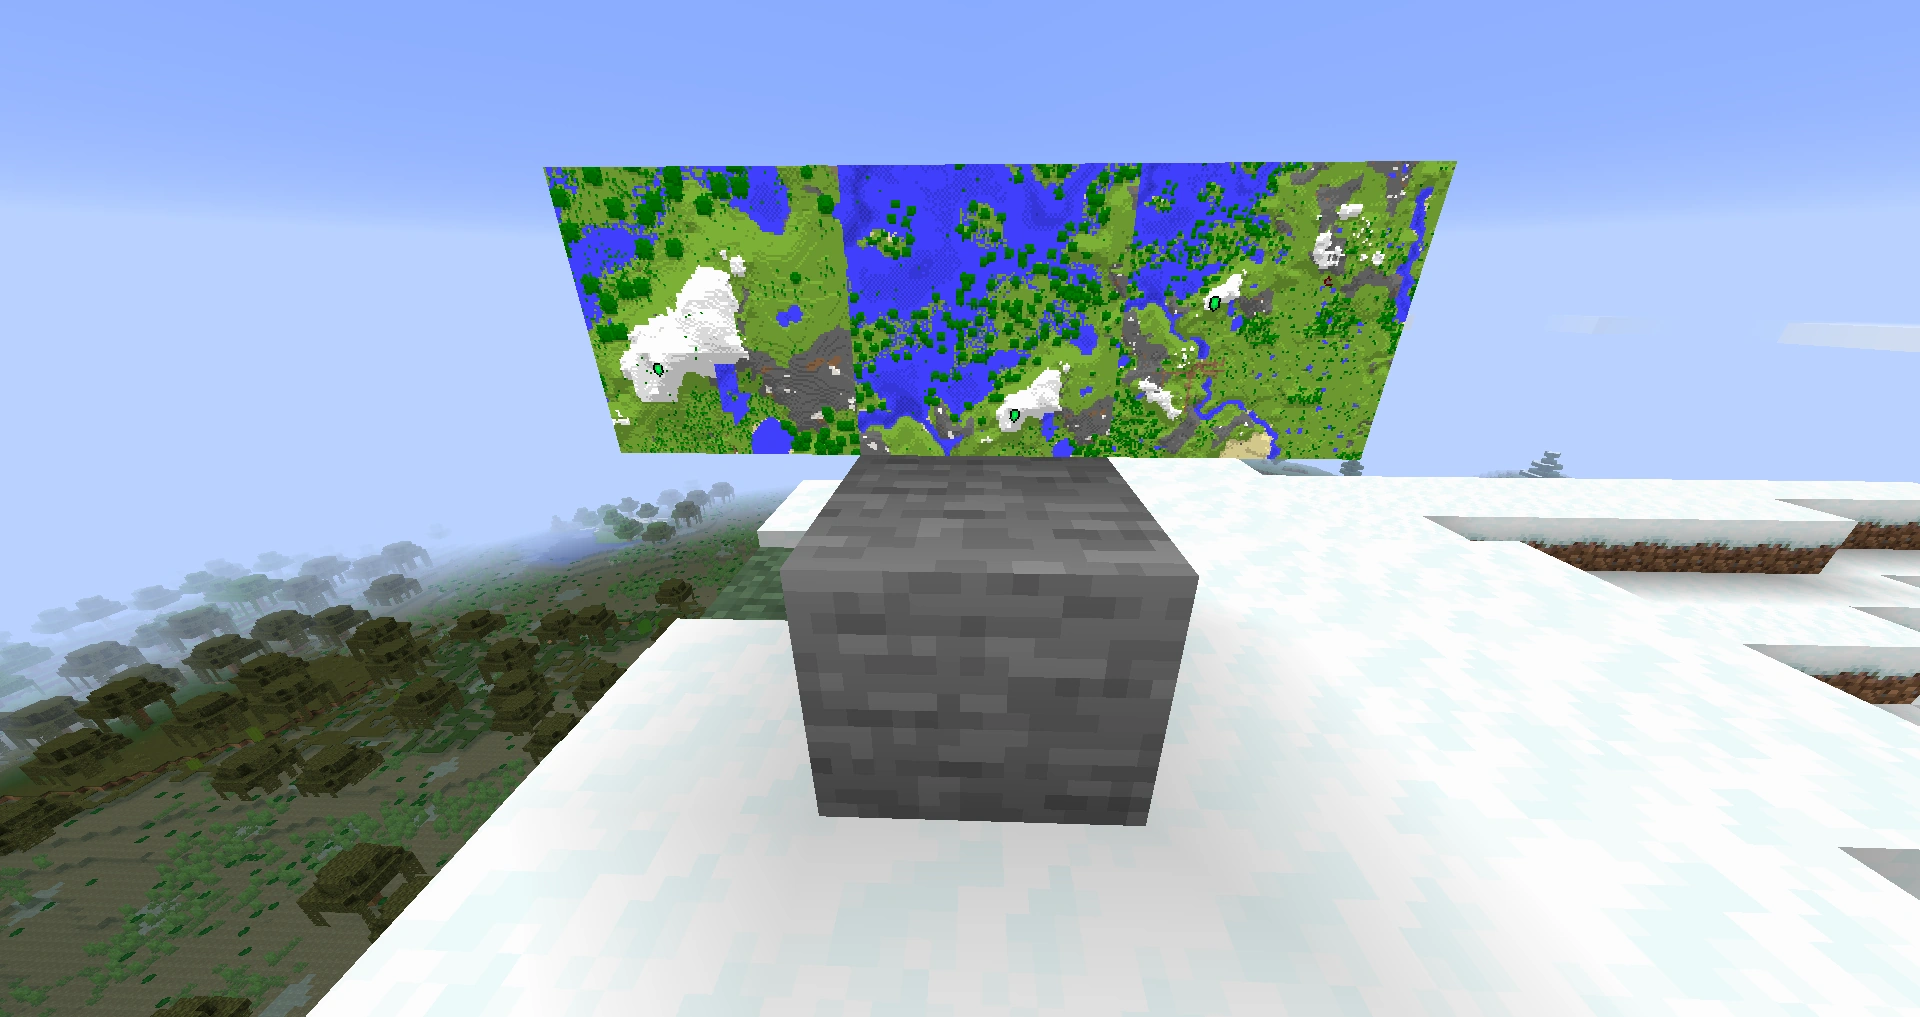
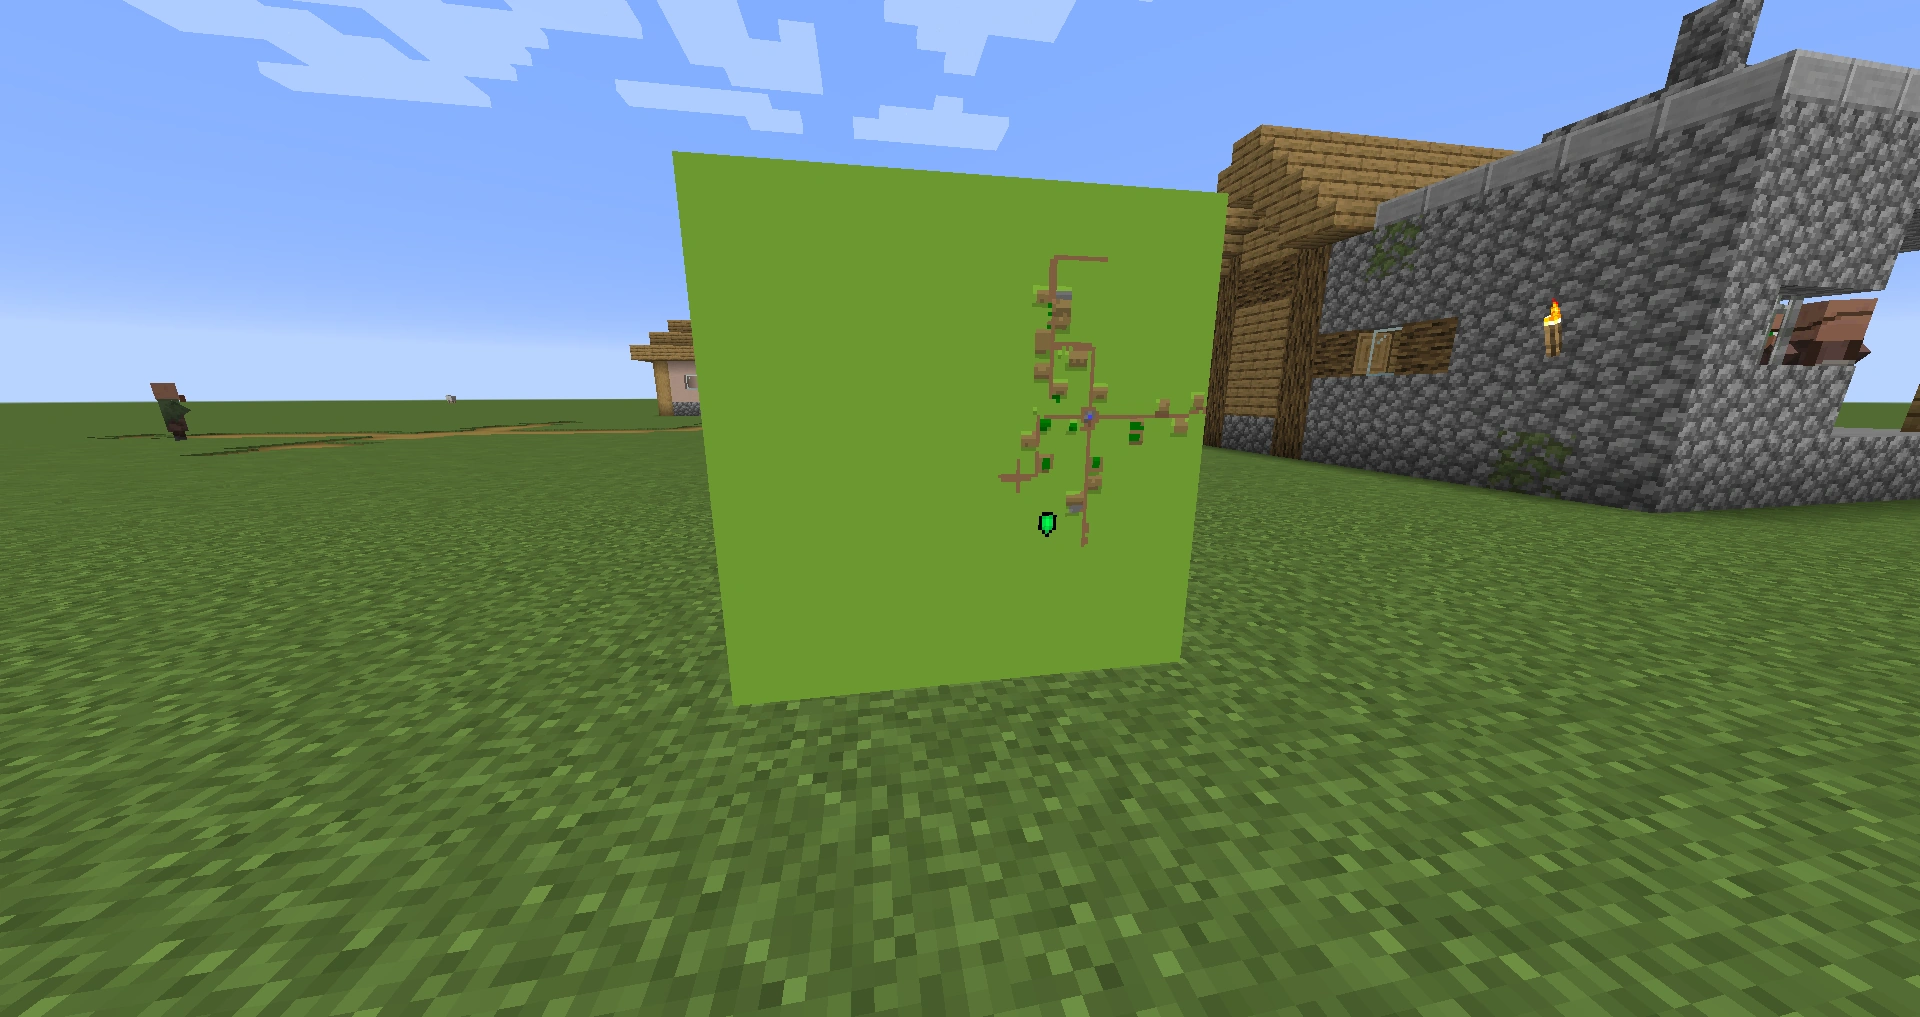
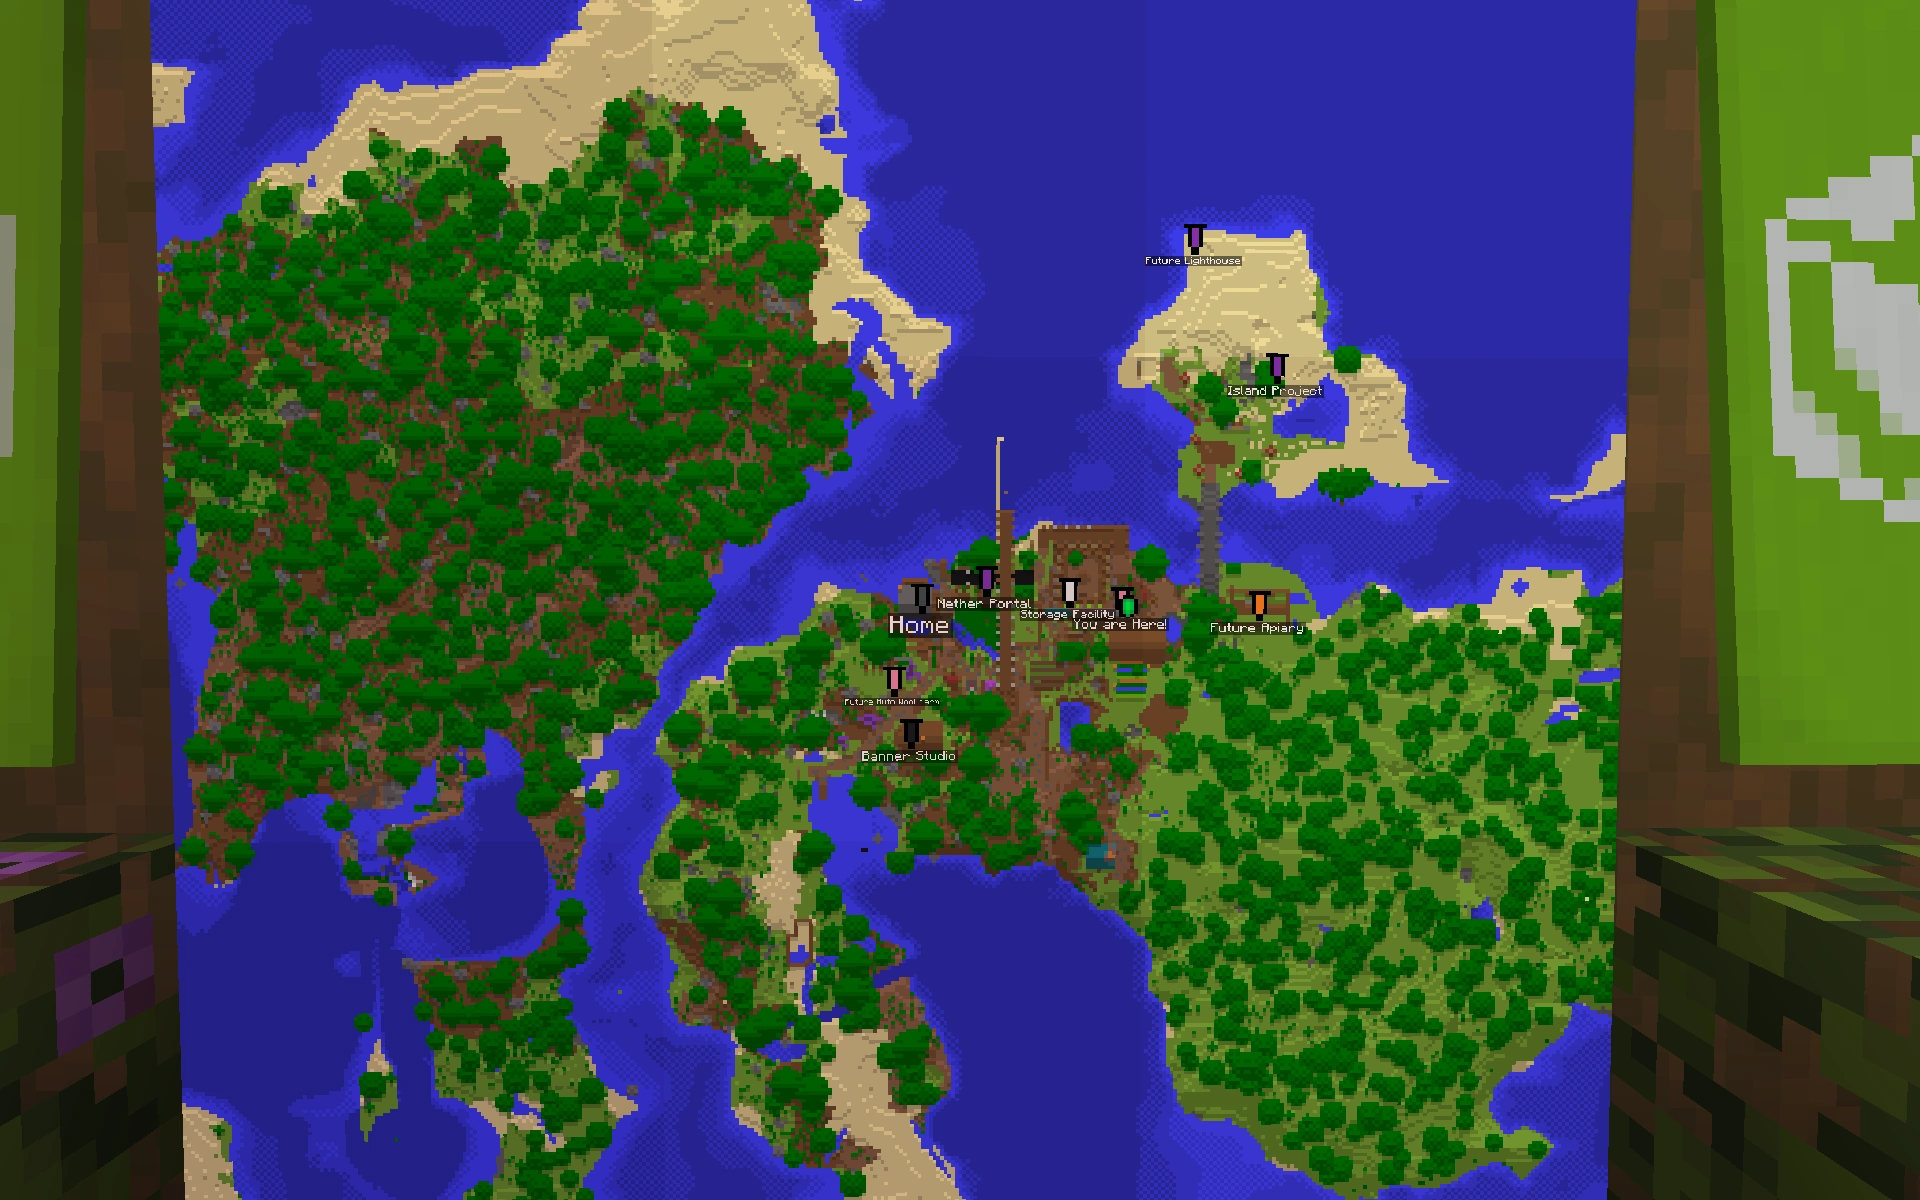
See also[]
References[]
- ↑ a b https://youtu.be/EpP1diZdEdI
- ↑ MC-214649 — resolved as "Won't Fix".
- ↑ https://twitter.com/jeb_/status/87815841160237056
- ↑ https://twitter.com/notch/status/88155424880201728
- ↑ https://web.archive.org/web/0/http://notch.tumblr.com/post/4988431144/the-maps
- ↑ https://web.archive.org/web/0/https://www.mojang.com/2013/10/minecraft-1-7-the-update-that-changed-the-world