A continuación aparece una instantánea de la página web tal y como aparecía en 29/5/2024 (la última vez que nuestro rastreador la visitó). Esta es la versión de la página que se usó para la clasificación de los resultados de búsqueda. Puede que la página haya cambiado desde la última vez que la guardamos en caché. Para ver lo que puede haber cambiado (sin la información destacada), ve a la página actual.
Bing no se hace responsable del contenido de esta página.
How to make a Barbie Cake! · Mama's Priceless Parties | DIY Parties
Skip to content
The amazement that a Barbie Doll Cake brings is Priceless. My daughter was over the moon when she saw it. Follow along with me in this easy-to-follow step-by-step tutorial. I used Boxed Cake Mix and Frosting and love how it turned out! If you prefer, you can make it from scratch.
I had so much fun making this Barbie Cake, and hope you have just as much fun! Want a Princess Cake instead? Just use a Princess instead of a Barbie and change the colour of the frosting.
Here are some quick links in case you want to skip ahead to a specific section.
You want to pick a nice-looking doll with great hair that compliments this cake. I used hair smoothing serum on my Barbie to improve her hair.
If your Barbie needs more hair help, try this. First, brush Barbie’s hair to eliminate tangles. Next, wash Barbie’s hair with regular shampoo. Then, coat hair with regular conditioner and leave on hair for at least 10 minutes. Wash out and let dry. Finish off with hair smoothing serum.
Barbie Doll Prep
Barbie needs to get ready for the cake. First, determine her hairstyle. If you want to leave her hair down, clip it up before putting her into the cake. You don’t want to have her hair in the way when frosting. When the cake is complete, let her hair down.
Next, determine if Barbie will wear jewelry. I added some bling to my Barbie with a hair elastic, necklace and belt. I made them using small, shiny beads. Put the jewelry on your Barbie, but leave the belt off until after making the top of the dress.
This post may contain affiliate links, which means if you buy something, I’ll receive a small commission without additional cost to you. As an Amazon Associate, I earn from qualifying purchases. Thanks for your support!
Decorate Top of Barbie's Dress
You can use Barbie’s clothing for the top of her dress or make it with frosting and decorating sugar. It is super simple. I used white frosting and pink decorating sugar to make a beautiful, strapless, low-back top. You can make this the day before decorating the cake.
Steps to make Top of Dress:
Raise Barbie’s arms up so they are out of the way.
Apply white frosting to Barbie’s chest in a circular motion, making a heart shape. Then, pull the frosting down to the belly button and cover the stomach and lower back.
Using a toothpick, shape the top if needed.
Lay Barbie flat on a paper towel.
Sprinkle pink decorating sugar on the frosting. Do this immediately after applying the frosting so that the decorating sugar sticks to Barbie.
Put one hand under the paper towel and very gently press Barbie into the loose decorating sugar on the paper towel. Keep doing this until she has no white frosting visible. Don’t forget to do the very top edge of Barbie’s chest.
Using your finger, gently tap Barbie’s top to ensure it is smooth and flat.
If there is too much frosting on Barbie, remove the excess frosting and repeat steps 5-7.
Add the belt (optional). Gently push the belt into the frosting top.
Put Barbie in the seated position and put her down for later. You can make her top the day before decorating the cake.
Making Cakes
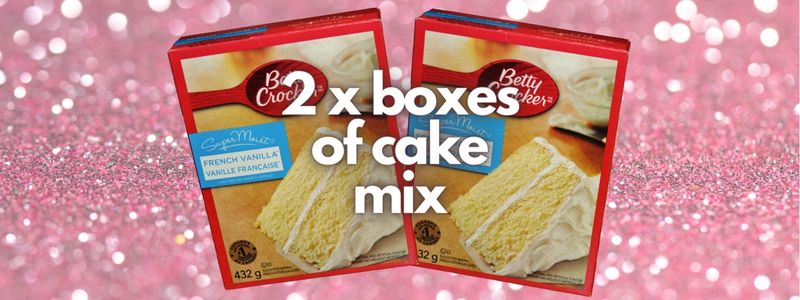
I used Betty Crocker Super Moist French Vanilla Cake Mix for this Cake. It is yummy, fast and easy! However, you can make it from scratch if you prefer. I used 2 boxes of cake mix to make 4 – 9″ round cakes. You could also make 8″ round cakes.
Only mix one box at a time. Follow the instructions on the back of the box. I always use milk instead of water.
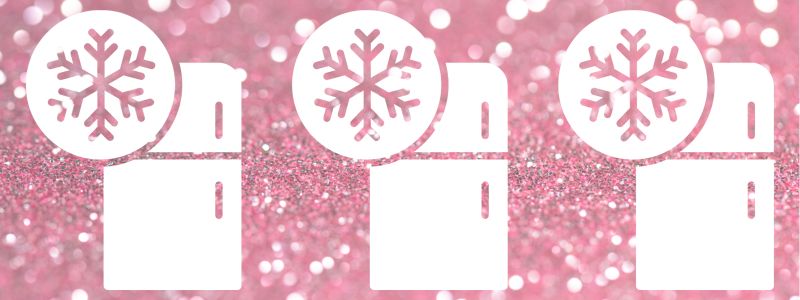
NOTE: Allow cakes to cool completely before freezing.
Freezing Cake Layers
Freezing the cakes helps reduces the crumbs and allows for easier cake cutting. Put each cake layer into a large Ziplock bag and freeze for at least 2 hours. You could also freeze it days or even weeks in advance. Make sure to put the cakes on a level surface in the freezer.
Getting Cake Layers Ready
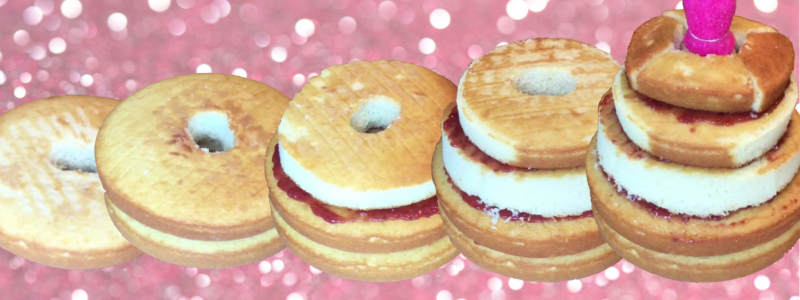
Place a frozen 9″ cake layer on a cutting board. Cut a 7″ cake circle from the side using a bowl or circle template. When cutting, make sure the knife is vertically straight. Keep the outer rings of the cake for the top of the cake
Place another frozen 9″ cake layer on a cutting board. Cut a 6″ cake circle from the side. Keep the outer ring of the cake for the top of the cake.
Make a center cutout for Barbie on each layer of cake. The cutout should be consistent among layers and should not be more than the width of Barbie’s hips. You could use an oval cookie cutter, cupcake corer or knife.
You should now have:
6″ cake layer with center cutout
7″ cake layer with center cutout
9″ cake layer with center cutout x 2
excess outer ring cake pieces
Assembling Cake Layers
Place a 9″ cake layer on your platter. Then, spread the filling on top of the cake layer. Do not go right to the outside edge. I use St. Dalfour Raspberry Fruit Spread; a thin layer of filling works great. It adds just enough moisture between the layers.
Place another 9″ cake layer on top of the first layer. Make sure to align the center hole for Barbie. Then, spread the filling on top of the second cake layer. Do not go right to the outside edge.
Place the 7″ cake layer on top of the second cake layer. Make sure to align the center hole for Barbie. Then, spread the filling on top of the third cake layer.
Place the 6″ cake layer on top of the third cake layer. Make sure to align the center hole for Barbie.
Wrap Barbie’s legs in clear cling wrap and put Barbie into the cake hole. You can always put her legs at a slight angle to make her a bit shorter.
Spread filling on top of the fourth cake layer.
Cut 4 small angled pieces of cake from the outside cake rings (leftovers from the 6″ and 7″ cake layers) and assemble around Barbie’s waist. If the cake is not high enough, you can adjust Barbie’s legs or add another cake layer using the leftovers.
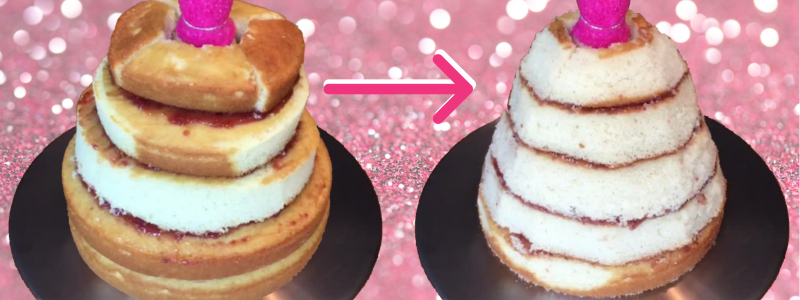
Shape Cake into a Dress
Using a long serrated knife, gently cut Barbie’s Dress from top to bottom. It helps to hold the cake while cutting. To get a bell shape, imagine an angled line going from her waist to the bottom of the dress. Keep the knife at this angle to make the bell shape.
Keep cutting around the whole dress. Take your time and do a little at a time. Just keep the overall bell shape in mind.
Using a small serrated knife, clean up any big edges and the very top of Barbie’s Dress.
Gently place some crumbs between the cake and Barbie’s waist. Using a small knife, gently push the crumbs down so it is flat.
Frosting
I used Betty Crocker Creamy Deluxe French Vanilla Frosting for this cake. It is yummy, fast and easy! However, you can make it from scratch if you prefer. I used 3.5 cans of frosting, so 4 cans.
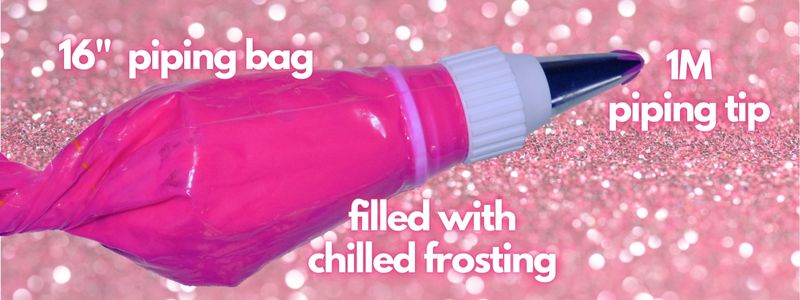
Betty Crocker has recently changed their frosting recipe, and it does not pipe as well as it used to. But not to worry, I created a new Frosting HACK, which is great for piping. Check out my Betty Crocker Frosting Hack for Piping.
You will need to match the colour of the frosting to the decorating sugar. For my frosting, I used Wilton Icing Color Rose. It matched perfectly. If you need help colouring your frosting, seeHow to Colour Icing.
Add a thin layer of frosting to the bottom and top layers of the cake. Be careful with the top layer; it is fragile.
Using a paper towel, wipe the frosting off the platter. Repeat with a damp paper towel. Be carful not to touch the cake.
Starting at the bottom back of the cake, make a Rosette. Move over half an inch and make another Rosette. Complete the first row. If you need help piping Rosettes, see Piping Technique 101, which has free printable practice sheets.
Start the second row between the 2 Rosettes below it. The Rosettes should form a triangle. Complete the second row of Rosettes.
Row by row, finish the cake.
If you make a mistake with a rosette, you can fix it. Gently remove the rosette with a butter knife. Try your best to isolate the problem rosette when removing it. Then, pipe a new rosette in its place.
Complete List
Barbie doll / Princess doll
Cake batter (Betty Crocker Super Moist French Vanilla Cake Mix x 2)
I would love to hear about your Barbie Cake! Please share your pictures and comments below.
Mama's Helpful Tips
Use a nice looking doll.
Want a Princess Cake instead? Just use a Princess instead of a Barbie and change the colour of the frosting.
When making the cake mixes, use milk instead of water.
Try to keep the overall cake batter level in each pan as consistent as possible; so they bake evenly.
When freezing cakes, make sure to put them on a level surface.
When opening a new Icing Colour, put a pair of disposable food grade gloves on to prevent getting dye on your fingertips.
If you make a mistake with a rosette, you can fix it. Gently remove the rosette with a butter knife. Try your best to isolate the problem rosette when removing it. Then, pipe a new rosette in its place.