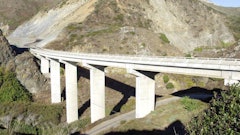
In the world of concrete repair, there's an age-old adage: "Surface preparation is 98% of the battle." It’s a simple statement, but a critical message. Neglecting or shortcutting surface prep will inevitably lead to repair failures that waste time, money, labor, and materials. To ensure success, concrete professionals follow the three Cs of surface preparation: Clean, Check, and Condition.
Let’s dig into each of these crucial steps.
Step 1. Clean the Surface
Cleaning the surface might sound like a straightforward task, but doing it right means much more than a spring-cleaning session. The goal here is to remove any and all concrete surface contaminants, stains, or substances that can inhibit bond. Beyond dirt and grime, cleaning is performed to remove any loose concrete or aggregates from the surface. Special attention must be paid to removing foreign materials such as sealers, paints, oil, tree sap, adhesive residue, wax, or glues, as these act as bond breakers.
While cleaning concrete with a pressure washer is the go-to method, the incorporation of soaps or specialty concrete cleaners should be strongly considered for a deeper clean.  Delaminations typically occur because of a weak zone located directly below a densified surface layer (DSL) that fractures along a horizontal plane allowing the top surface of the floor to separate from the body of the concrete.
Read more on "How to Avoid the Delamination of Steel-troweled Floors" by Kim Basham at https://CONC.me/j17de1ikSakrete
Step 2. Check the Surface
Once the surface is clean, we move to step two: checking the surface. In this step, we’re focusing on three aspects: absorption, structural integrity, and surface profile.
Absorption (or lack thereof): Look for signs of water beading on the surface. If water beads up, it indicates the presence of contaminants that weren’t removed during the initial cleaning.
Examine these areas closely and try to determine just what is the source of the contaminant. Is it oil based? If so, re-clean with a concentrated de-greaser. If it is a solvent-based contaminant, like some sealers, then a solvent-based cleaning solution will need to be employed.
Re-test the surface after each subsequent spot cleaning. If water still beads, then the affected section of the concrete surface will likely have to be mechanically abraded or even chipped down through the contaminant’s level of penetration.
On the flip side, pay attention to areas that absorb water particularly fast, which indicate high porosity and require additional conditioning prior to repair.
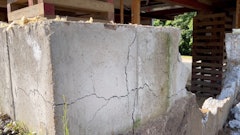
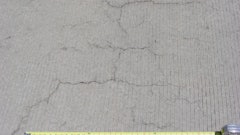
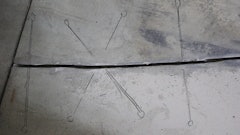
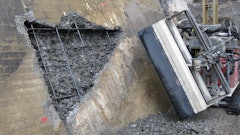
Structural Integrity: A successful repair must start with a sound concrete surface. Damage may be obvious, like chunks of concrete removed during pressure washing, but damage can also be hidden. To verify the integrity of the concrete surface and body, tap the surface of suspect areas with a hammer or drag a chain across them and listen to the sound it makes. If the chains “rings” as it is pulled or a solid rebound is experienced with the hammer, then the concrete surface is solid and sound.
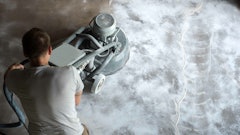
Conversely, when tapped you hear a “thunk” sound, or a scraping sound is heard when the chain is being dragged, this is cause for pause. These are signs of hollow spots or portions beneath the concrete surface. These hollow-sounding areas are sure signs of delamination. If you hear anything out of the ordinary, the surface will likely require further prep work. Examples of surface abrading are grinding, wet-blasting, and scarification.
Surface Profile: Hardened concrete surfaces have gone through finishing in the last steps of placement. Interior concrete surfaces are typically hard-trowelled, while exterior concrete is finished as a broomed surface, to impart a non-slip surface. Ask yourself if the surface to be repaired has an open enough profile that will allow for the proper bonding of repair materials? Hard-trowelled or lightly broomed surfaces are often too tight to allow for proper bonding. In other words, any concrete surface to be repaired must have an open and porous texture in order to promote proper bonding of the layers. When in doubt, grind or roughen up the surface before proceeding with the repair.
Step 3. Condition the Surface
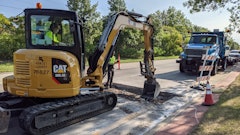
Once the surface is clean and checked, it's time to condition it properly before the application of concrete repair materials. There are three methods for surface conditioning, and it's essential to choose just one and stick with it to avoid interference between methods.  For smaller projects, consider using the Alpha Spike Disk or a diamond-cupped attachment on a hand-held grinder. If in the process of removing soft material layers of delamination, the affected areas just keep getting deeper and deeper, then full-scale demolition of the unsound concrete will need to be performed before proceeding with the project.Sakrete
Saturated Surface Dry (SSD): The simplest – and bare minimum – approach involves soaking the repair area with water and allowing it to absorb before applying a repair material. The goal is to bring the surface to a neutral state that neither adds water to the repair (which often impedes bond), nor absorbs water from the repair material. You’ll know you’re at SSD when the concrete looks damp but is dry to the touch.
- Pro: Simplicity, speed, low cost
- Con: Provides the bare minimum conditioning performance.
Slurry Coating: In this approach, the repair material itself is used as a bonding paste. A slurry of the repair material and water is mixed to a consistency similar to lose grout or paint. It is then applied to the surface area being repaired. It's crucial to work the slurry into the pores to prevent off-gassing and ensure a proper bond. Allow the slurry to dry slightly, then follow with the full repair.
- Pro: Low cost as no additional materials required, provides enhanced performance over SSD
- Con: May not deliver sufficient performance for some non-porous surfaces.
Priming: The most effective method for surface conditioning involves using a bonding agent to prime the concrete surface before applying the repair materials. Bonding agents come in several forms, such as Sakrete’s Bond Strength Primer. Liquid latex primers are applied to the surface using a roller or paintbrush and then allowed to dry to a tacky state before applying the repair material. As with all other conditioning methods, it's important to avoid puddles, as they can act as bond breakers. Pay close attention to the absorption rate of the primer. Highly porous surfaces can absorb primers quickly and may require additional coats for peak performance.
Other examples of bonding agents include, but are not limited to, re-emulsifiable latex bonding agents, epoxy bonding agents, and styrene butadiene (SBR) latex.
- Pro: Ensures peak performance of repair materials
- Cons: Adds cost to the project
With these critical steps completed, you’re ready to move forward with the concrete repair project.