Kerio Connect is a popular email management application that excels at email/calendar/task/contact/notes management. In 2017, GFI Software acquired the Kerio Connect client, which maintains and markets it. Kerio Connect is a web and desktop-based email client supported by Windows, MacOS, and Linux. Though Kerio Connect offers many services to users, there is still a need for Kerio Email backup.
Multiple reasons initiate users to back up Kerio Emails into External Drive in the required file format. This blog will dive deep into how to export Kerio’s email to PST and other file formats.
Instant Solution: Looking for a Professional Solution for Kerio email data backup? Here it is, Effortlessly Export your Email data from Kerio Connect/Mail Server to PST, MBOX, EML, MSG, OLM, and HTML file formats. Start your free trial with the Shoviv IMAP Backup and Restore tool today.
What are the reasons for Kerio Email Backup?
Saving Kerio Connect Email into an External Drive provides multiple benefits. Below are some reasons and benefits you can avail yourself by backing up your Kerio Connect mailboxes.
- Accessing your Kerio emails is effortless, with a backup copy ensuring availability regardless of location or time.
- Keep yourself shielded from unexpected events by frequently backing up your Kerio emails and organizing your inbox to prevent unwanted scenarios. Even amidst a hacking incident, your data will stay shielded within the external drive, ensuring its security.
- Enhance your efficiency by consolidating the backup of several Kerio user mailboxes into a single, streamlined process, saving time and effort.
- Managing the risk of data loss stemming from diverse causes, spanning accidental deletions and the looming threat of unauthorized entry into sensitive information.
- Local storage ensures data accessibility even offline, providing continuity irrespective of network availability.
- If you export Kerio email to PST, you can open and access all your emails in any Outlook account by adding PST.
In today’s digital landscape, there is a surge of interest among individuals seeking a solution to transfer their Kerio Connects mailboxes into their External Drives. If you are among them, stick with this blog to uncover the step-by-step process from start to finish.
Can you manually back up the Kerio mail?
Although there is a manual method available, it is not particularly practical. I’ll outline the steps in the following section. Below, you will find the instructions for manual Kerio email backup.
- Log into your Kerio account >> go to Configuration >> proceed to Archiving & Backup >> select the Backup option within the admin settings.
- Select the checkbox next to the option to enable message storage and configuration recovery backup.
- Tap to input details for the backup.
- Choose when and how to export, and then press OK to proceed.
- Go to the advanced options, specify the highest allowable size and the number of backups, and press OK to proceed.
- Determine the destination folder within the Target Backup Directory to store your Kerio mail backup.
- If you need to authenticate on the network drive, choose Specify and type in your login credentials.
- Enter your email address into the Notification section to ensure you receive timely updates regarding backups.
- Click Apply and proceed by activating the Start Now option.
Read It Before Using Manual Way- During the endeavor to implement manual backup procedures for the Kerio Connect mail server, numerous users encountered perplexity and became entangled in the process. Their attempts proved futile, stalling any progress they hoped to make. Moreover, you will not get any advanced option to customize your results as per your requirements. If you are not technically sound, then don’t try manual backup as it can risk your data.
If you seek to safeguard your data while transitioning to a desired file format, consider employing Shoviv IMAP Backup Email Software for a secure backup process.
Some Prominent Features of the Shoviv IMAP Backup and Restore Tool
- This tool harmonizes effortlessly with diverse email clients, including Kerio Mail, Gmail, SquirrelMail, Yandex Mail, Yahoo! Mail, and any IMAP-using email service.
- It works on job-driven processing, it enables users to generate and execute a multitude of tasks concurrently.
- This software can help all Windows Operating System users to download their emails in the desired format.
- Kerio email backup can be taken into PST, MBOX, EML, HTML, MHT, and MSG.
- With the help of advanced filter settings, users can selectively back up Kerio Connect mailbox items.
- Moreover, users can schedule the backup process as per the requirement.
- As its name specifies; this utility can also import/restore data into the mailbox from the files.
- This application boasts reliability and trustworthiness, crafted by a seasoned team of professional, well-versed backup solutions.
Shoviv IMAP Backup and Restore tool is the most secure and trusted email backup application suggested by many adepts. This software can help you overcome all the manual method’s drawbacks easily. Follow these steps to backup emails from Kerio Connects:
Mastering the Technique of Archiving Kerio Emails to Your External Device
- Start with installing the Shoviv IMAP Backup and Restore AKA Kerio Mail Backup Tool application, then open it.

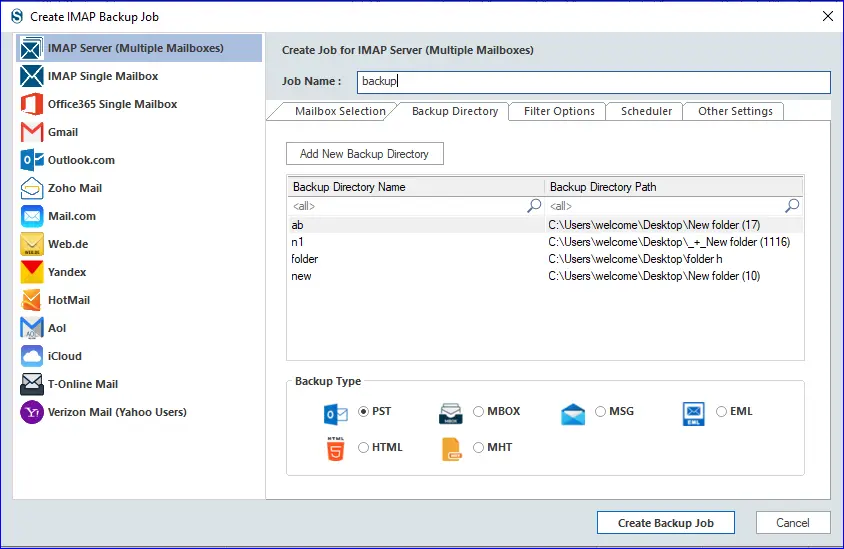
- Select the Backup Job option. A pop-up window will open where you can enter the Job Name.

- Choose the Add Mailbox option, input your login information to fetch the mailboxes, and proceed to click on the Backup Directory tab.

- Determine the location for saving your backup file by selecting the appropriate directory. Then, use the dashboard to choose your preferred file format. Here, we will choose Kerio emails as we want to export Kerio emails to PST.
- Head to the filter setting and select the criteria to omit unnecessary emails from the backup procedure.

- Open the Scheduler tab and arrange the backup procedure as per the needed schedule.

- Finally, please navigate to the additional settings tab and adjust them to your preferences. When everything is set, press the Create Backup Job button to proceed.

Following the above process, you can successfully back up Kerio emails into external drives.
Final Words:
One must secure the Kerio mailbox through backup as email backup comes as a boon in adverse conditions. Shoviv Software’s user-friendly interface empowers individuals from diverse backgrounds to execute Kerio email backup operations with just a few simple interactions. Uncover the tool’s potential firsthand with a free trial version on our website. Before committing to the software’s professional version, you can use it to check its suitability for your needs. With Shoviv Software, users receive complimentary technical support as part of the package. For any query or support feel free to write to support@shoviv.com or connect through the live chat option.
- How to Backup Att.net Email in Outlook PST File? - June 5, 2024
- Ways to Migrate Emails from EarthLink to Office 365 - May 28, 2024
- How to Migrate Emails from Gmail to iCloud? - May 24, 2024