Below is a snapshot of the Web page as it appeared on 10/06/2024 (the last time our crawler visited it). This is the version of the page that was used for ranking your search results. The page may have changed since we last cached it. To see what might have changed (without the highlights), go to the current page.
Bing is not responsible for the content of this page.
Update Furniture With Peel and Stick Wallpaper - Artsy Chicks Rule®
Learn how to update furniture with peel and stick wallpaper!! Such a great way to elevate that makeover…and simple too!
Hello friends! I hope you are having an amazing week so far. It’s been SO rainy here. I think we are having April showers in May! haha! How is it where you are? At least it’s warm so I’m not really complaining.
Remember that large piece I keep mentioning that I’ve been working on?? Well, it’s finished! Yippee!
It was a true labor of love. I have been working on it off and on for months. I am SO happy it’s done!! For more reasons than one. lol
Anyway, as I was editing the photos and putting the post together, I realized I had way too many photos to share in one post. And really, way too much to talk about too. So, I’ve decided to share the big reveal today and then talk about how I update furniture with peel-and-stick wallpaper first. Then I will come back next week and share the super cool finish I did on it.
Update Furniture with Peel and Stick Wallpaper
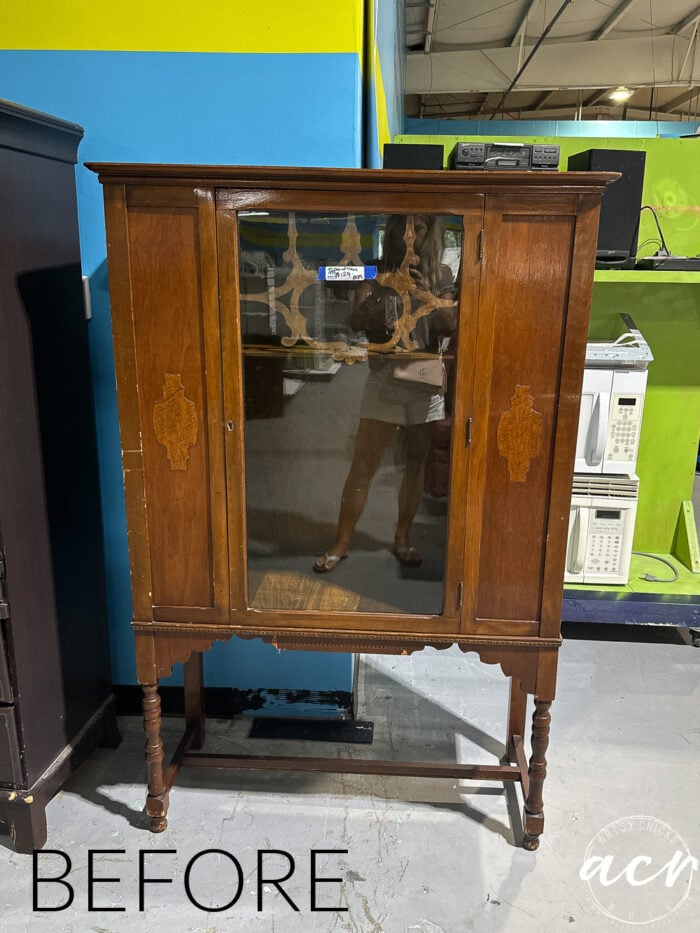
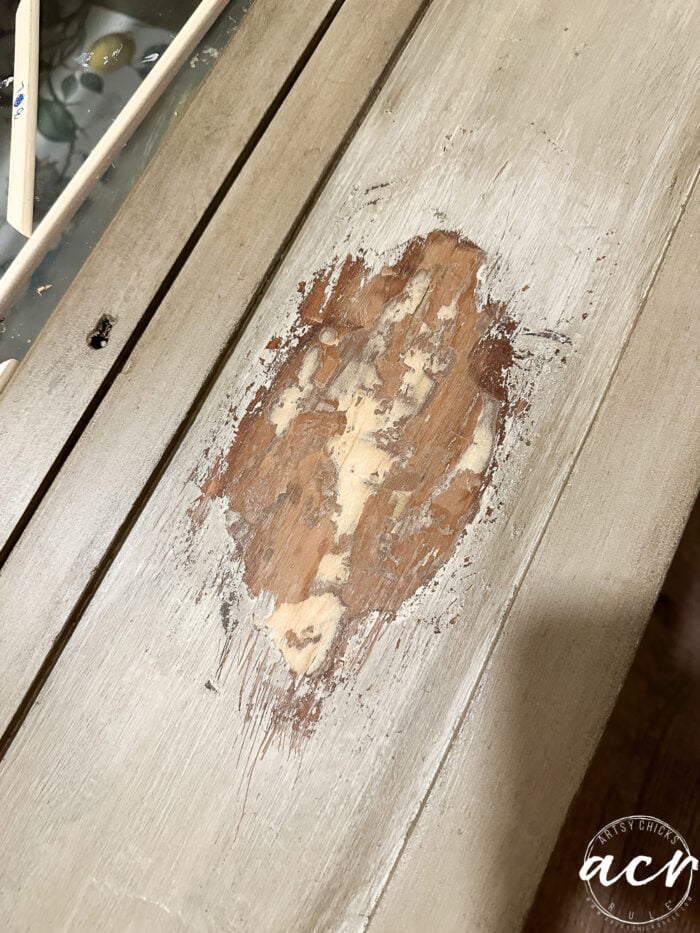
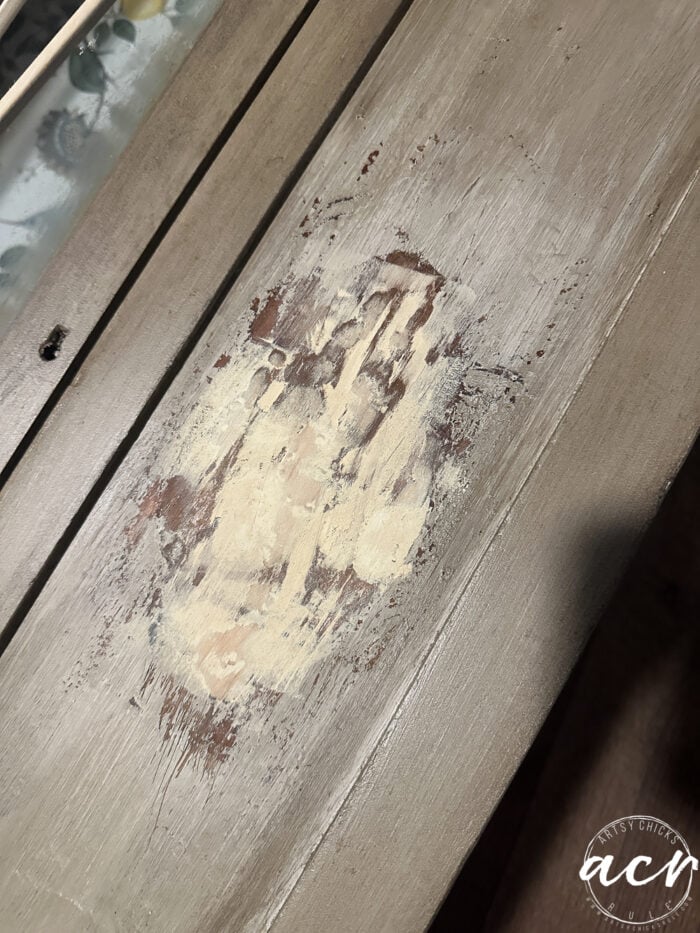
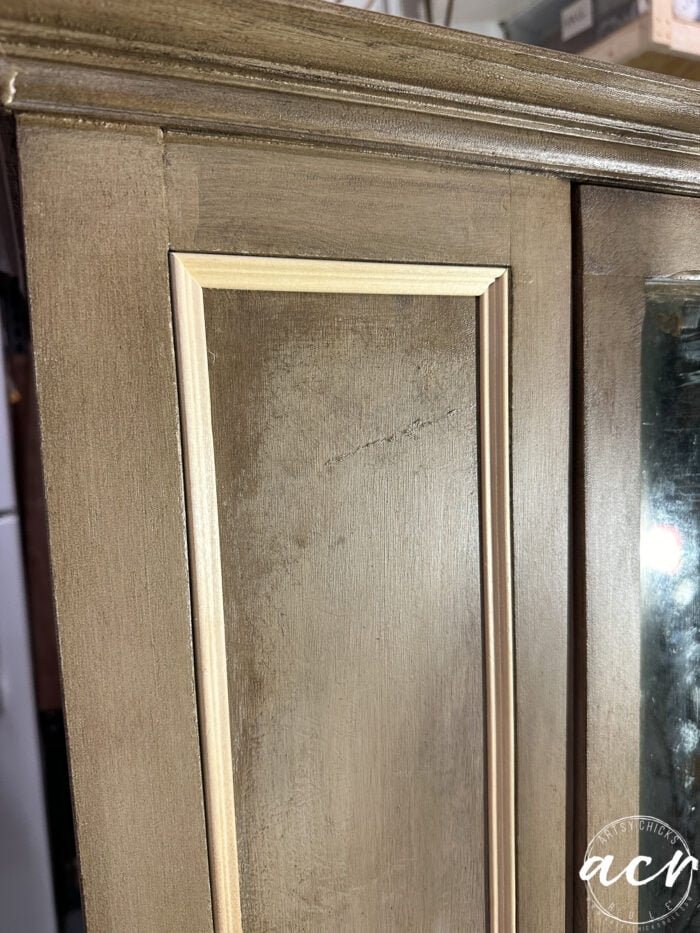
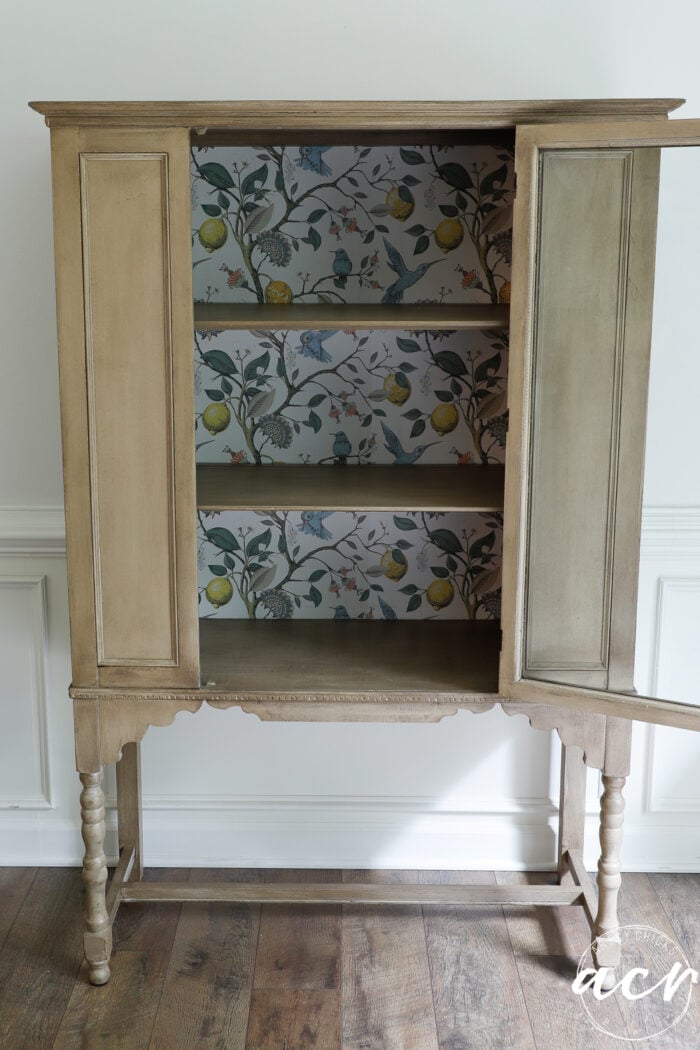
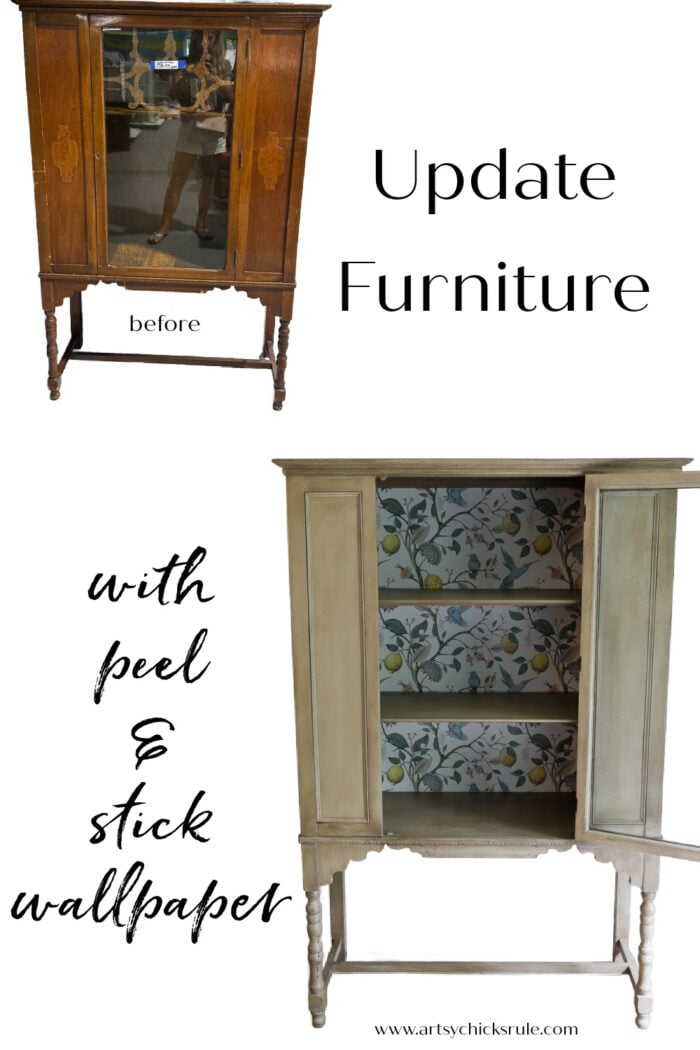
Many months ago I found this vintage cabinet at one of our local ReStores.
I decided to bring it home and make it over. I rarely do the large pieces anymore because I am old! No, really, it’s just a lot to load them up, unload them, reload them, etc. So I gravitate to the smaller pieces more. It was so much fun to do a larger piece though! I have missed it.
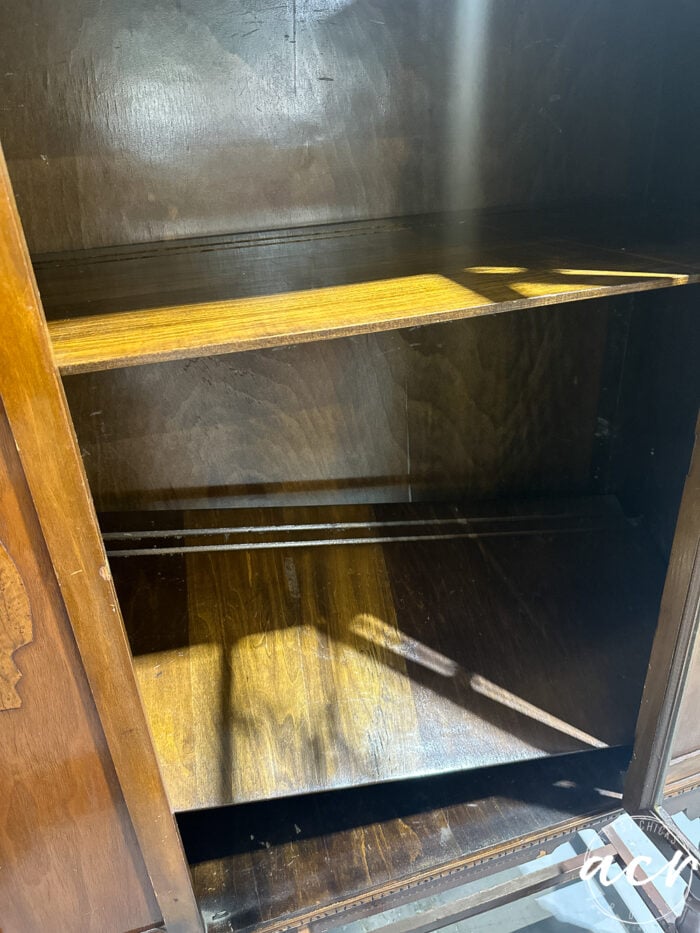
The inside, wonky shelves and all.
The bottom shelf was not in place but everything was/is there for it so no issues with that.
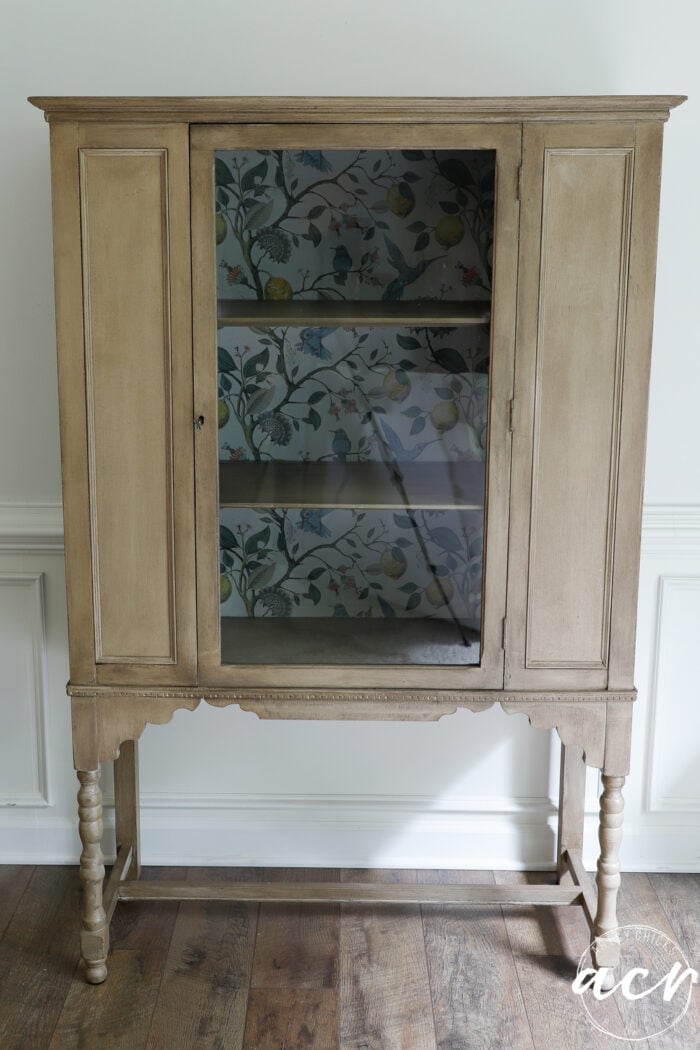
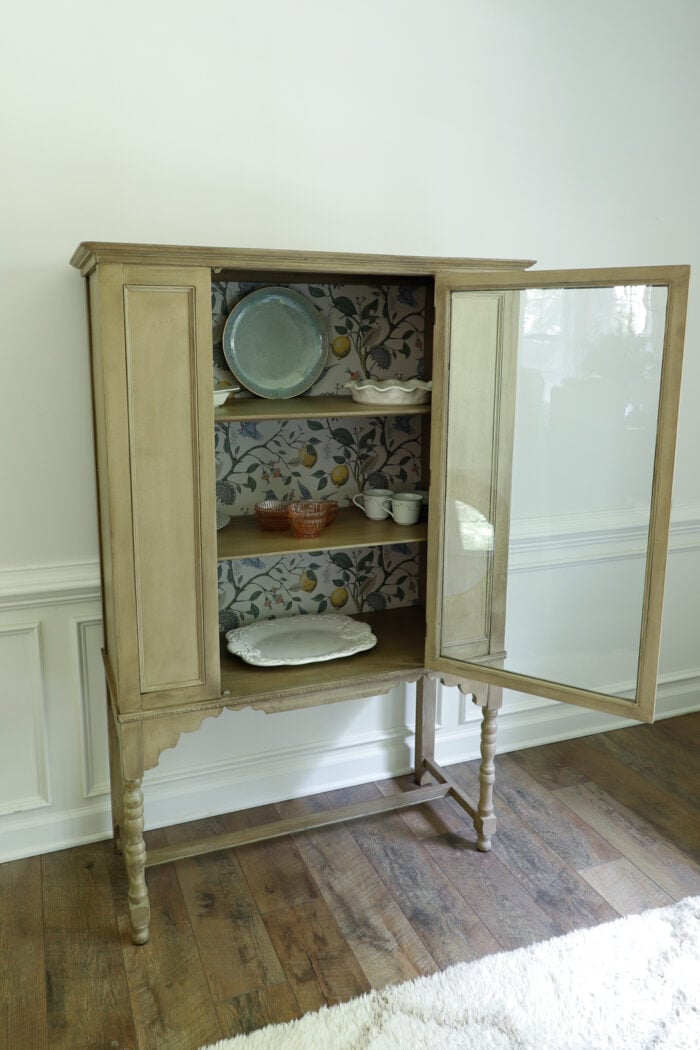
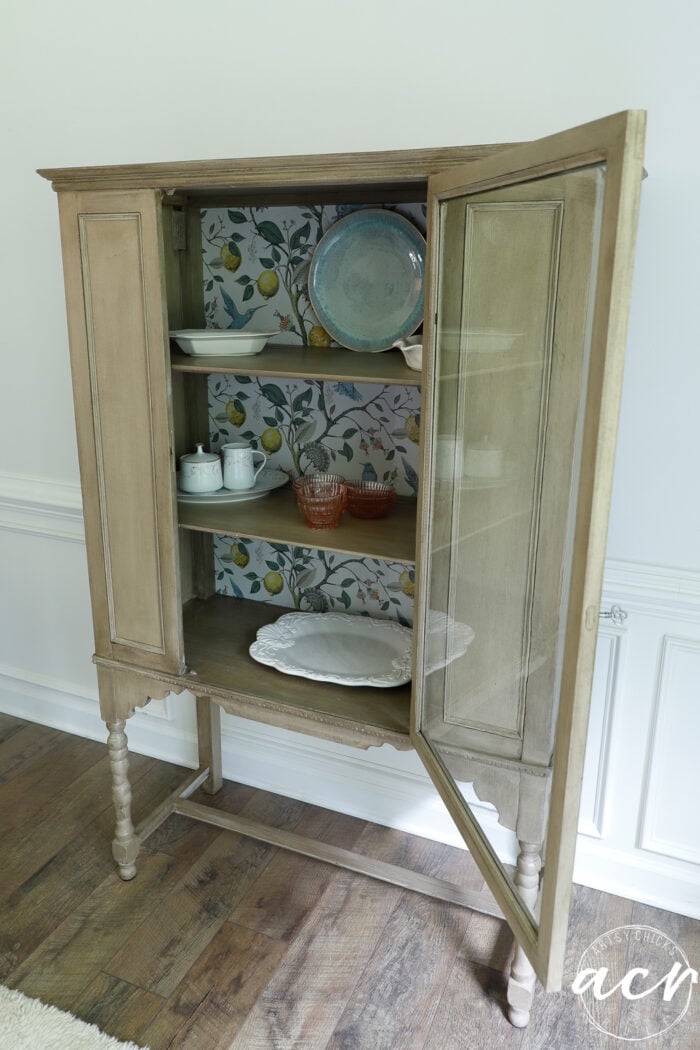
Here is the “after”.
I love the faux wood look I gave this one. I can’t wait to tell you all about it next week! Be sure to check back for that.
This wallpaper is the bomb. Very well made and highly recommend it for applying to walls. It has staying power, that is for sure! You can find the wallpaper right >>> here.
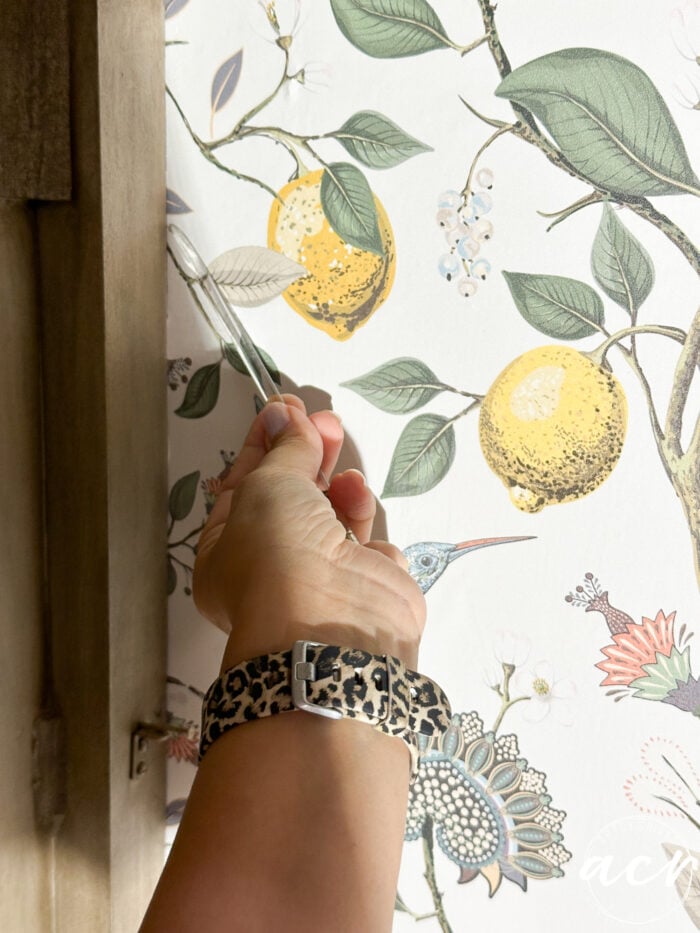
I cut the paper a little long on the top and the bottom and then used the end of this paint brush to push the paper in the creases/corners, etc.
It was flat on one edge so it worked perfectly. On the left side, I simply lined it up and tucked it in.
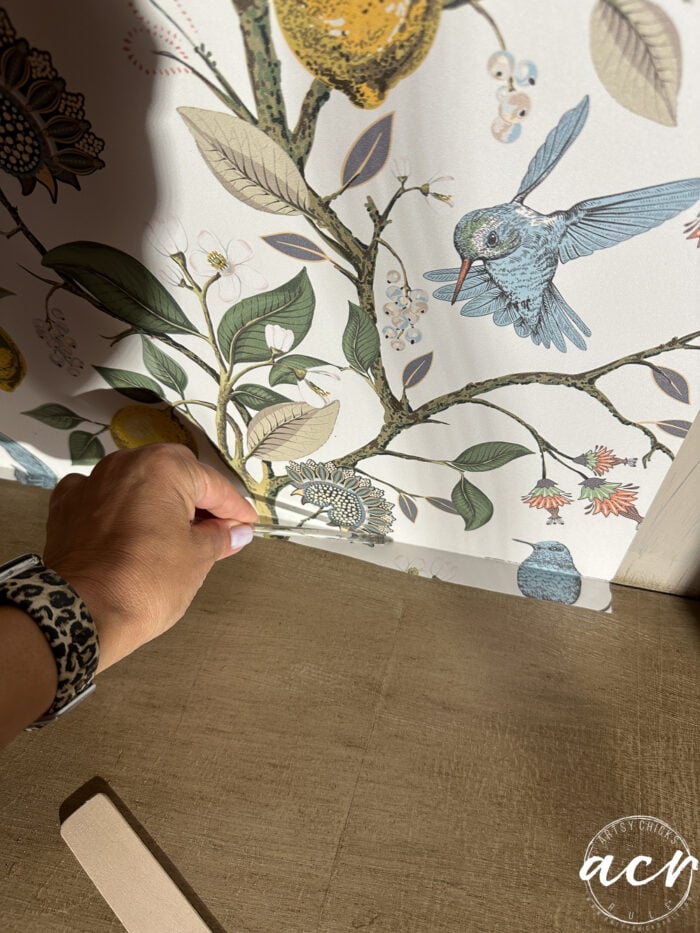
On the bottom, I created a crease to cut. I used a box cutter to go along the crease and cut the paper.
For the right side, I lined up the paper in the middle and did the same thing with the end of the paintbrush and box cutter on the right.
I find that this gives me the best, most perfect edge. Sometimes when measuring and then cutting ahead of time ends up with short pieces, etc. This creates a tiny bit of waste but gives you the cut exactly where you need it.
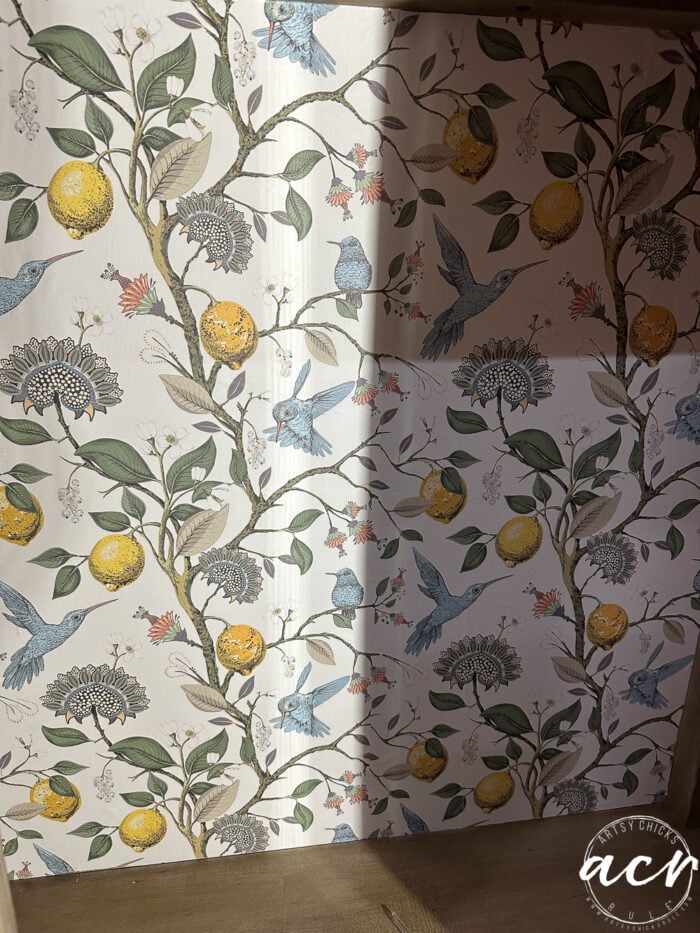
See how perfect all the cuts/edges look?
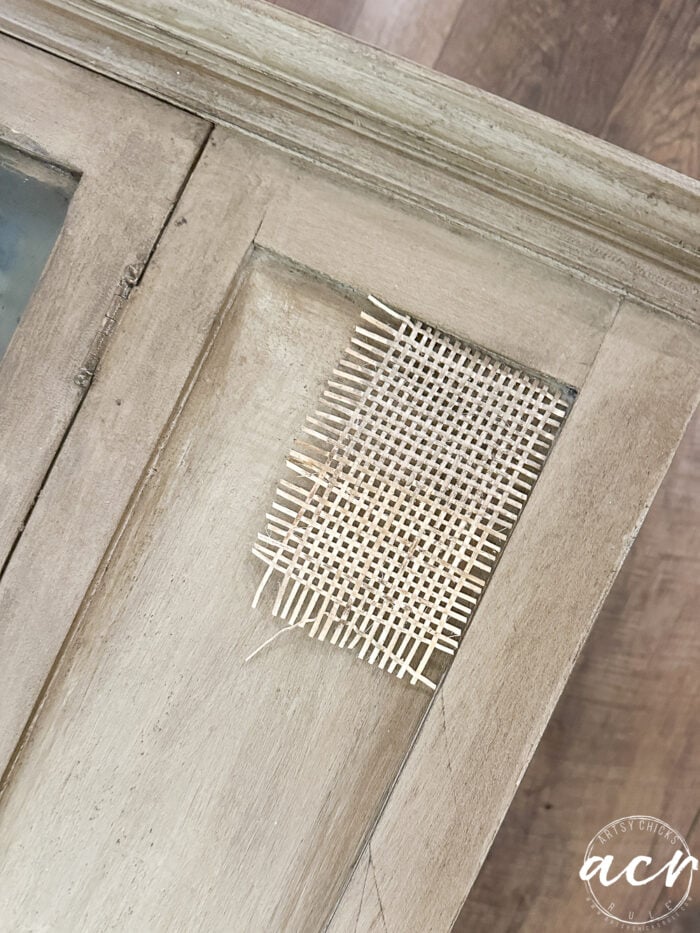
For the front, I had originally planned to use this caning in these sections. (small section I was testing stain on)
But I didn’t really love this look when it came down to it. So I switched gears as I often do!! haha!
Which meant that I had to go back and get these oh-so-thin (and hard to remove) wood embellishments all the way off. (they would’ve been hidden under the caning, but not now that the design plan changed)
Once they were finally removed (thanks to my sweet hubby for helping me with that), I sanded and filled them so they would be nice and smooth.
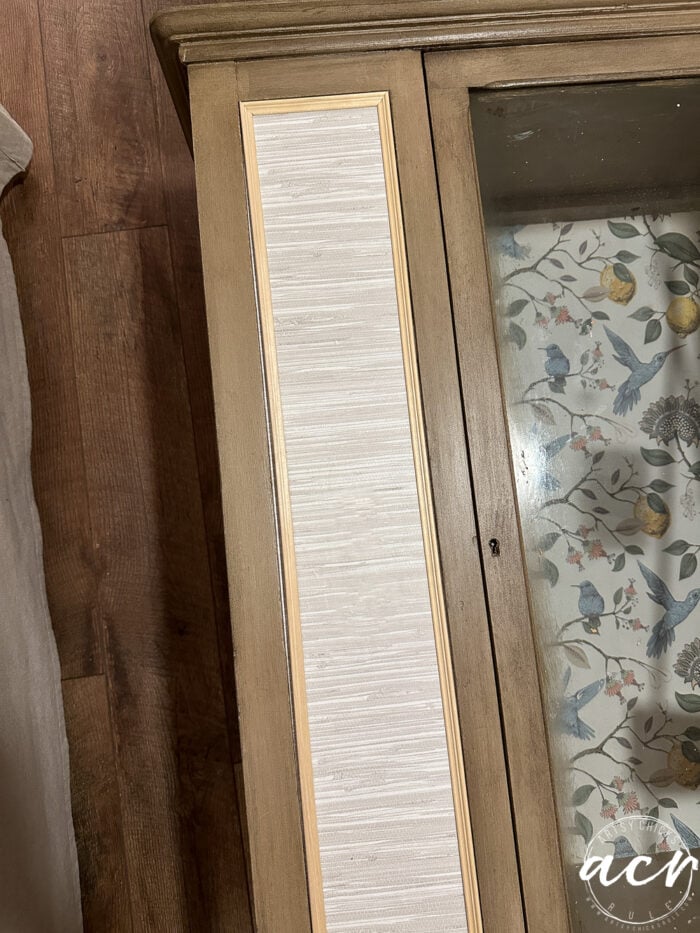
My husband had already cut this trim to cover the caning I was originally going to put here…
And I really liked the look of it, plus I knew I wanted some sort of “texture” or something on these side areas so I decided to use another peel and stick wallpaper here.
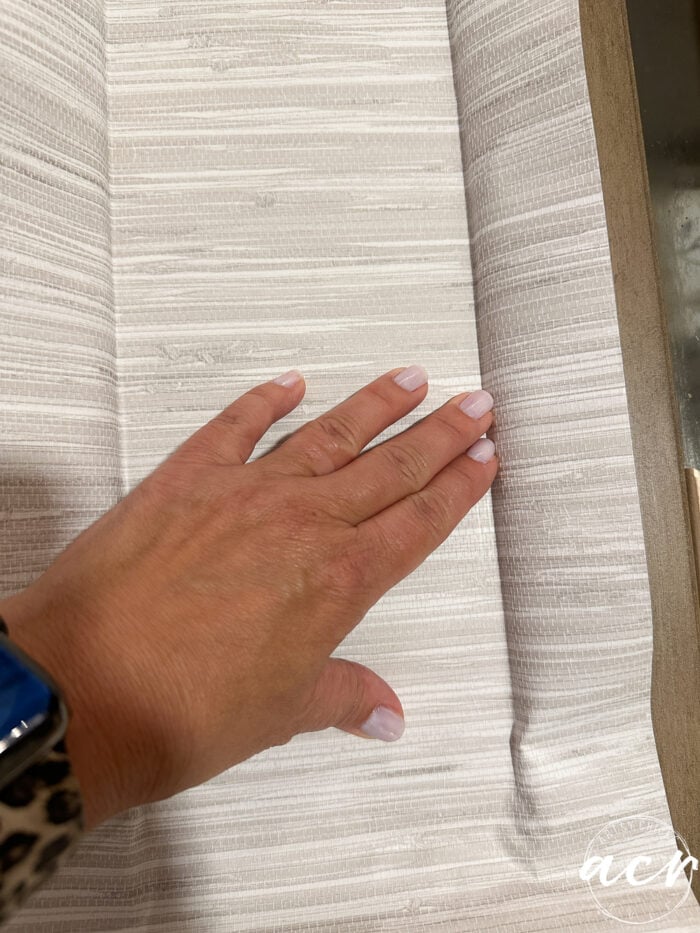
This grasscloth peel-and-stick wallpaper. You can find this wallpaper >>> here.
I pressed and cut the paper the same way I did the inside.
I’m not leaving it that color, I just wanted the grasscloth texture on the sides.
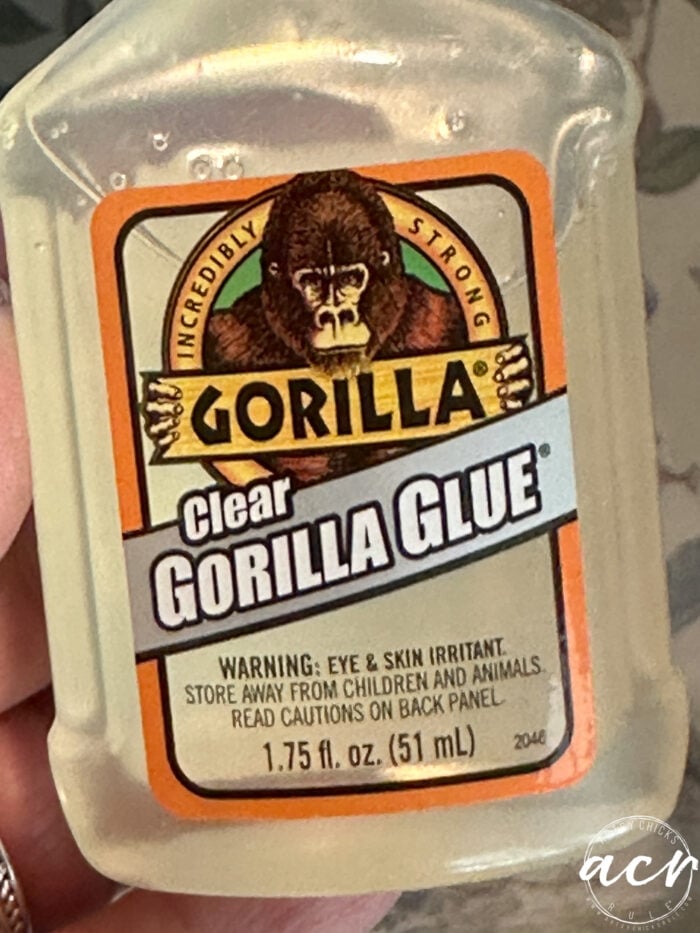
I painted the wallpaper and the wood trim pieces and glued trim in using this glue.
I’ve never used this before but it worked pretty good.
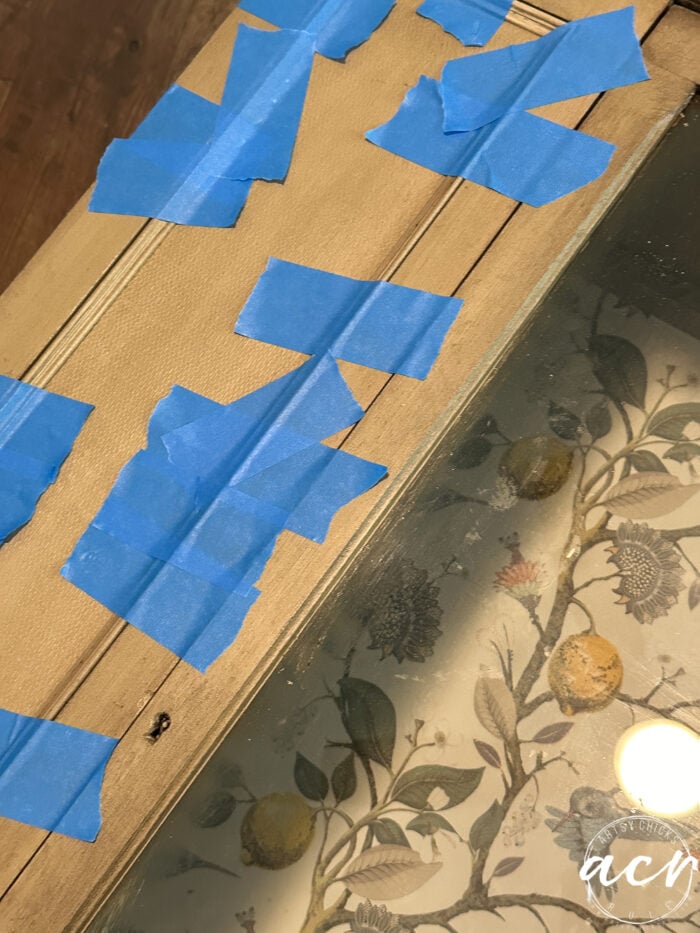
I wasn’t able to get a good hold with the clamps (I tried) so used tape to hold them tight until they dried.
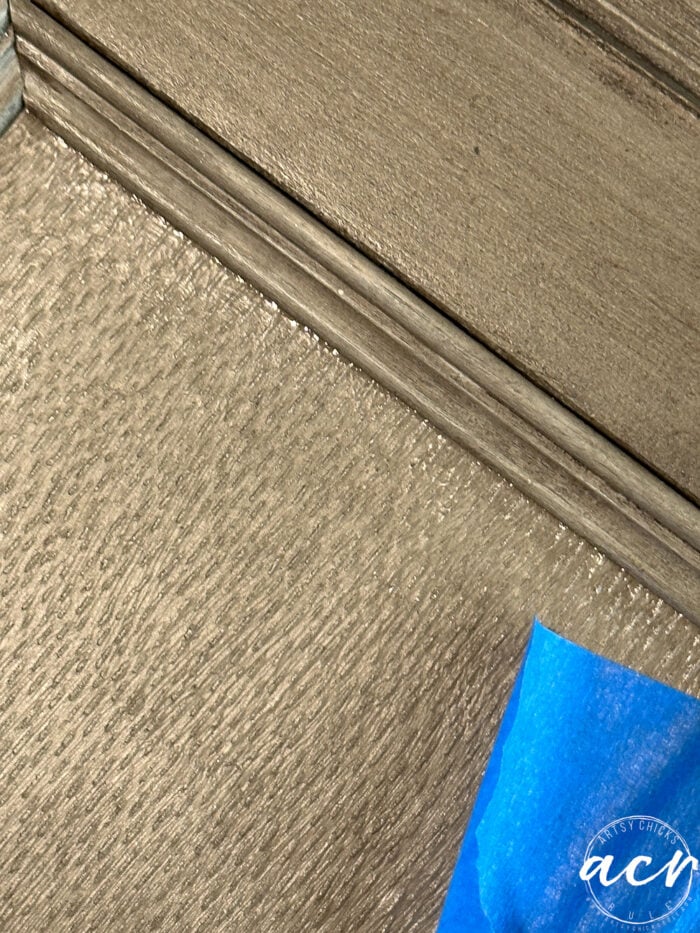
Here’s an up-close look at the texture I was referring to.
And done!
The texture on the sides is more apparent in person. It’s hard to pick up in the photos.
But I just LOVE the little trim pieces texture or not! I think they added such a nice touch and finish look to the cabinet.
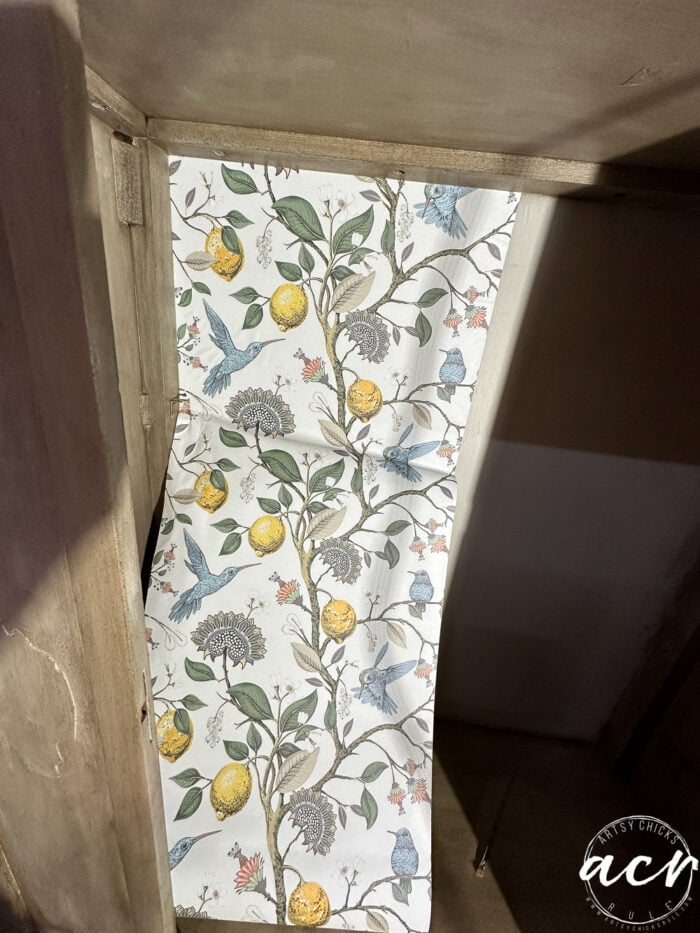
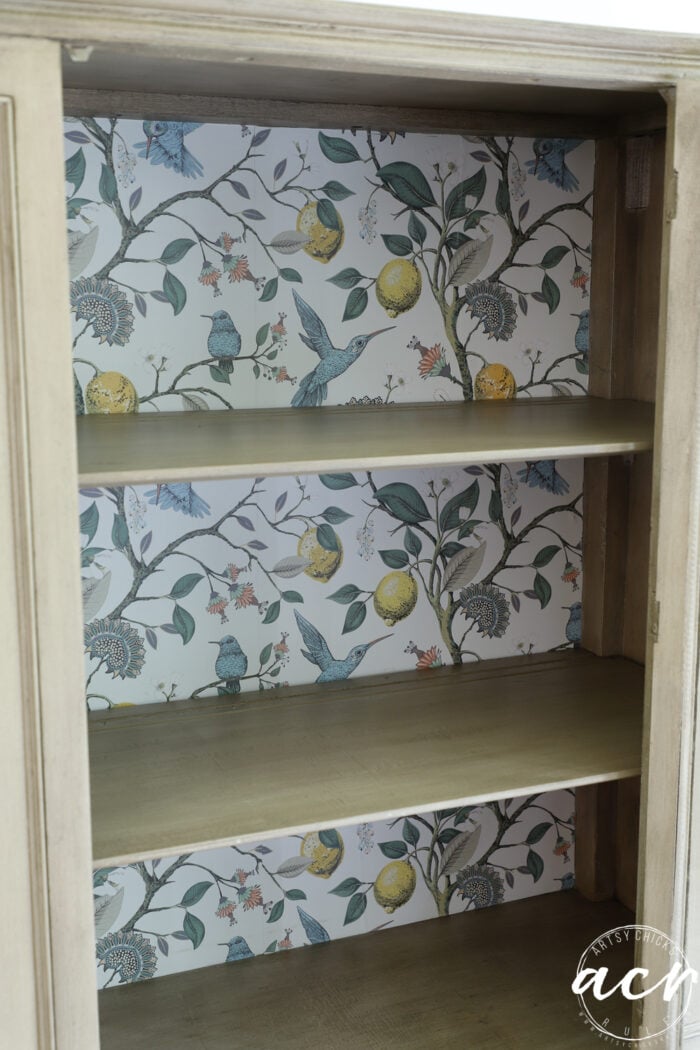
The peel and stick wallpaper on the back wall of this cabinet is fun surprise.
And that’s how to update furniture with peel and stick wallpaper! The design choices are limitless too. There are so many more peel and stick papers available these days.
Such a fun way to elevate that next makeover!
Have you used peel and stick or even regular wallpaper this way?
PIN it to save it!
Before we go, I just wanted to share that I found another lump on our Ryder boy.
Just this morning, actually. I took him in to the vet and they took a sample to biopsy it. (you can just see it on his left foot/leg there, it’s a little bloody from the needle aspiration) The large one on his face we had surgically removed last year was a benign Hemangioma. They are very bloody tumors. This one looks the same. (however, they can be benign, Hemangiomas, or cancerous, Hemangiosarcomas) Results early next week. My poor sweet boy, please keep him in your prayers!
I hope you have a wonderful weekend and I’ll see you back here next week with all the details on the simple faux wood finish!
Love that added trim and texture feature you added to the front!
I do have Ryder in my thoughts for good result on the test and easy recovery if removel necessary. <3
Ooohh, I SO want that piece of furniture! Beautiful work btw.
My heart and love goes out to beautiful Ryder and your family, I feel he’s going to be just fine; we had a sweet black lab that got the bumps throughout his life and they never brought any issues, he lived for sixteen years (I think thats 120 years for a ranch dog 😂).
If you want to, shoot me a message and I’ll make a batch of organic doggie treats, my fur babies love them. Or, I can draw a picture of him for you (I think he’s gorgeous)💕.
Hugs!
Thank you so much, Cassie! Aw, that is encouraging, thank you!!! Wow, that is so kind and thoughtful, Cassie! Ryder would love that, I am sure. :) xoxo
That is a really cool cabinet. I love it! I can’t wait to she how you did the faux wood finish. Was the some sort of design on the glass? The ‘before’ photo looks like there is something on the glass around that top shelf area.
Prayers for Ryder!
The faux finish tutorial is coming tomorrow! Check you inbox in the morning for that. :) And yes, sure was. I decided to remove it for the final design. I show it in tomorrow’s post a little more. Thank you for the prayers, Cheryl! xoxo
Amazing transformation, Nancy! I love a surprise inside a cabinet and this paper is just beautiful. There are so many choices, it can be overwhelming and I get tired of looking but this might be exactly what I need for my pantry. Looking forward to seeing how you created the finish that brought this outdated piece of furniture to life.
Thanks, Marcie! It is overwhelming! I’m considering adding some to our kitchen and I’ve been looking again…haven’t found anything that is “just right” yet! I do love this one so much, will definitely be using it again on something somewhere! Finish tutorial coming tomorrow! xo
Oh, Nancy – I think this is one of your absolute BEST transformations to date. WOW. It is stunning. I love love love it. I love the paint job and the trim and texture you put on it. it went from bleh to YEAH!
I am so sorry about poor Ryder. He is in my prayers, and you too, it’s hard to go through worries like this. Hope it’s nothing more than just that, a mass that needs to be removed and nothing more. Hugs.
Love the outcome!! I want to try this peel/stick method on my daughter’s cabinets in her rental apartment. That and the peal and stick back splash. Along with the tiles on the counter! The kitchenette is old and hideous!
Prayer to St. Francis for good results for Ryder!! ❤️
Thank you, Dawn! Yes, that is a great idea. You should do it! This one in particular sticks VERY well. You can make it beautiful. :) Thank you for the prayers! xoxo
Our precious Ryder! Sending him much love and hugs, and of course, prayers for a perfect outcome. Prayers to you and your loving family also.
The cabinet looks great enough that I ordered several rolls! Can’t wait until next week to see what you did to so beautifully beautify it!.
Thank you so much, Caye! We really appreciate that! :)
And that’s awesome! You will love it!! It’s one of my favorites that I’ve used. So pretty. (and very good quality) I’m sharing the faux finish tomorrow on the blog! xo
What a gorgeous cabinet!! I LOVE the paper you chose for the back! I miss you doing furniture, but I know it’s not as easy as it used to be. Hoping Ryder’s tumor is benign…poor sweet boy! 🩷 XOXO
Thanks, Christy!! It sure isn’t! I don’t know how you do it!! lol I do miss it though. I love doing furniture makeovers. I’m going to try to do more but we’ll see how that goes!! haha! xoxo
I love your makeover !! The wallpaper is such a fun pop.
I can’t wait to see how you did your faux wood painting. It turned out wonderful !
My best thoughts to you for Ryder. Such a sweet pup. I know how difficult this is, but pet medicine is soo much better today. I’m hoping for the best possible results. :)
p
Thank you, p! Faux painting is coming tomorrow. :)
And thank you for Ryder, can’t believe he has another lump already but I know everything will be okay! xoxo
Want to be inspired, learn new skills, discover all the tricks to furniture makeovers, creating new out of the old and more? You'll also receive my FREE ebook "Creating Fabulous Finishes" PLUS access to my private Printables Resource Library, too!
Sign up to get the Weekly Newsletter! Our emails include an unsubscribe link and you may opt-out at any time. Your information will *never* be shared or sold to a 3rd party.


")
")
")
")
")
")


")

Love, love, love this piece! Looking forward to details on the finish next week! Prayer for Ryder 😔🙏
Thank you, Susan! Sharing tomorrow! :) xo (and thank you for the prayers too)
Love that added trim and texture feature you added to the front!
I do have Ryder in my thoughts for good result on the test and easy recovery if removel necessary. <3
Thanks you, Molly Jo! :) xoxo
Ooohh, I SO want that piece of furniture! Beautiful work btw.
My heart and love goes out to beautiful Ryder and your family, I feel he’s going to be just fine; we had a sweet black lab that got the bumps throughout his life and they never brought any issues, he lived for sixteen years (I think thats 120 years for a ranch dog 😂).
If you want to, shoot me a message and I’ll make a batch of organic doggie treats, my fur babies love them. Or, I can draw a picture of him for you (I think he’s gorgeous)💕.
Hugs!
Thank you so much, Cassie! Aw, that is encouraging, thank you!!! Wow, that is so kind and thoughtful, Cassie! Ryder would love that, I am sure. :) xoxo
Lovely cabinet, Nancy!
I’m so sorry about Ryder’s continued health issues. Prayers are on the way for healing for Ryder and you and your family.
Thank you, Gayle! I so appreciate the prayers. xoxo
That is a really cool cabinet. I love it! I can’t wait to she how you did the faux wood finish. Was the some sort of design on the glass? The ‘before’ photo looks like there is something on the glass around that top shelf area.
Prayers for Ryder!
The faux finish tutorial is coming tomorrow! Check you inbox in the morning for that. :) And yes, sure was. I decided to remove it for the final design. I show it in tomorrow’s post a little more. Thank you for the prayers, Cheryl! xoxo
Amazing transformation, Nancy! I love a surprise inside a cabinet and this paper is just beautiful. There are so many choices, it can be overwhelming and I get tired of looking but this might be exactly what I need for my pantry. Looking forward to seeing how you created the finish that brought this outdated piece of furniture to life.
Thanks, Marcie! It is overwhelming! I’m considering adding some to our kitchen and I’ve been looking again…haven’t found anything that is “just right” yet! I do love this one so much, will definitely be using it again on something somewhere! Finish tutorial coming tomorrow! xo
Oh, Nancy – I think this is one of your absolute BEST transformations to date. WOW. It is stunning. I love love love it. I love the paint job and the trim and texture you put on it. it went from bleh to YEAH!
I am so sorry about poor Ryder. He is in my prayers, and you too, it’s hard to go through worries like this. Hope it’s nothing more than just that, a mass that needs to be removed and nothing more. Hugs.
Aw, really, Michele?! That’s awesome. Thank you so very much!
And yes, it’s hard for sure, thank you for the prayers, friend! xoxo
Love the outcome!! I want to try this peel/stick method on my daughter’s cabinets in her rental apartment. That and the peal and stick back splash. Along with the tiles on the counter! The kitchenette is old and hideous!
Prayer to St. Francis for good results for Ryder!! ❤️
Thank you, Dawn! Yes, that is a great idea. You should do it! This one in particular sticks VERY well. You can make it beautiful. :) Thank you for the prayers! xoxo
Our precious Ryder! Sending him much love and hugs, and of course, prayers for a perfect outcome. Prayers to you and your loving family also.
The cabinet looks great enough that I ordered several rolls! Can’t wait until next week to see what you did to so beautifully beautify it!.
Thank you so much, Caye! We really appreciate that! :)
And that’s awesome! You will love it!! It’s one of my favorites that I’ve used. So pretty. (and very good quality) I’m sharing the faux finish tomorrow on the blog! xo
Wow! Great makeover! Love the wallpaper!
Sorry to hear about Ryder. Praying that everything turns out well.
Thanks, Audra! And thank you so much for the prayers too, friend! xoxo
What a gorgeous cabinet!! I LOVE the paper you chose for the back! I miss you doing furniture, but I know it’s not as easy as it used to be. Hoping Ryder’s tumor is benign…poor sweet boy! 🩷 XOXO
Thanks, Christy!! It sure isn’t! I don’t know how you do it!! lol I do miss it though. I love doing furniture makeovers. I’m going to try to do more but we’ll see how that goes!! haha! xoxo
I love your makeover !! The wallpaper is such a fun pop.
I can’t wait to see how you did your faux wood painting. It turned out wonderful !
My best thoughts to you for Ryder. Such a sweet pup. I know how difficult this is, but pet medicine is soo much better today. I’m hoping for the best possible results. :)
p
Thank you, p! Faux painting is coming tomorrow. :)
And thank you for Ryder, can’t believe he has another lump already but I know everything will be okay! xoxo
I really like how you updated this piece and gave it new life!
Thank you, Rose! xoxo