35 Easy Crochet Borders For Baby Blankets (Simple + Quick)
THIS ARTICLE CONTAINS AFFILIATE LINKS THAT SUPPORT HANDY LITTLE ME CONTENT AND FREE PATTERNS.In this blog post, 35 easy crochet borders for baby blankets (simple + quick).
Crocheting is a wonderful craft that can be used to create beautiful and cozy baby blankets.
However, sometimes, the edges of a blanket can look unfinished or plain.
That’s where crochet edging techniques come in!
They add a decorative touch and can help make a blanket look more polished.
Whether you’re a beginner or an experienced crocheter, there’s a border pattern here for you.
So why not add a little extra flair to your next baby blanket project?

Weekly news, free patterns, tutorials, and more.

35 Easy Crochet Borders For Baby Blankets
Check out the easy crochet borders for baby blankets below to find the perfect edging for your project.
Happy Crocheting!

Single Crochet Border Edge to Clean Ugly Edges by Dream A Little Bigger
The single crochet border is a basic yet versatile option, perfect for beginners or when you want a simple finish.
It creates a neat and tidy edge, adding structure and definition to your baby blanket without overwhelming the design.
It's an easy border for all makers.

Half Double Crochet Border Tutorial by Jewels And Jones
With the half double crochet border, you can quickly add texture and depth to your baby blanket.
This stitch is slightly taller than single crochet, providing a bit more visual interest while still maintaining a straightforward and easy-to-follow pattern.
Make your blanket border pop!

Double Crochet Border Tutorial by Jewels And Jones
The double crochet border is a classic choice that works up quickly and adds sturdiness to your blanket's edge.
Its taller stitches create a slightly more open and airy border, making it perfect for blankets that need a bit of extra drape and softness.
This crochet border stitch pattern is perfect for a throw blanket.

Granny Stripe Edging: A Tutorial by Happy In Red
The granny stripe border adds a colorful and traditional touch to your baby blanket, reminiscent of classic granny square patterns.
Its lacy and textured appearance makes it a charming choice for blankets with a vintage or cottagecore aesthetic, adding warmth and character to your next project.
Perfect for an elegant and more finished look.

Scalloped Edging Or Shell Stitch Border by Moogly
Delicate and feminine, the scallop border creates a gentle wave effect along the edge of your blanket.
This elegant shell edging adds a touch of whimsy and sophistication, perfect for blankets intended for special occasions or as cherished heirlooms.
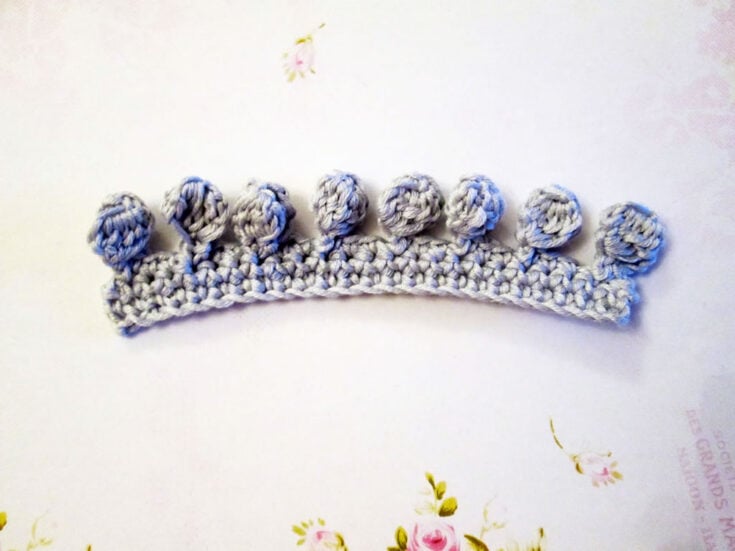
How to Crochet Bobble Edging by Tea And A Sewing Machine
The bobble border is a playful and textured option that adds depth and interest to your baby blanket.
Each bobble stitch creates a small, raised bump, giving the border a fun and tactile quality that's perfect for stimulating little fingers and eyes.
It's great for any blanket design.

Crochet Picot Stitch Border Tutorial by Jewels And Jones
The picot border adds a delicate and decorative finish to your baby blanket, featuring small pointed accents along the edge.
This charming border creates a subtle scalloped effect, adding a touch of elegance and refinement to your project.
You can play with many different colors.

Crab Stitch (Or Reverse Single Crochet) - With Video Tutorial by Raffamusa Designs
Also known as reverse single crochet, the crab stitch border creates a unique and twisted edge that stands out from traditional crochet borders.
This edgy and modern option adds a bold finishing touch to your baby blanket, perfect for contemporary designs or when you want to add a bit of unexpected flair.
How To Add A Simple Shell Border To A Granny Square Baby Blanket - Crochet Tutorial by Lullaby Lodge
The shell border features clusters of stitches that create a scalloped or fan-like pattern along the edge of your blanket.
This pretty and romantic border adds texture and movement to your project, evoking images of ocean waves or delicate seashells.
Puff Edge Stitch Blanket Border – Crochet Tutorial by Okie Girl Bling And Things
The puff stitch border creates soft and fluffy bumps along the edge of your baby blanket, adding a cozy and tactile element to your project.
This cute and cuddly border is perfect for blankets intended to keep little ones warm and snug, making it a popular choice for nursery decor.
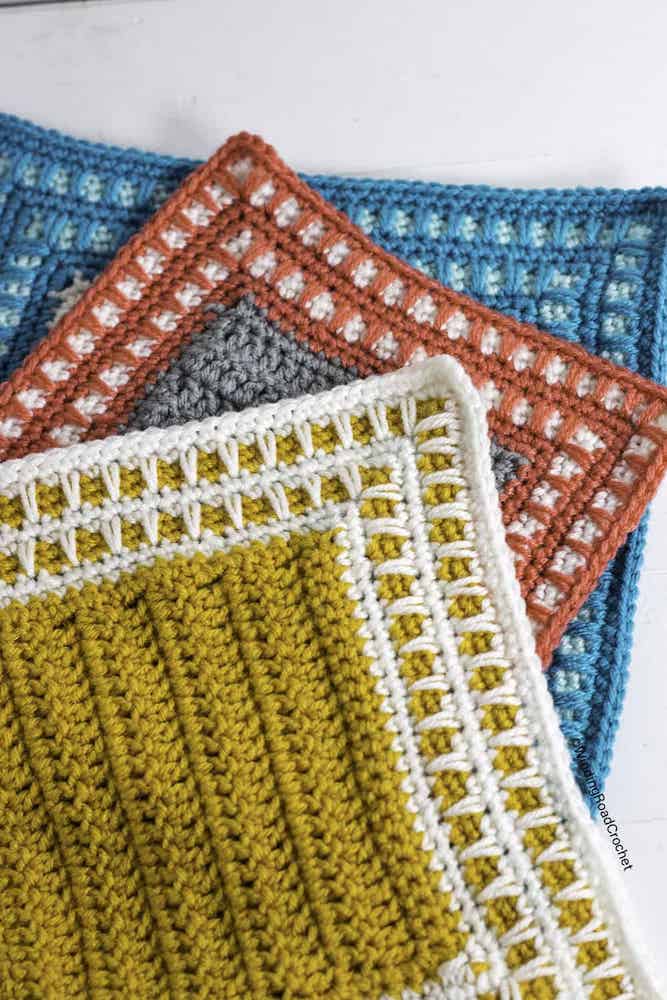
Spike Stitch Crochet Edging Free Pattern And Video by Winding Road Crochet
The spike stitch border features elongated stitches that create bold and angular accents along the edge of your blanket.
This modern and graphic border adds visual interest and dimension to your project, perfect for contemporary designs or when you want to make a statement.

V Stitch Shells Border Crochet Tutorial by Crafting Happiness
The V-stitch shell border creates an open and airy pattern with its distinctive V-shaped stitches, adding a light and lacy touch to your baby blanket.
This versatile border works well with a variety of yarn weights and colors, allowing you to customize your project to suit your personal style.
Crochet Moss Stitch Border For Blankets by Crafting Happiness
The moss stitch border creates a subtle and textured pattern with its alternating single crochet and chain stitches, adding depth and dimension to your baby blanket.
This simple yet effective border is easy to master and provides a classic and timeless finish to your project.

Herringbone Single Crochet Stitch – Modern Crochet Stitch Tutorial
The herringbone border creates a sleek and sophisticated look with its distinctive diagonal lines and textured stitches.
This elegant border adds a touch of luxury and refinement to your baby blanket, perfect for special occasions or when you want to create a more polished finish.

How To Crochet The Perfect C2C Crochet Border by Madame Stitch
The corner-to-corner border follows the diagonal lines of the popular C2C crochet technique, creating a gradual and modular pattern along the edge of your blanket.
This versatile border adds visual interest and texture to your project, making it a popular choice for blankets with a modern and minimalist aesthetic.

Popcorn Border by Moogly
The popcorn stitch border features raised bumps that resemble small popcorn kernels, adding a fun and playful texture to your baby blanket.
This cute and whimsical border adds a touch of charm and personality to your project, making it a popular choice for nursery decor or baby shower gifts.

Crochet Tulip Border
The tulip stitch border features floral motifs that create a whimsical and romantic pattern along the edge of your blanket.
This charming and feminine border adds a touch of elegance and sweetness to your project, making it perfect for blankets intended for baby showers or as gifts for special occasions.

Bobble Border – How To Crochet Tutorial by You Should Craft
The bobble stripe border features rows of bumpy and textured bobbles that create a playful and whimsical pattern along the edge of your blanket.
This fun and cheerful border adds a touch of charm and personality to your project, making it perfect for blankets intended for nursery decor or baby shower gifts.

Easy Crochet Ruffle Edge by Dream A Little Bigger
The ruffle border features frilly and feminine stitches that create a soft and flowing pattern along the edge of your blanket.
This delicate and romantic border adds a touch of elegance and sophistication to your project, making it perfect for blankets intended for special occasions or as heirloom gifts.

How To Crochet Fringed Edging by Tea And A Sewing Machine
The fringe border features strands of yarn that hang loosely from the edge of your blanket, adding movement and texture to your project.
This bohemian and playful border adds a touch of whimsy and charm to your project, making it perfect for blankets intended for nursery decor or as gifts for special occasions.

Crochet Border: Happily Ever Afghan by Crochet 365 Knit Too
The granny square border features clusters of stitches that create a traditional and timeless pattern along the edge of your blanket.
This charming and nostalgic border adds a touch of vintage flair to your project, making it perfect for blankets intended for nursery decor or as gifts for special occasions.

How To Crochet Bullion Stitch Border by Naztazia
The bullion stitch border features tall and twisted stitches that create a dense and textured pattern along the edge of your blanket.
This intricate and sophisticated border adds a touch of elegance and refinement to your project, making it perfect for blankets intended for special occasions or as heirloom gifts.

Camel Stitch Border by Bella Coco Crochet
The camel stitch border is a unique crochet technique that creates a raised and textured edge reminiscent of the humps on a camel's back.
It involves working half double crochet stitches in the horizontal bar behind the traditional front and back loops, resulting in a distinct and three-dimensional pattern.
This border adds a touch of visual interest and depth to your crochet projects, making it a popular choice for blankets, scarves, and other accessories.

Linen Stitch Border by The Unraveled Mitten
The linen stitch border is a simple yet elegant crochet technique that creates a dense and tightly woven texture resembling woven fabric.
It involves alternating single crochet and chain stitches across each row, resulting in a subtle and sophisticated pattern with a slight resemblance to linen fabric.
This border adds a timeless and classic touch to crochet projects such as blankets, scarves, and dishcloths, making it a versatile choice for both beginners and experienced crocheters.

Easy Crochet Rolling Fans Border by Crafting Happiness Handmade
The easy crochet rolling fans border is a delightful and airy edging pattern that resembles rolling waves or fans gently unfurling.
It is created by working clusters of double crochet stitches into chain spaces, creating a lacy and textured effect.
This border adds a whimsical and playful touch to crochet projects such as baby blankets, shawls, or afghans, making it an excellent choice for those looking to add charm and elegance to their creations.
It is the perfect border for all blankets.

The Crochet Border - Shark Fins by Crochet Kingdom
It is an innovative and eye-catching edging pattern that mimics the shape of shark fins emerging from the edge of the fabric.
It is achieved by working clusters of double crochet stitches and chain spaces in a staggered formation, creating a distinctive and playful design reminiscent of ocean waves.
This border adds a fun and adventurous element to crochet projects such as blankets, towels, or beach accessories, making it perfect for those seeking to infuse their creations with a touch of marine-inspired charm.
A unique border for baby blankets.

Crochet Star Border by Nana's Crafty Home
The crochet star border is a charming and whimsical edging pattern featuring clusters of stitches arranged to resemble twinkling stars.
Using basic crochet stitches like single crochet and picots, this border creates a delightful celestial motif that adds a touch of magic to any project.
Perfect for baby blankets, afghans, or holiday-themed items, the crochet star border brings a sense of enchantment and wonder to your crochet creations.

Wave Border Tutorial Lovely!
The wave border is a fluid and undulating edging pattern that mimics the gentle movement of ocean waves.
Using a combination of double crochet stitches and chain spaces, this border creates a rhythmic and dynamic design along the edge of your crochet project.
Perfect for blankets, shawls, or scarves with a seaside theme, the Wave Border adds a sense of tranquility and movement, making it ideal for capturing the beauty of the sea in your creations.

A Simple Crochet Border by One Dog Woof
This simple border is the perfect finishing touch to every blanket pattern.
It's one of my favorite crochet blanket borders, as it includes basic stitches and unique texture.
Perfect for a beginner crocheter and an intermediate.

A Different Crochet Bobble Border: Berry Stitch Crochet Edging Free Tutorial by Made By Gootie
The berry stitch crochet edging is a charming and textured border pattern featuring clusters of berry-like stitches that add dimension and visual interest to your project.
Using a combination of single crochet, double crochet, and chain stitches, this edging creates a beautiful and intricate finish perfect for blankets, shawls, or scarves.
Elevate your crochet projects with the delightful edging, adding a touch of elegance and whimsy to your handmade creations.
How To Crochet A Ribbed Border For Blankets by Raffamusa Designs
The ribbed crochet border is a classic and versatile edging pattern that adds texture and structure to your crochet projects.
Created using alternating rows of front post and back post double crochet stitches, this border mimics the appearance of ribbing in knitted fabric.
Perfect for blankets, hats, or sweaters, the Ribbed Crochet Border provides a polished and professional finish while also offering a cozy and stretchy texture.

Crochet Dot Border Stitch Tutorial & Video by Crafting Happiness
The crochet dot border stitch is a delightful and decorative edging pattern featuring clusters of raised dots that resemble small beads or pearls.
Created using simple stitches like single crochet and slip stitch, this border adds a touch of whimsy and charm to your crochet projects.
Perfect for blankets, dishcloths, or pillowcases, the crochet dot border stitch provides a fun and stylish finish, elevating your handmade creations with its playful texture and visual appeal.

How To Crochet The Pom Pom Edging by Urbaki
The crochet pom pom border is a fun and playful edging pattern that adds a touch of whimsy to your crochet projects.
Using basic crochet stitches and pom pom embellishments, this border creates a charming and festive finish.
Perfect for baby blankets, scarves, or hats, it brings a pop of color and texture, making your handmade creations stand out with flair and personality.

Half Double Slip Stitch Border by Daisy Farm Crafts
The half double slip stitch border is a sleek and modern edging pattern that creates a neat and tidy finish to your crochet projects.
By working half double crochet stitches into the slip stitches of the previous row, this border produces a subtle yet structured texture.
Perfect for blankets, scarves, or garments, the half double slip stitch border adds a touch of sophistication and polish, elevating your handmade creations with its clean lines and contemporary appeal.

Crochet Chain Border
The crochet chain border is a simple yet versatile edging pattern that adds a clean and minimalist finish to your crochet projects.
Created using basic chain stitches worked along the edge of the fabric, this border provides a delicate and airy accent.
Perfect for blankets, scarves, or dishcloths, the crochet chain border offers a subtle and elegant touch, allowing your handmade creations to shine with understated beauty.
Why Crochet A Border On A Baby Blanket?
Adding a border to crocheted blankets serves multiple essential functions.
It offers a refined, polished appearance, framing the blanket’s rough edges with a clean, professional finish.
Beyond aesthetics, the border reinforces the structural integrity of the blanket, guarding against unraveling or fraying over time, which is particularly important for blankets subjected to frequent use and laundering.
Additionally, the border can serve as a decorative element, allowing crocheters to incorporate various stitches, colors, and patterns to complement the overall design or add visual interest.
How Do You End A Crochet Blanket?
Ending a crochet blanket involves completing the final row or round of stitches, fastening off the yarn, and weaving in the loose ends to secure them.
Here’s a step-by-step guide on how to end a crochet blanket:
- Complete the final row or round: Work the last row or round of stitches according to your pattern or design until you reach the desired size for your blanket.
- Fasten off the yarn: Once you’ve finished the last stitch, cut the yarn, leaving a tail that is several inches long (usually around 6-8 inches). Yarn over and pull the tail through the loop on your hook to create a knot. This secures the last stitch in place.
- Weave in the ends: Thread the yarn tail onto a yarn needle. Insert the needle under the loops of several stitches along the edge of your blanket, being careful to weave the yarn in discreetly to avoid creating bumps or gaps. Continue weaving the yarn back and forth in different directions for about an inch or two, then trim any excess yarn close to the surface of the fabric.
- Repeat for any remaining tails: If you changed yarn colors or joined new skeins of yarn during your project, repeat the process of fastening off and weaving in ends for each tail to ensure they are securely fastened and hidden within the fabric.
- Block the blanket (optional): Blocking your finished crochet blanket can help to even out stitches, relax the fabric, and improve the overall appearance. Depending on the fiber content of your yarn and your preference, you can wet block, steam block, or simply pin the blanket into shape and let it air dry.
Once you’ve completed these steps, your crochet blanket is finished and ready to use or gift!
Make sure to take your time when weaving in ends to ensure they are securely fastened and won’t come undone with use.
Should You Block A Crochet Blanket Before Adding A Border?
Whether or not to block a crochet blanket before adding a border depends on various factors.
Blocking can be beneficial for achieving a more uniform appearance, especially if the blanket has uneven tension or if precise sizing is important.
It can also help to relax the fabric and improve its drape, particularly for blankets made from natural fibers like wool or cotton.
Additionally, blocking can aid in adjusting the size of the blanket if it has stretched or shrunk during crocheting.
However, if the blanket already has a consistent texture and size, or if the border design is forgiving of slight irregularities, blocking may be unnecessary.
Ultimately, the decision to block before adding a border comes down to personal preference and the desired outcome for the finished project.
Learn everything about blocking here – Blocking Knits – How To Block Knitting Guide
How Do I Choose A Crochet Border?
Choosing a crochet border for your project involves considering several factors to ensure it complements the overall design and enhances the finished piece.
Begin by assessing the style and purpose of your project—is it traditional, modern, or whimsical?
The border should align with the aesthetic of the main body of the project.
Additionally, consider the stitch pattern used in the main portion of the project; a border that complements or contrasts with this pattern can create a cohesive and visually appealing result.
Think about the functionality of the border as well—does it need to add structure, provide stability, or simply serve as a decorative embellishment?
Finally, consider the yarn color and weight to ensure the border harmonizes with the rest of the project.
Whether you opt for a simple single crochet edging, an intricate lace border, or something in between, choosing a crochet border involves selecting one that enhances the overall look and feel of your project while fulfilling its practical requirements.
What is the easiest border for a crochet blanket?
The easiest border for a crochet blanket, especially for beginners, is typically a simple single crochet border.
A pretty alternative that is also easy is a crochet shell border; you can view a tutorial for that here on my YouTube channel.
Should I use a bigger crochet hook for the border?
Opting for a larger crochet hook when crafting the border of your blanket can yield various benefits, contingent upon the desired effect and yarn thickness.
Firstly, a larger hook size can produce a looser stitch pattern, fostering a softer, more flowing texture, ideal for blankets fashioned from thicker yarns or aiming for a relaxed, airy border.
Additionally, it lends an opportunity to inject flair, as the larger stitches create a bold, visually striking border that complements the blanket’s main body.
Moreover, adjusting tension becomes more manageable with a larger hook, compensating for any disparities between the border and main body tension, ensuring a flat, cohesive appearance.
Speedier progress is also a perk, with larger stitches translating to quicker completion—a boon for those on tight deadlines or simply seeking efficient project closure.
Yet, while a larger hook offers advantages, it’s crucial to assess its impact on the overall aesthetic, as smaller hook sizes might better suit projects aiming for a tighter, more structured border.
Ultimately, the choice of hook size hinges on individual preference, desired aesthetic, and yarn characteristics, inviting experimentation to discover the perfect match for each unique project.
What supplies do you need to crochet a baby blanket boarder?
To crochet a baby blanket border, you’ll need basic crochet supplies.
Firstly, you’ll require a crochet hook in an appropriate size for the yarn you’re using and the desired tension of your stitches.
Yarn is the next essential item, chosen in a soft and washable fiber suitable for baby use.
Acrylic or cotton yarns are popular choices due to their durability and easy care.
You’ll also need a yarn needle/tapestry needle for weaving in ends and sewing seams, scissors for cutting yarn, and, optionally, stitch markers for marking corners or specific points along the edge of the blanket.
If you’re following a specific pattern, ensure you have the instructions or design inspiration on hand.
Additionally, blocking materials like blocking mats, T-pins, and a spray bottle or steam iron may be necessary to shape and finish the border neatly.
With these supplies, you’ll be well-equipped to add a beautiful border to your baby blanket.
Crochet Lessons
If you are a new maker and need help with the crochet basics, check out the crochet lessons here – Crochet Lessons {With Video Tutorials}.
There, you will find tutorial posts for all the crochet techniques a newbie needs to know.
Including how to make a slip knot how to create a foundation chain (ch), how to crochet the basic crochet stitches, single crochet stitches (sc), double crochet stitches (dc), how to crochet granny squares and all the crochet abbreviations ( in UK and US terms) a maker needs to know.
And if you need more video tutorials, check out my YouTube channel here. – Handy Little Me – YouTube
Check out the ultimate crochet stitch library – 30 Crochet Stitches For All Skill Levels
To check out knit patterns, check out this pattern category – Free Knitting Patterns
Join The Handy Little Me Facebook Group to connect with more makers.
You can also find us on Ravelry, Pinterest, and Instagram.
Free Crochet Patterns
- Free Crochet Easter Eggs Pattern
- 50 Best Crochet Stitches For Blankets And Afghans
- Crochet Round Rug Pattern
- 35 Free Easter Crochet Patterns
- 35 Free Cotton Yarn Crochet Patterns
- How To Crochet A Blanket
- 40 Free Granny Square Crochet Patterns
- Crochet Blanket Sizes And How Much Yarn
- Outlander Shawl Crochet Pattern
- Crochet Beach Cover-Up Pattern
- Granny Square Bag – Easy Free Crochet Pattern
- Free Crochet Octopus Pattern (+ Video Tutorial)
- Crochet Summer Hat: Easy Pattern
- The 10 Best Yarns For Crochet Dishcloth Patterns
- 30 Bernat Blanket Yarn Free Crochet Patterns
")
")
