 Image: Google
Chromebooks are fantastic PCs for people who just need the basics and a computer that doesn’t require a lot of maintenace. Because of that philosophy, a Chromebook is already an ultra-secure computer straight out of the box.
But you can always do more, particularly if you want to minimize traces of your internet wanderings, or prevent your every online action from contributing to an advertising profile.
You may share a Chromebook with others or desire a setup that’s protected against the latest security threats. Perhaps it’s time for a little de-Googling in your life, as the giant from Mountain View can collect a lot of information about you.
Whatever your reasons, here are some ways to fortify your Chromebook’s security and privacy.
Own your Google security
IDG
IDG
IDG
Chrome OS benefits from Google’s ongoing security efforts to identify malicious websites and sandbox each browser tab so one site can’t take down your whole computer.
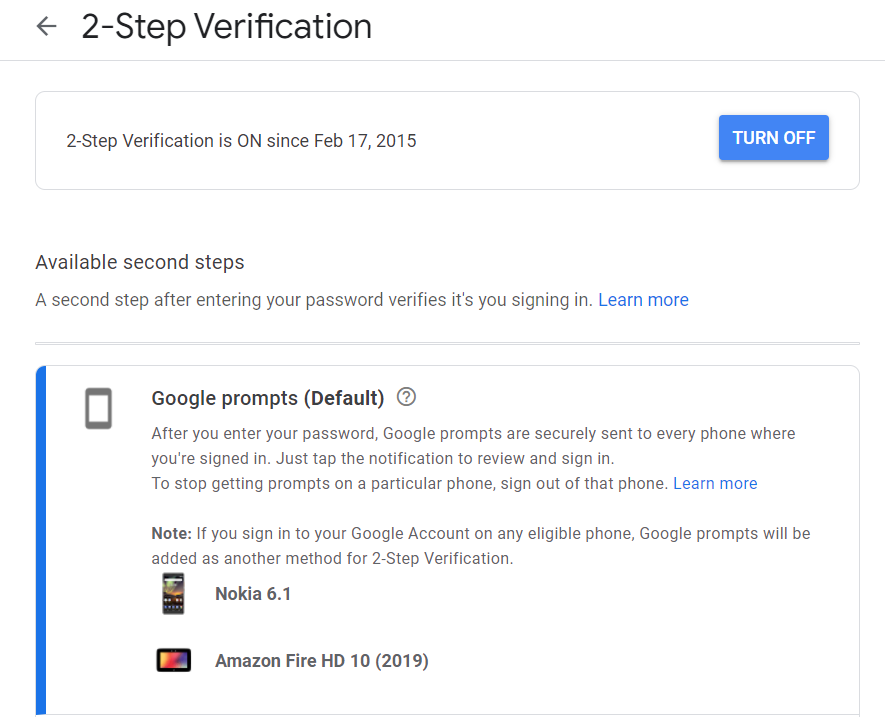
Good security, however, includes you and how you manage your own data. In this case, it means ensuring that you’ve properly secured your own Google account. Your Google Account is the major gate to your Chromebook so you should have a solid password and use two-factor authentication.
Google now makes two-factor authentication extremely easy via Google prompts. Instead of getting a code from an authentication app, Google’s prompts throw up an alert on your mobile devices running Android or iOS (iPhone 5S and up). You can then authorize signing in to your Google account by simply tapping Yes on your phone.
Another alternative is to use a security key such as YubiKey to sign in. This can also be assigned as a two-factor backup if your phone isn’t nearby. You can set up security keys in the two-factor authentication section of your Google Account.
One thing you definitely don’t want to do is use text or voice messages as two-factor authentication. Text messages aren’t encrypted, you can easily get phished, and the phone company can be fooled into transferring your phone number to an attacker. If you are using SMS authentication, turn it off in the two-factor authentication section linked above.
If you want a little more convenience for sign-in, however, your Chromebook can also use your phone as authentication instead of a password. Anytime your phone is near your Chromebook, it will just automagically unlock. That’s a nice convenience feature, but it may not be desirable for some. If you want to set this up go to Settings > Connected Devices > Android phone > Set up and follow the instructions.
In your Chromebook settings, you can also tweak a number of different features. For maximum security, restrict sign-in to just your account.
This means no one else can sign in and use your Chromebook—nosy relatives or miscreant youth will be denied at every turn.
IDG
IDG
IDG
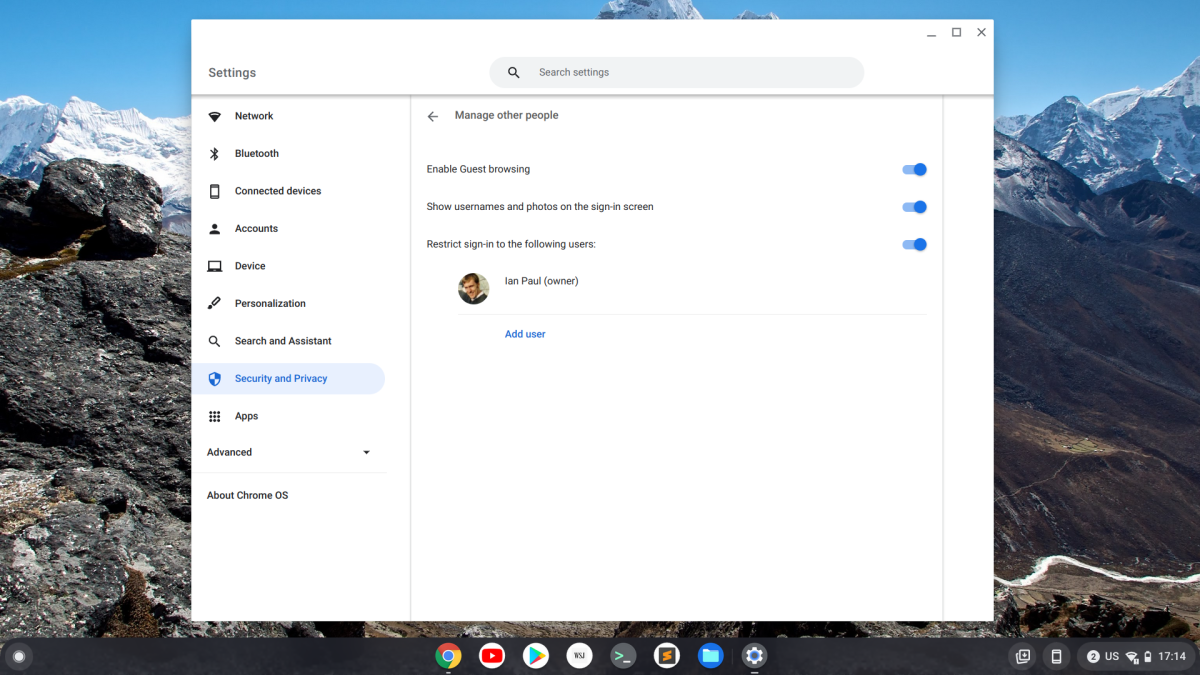
If others are determined to use your Chromebook, you can at least assert a little more control by allowing only specific Google accounts to use your device. To start, go to Settings > Security and Privacy > Manage other people and then activate the option that says Restrict sign-in to the following users. Next, click Add user, and then enter their Google Account email address. It’s also a good idea to deactivate the Enable Guest browsing option on this page for maximum user restriction.
If any of the people on your device are also children, you can enable Google’s parental controls by going to Settings > Accounts > Parental Controls. Click Set up and follow the instructions.
If you’re going to loan your Chromebook to someone else or plan to resell it, there’s a very easy method to wipe your data from the device. Use the Powerwash feature in Settings > Advanced > Reset settings > Powerwash > Reset.
Resetting a Chromebook is different from doing this to a Windows PC since Chromebooks largely leave all important files in the cloud. You’ll still want to check if you have any unique files saved to your laptop, but with 32GB to 64GB of storage it’s not like you can have that many in the first place.
Leave no trace

IDG
IDG
IDG
You’ve probably had the experience of checking out, say, a new tent on Amazon, and then suddenly ads for that shelter appear on every site you visit—even after you’ve bought it.
You can stop the madness with privacy-focused extensions like Privacy Badger, an extension from the Electronic Frontier Foundation, and uBlock Origin. The latter is an explicit ad blocker, while the EFF extension is focused on blocking trackers. Both allow you to whitelist specific sites if you need to.
Another helpful extension from the EFF privacy advocates is HTTPS Everywhere, an extension that forces a secure HTTPS (the lock symbol) connection when available on sites you visit. HTTPS Everywhere isn’t as necessary as it once was thanks to Google. The search giant basically forced any HTTPS holdouts to enable the security feature through warnings in Chrome, as well as considering it as a factor for search rankings.
Nevertheless, you will run across non-secure sites that don’t default to HTTPS and this extension can help. Although if the site doesn’t have an HTTPS option at all then this extension won’t help—site owners need to enable it and acquire an SSL/TSL certificate.
Also, keep a careful eye on your extensions. Google is better at vetting the extensions you can install in Chrome. Nevertheless, it’s still best to stick to well-known extensions. Check the reviews in the Chrome Web Store as well to see what others have to say.
Finally, you can also use a VPN.
A VPN won’t protect you from advertisers (or Google or Facebook), but it can shield your activity from your internet service provider (if that’s a concern for you), as well as add an extra layer of security when using public Wi-Fi networks.
Our favorite VPN provider for privacy and security is Mullvad, but we have tons of other recommendations as well in our best VPNs roundup.
Back off on the Google
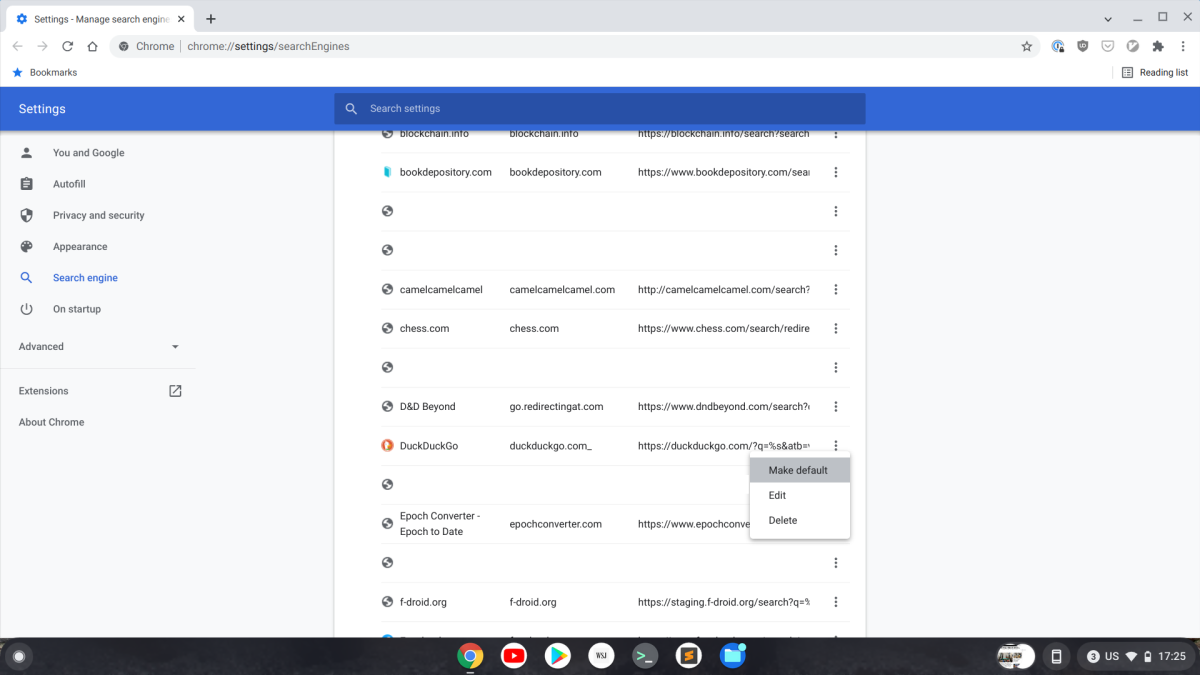
Maybe you want to give Google a little less information to have on you (all those details can lead to some interesting results). One solution is to switch your default search provider to DuckDuckGo. It’s a privacy-focused search engine that doesn’t track your search history.
IDG
IDG
IDG
To do this, go to DuckDuckGo, right-click in the address bar, and select Edit Search Engines. Then, from the list of “Other search engines,” click the three vertical lines next to DuckDuckGo and select Make default. Now when you type a search query in Chrome, it will be powered by the quacky search engine that keeps your secrets safe.
Another alternative is to use Chrome’s Guest Mode, which enables you to browse with Chrome without attaching any of the history to your Google account. All you need to do is sign out of your current session and log in as a guest (unless you disabled it in the previous step). It’s perfect for when you don’t want your browsing history to follow you around for all time, though this feature does allow others to log in to your device and use it.
Finally, just like with Chrome on Windows or macOS, Chrome OS has an incognito mode where Chrome promises not to track or record your online activity in any way when using it.
Going darker
You can further minimize Google’s hold on your personal information by turning off autofill and adjusting automatic sync in Chrome. While the autofill feature is definitely convenient, you may not want to have this feature at the ready to put in your name, address, email, and more in online forms. As for sync, we’ll make it more secure since killing it off means your search browsing history, bookmarks, and other preferences will remain local to that machine, which is not particularly convenient.
To deal with Autofill you need to adjust the settings in Chrome itself by entering chrome://settings/autofill into the browser’s address bar. Here, you can turn off the settings for Chrome that offer to remember or fill in passwords, payment methods, and addresses. If you want this feature but don’t want Google to handle them, a password manager with a Chrome extension can take care of this for you. Check out our roundup of the best paid and free password managers to find one that’s right for you.
To continue our journey, open the Chrome OS settings app and go to Settings > Accounts > Sync and Google services. Under “Other Google services” turn off the following: Autocomplete searches and URLs, Help improve Chrome’s features and performance, Make searches and browsing better, and Enhanced spell check. You can also turn off Google Drive search suggestions, but if you’ve already got your documents in Google Drive, well… ¯\_(ツ)_/¯.
Next, let’s bump up your Google Sync settings in order to keep syncing but make your data more private. To do this go to Settings > Accounts > Sync and Google services again and under “Encryption options” select the radio button for encrypting with your own passphrase. The catch here is that you’ll have to remember your passphrase, but that’s easily solved if you have a password manager.
IDG
IDG
IDG
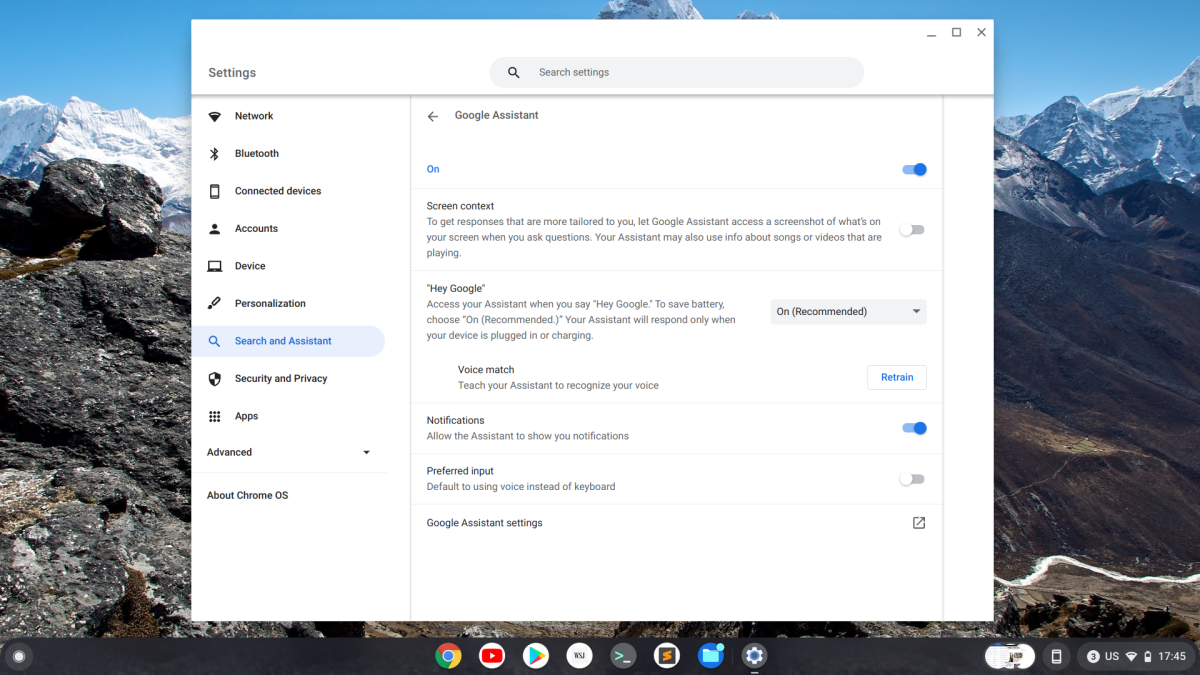
Let’s also turn off one final key feature—namely, Google Assistant. Go to Security > Search and Assistant > Google Assistant. If you just want to forget the whole thing, turn the slider at the top of the screen to Off. If you want to keep Google Assistant activated, then at the very least turn off Screen context, which allows Google Assistant to take a screenshot of your display when you ask questions. I mean, what?
If you don’t want the voice activation, then turn off “Hey Google” using the drop-down menu on this screen.
To go even deeper into the privacy woods, you can switch up your DNS server to a provider that won’t log or retain these lookups. By default, your administrator or internet service provider may retain this information.
To change the DNS settings on your Chromebook, first head to the the Chrome menu, choose Settings > Network and select your active Wi-Fi connection.
Next scroll down to the Network tab and choose the radio button labeled “Custom name servers.” Four text entry boxes will appear below the button. Now it’s just a matter of choosing your DNS provider. There are a number of free services such as OpenDNS or DNS Watch. If you use OpenDNS then enter 208.67.222.222 or 208.67.220.220 in the first two boxes. Or if you want to use Family Shield DNS that blocks adult content use 208.67.222.123 and 208.67.220.123. Now you can close this up, and you’re all set. If you want to be extra sure you’re using the new DNS you could disconnect and reconnect to Wi-Fi, but it’s not necessary.
DNS settings are configured on a per-connection basis. If you use multiple networks regularly then you’ll have to edit the DNS settings for each to use your new DNS servers on them.
While your Chromebook is already about as secure a computer as you can get, it can’t hurt to go the extra mile. With a few strategic moves, your Chromebook and your Google Account will be better protected against many of the dangers lurking on the web.


