Technical

Blocking Adverts, Tracking & Malware With RPZ

A while back, I decided I wanted to prevent at least some adverts and tracking, but rather than on a device by device basis, I wanted to achieve this for all devices on the network. Those that know me and my recent work will understand that naturally, DNS blocking sprang to mind, as I’m already very familiar with RPZ.

Originally, I was consuming a bunch of lists with some code, manipulating the entries with some weighting and then outputting an RPZ for my servers to use. However, more recently I found Energized Protect, which has a load of different levels of blocking, and they provide the different levels in a variety of formats, helpfully including RPZ. So, I’ve been trialling their lists for a couple of weeks now.

As with any external feed, you need to be aware of either false positives being added to the list by the curator, as well as things they think should be on the list that you may disagree with. I was recently affected by this with my Amazon devices, whereby one or more domains critical to the correct functioning of the Echo devices found their way onto the block list I’m consuming. To be fair, I’m consuming one of the more extreme variants of the list, and so this was something I was aware could happen (although I admit, it didn’t spring straight to the front of my mind when troubleshooting over the weekend!).

So, let’s talk about how this works.

RPZ is a feature within some DNS servers that allows you to modify the responses given to clients depending on a number of different criteria. BIND from Internet Systems Consortium (ISC) was pretty much first to have RPZ, but others have varying levels of support for the main functionality. The BIND implementation allows you to define a policy that can consist of a number of layers. Within the policy you can override the entire contents of a layer, and within each layer you can have permit and deny actions based on a number of triggers. For this use case, we are interested in two of the triggers:

  • the name being looked up
  • the IP of the client making the request

The file we download from Energized Protect will form the main blocking layer, and we’ll override the entire layer at the policy level with NXDOMAIN. Arguably we could send queries to a web server with a block page, but not all things on the requesting end of this are browsers, and we can get logging from the BIND servers if we want to know what was blocked for a given client for the purposes of troubleshooting. Of course, we will want to be able to override these entries incase something gets on the list that we don’t want to be affected by (see above).

RPZ layers are DNS zone file format (see RFC1035 section 5 if you’re particularly interested in DNS master zone format, or for RPZ you can read the RFC draft (it’s not made it to a full RFC yet…)).

Because they’re DNS zone files, they can be transferred to other DNS servers using the normal notify and transfer mechanisms.

On my network here, there’s a central authoritative server, and then a pair of recursive servers that deal with actual client requests. I’ll get around to writing about the anycast set up of those in another article.

For the purposes of this article, the authoritative master is on 192.168.1.53, and the two slaves that are actually dealing with the client recursion are on 192.168.1.51 and 192.168.1.52.

Central Authoritative Server

We’ll start with the central authoritative server. There are two bits to this, periodically fetching the RPZ, and serving it to the slave servers.

All of the scripts I talk about below, can be found in the Bitbucket repository. The code is fairly straight foward, but of course, drop me a line if you have questions.

Energized Protect update their feeds every 6 hours, and so there’s no need to poll them any more often than that. Further, the updateblockrpz script keeps an unchanged copy of the downloaded file so that wget can do timestamping and only download the file if it has actually changed on the server.

There are two further scripts, both of which allow you to manipulate an override layer in the policy. The first, rpz-override, allows you to add and remove domains from the override, either to add things you want to block, or allow things blocked in the block layer. The second script, rpz-override-client, allows you to base the action on the client IP instead of on the queried name. Both of these are written in Perl, and more specifically are built on the Net::DNS module to send the changes into the server via a dynamic update.

Next, let’s look at how we configure the server. A base understanding of BIND configuration is assumed.

First, we’ll need to config it to master the two zones, permit dynamic updates on the override zone, and permit slaves to transfer them. Depending on your distro, the location of your named.conf may vary, and also whether it’s a single file or split out with includes. I’ll just include generic config here to try and cover as many bases as possible.

zone "block" {
	type master;
	file "rpz/block";
	notify explicit;
	also-notify {
		192.168.1.51;
		192.168.1.52;
	};
};

zone "override" {
	type master;
	file "rpz/override";
	notify explicit;
	also-notify {
		192.168.1.51;
		192.168.1.52;
	};
	allow-update { 127.0.0.1; ::1; };
};

Normal rules apply here; config like also-notify can inherit from the main options section, or can be overridden per zone like we have done here (line 4 to force just the specific entries listed in lines 5-7). We do the same again with the override zone (lines 14 & 15-17), but here we also add the allow-update (line 19), in order to permit the maintenance scripts to work. If your main options section has allow-update specified, you will need to specify allow-update { none; }; in addition for the block zone, to prevent BIND from keeping journals for the zone. If you need other config that will lead to journals, such as ixfr-from-differences, for example, then the updateblockrpz script may need a tweak to freeze and thaw the block zone instead of just reloading the update.

I run the updateblockrpz script from cron at a randomly selected minute after the hour, every 6 hours and lazily capture the output to a tmp file for troubleshooting purposes. Yes, I should likely update this to log properly!

17 */6 * * * /usr/local/bin/updateblockrpz >/tmp/updateblockrpz.tmp

Slave Servers

Having got the RPZ zones set up on the master, we can turn our attention to the slaves that are actually handling the queries from the clients on the network.

First, we’ll slave the RPZ zones from the master:

masters rpzmasters { 192.168.1.53; };
zone "block" {
    type slave;
    file "rpz/block";
    masters { rpzmasters; };
};
zone "override" {
    type slave;
    file "rpz/override";
    masters { rpzmasters; };
};

…and next, we’ll define the policy that’ll apply to the clients:

options {
...
	response-policy {
		zone "override" policy given;
		zone "block" policy nxdomain;
	}
		break-dnssec yes
		qname-wait-recurse no
		max-policy-ttl 900
	;
...
};

As we mentioned before, we’re overriding the block layer at the policy level, forcing anything in that layer to result in a NXDOMAIN response. The override layer is left as given so that the actions in the layer carry. The policy is evaluated top to bottom, with the first action encountered causing an exit from policy, hence the override layer, which could be whitelisting something that’s in the block layer, is listed first.

RPZ Entries

Lastly, we’ll just briefly cover different types of record that you might want to put in the override layer; the scripts will help you mostly with this, but for those that are interested, here’s a little more detail.

Broadly, as we discussed earlier, we’re interested in two main triggers; the name being looked up, and the client making the query.

Entries that affect the domain name being looked up broadly look like this:

some.domain.name.override. 300 IN CNAME <action>.

Where <action> is one of the following:

  • rpz-passthru (whitelist)
  • rpz-drop (drop the query – quite unfriendly, will cause the client to wait for a timeout)
  • . (a literal dot, which will cause a NXDOMAIN response)

It’s also possible to do something like this, if you want to override to a block page or honeypot, for example:

some.domain.name.override. 300 IN A 192.168.0.1

…and of course, any of those can be prefixed with *. to cause the action to apply to everything within the bailiwick of some.domain.name.

Entries that affect the client look a little different. Firstly, they’re reversed, a bit like in-addr.arpa zones but they’re prefixed by an additional item specifying the CIDR notation. So, if you want to (using the actions from above) whitelist all queries from single IP 192.168.58.3, you’d do:

32.3.58.168.192.rpz-client-ip.override. 300 IN CNAME rpz-passthru.

However, if you wanted to block the upper /25, you’d do this (note use of the subnet IP, you need to specify the correct subnet boundary IP):

25.128.58.168.192.rpz-client-ip.override. 300 IN CNAME rpz-passthru.

Other Trigger Types

We’ve not talked about the other triggers, but briefly, you can also trigger actions based on:

  1. rpz-ip – the IP addresses that are returned in the answer to a query.
  2. rpz-nsdname – the domain name of the nameservers that are authoritative for the domain in the query.
  3. rpz-nsip – the IP addresses of the nameservers that are authoritative for the domain in the query (ie: what the names in (2) resolve to).

Type 1 can lead to data exfiltration, which, if you’re blocking a domain because you want to prevent exfiltration, defeats the object. If you put type 1 or type 3 in a layer, then if BIND reaches that layer as it works through the policy, it will do the recursion to the authority for the zone in order to work out if the trigger is a match. If you’re worried about data exfiltration, you MUST put the domains you’re blocking for that purpose in a RPZ layer above the first layer that includes type 1 or type 3 entries, then BIND will execute your configured action without any recursion.

…but what about DNSSEC

If you’ve read all that, and you’re thinking to yourself “hey, but surely returning modified answers will break DNSSEC” then you’re right. Your client machine stub-resolvers will trust your DNS resolver, and so won’t notice, but if you’re pointing a validating resolver at this setup, you’ll need to make sure you keep the break-dnssec yes; option I included above. Possibly counter-intuitively, this causes your RPZ server to lie to the downstream validating resolver. If baddomain.com is DNSSEC signed, and is on your block list, the downstream validating resolver will usually be sending queries with CD set instead of trusting your validation, expecting your server to send all the required DS, DNSKEY, etc. with break-dnssec yes; the RPZ server will lie; it’ll pretend baddomain.com isn’t signed and will strip all DNSSEC data in responses to the downstream resolver(s).

It’s important to note that this has an edge case. Let’s imagine you have gooddomain.com, which is signed, and is not being modified by your policy at all. Now let’s imagine you have badthing.gooddomain.com which is not at a zone split boundary, and is just a regular non-delegation entry in gooddomain.com. If you add badthing.gooddomain.com specifically to your RPZ for modification, the server can’t deal with lying about just that entry, and the downstream validator will spot the lie, returning SERVFAIL to its downstream client(s).

Standard
Technical

Alexa, why are you broken?

For a bit of context, I have an Echo Show as a bedside alarm clock, and I also have an Echo Clock paired to an Echo Dot in the kitchen, primarily to visualise timers when I’m cooking.

After a power cut late on Friday evening, the Echo Show came back on but displaying the wrong time (more or less an hour behind, but not exactly). If you asked “Alexa, what time is it?”, the correct time would be spoken, despite the wrong time still being displayed. Weird.

So, I got up, late, of course, and went to make breakfast. The Echo Clock in the kitchen is now also displaying the wrong time, but not the same wrong time that the Echo Show is displaying. Again, asking the paired Echo Dot for the time results in it speaking the correct time. Weirder and weirder.

I tried a bunch of things with the clock, reset and re-pair, checking the location and timezone settings for the devices in the app, but nothing resolved the incorrect time. I also noticed that the clock wasn’t displaying timers properly, and the Echo Dot had stopped announcing the end of timers.

I’d checked whether the Echo devices were unable to contact some central cloud service at Amazon with a quick check of twitter and some down detectors, and they didn’t seem to indicate widespread problems, and then it struck me: I wondered if my RPZ had picked up one or more entries that was causing this?

For some context at this point, I’ve been trialling the Energized Protection “Ultimate” in RPZ format. More about that soon in another post.

I got the MAC addresses for the Echo units from the Alexa app, grabbed the assigned IPs from the firewall and then looked in the RPZ logs to see if anything was being blocked for those client IPs — BINGO!

The log entries all start at the time of the power outage, and the TTL on (at least) fireoscaptiveportal.com is 60, and so I wonder if the Echo devices resolve the IP and then continue to use the resolved IP, ignoring the TTL?

There were four domains continually being blocked for the two devices:

  • fireoscaptiveportal.com
  • mas-sdk.amazon.com
  • prod.amazoncrl.com
  • unagi-na.amazon.com

I added whitelist entries to the RPZ for those, and immediatly could hear the Echo Dot in the kitchen announcing something … it was a timer from a few days before. As I stopped one, it would tell me about another, until it seemed to get very confused, resulting in a power off/power on.

fireoscaptiveportal.com.override. 5 IN CNAME rpz-passthru.
*.fireoscaptiveportal.com.override. 5 IN CNAME rpz-passthru.

Both the Echo Show and Echo Clock immediately corrected their displayed time, and timers were both displayed correctly and announced at the end correctly.

I’ve subsequently added fixed IP leases in the firewall’s DHCP config for the Echo devices, and added client-ip whitelisting for them in the RPZ.

32.105.0.1.10.rpz-client-ip.override. 5 IN CNAME rpz-passthru.
32.106.0.1.10.rpz-client-ip.override. 5 IN CNAME rpz-passthru.

Standard
Technical

Automatic Key Rolling

I recently moved my test domains onto a separate DNS master so that I could more freely tinker with these domains without risk to my regular stable domains.

I use catalog zones (maybe this is for another post!) to distribute the zones to save myself the bother of having to configure all the slaves, particularly since I’ve recently started spinning up an experimental anycast network of virtual machines, and so I added a second catalog to my slave servers, and away we went.

I’m a keen user of debian, and so I built the test master on ‘sid’ so I could run bleeding edge.

The benefit, primarily, was that whereas Debian 10 gets BIND 9.11.5, sid gets 9.16.8 (at the time of writing) as well as a newer version of openssl, meaning I could sign a zone with algorithm 16, ED448. DS digest algorithm 4 (SHA-384) is also supported.

The biggy for me, though, and the main driver for having the newer version of BIND, was dnssec-policy; getting BIND to automatically roll your keys.

I’m not aware of an ability in this version to support either a hook to run a script to interact with your registrar to update a DS record when your KSK rolls, nor an ability to automate CDS or CDNSKEY, but they’ll be coming at some point in the future.

I decided to test this by auto-rolling my ZSK, so, I added the following to /etc/bind/named.conf.options :

dnssec-policy normal {
	dnskey-ttl PT1H;
	keys {
		ksk lifetime unlimited algorithm ecdsa384;
		zsk lifetime 90D algorithm ecdsa384;
	};
	max-zone-ttl P1D;
	parent-ds-ttl P1D;
	parent-propagation-delay PT1H;
	parent-registration-delay P1D;
	publish-safety PT1H;
	retire-safety PT1H;
	signatures-refresh P5D;
	signatures-validity P2W;
	signatures-validity-dnskey P2W;
	zone-propagation-delay PT5M;
};

You don’t need to create initial keys or anything; BIND will do all the key juggling automatically, and will store them wherever you set key-directory to in your options section.

It doesn’t matter how you add your domains; I use rndc addzone as I have scripts that automate this and adding the zone to the catalog (again, that’ll be in another post at some point), the key thing being you just specify the policy in the zone. I’m also using inline-signing; whether you do will depend on your setup. Here’s a sample:

zone "some.zone" {
    type master;
    file "/path/to/some.zone.file";
    dnssec-policy "normal";
    inline-signing yes;
};

…and as if by magic, rndc reconfig, and the keyfiles are created, and the zone signed.

Standard
Technical

More DNS Anycast

Also known as “how to do BGP with Vultr using ExaBGP”.

Having previously written about locally anycasting services within my home network, I recently decided to run an experiment anycasting a prefix on the internet.

I’ve used ExaBGP before, and so it was a no brainer to use it again. For anycasted services, it offers a couple of benefits; it’s small and lightweight, it’s in many linux distros, and it can easily spawn a watchdog process that you can use to control your prefix advertisements.

I’ve been using Vultr for my authoritative DNS servers for a while, and so it was also a bit of a no brainer to use their services for this. I’m familiar with their UI, I already have an account, and even on the cheapest virtual machines, you can do BGP; you just need to send them a letter of authority (LOA) proving you own the address space you plan on advertising. I have my own IPv6 PI address space from RIPE, courtesy of a friendly sponsoring LIR, as well as my own ASN, so I was all set.

The other nice thing about Vultr is that the BGP session is the same peer IP at the Vultr end regardless of which of their datacentres you choose to spin things up in which means your automation to configure things is easier.

Vultr insist on a BGP session password, and the first problem I ran into turns out to be related to this, and so part of the reason for writing this is to help out anyone that also runs into this problem.

I went down a bit of a rabbit hole thinking the problem was to do with multihop BGP (Vultr’s sessions are multihop) and wondered if I needed to be setting the TTL on the outbound packets. This turned out not to be the case, but I left the settings in place anyway.

I installed BIRD and used one of Vultr’s canned configs for the virtual machine in question, and this worked like a charm, so this steered me in the direction of the problem being in my configuration of ExaBGP.

BIRD would have done the job, but I’d have had to write a new watchdog, and the one I have for ExaBGP is tried and tested, tweaked to my needs, and works well, so I was keen to get ExaBGP working. It’s a complete re-write from the one I talk about in the earlier blog post, so maybe I’ll write a post on that soon…

Either in a template or neighbor configuration, depending on the complexity of your needs, you just need outgoing-ttl 2; and incoming-ttl 2;

By default, ExaBGP expects md5-password to be a base64 encoded string, and so if what you’ve specified is just the plain text string for the session, it won’t work. If you want to specify the plain text password in this parameter, you need to set md5-base64 to false.

I’m using ansible to automate configuration, and so the template for my exabgp.conf looks like this:

process monitor {
	run /usr/local/bin/exabgp-healthcheck anycast;
	encoder text;
}

neighbor 2001:19f0:ffff::1 {
	local-address {{ ansible_default_ipv6.address }};
	router-id {{ router_id }};
	local-as {{ as_number }};
	peer-as 64515;
	hold-time 10;
	group-updates true;
	md5-password {{ md5_password }};
	md5-base64 false;
	outgoing-ttl 2;
	incoming-ttl 2;

	capability {
		graceful-restart 10;
	}

	family {
		ipv6 unicast;
	}

	api service {
		processes [ monitor ];
	}
}

I don’t have any IPv4 prefixes to advertise, so you’d need to add the relevant bits to the above if you do.

I had upgraded ExaBGP to version 4 as part of a distro upgrade on my internal resolvers, and rather than update the watchdog script, I opted for reverting ExaBGP’s setting instead, and so in exabgp.env I altered the ack setting to false in the [exabgp.api] section.

Standard
Technical

Validation…

Following on from my post about the new key being added to the zone, the required 30 days have passed and if your resolver is RFC5011 compliant, it should now trust the key.

You can check this as follows:

BIND

$ cat /var/named/managed-keys.bind
$ORIGIN .
$TTL 0  ; 0 seconds
@                       IN SOA  . . (
                                1904       ; serial
                                0          ; refresh (0 seconds)
                                0          ; retry (0 seconds)
                                0          ; expire (0 seconds)
                                0          ; minimum (0 seconds)
                                )
                        KEYDATA 20170425142612 20170210095625 19700101000000 257 3 8 (
                                AwEAAagAIKlVZrpC6Ia7gEzahOR+9W29euxhJhVVLOyQ
                                bSEW0O8gcCjFFVQUTf6v58fLjwBd0YI0EzrAcQqBGCzh
                                /RStIoO8g0NfnfL2MTJRkxoXbfDaUeVPQuYEhg37NZWA
                                JQ9VnMVDxP/VHL496M/QZxkjf5/Efucp2gaDX6RS6CXp
                                oY68LsvPVjR0ZSwzz1apAzvN9dlzEheX7ICJBBtuA6G3
                                LQpzW5hOA2hzCTMjJPJ8LbqF6dsV6DoBQzgul0sGIcGO
                                Yl7OyQdXfZ57relSQageu+ipAdTTJ25AsRTAoub8ONGc
                                LmqrAmRLKBP1dfwhYB4N7knNnulqQxA+Uk1ihz0=
                                ) ; KSK; alg = RSASHA256; key id = 19036
                                ; next refresh: Tue, 25 Apr 2017 14:26:12 GMT
                                ; trusted since: Fri, 10 Feb 2017 09:56:25 GMT
2017-03-12.automated-ksk-test.research.icann.org KEYDATA 20170424152612 20170317172529 19700101000000 257 3 8 (
                                AwEAAa9qsSLDI+H0keqE3Yzdr6XuhqhBQVWw5xdgNoWL
                                hE4VxSEIBz9IuCA4w4ssSrClZ59seNc76ltDFcKJv3X9
                                jDjzRtBLjenIgV4n/3GpKrAAnRlYbUtpBEdlk4mxoL3B
                                lX8pfLg7RQfTlWaxOUga1+CChcVieFF/si/eePc9HpZb
                                WxHZRLCAE8dlDa0aa0tfVAZWOnaifpmbTvhDK3tdvMU0
                                tfG2YfsOYcFB9z2KWmCDYwCONNKtls3p6wMwolun1h8I
                                Yo0PF98vqjAp3NVRZvKKdgyF/bZ/iJtAZFytXvXU6Gwa
                                5tOm1wgP6wuKupscP8KHBluZyOSKw4RMTk6YBdE=
                                ) ; KSK; alg = RSASHA256; key id = 3934
                                ; next refresh: Mon, 24 Apr 2017 15:26:12 GMT
                                ; trusted since: Fri, 17 Mar 2017 17:25:29 GMT
                        KEYDATA 20170424152612 20170418002534 19700101000000 257 3 8 (
                                AwEAAfUtjasCuLysD4MbjG3v4Kyu0vvVJ/0cIreP6flt
                                MeZmwQ5SRta/mB+eFVjau+6YKra2UeTKxojBovHH2lZr
                                w7NNejL44/Xps4gR3LSVMnCdwras+yvj4en64ghRGWYO
                                uB+Icb0AqrCUhLFWR8yx41UkfaA2vzFnM2xTx0N0+o6R
                                6UciWuwJResomQupOjNUy2ZAi81Y3pb0x3Lw4POjpcSJ
                                zrK4aZ/5UPymplqhLEU2DsoQmyFlM5RNTt0YXR8XM4Yw
                                su/scxg0u00IF1GC8xcyZUTMc1Rz98AY1VUo5QqUp9Vb
                                Aed5Aw1nNYfjLTj+zOykedgmjms1iNgh9EY111c=
                                ) ; KSK; alg = RSASHA256; key id = 19741
                                ; next refresh: Mon, 24 Apr 2017 15:26:12 GMT
                                ; trusted since: Tue, 18 Apr 2017 00:25:34 GMT

We can see in the output above that the new key, keytag 19741, is now trusted.

Unbound

$ cat /var/lib/unbound/2017-03-12.automated-ksk-test.research.icann.org.ds
; autotrust trust anchor file
;;id: 2017-03-12.automated-ksk-test.research.icann.org. 1
;;last_queried: 1493044058 ;;Mon Apr 24 14:27:38 2017
;;last_success: 1493044058 ;;Mon Apr 24 14:27:38 2017
;;next_probe_time: 1493047519 ;;Mon Apr 24 15:25:19 2017
;;query_failed: 0
;;query_interval: 3600
;;retry_time: 3600
2017-03-12.automated-ksk-test.research.icann.org.       60      IN      DNSKEY  257 3 8 AwEAAa9qsSLDI+H0keqE3Yzdr6XuhqhBQVWw5xdgNoWLhE4VxSEIBz9IuCA4w4ssSrClZ59seNc76ltDFcKJv3X9jDjzRtBLjenIgV4n/3GpKrAAnRlYbUtpBEdlk4mxoL3BlX8pfLg7RQfTlWaxOUga1+CChcVieFF/si/eePc9HpZbWxHZRLCAE8dlDa0aa0tfVAZWOnaifpmbTvhDK3tdvMU0tfG2YfsOYcFB9z2KWmCDYwCONNKtls3p6wMwolun1h8IYo0PF98vqjAp3NVRZvKKdgyF/bZ/iJtAZFytXvXU6Gwa5tOm1wgP6wuKupscP8KHBluZyOSKw4RMTk6YBdE= ;{id = 3934 (ksk), size = 2048b} ;;state=2 [  VALID  ] ;;count=0 ;;lastchange=1489997718 ;;Mon Mar 20 08:15:18 2017
2017-03-12.automated-ksk-test.research.icann.org.       60      IN      DNSKEY  257 3 8 AwEAAfUtjasCuLysD4MbjG3v4Kyu0vvVJ/0cIreP6fltMeZmwQ5SRta/mB+eFVjau+6YKra2UeTKxojBovHH2lZrw7NNejL44/Xps4gR3LSVMnCdwras+yvj4en64ghRGWYOuB+Icb0AqrCUhLFWR8yx41UkfaA2vzFnM2xTx0N0+o6R6UciWuwJResomQupOjNUy2ZAi81Y3pb0x3Lw4POjpcSJzrK4aZ/5UPymplqhLEU2DsoQmyFlM5RNTt0YXR8XM4Ywsu/scxg0u00IF1GC8xcyZUTMc1Rz98AY1VUo5QqUp9VbAed5Aw1nNYfjLTj+zOykedgmjms1iNgh9EY111c= ;{id = 19741 (ksk), size = 2048b} ;;state=2 [  VALID  ] ;;count=0 ;;lastchange=1492590342 ;;Wed Apr 19 08:25:42 2017

Similarly, for unbound, we can see above that the status is now VALID.

Standard
Technical

Wiper Relay


Recently, the wipers have started to play up on my 2010 BMW E60 LCI

I booked it in to North Oxford BMW last Saturday morning, as it’d been there for services and I’m happy with the work and the customer care.

Of course, sod’s law jumped in, and on the Friday night on the way home from work, the wipers worked fine. Grr.

I took it along to BMW anyway, and thankfully the wipers played up for the technician, and the computer had logged helpful fault codes.

The motor was declared as fine, and a replacement relay was recommended.

They had none in stock, and so I ordered one to collect; I’m quite competent and can swap a relay.

In the mean time I checked the handbook; no mention of relays, just fuses. OK; off to google we go.

The relays are in the “e-box” which is under one of the cabin air intake filters. A helpful Youtube video showed how to get to it.

I picked the relay up this morning, and as the weather was nice, set about replacing it this afternoon.

I undid the clips etc on the drivers side cabin air filter, and fiddled with the surround, before, eventually, the lower part came off, revealing…

…no, not the e-box as expected…

I was faced with the brake servo, which immediately made perfect sense; I immediately realised I’d watched a US video.

So I put it all back together, and started taking the passenger side apart.

BMW_1

Untouched, before disassembly…

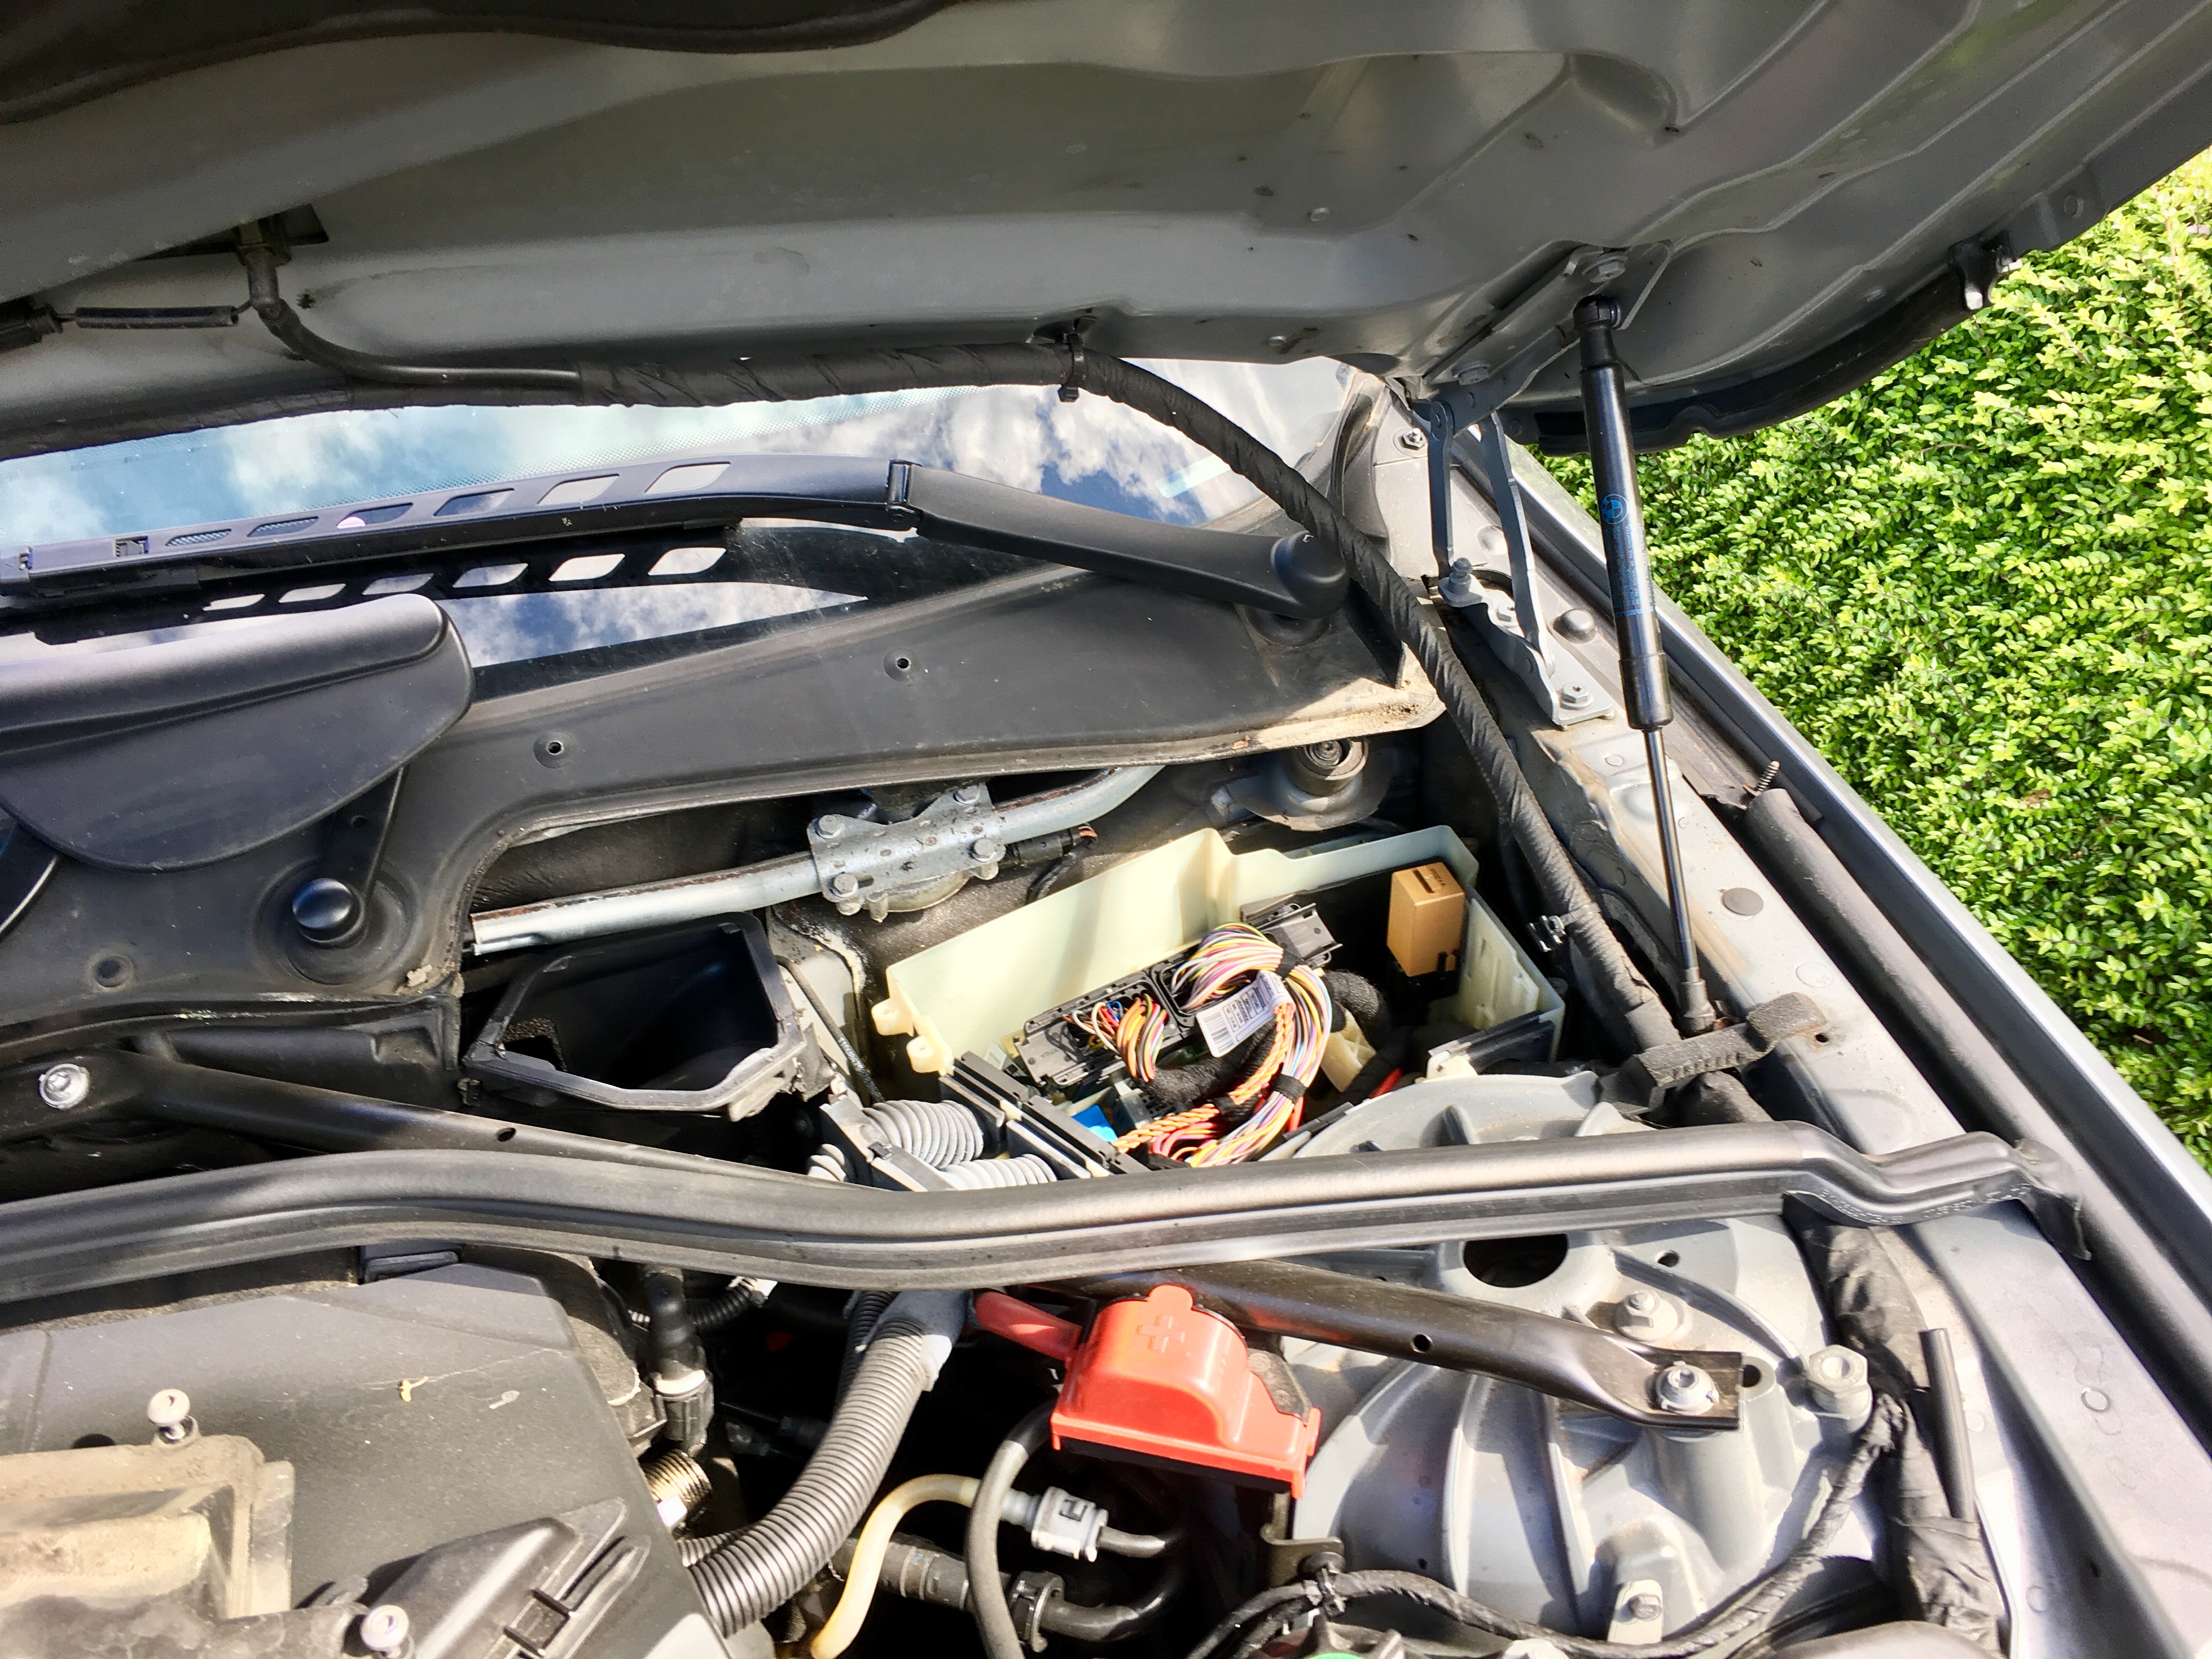
Undo that clip along the left edge of the cover, and there’s a clip you can undo with a 13mm socket on the lower right corner (as pictured). Lift it off.

Then, you need to unclip the seal (pictured) – it just lifts off. There’s a clip on plastic cover in the middle below the windscreen, just visible in the left of the picture above; it just slides to the right and comes off.

Once that’s done, you can undo the screw (centre, bottom, next to the red battery terminal, in the picture above) and 3 more of the hex 13mm to be undone with the socket.

You can remove an odd little plastic cover that fits around the right hand bonnet stay with a bit of a wiggle, and then the cover comes off revealing…

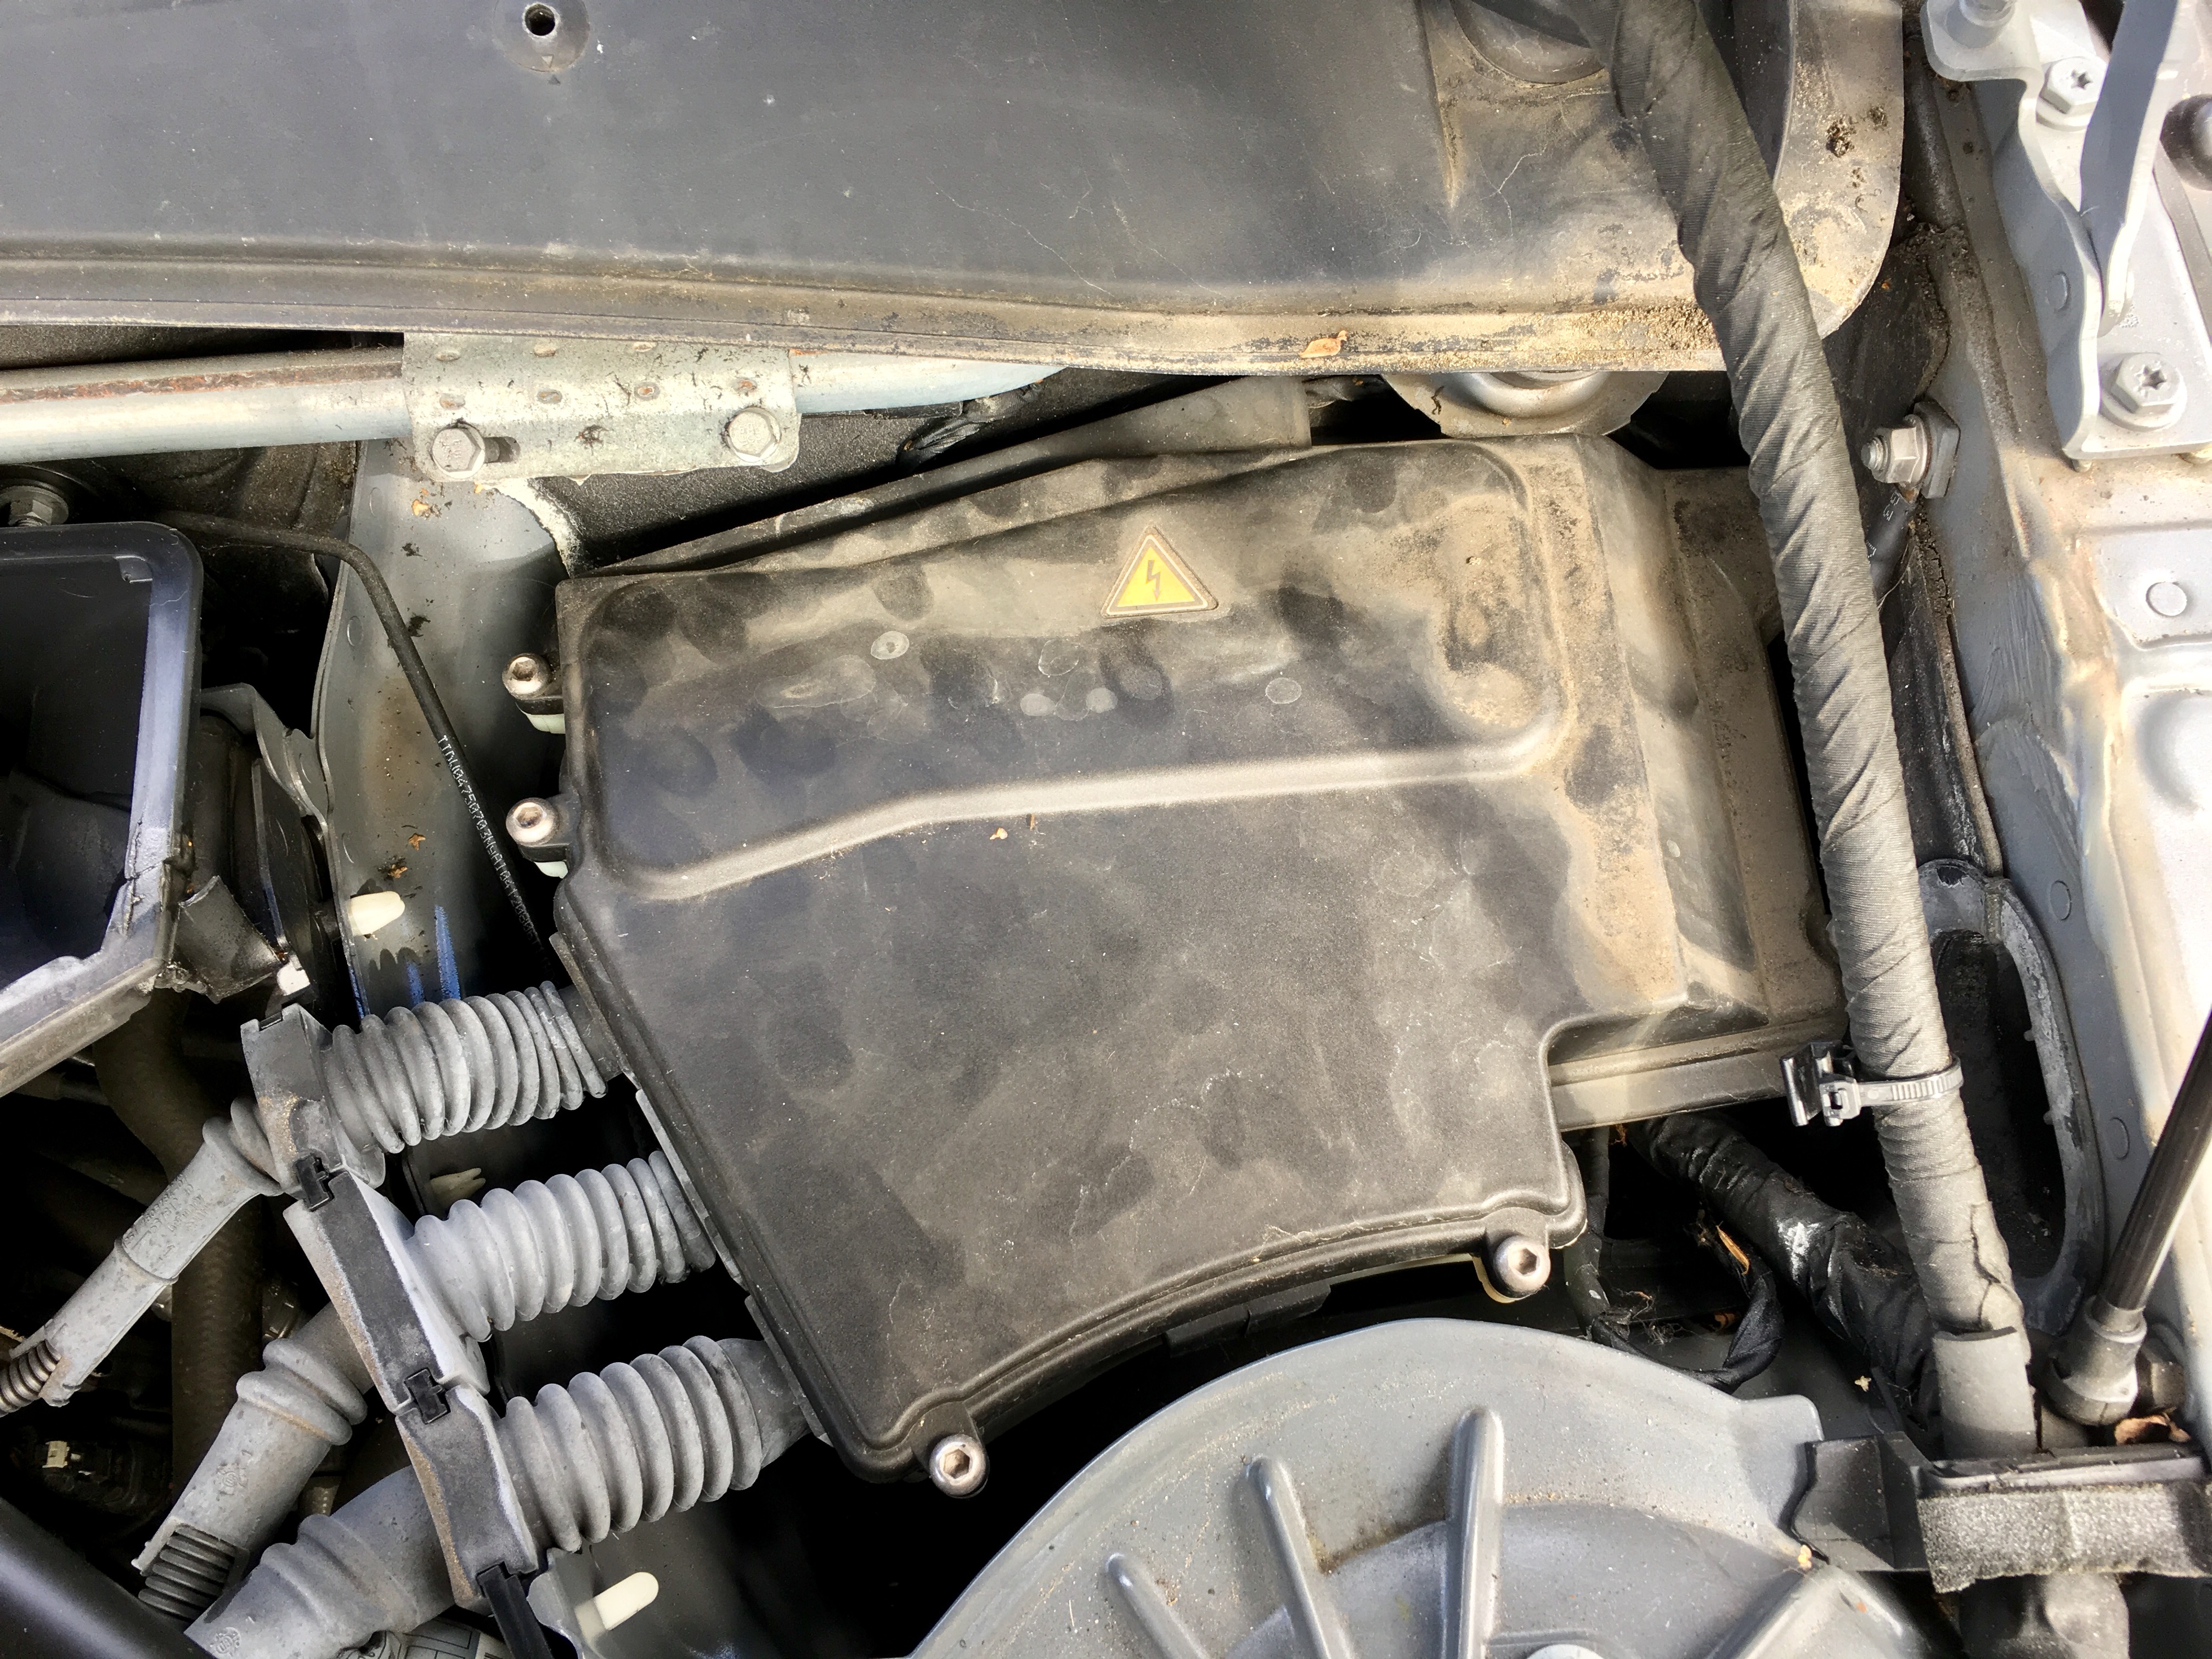
BMW_2

Undo the alan screws holding the lid on, and…

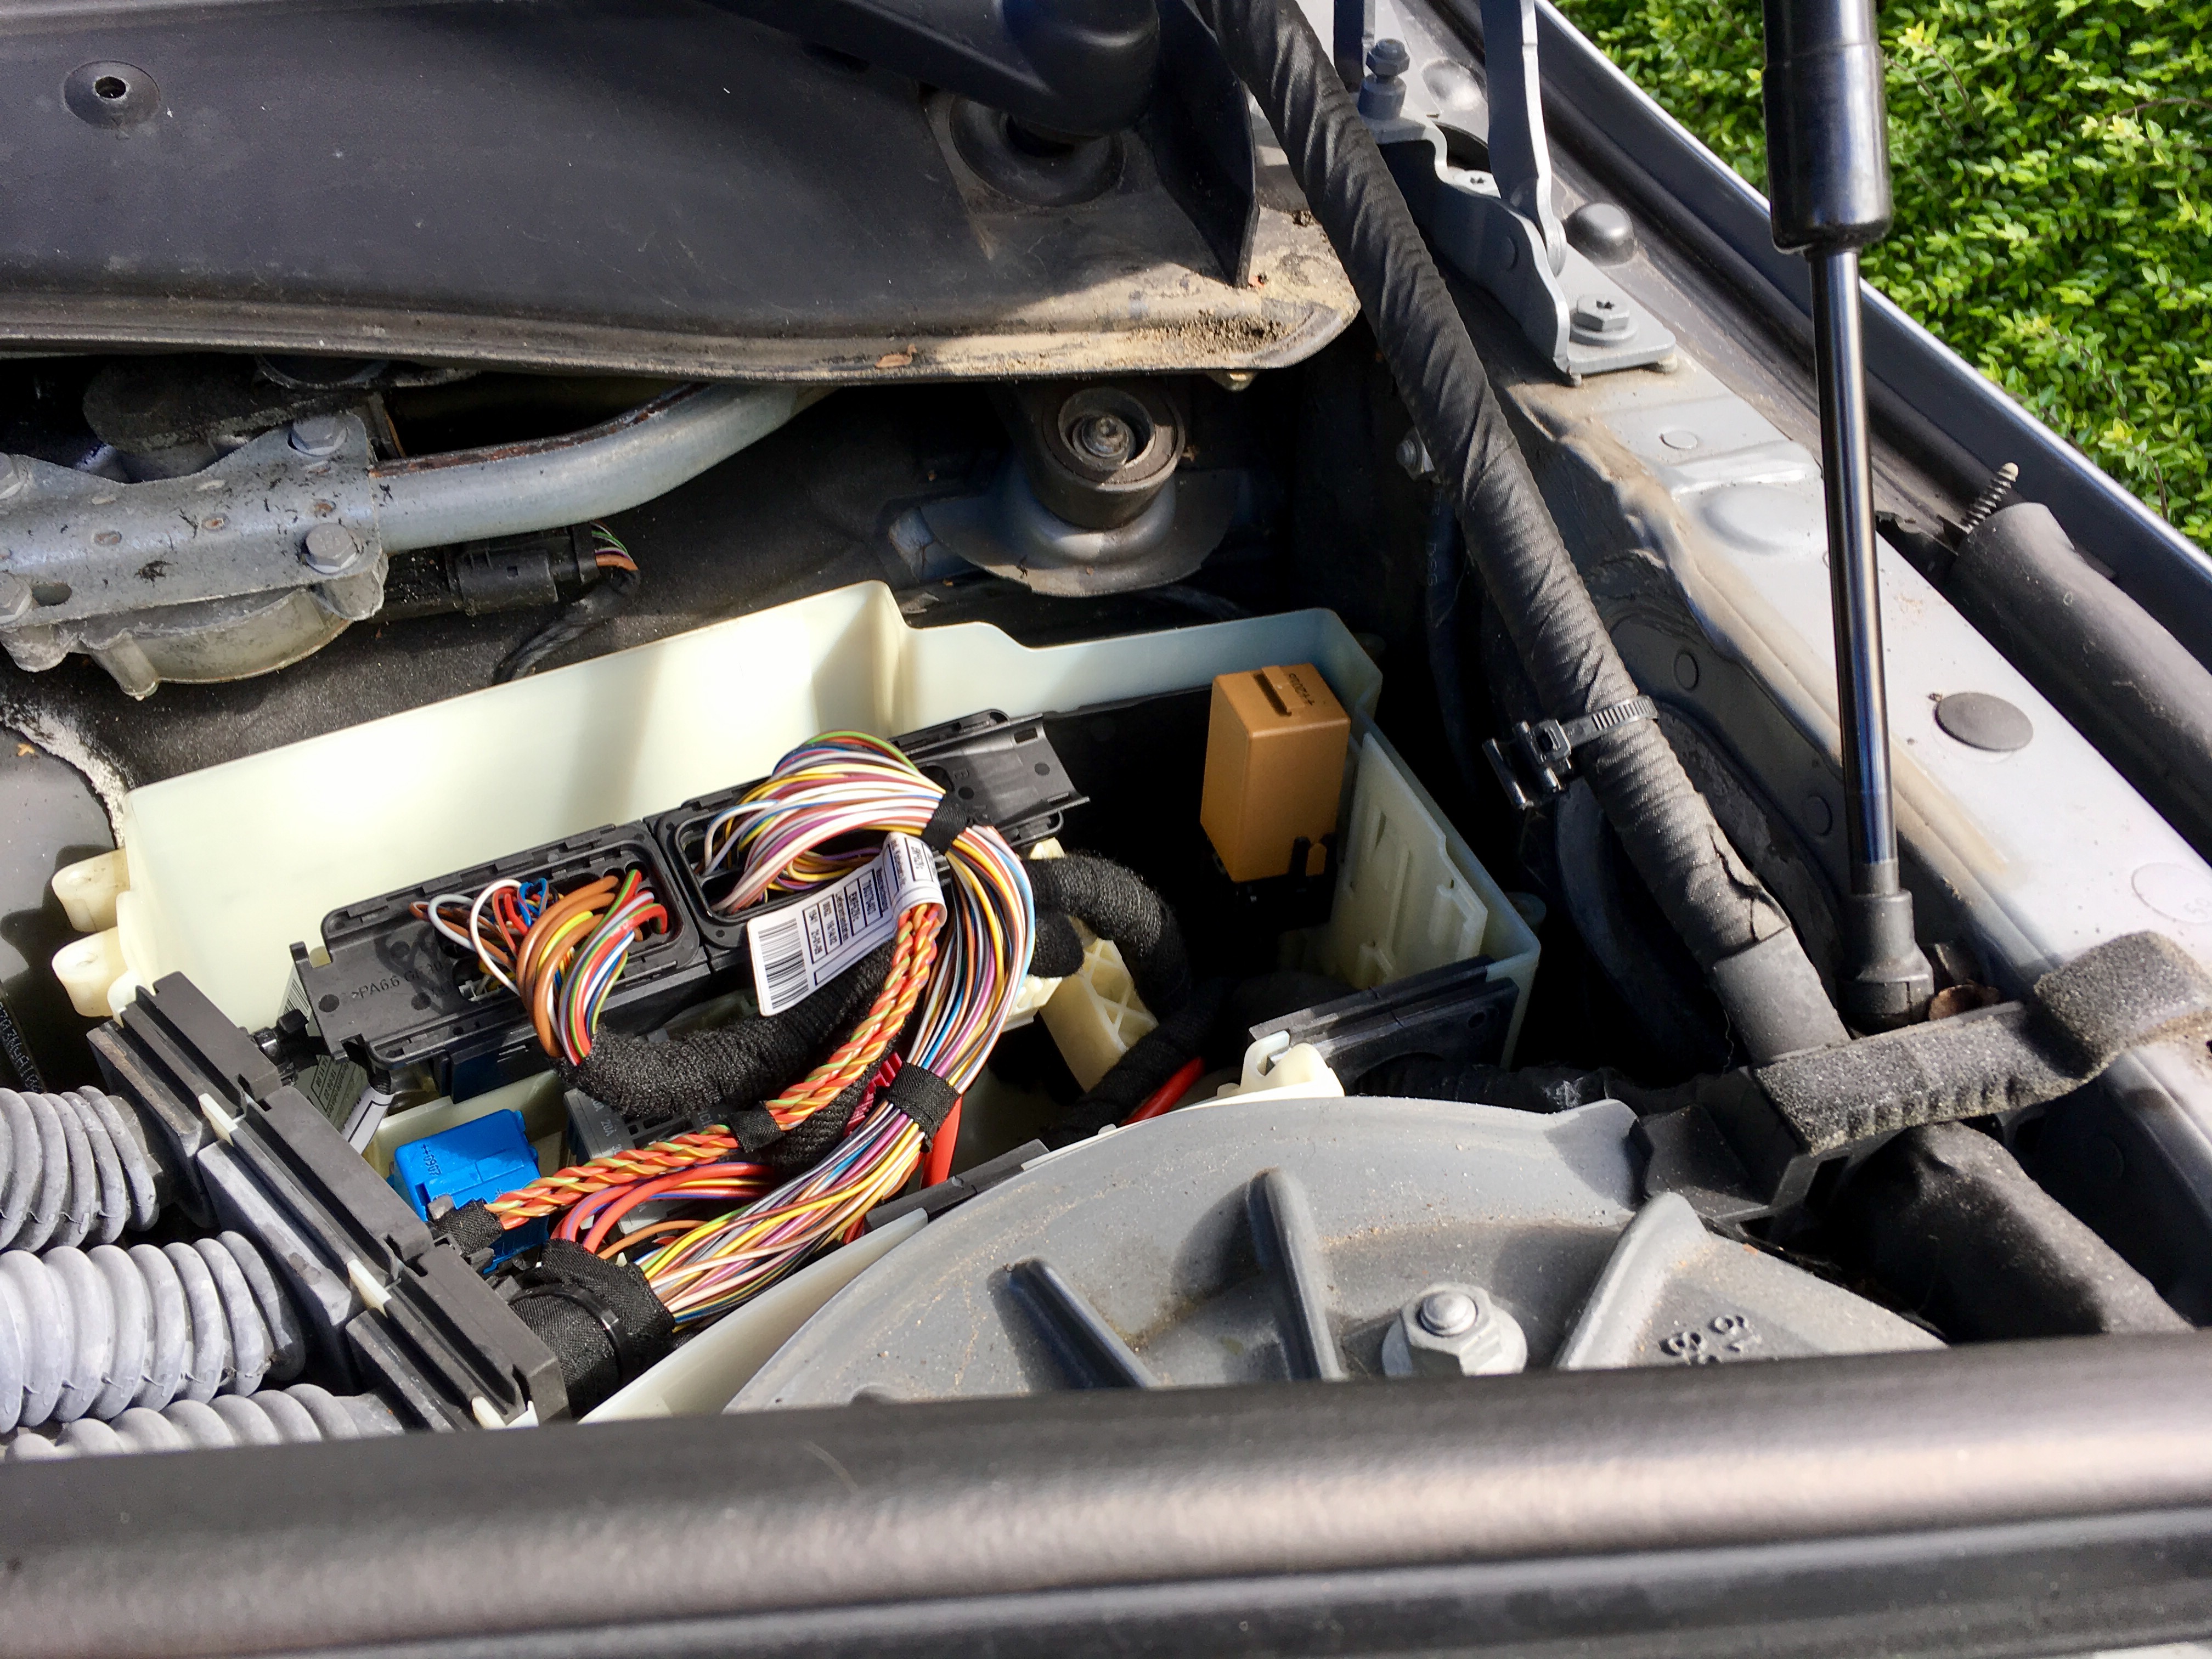
BMW_3BMW_4

That browny-beige relay is the wiper relay.

The invoice says it’s a B61.36.8.384.505.

Hope this helps someone.

Standard
Technical

A New Key…

Further to my post on ICANN’s automated KSK testlab, ICANN generated a new key on the 19th, and added it to the test zone that we’re using, and we can see it below:

$ dig +multiline @::1 2017-03-12.automated-ksk-test.research.icann.org dnskey

; <<>> DiG 9.9.5-9+deb8u6-Debian <<>> +multiline @::1 2017-03-12.automated-ksk-test.research.icann.org dnskey
; (1 server found)
;; global options: +cmd
;; Got answer:
;; ->>HEADER<<- opcode: QUERY, status: NOERROR, id: 36605
;; flags: qr rd ra ad; QUERY: 1, ANSWER: 3, AUTHORITY: 0, ADDITIONAL: 1

;; OPT PSEUDOSECTION:
; EDNS: version: 0, flags:; udp: 4096
;; QUESTION SECTION:
;2017-03-12.automated-ksk-test.research.icann.org. IN DNSKEY

;; ANSWER SECTION:
2017-03-12.automated-ksk-test.research.icann.org. 60 IN	DNSKEY 257 3 8 (
				AwEAAa9qsSLDI+H0keqE3Yzdr6XuhqhBQVWw5xdgNoWL
				hE4VxSEIBz9IuCA4w4ssSrClZ59seNc76ltDFcKJv3X9
				jDjzRtBLjenIgV4n/3GpKrAAnRlYbUtpBEdlk4mxoL3B
				lX8pfLg7RQfTlWaxOUga1+CChcVieFF/si/eePc9HpZb
				WxHZRLCAE8dlDa0aa0tfVAZWOnaifpmbTvhDK3tdvMU0
				tfG2YfsOYcFB9z2KWmCDYwCONNKtls3p6wMwolun1h8I
				Yo0PF98vqjAp3NVRZvKKdgyF/bZ/iJtAZFytXvXU6Gwa
				5tOm1wgP6wuKupscP8KHBluZyOSKw4RMTk6YBdE=
				) ; KSK; alg = RSASHA256; key id = 3934
2017-03-12.automated-ksk-test.research.icann.org. 60 IN	DNSKEY 256 3 8 (
				AwEAAbqImB5UsfE5J/sx3L3uQxjSY5HIPjrlTFKA+cxE
				R8SmU1wWGo21nrNBm3pOIYoC3zhiaCq1Jo6XrTcg+In+
				62g7PeXBO+2QBoHzCBxqbFMPoGpHph7D/OebWOvw5Akz
				MFqus2/JxZtvJOgkBws1EbzOw/lKbJUZVStUiCOZ8wFP
				Xd3X7nQMjVTOu6Cb2uGAVrgBRsARo+2CdcXNEtzNTHU1
				c+VxH9G/t/2VCrueDmr/epUP1adkyNUmXoYaG3eMrdGr
				ml8Dr7OMrt40vlWFp6i3TxltDXG/navXdEmL/w6f+pA6
				Dt9KVw/iEUxB08+4VY6jMkxfWJAD6t5XwCVcKH8=
				) ; ZSK; alg = RSASHA256; key id = 19401
2017-03-12.automated-ksk-test.research.icann.org. 60 IN	DNSKEY 257 3 8 (
				AwEAAfUtjasCuLysD4MbjG3v4Kyu0vvVJ/0cIreP6flt
				MeZmwQ5SRta/mB+eFVjau+6YKra2UeTKxojBovHH2lZr
				w7NNejL44/Xps4gR3LSVMnCdwras+yvj4en64ghRGWYO
				uB+Icb0AqrCUhLFWR8yx41UkfaA2vzFnM2xTx0N0+o6R
				6UciWuwJResomQupOjNUy2ZAi81Y3pb0x3Lw4POjpcSJ
				zrK4aZ/5UPymplqhLEU2DsoQmyFlM5RNTt0YXR8XM4Yw
				su/scxg0u00IF1GC8xcyZUTMc1Rz98AY1VUo5QqUp9Vb
				Aed5Aw1nNYfjLTj+zOykedgmjms1iNgh9EY111c=
				) ; KSK; alg = RSASHA256; key id = 19741

;; Query time: 285 msec
;; SERVER: ::1#53(::1)
;; WHEN: Tue Mar 21 20:17:12 GMT 2017
;; MSG SIZE  rcvd: 905

Key 19741 is a new KSK in the zone.

If you look in managed-keys.bind (I’m running Debian, and so that’s in /var/cache/bind/) you’ll now see the new key is visible while BIND is observing the new key. RFC5011 defines the period that the resolver must observe the new key for as either at least two times the TTL of the keyset containing the new key, or 30 days; whichever is the longer.

I’m cheating, slightly, and taking a look at managed-keys.bind from a different server, because my Debian box is running BIND 9.9.5, whereas I have access to a 9.11 box; you’ll see why below:

$ cat /var/named/managed-keys.bind
$ORIGIN .
$TTL 0	; 0 seconds
@			IN SOA	. . (
				284        ; serial
				0          ; refresh (0 seconds)
				0          ; retry (0 seconds)
				0          ; expire (0 seconds)
				0          ; minimum (0 seconds)
				)
			KEYDATA	20170322222551 20170210095625 19700101000000 257 3 8 (
				AwEAAagAIKlVZrpC6Ia7gEzahOR+9W29euxhJhVVLOyQ
				bSEW0O8gcCjFFVQUTf6v58fLjwBd0YI0EzrAcQqBGCzh
				/RStIoO8g0NfnfL2MTJRkxoXbfDaUeVPQuYEhg37NZWA
				JQ9VnMVDxP/VHL496M/QZxkjf5/Efucp2gaDX6RS6CXp
				oY68LsvPVjR0ZSwzz1apAzvN9dlzEheX7ICJBBtuA6G3
				LQpzW5hOA2hzCTMjJPJ8LbqF6dsV6DoBQzgul0sGIcGO
				Yl7OyQdXfZ57relSQageu+ipAdTTJ25AsRTAoub8ONGc
				LmqrAmRLKBP1dfwhYB4N7knNnulqQxA+Uk1ihz0=
				) ; KSK; alg = RSASHA256; key id = 19036
				; next refresh: Wed, 22 Mar 2017 22:25:51 GMT
				; trusted since: Fri, 10 Feb 2017 09:56:25 GMT
2017-03-12.automated-ksk-test.research.icann.org KEYDATA 20170321232551 20170317172529 19700101000000 257 3 8 (
				AwEAAa9qsSLDI+H0keqE3Yzdr6XuhqhBQVWw5xdgNoWL
				hE4VxSEIBz9IuCA4w4ssSrClZ59seNc76ltDFcKJv3X9
				jDjzRtBLjenIgV4n/3GpKrAAnRlYbUtpBEdlk4mxoL3B
				lX8pfLg7RQfTlWaxOUga1+CChcVieFF/si/eePc9HpZb
				WxHZRLCAE8dlDa0aa0tfVAZWOnaifpmbTvhDK3tdvMU0
				tfG2YfsOYcFB9z2KWmCDYwCONNKtls3p6wMwolun1h8I
				Yo0PF98vqjAp3NVRZvKKdgyF/bZ/iJtAZFytXvXU6Gwa
				5tOm1wgP6wuKupscP8KHBluZyOSKw4RMTk6YBdE=
				) ; KSK; alg = RSASHA256; key id = 3934
				; next refresh: Tue, 21 Mar 2017 23:25:51 GMT
				; trusted since: Fri, 17 Mar 2017 17:25:29 GMT
			KEYDATA	20170321232551 20170418002534 19700101000000 257 3 8 (
				AwEAAfUtjasCuLysD4MbjG3v4Kyu0vvVJ/0cIreP6flt
				MeZmwQ5SRta/mB+eFVjau+6YKra2UeTKxojBovHH2lZr
				w7NNejL44/Xps4gR3LSVMnCdwras+yvj4en64ghRGWYO
				uB+Icb0AqrCUhLFWR8yx41UkfaA2vzFnM2xTx0N0+o6R
				6UciWuwJResomQupOjNUy2ZAi81Y3pb0x3Lw4POjpcSJ
				zrK4aZ/5UPymplqhLEU2DsoQmyFlM5RNTt0YXR8XM4Yw
				su/scxg0u00IF1GC8xcyZUTMc1Rz98AY1VUo5QqUp9Vb
				Aed5Aw1nNYfjLTj+zOykedgmjms1iNgh9EY111c=
				) ; KSK; alg = RSASHA256; key id = 19741
				; next refresh: Tue, 21 Mar 2017 23:25:51 GMT
				; trust pending: Tue, 18 Apr 2017 00:25:34 GMT

On my 9.9.5 server, I don’t have the helpful comments. We can see, helpfully, that the root key (19036), and our original testlab key (3934) are trusted. We can also see that the server observing key 19741 because the instead of trusted since we can see trust pending

If you remember from the original post, whereas BIND keeps a track in managed-keys.bind, Unbound tracks the metadata in the external file we specified with auto-trust-anchor-file:. The file has been updated in a similar way to BIND’s:

$ cat /var/lib/unbound/2017-03-12.automated-ksk-test.research.icann.org.ds
; autotrust trust anchor file
;;id: 2017-03-12.automated-ksk-test.research.icann.org. 1
;;last_queried: 1490135144 ;;Tue Mar 21 22:25:44 2017
;;last_success: 1490135144 ;;Tue Mar 21 22:25:44 2017
;;next_probe_time: 1490138421 ;;Tue Mar 21 23:20:21 2017
;;query_failed: 0
;;query_interval: 3600
;;retry_time: 3600
2017-03-12.automated-ksk-test.research.icann.org.	60	IN	DNSKEY	257 3 8
AwEAAa9qsSLDI+H0keqE3Yzdr6XuhqhBQVWw5xdgNoWLhE4VxSEIBz9IuCA4w4ssSrClZ59seNc76ltDFcKJv3X
9jDjzRtBLjenIgV4n/3GpKrAAnRlYbUtpBEdlk4mxoL3BlX8pfLg7RQfTlWaxOUga1+CChcVieFF/si/eePc9Hp
ZbWxHZRLCAE8dlDa0aa0tfVAZWOnaifpmbTvhDK3tdvMU0tfG2YfsOYcFB9z2KWmCDYwCONNKtls3p6wMwolun1
h8IYo0PF98vqjAp3NVRZvKKdgyF/bZ/iJtAZFytXvXU6Gwa5tOm1wgP6wuKupscP8KHBluZyOSKw4RMTk6YBdE=
;{id = 3934 (ksk), size = 2048b} ;;state=2 [  VALID  ] ;;count=0 ;;lastchange=1489997718 ;;Mon Mar 20 08:15:18 2017

2017-03-12.automated-ksk-test.research.icann.org.	60	IN	DNSKEY	257 3 8
AwEAAfUtjasCuLysD4MbjG3v4Kyu0vvVJ/0cIreP6fltMeZmwQ5SRta/mB+eFVjau+6YKra2UeTKxojBovHH2lZ
rw7NNejL44/Xps4gR3LSVMnCdwras+yvj4en64ghRGWYOuB+Icb0AqrCUhLFWR8yx41UkfaA2vzFnM2xTx0N0+o
6R6UciWuwJResomQupOjNUy2ZAi81Y3pb0x3Lw4POjpcSJzrK4aZ/5UPymplqhLEU2DsoQmyFlM5RNTt0YXR8XM
4Ywsu/scxg0u00IF1GC8xcyZUTMc1Rz98AY1VUo5QqUp9VbAed5Aw1nNYfjLTj+zOykedgmjms1iNgh9EY111c=
;{id = 19741 (ksk), size = 2048b} ;;state=1 [ ADDPEND ] ;;count=34 ;;lastchange=1489997718 ;;Mon Mar 20 08:15:18 2017

In line 15, we see the original key (3934) with a status of VALID, whereas in line 22 we see the newly spotted key 19741 is ADDPEND.

What’s next…?

Now we wait; 30 days, and as long as the key is observed throughout, the key should become trusted at the end of this…

Standard
Technical

Rolling, rolling, rolling…

Introduction

In October 2017, ICANN are going to roll the key signing key in the root of the DNS.

If you’re not technical and don’t know what I just said, this post isn’t for you.

If, however, you run a validating recursive resolver, read on…

In October (the 11th to be exact), the key will roll and you’ll need to have done one of two things…

  1. Update your root trust anchor manually
  2. Check your resolver is RFC5011 compliant.

But first, a little…

Background…

So you know how DNSSEC works…

…you sign a zone. More specifically, you generate two keys, a key to sign the zone (ZSK), and a key to sign the keys (KSK). The zone gets bigger because for each record set, a signature is generated and added (RRSIG records). The public part of the keyset is also added to the zone (DNSKEY records). Some form of proof of non-existance is added (NSEC or NSEC3).

Next, once the keys and signatures have made it to all of the nameservers for the zone, you generate a delegated signer record (DS) from the KSK, and you publish that in the parent. The parent then signs the DS record, and hey presto, your chain of trust is made.

So, where’s the DS record for the root… To make this chain of trust work, resolvers that want to validate the DNSSEC chain of trust need a starting point in the root…

Your resolver has a trust anchor for the root. Depending on what you’re using for a resolver, this will either be the DS of the root KSK, or the public part of the KSK.

Your resolver will have this built in, but then, if configured correctly, will use an automatic mechanism to keep that key up to date and roll it when required.

RFC5011

RFC5011 defines how a resolver can automatically update a trust anchor for a zone.

So that you can check whether your resolver will follow this process, ICANN have an automated testbed for the KSK roll, which I encourage you to look at.

ICANN’s Automated Test

Each week, they create a new zone, and they sign it with a set of newly generated keys. Purposefully broken DS records are published in the parent zone, so that a normal validating resolver will SERVFAIL (because validation fails).

By adding a trust anchor to your resolver, the zone will validate.

If correctly configured, your resolver will now look for new key signing keys, and will observe them, and use them as per RFC5011.

So, lets take a look at this. Before I add a trust anchor, I can check that the zone doesn’t validate:


$ dig @::1 2017-03-12.automated-ksk-test.research.icann.org soa

; <<>> DiG 9.9.5-9+deb8u6-Debian <<>> @::1 2017-03-12.automated-ksk-test.research.icann.org soa
; (1 server found)
;; global options: +cmd
;; Got answer:
;; ->>HEADER<<- opcode: QUERY, status: SERVFAIL, id: 39100
;; flags: qr rd ra; QUERY: 1, ANSWER: 0, AUTHORITY: 0, ADDITIONAL: 1

;; OPT PSEUDOSECTION:
; EDNS: version: 0, flags:; udp: 4096
;; QUESTION SECTION:
;2017-03-12.automated-ksk-test.research.icann.org. IN SOA

;; Query time: 1908 msec
;; SERVER: ::1#53(::1)
;; WHEN: Mon Mar 20 13:22:57 GMT 2017
;; MSG SIZE  rcvd: 77

We can see in line 7, that we have a SERVFAIL response.

This server is running BIND. So, first we check that the server is configured manage keys using RFC5011:

options {
    ...
    dnssec-validation auto;
    ...
};

If you’re just adding this, don’t forget to rndc reconfig

Trust Anchor

Now, we need to add a trust anchor:

BIND

managed-keys {
  2017-03-12.automated-ksk-test.research.icann.org initial-key 257 3 8
  "AwEAAa9qsSLDI+H0keqE3Yzdr6XuhqhBQVWw5xdgNoWLhE4VxSEIBz9I
  uCA4w4ssSrClZ59seNc76ltDFcKJv3X9jDjzRtBLjenIgV4n/3GpKrAA
  nRlYbUtpBEdlk4mxoL3BlX8pfLg7RQfTlWaxOUga1+CChcVieFF/si/e
  ePc9HpZbWxHZRLCAE8dlDa0aa0tfVAZWOnaifpmbTvhDK3tdvMU0tfG2
  YfsOYcFB9z2KWmCDYwCONNKtls3p6wMwolun1h8IYo0PF98vqjAp3NVR
  ZvKKdgyF/bZ/iJtAZFytXvXU6Gwa5tOm1wgP6wuKupscP8KHBluZyOSK
  w4RMTk6YBdE=";
};

This is added in your named.conf file.

Once again, don’t forget to rndc reconfig

Unbound

If you’re running Unbound, then you can add the DNSKEY or DS records to a file in a location that Unbound can read and write to (so, somewhere like /var/lib/unbound/ and then add a auto-trust-anchor-file line in the server: section of your unbound.conf file.

cat /var/lib/unbound/2017-03-12.automated-ksk-test.research.icann.org.ds
2017-03-12.automated-ksk-test.research.icann.org. IN DS 3934 8 1 47AA8AAF4D75B3D9C58448F241F793EBC4977821
2017-03-12.automated-ksk-test.research.icann.org. IN DS 3934 8 2 0D27F2E6EA9CA548F1896A71FB07CED86074D3462F2A720D6177F3C5CEC15F0D

Note; the file doesn’t look like this once you’ve told Unbound about it, as it uses the file to store metadata related to the RFC5011 process.

server:
    ...
    auto-trust-anchor-file: "/var/lib/unbound/2017-03-12.automated-ksk-test.research.icann.org.ds"
    ...

After adding those, you’ll want to unbound-control reload to pick up the changes.

Testing

$ dig @::1 2017-03-12.automated-ksk-test.research.icann.org soa

; <<>> DiG 9.9.5-9+deb8u6-Debian <<>> @::1 2017-03-12.automated-ksk-test.research.icann.org soa
; (1 server found)
;; global options: +cmd
;; Got answer:
;; ->>HEADER<<- opcode: QUERY, status: NOERROR, id: 30413
;; flags: qr rd ra ad; QUERY: 1, ANSWER: 1, AUTHORITY: 2, ADDITIONAL: 3

;; OPT PSEUDOSECTION:
; EDNS: version: 0, flags:; udp: 4096
;; QUESTION SECTION:
;2017-03-12.automated-ksk-test.research.icann.org. IN SOA

;; ANSWER SECTION:
2017-03-12.automated-ksk-test.research.icann.org. 60 IN	SOA ns1.research.icann.org. automated-ksk-test.research.icann.org. 1489968062 3600 600 86400 60

;; AUTHORITY SECTION:
2017-03-12.automated-ksk-test.research.icann.org. 60 IN	NS ns2.research.icann.org.
2017-03-12.automated-ksk-test.research.icann.org. 60 IN	NS ns1.research.icann.org.

;; ADDITIONAL SECTION:
ns1.research.icann.org.	3600	IN	A	192.0.34.56
ns2.research.icann.org.	3600	IN	A	192.0.45.56

;; Query time: 428 msec
;; SERVER: ::1#53(::1)
;; WHEN: Mon Mar 20 13:44:24 GMT 2017
;; MSG SIZE  rcvd: 181

This time, we can see that on line 7, we have a NOERROR response, and on line 8, we can see that we have ad in the flags.

What’s next…

Now, we wait. The next step is that ICANN’s automated test lab will generate and publish a new KSK into the zone on the 19th.

Standard
Technical

Anycasting DNS

Introduction…

I wanted to have a tinker with anycasting, and DNS seemed a sensible place to start, and easy to test and muck about with. So, I spun up a couple of DNS resolvers, and decided what my anycasted IP addresses would be. They need to be outside of the subnets I’m using on the rest of my network, as I want to route traffic to them. I’ve put the underlying machine’s unicast addresses in this subnet too, but you wouldn’t have to, depending on your set up.

Servers…

The nameservers are, essentially, identical to servers that’d deal with unicast traffic, except for the following changes. I’m using BIND, but it really doesn’t matter what you use.

We need to bind up the anycast addresses so that the O/S will deal with their traffic…

In my case, my anycasted addresses will be 10.1.53.1 and 10.1.53.2, and I’m using Debian, so my additions to /etc/network/interfaces are:

auto lo:1
iface lo:1 inet static
address 10.1.53.1
netmask 255.255.255.255

auto lo:2
iface lo:2 inet static
address 10.1.53.2
netmask 255.255.255.255

We need to stop the machine responding to ARP for these. Actually, we tell it to stop responding to ARP requests unless the interface the ARP arrives on matches the ARP’d for IP, so because we’ve bound them up to the loopback, we don’t want the machine to respond via eth0, for example, so I added the following to /etc/sysctl.conf:

net.ipv4.conf.eth0.arp_ignore = 1
net.ipv4.conf.eth0.arp_announce = 2

BGP & Load Balancing…

Now we need to advertise the anycast addresses to our router. In this case, we’ll use BGP to do this. To do that, we’ll use ExaBGP. Grab that and install it on the server, and then the config looks something like this. My router is 10.1.53.254, and my two nameservers live in 10.1.53.0/24

neighbor 10.1.53.254 {
  router-id 10.1.53.11;
  local-address 10.1.53.11;
  local-as 64601;
  peer-as 64601;
  hold-time 10;

  process watch-nameserver {
    run /usr/local/bin/nameserver_watchdog;
  }

  static {
    route 10.1.53.1/32 next-hop 10.1.53.11 watchdog anycastdns withdraw;
    route 10.1.53.2/32 next-hop 10.1.53.11 watchdog anycastdns withdraw;
    route xxxx.xxxx.xxxx:53::1/128 next-hop xxxx.xxxx.xxxx:53::11 watchdog anycastdns withdraw;
    route xxxx.xxxx.xxxx:53::2/128 next-hop xxxx.xxxx.xxxx:53::11 watchdog anycastdns withdraw;
  }
}

I withdraw the routes from the outset, so that the watchdog will announce them upon successful testing.

The router’s BGP config looks like this (it’s JunOS):

# show protocols bgp group dns-anycast
local-address 10.1.53.254;
hold-time 10;
family inet {
    unicast;
}
family inet6 {
    unicast;
}
peer-as 64601;
local-as 64601;
multipath;
neighbor 10.1.53.11;
neighbor 10.1.53.12;

I’m going to equally load balance between the two servers, but you could set a localpref on each server, for example, and have server1 handle .1 primarily with server2 taking over in the event of failure, and vice versa.

Don’t fall for JunOS’ misleading ‘per packet’ configuration item; this will, despite appearances, load balance per flow based on a hashing algorithm.

# show routing-options forwarding-table
export dns-anycast-loadbalance;

# show policy-options policy-statement dns-anycast-loadbalance
then {
    load-balance per-packet;
}

Monitoring and Health…

We’ve included a watchdog in the ExaBGP config. Without this, clearly if the nameserver fails entirely, then the BGP session will be torn down, and the traffic directed to the other host. However, if the nameserver daemon fails, then the BGP session will remain, and traffic will be disrupted. Therefore, there’s a watchdog that’ll check that the nameserver daemon is listening, and will perform a lookup against it, announcing the anycast address(es) while it’s up, and withdrawing them in the event of failure. The watchdog looks like this:

#!/usr/bin/perl

use strict;

my $debug = 0;

unless($debug) {
	$SIG{'INT'} = sub {};
}
select STDOUT;
$| = 1;

use IO::Socket;
use Net::DNS;

my $state = 'init';

my $ip;
my $domain;
if(open(C,"/etc/nameserver_watchdog.conf")) {
	chomp(($ip, $domain) = split /:/, <C>);
	close C;
} else {
	$ip = '127.0.0.1';
	$domain = 'localdomain';
}
print "checking $ip for $domain\n" if $debug;

while(1) {
	eval {
		local $SIG{ALRM} = sub { die 'Timed Out'; };
		alarm 2;
		print "attempting connect... state is [$state]\n" if $debug;
		my $socket = IO::Socket::INET->new(Proto=>'tcp', PeerAddr=>$ip, PeerPort=>53, Timeout=>2);
		if($socket && $socket->connected() && do_lookup($ip, $domain)) {
			print "announce watchdog anycastdns\n" if $state ne 'up';
			$socket->close();
			alarm 0;
			$state = 'up';
			print "state set to up\n" if $debug;
		} else {
			print "withdraw watchdog anycastdns\n" if $state ne 'down';
			$state = 'down';
			print "state set to down\n" if $debug;
		}
	};
	if($@) {
		print "state is [$state]\n" if $debug;
		print "withdraw watchdog anycastdns\n" if $state ne 'down';
		$state = 'down';
		print "state set to down in barf\n" if $debug;
	}
	alarm 0;
	sleep 10;
}

sub do_lookup {
	my $ip = shift;
	my $domain = shift;
	my $r = Net::DNS::Resolver->new;
	$r->nameservers($ip);
	$r->tcp_timeout(5);
	$r->udp_timeout(5);
	my $q = $r->query($domain,'SOA');
	my $found = 0;
	print "Answer: ".($q->answer)[0]->serial."\n" if $debug;
	$found++ if ($q->answer)[0]->serial =~ m/^\d+$/;
	if($debug > 1) {
		require Data::Dumper;
		print Data::Dumper::Dumper($q)."\n\n";
	}
	return 1 if $q && $found;
	print "Error:\n" if $debug;
	print $r->errorstring if $debug;
	print "\n===\n" if $debug;
	return 0;
}

/etc/nameserver_watchdog.conf contains lines of the format ip.ad.dr.ess:domain.com.

It’ll announce the address in the event that a tcp connection succeeds as well as a DNS lookup that you’d expect the server should answer or be permitted to recurse for you. If the DNS daemon stops responding the watchdog will withdraw the routes; if the server fails, the BGP session will fail, and the route will be withdrawn anyway.

Standard
Technical

Live Electricity Usage

So, following on from my recent post on updating my Currentcost code I now have every update coming from the Currentcost unit popping directly into the database, every 6 seconds.

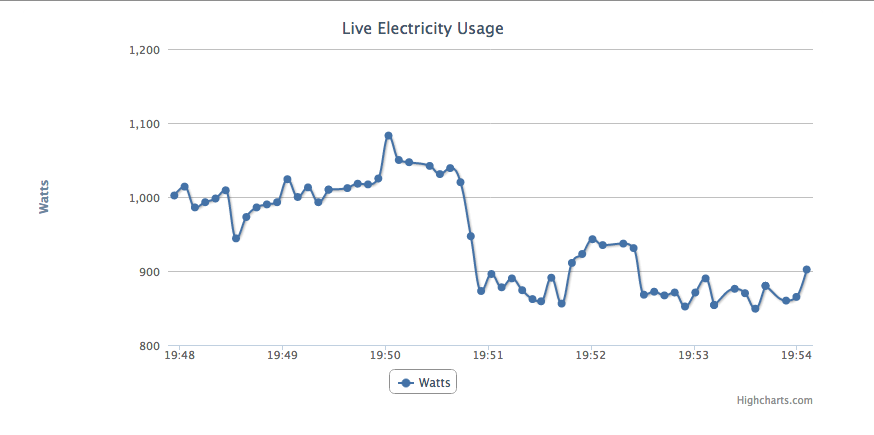
I had become aware of the Highcharts charts javascript and when reading through their Live Charts Demo decided that this was just waiting to be played with.

I now have essentially the same graph that they have in that demo, and the page HTML is very similar. The difference is obviously to call my code instead, and also a change to refresh every 6 seconds:

function requestData() {
    $.ajax({
        url: '/power/latest.php',
        success: function(point) {
            var series = chart.series[0],
                shift = series.data.length > 60; // shift if the series is longer than 20

            // add the point
            chart.series[0].addPoint(eval(point), true, shift);

            // call it again after one second
            setTimeout(requestData, 6000);
        },
        cache: false
    });
}

My AJAX call is also to some PHP, but mine looks up the latest data from the database with a simple SQL statement:

select unix_timestamp(time) as time,data_value from data order by time desc limit 1

I quickly realised that this would slap the database, and more so if more than one person was viewing the page. That would be unnecessary, and so I installed memcached and the php5 memcached module.

<?php header("Content-type: text/json"); $m = new Memcached(); $m->addServer('127.0.0.1', 11211);

if(!($row = $m->get('leccy'))) {
        //echo "didn't get from memcache\n";
        $row = get_from_db();
        $m->set('leccy', $row, 6);
}
else if(time() - $row['time'] > 5) {
        //echo "got, but is old\n";
        $row = get_from_db();
        $m->set('leccy', $row, 6);
}

// x is JS time which is unixtime x 1000
$x = $row['time'] * 1000;

// y is the value at that point
$y = $row['data_value'] * 1;

$ret = array($x, $y);

echo json_encode($ret);

function get_from_db() {
        mysql_connect("db server","db user","db passwd") or die("cannot connect: ".mysql_error());
        mysql_select_db("db name");
        $sql = 'select unix_timestamp(time) as time,data_value from data order by time desc limit 1';
        $sth = mysql_query($sql) or die("no query: ".mysql_error());
        $row = mysql_fetch_assoc($sth);
        mysql_close();
        return $row;
}

?>

Edit: Slight tweak to the code, as there was some obvious lazyness that I tidied up.

Enjoy.

live_graph

Standard